Nano Tyrann Pro - Remote control toy Carson - Free user manual and instructions
Find the device manual for free Nano Tyrann Pro Carson in PDF.

| Product Type | Radio-controlled helicopter (toy) |
| Brand | Carson |
| Model | Nano Tyrann Pro |
| Category | Radio-controlled toy |
| Recommended age | From 8 years (adult supervision required) |
| Helicopter power source | Rechargeable lithium battery (included) |
| Transmitter power source | Batteries (not included, AA type recommended) |
| Charging time | Approximately 60 minutes |
| Flight time | Approximately 6 to 8 minutes |
| Remote control range | Approximately 30 meters |
| Operating frequency | 2.4 GHz |
| Main functions | Forward/backward flight, left/right rotation, automatic takeoff/landing, gyroscopic stabilization |
| Dimensions (approx.) | 15 x 10 x 5 cm |
| Weight (approx.) | 30 g |
| Materials | Plastic, metal, electronic components |
| Safety | Not suitable for children under 8; use in an open area without obstacles; maintain a safe distance of 30 m; do not touch rotating propellers |
| Care and cleaning | Clean with a soft dry cloth; remove batteries if not in use for extended period |
| Warranty | 24 months against manufacturing defects (excluding normal wear and batteries) |
| Certification | Compliant with European directive 2014/53/EU (radio equipment) |
| Recycling | Do not dispose of with household waste; take to a recycling center or collection point |
| Spare parts | Available from the manufacturer (Carson) or authorized after-sales service |
Frequently Asked Questions - Nano Tyrann Pro Carson
User questions about Nano Tyrann Pro Carson
0 question about this device. Answer the ones you know or ask your own.
Ask a new question about this device
Download the instructions for your Remote control toy in PDF format for free! Find your manual Nano Tyrann Pro - Carson and take your electronic device back in hand. On this page are published all the documents necessary for the use of your device. Nano Tyrann Pro by Carson.
USER MANUAL Nano Tyrann Pro Carson
Before using your product for the first time or ordering any spare parts, check that your manual is fully up-to-date. This manual contains the technical appendices, important instructions for correct start-up and use and product information, all fully up-to-
date before going to press. The contents of this manual and the technical data of the product can change without prior notice.
For the latest version of your manual, see: www.carson-modelsport.com
FR // Remarque importante
natural_image
Line drawing of a helicopter with directional arrows indicating left and right motion (no text or symbols)natural_image
Illustration of a smart city street scene with buildings, a car, and a helicopter (no text or symbols)
natural_image
Simple line drawing of a helicopter inside an enclosure with buildings and a checkmark (no text or symbols)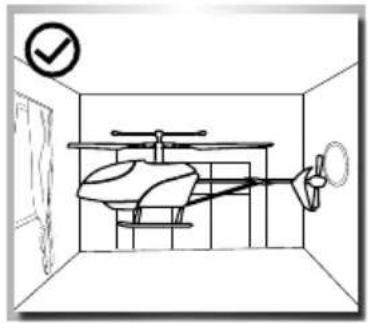
natural_image
Line drawing of a helicopter inside a vehicle cabin with a checkmark icon (no text or symbols on the diagram itself)
natural_image
Simple line drawing of a helicopter under rain with lightning and smoke clouds (no text or symbols)
natural_image
Line drawing of a helicopter with wind turbines and clouds, no text or symbols presentnatural_image
Simple line drawing of an umbrella with raindrops and a warning symbol (no text or labels)
natural_image
Simple line drawing of a helicopter with a cross symbol (no text or labels)FEHLERSUCHE
We congratulate you for buying this CARSON product, which is designed and manufactured using state of the art technology.
According to our policy of continued development and product improvement we reserve the right to make changes in specifications regarding equipment, material and design at any time without notice.
Specifications or designs of the actual product may vary from those shown in this manual or on the box.
The manual forms part of this product. Should you ignore the operating and safety instructions, the warranty will be void.
Keep this guide for future reference.
Limited Warranty
This product is warranted by CARSON against manufacturing defects in materials and workmanship under normal use for 24 months from the date of purchase from authorised franchisees and dealers. In the event of a product defect during the warranty period, return the product along with your receipt as proof of purchase to any CARSON store.
CARSON will, at its option, unless otherwise provided by law:
(a) Correct the defect by repairing the product without charging for parts and labour;
(b) Replace the product with one of the same or similar design.
All replacement parts and products, and products on which a refund is made, become the property of CARSON. New or reconditioned parts and products may be used in the performance of warranty services.
Repaired or replaced parts and products are warranted for the remainder of the original warranty period. You will be charged for repair or replacement of the product made after the expiration of the warranty period.
The Warranty does not cover:
- Damage or failure caused by or attributable to acts of God, abuse, accident, misuse, improper or abnormal usage, failure to follow instructions, improper installation or maintenance, alteration, lightning or other incidence of excess voltage or current;
- Damage caused by losing control of your model;
- Any repairs other than those provided by a CARSON authorised service facility;
- Consumables such as fuses or batteries;
- Cosmetic damage;
- Transportation, shipping or insurance costs; or
- Costs of product removal, installation, set-up service adjustment or reinstallation;
- Any changes to plugs and cables, open the housing and damage the sticker.
This warranty gives you specific legal rights, and you may also have other rights which may vary according to the country of purchase.
Declaration of conformity
TAMIYA-CARSON Modellbau GmbH & Co. KG hereby declares that the radio equipment type 500507127 / 500507141 conforms to Directive 2014/53/EU. The complete text for the EU declaration of conformity is available at the following Internet address.
The explanation of the symbol on the product, packaging or instructions: Electronic devices are valuable products and should not be disposed of with the household waste when they reach the end of their service life! Help us to protect the environment and respect our resources by delivering this appliance to the relevant recycling point.

We wish you a lots of fun using your CARSON product!
Before use, read this manual carefully!
SAFETY PRECAUTIONS LITHIUM BATTERIES
1. General
Lithium batteries (accumulators) are energy storage devices with a high energy density and can present risks. For this reason, particular care is needed when charging, discharging, storing and handling.
Read these instructions very carefully before first using the battery. Do not fail to take note of the warning notices and instructions for use.
Misuse can lead to risks such as explosion, overheating or fire.
Failure to observe the instructions for use leads to early failure and other defects.
The instructions should therefore be kept in a safe place and it is essential that they are handed over to the second user if the batteries are passed on.
2. Warning notices
- Avoid short-circuits. A short-circuit may well destroy the product. Cables and connections must be well insulated.
- It is essential when connecting the battery to ensure that the polarity is correct.
- Original plug connectors and cables may not be cut off or changed - if need be, use an adapter cable.
- Do not expose the battery to excessive heat or cold or to direct sunlight. Do not throw in the fire. Do not place the battery in contact with water or other liquids.
- Charge the battery only with charging units intended for the purpose and always use the balancer connection. It is only by using the balancer connection that optimum charging can be ensured. If this connection is not used, charging is subject to the risks mentioned above. Before charging, always first allow the battery to cool to ambient temperature. Never charge while hot.
- When charging, place the battery on a non-flammable, heat-resistant support. There should be no flammable or readily ignited objects in the vicinity of the battery.
- During charging or operation, never leave the battery unsupervised.
- Do not fail to keep to the recommended charge/discharge current.
- The battery casing must not be damaged. It is essential to avoid damage by sharp objects such as knives or the like, from dropping, impact, bending etc. Damaged batteries may no longer be used.
- Batteries are not toys. They should be kept away from children.
3. Charging instructions
Lithium batteries are charged according to the CC-CV procedure. CC stands for "constant current", which is applied during the first phase of charging. Once the battery reaches the maximum voltage configured in the charger, it switches to CV (constant voltage) for the second phase of charging. The battery voltage no longer increases. The charging current now falls continuously until the battery is fully charged. The maximum charging current for the battery is 1C (C=nominal capacity of the battery, e.g. for a battery with a nominal capacity of 2700 mA, the maximum charging current for the battery is 2700 mA (2.7 A)). Never charge several batteries together from a single charger. Differing states of charge and capacities can lead to overcharging and destruction.
4. Storage instructions
Lithium batteries should be stored charged to 20-50 % of their capacity and at a temperature of 15-18 °C. If the cell voltage falls below 3 V, they should be recharged. Deep discharge and storage when discharged (call voltage <3 V) will render the battery unusable.
5. General terms of guarantee
There is a legal guarantee for production and material faults as applicable at the time of dispatch. No liability is accepted for normal wear and tear. This guarantee does not apply for defects attributable to improper use, inadequate maintenance, third-party interference or mechanical damage. This applies, in particular, to used batteries and batteries clearly showing signs of use.
Damage and loss of performance due to improper handling and/or overload are not product faults. Batteries are consumables and subject to a certain ageing. This is influenced by factors such as the charge/discharge currents, the charging procedure, the operating and storage temperatures and the state of charge during storage. The ageing shows itself in, among other things, an irreversible loss of capacity. In the model field, where batteries are frequently used to supply motors, very high currents can flow from time to time.
6. Exclusion of liability
Since we are unable to have any control over charge/discharge, handling, compliance with assembly and operating instructions, battery replacement and its care and maintenance, TAMIYA / CARSON can accept no liability for loss, damage or costs incurred.
Any claim for damages that may result from operation, failure or faulty operation or that is in any way related thereto will therefore be refused. We accept no liability for personal injury or material damage and their consequences that arise from our delivery.
7.Disposal instructions
Batteries are hazardous waste. Damaged or unusable cells must be disposed of in the correct manner.
No liability for printing errors, we reserve the right to make changes!
SAFETY PRECAUTIONS (PLEASE KEEP!)
- WARNING! Not suitable for children under 8 years. Please keep these instructions for possible correspondence. Right reserved to change colours and make technical changes. Help from adults is required to remove the transport protection.
- Before first use: Please read the user information together with your child.
- Operation and safe handling must be explained (preferably with graphical displays).
- Flying the Aircraft model requires practice, and children must be taught under the supervision of adults.
- Note for adult supervisor: Check whether the toy has been assembled in accordance with the instructions. Assembly must be carried out under the supervision of an adult.
- Hands, hair and loose clothing must be kept away from the propeller (rotor).
- Do not change or modify anything on the Aircraft model!
- In order to ensure that the toy is used safely, the room in which the Aircraft model is used must be of a sufficient size. The room must be free of obstructions.
- This toy is only intended for use in private areas (house and garden). (And in windless conditions!!!)
- Caution! The Aircraft model should not be started if persons, animals or obstructions are present in the flying area of the aircraft model. (30m)
- Caution: Risk of eye injuries! Do not fly the Aircraft model in the vicinity of your face in order to avoid injuries.
-
Never pick up the Aircraft model while the propellers are still turning.
-
To avoid unexpected operation, the batteries must be removed from the toy when it is not being used.
-
First switch on the transmitter, then the Aircraft model to avoid unexpected operation. When you are switching off, switch the Aircraft model off first, then the transmitter.
-
Always use the stipulated types of battery! Insert the batteries so that the positive and negative poles are in the correct position! Do not throw used batteries in the domestic rubbish - take them to a collection point or dispose of them at a hazardous waste depot. Remove empty batteries from the Aircraft model. Do not attempt to charge non-rechargeable batteries. Rechargeable batteries must be removed from the Aircraft model before charging. Rechargeable batteries must only be recharged under the supervision of an adult. Do not use different types of battery, and do not insert new and used batteries at the same time. Do not short-circuit the crosspieces. Do not mix old and new batteries. Do not mix alkaline, standard (carbon-zinc) and rechargeable batteries.
-
Please do not insert any cables into plug-in socket connections.
-
Check charger for damage at regular intervals. In the event of damage, the charger may not be used until it has been properly repaired. Only carry out charging in dry rooms, protect device from moisture.
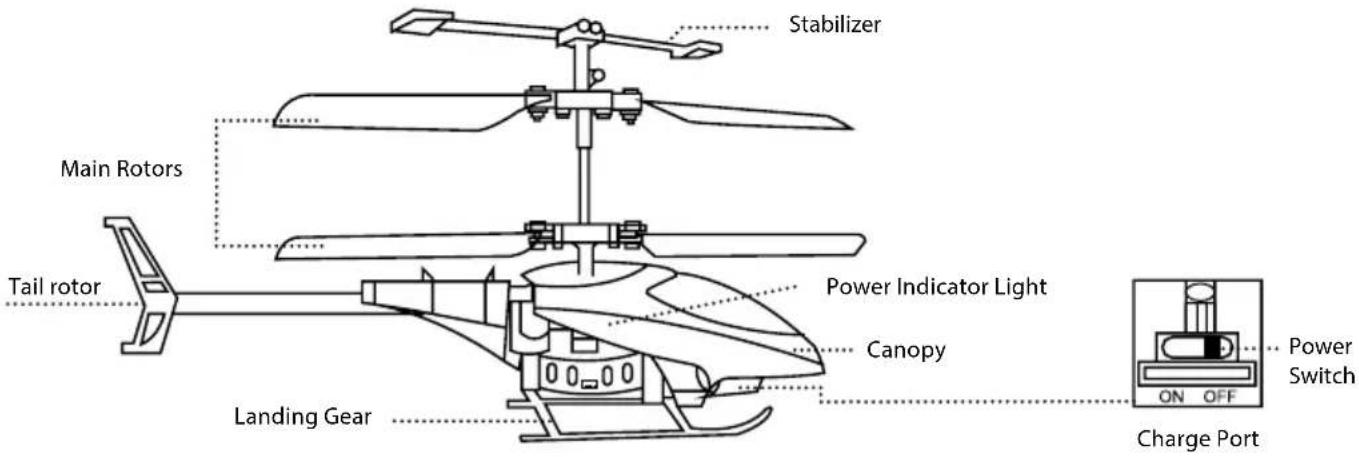
TECHNICAL DATA
• Model with 2-channel RC system
• Transmitter operating voltage: 4.8-6V
- Function:
- Gyro Electronic
INCLUDED ITEMS
- Aircraft model
- 2 channel transmitter
-
LiPo battery 3,7V
-
Batteries 4x AA (R06)
- Manual
THE AIRCRAFT MODEL WITH MORE FUNCTIONS
Features:
• Stable flight behaviour
• Completely assembled Ready To Fly
• Incl. Gyro (stabilizing function)
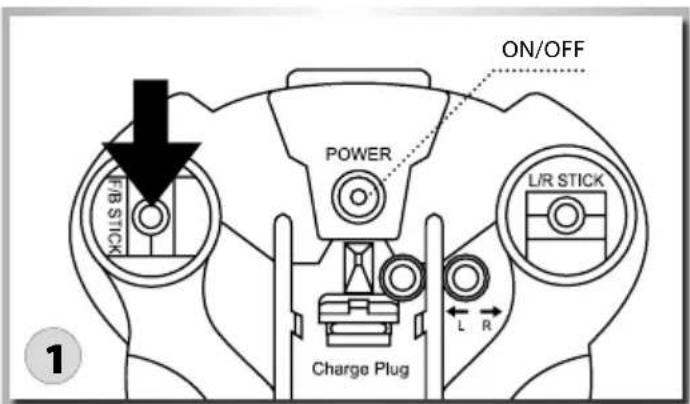
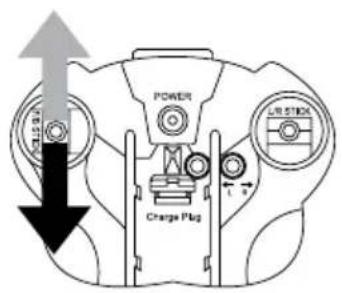
TWO CHANNEL REMOTE CONTROL TRANSMITTER
Explanation transmitter
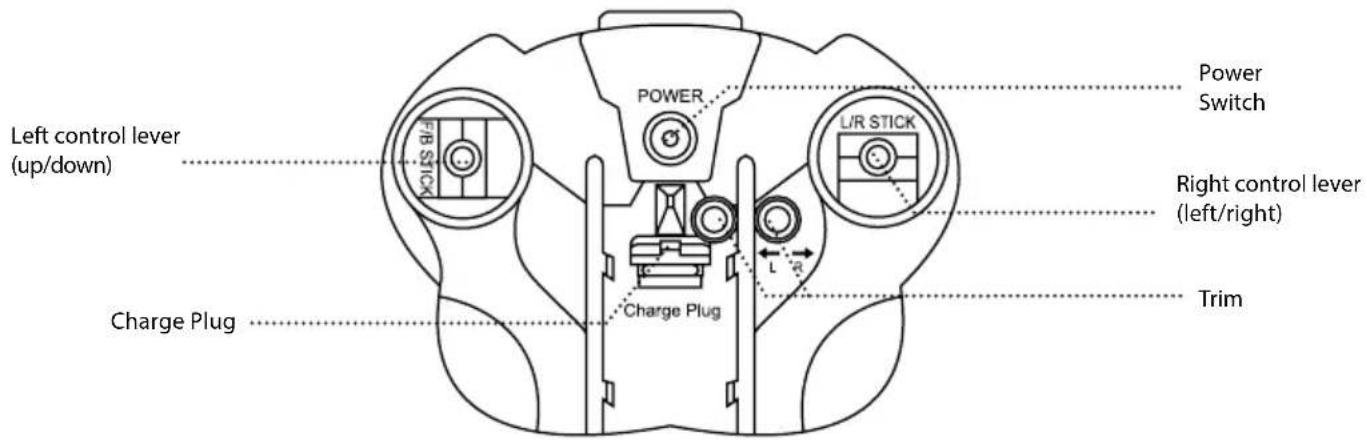
BATTERY MOUNTING
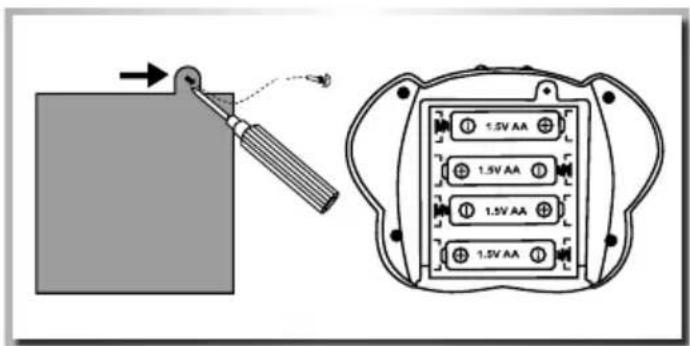
Caution
- Do not mix old and new batteries/rechargeable batteries.
- Do not mix different types of batteries.
- Do not charge non-rechargeable batteries.
Put fresh AA Mignon batteries with correct polarity into the battery-case.
LIPO BATTERY CHARGING
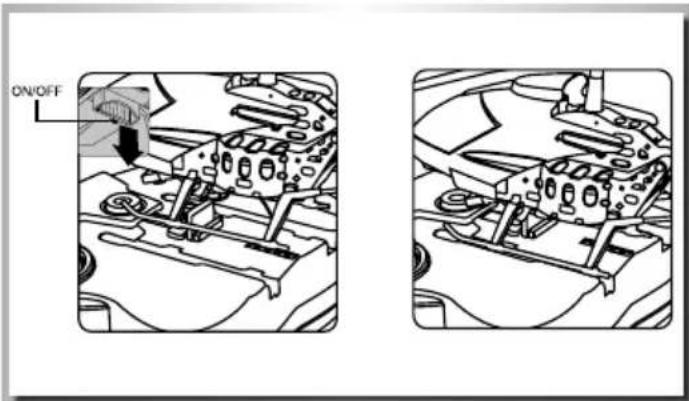
- Turn the aircraft model off.
- Plug the model on the charging socket of the transmitter. The indicator LED lights up.
- When the battery is fully charged, the indicator LED goes out. Now pull off the helicopter from the charging-port.
Note: If the LED is flashing, the transmitter batteries are weak. Replace it with new batteries.
During charging, never be left unattended the model!
Attention: The charging time can be 40 minutes.
The flying time is about 6-8 minutes.
READY TO START
Now we're good to go! But before liftoff, make sure that you have read this manual through completely.
Push the throttle lever fully down and then switch on the transmitter.
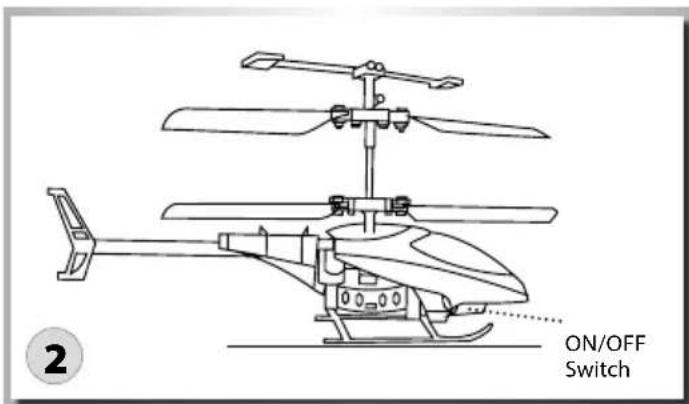
Switch on the Copter and place it on a flat surface.
Now move the throttle lever completely up and then back down.
Now the Aircraft model is ready to launch.
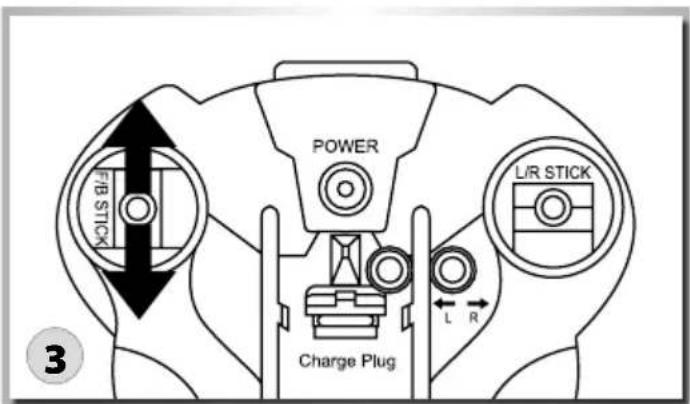
STEERING YOUR MODEL
CAUTION
To avoid loss of control: ALWAYS move the controls S-L-O-W-L-Y! The throttle increases/decreases the flying height your Helicopter.
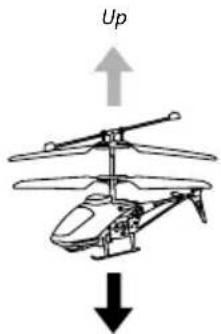
Down
Hover up and down:
When the aircraft model flies steadily, you can slowly push the throttle stick up to make the model fly higher, or release the stick slightly to make it go lower. Move the stick slowly and slightly up and down for smooth flying.

natural_image
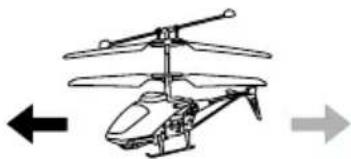
Line drawing of a helicopter with directional arrows indicating left and right motion (no text or symbols)left
right
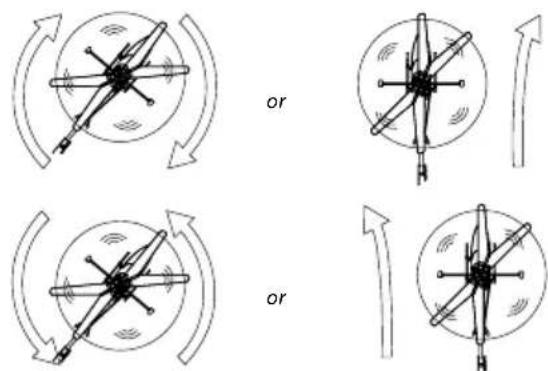
Turn clockwise and counter clockwise:
Hold the helicopter at a certain height. The push the direction stick to the left to turn counter-clockwise and push the direction stick to the right to turn clockwise.
FLIGHT OPERATION
Trimming the Helicopter
Already shortly before the Helicopter takes off, you can recognize whether it wants to turn or glide in a particular direction. Correct the deviations from the vertical ascent with the trim knob of the turn function.
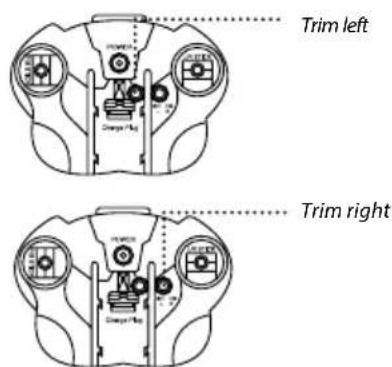
Trim left / right:
If the model rotates in one direction, you can adjust the trim, till the model fly.
natural_image
Illustration of a smart city street scene with buildings, a car, and a parking lot (no text or symbols)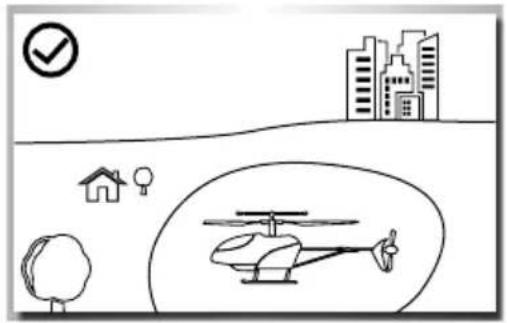
natural_image
Simple line drawing of a helicopter inside an enclosure with city skyline and checkmark (no text or symbols)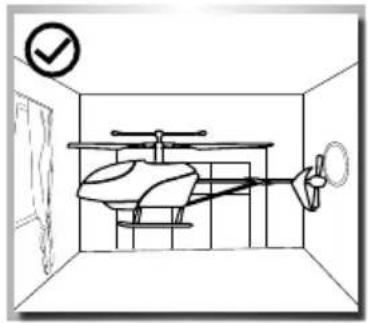
natural_image
Line drawing of a helicopter inside a vehicle cabin with a checkmark icon (no text or symbols on the diagram itself)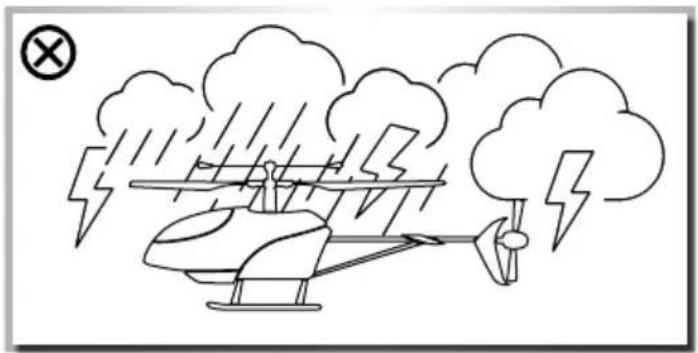
natural_image
Simple line drawing of a helicopter under stormy weather with lightning bolts (no text or symbols)
natural_image
Line drawing of a helicopter with wind turbines and clouds, no text or symbols presentIt is best to fly only in closed rooms
- With sufficient free space in all directions
- On flat ground
- Without standing (furniture) or moving obstacles (persons, animals)
• In rooms without air draught
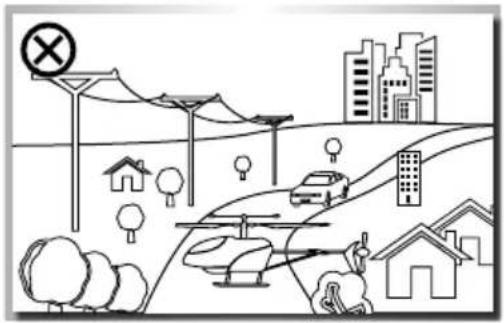
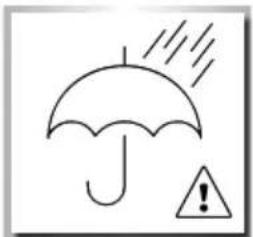
If you want to fly outdoors, do this
• Only when there is no wind
Do not fly
- If you are exhausted or your reaction is impaired in any way.
- At wind-force 1 or greater.
- Keep your model away from high-voltage cables or radio
masts. Never use the model in lightning storms. Atmospheric disturbances can affect the signals of your remote controlling transmitter.
- Near any obstacles such as buildings, furniture, persons and animals.
• On public roads
natural_image
Simple line drawing of an umbrella with raindrops and a warning triangle (no text or symbols)
natural_image
Simple line drawing of a helicopter with no text or symbolsTROUBLESHOOTING
| Problem Cause Reparation | ||
| The model does not move Check, if the transmitter and the model are switched ON. | Switch on the Transmitter and the Model. | |
| Check the battery voltage of transmitter and model | Employ completely charged batteries | |
| Motor does not turn Motor is too hot Allow the motor to cool down | ||
| The model reacts incorrectly to the control commands or flies choppily | Check the state of the transmitter and receiver battery charges | Employ completely charged batteries |
| The model does not take off | Rotor blades are twisted | Exchange the rotor blades |
| Motor is too hot Allow the motor to cool down | ||
| Batteries are empty Charge the batteries or exchange them | ||
| The model moves forward/ backward and sidewise, but does not hover | Check whether the Helicopter is exposed to a draught, e.g. by an opened window or an air conditioner. Hover flight is not possible when there is a draught | Close the window/door, switch off the air conditioner or select a more suitable room |
| The model vibrates severely | Check whether the rotors run true | Possibly change the rotor blades |
| Transmitter and Helicopter can not be binded | Throttle control not set to minimum Throttle need to be minimized to zero | |