IC 110 - Ice machine STEBA - Free user manual and instructions
Find the device manual for free IC 110 STEBA in PDF.
User questions about IC 110 STEBA
0 question about this device. Answer the ones you know or ask your own.
Ask a new question about this device
Download the instructions for your Ice machine in PDF format for free! Find your manual IC 110 - STEBA and take your electronic device back in hand. On this page are published all the documents necessary for the use of your device. IC 110 by STEBA.
USER MANUAL IC 110 STEBA
natural_image
White Steba® water purifier with digital display and control buttons (no visible text or symbols on device body)220 - 240V\~; 50Hz; 250W (kühlen) / 35W (heizen)
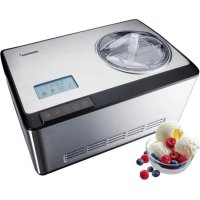
Peltier-Eismaschine
IC 110
Instructions for use 13
Mode d'emploi 24
natural_image
Technical line drawings of mechanical components with arrows indicating motion or assembly (no text or symbols)Arbeitsplatz
Wichtig:
text_image
Exploded view diagram of a smart appliance with numbered parts for identification
text_image
8:0:0:0 7 9 8 12 1 10 11 1 + 2 3 COOLING HEATING 4 5 SETTING START/STOP 6Hinweis
natural_image
Diagram showing a container being inserted into a cylindrical housing with a downward arrow indicating force (no text or symbols present)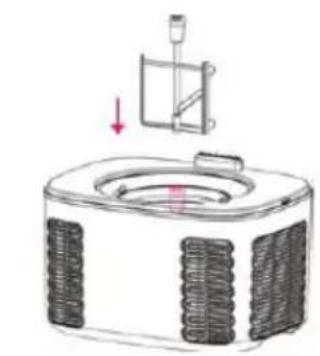
natural_image
Diagram of a mechanical device with a valve and cooling fins, showing internal structure without any text or symbols.
natural_image
Diagram of a portable air conditioner unit with cooling fins and lid, showing internal structure and airflow direction (no text or symbols)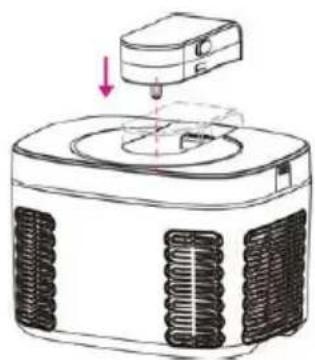
natural_image
Diagram of a mechanical device with a downward arrow indicating force or movement (no text or symbols present)natural_image
Diagram of a mechanical device with a cylindrical component and side panels, showing internal structure and directional arrows (no text or symbols)natural_image
Diagram of a portable air conditioner unit with cooling fins and lid, showing internal structure and airflow direction (no text or symbols)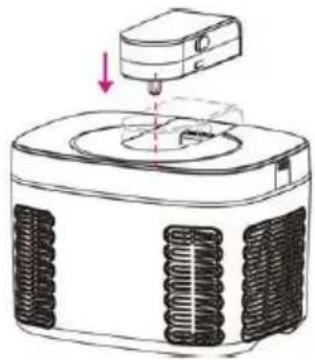
natural_image
Diagram of a mechanical device with a downward arrow indicating force or movement (no text or symbols present)This device works with the Peltier effect and does not require a compressor and coolant.
Generally
This insulated appliance is for private and indoor use only and must not be used commercially. Please read the instruction manual carefully and keep it at a safe place. When the appliance is given to another person the instruction manual should be passed to that person, too. Only use the appliance as described in the instruction manual and pay attention to the safety information. No liability for damages or accidents will be accepted, which are caused by not paying attention to the instruction manual. Remove all packaging and sticker. Wash up all parts carefully (see cleaning).
Safety information
- Connect and operate the appliance in accordance with the specifications shown on the rating label.
- Do not use if the plug cord is damaged. Verify before every use.
- Do not plug with wet hands.
- Connect the power plug to a properly installed and easily accessible socket only.
- To unplug the power plug, always pull the plug – not the cable.
- Plug off the appliance after each use or in case of failure.
- Do not pull at the cord. Don't pull it over edges and don't bend it too much.
- Keep the cord away from hot parts.
The appliance can be used by children aged 8 and above and persons with limited physical, sensory or mental capabilities or lack of experience/knowledge, provided that are supervised or have been provided with instruction in the safe use of the appliance and have understood the resulting dangers. Children must not use the packaging as a toy. Cleaning and user maintenance must not be carried out by children unless they
are 8 years or older and are supervised.
- Children under the age of 8 must be kept away from the appliance and the connecting cable.
- Children should be supervised to ensure that they do not play with the appliance or packaging material (e.g. Plastic Bags).
- The appliance must not be operated using a timer or a separate remote system!
- Never leave the appliance unattended when in use.
- Do not leave the appliance outdoors or in a damp area.
- Never immerse the unit in water.
- Never use the device after a malfunction, e.g. if it felt down or has been damaged in any other manner.
- The manufacturer is not liable for damage which is occurring due to the usage of the appliance in a different way as described or a mistake in the handling has been made.
- To prevent injury, repairs such as replacing a damaged cord, should only be carried out by a customer service. Only original spare parts have to be used.
- Only use the device as described in this manual.
- This appliance is intended to be used in household and similar applications such as:
o staff kitchen areas in shops, offices and others working environments
o by clients in hotels, motels and other residential type environments
o bed and breakfast type environments.
- Before initial use: clean all parts carefully and leave to dry.
- If an extension cable is used, it has to have a cross-section of 1.5mm^2
- If a GS-tested 16 A multi-pin extension is used, it may not be charged with more than 3680 watts due to fire hazard.
- Make sure that children do not tease the cable or that a trip hazard occurs.
- The device must always be disconnected from the power supply if it is not supervised and before assembling, disassembling or cleaning.
- Do not operate the appliance or the frozen container onto or in a heating device (such as an oven or microwave).
- Do not reach into the refill opening or insert any objects into it during operation.
- To avoid frostbite always remove the ice container with the handle. Never touch the ice container or the inner cooling container with wet hands.
- Hygiene: Please always clean the device to avoid bacteria and mold formation.
Cleaning
Attention! Pull the plug before cleaning.
- Never immerse the unit into water.
- Food residues must be removed for reasons of hygiene.
- Pull the rabble arm and the drive axle out of the motor part to take the motor out of the lid.
- All parts, except the motor and the housing can be cleaned with water and normal detergent. Do not use abrasive detergent! Leave to dry.
- Do not clean the freeze container into the dishwasher! Make sure that it is not dented.
- Clean the motor part and the housing with a damp cloth.
- For cleaning, the transparent lid can be disassembled:
o Take the smaller transparent cover (# 8) with the 2 recessed grips with a twisting motion from the larger transparent cover.
o Remove the larger transparent cover for the motor with a twisting motion on the motor.
o Proceed in the opposite direction for installation.

Workplace
Important:
Never place this device on or next to hot surfaces (e.g. hot stoves). Only use it on a even, stable and a heat resisting surface. It is important that no inflammable items are near to the device. Do not place the device on the edge of the table so that it cannot be touched by children or fall down when touched.
text_image
Exploded view diagram of a microwave oven with numbered parts for identification
text_image
8:0:0:0 7 9 8 12 1 1 COOLING 2 3 HEATING 4 5 SETTING 6 START/STOPNotice
Please note: Homemade ice cream does not have the consistency of industrial ice cream or ice cream from the ice cream parlour.
Also there, a semi-solid mass is firstly produced and then frozen. Additives (stabilizers) are added. You can avoid these additives with homemade ice cream.
If the ice cream is not firm enough for you after the basic program (ice program) and after-cooling, place the ice cream in a container in the freezer for 30 minutes without a mixing arm.
The following factors can affect ice consistency:
• The food used (e.g. high-fat milk)
- Please do not expose the device to direct sunlight or do not place it near a stove when cooking.
- Please ensure that the device is adequately ventilated. It should be at least 15 cm from the wall.
- If the device should stop while the ice is being made, press the rear edge of the lid.
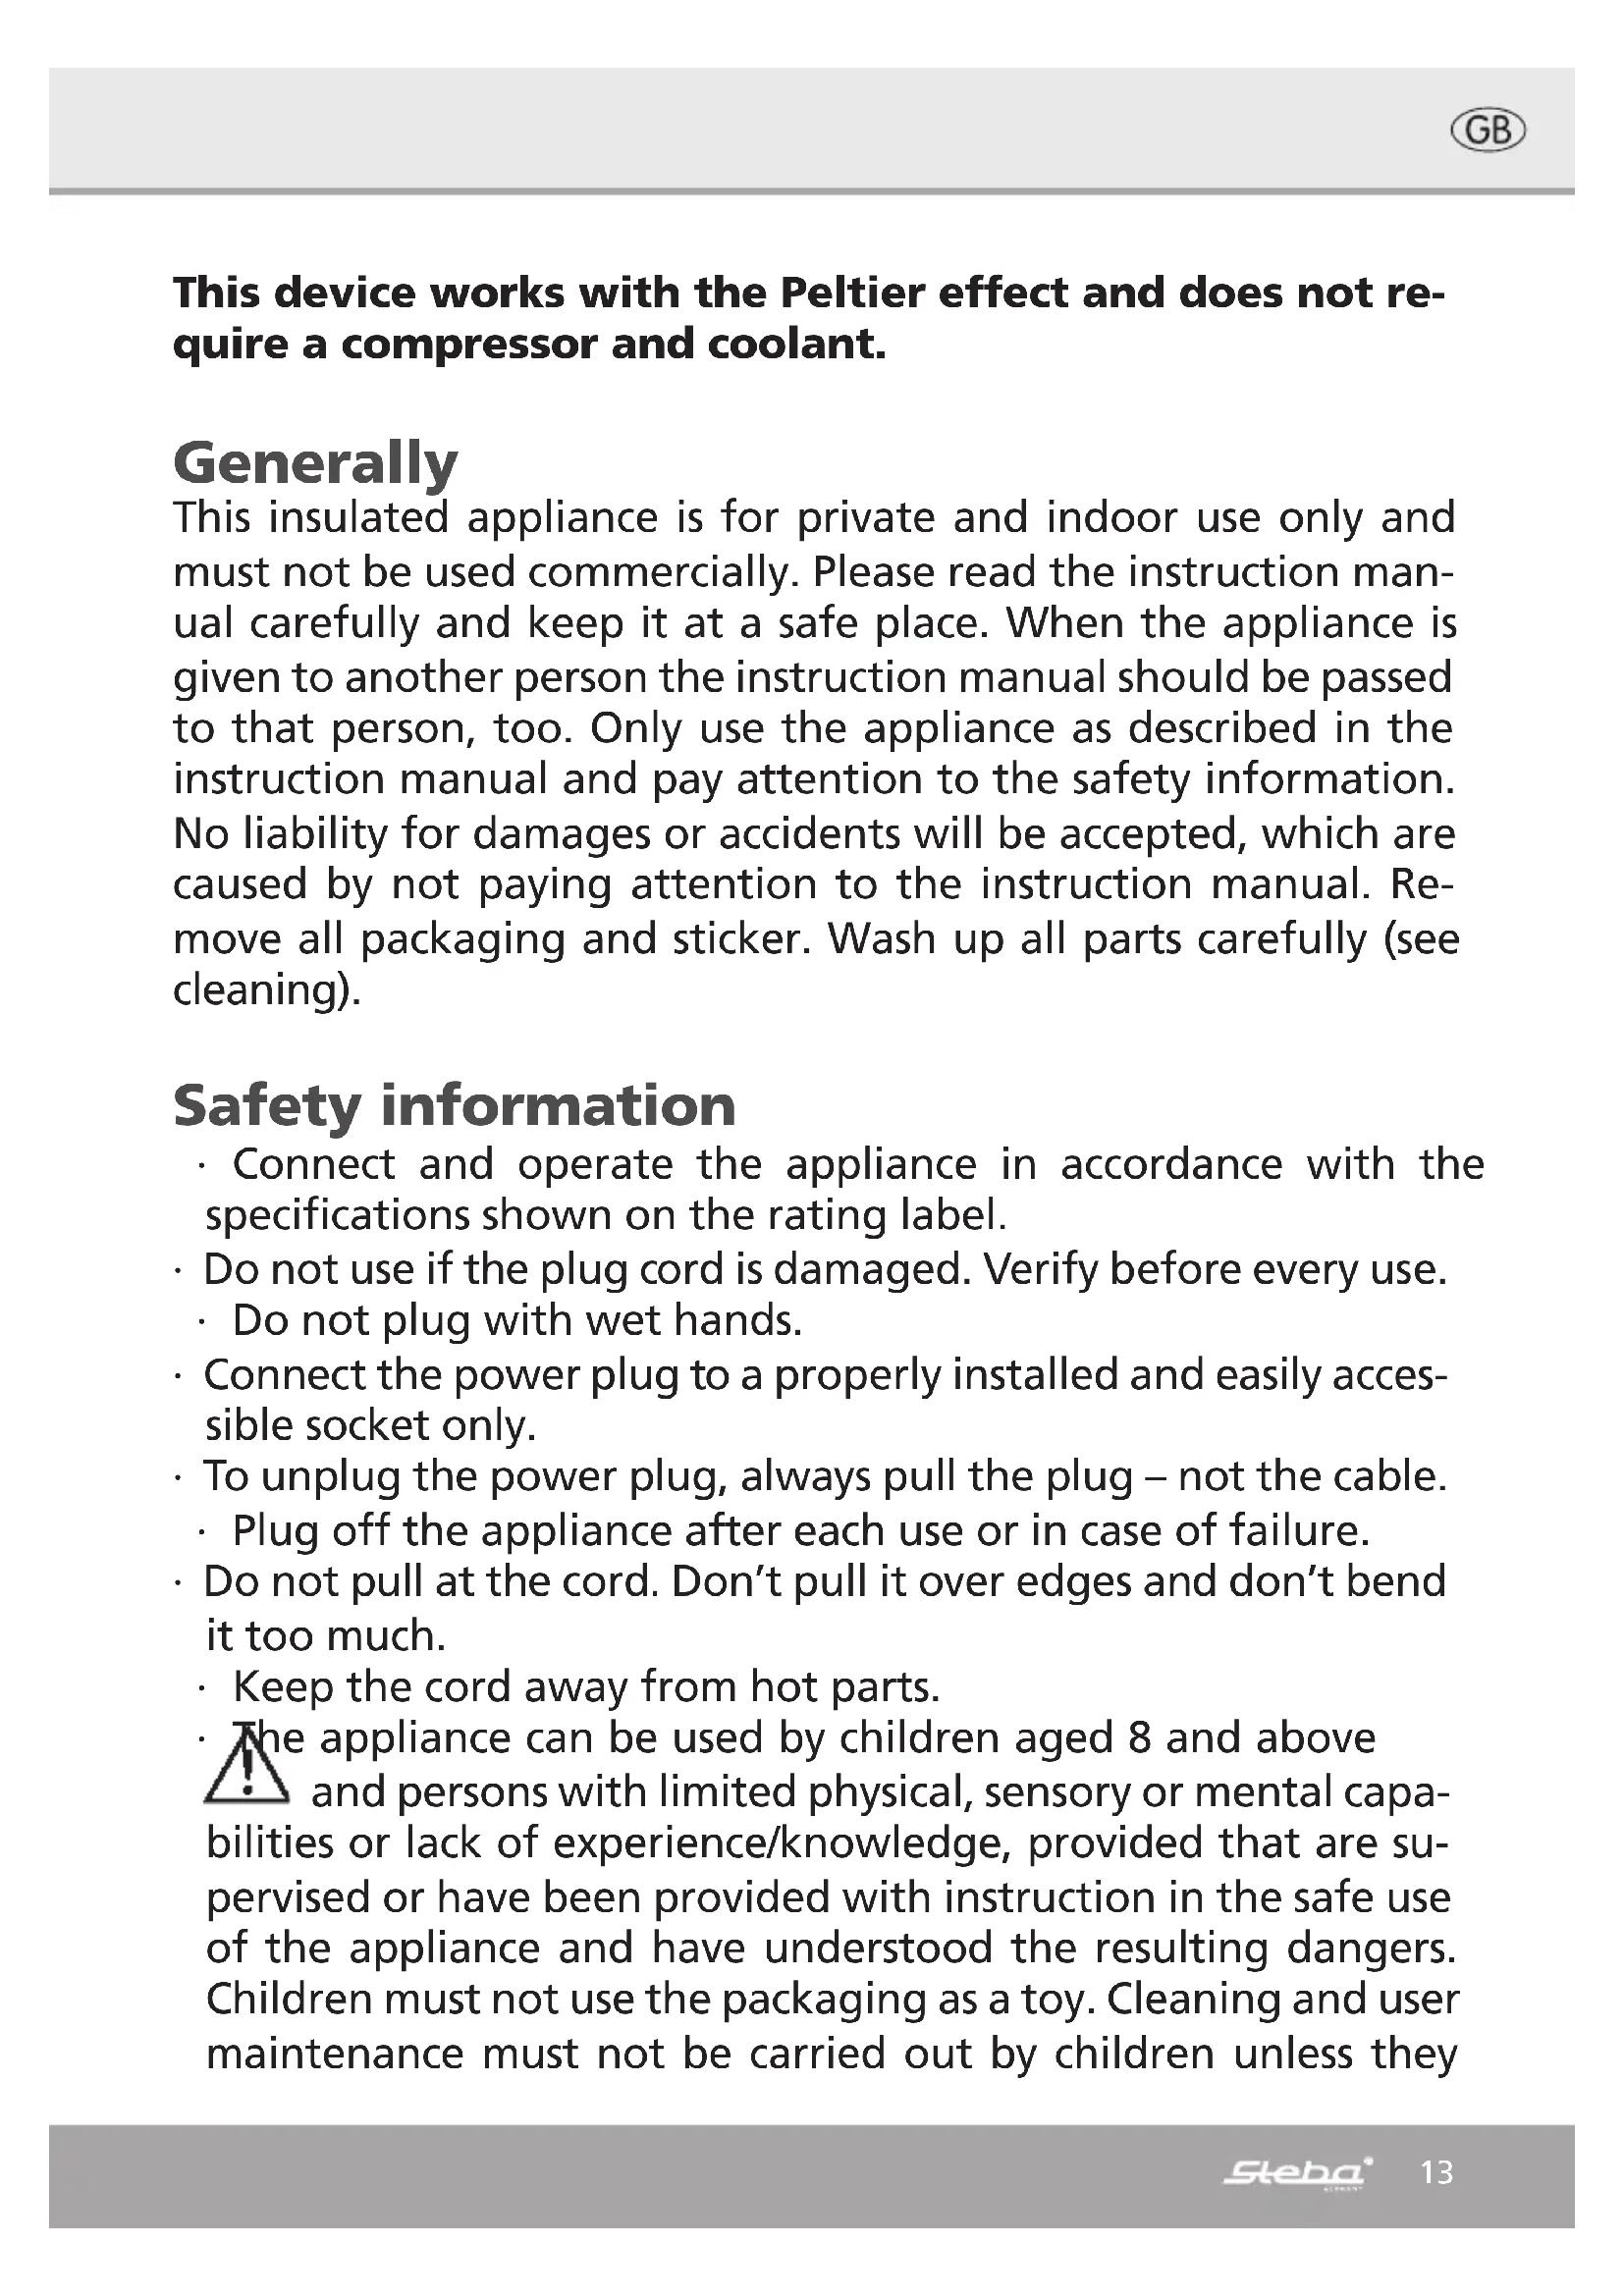
Making Ice Cream
While preparing the ice cream mixture and cooling it down in the frigde, please pre-cool the ice cream maker as described:
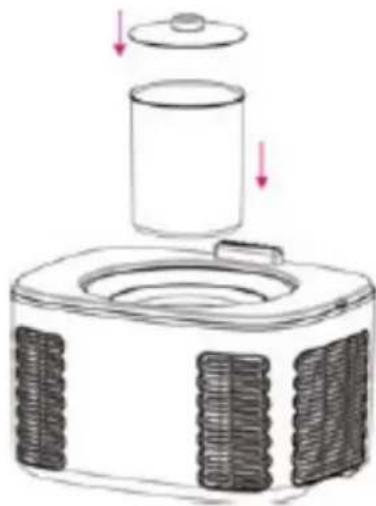
- Place the dry freeze container without the rabble arm in the thermal container.
- Put on the lid and the motor part and select the ice program by using the cooling button. The display shows 02:00. Start the device with the start / stop button.
- Stop the ice program once the ice cream mixture has cooled down in the fridge and pour the liquid into the pre-cooled freeze container. Now insert the rabble arm. Fill the prepared mixture into the detachable ice container. The container may only be filled up to 5cm below the edge as the ice cream increases its volume during freezing.

The outer wall of the ice container must be dry, otherwise the container will freeze to the thermal container.
Place the ice container in the thermal container and insert the rabble arm.
- Place the lid on and engage, also engage the motor part to the lid.

natural_image
Diagram of a gasifier with a cylindrical container and cooling unit, showing internal structure (no text or symbols)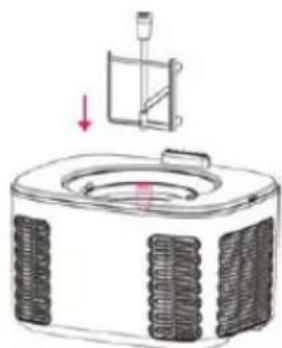
natural_image
Diagram of a mechanical device with a handle and internal components, showing no text or symbols.
natural_image
Diagram of a portable air conditioner unit with cooling fins and heat exchanger (no text or symbols)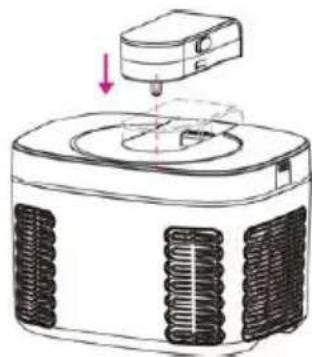
natural_image
Diagram of a 3D printer with cooling fan and base mount, showing mechanical components (no text or symbols)- Plug in the device. The display shows - - - - and the symbols are flashing. By pressing the cooling button, you choose between:
o Soft ice cream the display shows 01:40 (100 min), the symbol flashes
o Ice cream the display shows 02:00 (120 min), the symbol flashes
o Sorbet the display shows 01:30 (90 min), the symbol flashes
o DIY the display shows 01:40 (100 min), the symbol flashes
- Start the device with the start / stop button, the selected ice program runs.
- When the time has elapsed, an acoustic signal sounds, the device goes into the after-cooling function for 1 hour without stirring and then into the stand-by mode.
- Remove the stirrer before the after-cooling process.
DIY: With this function you can change the time, but not the temperature setting!
- If you want to change the time, stop the currently selected ice cream program (soft ice - ice cream - sorbet).
- Use the cooling button to select the DIY symbol. 01:40 lights up in the display and the symbol flashes.
- Use the +/- key to select the time between 10 minutes and 3 hours.
- Restart the device.
- The next time ice is prepared, the appliance starts again with the basic program.
Ice cream recipes
Vanilla ice cream
150ml cold milk, 150ml cold cream (30%), 3 egg yolk, 50gr sugar, vanilla bean.
Basic recipe
Heat milk, cream and the scratched vanilla bean. Mix the egg yolks with sugar, stir in the hot liquid and beat until fluffy. Leave the mixture to cool in the refrigerator. Now, put the cooled mixture into the container and let the ice cream maker work.
Chocolate ice cream
Use the basic recipe for vanilla ice cream and add 40gr cocoa while heating the milk with the cream.
Mocha ice cream
Use the recipe for chocolate ice cream and add 1 tsp espresso powder to the milk-cream mixture.
Yoghurt ice cream
150gr cold plain yoghurt, 200gr cold cream, 75gr icing sugar, 1 tbsp. lemon juice. Mix yoghurt with icing sugar and lemon juice. Beat the cream and fold in. Fill into the container and let the ice cream maker work.
Berry ice cream
150gr cold plain yoghurt, 150gr cold mixed berries, 75gr icing sugar. Purée the washed berries and add icing sugar, yoghurt. Fill into the container and let the ice cream maker work.
Raspberry sorbet
250gr cold raspberries, 60gr icing sugar, 75ml white wine, 1 tbsp. strawberry liqueur. Purée the cold berries with icing sugar and white wine. Fill the mixture into the container and let the ice cream maker work. Add the liqueur at the end.
Hints
- Only use fully ripe fruits for making fruit ice cream. Pieces of fruits or berries can be added through the refill opening in the lid near the end of the freezing process.
- Add little amounts of alcohol at the end (Attention! Children)
- Never insert fingers or other objects into the opening.
- The higher the fat content of the ingredients, the creamier the ice.
- Keep in mind while preparing: cold ice cream tastes less sweet than the warm raw mixture!
- Homemade ice cream is not that firm as machine-made
Making Yoghurt
- Only use the white yoghurt container!
- Put the ingredients for yoghurt in the container, place the yoghurt lid and put it into the thermal container.
- Place the lid and engage, also engage the motor part in the lid. For yoghurt production the rabble arm is not needed.
natural_image
Diagram of a mechanical device with a cylindrical component and side supports, showing internal structure (no text or symbols)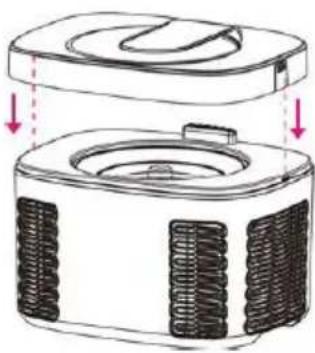
natural_image
Diagram of a portable air conditioner unit with cooling fins and ventilation slots (no text or labels)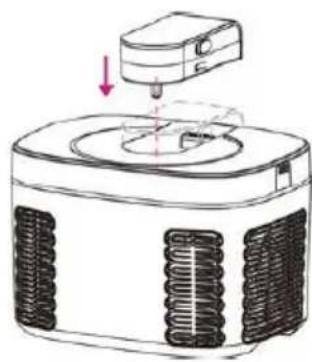
natural_image
Diagram of a 3D printer with cooling unit and mechanical components (no text or symbols)- Plug in the device. The display shows - - - - and the symbols are flashing.
- Press the heating button. flashes and 42°C light up in the display.
- Press the start / stop button, the program runs. When the time has elapsed, an acoustic signal sounds.
- If the program is not cancelled with the start / stop button, the appliance will switch into cooling mode for 8 hours. - - - - lights up in the display.
- Once the 8 hours of cooling have elapsed, the device switches into stand-by mode.
Change of time and temperature:
- Press the heating button twice, DIY flashes and 42 °C light up.
- +/- with this key you can change the temperature in steps of 1 °C between 25-50 °C, the standard time 8 hours flashes.
- If you also want to change the time, press the Setting button.
- Use the +/- key to change the time between 1 - 99 hours.
- Start the self-selected program.
- When the time has elapsed, a signal sounds in the display and 00:00 lights up.
- The next time you prepare yoghurt, the device starts again with the basic program.
Plain yoghurt...
... is a sour milk-type product obtained from UHT-milk with a fat content of 1,5–3,5% and the influence of bacteria. The milk is inoculated with yoghurt cultures or fresh plain yoghurt. At an average temperature of 42°C, the lactic acid bacteria multiply. Once enough lactic acid is produced, protein is precipitated and the milk thickens.
There are clockwise and anti-clockwise lactic acid bacteria. Clockwise lactic acid bacteria play an important role in carbohydrate metabolism as the body make better use of it. If you had digestive problems after eating some yoghurt, then maybe too much anti-clockwise lactic acid was the cause, as they are broken down more slowly.
The consistency of the yoghurt is dependent on the fat content of the milk used. At a fat content of 3,5% the yoghurt gets a little firmer, with 1,5% softer. Any other milk should be heated up to 80 – 90°C and cooled down to 40°C. Do not refrigerate yoghurt for more than 10 days.
Preparation:
You can use both UHT milk and pasteurized fresh milk. For off-farm milk (milk dispenser / milk refuelling station), the milk must be boiled first and cooled to at least 35 °C. Stir one cup of yoghurt (125gr) into 0,75 litre of milk and fill into the yoghurt container. Then, place into the device and start the yoghurt program.
Mature Time:
The milk mixture should be left in the appliance for at least 8h. The longer the yoghurt matures, the tastier it becomes. The colder the mixture, the longer the timer has to be set. Use a spoon to check the consistency and, if necessary, increase the timer. Do not move the device during the mature time, otherwise the yoghurt might not thicken.
One cup of the finished Yoghurt can be used as the starter culture, but not more than approx. 20 times, as the effect is not so good any more. Keep the ready yoghurt always in the refrigerator. Ingredients such as sugar, fruits or flavours can be added later to the plain yoghurt.
Correct Disposal of this product
This marking indicates that this product should not be disposed with other household wastes throughout the EU. To prevent possible harm to the environment or human health from uncontrolled waste disposal, recycle it responsibly to promote the sustainable reuse of material resources. To return your used device, please use the return and collection systems or contact the retailer where the product was purchased. They can take this product for environmental safe recycling.
Packaging disposal: Do not throw away the package materials. Please put it in the recycling bin.


Gift box: Paper, should be put to the old paper collection point. Plastic packaging material and foils should be collected in the special collection containers.
Service and Repair:
If the appliance must be repaired, please get in touch with your trader or with the manufacturer:
natural_image
Technical line drawings of mechanical components with arrows indicating motion or assembly (no text or symbols)Plan de travail
text_image
Exploded diagram of a smart air purifier with numbered parts for identificationPanneau de commande
1) Minus
2) Plus
3) Refroidir
4) Chauffer
5) Réglage
6) Marche / arrêt
7) Affichage
8) Crème glacée (100 min)
9) Glace (120 min)
10) Sorbet (90 min)
11) Yaourt (8huers)
12) DIY

text_image
8:0:01 7 9 8 12 1 10 11 1 + 2 3 COOLING HEATING 4 5 SETTING START/STOP 6natural_image
Diagram of a gasifier with a cylindrical container and cooling unit, showing internal structure (no text or symbols)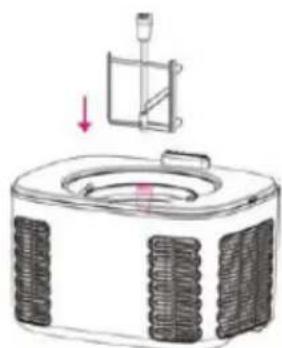
natural_image
Diagram of a mechanical device with a cylindrical component and a downward arrow indicating force or movement (no text or symbols)natural_image
Diagram of a portable air conditioner unit with cooling fins and a lid, showing internal structure and airflow direction (no text or symbols)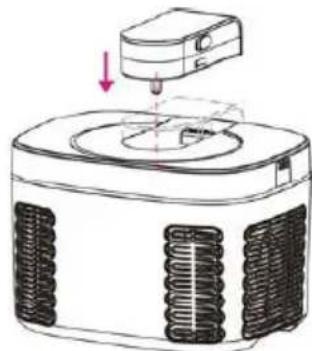
natural_image
Diagram of a portable air purifier with cooling unit and mechanical component (no text or symbols)o Crème glacée 100 minutes
o Glace 120 minutes
o Sorbet 90 minutes
o DIY 100 minutes
natural_image
Diagram of a mechanical device with a cylindrical component and side panels, showing internal structure and arrows indicating motion (no text or symbols)natural_image
Diagram of a portable air conditioner unit with cooling fins and ventilation slots (no text or symbols)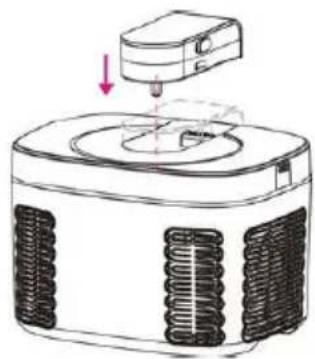
natural_image
Diagram of a mechanical device with a downward arrow indicating force or movement, no text or symbols presentnatural_image
Technical line drawings of mechanical components with arrows indicating motion or assembly (no text or symbols)Plaatsing
Belangrijk:
text_image
Exploded view diagram of a microwave oven with numbered parts for identification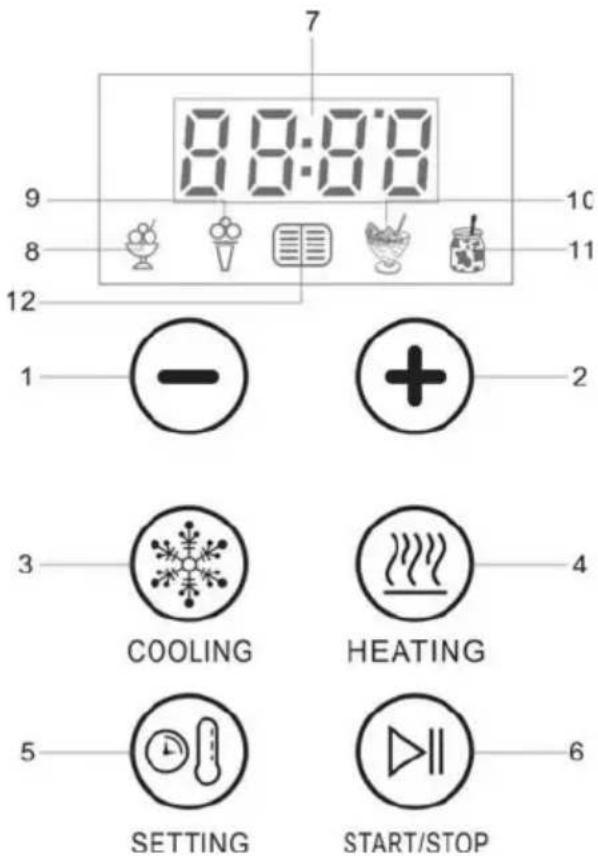
text_image
8:0:0:0 7 9 8 12 1 1 COOLING 2 3 HEATING 4 5 SETTING 6 START/STOPMaken van ijs
natural_image
Diagram of a cylindrical device with a lid and base, showing internal components and directional arrows (no text or symbols)natural_image
Diagram of a portable air conditioner unit with cooling fins and lid, showing internal structure and airflow direction (no text or symbols)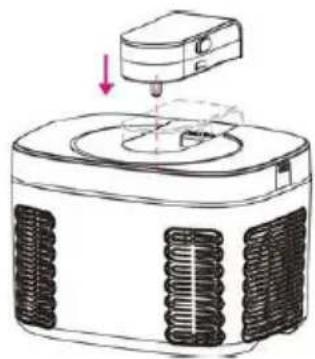
natural_image
Diagram of a mechanical device with a downward arrow indicating force or movement (no text or symbols present)o bed and breakfast miljøer
natural_image
Technical line drawings of a mechanical component showing three sequential assembly steps with arrows indicating motion (no text or symbols present)Arbejdspladsen
Vigtig
text_image
Exploded view diagram of a microwave oven with numbered parts for identification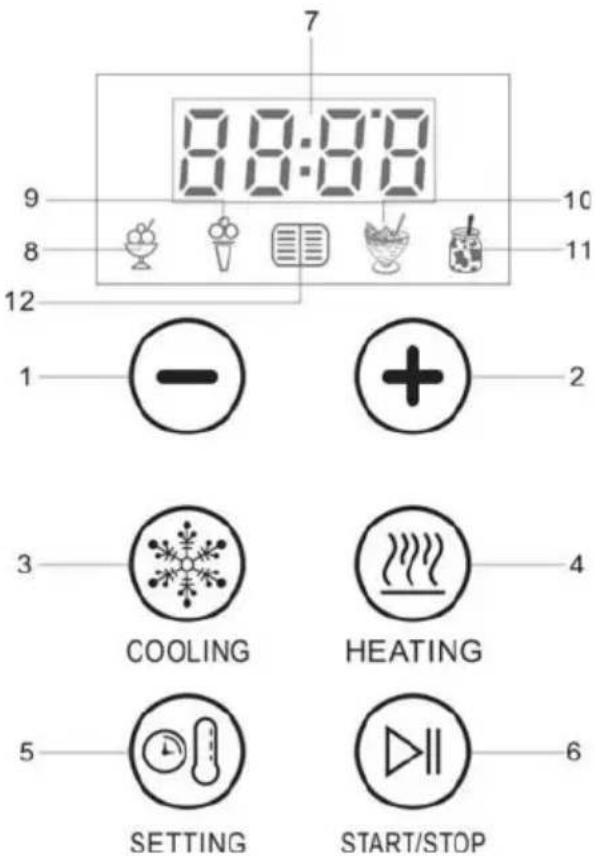
text_image
7 8:0:0:0 9 8 12 1 10 11 1 + 2 3 COOLING HEATING 4 5 SETTING START/STOP 6Tilberedning af is
natural_image
Diagram showing a cylindrical container with a downward arrow pointing to a textured base (no text or symbols)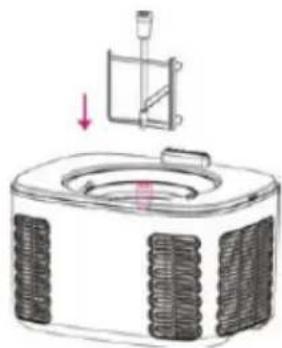
natural_image
Diagram of a gas stove with a valve and cooling unit (no text or labels)natural_image
Diagram of a two-tiered electric heater with cooling fins and heat exchanger (no text or labels)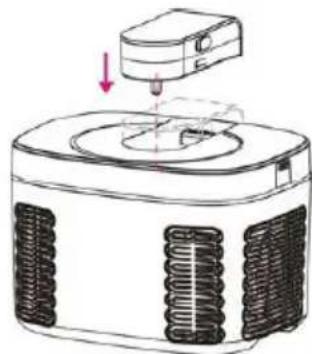
natural_image
Diagram of a mechanical device with a downward arrow indicating force or movement, no text or symbols presentnatural_image
Diagram of a mechanical device with a cylindrical component and side panels, showing internal structure and arrows indicating motion (no text or symbols)natural_image
Diagram of a portable air conditioner unit with cooling fins and a lid, showing internal structure and airflow direction (no text or symbols)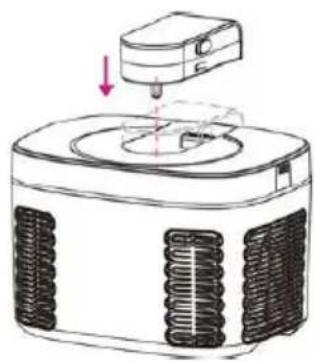
natural_image
Diagram of a 3D printer with cooling fan and mechanical component, showing no text or symbols- Tilslut kablet. I displayet lyser ---- og symbolerne blinker.
- Tryk på varmeknappen blinker og 42°C lyser i displayet.
- Start/ stop knappen trykkes, standardprogrammet 42 °C / 8 timer starter.