BP A130 - Blood pressure monitor MICROLIFE - Free user manual and instructions
Find the device manual for free BP A130 MICROLIFE in PDF.
| Product type | Electronic blood pressure monitor for arm, with cuff |
| Brand | Microlife |
| Model | BP A130 |
| Dimensions (L x W x H) | 180 x 110 x 75 mm |
| Weight (batteries included) | 480 g |
| Power supply | 4 AA alkaline batteries 1.5 V or mains adapter 6 V / 600 mA (optional) |
| Battery life | Approx. 920 measurements with new batteries |
| Measurement method | Oscillometric, equivalent to Korotkoff method |
| Measurement range (pressure) | 20 – 280 mmHg |
| Measurement range (pulse) | 40 – 200 beats/min |
| Static accuracy | ± 3 mmHg |
| Display resolution | 1 mmHg |
| Blood pressure classification | Color indicator (green, yellow, red) according to WHO ranges |
| Arrhythmia detection | Yes, with specific symbol |
| Memory | 100 measurements with date and time |
| Voice announcement | Yes (speech synthesis of results) |
| Programmable alarm | 2 daily alarms (medication reminder) |
| Available cuff sizes | S (17-22 cm), M (22-32 cm), L (32-42 cm), M-L (22-42 cm) |
| Cuff cleaning | Hand wash with soapy water, do not machine wash |
| Protection class | IP20 |
| Warranty | 5 years (excluding batteries and wear) |
| Repairability / Spare parts | Cuffs and mains adapter available via customer service |
Frequently Asked Questions - BP A130 MICROLIFE
User questions about BP A130 MICROLIFE
0 question about this device. Answer the ones you know or ask your own.
Ask a new question about this device
Download the instructions for your Blood pressure monitor in PDF format for free! Find your manual BP A130 - MICROLIFE and take your electronic device back in hand. On this page are published all the documents necessary for the use of your device. BP A130 by MICROLIFE.
USER MANUAL BP A130 MICROLIFE
Europe/Middle-East/Africa
Microlife AG
Espensrasse 139
9443 Widnau Switzerland
Tel. +41 71 727 70 30
Fax+41/717277039
Email:apming@microlife.com
www.microlife.com
Asia
Microlife Corporation
9F,431,RuiGangRoad,NiHu
Taipei, 11492, Taiwan, R.O.C.
Tel. +866 28797-1288
Fax+68628797-1283
Email service@microlife.com.tw
www.microlife.com
North / Central / South America
Microlife USA, Inc.
1617 Gull to Bay Blvd. 2nd Floor Ste A
Clearwater,FL337551USA
Tel. +17274425353
Fax+17274425377
Email msa@microlifeusa.com
www.microlife.com

Microlife BP A130
EN 2
RU
FR 17
DE 25
ES 33
PL 41
Microlife BP A130 BP A130Guarantee Card
microlife
Name of Purchaser / Φ ΣΟ, noynatema / Nom de l'achateur / Name des Kaufters / Nombre del comprador / Imie i nazwiska nabywky
Serial Number / Cacmimn Nohmep! Numero de série! Serienummer! Notoe de série! Numer sayy
Date of Purchase / Darta nojynik / Date
d'achat / Kaftdatum / Fecha de compra /
Data zakupu
Specialist Dealer | Chetuyanapcoaahmynnep / Revenaut / Fachhandier /Vendedor especializado / Przestawicel
microlife
Microlife BP A130
EN
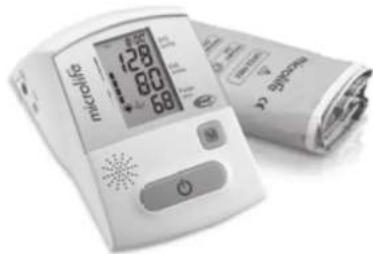
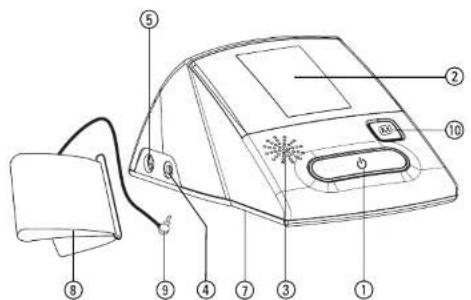
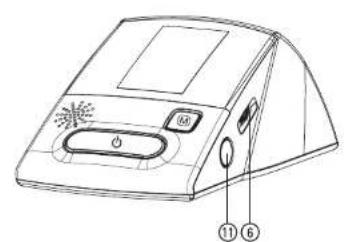
① ON/OFF button
② Display
③ Speaker
Cuff Socket
⑤ Mains Adapter Socket
Volume Control
⑦ Battery Compartment
Cuff
Cuff Connector
10 M-button (memory)
⑪ Time Button
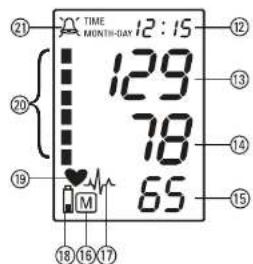
Display
12 Date/Time
① Systolic Value
14 Diastolic Value
15 Pulse Rate
16 Stored Value
Heart Arrhythmia Indicator
18 Battery Display
19 Pulse
20 Traffic Light Indicator
② Alarm Time
Dear Customer,
Your new Microlife blood pressure monitor is a reliable medical device for taking measurements on the upper arm. It is simple to use, accurate and comes highly recommended for blood pressure monitoring in your home. This device was developed in collaboration with physicians and clinical tests carried out prove its measurement accuracy to be of a very high standard.*
Please read through these instructions carefully so that you understand all functions and safety information. We want you to be happy with your Microlife product. If you have any questions, problems or want to order spare parts please contact your local Microlife
Customer Service. Your dealer or pharmacy will be able to give you the address of the Microlife dealer in your country. Alternatively, visit the internet at www.microlife.com where you will find a wealth of invaluable information on our products.
Stay healthy - Microlife AG!
- This device uses the same measuring technology as the award winning «BP 3BTO-A» model tested according to the British Hypertension Society (BHS) protocol.

Read the instructions carefully before using this device.

Type BF applied part

Keep dry
Table of Contents
- Important Facts about Blood Pressure and Self-Measurement
How do I evaluate my blood pressure?
-
Using the Device for the First Time
-
Activating the fitted batteries
- Setting the date and time
- Changing the language
- Adjusting the volume
-
Selecting the correct cuff
-
Taking a Blood Pressure Measurement using this Device
-
Appearance of the Heart Arrhythmia Indicator for early Detection
-
Traffic Light Indicator in the Display
-
Data Memory
Viewing the stored values
Memory full
Clearing all values
- How not to store a reading
-
Setting the Alarm Function
-
Battery Indicator and Battery change
-
Low battery
- Flat battery - replacement
- Which batteries and which procedure?
-
Using rechargeable batteries
-
Using a Mains Adapter
-
Error Messages
-
Safety, Care, Accuracy Test and Disposal
-
Safety and protection
Device care - Cleaning the cuff
Accuracy test -
Disposal
-
Guarantee
- Technical Specifications Guarantee Card (see Back Cover)
1. Important Facts about Blood Pressure and Self- Measurement
- Blood pressure is the pressure of the blood flowing in the arteries generated by the pumping of the heart. Two values, the systolic (upper) value and the diastolic (lower) value, are always measured.
- The device indicates the pulse rate (the number of times the heart beats in a minute).
- Permanently high blood pressure values can damage your health and must be treated by your doctor!
- Always discuss your values with your doctor and tell him/her if you have noticed anything unusual or feel unsure. Never rely on single blood pressure readings.
-
There are several causes of excessively high blood pressure values. Your doctor will explain them in more detail and offer treatment where appropriate. Besides medication, weight loss and exercise can also lower your blood pressure.
-Under no circumstances should you alter the dosages of any drugs prescribed by your doctor! -
Depending on physical exertion and condition, blood pressure is subject to wide fluctuations as the day progresses. You should therefore take your measurements in the same quiet conditions and when you feel relaxed! Take at least two readings every time (in the morning and in the evening) and average the measurements.
It is quite normal for two measurements taken in quick succession to produce significantly different results.
- Deviations between measurements taken by your doctor or in the pharmacy and those taken at home are quite normal, as these situations are completely different.
- Several measurements provide much more reliable information about your blood pressure than just one single measurement.
- Leave a small break of at least 15 seconds between two measurements.
If you suffer from an irregular heartbeat (arrhythmia, see «Section 4.»), measurements taken with this device should be evaluated with your doctor.
The pulse display is not suitable for checking the frequency of heart pacemakers!
- If you are pregnant, you should monitor your blood pressure very closely as it can change drastically during this time!
This monitor is specially tested for use in pregnancy and pre-eclampsia. When you detect unusual high readings in
pregnancy, you should measure again after 4 hours. If the reading is still too high, consult your doctor or gynecologist.
How do I evaluate my blood pressure?
Table for classifying blood pressure values in adults in accordance with the World Health Organisation (WHO) in 2003. Data in mmHg.
| Range Systolic Diastolic | Recommen-ndation | |||
| blood pressure too low | \( \downarrow 100 \) | \( \downarrow 60 \) | Consult your doctor | |
| 1. | blood pressure optimum | 100 - 120 | 60 - 80 | Self-check |
| 2. | blood pressure normal | 120 - 130 | 80 - 85 | Self-check |
| 3. | blood pressure slightly high | 130 - 140 | 85 - 90 | Consult your doctor |
| 4. | blood pressure too high | 140 - 160 | 90 - 100 | Seek medical advice |
| 5. | blood pressure far too high | 160 - 180 | 100 - 110 | Seek medical advice |
| 6. | blood pressure dangerously high | 180 \( \uparrow \) | 110 \( \uparrow \) | Urgently seek medical advice! |
The higher value is the one that determines the evaluation. Example: a readout value between 150/85 or 120 / 98mmHg indicates blood pressure too high
2. Using the Device for the First Time
Activating the fitted batteries
Pull out the protective strip from the battery compartment 7.
Setting the date and time
- After the new batteries are fitted, the year number flashes in the display. You can set the year by pressing the M-button ⑩. To confirm and then set the month, press the time button ⑪.
- Press the M-button to set the month. Press the time button to confirm and then set the day.
- Follow the instructions above to set the day, hour and minutes.
- Once you have set the minutes and pressed the time button, the date and time are set and the time is displayed.
- If you want to change the date and time, press and hold the time button down for approx. 3 seconds until the year number starts to flash. Now you can enter the new values as described above.
Changing the language
You can change the language by using the following procedure:
- While the device is switched off keep the ON/OFF button ① pressed until you see the letters «LAn» on the LCD.
- Now you can change the language by continuously pressing the M-button 10:
1=English, 2=Russian, 3=French, 4=German, 5=Spanish, 6=Polish. - Confirm the selection by pressing the ON/OFF button ①
Adjusting the volume
Use the volume control 6 to adjust the volume of the speaker.
Selecting the correct cuff
Microlife offers different cuff sizes. Select the cuff size to match the circumference of your upper arms (measured by close fitting in the centre of the upper arm).
| Cuff size for circumference of upper arm |
| S 17 - 22 cm (6.75 - 8.75 inches) |
| M 22 - 32 cm (8.75 - 12.5 inches) |
| L 32 - 42 cm (12.5 - 16.5 inches) |
| M - L 22 - 42 cm (8.75 - 16.5 inches) |
Optional preformed cuffs «Easy» are available.
Only use Microlife cuffs.
^+ Contact your local Microlife Service if the enclosed cuff 8 does not fit.
- Connect the cuff to the device by inserting the cuff connector ⑨ into the cuff socket ④ as far as it will go.
3. Taking a Blood Pressure Measurement using this Device
Checklist for taking a reliable measurement
- Avoid activity, eating or smoking immediately before the measurement.
- Sit down for at least 5 minutes before the measurement and relax.
- Always measure on the same arm (normally left).
- Remove close-fitting garments from the upper arm. To avoid constriction, shirt sleeves should not be rolled up - they do not interfere with the cuff if they are laid flat.
-
Always ensure that the correct cuff size is used (marking on the cuff).
-
Fit the cuff closely, but not too tight.
Make sure that the cuff is positioned 2cm above the elbow. -
The artery mark located on the cuff (ca. 3 cm long bar) must lie over the artery which runs down the inner side of the arm.
Support your arm so it is relaxed. -
Ensure that the cuff is at the same height as your heart.
-
Press the ON/OFF button (1) to start the measurement.
- The cuff will now pump up automatically. Relax, do not move and do not tense your arm muscles until the measurement result is displayed. Breathe normally and do not talk.
- When the correct pressure is reached, the pumping stops and the pressure falls gradually. If the required pressure was not reached, the device will automatically pump some more air into the cuff.
- During the measurement, the heart symbol 19 flashes in the display and a beep sounds every time a heartbeat is detected.
- The result, comprising the systolic 13 and the diastolic 14 blood pressure and the pulse rate 15 is displayed and a long beep is heard. At the same time, the blood pressure monitor will announce the result. Note also the explanations on further display symbols in this booklet.
11.When the device has finished measuring, remove the cuff. - Switch off the device. (The monitor does switch off automatically after approx. 3 min.).
You can stop the measurement at any time by pressing the ON/OFF button (e.g. if you feel uneasy or an unpleasant pressure sensation).
4. Appearance of the Heart Arrhythmia Indicator for early Detection
This symbol 17 indicates that certain pulse irregularities were detected during the measurement. In this case, the result may deviate from your normal blood pressure - repeat the measurement. In most cases, this is no cause for concern. However, if the symbol appears on a regular basis (e.g. several times a week with measurements taken daily) we advise you to tell your doctor. Please show your doctor the following explanation:
Information for the doctor on frequent appearance of the Arrhythmia indicator
This device is an oscillometric blood pressure monitor that also analyses pulse frequency during measurement. The device is clinically tested.
The arrhythmia symbol is displayed after the measurement, if pulse irregularities occur during measurement. If the symbol appears more frequently (e.g. several times per week on measurements performed daily) we recommend the patient to seek medical advice.
This device does not replace a cardiac examination, but serves to detect pulse irregularities at an early stage.
5. Traffic Light Indicator in the Display
The bars on the left-hand edge of the traffic light display 20 show you the range within which the indicated blood pressure value lies. Depending on the height of the bar, the readout value is either within the normal (green), borderline (yellow) or danger (red) range. The classification corresponds to the 6 ranges in the Table as defined by the WHO, as described in «Section 1.».
6. Data Memory
At the end of each measurement, this device automatically stores the result, including date and time.
Viewing the stored values
Press the M-button ⑩ briefly, when the device is switched off. The display first shows «M» ⑭ and then a value, e.g. «M 17». This means that there are 17 values in the memory. The device then switches to the last stored result at which point an audio interpretation will also be heard.
Pressing the M-button again displays the previous value. Pressing the M-button repeatedly enables you to move from one stored value to another.
Memory full
Pay attention that the maximum memory capacity of 100 is not exceeded. When the memory is full, the old values are automatically overwritten with new ones. Values should be evaluated by a doctor before the memory capacity is reached - otherwise data will be lost.
Clearing all values
If you are sure that you want to permanently remove all stored values, hold down the M-button (the device must have been switched off beforehand) until «CL» appears and then release the button. To permanently clear the memory, press the M-button while «CL» is flashing. Individual values cannot be cleared.
How not to store a reading
As soon as the reading is displayed press and hold the ON/OFF button 1 until 16 is flashing. Confirm to delete the reading by pressing the M-button 10.
7. Setting the Alarm Function
This device allows you to set 2 alarm times at which an alarm signal will then be triggered. This can be a useful aid, for instance as a reminder to take medication.
- To set an alarm time, press the time button (11) (the device must have been switched off beforehand) and immediately afterwards the M-button (10) and hold both down until the bell symbol (21) appears in the top left of the display. Then release both buttons. The flashing «1» in the display indicates that the first alarm time can now be set.
- Press the time button to set the hours - the hour display flashes and pressing the M-button allows you to set the alarm hour. To confirm, press the time button.
- The minute display will now flash. The minutes can be set using the M-button. To confirm, press the time button again.
- The bell symbol will now flash. Use the M-button to select whether the alarm time is to be active (bell) or inactive (crossed-out bell). To confirm, press the time button.
To set a second alarm time, proceed as above but if the «1» flashes, press the M-button to select «2» and confirm with the time button.
An active alarm time is indicated by the bell symbol in the display.
The alarm will sound at the set time every day.
To switch-off the alarm when it is sounding, press the time button (11).
To permanently switch off the alarm, proceed as above and select the crossed-out bell symbol. This will then disappear from the display.
The alarm times must be re-entered each time the batteries are replaced.
8. Battery Indicator and Battery change
Low battery
When the batteries are approximately 3/4 empty the battery symbol will flash as soon as the device is switched on (partly filled battery displayed). Although the device will continue to measure reliably, you should obtain replacement batteries.
Flat battery - replacement
When the batteries are flat, the battery symbol ⑧ will flash as soon as the device is switched on (flat battery displayed). You cannot take any further measurements and must replace the batteries.
- Open the battery compartment ⑦ on the bottom of the device.
- Replace the batteries - ensure correct polarity as shown by the symbols in the compartment.
- To set date and time, follow the procedure described in «Section 2».
The memory retains all values although date and time (and possibly also set alarm times) must be reset – the year number therefore flashes automatically after the batteries are replaced.
Which batteries and which procedure?
Use 4 new, long-life 1.5V size AA alkaline batteries.
Do not use batteries beyond their date of expiry.
Remove batteries if the device is not going to be used for a prolonged period.
Using rechargeable batteries
You can also operate this device using rechargeable batteries.
Only use «NiMH» type reusable batteries.
Batteries must be removed and recharged when the flat battery symbol appears. They should not remain inside the device as they may become damaged (total discharge as a result of low use of the device, even when switched off).
Always remove the rechargeable batteries if you do not intend to use the device for a week or more.
Batteries cannot be charged in the blood pressure monitor. Recharge batteries in an external charger and observe the information regarding charging, care and durability.
9. Using a Mains Adapter
You can operate this device using the Microlife mains adapter (DC 6V, 600 mA).
Only use the Microlife mains adapter available as an original accessory appropriate for your supply voltage.
Ensure that neither the mains adapter nor the cable are damaged.
- Plug the adapter cable into the mains adapter socket ⑤ in the blood pressure monitor.
- Plug the adapter plug into the wall socket.
When the mains adapter is connected, no battery current is consumed.
10.Error Messages
If an error occurs during the measurement, the measurement is interrupted and an error message, e.g. «ERR 3», is displayed.
| Error | Description | Potential cause and remedy |
| «ERR 1» | Signal too weak | The pulse signals on the cuff are too weak. Re-position the cuff and repeat the measurement.* |
| «ERR 2» | Error signal During the measurement, error signals were detected by the cuff, caused for instance by movement or muscle tension. Repeat the measurement, keeping your arm still. | |
| «ERR 3» | No pressure in the cuff | An adequate pressure cannot be generated in the cuff. A leak may have occurred. Check that the cuff is correctly connected and is not too loose. Replace the batteries if necessary. Repeat the measurement. |
| «ERR 5» | Abnormal result | The measuring signals are inaccurate and no result can therefore be displayed. Read through the checklist for performing reliable measurements and then repeat the measurement.* |
| «HI» Pulse or cuff pressure too high | The pressure in the cuff is too high (over 300 mmHg) OR the pulse is too high (over 200 beats per minute). Relax for 5 minutes and repeat the measurement.* | |
| «LO» Pulse too low | The pulse is too low (less than 40 beats per minute). Repeat the measurement.* |
- Please consult your doctor, if this or any other problem occurs repeatedly.
If you think the results are unusual, please read through the information in «Section 1.» carefully.
11.Safety, Care, Accuracy Test and Disposal

Safety and protection
- This device may only be used for the purposes described in these instructions. The manufacturer cannot be held liable for damage caused by incorrect application.
- This device comprises sensitive components and must be treated with caution. Observe the storage and operating conditions described in the «Technical Specifications» section.
- Protect it from:
-water and moisture
- extreme temperatures
- impact and dropping
- contamination and dust
- direct sunlight
-heat and cold
The cuffs are sensitive and must be handled with care.
- Do not exchange or use any other kind of cuff or cuff connector for measuring with this device.
-Only pump up the cuff once fitted.
The function of this device may be compromised when used close to strong electromagnetic fields such as mobile phones or radio installations and we recommend a distance of at least 1m In cases where you suspect this to be unavoidable, please verify if the device is working properly before use.
-
Do not use this device if you think it is damaged or notice anything unusual.
-
Never open this device.
- If the device is not going to be used for a prolonged period the batteries should be removed.
- Read the additional safety information provided within the individual sections of this instruction manual.

Ensure that children do not use this device unsupervised; some parts are small enough to be swallowed. Be aware of the risk of strangulation in case this device is supplied with cables or tubes.
Device care
Clean the device only with a soft, dry cloth.
Cleaning the cuff
Carefully remove spots on the cuff with a damp cloth and soapsuds.

WARNING: Do not wash the cuff in a washing machine or dishwasher!
Accuracy test
We recommend this device is tested for accuracy every 2 years or after mechanical impact (e.g. being dropped). Please contact your local Microlife-Service to arrange the test (see foreword).
Disposal

Batteries and electronic devices must be disposed of in accordance with the locally applicable regulations, not with domestic waste.
12.Guarantee
This device is covered by a 5 year guarantee from the date of purchase. The guarantee is valid only on presentation of the guarantee card completed by the dealer (see back) confirming date of purchase or the receipt.
- Batteries and parts that become worn with use are not included.
- Opening or altering the device invalidates the guarantee.
-
The guarantee does not cover damage caused by improper handling, discharged batteries, accidents or non-compliance with the operating instructions.
-
The cuff has a functional guarantee (bladder tightness) for 2 years. Please contact your local Microlife-Service (see foreword).
13. Technical Specifications
| Operating conditions: | 10 - 40 °C / 50 - 104 °F |
| 15 - 95 % relative maximum humidity | |
| Storage conditions: | -20 - +55 °C / -4 - +131 °F |
| 15 - 95 % relative maximum humidity | |
| Weight: | 480 g (including batteries) |
| Dimensions: | 180 x 110 x 75 mm |
| Measuring procedure: | oscillometric, corresponding to Korotko method: Phase I systolic, Phase V diastolic |
| Measurement range: | 20 - 280 mmHg – blood pressure |
| 40 - 200 beats per minute – pulse | |
| Cuff pressure display | |
| range: | 0 - 299 mmHg |
| Resolution: | 1 mmHg |
| Static accuracy: | pressure within ± 3 mmHg |
| Pulse accuracy: | ± 5 % of the readout value |
| Voltage source: | 4 x 1.5 V alkaline batteries; size AA |
| Mains adapter DC 6V, 600 mA (option) | |
| Battery lifetime: | approx. 920 measurements |
| (using new batteries) | |
| IP Class: | IP20 |
| Reference to standards: | EN 1060-1 /-3 /-4; IEC 60601-1; IEC 60601-1-2 (EMC); IEC 60601-1-1 |
| Expected service life: | Device: 5 years or 10000 measurements |
| Accessories: 2 years | |
| This device complies with the requirements of the Medical Devi Directive 93/42/EEC. | |
| Technical alterations reserved. | |
Microlife BP A130
RU
① KhONka BKN/BblkN
② DnCnJIeI
③ДиHAmNK
④ THe3D0ДЯMaHKeTbI
⑤ THe3Do Dn86NoKa NITaHnA
⑥ Perympobkra pomKoCTN
⑦ OtceKДЯбatapei
⑧ MaHkeTa
⑨ CoeДиНТeЛь МАнЖeТы
10 Khonka M (Pamr)
11 KhoNka Time (BpeMa)
Ducnnei
12 Data/BpeM
13 CnCTOJIuYeCKoe DaJIeHne
14ДиacToHueCKoe DaBHeHne
15 Yactota nylbca
16 CoxpaHHeHHoe 3HaueHne
17 INHdkatop apntmnc cepda
18 INHnkaTOp pa3pa da 6aTapei
19IyIbc(HnDnKaTOp cepua)
20 INHdNkATOp yPOBnI DaJIeHnI
② BpemcHnHa
YBaKaembI nOKyNaTeJIb,
BaH HOBBI TOHOmeTp Microlife ABLIeTc HAdEHXbIM MeINUHCKMn np6opom dIy BbIOJHHeHn I3MepeHn Ha nIpe. OH npocB IVCIOJIb3OBAHH, Toey N HAcTOTeJIbHO peKOMeHNIOBAn DJIY IN3MepeHn apTePnaJIbHO DaJIeHn B DoMaIJHx YCNOBnx. Pp6op 6bln pa3pa6oTah B COTpyDnHueCTBe C BpaayAMn, a KInHmYeCKne Tectbl NOITBepdNII NBICOKyTO TOnHOCTb Ero IN3MepeHn.
IoxaJyHCTa, BHIMATEbHO IPOOTHe HAcTOnue yKa3aHNJa IIN NOUYeHnY YeTKOro IpeCTabENHnO 6o Bcex fHyHKUxN I TexNHKe 6e30NaCHOCTn. Ham 6bl XOTENoCb, YTObbl Bbl 6bl Nn yDObNEbOpEnb KaeeCTBOM n3dEeNia Microlife. PnB Bo3HKnHOBeHm BonpocOB, npobNm nn dnn 3aKa3a 3anacNbIX qacte, noKanynta, opa- uAHTecB B MeCThBn CepBncBn CEHTP Microlife. BaW dInep nn anTEka MOrYT ppeOCTabTB Bam aDpec Dnepa Microlife B BaWe cTpaHe. B KaueCTBe aJIbTePHaTNBbl, nocETnE B IVtepHete cTpaHnuy www.microlife.ru, rde Bbl CMOKeTe hainr prd none3hIx CBeDEHn No HaewMy n3dEHHIO.
BybTe 3doopBbl - Microlife AG!
*B npubope ucnonb3oBaHa ma je mexHoNo2u 3MepeHu, ymo u e ommeueHou HaepadAmu Modenu 已 _ 日 BP 3BTO-A》,Komopar ycneuho npoua knuHueckue ucnbImaHua 6 coombemcBuuC npomokonom Bpumahckozrunepmohueckoz0 ObecmeBa (BHS).

Ipeep nCnoJIb3OBAHnem npi6opa BnHMaTeIbHo npoTuTte daHHoe pyKOBOdCTBO.

U3eJIne Tuna BF

XpaHntbBCyXOMMeCTe
OrJablJIeHne
-
Baxhna nHΦopMaζη o6 apTeρnJIbHOM daBJIeHn I camocToTaeNbHoe n3MepHeHne
-
KaK onpeDenitb apTepeNaIbHoe daBneHHe?
2.Испоьзоване пибopaВпервьл pa3
-AkTnBaZma6batapei
- YctaHOBka DaTbI IN BpeMeHH
Bb16opra3bika
- Peruginopobka rpoMkoCTn
Побор похаяшеи Манжеты
- BbInonHeHne n3MepeHn apTeepaIbHoro daBJeHn npi nOmoU np6opa
4.ПЯВLEHHe INHДИΚaTopa apITMmN cepdza Ha paHHei cTaDnN
5.Инданкатурьндавлия«С Beetор» - NamrTb
-ПрсмOTс coXpaHeHHbIX BeJIuINH
3aONHeHnIaMRTN
- YdaJIeHHe BCEx 3HaueHnI
KakOTmehntb coxpaheHne pe3yNbTaTa
- Hactpoika cnHana
PekomeHdaun dny noluyehna Hndexhbxpe3ynbTaTOB n3MepeHH
1.ИЗбаятЕ ФиЗмчecкОД AKТУВHOCТИ, He eшьTe И He KypNTe HENOSCpeDCTBEHNOпepeДИЗМЕрEHnEM.
2.Передизмеренипрсдьт,но Крайн Мере,Ha пЯТ bMHyT n paccna6bTecb.
3.Bcerda npoBOnTe n3MepenHa OndHn ToJ Xe pyke (ObIyHO Ha JeBO).
4. Chmnte oIeRaOuO odExdy c npeya. He cneJeYt 3aKaTbI BaTb pykab pybaKn, 3To MoKET npBecTN K CdaBnBaHIO, pykaba N3 TOHKO TKAHN HE MeWahOT N3MepeHHIO, ecNI npNepraTcBO6oHO.
5. Y6eIntecb, yTO hCnOJIb3yeTcMaHKeTa npaBnIbHoropa3Mepa (MapKIpOBKa Ha MaHKeTe).
- ΠΠΟΤΗ ΜΑΝΟχΚΙΜΑχΚΕΤυ, HO He CΨιδΚΟΜ TγΟ.
- 6eIInTeCb, yTo MaHKeTa paCIONoXKeHa Ha 2 CM. BbIIe JIOKtIa.
- Metka apTepn Ha MaHKeTe (NHHa DnHHOkONo 3 cm.) DOJIxHa HaxoOnTbCra HaI apTepeNe C BHyTpENHe CTOpHbI pyKn.
- Pacnoonoknte pyky TaK, YTo6bl OHa ocTabaIacb paccna6JIeHHoH.
-
Y6eIntecb, yTO MaHKeTa HaxOJNTcHa Toi JKe BbICOTe, TTo n cepdue.
-
Haxmte KhoKy BKJ/BblkI ① nHaHaJaHa3MepeHnA.
- Tenepb 6ydt npOn3BeDeHa aBToMaTnuecka HakaKa MaHKeTbI.Paccna6bTeCb,He DnraTecbN He HApraaTe pyky do Tex nop, noka He OTo6pa3ntcpe3yJbTaT N3MepeHna. Dblwnte HopMaJIbHo n He pa3roBaPnBaIte.
- Ecnn m3mepeHne ycneuho 3aBepueHo, nokaqna npekpauaetcny npocxOHT nocTeeHHbI c6poc daBHeHn. Ecnn Tpe6yEmoe daBHeHne He DoCTnHyTO, np6op abTomTuCeckn npon3BeTeDOnONHHTelbHOe HArHeTaHne Bo3dyxA B MaHKeTy.
9.BoBpemn3MepeHn,3NaOKeCepuα19MnraeTHaDnCnpeu npa3daeTc3ByKOBoCnHan npKakDom ydape cepuca.
10.3aTeM OTo6paXaETcpe3yNbTaT, COCTOuNm N3 CNTOnHecCKoro 13 n DnactoNueckoro 14 apTePnaBHOro daBHeHnA, a TAKKe IynbCa 15, npa3daetc nnHHbI 3ByKOBo CMrHAn. B To Xe Bpemr TOHOMeTp o6bBnt pe3yNbTaT n3MepeHnC. M. TaIOKe NOrCHENr IO dpyIM NOKa3AHnM DnCJIeR B 3tOM 6yKNeTe.
11.1o OKOHauHHIO N3MepeHnA CHIMITE n y6epHTe MaHXKeTy.
12.BbIKIOHTe np6Op. (TOHOMETp ABTOMATNueCKN OTKIOHTcnp6n3ntelbHO uepe3 3MH).
BbMOKTe OCTaHOBntb N3MepeHne BJIIO6oM MOMHT HaxaTHe M KHOJKN BKJI/BblIKI (HaNPmEp,ecnBbIcNbITbIBaTe Heydo6CTBO NnHepnraTHoe OuUeHne OT HaHetaEMOrO daBJIeHn).
JHaa 6aTape).AaBHeIuNE I3MepeHna He MOryT npOn3BO-NTbCn DO 3aMeHbI 6aTapei.
- OtkpoTe oTeK dIa 6aTapee ⑦ B HnKHeu cactn npn6opa.
2.3aMeHnTe 6batape, y6eBnBunncb, YTO cO6NIOHe nOJIpHOCTb B COOTBETCTBN C CMBOJAMN B OTCKe.
3.ДЯТORO,уTO6bI yCTAHOBNT bDaty N BpEma,CneDyTe npOe-dype,OnncAHHOB B«Pa3dene 2.»

B namtn coxpanroTc Bce 3haeHnH, Ho daTa n BpeMn (n BO3MOXHO 3aDaHHoe BpeM CnHaNoB) 6ydyT cboPoHeHbI -noTomy noCne 3aMeHbI 6tapei roAABTomatNecK 3AmraEeT.
3JemeHbI NHTaHnI INpoueypa 3aMeHbI

PoxaNyCTa, nCnoB3yIte 4 HOBbIe IeIOuHbIe 6aTapeHa 1,5B C dIITeJIbHbIM cPOKOM cIyX6bl pa3Mepa AA.

He nCIOJIb3yIte 6aTapeN C NCTeKShM CpOKOM FOJHOCTN.

OoctaHbTe 6atape,ecn np6Op He 6yDet nCNOB30BaTbCBy TeueHne IINTeNbHoro nepnoa BpemeHn.
IcnoJb3ObaHne aKkymyIaTopoB
C np6opom MoxHo pa6oTaB, nCnoNb3yraAkkymyTOpHbIe 6batapei.

PoxaNyIcTa, nCnoJIb3yIe ToIbKO OINH TnN aKKMyIaTOpHBIX 6batape NIMH

BaTapeHne6xOIMBOBbHyTbNpe3apnTb,ecnI NOBnETCa CMBON 3JemeHTOB NITaHnRA (pa3pXKeHHa 6baTape).Onn He DOnKhbl OCTaBaTbcBHyTpN pIn6oPa, nCKoMbky MOrTy BbIITu N3 CTpoR (daXe B BbIKNoUeHHOM np6ope BaTape npdoJnxAoiT pa3pKaTcBc).

Bcerda BbHmMaTe AkkymyIaTOpbi, ecn He co6npaTeEc bno30BaTbc np6opom B TeueHne Hee nn 6oJe!

AkkymyIaTOPbI HE MOrTy 3apXaTbcB TOHOMTepe! NobTOpHO 3apdnte AkkymyIaTOPbI BO BHeUHem 3apAHOM yCTpoiCTBe N O3HaKOMbTeEc b CnHΦopMauNei no 3apJKe, yXoY u cPoy cLyXbI!
9. IcnoJb3ObaHne 6Joka nHTaHn
Bb mokepe pa6oTaB c np6opom npn nmoOn 6NoKa nTaHn Microlife (NocToHHbTOK 6B, 600 mA).

IcnoIb3yIte tonbko 6nokn nHTanHna Microlife, oTHocuIneec KOpINHaNbHbIM npHaNdxKHOCTM n pacCHiTAHHbIe Ha COOTBETCTBYIOUee HAnpJKeHne.

Y6eIITecb B TOM, YTO HN 6nOK nHTaHnA, HN Ka6eB He NOBpeKJeHbl.
- Bctabbe Ka6eIb 6noka nHTAHB BRHe3do 6noka nHTAHB 5 B TOHometpe.
- Bctabbte Bnky 6Ioka nHTaHnB po3eTKy.
Ppi noKJIooHn 6Ioka nHTaHn TOK 3JeMeHToB nHTaHn He notpe6JIaETc.
10.Coo6eHn8 o6 ouh6kax
EcnBvBpeMn3mepeHn npocxOHT oun6ka,To npoceDypa n3mepeHn npepbBaetcN BbIaetc coo6uHne 6 oun6ke, HanpImep «ERR 3».
Octopokno ydaJIne nIHTa C MaHKeTbI C NOMOcIbIO BlaXHOITpIKN MblbHOB BObl.
PENyPExKHeH:He CTpaTb MaHKeTy B CTpaJIbHOI INIOcCyDcOeHNO MAuHHe!
ПоберкatoTOUHOCTHN
Mby peKOMeHdyem npOBepaTb TOnHOCTb np60paKaXDbie 2 rOda
JIb6o nocne MexAHueckoro Bo3deNCTBn (HaNPmEp, naDeHn).
Ipy npOBeEHnTeCTa o6pATNTecb B MeCThBi CepBnCHbI ueHTp Microlife (cM. BBeHeHne).
YTNJIN3aun

Batapeu 3JneKtpoHHbIe np6opblcneJeYtunn3npoBaT B COOTBETCTBUN C pInHrTaIMN HopMaMn H He Bbl6paCbIBaT BmecTe C bItOBbIMN OTXoAMN.
12.Гаразня
Ha np6op pacnpoctpaehre rapaHTnB TeueHne 5 nTc daTbI npno6peHn. rapaTHn DeiCTBnteJbHa TOJIbKO pRn HAnuHn rapaHTnHoro TaNoHa, 3anoHHeHHOrO dInepom (CM. C o6paTHo CTOpOnb), noTBePkaUoJero DaTy npOdaJN, INJ KaccOBoro Yeka.
Ha 6aTapeu IN KOMnneKtyIOUe Yactn rapaHTn He paCnpocTpahReTc.
BckpbTne m MexaHueckne NOBpeKdeHn npuBoaT K ytpaTe rapaHTn.
- IapaHTnHe paCnpOcTpaHReTcHaNoBpeXeHnBb3BaHHbIe HeIpaBnIbHbIM O6paueHnEm,pa3pIaNBUnMnC6bTapeAIMN,HeCuaCTHbIMN CnyaAaMn NIn HeBbIOJHHeHemNHCTpyKuIN P0 3KcPJIyatauIN.
- rapaHTna Ha MaHKeTy BKNIOaE rapaHTnIO Ha BHyTppeHHIO KaMepy (repMeTNUHOCt b KaMepbl) Ha 2 roda.
IoxaIyIcTa, obaTntecb B MeCTHbI OepBnCHbI LeHTp Microlife (CM. BBeJeHne).
13.TexHnueckne xapaKTepeNCTnKN
YcnoBn npmHeHHa:
ot 10do 40^
MAKcIMaJIbHaO OTHOCHTeJIbHaB Bnax-HoCTb 15-95%