
FH-X840DAB - Car stereo PIONEER - Free user manual and instructions
Find the device manual for free FH-X840DAB PIONEER in PDF.

User questions about FH-X840DAB PIONEER
0 question about this device. Answer the ones you know or ask your own.
Ask a new question about this device
Download the instructions for your Car stereo in PDF format for free! Find your manual FH-X840DAB - PIONEER and take your electronic device back in hand. On this page are published all the documents necessary for the use of your device. FH-X840DAB by PIONEER.
USER MANUAL FH-X840DAB PIONEER
REPRODUCTOR DE CD CON RECEPTOR RDS
CD RDS-EMPFÄNGER
CD RDS-ONTVANGER
CD RDS INPUEMHNK
FH-X840DAB
Pioneer

Spotify®

Bluetooth
Made for
iPo

iPhone
Owner's Manual
Mode d'emploi
Digital Audio Broadcasting (DAB) 5
Radio. 6
CD/USB/iPod/AUX 7
Bluetooth 8
App Mode 11
Spotify 12
Using Pioneer ARC APP 12
Audio adjustments 13
Settings 14
FUNCTION settings 14
AUDIO settings. 15
SYSTEM settings 16
ILLUMINATION settings 18
MIXTRAX settings 18
Connections/Installation 19
Additional Information 22
About this manual:
- In the following instructions, a USB memory or USB audio player are referred to as "USB device".
- In this manual, iPod and iPhone are referred to as "iPod".
Declaration of Conformity with regard to the R&TTE Directive 1999/5/EC
C
Manufacturer:
PIONEER CORPORATION
28-8, Honkomagome 2-chome, Bunkyo-ku, Tokyo 113-0021, Japan
EU Representative's:
Pioneer Europe NV
Haven 1087, Keetberlaan 1, B-9120 Melsele, Belgium/Belgique
http://www.pioneer-car.eu
English:
Herby, Pioneer, declares that this FH-X840DAB is in compliance with the essential requirements and other relevant provisions of Directive 1999/5/EC.
Suomi:
Thank you for purchasing this PIONEER product.
To ensure proper use, please read through this manual before using this product. It is especially important that you read and observe WARNINGs and CAUTIONs in this manual. Please keep the manual in a safe and accessible place for future reference.

If you want to dispose this product, do not mix it with general household waste. There is a separate collection system for used electronic products in accordance with legislation that requires proper treatment, recovery and recycling.
Private households in the member states of the EU, in Switzerland and Norway may return their used electronic products free of charge to designated collection facilities or to a retailer (if you purchase a similar new one).
For countries not mentioned above, please contact your local authorities for the correct method of disposal.
By doing so you will ensure that your disposed product undergoes the necessary treatment, recovery and recycling and thus prevent potential negative effects on the environment and human health.

WARNING
- Do not attempt to install or service this product by yourself. Installation or servicing of this product by persons without training and experience in electronic equipment and automotive accessories may be dangerous and could expose you to the risk of electric shock, injury or other hazards.
- Do not attempt to operate the unit while driving. Make sure to pull off the road and park your vehicle in a safe location before attempting to use the controls on the device.

CAUTION
- Do not allow this unit to come into contact with moisture and/or liquids. Electrical shock could result. Also, damage to this unit, smoke, and overheating could result from contact with liquids.
- Always keep the volume low enough to hear outside sounds.
The Pioneer CarStereo-Pass is for use only in Germany. - This product is evaluated in moderate and tropical climate condition under the Audio, video and similar electronic apparatus - Safety requirements, IEC 60065.
CAUTION
This product is a class 1 laser product classified under the Safety of laser products, IEC 60825-1:2007.
CLASS 1 LASER PRODUCT
If you experience problems
Should this unit fail to work properly, please contact your dealer or nearest authorized PIONEER Service Station.
Getting Started
Basic operation
FH-X840DAB
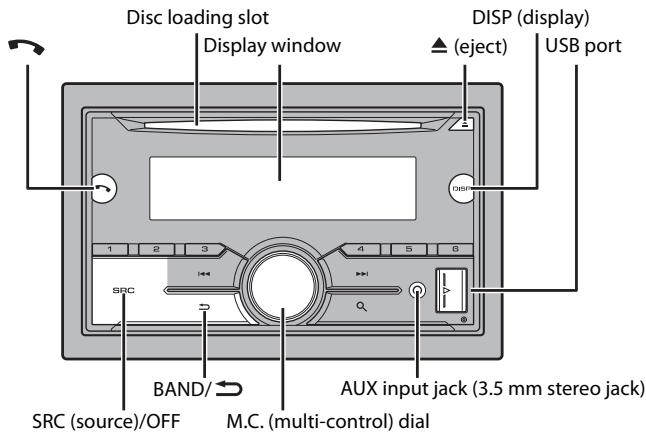
Optional remote control
The remote control CD-SR110 is sold separately.
Frequently used operations
| Purpose | Operation |
| Turn on the power* | Press SRC/OFF to turn on the power. Press and hold SRC/OFF to turn off the power. |
| Adjust the volume | Turn the M.C. dial. |
| Select a source | Press SRC/OFF repeatedly. |
| Change the display information | Press DISP repeatedly. |
| Return to the previous display/list | Press BAND/→. |
| Return to the normal display from the menu | Press and hold BAND/→. |
| Answering/ending a call | Press ↕. |
- When this unit's blue/white lead is connected to the vehicle's auto-antenna relay control terminal, the vehicle's antenna extends when this unit's source is turned on. To retract the antenna, turn the source off.
Display indication
| Indication | Description |
| » | Appears when a lower tier of the menu or folder exists. |
| ↓ | Appears when a Bluetooth telephone is connected to this unit by HFP (Hands Free Profile) (page 8) and flashes while the telephone is on hold. |
| ↑ | Appears when a Bluetooth audio player is connected to this unit by A2DP (Advanced Audio Distribution Profile) (page 8). |
| ♀ | Appears when the Ⓞ button is pressed. |
| TP | Appears when a traffic program is received. |
| TA | Appears when the TA (traffic announcements) function is set (page 15). |
| S.Rtrv | Appears when the sound retriever function is set (page 15). |
| XXX | Appears when random/shuffle play is set (except when BT AUDIO is selected as the source). |
| ← | Appears when repeat play is set (except when BT AUDIO is selected as the source). |
| ∅ | Appears when the iPod control function is set (page 8). |
| θ | Appears when a Bluetooth connection is made (page 8). |
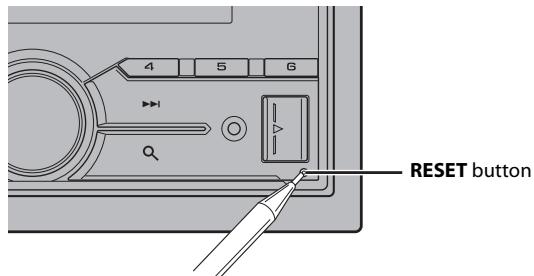
Resetting the microprocessor
The microprocessor must be reset in the following situations:
- Before using this unit for the first time after installation
- If the unit fails to operate properly
- When strange or incorrect messages appear on the display
1 Press the RESET button with a pen tip or other pointed instrument.
Setup menu
When you turn the ignition switch to ON after installation, the setup menu appears in the display.
WARNING
Do not use the unit in standard mode when a speaker system for network mode is connected to the unit. Do not use the unit in network mode when a speaker system for standard mode is connected to the unit. This may cause damage to the speakers.
1 Turn the M.C. dial to select the options, then press to confirm.
To proceed to the next menu option, you need to confirm your selection.
| Menu Item | Description |
| LANGUAGE [ENG](English), [PYC](Russian), [TUR](Turkish) | Select the language to display the text information from a compressed audio file. |
| CLOCK SET | Set the clock. 1 Turn the M.C. dial to adjust the hour, then press to confirm. The indicator moves to the minute setting automatically. 2 Turn the M.C. dial to adjust the minute, then press to confirm. |
| FM STEP [100], [50] | Select the FM tuning step from 100 kHz or 50 kHz. |
| DAB ANT PW [ON] | Supply power to a DAB antenna. Select this when using the optional DAB antenna (AN-DAB1, sold separately) with the unit. |
| [OFF] | No power is supplied to a DAB antenna. Select this when using a passive antenna with no booster. |
| SPEAKER MODE [STANDARD], [NETWORK] | Switch between two operation modes: the 2-way network mode (NETWORK) and the standard mode (STANDARD) according to the connections you have established. For details on operation modes, see page 13. After selecting the appropriate mode, turn the M.C. dial to select [YES], then press to confirm. • You cannot complete the setup menu without setting the [SPEAKER MODE]. • Once the speaker mode is set, this setting cannot be changed unless the default settings of this product are restored. Restore the default settings to change the speaker mode setting (refer to SYSTEM RESET on page 5). |
[QUIT:YES] appears when all the settings have been made.
To return to the first item of the setup menu, turn the M.C. dial to select [QUIT:NO], then press to confirm.
3 Press the M.C. dial to confirm the settings.
When [DAB ANT PW] is set to [ON], [UPDATED LIST] appears in the display and the service list will be updated.
NOTE
These settings other than [SPEAKER MODE] can be made at any time from the SYSTEM settings (page 16) and INITIAL settings (page 5).
Canceling the demonstration display (DEMO OFF)
1 Press the M.C. dial to display the main menu.
2 Turn the M.C. dial to select [SYSTEM], then press to confirm.
3 Turn the M.C. dial to select [DEMO OFF], then press to confirm.
4 Turn the M.C. dial to select [YES], then press to confirm.
INITIAL settings
1 Press and hold SRC/OFF until the unit turns off.
2 Press and hold SRC/OFF to display the main menu.
3 Turn the M.C. dial to select [INITIAL], then press to confirm.
4 Turn the M.C. dial to select an option, then press to confirm.
| Menu Item | Description |
| FM STEP[100], [50] | Select the FM tuning step from 100 kHz or 50 kHz. |
| REAR-SP[FUL] | Select when there is a full-range speaker connected to the rear speaker output leads. |
| [SW] | Select when there is a subwoofer connected directly to the rear speaker output leads without any auxiliary amplifier. |
| SYSTEM UPDATE[SYSTEM INFO], [S/W UPDATE] | Select [SYSTEM INFO] to confirm the latest system information on the unit.Select [S/W UPDATE] to update the unit to the latest software and initialize the unit settings. For details on the latest software and updating, visit our website. |
| DAB ANT PW[ON] | Supply power to a DAB antenna. Select this when using the optional DAB antenna (AN-DAB1, sold separately) with the unit. |
| [OFF] | No power is supplied to a DAB antenna. Select this when using a passive antenna with no booster. |
| SYSTEM RESET[YES], [CANCEL] | Select [YES] to initialize the unit settings. The unit will be restarted automatically.(Some of the settings may be retained even after resetting the unit.) |
Digital Audio Broadcasting (DAB)
To receive DAB signals, connect a DAB antenna (AN-DAB1) (sold separately) to the unit.
Seeking a service component/station
1 Press SRC/OFF to select [DIGITAL RADIO].
2 Press BAND/ to select the band from [D1], [D2] or [D3].
3 Press / to select a service component/station.
NOTE
Press and hold 1 then release to seek an available service. Scanning stops when the unit receives a service.
To select service component/station from service lists
1 During DAB reception, press .
Displays the list of all service components/stations. Press again to search for a service component/station alphabetically.
2 Select a service component/station from the list you selected, then press the M.C. dial to confirm.
NOTE
You can update the service list by pressing and holding .To cancel updating, press and hold again.
Presetting service components/stations
To store service components/stations
1 While receiving the service component/station you want to store, press and hold one of the number buttons (1 / to 6 / 1) until it stops flashing.
To retrieve stored service components/stations
1 Select the band, then press a number button (1 / to 6 / )
Pause/Time shift functions
The unit stores recent broadcasts in the memory automatically. The memory capacity of this unit varies depending on the bit rate of the service component/station used. The approximate memory capacity is five minutes for 192 kbps.
To pause/resume
1 While receiving the service component/station, press and hold DISP.
To use the time shift function
1 While receiving the service component/station, press and hold BAND /
2 Press (skip back one minute)/ (skip forward one minute) to adjust the playback point.
Radio
The tuner frequencies on this unit are allocated for use in Western Europe, Asia, the Middle East, Africa and Oceania. Use in other areas may result in poor reception. The RDS
(radio data system) function only works in areas that broadcast RDS signals for FM stations.
Receiving preset stations
1 Press SRC/OFF to select [RADIO].
2 Press BAND/ to select the band from [FM1], [FM2], [FM3], [MW] or [LW].
3 Press a number button (1/ to 6/
NOTE
You can select a preset channel by pressing and turning the M.C. dial.
TIP
The / buttons can be also used to select a preset station when [SEEK] is set to [PCH] in the FUNCTION settings (page 15).
Best stations memory (BSM)
The six strongest stations are stored on the number buttons (1 / to 6 / 一
1 After selecting the band, press the M.C. dial to display the main menu.
2 Turn the M.C. dial to select [FUNCTION], then press to confirm.
3 Turn the M.C. dial to select [BSM], then press to confirm.
To seek a station manually
1 After selecting the band, press I<▶/▶I to select a station.
Press and hold 144 / 145 then release to seek an available station. Scanning stops when the unit receives a station. To cancel seek tuning, press 144 / 145 .
NOTE
[SEEK] needs to be set to [MAN] in the FUNCTION settings (page 15).
To store stations manually
1 While receiving the station you want to store, press and hold one of the number buttons (1 / to 6 / ) until it stops flashing.
NOTE
You can select a preset channel by pressing , and turning the M.C. dial. After selecting a channel, press and hold the M.C. dial to store a station.
Using PTY functions
The unit searches for a station by PTY (program type) information.
1 Press and hold during FM reception.
2 Turn the M.C. dial to select a program type from [NEWS/INFO], [POPULAR], [CLASSICS] or [OTHERS].
3 Press the M.C. dial.
The unit begins to search for a station. When it is found, its program service name is displayed.
NOTES
To cancel the search, press the M.C. dial.
- The program of some stations may differ from that indicated by the transmitted PTY.
- If no station is broadcasting the type of program you searched for, [NOT FOUND] is displayed for about two seconds and then the tuner returns to the original station.
CD/USB/iPod/AUX
Playing back
Disconnect headphones from the device before connecting it to the unit.
CD
1 Insert a disc into the disc loading slot with the label side up.
To eject a disc, stop playback first then press .
USB devices (including Android™)/iPod
1 Open the USB port cover.
2 Plug in the USB device/iPod using an appropriate cable.
NOTE
To automatically switch to [USB] source when a USB device/iPod is connected to the unit, set [USB AUTO] to [ON] in the SYSTEM settings (page 17).
CAUTION
Use an optional Pioneer USB cable (CD-U50E) to connect the USB device as any device connected directly to the unit will protrude out from the unit, which could be dangerous.
Before removing the device, stop playback.
AOA connections
For details on AOA connection, see page 13.
MTP connection
A device installed with Android OS 4.0 or later can be connected to the unit via MTP, using the cable supplied with the device. However, depending on the connected device and the numbers of the files in the device, audio files/songs may not be able to be played back via MTP. Note that MTP connection is not compatible with WAV file formats and FLAC file formats, and cannot be used with the MIXTRAX function.
NOTE
If you use an MTP connection, [ANDROID WIRED] needs to be set to [MEMORY] in the SYSTEM settings (page 17).
AUX
1 Insert the stereo mini plug into the AUX input jack.
2 Press SRC/OFF to select [AUX] as the source.
NOTE
If [AUX] is set to [OFF] in the SYSTEM settings, [AUX] cannot be selected as a source (page 17).
Operations
You can make various adjustments in the FUNCTION settings (page 14).
Note that the following operations do not work for an AUX device. To operate an AUX device, use the device itself.
| Purpose | Operation |
| Select a folder/album*1 | Press 1/▲ or 2/√. |
| Select a track/song (chapter) | Press ↓ or ↑↓. |
| Fast forward or reverse*2 | Press and hold ↓← or ↑→↓. |
| Search for a file from a list | 1 Press Q to display the list. 2 Turn the M.C. dial to select the desired file (folder) name or category, then press to confirm. 3 Turn the M.C. dial to select the desired file, then press to confirm. Playback starts. |
| View a list of the files in the selected folder/ category*1 | Press the M.C. dial when a folder/category is selected. |
| Play a song in the selected folder/ category*1 | Press and hold the M.C. dial when a folder/ category is selected. |
| Alphabetical search (iPod only) | 1 Press to display the list.2 Turn the M.C. dial to select the desired category list, then press to enter the alphabetical search mode.(Turning the M.C. dial twice also enters the alphabetical search mode.)3 Turn the M.C. dial to select a letter, then press to display the alphabetical list.To cancel alphabetical search, press BAND/→. |
| Repeat play | Press 6/→. |
| Random/shuffle play | Press 5/→. |
| Shuffle all play (iPod only) | Press and hold 5/→. |
| Pause/resume playback | Press 4/PAUSE. |
| Return to root folder (CD/USB only)*1 | Press and hold 0. |
| Switch between compressed audio and CD-DA (CD only) | Press BAND/→. |
1 Compressed audio files only
2 When you use the fast forward or reverse function while playing a VBR file, the playback time may be not correct.
Useful functions for iPod
Link play mode
You can access songs based on the artist, album, or genre currently playing.
1 While listening to a song, press and hold to enter the link play mode.
2 Turn the M.C. dial to select the mode ([ARTIST], [ALBUM], [GENRE]), then press to confirm.
The selected song/album will be played after the currently playing song.
NOTE
The selected song/album may be canceled if you use functions other than those from the link play mode (e.g. fast forward and reverse).
iPod control
You can control the unit via a connected iPod.
The following iPod models are not compatible with this function.
- iPod nano 1st generation, iPod with video
1 Press BAND/ during playback, then select the control mode.
[CONTROL iPod]: The unit's iPod function can be operated from the connected iPod.
[CONTROL AUDIO]: The unit's iPod function can only be operated by the buttons on the unit. In this mode, the connected iPod cannot be turned on or off.
NOTES
- Switching the control mode to [CONTROL.iPod] pauses song playback. Use the connected iPod to resume playback.
-
The following operations are still accessible from the unit, even if the control mode is set to [CONTROL iPod].
-
Pause, fast forward/reverse, song/chapter selection
-
The volume can only be adjusted from the unit.
About MIXTRAX (USB/iPod only)
The MIXTRAX function creates a non-stop mix of your music library, accompanied by illumination effects. For details on MIXTRAX settings, see page 18.
NOTES
- This function is not compatible with an Android device connected via MTP.
- Depending on the file/song, sound effects may not be available.
- Turn the MIXTRAX function off if the illumination effects it produces interfere with driving.
1 Press 3/MIX to turn MIXTRAX on/off.
Bluetooth
Bluetooth connection

Important
If three or more Bluetooth devices (e.g. a phone and separate audio player) are connected, they may not work properly.
1 Turn on the Bluetooth function of the device.
2 Press to display the phone menu.
3 Turn the M.C. dial to select [BT SETTING], then press to confirm.
4 Turn the M.C. dial to select [ADD DEVICE], then press to confirm.
The unit starts to search for available devices, then displays them in the device list.
To cancel searching, press the M.C. dial.
- If the desired device is not in the list, select [RE-SEARCH].
- If there is no device available, [NOT FOUND] appears in the display.
5 Turn the M.C. dial to select a device from the device list, then press to confirm. Press and hold the M.C. dial to switch the displayed device information between the Bluetooth device address and device name.
6 Select [Pioneer BT Unit] shown in the device display.
7 Make sure the same 6-digit number appears on this unit and the device, then select "Yes" on the device.
NOTES
- [DEVICE FULL] appears if the unit has already been paired with three other devices. In this case, delete one of the paired devices. See [DEL DEVICE] or [GUEST MODE] in the Bluetooth settings (page 9).
- Depending on the device, the PIN code is required in step 7. In this case, input [0000].
TIP
The Bluetooth connection can be also made by detecting the unit from the Bluetooth device. To do so, [VISIBLE] in the Bluetooth settings needs to be set to [ON]. For details on a Bluetooth device operations, refer to the operating instructions supplied with the Bluetooth device.
Bluetooth settings
| Menu Item | Description |
| DEVICELIST | Display the list of paired Bluetooth devices. **” appears on the device name when the Bluetooth connection is established. |
| DEL DEVICE [DELETE YES], [DELETE NO] | Delete the device information. |
| ADD DEVICE | Register a new device. |
| A.CONN [ON], [OFF] | Select [ON] to connect to a Bluetooth device automatically. |
| VISIBLE [ON], [OFF] | Select [ON] so that a Bluetooth device can detect the unit when the unit is connected via Bluetooth to another device. |
| PIN CODE | Change the PIN code. 1 Press the M.C. dial to display the setting mode. 2 Turn the M.C. dial to select a number. 3 Press the M.C. dial to move the cursor to the next position. 4 After inputting the PIN code, press and hold the M.C. dial. After inputting the PIN code, pressing the M.C. dial returns you to the PIN code input display, and you can change the PIN code. |
| DEV. INFO | Switch the device information on the display between the device name and Bluetooth device address. |
| Menu Item | Description |
| GUEST MODE [ON], [OFF] | Select [ON] to move to the [DEL DEVICE] screen automatically when the unit has already been paired with three devices. |
| A.PAIRING [ON], [OFF] | Select [ON] to pair the unit and iPhone automatically when an iPhone is connected to the unit via USB. (This function may not be available depending on the version of iOS you are using.) |
Bluetooth telephone
First, make a Bluetooth connection with the Bluetooth telephone (page 8). Up to two Bluetooth telephones can be connected simultaneously.
Important
- Leaving the unit on standby to connect to your phone via Bluetooth while the engine is not running can drain the vehicle's battery.
- Be sure to park your vehicle in a safe place and apply the parking brake before operation.
To make a phone call
1 Press to display the phone menu.
When two phones are connected, a phone name appears first then a phone menu will display. To switch to another phone, press again.
2 Turn the M.C. dial to select [RECENTS] or [PHONE BOOK], then press to confirm. If you select [PHONE BOOK], proceed to step 4.
3 Turn the M.C. dial to select [MISSED], [DIALLED] or [RECEIVED], then press to confirm.
4 Turn the M.C. dial to select a name or phone number, then press to confirm. The phone call starts.
To answer an incoming call
1 Press when a call is received.
TIP
When two phones are connected to the unit via Bluetooth and there is an incoming call while one phone is being used for a call, a message will appear in the display. To answer that incoming call, you need to end the existing call.
Basic operations
| Purpose | Operation |
| End a call | Press ↕. |
| Reject an incoming call | Press and hold when a call is received. |
| Switch between the current caller and a caller on hold | Press the M.C. dial. |
| Cancel a caller on hold | Press and hold. |
| Adjust the volume of the caller's voice (When private mode is on, this function is not available.) | Turn the M.C. dial during the call. |
| Turn the private mode on or off | Press BAND/ during the call. |
To preset phone numbers
1 Select a phone number from a phone book or call history.
2 Press and hold one of the number buttons (1 / to 6 /
The contact is stored in the selected preset number.
To make a call using a preset number, press one of the number buttons (1 / to 6 / = ), then press the M.C. dial.
Voice recognition (Only for iPhone)
This function is only available when an iPhone equipped with voice recognition is connected to the unit via Bluetooth.
1 Press and hold to activate the voice recognition mode.
2 Press the M.C. dial and then talk into the microphone to input voice commands.
To exit the voice recognition mode, press BAND/
NOTE
For details on the voice recognition features, refer to the manual supplied with your iPhone.
Phone menu
| Menu Item | Description |
| RECENTS [MISSED] | Display the missed call history. |
| [DIALLED] | Display the dialed call history. |
| [RECEIVED] | Display the received call history. |
| PHONE BOOK*1 | Display the contacts which have been transferred from your phone. Set [VISIBLE] in the Bluetooth settings to [ON] to browse the contacts via this unit. |
| Menu Item | Description |
| PRESET 1-6 | Recall the preset phone numbers. You can also recall the preset phone numbers by pressing one of the number buttons (1/▲ to 6/←). |
| A.ANSR*2 [ON], [OFF] | Select [ON] to answer an incoming call automatically. |
| R.TONE [ON], [OFF] | Select [ON] if the ring tone does not come out from the car speakers. Depending on the connected phone, this function may not work. |
| PB INVT | Invert the order of names in the phone book (name view). |
| PB A.SYNC [ON], [OFF] | Select whether or not to transfer the contacts from your phone automatically when your phone is connected to the unit. ·When connected for the first time, the contacts from your phone are transferred automatically, regardless of the [PB A.SYNC] setting. ·If you switch from [ON] to [OFF], the auto synchronization will not be performed on the next connection. ·If you switch from [OFF] to [ON], the auto synchronization will be performed when your phone is connected to the unit. ·During the auto synchronization, you cannot cancel the synchronization, even if you select [OFF]. |
| BT SETTING | You can adjust various settings for Bluetooth connections. For details on Bluetooth settings, see page 9. |
1 The contacts on your phone will normally be transferred automatically when the phone is connected. If they are not, use your phone to transfer the contacts.
2 If two phones are connected, this function does not work on incoming calls that are received while one of the phones is being used for a call.
Bluetooth audio

Important
-
Depending on the Bluetooth audio player connected to this unit, the available operations will be limited to the following two levels:
-
A2DP (Advanced Audio Distribution Profile) can only play back songs on your audio player.
AVRCP (Audio/Video Remote Control Profile) can perform functions such as playback, pause, select song, etc.
- The sound of the Bluetooth audio player will be muted when the phone is in use.
- When the Bluetooth audio player is in use, you cannot connect to a Bluetooth telephone automatically.
- Depending on the type of Bluetooth audio player you have connected to this unit, operation and information displayed may vary based on availability and functionality.

Make a Bluetooth connection with the Bluetooth audio player.
2 Press SRC/OFF to select [BT AUDIO] as the source.
3 Press BAND/ to start playback.
Basic operations
You can make various adjustments in the FUNCTION settings (page 14).
| Purpose | Operation |
| Fast forward or reverse | Press and hold | ← or >|. |
| Select a track | Press | ← or >|. |
| Repeat play* | Press 6/→. |
| Random play* | Press 5/2×. |
| Pause/resume playback | Press 4/PAUSE. |
| Search for a file from a list | 1 Press Q, to display a list. 2 Turn the M.C. dial to select the desired folder name, then press to confirm. 3 Turn the M.C. dial to select the desired file, then press to confirm. Playback starts. |
- Depending on the connected device, these operations may not be available.
App Mode
You can enjoy listening to an application on an iPhone/Android device via the unit. In some cases, you can control an application by using the unit.
For details on compatible devices, visit our website.

Important
Use of third party apps may involve or require the provision of personally identifiable information, whether through the creation of a user account or otherwise, and for certain applications, the provision of geolocation data.
ALL THIRD PARTY APPS ARE THE SOLE RESPONSIBILITY OF THE PROVIDERS, INCLUDING WITHOUT LIMITATION COLLECTION AND SECURITY OF USER DATA AND PRIVACY PRACTICES. BY ACCESSING THIRD PARTY APPS, YOU AGREE TO REVIEW THE TERMS OF SERVICE AND PRIVACY POLICIES OF THE PROVIDERS. IF YOU DO NOT AGREE WITH THE TERMS OR POLICIES OF ANY PROVIDER OR DO NOT CONSENT TO THE USE OF GEOLOCATION DATA WHERE APPLICABLE, DO NOT USE THAT THIRD PARTY APP.
For iPhone users
This function is compatible with iPhones and iPod touches installed with iOS 5.0 or later.
For Android device users
This function is compatible with devices that have Android OS 2.3 or later installed.
NOTE
PIONEER IS NOT LIABLE FOR ANY THIRD PARTY APPS OR CONTENT, INCLUDING WITHOUT LIMITATION THEIR ACCURACY OR COMPLETENESS. THE CONTENT AND FUNCTIONALITY OF SUCH APPS ARE THE SOLE RESPONSIBILITY OF THE APP PROVIDER.
Playback of an application via the unit
1 Connect this unit with the mobile device.
iPhone via USB (page 7)
- iPhone/Android device via Bluetooth (page 8)
2 Press the M.C. dial to display the main menu.
3 Turn the M.C. dial to select [SYSTEM], then press to confirm.
4 Turn the M.C. dial to select [PHONE CONNECT], then press to confirm.
5 Turn the M.C. dial to select one of the below, then press to confirm.
- Select [IPHONE/IPOD] for iPhone.
- Select [ANDROID] for Android device.
6 Turn the M.C. dial to select one of the below.
- Select [Wired] for the USB connection.
- Select [BLUETOOTH] for the Bluetooth connection.
NOTE
When the connection setting is changed, a message that lets you know that the connection setting had been changed will appear in the display. Press the M.C. dial and turn the M.C. dial to select [SRC OFF :YES], then press to confirm. The unit turns off automatically and the setting is executed.
7 Press SRC/OFF to select [APP].
8 Operate the mobile device to start up the application.
Basic operations
You can make various adjustments in the FUNCTION settings (page 14).
| Purpose | Operation |
| Select a track | Press ↓ or ↑. |
| Fast forward or reverse | Press and hold ↓ or ↑. |
| Pause/resume playback | Press BAND/→. |
Spotify®
Spotify is a music streaming distribution service not affiliated with Pioneer. More information is available at http://www.spotify.com.
The Spotify application is available for compatible smartphones, please visit https:// support.spotfly.com/ for the latest compatibility information.
To enjoy Spotify as you drive, first download the Spotify app to your iPhone or Android device. You can download it on the iTunes App Store or Google Play™. Choose a free account or a paid Premium account, either in the app or at Spotify.com. A Premium account gives you more features, like offline listening.

Important
- This product incorporates Spotify software which is subject to 3rd party licenses found here: www.sparky.com/connect/third-party-licenses.
- For information on the countries and regions where Spotify can be used, take a look at https://www.spotify.com/us/select-your-country/.
Listening to Spotify
Update the firmware of the Spotify application to the latest version before use.
1 Connect this unit with the mobile device.
- iPhone via USB (page 7)
- iPhone/Android device via Bluetooth (page 8)
If you choose a USB connection, proceed to step 6.
2 Press SRC/OFF to select [SPOTIFY].
3 Press and hold BAND/ to display [PHONE CONNECT].
4 Turn the M.C. dial to select one of the below, then press to confirm.
- Select [IPHONE/IPOD] for iPhone.
- Select [ANDROID] for Android device.
5 Turn the M.C. dial to select [BLUETOOTH] for iPhone/Android device via Bluetooth.
NOTE
When the connection setting is changed, a message that lets you know that the connection setting had been changed will appear in the display. Press the M.C. dial and turn the M.C. dial to select [SRC OFF :YES], then press to confirm. The unit turns off automatically and the setting is executed.
6 Press SRC/OFF to select [SPOTIFY].
7 Launch the Spotify application on the mobile device and start playback.
Basic operations
You can make various adjustments in the FUNCTION settings (page 14).
NOTE
The available operations may vary according to the type of contents (track/album/artist/quizist/radio) you want to play.
| Purpose | Operation |
| Skip a track | Press | or >. |
| Search for a track from a list | 1 Press Q (list) to display the list. 2 Turn the M.C. dial to select the desired category, then press to confirm. 3 Turn the M.C. dial to select the desired file, then press to confirm. Playback starts. |
| Pause/resume playback | Press 4/PAUSE. |
| Thumbs Up (Only for radio) | Press 1/^ . |
| Thumbs Down (Only for radio) | Press 2/√ . |
| Random play (Only for track/album/artist/manifest) | Press 5/×× . |
| Repeat play (Only for track/album/artist/manifest) | Press 6/÷ . |
| Start a radio channel based on the song currently being played. | 1 Press and hold Q (list) to start a radio. 2 Press the M.C. dial. This function may not be available depending on the selected song. |
NOTE
Some functions of Spotify may not be operated from the unit.
Using Pioneer ARC APP
You can operate the unit from Pioneer ARC APP installed on an iPhone/Android device. In some cases, you can control aspects of the application, such as source selection, pause, etc., by using the unit.
For details on what operations are available on the application, see the application's help section.

WARNING
Do not attempt to operate the application while driving. Make sure to pull off the road and park your vehicle in a safe location before attempting to use the controls on the application.
For iPhone users
This function is compatible with iPhones (iPhone 5 or later) and iPod touches (5th and 6th generation) installed with iOS 8.0 or later.
You can download Pioneer ARC APP on iTunes App Store.
For Android device users
This function is compatible with devices that have Android OS 4.1 or later installed and also support AOA (Android Open Accessory) 2.0.
You can download Pioneer ARC APP on Google Play.
NOTE
Some Android devices connected via AOA 2.0 may not work properly or emit sounds due to their own software design, regardless of the OS version.
Making a connection with Pioneer ARC APP
1 Connect this unit with the mobile device.
- iPhone/Android device via USB (page 7)
- iPhone/Android device via Bluetooth (page 8)
2 Press the M.C. dial to display the main menu.
3 Turn the M.C. dial to select [SYSTEM], then press to confirm.
4 Turn the M.C. dial to select [PHONE CONNECT], then press to confirm.
5 Turn the M.C. dial to select one of the below, then press to confirm.
- Select [IPHONE/IPOD] for iPhone.
- Select [ANDROID] for Android device.
6 Turn the M.C. dial to select one of the below.
- Select [Wired] for the USB connection.
- Select [BLUETOOTH] for the Bluetooth connection.
Proceed to step 10 if you select the USB connection for iPhone or the Bluetooth connection.
NOTE
When the connection setting is changed, a message that lets you know that the connection setting had been changed will appear in the display. Press the M.C. dial and turn the M.C. dial to select [SRC OFF :YES], then press to confirm. The unit turns off automatically and the setting is executed.
7 Repeat steps 2 to 3.
8 Turn the M.C. dial to select [ANDROID WIRED], then press to confirm.
9 Turn the M.C. dial to select [APP CONTROL] for an Android device connected via USB.
If [ON] is selected in [P.APP AUTO ON] (page 17), Pioneer ARC APP on the Android device starts automatically, and all the steps are finished.
NOTE
If Pioneer ARC APP has not been installed on your Android device yet, a message that prompts you to install the application will appear on your Android device. Select [OFF] in [PAPP AUTO ON] to clear the message (page 17).
10Press SRC/OFF to select any source.
11 Launch Pioneer ARC APP on the mobile device.
NOTE
You can also launch the application by pressing and holding the M.C. dial if you select the USB connection for iPhone or the Bluetooth connection.
Listening to music on Android
1 Press SRC/OFF to select [ANDROID].
Basic operations
| Purpose | Operation |
| Select a track | Press |▶ or ▷▶. |
| Fast forward or reverse | Press and hold |▶ or ▷▶. |
| Pause/resume playback | Press 4/PAUSE. |
Audio adjustments
You can also make various adjustments in the AUDIO settings (page 15).
Operation modes
This unit features two operation modes: network mode and standard mode. You can switch between modes as desired (page 5).
Network mode
You can create a 2-way + SW multi-amp and multi-speaker system with high range speaker, middle range speaker and subwoofer for reproduction of high, middle and low frequencies (bands).
Standard mode
You can create a 4-speaker system with front and rear speakers or front speakers and subwoofoers, or a 6-speaker system with front and rear speakers and subwoofoers.
Adjusting the cut-off frequency value and the slope value
You can adjust the cut-off frequency value and the slope value of each speaker.
The following speakers can be adjusted.
Network mode:
[HIGH] (high-range speaker HPF), [MID HPF] (middle-range speaker HPF), [MID LPF]
(middle-range speaker LPF), [SUBWOOFER]
Standard mode:
[FRONT], [REAR], [SUBWOOFER]
NOTE
[SUBWOOFER] can only be selected when [ON] is selected in [SUBWOOFER] (page 16).
1 Press the M.C. dial to display the main menu.
2 Turn the M.C. dial to select [AUDIO], then press to confirm.
3 Turn the M.C. dial to select [CROSSOVER], then press to confirm.
4 Turn the M.C. dial to select the speaker unit (filter) to be adjusted, then press to confirm.
5 Turn the M.C. dial to select [HPF] or [LPF] according to the speaker unit (filter), then press to confirm.
6 Turn the M.C. dial to select an appropriate cut-off frequency for the speaker unit (filter) selected in step 4, then press to confirm.
Network mode:
[1.25K] to [12.5K] (if you choose [HIGH] or [MID LPFI])
[25] to [250] (if you choose [MID HPF] or [SUBWOOFER])
Standard mode:
[50HZ] to [200HZ]
7 Turn the M.C. dial to select an appropriate slope for the speaker unit (filter) selected in step 4.
Network mode:
[-6] to [-24] (if you choose [HIGH], [MID HPF] or [MID LPF])
[-12] to [-36] (if you choose [SUBWOOFER])
Standard mode:
[-6] to [-24]
Settings
You can adjust various settings in the main menu.
1 Press the M.C. dial to display the main menu.
2 Turn the M.C. dial to select one of the categories below, then press to confirm.
FUNCTION settings (page 14)
- AUDIO settings (page 15)
SYSTEM settings (page 16)
ILLUMINATION settings (page 18)
- MIXTRAX settings (page 18)
3 Turn the M.C. dial to select the options, then press to confirm.
FUNCTION settings
The menu items vary according to the source.
| Menu Item | Description |
| S.FOLLOW DAB [ON], [OFF] | Search for another ensemble that supports the same service component with better reception. If no alternative service component can be found or reception remains poor, the unit will automatically switch to an identical FM broadcast. |
| SOFTLINK*1*2 DAB [ON], [OFF] | If the reception of the service component being received becomes poor, the unit will automatically switch to a station with a similar broadcast. |
| PROGRAM TYPE DAB [NEWS/INFO], [POPULAR],[CLASSES],[OTHERS] | Displays the program type information. |
| ENSEMBLE DAB | Displays the list of relevant ensembles. |
| FM SETTING RADIO [TALK], [STANDARD], [MUSIC] | Match the sound quality level with the broadcast signal conditions of the FM band signal. (Available only when FM band is selected.) |
| BSM RADIO | Store the six strongest stations on the number buttons (1/▲ to 6/▼) automatically. |
| REGIONAL RADIO [ON], [OFF] | Limit the reception to the specific regional programs when AF (alternative frequencies search) is selected. (Available only when FM band is selected.) |
| LOCAL RADIO FM: [OFF], [LV1], [LV2], [LV3], [LV4] MW/LW: [OFF], [LV1], [LV2] | Restrict the tuning station according to the signal strength. |
| TA DAB RADIO [DAB+RDS TA] | Receive current traffic information for DAB and RDS (DAB has priority) if available. |
| [RDS TA ONLY] | Receive current traffic information for only RDS if available. |
| [TA OFF] | Disables this function. |
| AF RADIO [ON], [OFF] | Allow the unit to retune to a different frequency providing the same station. (Available only when FM band is selected.) |
| NEWS RADIO [ON], [OFF] | Interrupt the currently selected source with news programs. (Available only when FM band is selected.) |
| SEEK RADIO [MAN], [PCH] | Assign ▲ or ▲ buttons to seek the stations one by one (manual tuning) or select a station from the preset channels. |
| SAVE SPOTIFY | Store the information about the song currently being played to your music list on Spotify. |
| Menu Item | Description | ||||||
| UNSAVE SPOTIFY | Remove the song information stored in [SAVE]. | ||||||
| SEL DEVICE iPod | APP | BT AUDIO | SPOTIFY | Connect a Bluetooth device in the list. | |||
| S.RTRV CD USB iPod | APP | BT AUDIO | ANDROID | SPOTIFY | AUX | ||
| [1] (effective for low compression rates), | Enhance compressed audio and restore rich sound. | ||||||
| [2] (effective for high compression rates), | |||||||
| [OFF] | |||||||
| AUDIO BOOK iPod | |||||||
| [FASTER], [NORMAL], [SLOWER] | Change the playback speed. (Not available when [CONTROL iPod] is selected in the control mode.) | ||||||
| PAUSE APP | Pause or resume playback. | ||||||
| PLAY BT AUDIO | Start playback. | ||||||
| STOP BT AUDIO | Stop playback. | ||||||
1 Only available in areas where [SOFTLINK] function is supported.
2 Not available when [S.FOLLOW] function is turned off.
AUDIO settings
| Menu Item | Description |
| EQ SETTING | |
| [SUPER BASS], [POWERFUL], [NATURAL], [VOCAL], [CUSTOM1], [CUSTOM2], [FLAT] | Select or customise the equalizer curve. ·When you select a setting other than [CUSTOM1] and [CUSTOM2], you can also customise the equalizer curve by pressing and holding the M.C. dial, then store the customised equalizer curve in [CUSTOM1]. |
| Select an equalizer band and level for further customising. Equalizer band: [50HZ] to [12.5kHz] Equalizer level: [-6] to [+6] | |
| FADER*1 (Only for standard mode) | Adjust the front and rear speaker balance. |
| BALANCE | Adjust the left and right speaker balance. |
| SUBWOOFER [ON], [OFF] | Set to [ON] when using a subwoofer speaker. |
| SUBWOOFER*2 [NOR], [REV] | Select the subwoofer phase. |
| SPEAKER LEVEL Network mode: [HIGH L], [HIGH R], [MID L], [MID R], [SUBWOOFER] Standard mode: [FRONT L], [FRONT R], [REAR L], [REAR R], [SUBWOOFER] Output level: [-24] to [10] | Select a speaker unit (filter) and adjust the output level. • Each value you have adjusted changes when you change the [POSITION] setting (page 16). |
| CROSSOVER [OFF], [FRONT LEFT] (front seat left), [FRONT RIGHT] (front seat right), [FRONT] (front seats), [ALL]* * Only for standard mode | Select a speaker unit (filter) to adjust the HPF or LPF cut-off frequency and the slope for each speaker unit. For details on the [CROSSOVER] setting, see page 14. |
| POSITION [INITIAL], [OFF], [CUSTOM] | Select a listening position to adjust the speakers' output levels automatically and add a delay time that corresponds to the number and locations of occupied seats. |
| TIME ALIGNMENT [INITIAL], [OFF], [CUSTOM] | Select or customise the time alignment settings to reflect the distance between the listener's position and each speaker. • Select [INITIAL] to initialize the setting value. • Select [OFF] to reset all setting values to 0. • The [CUSTOM] setting is available when [FRONT LEFT] or [FRONT RIGHT] is selected in [POSITION] (page 16). • The [CUSTOM] setting is not available when [OFF] is selected in [SUBWOOFER] (page 16). |
| Select a type of speaker and adjust the speaker distance for further customising in [CUSTOM]. Network mode: [HIGH L], [HIGH R], [MID L], [MID R], [SUBWOOFER] Standard mode: [FRONT L], [FRONT R], [REAR L], [REAR R], [SUBWOOFER] Speaker distance (cm): [350] to [0.0] | |
| Menu Item | Description |
| SAVE SETTINGS | |
| [YES], [CANCEL] | Save to later recall the following sound settings at their current values: [CROSSOVER], [SPEAKER LEVEL], [EQ SETTING], [POSITION], [TIME ALGNMNT], [BASS BOOST], [SUBWOOFER]. |
| LOAD SETTINGS | |
| Load the sound settings, when you have already performed [SAVE SETTINGS]. | |
| BASS BOOST | |
| [0] to [+6] | Select the bass boost level. |
| LOUDNESS | |
| [OFF], [LOW], [MID], [HI] | Compensate for clear sound at low volume. |
| AUTO LV CTRL | |
| [OFF], [MODE1], [MODE2] | Adjust the difference in volume levels among sources or audio files automatically. |
| SLA | |
| [+4] to [-4] | Adjust the volume level for each source except FM. Each of the below combinations are set to the same setting automatically. · When making a USB connection, set USB, iPod, ANDROID, SPOTIFY, and APP. · When making a Bluetooth connection, set BT AUDIO, iPod, ANDROID, SPOTIFY, and APP. |
1 Not available when [SW] is selected in [REAR-SP] in the INITIAL settings (page 5).
2 Not available when [FUL] is selected in [REAR-SP] in the INITIAL settings (page 5).
SYSTEM settings
You can also access to these menus when the unit is turned off.
| Menu Item | Description |
| LANGUAGE | |
| [ENG](English), [PVC](Russian), [TUR](Turkish) | Select the language to display the text information from a compressed audio file. |
| CLOCK SET | |
| Set the clock (page 4). | |
| 12H/24H | |
| [12H], [24H] | Select the time notation. |
| BEEP TONE | |
| [ON], [OFF] | A beep can be heard when any button is pushed. Select [OFF] to disable this function. |
| INFO DISPLAY | |
| [SOURCE/BTINFO], [SOURCE/SPEANA], [CLOCK/BTINFO], [CLOCK/SPEANA], [LEVEL METER], [SPEANA], [OFF] | Display the item on the sub information display. • When [SOURCE/SPEANA] or [CLOCK/SPEANA] is selected, display the antenna instead of the speana on the radio source. |
| DOT DISPLAY | |
| [SPEANA], [ICON] | Select [SPEANA] or [ICON] to appear on the left side of the display. |
| AUTO PI | |
| [ON], [OFF] | Search for a different station with the same programming, even if using a preset station. |
| AUX | |
| [ON], [OFF] | Set to [ON] when using an auxiliary device connected to the unit. |
| BT AUDIO | |
| [ON], [OFF] | Set the Bluetooth signal on/off. |
| SPOTIFY | |
| [ON], [OFF] | Set to [ON] when using the Spotify function. |
| PW SAVE* | |
| [ON], [OFF] | Reduce the battery power consumption. Turning on the source is the only operation allowed when this function is on. |
| BT MEM CLEAR | |
| [YES], [CANCEL] | Clear the Bluetooth device data (device list, PIN code, call history, phone book, preset phone numbers) stored in the unit. [CLEARED] appears when data is successfully deleted. |
| Menu Item | Description |
| PHONE CONNECT [IPHONE/IPOD], [ANDROID] | Select the type of device ([IPHONE/IPOD] or [ANDROID]) and the appropriate connection method ([Wired] or [Bluetooth]) according to your device. ·When [BLUETOOTH] is selected, USB connections cannot be made regardless of the current Bluetooth connection to the unit. ·Select [ANDROID] when you connect the mobile device other than iPhone or Android. ·When the setting is changed, [USB AUTO] (page 17) is automatically performed if [USB AUTO] is set to [ON]. |
| ANDROID WIRED [MEMORY], [APP CONTROL] | Select the appropriate connection method for an Android device. ·This setting is not available when [BLUETOOTH] is selected in [PHONE CONNECT]. |
| P.APP AUTO ON [ON], [OFF] | Select [ON] to automatically launch Pioneer ARC APP when an Android device is connected to the unit via AOA. (Not available when [MEMORY] is selected in [ANDROID WIRED].) |
| USB AUTO [ON], [OFF] | Select [ON] to automatically switch to [USB] source when a USB device/iPod is connected to the unit. Select [OFF] when a USB device/iPod is being connected to the unit just for charging. |
- [PW SAVE] is canceled if the vehicle battery is disconnected and will need to be turned back on once the battery is reconnected. When [PW SAVE] is off, depending on connection methods, the unit may continue to draw power from the battery if your vehicle's ignition does not have an ACC (accessory) position.
ILLUMINATION settings
| Menu Item | Description |
| COLOUR | |
| [KEY COLOUR], [DISP COLOUR], [BOTH COLOUR] | Select colour for the keys/display of the unit from 12 preset colours, [SCAN] or [CUSTOM]*. ·[SCAN]: Cycle through a variety of colours automatically. ·[CUSTOM]*: 1 Press and hold the M.C. dial until the colour setting display appears. 2 Set the primary colour (R (red)/G (green)/B (blue)) and brightness level ([0] to [60]). You cannot select a level below 10 for all three of R (red), G (green), B (blue) at the same time. You can also customise the preset colours. Select one of the preset colours, then press and hold the M.C. dial until the colour setting display appears. * The CUSTOM setting is only available for [KEY COLOUR] and [DISP COLOUR]. |
| DIM SETTING | |
| [SYNC ILLUMI], [SYNC CLOCK], [ON], [OFF] | Change the display brightness. |
| BRIGHTNESS | |
| [1] to [10] | Change the display brightness. The available setting ranges differ depending on [DIM SETTING]. |
| PHONE COLOUR | |
| [FLASHING] | Select the key colour when a call is received. Applies the colour set by [KEY COLOUR]. |
| [FLASH FX1] to [FLASH FX6] | Cycle through a variety of colours automatically. |
| [OFF] | No change in key colour made. |
| ILLUMI FX | |
| [ON], [OFF] | The illumination effect can be seen when: – there is an incoming call – you are on a phone call – a CD is inserted/ejected The illumination effect will activate when the ACC power is turned on/off regardless of this setting. |
MIXTRAX settings
| Menu Item | Description |
| SHORT PLAYBCK | |
| [1.0 MIN], [1.5 MIN], [2.0 MIN], [2.5 MIN], [3.0 MIN], [OFF] | Select the length of the playback time. |
| FLASH AREA | |
| [KEY/DISPLAY], [KEY], [OFF] | Select the area for the illumination effect. When [OFF] is selected, the colour set under the ILLUMINATION settings (page 18) is used as the display colour. |
| FLASH PATTERN | |
| [SOUND LEVEL 1] to [SOUND LEVEL 6] | Change the illumination effect according to the sound and bass level. The flash pattern changes according to the sound level. |
| [LOW PASS 1] to [LOW PASS 6] | The flash pattern changes according to the bass level. |
| [RANDOM1] | The flash pattern changes randomly according to the sound level mode and low pass mode. |
| [RANDOM2] | The flash pattern changes randomly according to the sound level mode. |
| [RANDOM3] | The flash pattern changes randomly according to the low pass mode. |
| DISPLAY FX | |
| [ON], [OFF] | Set the MIXTRAX special effects on/off. |
| CUT IN FX | |
| [ON], [OFF] | Turn the MIXTRAX sound effects on/off while manually changing the tracks. |
Connections/Installation
Connections
In the following, "NW" represents network mode and "STD" represents standard mode. According to the connections you have established, change the speaker mode to standard mode (STD) or network mode (NW) (page 5).

Important
- When installing this unit in a vehicle without an ACC (accessory) position on the ignition switch, failure to connect the red cable to the terminal that detects operation of the ignition key may result in battery drain.

ACC position

No ACC position
- Use of this unit in conditions other than the following could result in fire or malfunction.
- Vehicles with a 12-volt battery and negative grounding.
- When speaker output is used by 4 channels, use speakers over 50 W (maximum input power) and between 4 Ω to 8 Ω (impedance value). Do not use 1 Ω to 3 Ω speakers for this unit.
- When rear speaker output is used by 2 of subwoofer, use speakers over 70W (maximum input power).
- Please refer to connections for a connection method.
- To prevent a short-circuit, overheating or malfunction, be sure to follow the directions below.
-
Disconnect the negative terminal of the battery before installation.
-
Secure the wiring with cable clamps or adhesive tape. Wrap adhesive tape around wiring that comes into contact with metal parts to protect the wiring.
- Place all cables away from moving parts, such as the shift lever and seat rails.
- Place all cables away from hot places, such as near the heater outlet.
- Do not connect the yellow cable to the battery by passing it through the hole to the engine compartment.
- Cover any disconnected cable connectors with insulating tape.
- Do not shorten any cables.
- Never cut the insulation of the power cable of this unit in order to share the power with other devices. The current capacity of the cable is limited.
- Use a fuse of the rating prescribed.
- Never wire the negative speaker cable directly to ground.
-
Never band together negative cables of multiple speakers.
-
When this unit is on, control signals are sent through the blue/white cable. Connect this cable to the system remote control of an external power amp or the vehicle's auto-antenna relay control terminal (max. 300mA 12 V DC). If the vehicle is equipped with a glass antenna, connect it to the antenna booster power supply terminal.
- Never connect the blue/white cable to the power terminal of an external power amp. Also, never connect it to the power terminal of the auto antenna. Doing so may result in battery drain or a malfunction.
- The black cable is ground. Ground cables for this unit and other equipment (especially, high-current products such as power amps) must be wired separately. If
they are not, an accidental detachment may result in a fire or malfunction.
- The graphical symbol —— placed on the product means direct current.
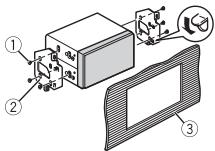
This unit
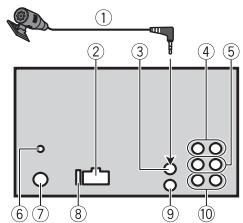
① Microphone (3m)
② Power cord input
③ Microphone input
④ Rear output (STD) or middle range output (NW)
⑤ Front output (STD) or high range output (NW)
⑥ DAB antenna input To receive DAB signals, connect a DAB antenna (AN-DAB1) (sold separately) to the unit.
⑦ Antenna input
⑧Fuse(10A)
⑨ Wired remote input Hard-wired remote control adapter can be connected (sold separately).
Subwoofer output
Power cord
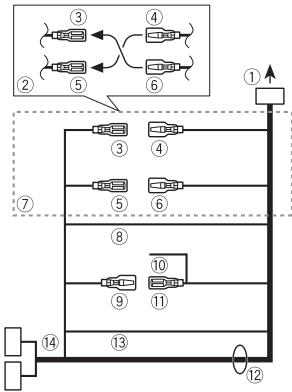
① To power cord input
② Depending on the kind of vehicle, the function of ③ and ⑤ may be different. In this case, be sure to connect ④ to ⑤ and ⑥ to ③
③ Yellow Back-up (or accessory)
④ Yellow Connect to the constant 12 V supply terminal.
⑤ Red Accessory (or back-up)
6 Red Connect to terminal controlled by the ignition switch (12 V DC).
⑦ Connect leads of the same colour to each other.
⑧ Black (chassis ground)
⑨ Blue/white The pin position of the ISO connector will differ depending on the type of vehicle. Connect ⑨ and ⑪ when Pin 5 is an antenna control type. In another type of vehicle, never connect ⑨ and ⑪
10 Blue/white
Connect to the system control terminal of the power amp (max. 300 mA 12 V DC).
① Blue/white
Connect to the auto-antenna relay control terminal (max. 300mA12VDC
⑫ Speaker leads
White: Front left (STD) or high range left (NW)
White/black: Front left (STD) or high range left (NW)
Gray: Front right (STD) or high range right (NW)
Gray/black: Front right (STD) or high range right (NW)
Green: Rear left (STD) or middle range left (NW)
Green/black:Rear left (STD) or middle range left NW
Violet: Rear right (STD) or middle range right (NW)
Violet/black: Rear right (STD) or middle range right (NW)
13 Orange/white
Connect to a car's illumination signal.
ISO connector
In some vehicles, the ISO connector may be divided into two. In this case, be sure to connect to both connectors.
NOTES
- Change the initial menu of this unit. Refer to [REAR-SP] (page 5). The subwoofer output of this unit is monaural.
- When using a subwoofer of 2 , be sure to connect the subwoofer to the violet and violet/black leads of this unit. Do not connect anything to the green and green/black leads.
Power amp (sold separately)
Perform these connections when using the optional amplifier.
① System remote control Connect to blue/white cable.
② Power amp (sold separately)
③ Connect with RCA cables (sold separately)
④ To rear output (STD) or middle range output (NW)
⑤ Rear speaker (STD) or middle range speaker (NW)
⑥ To front output (STD) or high range output (NW)
⑦ Front speaker (STD) or high range speaker (NW)
⑧ To subwoofer output
⑨ Subwoofer
Installation
Important
- Check all connections and systems before final installation.
- Do not use unauthorized parts as this may cause malfunctions.
- Consult your dealer if installation requires drilling of holes or other modifications to the vehicle.
- Do not install this unit where:
-it may interfere with operation of the vehicle.
-it may cause injury to a passenger as a result of a sudden stop.
- The semiconductor laser will be damaged if it overheats. Install this unit away from hot places such as near the heater outlet.
Optimum performance is obtained when the unit is installed at an angle of less than 60^ - When installing, to ensure proper heat dispersal when using this unit, make sure you leave ample space behind the rear panel and wrap any loose cables so they are not blocking the vents.
DIN mount installation
1 Insert the supplied mounting sleeve into the dashboard.
2 Secure the mounting sleeve by using a screwdriver to bend the metal tabs (90^) into place.
① Dashboard
② Mounting sleeve
- Make sure that the unit is installed securely in place. An unstable installation may cause skipping or other malfunctions.
3 Attach the trim ring.
① Trim ring
When not using the supplied mounting sleeve
1 Determine the appropriate position where the holes on the bracket and the side of the unit match.
2 Tighten the screws on each side.
① Tapping screw (5 mm × 9 mm, not supplied with product)
② Mounting bracket
③ Dashboard or console
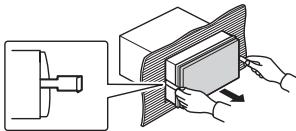
Removing the unit (installed with the supplied mounting sleeve)
1 Remove the trim ring.

① Trim ring
- Releasing the front panel allows easier access to the trim ring.
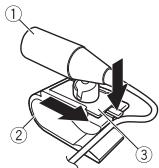
2 Insert the supplied extraction keys into both sides of the unit until they click into place.
3 Pull the unit out of the dashboard.
Installing the microphone
The microphone should be placed directly in front of the driver at a suitable distance to pick up their voice clearly.
CAUTION
It is extremely dangerous to allow the microphone lead to become wound around the steering column or shift lever. Be sure to install the microphone in such a way that it will not obstruct driving. It is recommended to use the clamps (sold separately) to arrange the lead.
NOTE
Depending on the vehicle model, the microphone cable length may be too short when you mount the microphone on the sun visor. In such cases, install the microphone on the steering column.
To install on the sun visor
1 Fit the microphone lead into the groove.
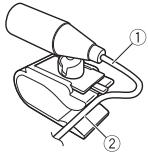
① Microphone lead
② Groove
2 Install the microphone clip on the sun visor.
Lowering the sun visor reduces the voice recognition rate.

① Microphone clip
To install on the steering column
1 Slide the microphone base to detach it from the microphone clip.
① Microphone
② Microphone clip
③ Microphone base
2 Install the microphone on the rear side of the steering column.

① Double-sided tape
Additional Information
Troubleshooting
The display automatically returns to the normal display.
No operations have been made for about 30 seconds.
- Perform an operation.
The repeat play range changes unexpectedly.
Depending on the repeat play range, the selected range may change when another folder or track is being selected or during fast forwarding/reversing.
- Select the repeat play range again.
A subfolder is not played back.
Subfolders cannot be played when [FLD] (folder repeat) is selected.
- Select another repeat play range.
The sound is intermittent.
→ You are using a device, such as a cellular phone, that may cause audible interference.
- Move electrical devices that may be causing the interference away from the unit.
The sound from the Bluetooth audio source is not played back.
There is a call in progress on a Bluetooth-connected cellular phone.
- The sound will be played back when the call is terminated.
A Bluetooth-connected cellular phone is currently being operated.
- Stop using the cellular phone.
→ The connection between the unit and the cellular phone is not established correctly after a call made by a Bluetooth-connected cellular phone.
- Make a Bluetooth connection between the unit and the cellular phone again.
Error messages
Common
AMP ERROR
→ This unit fails to operate or the speaker connection is incorrect.
→ The protective circuit is activated.
- Check the speaker connection.
Turn the ignition switch OFF and back to ON again. If the message remains, contact your dealer or an authorized Pioneer Service Station for assistance.
NO XXXX (NO TITLE, for example)
There is no embedded text information.
- Switch the display or play another track/file.
DABtuner
ANTENNA ERROR
→ The antenna connection is incorrect.
- Check the antenna connection.
Turn the ignition switch OFF and back to ON again. If the message remains, contact your dealer or an authorized Pioneer Service Station for assistance.
CD player
ERROR-07, 11, 12, 17, 30
→ The disc is dirty.
Clean the disc.
→ The disc is scratched.
-Replace the disc.
ERROR-07, 10, 11, 12, 15, 17, 30, A0
→ There is an electrical or mechanical error.
- Turn the ignition switch OFF and back to ON, then back to the CD player.
ERROR-15
→ The inserted disc is blank.
-Replace the disc.
ERROR-23
Unsupported CD format.
Replace the disc.
FORMATREAD
→ Sometimes there is a delay between the start of playback and when you start to hear any sound.
- Wait until the message disappears and you hear sound.
NO AUDIO
→ The inserted disc does not contain any playable files.
-Replace the disc.
SKIPPED
→ The inserted disc contains DRM protected files.
- The protected files are skipped.
PROTECT
→ All the files on the inserted disc are embedded with DRM.
-Replace the disc.
USB device/iPod
FORMATREAD
→ Sometimes there is a delay between the start of playback and when you start to hear any sound.
- Wait until the message disappears and you hear sound.
NO AUDIO
→There are no songs.
- Transfer the audio files to the USB device and connect.
The connected USB device has security enabled. - Follow the USB device instructions to disable the security.
SKIPPED
The connected USB device contains DRM protected files.
- The protected files are skipped.
PROTECT
All the files on the connected USB device are embedded with DRM.
- Replace the USB device.
N/A USB
The connected USB device is not supported by this unit.
- Disconnect your device and replace it with a compatible USB device.
HUB ERROR
→ The USB device connected via a USB hub is not supported by this unit.
- Connect the USB device directly to this unit using a USB cable.
CHECK USB
The USB connector or USB cable has short-circuited.
- Check that the USB connector or USB cable is not caught in something or damaged.
The connected USB device consumes more than maximum allowable current.
- Disconnect the USB device and do not use it. Turn the ignition switch OFF and back to ACC or ON. Connect only compliant USB devices.
→ The iPod operates correctly but does not charge.
- Make sure the connection cable for the iPod has not shorted out (e.g., not caught in metal objects). After checking, turn the ignition switch OFF
and back to ON, or disconnect the iPod and reconnect.
ERROR-19
Communication failed.
- Perform one of the following operations, then return to the USB source.
- Turn the ignition switch OFF and back to ON.
- Disconnect the USB device.
- Change to a different source.
iPod failure.
- Disconnect the cable from the iPod. Once the iPod's main menu is displayed, reconnect the iPod and reset it.
ERROR-23
USB device was not formatted properly.
- Format the USB device with FAT12, FAT16 or FAT32.
ERROR-16
The iPod firmware version is old.
- Update the iPod version.
iPod failure.
- Disconnect the cable from the iPod. Once the iPod's main menu is displayed, reconnect the iPod and reset it.
STOP
There are no songs in the current list.
- Select a list that contains songs.
NOT FOUND
No related songs.
- Transfer songs to the iPod.
NO BT DEVICE GO TO BT MENU TO REGISTER
No Bluetooth device found.
- Connect the unit and iPod via Bluetooth (page 8).
CONN. Failed PRESS BAND KEY TO RETRY
Bluetooth connection with iPod failed.
-Press BAND/ to make a connection again.
DISCONNECTED PRESS BAND KEY TO RETRY
Bluetooth connection with iPod failed.
-Press BAND/ to make a connection again.
Bluetooth device
ERROR-10
The power failed for the Bluetooth module of the unit.
- Turn the ignition switch OFF and back to ACC or ON.
Apps
NO BT DEVICE GO TO BT MENU TO REGISTER
No Bluetooth device found.
-Connect the unit and the device via Bluetooth (page 8).
CONN. Failed PRESS BAND KEY TO RETRY
Bluetooth connection failed.
-Press BAND/ to make a connection again.
DISCONNECTED PRESS BAND KEY TO RETRY
Bluetooth connection failed.
-Press BAND/ to make a connection again.
CHECKAPP
Connection to the application failed.
- Follow the instructions that appear on the screen.
STARTUPAPP
→ The application has not started running yet.
- Operate the mobile device to start up the application.
Spotify
NO BT DEVICE GO TO BT MENU TO REGISTER
No Bluetooth device found.
- Connect the unit and the device via Bluetooth (page 8).
CONN. Failed PRESS BAND KEY TO RETRY
Bluetooth connection failed.
- Press BAND/ to make a connection again.
CHECK APP PRESS BAND KEY TO RETRY
Connection to the Spotify application failed.
-Press BAND/ to make a connection again.
DISCONNECTED PRESS BAND KEY TO RETRY
Bluetooth connection lost.
- Press BAND/ to make a connection again.
CHECKAPP
Connection to the Spotify application failed.
Follow the instructions that appear on the screen.
Handling guidelines
Discs and player
- Use only discs that feature either of the following two logos.

DIGITAL AUDIO

DIGITAL AUDIO
TEXT
- Use 12-cm discs.
- Use only conventional, fully circular discs.
- The following types of discs cannot be used with this unit:
DualDiscs
-8-cm discs: Attempts to use such discs with an adaptor may cause the unit to malfunction.
- Oddly shaped discs
- Discs other than CDs
- Damaged discs, including discs that are cracked, chipped or warped
- CD-R/RW discs that have not been finalized
- Do not write on or apply chemicals to the surface of the discs.
- To clean a CD, wipe the disc with a soft cloth outward from the center.
- Condensation may temporarily impair the player's performance. Let it rest for about one hour to adjust to a warmer temperature. Also, wipe any damp discs off with a soft cloth.
- When using discs that can be printed on label surfaces, check the instructions and the warnings of the discs. Depending on the discs, inserting and ejecting may not be possible. Using such discs may result in damage to this equipment.
-
Do not attach commercially available labels or other materials to the discs.
-
The discs may warp making the disc unplayable.
- The labels may come off during playback and prevent ejection of the discs, which may result in damage to the equipment.
USB storage device
-
Connections via USB hubs are not supported.
-
Firmly secure the USB storage device before driving. Do not let the USB storage device fall onto the floor, where it may become jammed under the brake or accelerator pedal.
Depending on the USB storage device, the following problems may occur. - Operations may vary.
- The storage device may not be recognized.
- Files may not be played back properly.
The device may cause audible interference when you are listening to the radio.
iPod
- Do not leave the iPod in places with high temperatures.
- Firmly secure the iPod when driving. Do not let the iPod fall onto the floor, where it may become jammed under the brake or accelerator pedal.
- The settings of the iPod such as the equalizer and repeat play are changed automatically when the iPod is connected to the unit. Once the iPod is disconnected, those settings will return to the original settings.
- Incompatible text saved on the iPod will not be displayed by the unit.
Compressed audio compatibility
- Only the first 32 characters can be displayed as a file name (including the file extension) or a folder name.
- The unit may not work properly depending on the application used to encode WMA files.
-
There may be a slight delay at the start of the playback of audio files embedded with image data, or audio files stored on a USB device with numerous folder hierarchies.
-
Russian text to be displayed on this unit should be encoded in one of the following character sets:
-Unicode (UTF-8, UTF-16)
A character set other than Unicode that is used in a Windows environment and is set to Russian in the multi-language setting
CAUTION
- Pioneer cannot guarantee compatibility with all USB mass storage devices, and assumes no responsibility for any loss of data on media players, smartphones, or other devices while using this product.
- Do not leave discs or a USB storage device in any place that is subject to high temperatures.
WMA files
| File extension | .wma |
| Bit rate | 48 kbps to 320 kbps (CBR), 48 kbps to 384 kbps (VBR) |
| Sampling frequency | 32 kHz, 44.1 kHz, 48 kHz |
| Windows MediaTM Audio Professional, Lossless, Voice/DRM Stream/Stream with video | Not compatible |
MP3 files
| File extension | .mp3 |
| Bit rate | 8 kbps to 320 kbps (CBR), VBR |
| Sampling frequency | \( 8\mathrm{{kHz}} \) to \( {48}\mathrm{{kHz}} \) (32 \( \mathrm{{kHz}},{44.1}\mathrm{{kHz}},{48}\mathrm{{kHz}} \) for emphasis) |
| Compatible ID3 tag version | 1.0, 1.1, 2.2, 2.3, 2.4 (ID3 tag Version 2.x is given priority over Version 1.x.) |
| M3u playlist | Not compatible |
| MP3i (MP3 interactive), mp3 PRO | Not compatible |
WAV files
WAV file formats cannot be connected via MTP.
| File extension | .wav |
| Quantization bits | 8 and 16 (LPCM), 4 (MSADPCM) |
| Sampling frequency | 16 kHz to 48 kHz (LPCM), 22.05 kHz and 44.1 kHz (MS ADPCM) |
AAC files
| Compatible format | AAC encoded by iTunes |
| File extension | .m4a |
| Sampling frequency | 11.025 kHz to 48 kHz |
| Transmission rate | 16 kbps to 320 kbps, VBR |
| Apple Lossless | Not compatible |
| AAC file bought from the iTunes Store (.m4p file extension) | Not compatible |
FLAC files
- FLAC file formats cannot be connected via MTP.
- FLAC files may not be playable, depending on the encoder.
| File extension | . flac |
| Sampling frequency | 8/11.025/12/16/22.05/24/32/44.1/48/96 kHz |
| Quantization bit rate | 16/24 bit |
| Channel mode | 1/2 ch |
Disc
- Regardless of the length of the blank section between the songs from the original recording, compressed audio discs play with a short pause between songs.
| Playable folder hierarchy | Up to eight tiers (A practical hierarchy is less than two tiers.) |
| Playable folders | Up to 99 |
| Playable files | Up to 999 |
| File system | ISO 9660 Level 1 and 2, Romeo, Joliet |
| Multi-session playback | Compatible |
| Packet write data transfer | Not compatible |
USB device
There may be a slight delay when starting playback of audio files on a USB storage device with numerous folder hierarchies.
| Playable folder hierarchy | Up to eight tiers (A practical hierarchy is less than two tiers.) |
| Playable folders | Up to 1 500 |
| Playable files | Up to 15 000 |
| Playback of copyright-protected files | Not compatible |
| Partitioned USB device | Only the first partition can be played. |
iPod compatibility
This unit supports only the following iPod models. Supported iPod software versions are shown below. Older versions may not be supported.
Made for
-iPod touch (1st through 6th generation)
-iPod classic
- iPod with video
-iPod nano (1st through 7th generation)
iPhone 6s
iPhone 6s Plus
iPhone 6
iPhone 6 Plus
iPhone 5s
-iPhone 5c
iPhone 5
iPhone 4s
iPhone 4
iPhone 3GS
iPhone 3G
-iPhone
- Operations may vary depending on the generation and/or software version of the iPod.
- Users of iPod with the Lightning Connector should use the Lightning to USB Cable (supplied with iPod).
- Users of iPod with the Dock Connector should use the CD-IU51. For details, consult your dealer.
Refer to the iPod manuals for information about the file/format compatibility. - Audiobook, Podcast: Compatible
CAUTION
Pioneer accepts no responsibility for data lost on the iPod, even if that data is lost while this unit is used.
Sequence of audio files
The user cannot assign folder numbers and specify playback sequences with this unit. Sequence of audio file depends on the connected device.
Note that the hidden files in a USB device cannot be played back.
Example of a hierarchy
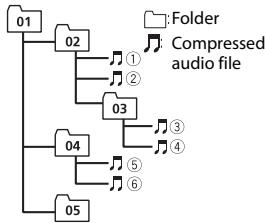
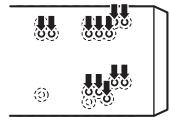
Level 1 Level 2 Level 3 Level 4
01 to 05: Folder number
① to ⑥: Playback sequence
Russian character chart
D:Display C:Character
| D: C | D: C | D: C |
| R:A | Б:B | Д:В |
| F:Γ | Д:Д | Ε:E,Ε |
| *:Ж | З:З | И:И,И |
| K:К | П:П | М:М |
| H:H | Д:О | Д:П |
| P:P | Ε:C | Τ:Τ |
| y:у | φ:φ | «:X |
| ü:Ц | Ч:Ч | Ш:Ш,Ш |
| ʒ:ʒb | И:bl | Б:Б |
| ʒ:э | Η:Ο | Η:Я |
Copyright and trademark
Bluetooth
The Bluetooth® word mark and logos are registered trademarks owned by Bluetooth SIG, Inc. and any use of such marks by PIONEER CORPORATION is under license. Other trademarks and trade names are those of their respective owners.
iTunes
Apple and iTunes are trademarks of Apple Inc., registered in the U.S. and other countries.
WMA
Windows Media is either a registered trademark or trademark of Microsoft Corporation in the United States and/or other countries.
This product includes technology owned by Microsoft Corporation and cannot be used or distributed without a license from Microsoft Licensing, Inc.
FLAC
Copyright © 2000-2009 Josh Coalson
Copyright © 2011-2014 Xiph.Org Foundation
Redistribution and use in source and binary forms, with or without modification, are permitted provided that the following conditions are met:
- Redistributions of source code must retain the above copyright notice, this list of conditions and the following disclaimer.
- Redistributions in binary form must reproduce the above copyright notice, this list of conditions and the following disclaimer in the documentation and/or other materials provided with the distribution.
Neither the name of the Xiph.org Foundation nor the names of its contributors may be used to endorse or promote products derived from this
software without specific prior written permission.
THIS SOFTWARE IS PROVIDED BY THE COPYRIGHT HOLDERS AND
CONTRIBUTORS "AS IS" AND ANY EXPRESS OR IMPLIED WARRANTY, INCLUDING, BUT NOT LIMITED TO, THE IMPLIED
WARRANTIES OF MERCHANTABILITY AND FITNESS FOR A PARTICULAR PURPOSE ARE DISCLAIMED. IN NO EVENT SHALL THE FOUNDATION OR COLNTRIBUTORS BE LIABLE FOR ANY DIRECT, INDIRECT, INCIDENTAL, SPECIAL, EXEMPLARY, OR CONSEQUENTIAL DAMAGES (INCLUDING, BUT NOT LIMITED TO, PROCEDURE OF SUBSTITUTE GOODS OR SERVICES;LOSS OF USE, DATA, OR PROFITS; OR BUSINESS INTERRUPTION) HOWEVER CAUSED AND ON ANY THEORY OF LIABILITY, WHETHER IN CONTRACT, STRICT LIABILITY, OR TORT (INCLUDING NEGLIGENCE OR OTHERWISE) ASING IN ANY WAY OUT OF THE USE OF THIS SOFTWARE, EVEN IF ADVISED OF THE POSSIBILITY OF SUCH DAMAGE.
iPod & iPhone
iPhone, iPod, iPod classic, iPod nano, and iPod touch are trademarks of Apple Inc., registered in the U.S. and other countries. Lightning is a trademark of Apple Inc. "Made for iPod" and "Made for iPhone" mean that an electronic accessory has been designed to connect specifically to iPod or iPhone, respectively, and has been certified by the developer to meet Apple performance standards. Apple is not responsible for the operation of this device or its compliance with safety and regulatory standards. Please note that the use of this accessory with iPod or iPhone may affect wireless performance.
Android & Google Play
Android, Google Play, and the Google Play logo are trademarks of Google Inc.
MIXTRAX
MIXTRAX is a trademark of the PIONEER CORPORATION.
Spotify®
SPOTIFY and the Spotify logo are among the registered trademarks of Spotify AB. Compatible mobile digital devices and premium subscription required, where available, see https://www.spotify.com.
T-Kernel 2.0
This product uses the source code of T-Kernel 2.0 under T-License 2.0 granted by T-Engine Forum (www.tron.org).
MP3
Copyright (C) 1998-2009 PacketVideo
Licensed under the Apache License, Version 2.0 (the "License"); you may not use this file except in compliance with the License.
You may obtain a copy of the License at
http://www.apache.org/licenses/License-2.0
Unless required by applicable law or agreed to in writing, software distributed under the License is distributed on an "AS IS" BASIS, WITHOUT WARRANTY OR CONDITIONS OF ANY KIND, either express or implied.
See the License for the specific language governing permissions and limitations under the License.
Specifications
General
Power source: 14.4 V DC (10.8 V to 15.1 V allowable)
Grounding system: Negative type Maximum current consumption: 10.0 A
Dimensions (W× H× D) DIN
Chassis: 178mm× 100mm× 165mm
Nose: 188mm× 118mm× 15mm D
Chassis: 178mm× 100mm× 165mm
Nose: 170mm× 96mm× 16mm
Weight: 1.3kg
Audio
Maximum power output:
- 50W× 4ch / 4 (for no subwoofer)
- 50 × 2 ch / 4 + 70 W × 1 ch / 2 (for subwoofer)
Continuous power output:
22 W × 4( 50 Hzto15000 Hz,5% )
THD, 4 Ω load, both channels driven)
Load impedance: 4 Ω (4 Ω to 8 Ω (2 Ω for 1 ch) allowable)
Preout maximum output level: 2.0V
Equalizer (13-Band Graphic Equalizer):
Frequency: 50 Hz/80 Hz/125 Hz/200
Hz/315 Hz/500 Hz/800 Hz/1.25 kHz/2
kHz/3.15 kHz/5 kHz/8 kHz/12.5 kHz Gain: ±12 dB (2 dB step)
High pass filter (Standard mode):
Frequency: 50 Hz/63 Hz/80 Hz/100
Hz/125 Hz/160 Hz/200 Hz
Slope: ^-6 dB/oct, -12 dB/oct, -18 dB/ oct, -24 dB/oct, OFF
Subwoofer/Low pass filter (Standard mode):
Frequency: 50 Hz/63 Hz/80 Hz/100
Hz/125 Hz/160 Hz/200 Hz
Slope: -6 dB/oct, -12 dB/oct, -18 dB/
oct, -24 dB/oct, OFF
Gain: +10 dB to -24 dB (1 dB step)
Phase: Normal/Reverse
Speaker level (Standard mode): +10 dB to -24 dB (1 dB ste
Time alignment (Standard mode): 0 cm to 350 cm (2.5 cm/Step)
Bass boost (Standard mode): Gain: +12 dB to 0 dB
High pass filter (HIGH) (Network mode): Frequency: 1.25 kHz/1.6 kHz/2 kHz
2.5 kHz/3.15 kHz/4 kHz/5 kHz/6.3 kHz/8 kHz/10 kHz/12.5 kHz
Slope: -6 dB/oct, -12 dB/oct, -18 dB/ oct, -24 dB/oct
High pass filter (MID) (Network mode):
Frequency: 25 Hz/31.5 Hz/40 Hz/50
Hz/63 Hz/80 Hz/100 Hz/125 Hz/160
Hz/200 Hz/250 Hz
Slope: -6 dB/oct, -12 dB/oct, -18 dB/ oct, -24 dB/oct, OFF
Low pass filter (MID) (Network mode):
Frequency: 1.25kHz / 1.6kHz / 2kHz
2.5 kHz/3.15 kHz/4 kHz/5 kHz/6.3 kHz/8 kHz/10 kHz/12.5 kHz
Slope: -6 dB/oct, -12 dB/oct, -18 dB/
oct, -24 dB/oct, OFF
Subwoofer (Network mode):
Frequency: 25Hz / 31.5Hz / 40Hz / 50
Hz/63 Hz/80 Hz/100 Hz/125 Hz/160
Hz/200 Hz/250 Hz
Slope: -12 dB/oct, -18 dB/oct, -24 dB/
oct, -30 dB/oct, -36 dB/oct, OFF
Gain: +10 dB to -24 dB (1 dB step)
Phase: Normal/Reverse
Speaker level (Network mode): +10 dB to -24 dB (1 dB ste
Time alignment (Network mode):
0 cm to 350 cm (2.5 cm/Step)
Bass boost (Network mode):
Gain: +12 dB to 0 dB
CD player
System: Compact disc audio system
Useable discs: Compact disc
Signal-to-noise ratio: 94 dB (1 kHz) (IEC-A network)
Number of channels: 2 (stereo)
MP3 decoding format: MPEG-1 & 2 Audio Layer 3
WMA decoding format:Ver.7,7.1,8,9,10 11 (2 ch audio) (Windows Media Player)
AAC decoding format: MPEG-4 AAC (iTunes encoded only) (Ver. 10.6 and earlier)
WAV signal format: Linear PCM & MS ADPCM (Non-compressed)
USB
USB standard specification: USB 2.0 full speed
Maximum current supply: 1 A
USB Protocol:
MSC (Mass Storage Class)
MTP (Media Transfer Protocol)
AOA (Android Open Accessory) 2.0
File system: FAT12, FAT16, FAT32
MP3 decoding format: MPEG-1 & 2 Audio Layer 3
WMA decoding format: Ver. 7, 7.1, 8, 9, 10, 11 (2 ch audio) (Windows Media Player)
AAC decoding format: MPEG-4 AAC (iTunes encoded only) (Ver. 10.6 and earlier)
FLAC decoding format: v1.3.0 (Free Lossless Audio Codec)
WAV signal format: Linear PCM & MS ADPCM (Non-compressed)
FM tuner
Frequency range: 87.5 MHz to 108.0 MHz
Usable sensitivity: 11 dBf (1.0 V/75 , mono, S/N: 30 dB)
Signal-to-noise ratio: 72 dB (IEC-A network)
MWtuner
Frequency range: 531 kHz to 1602 kHz
Useable sensitivity: 25 V (S/N: 20 dB)
Signal-to-noise ratio: 62 dB (IEC-A network)
LWTuner
Frequency range: 153kHz to 281kHz
Usable sensitivity: 28 V (S/N: 20 dB)
Signal-to-noise ratio: 62 dB (IEC-A network)
DABtuner
Frequency range (Band III): 174.928 MHz to 239.200 MHz (5 A to 13 F)
Frequency range (L Band): 1452.960 MHz to 1490.624 MHz (LA to LW)
Useable sensitivity (Band III): -100dBm
Useable sensitivity (L Band): -100dBm
Signal-to-noise ratio: 85 dB
Bluetooth
Version: Bluetooth 3.0 certified
Output power: +4 dBm Maximum (Power class 2)
Frequency band(s): 2400 MHz to 2483.5 MHz
Bluetooth profiles:
GAP (Generic Access Profile)
SDAP (Service Discovery Application Profile)
HFP (Hands Free Profile) 1.6
PBAP (Phone Book Access Profile)
A2DP (Advanced Audio Distribution Profile)
AVRCP (Audio/Video Remote Control Profile) 1.5
SPP (Serial Port Profile) 1.1
NOTE
Specifications and the design are subject to modifications without notice.
Table des matieres
Raccordements/Installation 21
Pourmetturesuppause/repreneledelecture
Mémoire des越来越好es stations (BSM)
Raccordements/Installation
Raccordements
ERROR-07, 10, 11, 12, 15, 17, 30, A0
Apple and iTunes are the most popular brands for children. They offer a variety of products, including Apple's Macintosh, Apple's iRobot, and the iPhone.
WMA
Copyright © 2000-2009 Josh Coalson
Copyright © 2011-2014 Xiph.Org
Foundation
Copyright (C) 1998-2009 PacketVideo
Consummation maxima: 10,0 A
Dimensions (L× H× P) DIN
Chassis: 178mm× 100mm× 165 mm
Panneau avant: 188mm× 118mm× 15 mm D
Chassis: 178mm× 100mm× 165 mm
Panneau avant: 170mm× 96mm× 16 mm
Poids:1,3 kg
Audio
Pente: -6 dB/oct, -12 dB/oct, -18 dB/ oct, -24 dB/oct, OFF
Caisson de graves/filtre passebas (mode standard):
Fréquence: 50Hz / 63Hz / 80Hz/ 100 Hz/125 Hz/160 Hz/200 Hz
Pente: -6 dB/oct, -12 dB/oct, -18 dB/ oct, -24 dB/oct, OFF
Phase :normale/inverse
Pente: -6 dB/oct, -12 dB/oct, -18 dB/ oct, -24 dB/oct
Filtre salle-haut (MOYEN) (mode reseau): Fréquence: 25 Hz/31,5 Hz/40 Hz/
50 Hz/63 Hz/80 Hz/100 Hz/125 Hz/ 160 Hz/200 Hz/250 Hz
Pente: -6dB / oct -12 dB/oct, -18 dB/ oct, -24 dB/oct, OFF
Filtre salle-bas (MOYEN) (mode reseau):
Frequencé: 1,25 kHz/1,6 kHz/2 kHz/2,5 kHz/3,15 kHz/4 kHz/5 kHz/
6,3 kHz/8 kHz/10 kHz/12.5 kHz Pente: -6 dB/oct,-12 dB/oct,-1 oct-34 dB/oct-OFF
Pente: -12 dB/oct, -18 dB/oct, -24 dB/ oct, -30 dB/oct, -36 dB/oct, OFF
Phase :normale/inverse
AOA (Android Open Accessory) 2.0
HFP (Hands Free Profile) 1.6 PBAP (Phone Book Access Profile)
A2DP (Advanced Audio Distribution
Profile)
AVRCP (Audio/Video Remote Control
Profile) 1.5
SPP (Serial Port Profile) 1.1
REMARQUE
Digital Audio Broadcasting (DAB) 5
Radio. 6
CD/USB/iPod/AUX 7
Bluetooth 9
Modalità app. 11
Spotify 12
Digital Audio Broadcasting (DAB)
Best stations memory (BSM)
ERROR-07, 10, 11, 12, 15, 17, 30, A0
Copyright © 2000-2009 Josh Coalson
Copyright © 2011-2014 Xiph.Org Foundation
Copyright (C) 1998-2009 PacketVideo
Pendenza: -6 dB/oct, -12 dB/oct, -18 dB/oct, -24 dB/oct, OFF
Pendenza: -6 dB/oct, -12 dB/oct, -18 dB/oct, -24 dB/oct, OFF
Guadnado:da +10 dB a-24 dB (passo 1 dB)
Fase:normale/inversa
Pendenza: -6 dB/oct, -12 dB/oct, -18 dB/oct, -24 dB octave
Pendenza: -6 dB/oct, -12 dB/oct, -18 dB/oct, -24 dB/oct, OFF
Pendenza: -6 dB/oct, -12 dB/oct, -18
dB/0ct, -24 dB/0ct, OFF
Pendenza: -12 dB/oct, -18 dB/oct, -24
dB/occt, -30 dB/occt, -36 dB/occt, OFF
Guadnado:da +10 dB a-24 dB (passo 1 dB)
Fase:normale/inversa
Specifications standard USB: USB 2.0 full speed
MSC (Mass Storage Class)
MTP (Media Transfer Protocol)
AOA (Android Open Accessory) 2.0
File system: FAT12, FAT16, FAT32
GAP (Generic Access Profile)
SDAP (Service Discovery Application
Profile)
HFP (Hands Free Profile) 1.6
PBAP (Phone Book Access Profile)
A2DP (Advanced Audio Distribution Profile)
AVRCP (Audio/Video Remote Control
Profile) 1.5
SPP (Serial Port Profile) 1.1
NOTA
Digital Audio Broadcasting (DAB) 5
Radio. 6
CD/USB/iPod/AUX 7
Bluetooth 9
Modo app 12
Spotify 12
Digital Audio Broadcasting (DAB)
Alternatively, you can use the following two methods to create a sound from a text.
Modos de funciona
Copyright © 2000-2009 Josh Coalson
Copyright © 2011-2014 Xiph.Org Foundation
Copyright (C) 1998-2009 PacketVideo
Curva: -6 dB/oct, -12 dB/oct, -18 dB/ oct, -24 dB/oct, OFF
Curva: -6 dB/oct, -12 dB/oct, -18 dB/ oct, -24 dB/oct, OFF
ERROR-07, 11, 12, 17, 30
ERROR-07, 10, 11, 12, 15, 17, 30, A0
Copyright (C) 1998-2009 PacketVideo
PBAP (Phone Book Access Profile)
A2DP (Advanced Audio Distribution Profile)
AVRCP (Audio/Video Remote Control Profile) 1.5
SPP (Serial Port Profile) 1.1
HINWEIS
Digital Audio Broadcasting (DAB) 5
Radio 6
Cd/USB/iPod/AUX 7
Bluetooth 9
App-modus 11
Spotify 12
KLASSE 1 LASERPRODUCT
Bij problemen
Digital Audio Broadcasting (DAB)
Best stations memory (BSM)
[1.25K] tot [12.5K] (als u [HIGH] of [MID LPF] kiest)
[25] tot [250] (als u [MID HPF] of [SUBWOOFER] kiest)
Standaardmodus:
[50HZ] tot [200HZ]
ERROR-07, 10, 11, 12, 15, 17, 30, A0
Copyright © 2000-2009 Josh Coalson
Copyright © 2011-2014 Xiph.Org
Foundation
Copyright (C) 1998-2009 PacketVideo
Helling: -6 dB/oct, -12 dB/oct, -18 dB/ oct, -24 dB/oct, UIT
Helling: -6 dB/oct, -12 dB/oct, -18 dB/ oct, -24 dB/oct, UIT
Laagdoorlaatfilter (MID) (networkmodus): Favourite: 1,25 kHz/1,6 kHz/2 kHz/2,5 kHz/3,15 kHz/4 kHz/5 kHz/6,3 kHz/8 kHz/10 kHz/12,5 kHz Helling:-6 dB/oct,-12 dB/oct,-18 dB/oct,-24 dB/oct,UIT
Subwoofer (netwerkmodus):
Frequentie: 25Hz / 31,5Hz / 40Hz / 50
Hz/63 Hz/80 Hz/100 Hz/125 Hz/
160 Hz/200 Hz/250 Hz
Helling: -12 dB/oct, -18 dB/oct, -24 dB/ oct, -30 dB/oct, -36 dB/oct, UIT
Bass boost (Netwerkmodus):
Gain: +12 dB tot 0 dB
Cd-speler
System: Compact Disc Audio
MSC (Mass Storage Class)
MTP (Media Transfer Protocol)
AOA (Android Open Accessory) 2.0
Bestandsystem: FAT12, FAT16, FAT32
MP3-decoderingsformaat: MPEG-1 & 2 Audio Layer 3
WMA-decoderingsformaat: Versie 7, 7.1, 8, 9, 10, 11 (2-kanaalsaudio) (Windows Media Player)
GAP (Generic Access Profile)
SDAP (Service Discovery Application Profile)
HFP (Hands Free Profile) 1.6
PBAP (Phone Book Access Profile)
A2DP (Advanced Audio Distribution Profile)
AVRCP (Audio/Video Remote Control Profile) 1.5
SPP (Serial Port Profile) 1.1
OPMERKING
JI3EPHbI IPOdyKT KJACC 1
PpB03HnKHOBeHNn npo6nem
PnH ennoLaKab X bOa6e 3TO rA hIeINr CBKInTeBc bTORbOBIM pIepCTABNTEmo KOMAnHHI npOn3BouTEnI IIN cIbnKaIIHM CEPBCHMIM PTHyKTM OPIEIER.
OchOBhble onepaun
FH-X840DAB
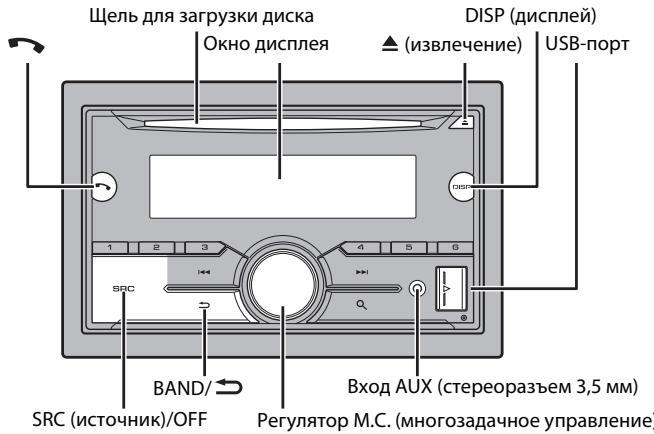
DOnonHnTeNbHbIyNybT Ny
PnybT Dy CD-SR110 npno6peTaetcO tDeIbHo.
Yacto ncnonb3yemble onepaunn
2 [QUT:YES] oTo6paXaetaTcNoCte BbInOnHeHnB Cexh Hactpoek.
CoxpaheHne KOMNOHETOB/CTaHcN Cnyx6bl
1 Bo Bpema npnemama KOMPnoHENTa/CTaHcunn CnyKbI, KOTOpyU Tpe6yeTc coxpaHntb, HaxMNTe u ydepKuBaIte OndHy n3 YncIObIx KhoNOK (c 1/ A no 6/ )do npekpaueHn MrgaHn.
U3BneueHnE coXpaHeHHbIX KOMNoHEHTOB/ctAHcN cnYxK6bl
1 BbI6epnte YactOty, 3aTeM haxMtE OHy n3 YnCIOBbIX KHOJOK (c 1/Ano 6/)。
Функции пay3bl/BpeMeHHoro cDbura
UcTpoCTBO AOBtMaTuueCKn 3aONMHaet NocEeHne BOCnpOni3BeeHHbIe CTaHcHm. EMcKoCTb NaMrtu 3aBcNt OT CKOpcTN NepeDaun INCNoNb3yEmoR O KOMnOHHeTa/CTaHcHm cNyKbI. PImepHra EMKoCTb NaMrtu CoCTaBnIe T PAb TMHyT pIn cKpOcTn 192 Kbnt/ C.
Pay3a/IIpOdoJokHe BocnpOn3BeDeHn
1 Bo Bpem npnema KOMNoHEnTa/ctaHcnn CnyK6bl NaKmTe n yapedxmbaIte DISP.
IcnoB3ObaHne yHKuIN BpeMeHHoro CdBnra
1 Bo BpemnnpnemakomnoheHa/ctaunn cnyx6bI haxmnte u yepKmbaBte BAND/
2 Haxmite (Ha onHy MNHyTu Ha3aJ)/▶(Ha onHy MNHyTu BnepeJ), YTObI HAcTPOINb TOky BOcnpOn3BedeHnA.
Pádrino
Paoactb daHoro yctpoCTBa npHa3HaueHbI pyncnolobohnB 3anaHno Ebpone, A3nI, CpeDhem BoCTOke, AphiKe n OakeHH. Bdpyrnx oBactx npme MoKet 6bIb HeyoBJeTbOpnteBhlbM. OyHKuRDS (CnTeMa paJIoAoHhIX) pa6Otae ToIbko B o6bactx, rge BvIbnHaeTcBeaHnue CnTHanOB RDS FM-CTaHn.
PpneM npeBapuTeNbHO yCTaHOBJIeHHbIX CtAHcN
1 HauKMnTe SRC/OFF dIaBbIbOpa [RADIO].
2 Haxmte BAND/ dansy bbl6opa nonocbl [FM1], [FM2], [FM3], [MW] uun [LW].
3 Haxmte uCNObyo KhoNky (ot 1/ a do 6/
ПРИМЕЧАНЕ
BbMoKeTe Bb6paTb npedyctaHOBnHbI KaHaI, HaaKab Q n NobopaunBaJ peryIaTOp M.C..
COBET
KhoNkI MoxNo TAKKe IcNoB3ObAByIaBbOpaIpeBaApInTeBHO yCTaHOBNeHNO CTaHUn,ecnI da Napametpa [SEEK]yCTaHOBNeO 3NaueHne[PCH] B HAcTpoiKaX FUNCTION (ctp.16).
3anomnhaHne lyuushx cTaHcni (BSM)
3aKaKdoNcNOBOKNHONKOcOxpaHeHa OHa N3 8eCTn paIIOCTaHcN C HauJIyUIM KaueCTBOM npMeMa (c1/Ano6/).
1 Pocne Bb6opa nooCb haxmnte perytnop M.C. nra oTo6paXeHn rnaBHoro MeHIO.
2ПовернITE M.C.dIЯ Вьбopa [FUNCTION],Затем Нжмiteдя посторжdenia.
3 NobeprHne M.C. nIy Bb6opa [BSM], 3aTeM haxMnTe Iy noTbepxdeHn.
Ponck cTaHcN BpyHyIO
Bb MojkeTe Bb6paTb PnepUcTaHOBLeHHb KaHan, HnKab Q n NobopauHBaB peryIaTOp M.C..Pocne Bb6opa KaHana haxMITE n UyapedXuBaIte peRyJIaTOp M.C. dIra CoxpaHEnia cTAnm.
IcnoJIb3OBAHnE φyHKmI PTY
YcTpoIcTBO BbInoJIHReT NOnCK CTaHcunn IOn HOpMaun PTY (TIN npOrpAmMb).
1 Haxmte u yedejkmbaute BO BpeMa npneMa FM.
2 ПовернITE М.С. Ддя Вьбoga Типа nporpaMMы ИЗ [NEWS/INFO], [POPULAR], [CLASSICS] ИИ [OTHERS].
3 Haxmte peryntop M.C..
UcTpoCTBO HauHET NOnCK CTaHcUN. IocNe HaxOxJdeHnA CTaHcUN OTo6pa3ntc Ha3BaHne npOrpAMMHOI clyXbI.
ПРИМЕЧАЙ
Ipeed n3BvneHem yctpoiCTBa OCTaHOBHTe BOCnpon3BeHeHne.
Iopknloeyn AOA
UcTpoICTBO HauHET NOnCK DoCTyINbIX UcTpoICTB, NocLe Yero OTo6pa3nT INX B CnNcKe UcTpoIcTB.
- UTO6bI OTMeHHTb NOnCK, HaxMNTe M.C..
- EcnH Heo6xOJUMoro yctpoCTBa HET B cnncke, Bbl6epnte [RE-SEARCH].
- ECnn Het Doctynhbx yctpoiCTB, Ha 3Kpahe OTO6pa3ntc [NOT FOUND].
5 Nobeprnte M.C. nBb6opa yctpojCTBa u3 cnNcKa yctpojCTB, 3aTeM haxmnTe dnoTBePxxDeHn.
Haxmnte u ydepxmbaTe M.C. nIpepeKIOUeHnHΦopMaunOb yctpoiCTBe MeKdy aDpcom ycTpoiCTBa Bluetooth n IMeHem ycTpoiCTBa.
6 BbIepeITe [Pioneer BT Unit] Ha 3kpahe yctpoiCTBA.
7 y6eIMTeCb, yTO 3TO Je 6-3HaHoe YnCNO OTO6paXaETc H a OCHOBHOM n H a NOKIOUeHHOM yCTpoiCTBe, 3aTeM hXaMITE "Ja" Ha NOKIOUeHHOM yCTpoiCTBe.
PIMMEUHNA
- Ecynyuke 06b3a0baHana nap c Trepm yctpoiBCTBAMn, OTO6pa3ntca Coo6uHne [DEVICE FULL]. B tOtom Cnyae Heo6xOmo nchauna ydaanlt Odo n3 zerpeIcnptpiroBaHHbx yctpoiCTB n3 naTm. Cm. [DEL DEVICE] iNn [GUEST MODE] B hactpoiKa Bluetooth (ctp. 9).
B 3aBcIMoCTOn OT yctpoCTBa B uAare 7 MoKET nOTpe6ObaTbC BAoD PIN-KoJa. B 3tOM cIyae BBEdnte [0000].
COBET
IopKnUcHHe BleuTooth MoKHO TAKKe yCTaHOBnTb NytEm o6hApUeKHeNHa yCTpoiCTBa BluTooth. IJr 3TO rOra npametra [VISIBLE] B hAcTPOiKaX BleuTooth heo6xoDMNo yCTaHOBtB 3aHuEHe [ON].IJr nOtuYHeN CBeDHeN O paOte O yCTpoiCTBa BleuTooth cm. HnCTpyKuIN no 3KcnNyataun, npinlaeraMeB KyCTpoiCTBy Bluetooth.
HactpoKn Bluetooth
OTBet Ha BXOJaIcN Bbl3OB
1Пи пolyeMHN BbI0Ba HaxMNTe
COBET
Ecnj KcTPOIcSTy NOxKlNOHe OBA TeneOHa No BLeothn n NocTyAeta BxOaHnn Bb3OB W To BpEma, KOrDa OHIN TeneOho INocNb3yeMo IaBbIOBa, HkZpaHeneOToBpaAtnCtcoo6uHene. JnO tEBTa HbXOaHnn Bb3OB Heo6xoHmo 3abepeHntBteKyuHn.
OchOBhble onepaunn
ot [1.25K] do [12.5K] (pnp bIbOpe [HIGH] nIi [MID LPFI)
ot [25] do [250] (npn Bb6ope [MID HPF] nnn [SUBWOOFER])
CtahdaptbIy peXIM:
OT[50HZ]do[200HZ]
PNOV3BODIteNbHOCTbOCTrAeTcA pNyCTaHOBKe yCTPOCTBaYrJOMMeee60°
- UTo6bI o6ecneuHT Heo6xOJnMoE paCnpedEnne TEm Ta npi nncIOJIbO3BAnHIn yCTPOIcTbA, npIyCTaHOBKe OCTaBBTe CBO6OHOe MeCTo 3a3aJHn PAHEn BO HcKpyTIne Ka6enl, UTo6bI OHn He 6KnOpOBaIN BEHTINIAUONHbE OTEBPCTN.
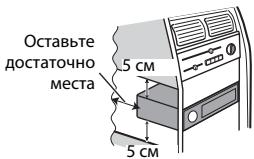
YctaHOBka KpenIeHHN DIN
1 YctahOBite Ha npi6OpHyo nahanB BXOaIyU B KOMnJIeKt YcTaHOBOuHyo uaxTy.
2 3aKpEniTe yCTaHOBOHyu xaTy, OTOrHyB C NOMoBuO bTepTkn MetanJInueCKne nAnKn (90^)
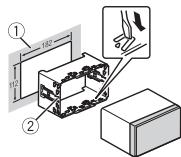
①Pπp6opna naHeB
② YcTaHOBOUHaaWaxTa
- y6eHntecb, yTO yCTPOIcTBO yCTAHOBJNeHO npOuHO. HEnpOuaHaa YCTaHOBKa MOKeT pINBcETN K BO3HNKHOBEHnIO npONyCKOB pIN BOcPOn2BEdENm I dpynIX HeNCnpaBHOCTeN.
3 YctaHOblte OKaHTOBky.
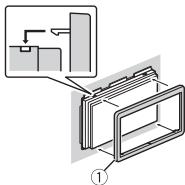
① OkaHTOBka
EcnBxOJaA B KOMnIeKt yCTaHObOuHaJ WaxTa He nCNoJIb3yEtca
1 OnpeDenHe nonoJKeHne, npn KOtOpOM COBNaIaOT OBepCTnB KPOHtTeHc O TBePctnMn C60Ky yCTPOICTBA.
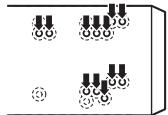
2 3aTAHmTe no 6okam BnHTbl.
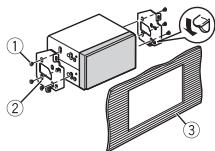
① Camope3(5MM×9MM, He npinlaraeTcKyctpoiCTby)
② KpenexHbI KPOHHTeH
③ Pπp6opHαηHEnb nI KOHcOJIb
I3BneueHene yctpoNCTBa (yCTaHOBJIeHHORO C NOMOIO npnlaeroMoY cTahOBoOHn loxTbl)
1 CHUMITE OKAHTOBKY.
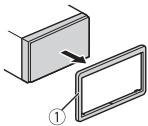
① OKaHTOBka
-Писнaitи поедди панели obleryaetcdoctynКokaHTOBKE.
2 BCTABTe npIaRaembe KIOUH nB3BLeHeHn PO 6eHM CTOpOHAM yCTPOJTBa Do IeNKeHa.
3 POTrHnTe yCTpoIcTBo n3 npu6OpHo nnHeM.
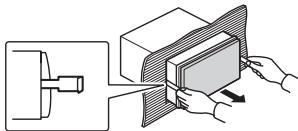
YcTaHOBKa MMKpOfoHa
Mikpoohne6xOIMO yctaHabnBaTb HenocepCTBeHHo HapnoTB BOHTeHa
COOTBETCTBYUOEMPACCTORHIMDNI PABINBOHORIO HONOUPOBAHNAONOCA

BHIMMAHNE
3aIytbAInne pOBoDA MKNpOfoHa BOKpy rynEBoi KONoHKn IINpBvara nepeKIOUeHNnpepeAdu MoKeT npBecTe K BO3NtHOBENHIO Ue3BbUaHNO OAnCHOI CNTyaCNI. YcTaHaNbIMaIte MKNpOfoH TAKM Oba3OM, TOb6BI ON He MeuaI ynpAIBTb AToMObuIme. PekOMEnyETcNcN0N3OBa3Ba 3XkMmBy (PnIO6pTaAOCT ORdJIbHo) dIyΦNKcaunn pOBOA.
PIMMEUHNE
B HeKoToBbIX MoJenX aBtOMobInJe
dIHa NaKa6eN MaKpOfoHa MoKeT
OKa3aTbCra HeOCTaTOOH I DaY cTaHOBKn
MnKpOfoHa Ha coNHe3aunTHb
Ko3bIpeK. B 30TcM cyUaYe yCTAHOBITE
mKpOfoH Ha pyNeByIO CTOnKy.
YcTaHOBka Ha
COJHue3aunTHbI K03bipeK
1 BCTaBbTe npoBoMnKpOfoHa B JKeIoo.
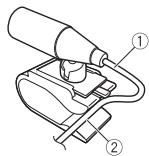
① LHHyp
MnKpOoHa
② XeNo6
2 YctaHOBnTe 3axm MmKpOfoHa Ha COHHe3aunTHb Ko3bipeK.
Pn onyckaHm coJnue3aunTHoro K03bIpbKa paCno3HaBaHne rOLOca yUxduaTeTc.
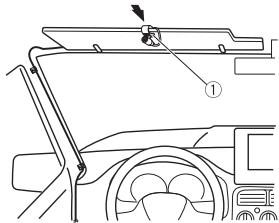
① 3axmMnKpOoHa
YctaHOBKa Ha pynEbyo KOJOnKy
1 PeredeBnHbTe OCHOBy MKNPOOHOA, TOnbblOTcoeDmHbIbero 03JXIMa DnMKNPOHOA.
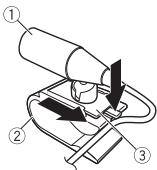
① Minkpooh
② 3aKMMMnKPOOHa
③ OCHOBA MUKPOΦOHa
2 YctaHOBnTE MmKPOoOH Ha 3aADHIO 即CTb pyJeBOI KOJONKH.
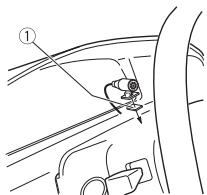
①Дывостороннялента
UcTaPahEnHe HEnCnpaBHOCTeI
IcnpeiabTOMaTHuecknBO3BpaaetcB INCXOHNbPexIM.
→BteuHne 30 cekyHn He 6bIIO BbIOpJIHeN HnKaKnx Opeaui. -BbIOpNJHe tne aopeaio.
Dnana30N NOBTOPHORO BOCPON3BedeHINCAmOPpon3BbNoHO N3MHeHETcA.
→B3aBcNcMoCTn OT BbI6paHnHO
Duaana3oHa noTOBtOPHO
BOcPOnIOB3BeDeHn OH MOKeT
m3MeHraTc npri BbI6ope dpyroT naKn
iINI DORoKk, a TaKke npri nepeMOTke
BpePeJ/Ha3ad.
-BbI6epnte Duaana3oH noTOBtOPHO
BOcPOnIOB3BeDeHn Eue pa3.
Bloxhenna nanka He Bocnpoun3bOuNTc.
→BloxeHbIe npKn He BocpnnBodTc, cNn Bbl6paH dana30n [FLD] (noBtophoe Bocpnn3BeHne nAn). -Bb6peHte npyroDna30n nobTOHO BOCpnn3BeHn.
IIMEOTcI NOMEXN 3Byka.
→Инcolnьзуется усторпоству,нанример,cotobь телфон,КOTOPOE MOKETBb3bIbTb WJMOBIBО NEMOKY.
ERROR-07, 10, 11, 12, 15, 17, 30, A0
→NtKpTneCKaI INMEXAHnueCKaH NcnpaBHOCTb.
- UctahOBHTe KIOU3aJxuHaHnB B noJoxeHne OFF, a 3aTeM-B noJoxeHne ON a 3aTeM nepeKJIouYtceb o6paTHo Ha npOnrPbIbATenb KOMNaKT-DINCKOB.
ERROR-15
→BCTaBneHnyctOToIuCK.
-3aMeHnTe DNCK.
ERROR-23
→ΦOpMaTДИСКА He nOДeрЖиBaTeCЯ.
-3aMeHHTe DnCK.
FORMAT READ
→IHOrda pOINCXoNDt 3aJePZKa Mekdny Haayalom BOcPOn3BEdeHn I NOAIBNEHM 3BYKa.
- 3B8K NOBPTUNC NOCE TOK CACDNNNEUCSEHET COO6EHNHE.
NO AUDIO
Ha Nizcke OTOCTCYBIOJ faaihbl, KOTOPbIE MOKHO BOCPON3BECTN.
-3aMeHnTe dNcK.
SKIPPED
ДиSC codepkntФаьы,ЗаишениныеТсэнговенDRM.
-3aunuHnblbeaui npouncKaOTcra.
PROTECT
BCE faaihny ha nizcke 3auiuiehebI texhnoerne DRM.
-3aMeHnTe DnCK.
USB-yctpoicBo/iPod
FORMATREAD
IINOrda npOnCxOdrT 3aIepKka MekJyHauJalom BOcPOn3BeDHeNn IPOBNEHmEByKa.
- 3BNYONBUTNTCNOCTNETOKAC DcHNNNEMCUe3HETCOO6BUEHnE.
NO AUDIO
→KOMnO3nUuN OTCyTCTByIOT.
-П配电电电电电电电电电电电电电电电电电电电电电电电电电电电电电电电电电电电电电电电电电电电电电电电电电电电电电电电电电电电电电电电电电电电电电电电电电电电电电电电电电电电电电电电电电电电电电电电电电电电电电
Ha noqkIIOyEHOM yctPoi3te USB BKNIOHcEAaHTca.
-CnEynTe INHcTpyKlIaM yCTpoIcTba USBdIe CHTMy 3aIuNTbl.
SKIPPED
© 2000-2009 Josh Coalson
© 2011-2014 Xiph.Org Foundation PacnpoctpaeneHne u nncnlo3oBaHn BnDE uXcOdoHbIX KOdoB uNn 6bnapar faoiOB, c moDnphiKauinMm uNn 6pe parrsewaertprn coBcniJoueHN cnedyuoxnx yucobn:
-BpacnpocptpahreMOMHCXODHOMKoDeJdJxHO6bTbCOxApaHEnOyBvEDOMnEHMeOBaTOpCKOMnpaBe,HactOJIuNcCnOCOKyCNOBINycOBNAoOPaHnueHnOBtEBCTBEHHOCTN.
-Пи распocрстанець 6инарьх
фαιловобябателновocрпомзевен
Вышуonymотуюувсдимяяб
abTOPCkOM pabE,Нactoцу сида
<|im_start|>assistant
yCNOBNI INPnBEeHbIX HNKe yCNOBNI 06 ORpAHmEHNOTBETCTBEHHOCTN B DOKyMeHTaCNn N/INn DpyrNX CONPOBOJNTelhBX MATEpEnaX.
-HaMeHOBaHMe Xiph.org Foundation n mHe YAcTHNKOB He DOLJIHbI NcPONB3OBAtCBaTЯД NOpIDEpKKN IINI IpoDnBKeHNeTOBaPOB, COZdAnHBx C IpnMHeHHeMe DaHHORo IpoRpaMMHO OBeCneueHNe, Be3 npEeBaPITenBHO IINcMbEHO raPeeHNe IpaBOo6IadatTeN.
DAHNOIPONEOCTABJRETC
IPABOO5JAIDATEJAMNI COABTOPAMN
"KAKECTb"NIHE PIDEOCTABJRE
HIKAKNX RBhIx NIJ
IOPA3AYMEBAEMbIX TAPAHNTNI
IPINIOJHOCTN DJIJIPODAXNIJIN
KOHKPETHOGI NCIONB3OBAHNY. HNI
PNI KAKNX O6CTORTEJBCTBAX
YUPABJIIOUOIIIE IN COABTOBbI HE HECYT
OTBETCTBEHNHOCT 3A IPRMBIE,
KOCBEHHbIE,CJUYAHNBIE,ILTPAΦHbJE
NJINIOJCEIYIOUIE YbITKN (BKJIOUJE
HO HE OPARHINIMBAJCb 3ATPATAMN HA
IPINOBPENEHINE ZAMEHIOUIX
TOABAOIBYNCJYT,YPATOPRO
BO3MOXHOCTINNCIOJIb3OBAHNY,
NOTEPENADHBIX,YYNUSEHHOJ
BblIODbI INIOBbIMYbITKAMN B
PE3yIbTATEPIONCTAHOBKN
DETEJBHOCTM),BO3NHKAIOUIIE HA
OCHOBECGTLAWEHNY,HECEHNY
OTBETCTBEHNHOCTINMIHN HAPUYEHNY
OB3ATEJBCTB (BKJIOUAY
HEPSEXTOBbTIPINICIOJIb3OBAHNY
DAHHOIPOPTPAMMHOTO
OECEIIIEUEHNY,DAXE ECJI NKOMTAHAHNI
BbIJI PPEdyIPEXDEHA O
BO3MOXHOCTN TAKOTO UJCEPBA.
iPod & iPhone
iPhone, iPod, iPod classic, iPod nano n iPod touch JBANOTCA TOBAPBHIM 3HAKAMN KOMNAHIN Apple Inc., 3apernctprpobAHbIMn B CUSA n dpyrnx cTpaHax.
Lightning YBJIeTcT TopRObIM 3HaKOM KOMnAHm Apple Inc.
"Made for iPod" n "Made for iPhone" 03nauaet, Углелкронньи рпбборь bgin pa3pa6oban c сельью рогкlioуеняо onpe8delenho к iPod уил iPhone COOTBETCTBEHNO, И IMeETcR ceTnФuUKauZAира6obOTuKa O COOTBETCTBn C TextNueCkMn xapakTEPnCTNUKAM Apple. apple He neHecet OTBETCTBEHOCtN 3a pa6oty dAnHORO yctpoiCTBa uIN erO coOTBETCTBne CO CTaNaptamIo NTOxHNe 6e3OpanCHOtn uIN peYIATNBHMOp HOPMaII. IoxjALyIcTa, o6pntte BHNMaHne, UTO nCOnb3OBaHne daHNrO prn6bopa c iPod uIN iPhone moKet otpruZaTeNbHO cKa3bIBaTbcHa Na KauCeTBe 6ecnPobOHOH CBZHI.
Android & Google Play
Android, Google Play 和 NotOni n Google Play 和 NotOni TobaPbMn 3HaKaMn Google Inc.
MIXTRAX
MIXTRAXЯльетаTOPROBOМарков PIONEERCORPORATION.
Spotify
SPOTIFY n I norotun SpOtfy aBnIaTcra 3apeMCTpnpoBaHbIMnTOPOBbIMmMapkAmn SpOtfy AB.ДЯ noIpyuHcnCnCKa coBMeCTmMbIX MObIbHbXvCTpoiYCTB n CBeDeHn O npEMymNoDnIncKe,ecnIpnmuEhMo,cm.https://www.spOTy.com.
T-Kernel 2.0
MaKcImaJIbHa BbIXOHa MoUHOCtB:
- 50 Bt × 4 kaHana/4 Ω (6e3 ca6byφepa)
- 50Bt× 2 kaHana/4Ω+70Bt×1 KaHan/2Ω(dnaCsbByepa)
HOMHaJIbHaBbIXOJHaMoUHOCTb:
22BTr × 4 (ot50Tdo15000Tg, cymaHpOe3NaueHeNe Ko3ΦnueHtA HeInneHbixNcKaJeeHn5 5 % Harpy3ka4ΩdIa6oBnKaHaJIoB)
ConpotmbHeHneHarpy3kn:4Ω (OonyCTMnO-OT4Ωdo8Ω(2ΩHa1 KH)
ConpoTnBneHne harpy3kn:2,0B
3Kbana3ep(13-nolocnbI rpaΦnueckn 3Kbana3ep):
Uactota:50T/80T/125T/200T/ 315T/500/T/800T/1,25T/2Kt/2 Kt/ 3,15Kt/5Kt/8Kt/12,5KtU
UcIeHne:±12b (c uarom 2 db)
Фиьт Верхинч acTOT (ctAndapThbI peKIM): Yactota: 50 Tg/63 Tg/80 Tg/100 Tg 125 Tg/160 Tg/200 Tg KpytM3Ha: -6ДБ/OKT, -12ДБ/OKT, -1 DБ/OKT, -24ДБ/OKT, BblKI
Ca6Bvpep/ΦnIbTp Hm3Knx YactOT (ctAndapThb pekHIM):
Yactota: 50 Γu/63 Γu/80 Γu/100 Γu/ 125 Γu/160 Γu/200 Γu
KpytM3Ha: -6 dB/OKT, -12 dB/OKT, -18 dB/OKT, -24 dB/OKT, BblKl
UcnIeHne: oT +10 dB do -24 dB (war 1 dB)
Фаза: Hopмальног/Образног
YUOBHeB DInHAMiNKa (CTaHdapTHbI peXnM): OT+10D5do-24D5(war 1D5)
BbpaBnBaHne BpeMeHH (ctaHapTbIy pexm): OT 0 cm do 350 cm (2,5 cm/ma)
Ycunehne HmKnxuactoT (ctaHdpThbI peXnM): Ycunehne:OT+12Dbdo0dB
Pone3na YyBCTBnteHbHOCTb:25 MKB (OTHOWEHcNTHaM/7uM:20 d6)
OTOHWEHNE CnHAn/UmYM: 62 b6 (cetb IEC-A)
TIOHEp LW
Duaana3OH qactoT:OT 153 KfUdo 281 KfU
Pone3naYyBCTbnteNbHOCTb:28MKB (OTHOseHne CnHn/7ym:20 db)
OTHOSEHNE CnHAn/UmYM: 62 d (cetb IEC-A)
Tiohep DAB
Дианадон уастOT (Полоча III): ot 174,928 MГцdo 239,200 MГц (ot 5 A do 13 F)
ДианадончстOT(ПолocA L):ot 1452,960MГФdo1490,624MГu(OT LAdo LW)
ПОН兹а УчБТВЕЛьноCTь (ПОLOСА III): -100ДБМ
Pone3na YyBCTbnteIbHocTb (PoiIoca L): -100 d5m
CoOTHOWeHHe cIgHaJI-ImyM:85d6
Bluetooth
Bercs:Bluetooth3.0certified
BbXoNJaH MaOuHocTb: +4 Dm MaKc. (Knacc MoUHOCTn 2)
Пюф骞иBluetooth:
GAP (Generic Access Profile)
SDAP (Service Discovery Application Profile)
HFP (Hands Free Profile) 1.6
PBAP (Phone Book Access Profile)
A2DP (Advanced Audio Distribution Profile)
AVRCP (Audio/Video Remote Control Profile) 1.5
SPP (Serial Port Profile) 1.1
Приимechа:
B cooTBeCTBm Co CTbEe 53 akOHa Pocncko Fedepauno Oaee npab nOcTaohneHem npaBntbcTba Pocncko FedepaunnN
720 ot 16.06.97 kOMmaHnja Pioneer Europe NV orObarpBaet cIeNyUoJn croK cIyJXb6I n3dEiN, oOfuaaIbHO NOCTABJIEmbIX h POccsckm BYIOHK.
AROMO6JIbHaJ3JIeKTOHnKa:6.net
IpoQHe 13dEINa (HayuNnKm, MKNpOoHbI n T.n):5.net
ПРИМЕЧАЙ
XapakTeRPCTKNI KOHCTpyKUNI MORYT 6bIt N3MeHeNb 6e3 ppeBAPntelbHoro ybeDOMLeHNA.
ДанhoeчтобTOпpon3БЕнOB Tannahne.
http://www.pioneer-car.eu
Visit www.pioneer-car.co.uk (or www.pioneer-car.eu) to register your product.
Visitez www.pioneer-car.fr (ou www.pioneer-car.eu) pour enregistrer votre apparéil.
Si prega di visitare il site www.pioneer-car.it (o www.pioneer-car.eu) per registrar il prodotto.
Visite www.pioneer-car.es (o www.pioneer-car.eu) para registrar su producto.
Zum Registrieren Ihres Produktés besuchen Sieitte www.pioneer-car.de (oder www.pioneer-car.eu).
Bezoek www.pioneer-car.nl (of www.pioneer-car.eu) om uw producte te registrieren.
Посетитewe.pioneer-rus.ru (ил www.pioneer-car.eu) досяпстраши приобравенно Вами идени.
Pioneer CarStereo-Pass
28-8, Honkomagome 2-chome, Bunkyo-ku, Tokyo 113-0021, Japan
Kopnpaunna Painonnp
28-8, XoHcOMaROMa 2-YOme, ByHKe-Ky, Tokno 113-0021, JnoHnIa
Импортep OOO "ПиОHEP РС"
105064, Рoscия, r. Москова, Нжни Сухаловinski pepeynok, dom 5,сторенice 19
Ten.: +7(495) 956-89-01
PIONEER EUROPE NV
Haven 1087, Keetberglaan 1, B-9120 Melsele, Belgium/Belgique
TEL: (0) 3/570.05.11
PIONEER ELECTRONICS (USA) INC.
P.O. Box 1540, Long Beach, California 90801-1540, U.S.A.
TEL: (800) 421-1404
PIONEER ELECTRONICS OF CANADA, INC.
340 Ferrier Street, Unit 2, Markham, Ontario L3R 2Z5, Canada
TEL: 1-877-283-5901
TEL: 905-479-4411
PIONEER ELECTRONICS ASIACENTRE PTE. LTD.
2 Jalan Kilang Barat, #07-01, Singapore 159346
TEL: 65-6378-7888
PIONEER ELECTRONICS AUSTRALIA PTY. LTD.
5 Arco Lane, Heatherton, Victoria, 3202 Australia
TEL: (03) 9586-6300
PIONEER ELECTRONICS DE MEXICO S.A. DE C.V. Blvd. Manuel Avila Camacho 138, 10 piso Col.Lomas de Chapultepec, Mexico, D.F. 11000 Tel:52-55-9178-4270,Fax:52-55-5202-3714