
U207CH1 - Coffee machine ROTEL - Free user manual and instructions
Find the device manual for free U207CH1 ROTEL in PDF.
| Product type | Filter coffee machine |
| Brand | Rotel |
| Model | U207CH1 |
| Rated voltage | 220-240 V ~ |
| Rated frequency | 50-60 Hz |
| Rated power | 900 W |
| Water tank capacity | Approximately 1.25 L |
| Carafe capacity | Approximately 1.25 L (12 cups) |
| Filter type | Permanent filter (reusable) |
| Delayed programming | Yes (up to 12 h in advance) |
| Automatic shut-off | Yes (after 40 min) |
| Keep warm | Yes (hot plate) |
| Display | LCD screen with clock |
| Pause and serve | Yes (pause up to 30 s) |
| Descaling | Recommended periodically |
| Safety | Automatic shut-off, sturdy glass carafe |
| Spare parts | Glass carafe, permanent filter (available) |
| Intended use | Domestic and similar (offices, hotels) |
Frequently Asked Questions - U207CH1 ROTEL
User questions about U207CH1 ROTEL
0 question about this device. Answer the ones you know or ask your own.
Ask a new question about this device
Download the instructions for your Coffee machine in PDF format for free! Find your manual U207CH1 - ROTEL and take your electronic device back in hand. On this page are published all the documents necessary for the use of your device. U207CH1 by ROTEL.
USER MANUAL U207CH1 ROTEL
natural_image
Rotel coffee maker with clear glass and digital display (no visible text or symbols)• GEBRAUCHSANWEISUNG
- MODE D'EMPLOI
• ISTRUZIONI PER L'USO
• INSTRUCTIONS FOR USE
- Funnel
- Control panel
- Jug lid
- Jug handle
- Glass jug
- Top lid
- Sprayer
- Water tank
- Water gauge
- Main housing
- Warming plate
- Bottom cover
BEDIENFELD
- Panneau de configuration
- Panello di controllo
- Control panel
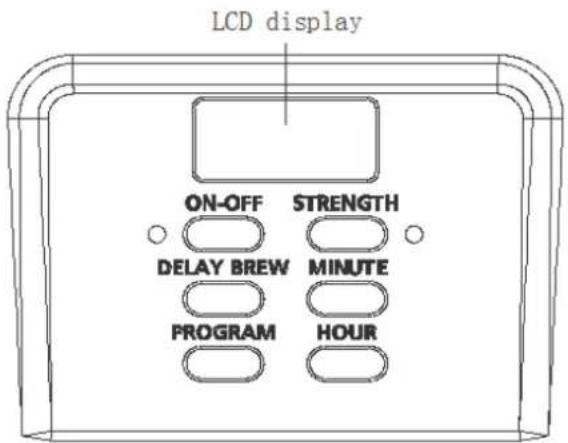
| EIN-AUS | MARCHE/ARRÊT | ALIMENTAZIONE | ON-OFF |
| AUFBRÜHEN VERZÖGERN | RETARDATEUR | PREPARAZIONE POSTICIPATA | DELAY BREW |
| PROGRAMM | PROGRAMME | PROGRAMMA | PROGRAM |
| STÄRKE | FORCE | INTENSITÀ | STRENGTH |
| MINUTE | MINUTE | MINUTO | MINUTE |
| STUNDE | HEURE | ORA | HOUR |
TECHNISCHE DATEN
- Safety instructions.... 31
- Before the first use.... 34
• Using your coffee maker 34 - Delay function 35
• Cleaning and maintenance....35 - Descaling 36
- Hints for great-tasting coffee .... 36
- Disposal 37
D/F/I/E....38
Garantie / Garantie / Garanzia / Warranty 38
Deutsch
Please read all instructions carefully before using the device and keep these for future reference.
○ This appliance can be used by persons with reduced physical, sensory or mental capabilities or lack of experience and knowledge if they have been given supervision or instruction concerning use of the appliance in a safe way and understand the hazards involved.
○ This appliance must not be used by children. The appliance and its connecting cable must be kept away from children.
○ Children shall not play with the appliance.
- The appliance shall always be disconnected from the mains when not in use or when left unattended, and before assembling, disassembling or cleaning. It must be unplugged by grasping the plug and never by pulling the cord.
Before plugging into a socket, it shall be ensured that the mains voltage matches the voltage specified on the rating plate of the appliance.
- The appliance shall not be operated with a damaged supply cord or plug, or after the appliance malfunctions, or has been damaged in any manner. It shall be returned to the nearest authorized service facility for examination, repair or adjustment.
- Incorrect repair attempt, assembly, or use of any accessory attachment not recommended or sold by the manufacturer may cause a fire, electric shock or personal injury and will void the manufacturer's warranty.
- To avoid any hazards, the motor base of the appliance, its cord or plug shall not be immersed into water or any other fluid.
- The use of the appliance shall be avoided near sinks or other vessels containing water, and with wet hands.
- The appliance must be used on a flat, stable and heat-resistant surface.
○ The power cord shall not touch hot surfaces.

○ CAUTION - HOT: Burns can occur by touching the hot surfaces of the appliance or contact with the steam.
○ This appliance must not be cleaned with cleansers, steel wool pads, or other abrasive material.
○ This appliance shall only be used with the jug provided.
○ This appliance shall not be used if the jug shows any signs of cracks or has a loose or weakened handle.
- The empty jug shall not be left on the warming plate.
○ The hot jug shall not be placed on a wet or cold surface.
- The appliance is intended to be used in household and similar applications such as:
■ staff kitchen areas in shops, offices and other working environments;
- farm houses;
■ by clients in hotels, motels and other residential type environments;
■ bed and breakfast type environments;
■ catering and similar non-retail applications.
○ The appliance shall not be used outdoors.
- BEFORE THE FIRST USE
○ Check that all accessories are complete and the unit is not damaged.
Fill water into water tank to the MAX level and brew water for several times without coffee powder, then discard the water.
○ Clean and dry all detachable parts thoroughly according to the section "CLEANING AND MAINTENANCE".
- Open the top cover and fill the water tank with cold water. The water level should not exceed MAX level as indicated on the water gauge.
- Place the funnel into the funnel support. Make sure it is assembled correctly, otherwise the top cover cannot be closed. Place the permanent filter in the funnel.
○ Add coffee powder into permanent filter. Usually a cup of coffee needs a leveled spoon of coffee powder, but you may adjust according to personal taste. Close the top cover completely.
○ Insert the glass jug with the lid closed onto the warming plate.
○ Plug the power cord into the outlet. The LCD display indicates "AM 12:00" (flashing). - Press "HOUR" and "MINUTE" repeatedly to set the current time.
Press "ON/OFF" button, the LED illuminates in red, and then the appliance begins to work.
The brewing process can be interrupted by pressing the "ON/OFF" button at any time, the LED will extinguish, indicating your coffee maker is power off. The appliance will continue brewing once "ON/OFF" button is pressed again.
Note: During brewing process, the buttons of "PROGRAM", "DELAY BREW", "HOUR" and "MINUTE" are invalid.
Note: You can take out the jug, pour and serve at any time. The appliance will stop dripping automatically. But the time should not exceed 30 seconds. - Remove the jug to serve when finish brewing (about one minute after the coffee stops dripping out).
When the process is finished, if you do not want to serve immediately, keep the coffee maker energised, so the coffee will be kept warm on the warming plate. The appliance will switch off automatically after 40 minutes, if it has not been manually disconnected after the completion of brewing. For an optimum coffee taste, serve it just after brewing.
○ Always turn the coffee maker off and disconnect the power supply when not in use.
Note: pay attention when pouring out the coffee, as freshly brewed coffee is hot.
- DELAY FUNCTION
If you wish to start the brewing automatically, e.g. 06:00 in the morning, you can set the automatic start function, after following steps 1 to 6 of section "USING YOUR COFFEE MAKER", as follows:
- Press "PROGRAM" button one time, the LED will illuminate in green and flash (means the coffee make entered the presetting time mode).
- Note: The time cycle is 12 hours.
- Set the desired starting time by pressing "HOUR" and "MINUTE" button repeatedly, e.g. to AM 06:00.
Press the "DELAY BREW" button, the LED is illuminated in green. After a while, the LCD will display the current time.
Note: You may cancel the automatic start function by pressing "ON/OFF" or "DELAY BREW". If you want to change the automatic start time, follow the above steps 1 to 4 again.
When the time is due, the LED will illuminate in red and the appliance starts brewing. When the process is finished, if you do not want to serve immediately, keep the coffee maker energised, so the coffee will be kept warm on the warming plate. The appliance will switch off automatically after 40 minutes, if it has not been manually disconnected after the completion of brewing. For an optimum coffee taste, serve it just after brewing.
Note: During brewing process, the buttons of "PROGRAM", "DELAY BREW", "HOUR" and "MINUTE" are invalid.
- CLEANING AND MAINTENANCE
- Clean all detachable parts after each use in warm detergent water.
○ Wipe the exterior surface of unit with a soft, damp cloth to remove stains.
If condensation accumulates on the filter housing, it does not indicate that the coffee machine is defective. Wipe off the area with a clean, dry cloth after each use.
Use a damp cloth to gently wipe the warming plate. Never use abrasive cleaner to clean it.
- DESCALING
To keep your coffee maker operating efficiently, you should periodically descale it, according to the water hardness in your area and the frequency of use. We recommend descaling the coffee maker as follows:
Fill the water tank with 0,5 litre of fresh water and 0,5 litre of descaling liquid. The Rotel descaler is recommended.
○ Insert the glass jug with lid closed onto the warming plate.
- Ensure the funnel is in place.
○ Switch on the appliance and allow it to "brew" the descaling solution.
○ After brewing approx. one cup of coffee, press the "ON/OFF" button and leave the appliance switched off for 15 minutes.
o Restart the appliance and run the solution until the water tank is completely empty.
- Rinse by operating the appliance with fresh water at least 3 times.
• HINTS FOR GREAT-TASTING COFFEE
○ A clean coffee maker is essential for making great-tasting coffee. Regularly clean the coffee maker as specified in the “CLEANING AND MAINTENANCE” section. Always use fresh, cold water in the coffee maker.
Store unused coffee powder in a cool, dry place. After opening a package of coffee powder, reseal it tightly and store it in the refrigerator to maintain its freshness.
- For an optimum coffee taste, buy whole coffee beans and finely grind them just before brewing.
Do not reuse coffee powder since this will greatly reduce the coffee flavour. Reheating coffee is not recommended as coffee is at its peak flavor immediately after brewing.
- Clean the coffee maker when over-extraction causes oiliness. Small oil droplets on the surface of brewed, black coffee are due to the extraction of oil from the coffee powder.
- Oiliness may occur more frequently if heavily roasted coffees are used.
- DISPOSAL
- For proper disposal, please return device to a retailer, a service agent or Rotel AG.
European Directive 2012/19/EC concerning Waste Electrical and Electronic Equipment (WEEE) states that household appliances should not be disposed of using the normal solid urban waste cycle. Exhausted appliances should be collected separately in order to optimise the cost of re-using and recycling materials comprising the machine, while preventing potential damage to public health and the environment. The crossed-out wheeled bin symbol appears on all products to remind owners of the obligations regarding separate waste collection. Owners should contact their local authorities or appliance dealers for further information concerning the correct disposal of household appliances.
This appliance conforms to the following EU directives:
CE
2014/35/EU (Low Voltage Directive)
2014/30/EU (Electromagnetic Compatibility Directive)
D/F/I/E
• GARANTIE / GARANTIE / GARANZIA / WARRANTY
• 2 JAHRE GARANTIE
• 2 ANS DE GARANTIE
• 2 ANNI DI GARANZIA
• 2 YEARS WARRANTY
○ Warranty commitment
We commit ourselves to repair this device free of charge, should a failure occur within the period of warranty despite proper handling. We repair all defects caused by material or manufacturing faults. The guarantee will be fulfilled either by repairing the device or replacing the defective parts, according to our judgement. A warranty does not cover damages due to wearing parts, damages and defects caused by improper handling or maintenance (such as limescale and commercial use). It will only be granted if either the warranty card stating date of purchase, dealer's stamp and signature, or the purchase receipt is sent with the device to the relevant after-sales service (see address below). Devices shall be returned in their original packaging. Transport costs are to be borne by the purchaser. Remember to specify your address to your sending, as well as a short declaration about the failure, shall the defect not be obvious.
Servicestation:
Service après-vente: Rotel AG


Brand : ROTEL
Model : U207CH1
Category : Coffee machine