Grill & More 7952 - Grill plate Solis - Free user manual and instructions
Find the device manual for free Grill & More 7952 Solis in PDF.


User questions about Grill & More 7952 Solis
0 question about this device. Answer the ones you know or ask your own.
Ask a new question about this device
Download the instructions for your Grill plate in PDF format for free! Find your manual Grill & More 7952 - Solis and take your electronic device back in hand. On this page are published all the documents necessary for the use of your device. Grill & More 7952 by Solis.
USER MANUAL Grill & More 7952 Solis
circa 35,0x18,5x39cm (LxAxP)
Peso circa 7,4 kg
IMPORTANT SAFETY PRECAUTIONS
Please read through this user manual thoroughly before using your Solis Grill & More contact grill, so that you become familiar with your appliance and can use it safely. We thoroughly recommend that you keep these instructions and, if you pass the appliance on, that you also hand these instructions to the new owner.
For your own safety, please observe the following safety measures when using electrical appliances:
- To prevent electric shock, neither the contact grill nor the power cord and the power plug must come into contact with water or other liquids. Risk of electric shock! Should the contact grill resp. the power cord or the power plug come into contact with water, use dry rubber gloves to immediately pull the power plug from the socket. Do not start using it again before having it checked for functionality and safety by Solis or a service centre authorized by Solis.
- Do not operate the appliance resp. pull or connect the plug with wet or moist hands or feet.
- Before using the appliance, check that the voltage stated on the type plate of your appliance matches your mains voltage. We do not recommend operating the appliance with a multiway plug adapter.
- Do not make any adjustments to the appliance, cable, plug or accessories.
- Use the appliance only to grill and toast foods as described in this manual. Do not use the appliance outdoors and protect it from moisture and wetness.
-
Do not leave the power cable hanging over table edges to prevent the appliance from being pulled down. Make sure that neither the appliance nor the power cord or plug comes into contact with hot surfaces, such as hotplates or a radiator, or that they come into contact with the appliance itself.
-
Install the power cord so that nobody can trip over it. Keep clear of pointed objects.
- Always fully unwind the power cord before connecting the power plug to the power socket.
- Never carry the appliance by the power cord and do not place anything on the power cord. Never pull on the power cord to disconnect the appliance from the power mains. Only pull on the plug.
- We recommend that you do not use an extension cable with this appliance. Do not place the appliance directly underneath a power socket.
- Keep the appliance away from hot gas, hot ovens and other heat-emitting appliances or heat sources. Never use the appliance on a hot or wet surface. Never place the appliance near moisture, heat and naked flames. Keep the appliance away from moving parts or appliances.
- The appliance must be placed on a solid, even, dry, stable and moisture as well as heat resistant work surface. Do not place the contact grill on an unstable work surface or one that is covered with textile materials.
- Keep a minimum safety distance of 20cm between the appliance and walls, curtains or other materials and objects and make sure that the air around the appliance can circulate freely.
- Never cover the appliance with cloths or the like while it is in use. The air inlet and outlet openings must never be obstructed. Do not place anything on the contact grill.
- Never place the appliance in such a way that it might fall into water or come into contact with water (e.g. in or next to a sink).
-
The appliance is not designed for outdoor use. The appliance must not come into contact with rain or other precipitations. Do not use in vehicles or on boats.
-
Unplug the appliance when it is not in use or unattended, and before cleaning. We recommend the use of a residual current device (RCD safety switch) to ensure additional protection during the use of electrical appliances. It is advisable to use a safety switch with a rated residual operating current of 30mA maximum. For professional advice consult an electrician.
- Before disconnecting the appliances power plug from the power socket, please always make sure that the appliance is not in use and has been switched off with the ON/OFF button.
- Do not make any changes to the appliance, the power cord, the plug or the accessories.
- Incorrect use may cause injury!
- Never reach for an appliance that has fallen into water or other liquids. Always use dry rubber gloves to pull the plug before taking it out. Do not start using it again before having it checked for functionality and safety by Solis or a service centre authorized by Solis.
- Place the appliance so that it is never exposed to direct sunlight.
- Never insert any objects or tool into appliance openings. The appliance may become damaged - danger of electric shock!
- Always switch the appliance off with the ON/OFF button and pull the power plug before attaching or detaching appliance parts. Then, please wait for the appliance to cool down completely.
- Always make sure that the appliance is correctly assembled before connecting it to a power socket and starting to use it.
-
Do not shake or move the appliance while it is in use. Never rearrange the appliance if it is switched on. Before moving the appliance, you should switch it off, pull the power plug and let it cool down completely.
-
Only use the appliance as described in this manual. Only use with the provided accessories or accessories recommended by Solis, incorrect accessories or misuse can lead to damage of the appliance, fire, electric shock or personal damage.
- Never use the appliance with an external timer switch or remote control.
- The appliance is only suited for household use and not for commercial use.
- Remove and discard all packaging materials and potential stickers or labels (except for the type plate) before using the appliance for the first time.
- Check your contact grill before every use to make sure that the appliance itself, the grill plates, the power cord and the power plug are without damage and no parts have come loose.
- To prevent electric shock, do not use the appliance if the appliance itself, the grill plate(s), the cord or the power plug are damaged or if the appliance is malfunctioning in any other way, has fallen to the ground or is damaged otherwise or if parts have come loose. Never attempt repairs yourself but take the appliance to Solis or a service centre authorized by Solis in order to get it inspected, repaired or mechanically and electrically maintained, in order to avoid a hazard.
-
People with limited physical, sensorial or mental capabilities as well as unknowing or inexperienced people and children must not use the contact grill except when supervised or thoroughly instructed on how to use the appliance by a person responsible for their safety. Additionally, they must be aware of the dangers arising from the appliance and know how to operate it safely. Cleaning and maintenance of the appliance must not be done by unsupervised children. Under no circumstances must the appliance be used or cleaned by children under the age of 8. The appliance and its power cord have to kept away from children under the age of 8.
-
Keep the appliance and the power cord away from children and pets.
- Children must be supervised, so that they do not play with the contact grill.
- Before pulling the power plug, please always switch the appliance off with the ON/OFF button, otherwise the appliance might be damaged.
- Pull the plug after every use.
- The appliance has to be cleaned after every use. Please refer to the notes given in the section "Cleaning and maintenance" on page 87 of this manual.
- Do not place anything on the appliance while it is in use or in storage.
- Only clean the appliance chassis with a dry or slightly moist cloth. Never use aggressive, abrasive or acidic detergents for cleaning.
- Always move the appliance very carefully and do not shake or throw it, it might be damaged.
- Avoid touching the metal casing of the upper grill plate resp. the grill plates themselves, as they can get very hot.
You should note the following in particular when using the contact grill:
- Remove all packaging materials and stickers (except for the type plate).
- Never place the grill on the edge of a table or worktop, this is to ensure that it can not fall down. The surface must be sufficiently large, stable, heat and moisture resistant, dry, even and clean. Therefore, never put the grill in a sink or on a tablecloth.
Do not place the grill on or next to a gas oven, gas burner or electric stove.
The cover and outer parts of the grill become hot during use! The grill must therefore be at least 20 cm away from curtains, walls, furniture or other heat sensitive or flammable surfaces.
After use, the appliance remains hot for some time! Please do not touch until it has completely cooled down.
Before using the appliance, make sure the contact grill is completely assembled.
Always completely unwind the power cord before plugging in the power plug. - Never put anything on the appliance cover - even if it is closed and is being stored.
- To switch the appliance off, always set the temperature control to the MIN position, turn the ON/OFF switch to the position "0" and pull the plug. Always let the appliance cool down completely before cleaning it, transporting it or putting it into storage.
Pay attention to hygiene and clean the grill after each use as described under "Cleaning". The cleaned grill plates have to be completely dry on both sides and along the edges before they are reinstalled into the appliance.
APPLIANCE DESCRIPTION
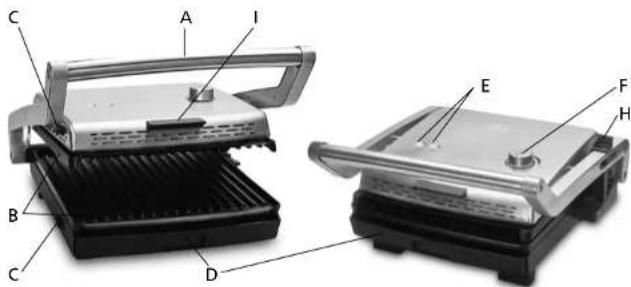
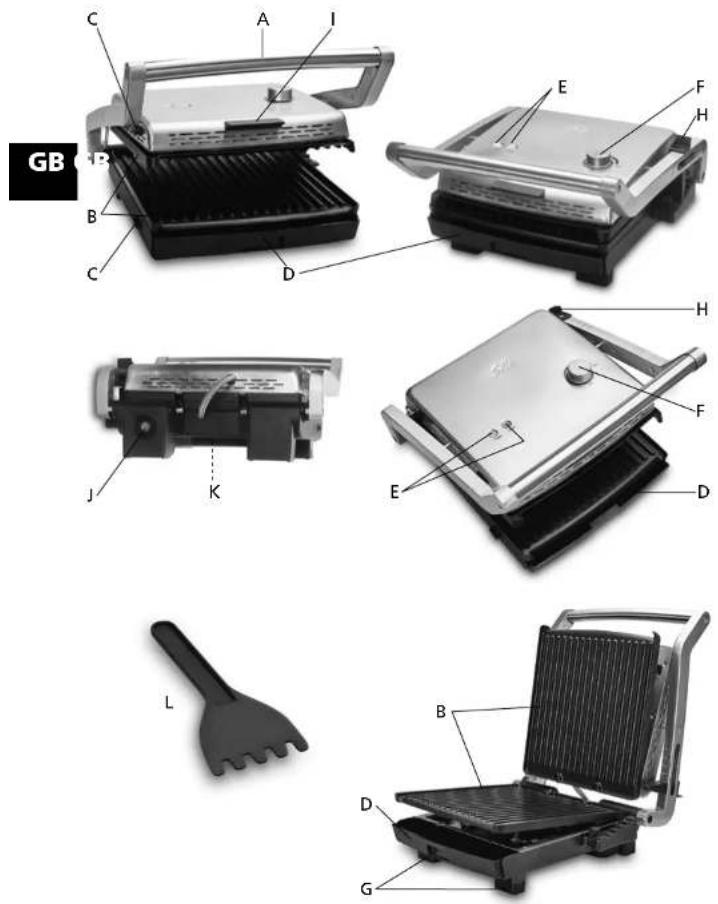
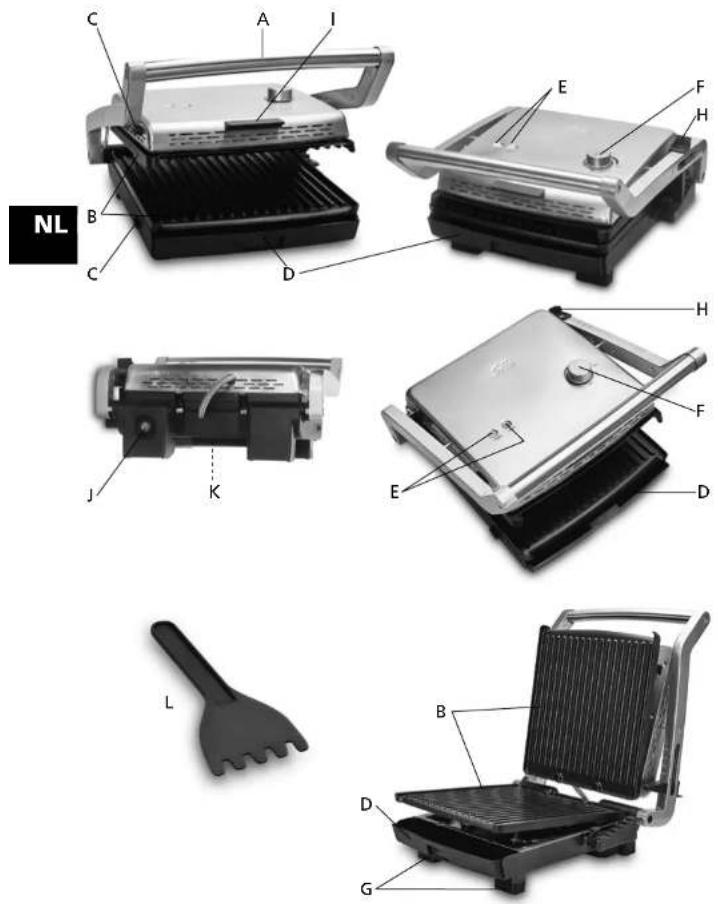
A Heat insulated metal handle
With this metal handle, you can lift the upper grill plate to open the grill.
B 2 grill plates, grooved
Non-stick, replaceable grill plates made from cast aluminium for healthy grilling without oil or fat; for easy cleaning, the grill plates can be separately removed from the appliance by a press of the button; dishwasher safe. The heating elements built into the bottom guarantee best heat transmission. The upper grill plate is height-adjustable and can hang above the bottom grill plate thanks to the height slider and the joint fixture.
C Release buttons for the grill plates
The two grill plates can be removed independently from each other and be switched around as well. The pressure buttons on the left side of the appliance release the grill plates.
D Grease drip tray
Is pushed into the appliance and can be removed for easy cleaning.
E Control lights for operation and stand-by
The red POWER control light illuminates once the appliance has been switched on with the ON/OFF button. The green READY control light illuminates once the grill plates have reached the temperature set with the temperature control.
F Temperature control
Continuously variable temperature control, can be set between MIN and MAX; for making sandwiches and paninis, we recommend a medium setting, for making grilled foods, a high setting is recommended.
G Removable foot attachments for adjusting the inclination angle of the grill When the two foot attachments are mounted to the front feet of the appliance, the grill is horizontally levelled (ideal for making waffles, sandwiches, paninis etc.). When the two foot attachments are removed, the grill is inclined to the front, letting the grease drip into the drip tray even better, e.g. when preparing meat. The two detached foot attachments can be space-efficiently stored in the two openings behind the front feet in the appliance base so that they do not get lost; they are firmly held in place by magnets.
H Height slider for setting the height of the upper grill plate and for opening or closing the grill
When not using the appliance or while it is stored in a vertical position, the slider should be set to the LOCK position; during use, it should be set to OPEN resp. to one of the 4 height levels (ranging from LOW to HIGH). The height levels allow to practically "hang" the upper grill plate above the lower grill plate. When grilling pressure sensitive foods like e.g. fish, you can hang or softly set the upper grill plate over the food thanks to the 4 height levels. Like that, the full weight of the upper grill plate is not placed on the grillables. Ideal also for gratinating.
I Handle for adjusting the inclination angle of the upper grill plate
The upper grill plate can be moved. Thanks to the heat insulated angle, its inclination angle can be adjusted.
J ON/OFF button
The power switch is placed on the appliance back; with red function light.
K Cord wrap for rolling up the power cord
The power cord can be wrapped up in the appliance base. The power cord has to be fully unwrapped during use.
L Cleaning spatula
You can use the cleaning spatula made from heat resistant plastic to easily remove leftover food from the grooved grill plates.
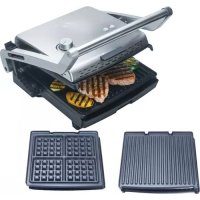
Note: Sandwich grilling plates (Art.no.720.13) and waffle baking plates (Art.no.720.12) are available as accessories. For further information, please refer to page 90 of this manual.
More pictures on pages 78/79
APPLIANCE DESCRIPTION
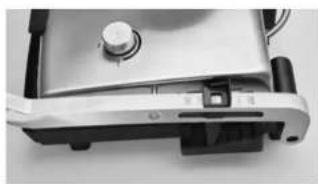
- Height slider with observation panel for setting the height of the upper grilling plate.
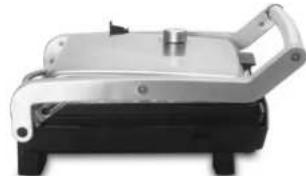
With foot attachments in place: The grill is horizontally levelled.
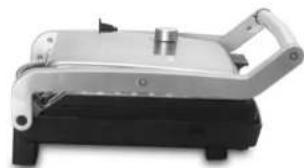
Without foot attachments: The grill is slightly inclined to the front.
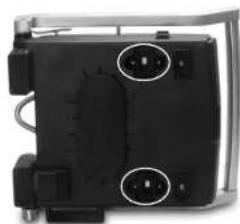
The foot attachments are space-efficiently and magnetically kept in the appli- ance base.
BEFORE FIRST USE
Before using your contact grill for the first time, please remove all potential advertisement stickers and labels (except for the type plate).
Set the height slider to the OPEN position and open the grill.
Wipe the grill plates with a moist towel and subsequently dry them.
Make sure that the grease drip tray is pushed all the way into the appliance base.
Make sure that the grill plates are correctly locked into the upper and lower part of the grill (see description on page 81).
Make sure that the temperature control is set to MIN.
Place the grill on a stable, even, dry and heat as well as moisture resistant work surface. Make sure that you keep at least 20~cm of space between the appliance and the next item to the left and right.
- Unwrap the power cord completely and plug the power plug into a suitable power outlet.
- Switch the appliance on with the ON/OFF button on the appliance back side, the red function light of the button and the red control light next to POWER light up.
Heat the grill up for 5 minutes on the highest temperature.
After these 5 minutes, set the temperature control to MIN, switch the appliance off with the ON/OFF button and pull the power plug.
- Let the appliance cool down. Wipe the cool grill plates clean with a moist towel and subsequently dry them.
Note: When the appliance heats up for the first time, some smoke might develop. This is caused by the protection layer on the heating elements and grill plates. This process is completely harmless and disappears by itself after a short period of time. The grilling performance is not impaired by this.
How to remove resp. install the grill plates
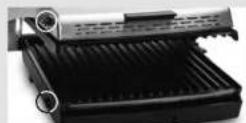
- Your grill is equipped with two release buttons for the grill plates. With them, you can separately remove the upper and lower grill plates for cleaning.
- Your grill must be absolutely cool before you remove the grill plates. Set the height slider to the OPEN position. Open the upper grill plate with the metal handle so that it is positioned at an angle of approx. 90^ .
To remove the lower grill plate, push the release button on the left appliance side inwards and simultaneously remove the lower grill plate from the appliance.
To remove the upper grill plate, lower it to an angle of approx. 45^ above the lower grill plate. Tilt the upper grill plate towards you with the handle (I) so that you can easily reach the upper release button. Press the release button inwards and simultaneously hold your hand under the upper grill plate, because it comes loose right away and falls down. Now, you can remove the upper grill plate.
To reinstall the grill plates, proceed exactly the other way around: Put the grill plates into position so that the flat ends are placed under the brackets on the back and push the front of the plates down into the casing. You can hear a clicking sound when the plates have locked into place.
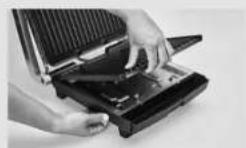
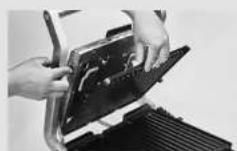
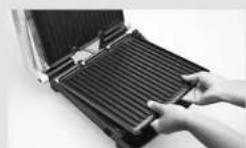
Caution: Always make sure that the grill plates are correctly installed and locked into place before starting to use the appliance

STARTING UP
- Make sure that the grease drip tray is pushed all the way into the appliance.
- Make sure that the grilling plates have correctly locked into place.
- Set the height slider to the OPEN position
- Place the grill on a stable, even, dry and heat as well as moisture resistant surface. Make sure that you keep at least 20~cm of space between the appliance and the next item to the left and right.
- If required, set the grill inclination angle by removing the two foot attachments from the front feet and placing them in the opening in the appliance base. When the foot attachments are removed, the grill is slightly inclined to the front. Potential grease from e.g. meat and fish can run into the grease drip tray more easily (see pictures on page 79).
- Completely unwrap the power cord and plug the power plug into a suitable power outlet.
- Switch the appliance on with the ON/OFF button on the appliance back side. The red function light on the button and the red control light next to POWER light up.
- Set the desired temperature. The upper grill plate should be closed and lined up with the lower grill plate and the height slider should be set to the OPEN position. Now, turn the temperature control to the right to a position between MIN and MAX. A high temperature is suitable for grilling meat, fish and vegetables, a medium temperature for making sandwiches and paninis.
- Once the green READY control light illuminates, the set temperature is reached and you can start placing food on the lower grill plate.
- Open the upper grill plate to a 90^ angle with the metal handle.
- Place the grillables on the lower grill plate.
- Close the upper grill plate by lowering the metal handle. If the height slider is set to OPEN, the upper grill plate is placed directly on the grillables. If you do not wish to place the upper grill plate directly on the food, you can adjust the height, at which you wish to place the upper grill plate above the grill abies, with the height slider (H). Like that, you can adjust the weight of the top when grilling pressure-sensitive foods like a fish. You can set the height so that the upper grill plate is placed on the grillables but is still held up by the height setting.
You can also use the height levels to make the grill plate hang above the grill-ables, so that it does not touch the grillables at all and instead hovers just above them - this is ideal if you wish to gratinate e.g. a cheese toast.
To adjust the height of the top, lift the top to the required height and push the height slider (H) to the corresponding height level.
LOW is the lowest height level
HIGH is the highest height level
The observation panel indicates the set position. To firmly set the slider to the particular height level (and not between two height levels), you should always wait for a faint clicking sound.
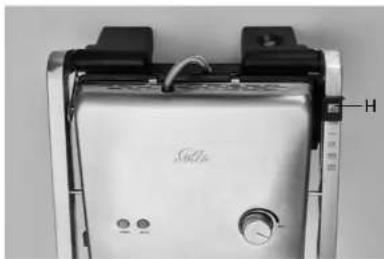

Then, slowly lower the top, so that the prop of the slider comes to a stop on the corresponding height level.
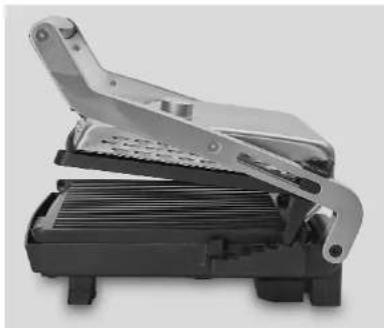
Additionally, you can slightly tilt the top to the front or back thanks to the joint fixture to make the upper grill plate fully lie down on the sandwich / the grillables, e.g. when placing the top directly on the grillables in the OPEN position. Use the black handle (I) on the edge of the top to adjust the inclination angle.
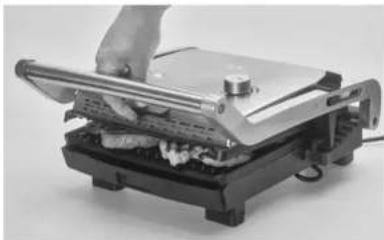
Notes: The grill is very hot during and after use. If you wish to adjust resp. rectify the inclination angle of the upper grill plate with your hand, you must never touch the top with your bare hands. The adjustment must always be made with the black handle (I). Additionally, you can use cooking gloves to protect your hands.
Warning: You must NEVER lift or lower the grill top with the black handle on the front edge of the top! To do that, always use the heat-insulated metal handle! Do not spray any non-stick sprays onto the grill plates, as this would damage the non-stick coating of the grill plates.
13. Removing the grillables from the grill:
When the grillables have finished grilling, open the upper grill plate with the metal handle and take the grillables from the grilling surface using heat resistant plastic or wooden spatulas.
Note: To avoid damaging the non-stick coating of the grill plates, never use metal kitchen tools or ones that have sharp or pointed edges. Never cut the grill abies directly on the grill plates. We recommend consequently using kitchen tools made from heat resistant plastic or wood only.
14. Switching the grill off:
If you have finished grilling, set the temperature control to the position MIN. Switch the appliance off with the ON/OFF button, the red function light on the button and the red control light next to POWER go out. Pull the power plug and let the appliance cool down.
TIPS FOR BEST GRILLING
We recommend when grilling meat that you use pieces that are thick enough to lie firmly on the bottom grill plate and at the same time touch the top grill plate.
The following types of meat are perfect for grilling with the Solis Grill & More: Beef rump steak, rib eye steak, sirloin steak, fillet Lamb chops, loin, sirloin, leg of lamb or lamb shank Pork loin, spare ribs, fillet, chops
We recommend you do not use meat with thick bones such as T-bone steaks.
- Tougher cuts such as pork neck chops can also be grilled, but to tenderise these cuts marinate them for a few hours in a marinade with wine or vinegar.
If you should wish to grill marinated meat - regardless of whether marinated by yourself or bought ready-marinated - please dab off the marinade with kitchen paper before grilling. Some marinades contain a high sugar content which scorches onto the grill.
- Foods should not be salted before grilling. Salt extracts liquids from the food and makes meat more chewy.
Never pierce the meat with a fork or cut it during grilling. This will let the meat's juices run out, making it dry and tough.
Never leave the meat on the grill for too long - pork is delicious even if it is still pink and juicy when served.
If you blanch sausages before grilling, they must not be pierced before grilling.
- When grilling fish, remove it when finished using a heat-resistant plastic spatula.
TIPPS FOR TOASTING SANDWICHES
Bread
You can toast many different types of bread: white bread, whole wheat, hot cross buns, farmhouse loaf etc. The Solis Grill & More is ideal for toasting Italian focaccias, Turkish bread or baguettes. When toasting sweet pastries and buns be careful not to toast them for too long as the sugar in them can make the pastry brown very quickly.
The classic toast is naturally ideal whether toasted on it's own, with a topping or with a filling.
Fillings
Caution is advised when biting fillings of cheese, tomatoes or jam: the heat stored in these ingredients can burn your mouth!
Fat free dishes
Thanks to the non-stick coating, it is not necessary to put butter or margarine on the outside of sandwiches.
CLEANING AND MAINTENANCE
Before cleaning, switch the appliance off by setting the temperature control to MIN and turning the ON/OFF button to the position "0". None of the control lights is illuminated now. Pull the power plug and let the contact grill cool down completely. In any case, you should clean your grill (meaning the chassis, the grill plates and the grease drip tray) after every use to prevent leftover food from baking in.
Cleaning the exterior of the grill
Clean the exterior with a soft, slightly moist towel or a non-scrapping sponge and, if need be, some mild detergent. Put the detergent on the cloth / the sponge and not directly on the grill's exterior. Dry everything carefully.
Cleaning the grease drip tray
Remove the grease drip tray and clean it in warm dish water with a soft, non-scraping sponge. Always put the detergent into the water or on the sponge, never directly onto the grease drip tray. Then, dry everything carefully and insert into the appliance.
-
Caution: The grease drip tray is not dishwasher-safe!
-
Warning: Be extremely careful when removing the grease drip tray after grilling. It is filled with hot grill fat and liquid!
Cleaning the grill plates
- Use a soft kitchen towel to wipe coarse food remains off the grill plates. Wiping the grill plates again with a moist cloth might be enough to clean them. With the included cleaning spatula, loose leftovers can be removed from the grooves. Use the cleaning spatula only if the appliance is completely cool.
- If the grill plates are very dirty, you should remove them from the appliance and simply clean them separately.
a) Ensure that the appliance and the grill plates are completely cold.
b) Open the grill plates to a degree of ca. 90^ with the metal handle.
c) Press the upper release button, the upper grill plate is unlocked and ready to be removed (see page 81 for a precise description).
d) Press the lower release button, the lower grill plate is unlocked and ready to be removed (see page 81 for a precise description).
- Clean the grill plates in hot dish water with a nylon dish scrubber or a soft, nonscrapping sponge. Always put the mild detergent into the water or on the sponge, never directly onto the grill plates.
-
Rinse and dry the grill plates carefully, also the back sides and the contact plugs. Then, reinsert the dry grill plates into the appliance.
-
Alternatively, you can clean the grill plates in the dishwasher. Place both grill plates in the cutlery basket of the dishwasher without them touching each other. Use a non-aggressive detergent.
Note: The undersides of the grill plates could change their colour after prolonged use and develop a certain patina. This is normal and does not impair the grilling function in any way. To remove the discolouration or the patina, use a nylon dish washing brush or a non-scouring plastic pot cleaner and clean the undersides in dish water. Then, carefully rinse and dry. - Never clean the appliance or parts of the appliance with aggressive or abrasive cleaning agents or solvents, oven cleaners, scouring pads, acetone or alcohol. Also, keep sharp or metal devices away from the appliance. The non-stick coating could be damaged or the appliance could be scratched!
- Never immerse the contact grill in water or other liquids!
All parts of the grill must be absolutely dry and correctly installed before you plug the power plug back into the power outlet. The undersides of the grill plates and their connection plugs have to be dry as well!
Tip: You can take the power cord off the appliance base. To do that, pull off the black cover, you can find the socket beneath it. You can then pull off the power cord.
STORAGE
- Make sure, that the appliance is switched off, meaning that the temperature control is set to MIN and the ON/OFF button is switched off. None of the control lights is illuminated. Then, pull the power plug from the socket.
- Let the grill with the grill plates and the grease drip tray cool down completely. Caution: Only perform storage tasks on a cool, clean and completely dry appliance!
- Reinstall the clean, dry grill plates back in the appliance.
- Push the clean and dry grease drip tray into the appliance.
- Close the appliance and set the height slider to the LOCK position, the two grill plates are now locked.
- Wind the power cord around the cord wrap at the bottom of the appliance.
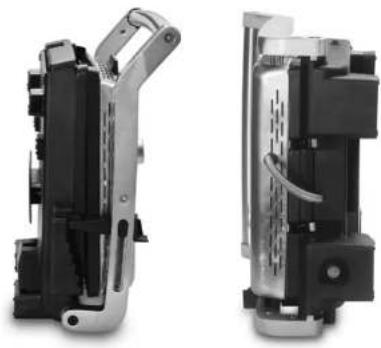
- Keep the appliance horizontally or vertically in a dry, dark place.
Tip: You can place the appliance vertically on its back or on the side with the height slider.
TECHNICAL SPECIFICATIONS
Model no. Type 7952
Product Contact grill
Voltage/frequency 220-240V\~/50/60Hz
Power 1800 Watts
Dimensions
approx. 35,0 × 18,5 × 39 cm (W×H×D)
GB
Technical changes reserved.
| Grill plates available as accessories resp. replacement parts | ||
| Artikel no. | Picture Article | |
| 720.11 Grill plates, grooved (x-piece pair) | ||
| 720.12 Waffle grill plates (x-piece pair) | ||
| 720.13 Sandwich grill plates (x-piece pair) | ||
You can purchase the accessories for your Solis Grill & More from good specialist stores or directly from Solis. You can find the contact addresses at the end of this manual.
DISPOSAL

EU 2012/19/EU
Information for correct disposal of the product in accordance with the European Directive EU 2012/19/EU.
At the end of its working life this equipment must not be disposed of as an household waste. It must be taken to special local community waste collection centres or to a dealer providing this service. Disposing of electrical and electronic equipment separately avoids possible negative effects on the environment and human health deriving from an inappropriate disposal and enables its components to be recovered and recycled to obtain significant savings in energy and resources. In order to underline the duty to dispose of this equipment separately, the product is marked with a crossed-out dustbin.
Solis of Switzerland Ltd reserves the right to carry out technical and visual changes and modifications to improve the product at any time.
SOLIS HELPLINE
This item stands out due to its long-life cycle and reliability. Despite this though, if a malfunction ever occurs, simply give us a call. Often a breakdown can be easily and quickly remedied with the right tip or technique without having to straight away send off the device for repair. We will give you all the advice and practical support you require. The contact addresses can be found at the end of this manual.
Keep the original packaging in a safe place so that you may use it in the event that transportation or shipping of the product becomes necessary.
APPPARAATBESCHRIJVING
A Warmte-isolerende metalen handgreep
APPPARAATBESCHRIJVING
Solis customer service
Please contact us in advance of sending in products for return or repair. We will gladly give you the respective address. Alternatively, you can simply visit www.solis.com.
Solis Klantendienst Helpline
Address for return shipment of
goods differs - please refer to:
Address for return shipment of
goods differs - please refer to
www.solis.com

+41-91-802 90 10

support.ch@solis.com

www.solis.com