MBG 3728 - Oven CLATRONIC - Free user manual and instructions
Find the device manual for free MBG 3728 CLATRONIC in PDF.

| Product type | Oven |
| Brand | Clatronic |
| Model | MBG 3728 |
| Power supply | 220-240 V~, 50/60 Hz, 1500 W |
| Net weight | Approx. 7.5 kg |
| Protection class | I |
| Cooking functions | Top and bottom heat, convection, rotisserie, combinations |
| Temperature range (convection) | 80 °C to 190 °C |
| Temperature range (top + bottom heat) | 100 °C to 230 °C |
| Timer | Up to 90 minutes with automatic shut-off and audible signal |
| Maximum load capacity (grid/tray) | 3.5 kg max |
| Included accessories | Grid, baking tray/drip tray, crumb tray, rotisserie with forks, removal tool, pizza stone (not illustrated) |
| Care and cleaning | Clean accessories with warm soapy water; interior with a damp cloth; never immerse the appliance |
| Safety | Hot surface (burn hazard), automatic shut-off at end of timer, overload protection (extension cable min. 1.5 mm²) |
| Recommended safety distance | 30 cm from flammable objects, do not install under a wall cabinet |
| Rotisserie use | For poultry and large pieces of meat, even cooking |
| Recommended preheating | 5 to 10 minutes before cooking |
| Warranty and repairs | Do not repair yourself; contact an authorized technician; power cord replaced by manufacturer or authorized service |
| Disposal | Do not dispose of with household waste; deposit at a collection point for electrical appliances |
Frequently Asked Questions - MBG 3728 CLATRONIC
User questions about MBG 3728 CLATRONIC
0 question about this device. Answer the ones you know or ask your own.
Ask a new question about this device
Download the instructions for your Oven in PDF format for free! Find your manual MBG 3728 - CLATRONIC and take your electronic device back in hand. On this page are published all the documents necessary for the use of your device. MBG 3728 by CLATRONIC.
USER MANUAL MBG 3728 CLATRONIC
natural_image
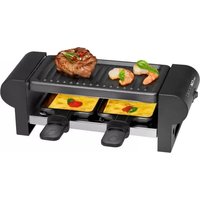
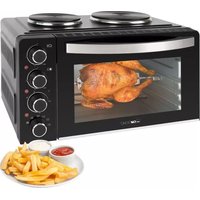
Black square toaster oven with a roasted chicken inside, no visible text or symbols on the device itself.DEUTSCH
Inhalt
Elimination......Page 22
ESPAÑOL
Indice
Overview of the Components ...... Page 3
Instruction Manual......Page 35
Technical Data......Page 39
natural_image
Diagram of a mechanical or electrical component with two connected parts, one larger and one smaller, against a gray background (no text or symbols)natural_image
Diagram of a mechanical or electrical component with two identical arms and a central shaft, no text or symbols present.natural_image
Diagram of a mechanical or electrical device with two sensors and a central body, no text or symbols present.natural_image
Diagram of a mechanical or electrical component with two connected parts, no visible text or symbolsnatural_image
Diagram of two identical mechanical components connected to a large irregular gray surface (no text or symbols)Thank you for choosing our product. We hope you will enjoy using the appliance.
Symbols in these Instruction Manual
Important information for your safety is specially marked. It is essential to comply with these instructions in order to avoid accidents and prevent damage to the appliance:

WARNING:
This warns you of dangers to your health and indicates possible injury risks.

CAUTION:
This refers to possible hazards to the appliance or other objects.

NOTE:
This highlights tips and information.
General Notes
Read the operating instructions carefully before putting the appliance into operation and keep the instructions including the warranty, the receipt and, if possible, the box with the internal packing. If you give this appliance to other people, please also pass on the operating instructions.
- The appliance is designed exclusively for private use and for the envisaged purpose. This appliance is not fit for commercial use.
- Do not use it outdoors. Keep it away from sources of heat, direct sunlight, humidity (never dip it into any liquid) and sharp edges. Do not use the appliance with wet hands. If the appliance is humid or wet, unplug it immediately.
- When cleaning or putting it away, switch off the appliance and always pull out the plug from the socket (pull the plug itself, not the lead) if the appliance is not being used and remove the attached accessories.
- Do not operate the appliance without supervision. If you leave the room you should always turn the appliance off. Remove the plug from the socket.
- The appliance and the mains lead have to be checked regularly for signs of damage. If damage is found the appliance must not be used.
- Use only original spare parts.
- In order to ensure your children's safety, please keep all packaging (plastic bags, boxes, polystyrene etc.) out of their reach.

WARNING:
Do not allow small children to play with the foil. There is a danger of suffocation!
Special Safety Precautions for this Appliance
You will find the following symbol with warning character on the appliance:
WARNING: Hot surface! Danger of burns!
The temperature of accessible surfaces can be very hot during and after operation.
- For this reason, always touch the appliance by its handle and controls. If necessary, use pot holders.
- Do not carry or lift the appliance during operation, but turn it off first and then disconnect the mains plug. Wait until the appliance has cooled down.
-
Always operate the appliance under supervision. Very dry bread can catch fire inside the appliance!
-
Make sure that the function switch is in the OFF position.
- Place the appliance on a heat resistant surface!
- Keep sufficient distance (30 cm) to highly flammable objects such as furniture, curtains, etc.! Never place the appliance inside a cabinet!
• Install the appliance with its back panel facing the wall. - Due to rising heat and vapours do not place the appliance under wall cupboards.
- Ensure that the mains cord does not touch hot parts of the appliance during operation.
- Do not operate the appliance with an external timer or separate remote control system.
- Do not repair the appliance by yourself. Always contact an authorized technician. If the supply cord is damaged, it must be replaced by the manufacturer, its service agent or similarly qualified persons in order to avoid a hazard.
- This appliance can be used by children aged from 8 years and above and persons with reduced physical, sensory or mental capabilities or lack of experience and knowledge if they have been given supervision or instruction concerning use of the appliance in a safe way and understand the hazards involved.
• Children shall not play with the appliance. - Cleaning and user maintenance shall not be made by children unless they are older 8 years and supervised.
- Keep the appliance and its cord out of reach of children less than 8 years.

CAUTION:
This appliance is not intended for immersion in water during cleaning. Please refer to the instructions provided in the chapter, "Cleaning".
Unpacking the Appliance
- Take the appliance out of its packaging.
- Remove all the packaging material such as plastic foil, filling material, cable ties and cardboard packaging.
- Check that all parts are supplied in the box.
- In case of incomplete delivery or damage, do not operate the appliance. Return it to your dealer immediately.

NOTE:
There may still be dust or production residues on the appliance. We recommend to clean the appliance as described under “Cleaning”.
Overview of the Components / Scope of Delivery
1 Operation indicator light
2 Temperature switch
3 Function switch
4 Time/main switch
5 Heating element
6 Glass door
7 Door handle
8 Grill rack
9 Baking tray/drip pan
10 Crumb tray
11 Removal tool for grill rack and baking tray
12 Revolving spit
12a Spit forks
13 Removal tool for revolving spit
No Illustration
Pizza stone
Controls
Top Control: Temperature Switch
- For convection, choose a temperature between 80 and 190^ .
- For top and bottom heat, choose a temperature between 100 and 230^ .
Centre Controls: Function Switch
OFFOff

Top heat and bottom heat

Top heat and bottom heat with convection

Top heat with convection

Top heat with revolving spit

Top and bottom heat with revolving spit and convection
Bottom Control: Time / Main Switch
Select an operating time of up to 90 minutes.
The oven is switched off at position OFF. The control lamp is off.
Notes for Use
Before Initial Use
There is a protective layer on the heating element. To remove this, operate the appliance for about 15 minutes without any contents. Set the function switch to □.

NOTE:
Any smoke or smells produced during this procedure are normal. Please ensure sufficient ventilation.
Electrical Connection
- Make sure that the function switch is in the OFF position.
- Check whether the mains voltage that you want to use matches the one of the appliance. You will find the information about this on the type plate.
- Insert the plug in a duly installed protective contact socket.

CAUTION: Overload
When using extension cords, these should have a cable cross-section of at least 1.5 mm^2 .
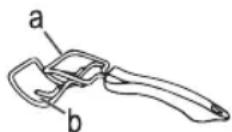
Removal Tool (11 / 13)
a) To remove the baking tray
b) To remove the grill rack
If you want to remove the revolving spit, use the removal tool (13).

CAUTION:
- The removal tools are not suitable for getting the pizza stone out of the appliance. The pizza stone could be damaged.
- To take the hot pizza stone out of the appliance, please use oven mitts.
Operation

WARNING:
- Never use containers made from plastic, cardboard, paper, or similar. Risk of fire!
- Do not use roasting bags or glass containers. These may burst.
- Also, when using the handles for the baking sheet or the revolving spit, protect yourself from the heat by using gloves or pot cloths.

CAUTION:
Do not overload the baking tray and the grill rack! (max. 3,5 kg)

NOTE:
- Always slide the crumb tray under the bottom heating element.
- We recommend to preheat the oven for approx. 5-10 minutes.
- Save energy by using the switch settings with convection. In doing so, the heated air is distributed quicker and evenly via the fan inside the oven.
- The temperature switch features different temperature ranges for convection or top and bottom heat
- Always use the inserted drip pan when grilling or roasting. This prevents grease from dripping onto the bottom heating element.
- When using the pizza stone, make sure it is completely dry before inserting it. High heat can cause cracks in a wet pizza stone.
For best results when preparing your pizza, we recommend that you preheat the pizza stone separately for about 10-15 minutes.
When preheating, slide the grill rack into the upper tray slot. Place the pizza stone on the grill rack. Set the top and bottom heat at 230 °C.
If you want to put a pizza with freshly prepared dough on the preheated pizza stone, dust the pizza stone with flour first.
Your oven offers you a number of settings. You can select a temperature and a time according to your recipe.
Here are a Few Examples of How You Can Use the Functions:
| Top heat: For grilling | |
| Functions with the revolving spit: | Poultry and large joints of meat are cooked evenly. |
| Top heat and bottom heat: | E. g. for pizza, pastries etc. |
Overview of Baking Times
| Temperature in °C | Time in min. | Function | Rack level | |
| Pizza 1 | 50 - 190 15 - 20 |  | Middle | |
| Toast 1 | 20 - 150 3 - 5 |  | Middle | |
| Pastries | 120 - 170 10 - 15 |  | Middle | |
| Cakes 1 | 50 - 180 | According to recipe |  | Bottom/ Middle |
| Roasts | 190 60 - 80 |  | Middle | |
| Poultry | 190 40 - 60 |  | Middle | |
| Steak | 190 | 25 - 30 |  | Top |
| Fish | 180 | 20 - 25 |  | Top |
The times given are only guidelines and vary depending on weight. We recommend that you use a roasting thermometer for meat and fish.

NOTE:
- When selecting 9 minutes or less, please select 15 minutes with the time switch first. Turn it back to your desired time afterwards again.
• After the set time has elapsed, the appliance automatically switches off and a short bell signal will sound.
Revolving Spit

NOTE:
Do not select a roast which is too large. The food being grilled must be far enough away from the internal walls and the heating elements and must not touch them.
- Insert the baking tray / drip pan into the bottom guide ridge of the oven.
- Rub edible oil on to the revolving spit and spit forks.
- Poultry has to be dressed before grilling. To do so, tie the wings and the legs closely to the body using kitchen yarn.
natural_image
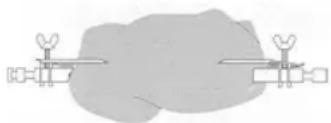
Diagram of a mechanical or electrical setup with two identical components connected by rods, no visible text or symbols.- Place the dressed poultry or the piece of roast meat carefully on to the revolving spit. Push the spit forks on to the revolving spit and use them to fix the roast meat in place. Tighten the fixing clips by means of the screws.
- Place the prepared revolving spit in the oven with the help of the removal tool (13). Put the end of the revolving spit without the notch into the motor on the right side of the oven first. Then hook the other end
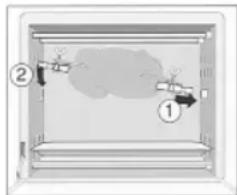
of the revolving spit into the hanger on the left hand side of the oven.
- Select a temperature and the function 📁. Set the operating time. The revolving spit begins to turn. Please ensure that the piece of roast meat can turn freely.
- After the set time has expired a sound is heard and the appliance switches off automatically. When the meat is cooked remove the revolving spit using the handle.
End Operation
- Set both switches to the OFF position.
- Disconnect the mains plug from the socket.
- Allow the appliance to cool before cleaning!
Cleaning

WARNING:
• Always disconnect the mains plug before cleaning.
- Wait until the appliance has cooled down.
- Never immerse the appliance in water. It could result in an electric shock or fire.

CAUTION:
- Do not use any wire brush or other abrasive objects.
- Do not use any acidic or abrasive detergents.
Crumb Tray, Baking Tray, Grill Rack, Revolving Spit, Spit Forks
Clean these parts in hot water by adding some washing-up detergent. Then dry the parts well.
Pizza Stone
Clean the pizza stone after each use with a damp cloth. Leave it to air dry. Only use it when completely dry. The extreme heat of the oven can cause cracks in a wet pizza stone.
Interior
Keep the interior of the oven clean.
- Remove splashes and food remains on the oven wall with a damp cloth together with some detergent.
- Wipe dry with a dry towel.
Base Unit
- Clean the housing after use with a slightly damp cloth.
- Put the crumb tray and other accessories back.
Storage
- Clean the appliance as described and let it completely dry.
• We recommend storing the appliance in the original packaging if you do not want to use it for long periods of time.
• Always store the appliance out of the reach of children in a well-ventilated and dry place.
Technical Data
Model: MBG 3728
Power supply: 220-240V\~, 50/60 Hz
Power consumption: 1500 W
Protection class:....I
Net weight: approx. 7.5 kg
The right to make technical and design modifications in the course of continuous product development remains reserved.
This appliance has been tested according to all relevant current CE guidelines, such as electromagnetic compatibility and low voltage directives, and has been constructed in accordance with the latest safety regulations.
Disposal
Meaning of the "Dustbin" Symbol
Protect our environment: do not dispose of electrical equipment in the domestic waste. Please return any electrical equipment that you will no longer use to the collection points provided for their disposal.
This helps avoid the potential effects of incorrect disposal on the environment and human health.
This will contribute to the recycling and other forms of re-utilisation of electrical and electronic equipment.
Information concerning where the equipment can be disposed of can be obtained from your local authority.
Instrukcja obsługi
natural_image
Diagram of a human brain with two connected devices, no text or symbols presentCTC Clatronic Sp. z o.o
Ul. Brzeska 1
45-960 Opole