USER MANUAL DEH-X7800DAB PIONEER
REPRODUCTOR DE CD CON RECEPTOR RDS
CD RDS-EMPFÄNGER
CD RDS-ONTVANGER
CD RDS ПРИЕМнИK
DEH-X7800DAB
DIGITAL MEDIA RECEIVER
RECEPTEUR NUMERIQUE MULTIMEDIA
RICEVITORE MULTIMEDIALE DIGITALE
RECEPTOR DIGITAL DE MEDIOS
DIGITALER MEDIA RECEIVER
DIGITALE MEDIA-RECEIVER
LUNΦPOBOI MEDIAPECINBEP
MVH-X580DAB
MVH-X580BT


Spotify®

Bluetooth
Made for

iPodiPhone
Owner's Manual
Mode d'emploi
Digital Audio Broadcasting (DAB) 6
Radio 6
CD/USB/iPod/AUX 7
Bluetooth 9
App Mode 12
Spotify 12
Using Pioneer ARC APP 13
Audio adjustments 14
Settings 15
FUNCTION settings 15
AUDIO settings. 16
SYSTEM settings 17
ILLUMINATION settings 19
MIXTRAX settings 19
Connections/Installation 20
Additional Information 22
About this manual:
- In the following instructions, a USB memory or USB audio player are referred to as "USB device".
- In this manual, iPod and iPhone are referred to as "iPod".
C
Manufacturer:
PIONEER CORPORATION
28-8, Honkomagome 2-chome, Bunkyo-ku, Tokyo 113-0021, Japan
EU Representative's:
Pioneer Europe NV
Haven 1087, Keetberlaan 1, B-9120 Melsele, Belgium/Belgique
http://www.pioneer-car.eu
[∗] DEH-X7800DAB, MVH-X580DAB, MVH-X580BT
English:
Hereby, Pioneer, declares that this [^*] is in compliance with the essential requirements and other relevant provisions of Directive 1999/5/EC.
Suomi:
Thank you for purchasing this PIONEER product
To ensure proper use, please read through this manual before using this product. It is especially important that you read and observe WARNINGs and CAUTIONs in this manual. Please keep the manual in a safe and accessible place for future reference.

If you want to dispose this product, do not mix it with general household waste. There is a separate collection system for used electronic products in accordance with legislation that requires proper treatment, recovery and recycling.
Private households in the member states of the EU, in Switzerland and Norway may return their used electronic products free of charge to designated collection facilities or to a retailer (if you purchase a similar new one).
For countries not mentioned above, please contact your local authorities for the correct method of disposal.
By doing so you will ensure that your disposed product undergoes the necessary treatment, recovery and recycling and thus prevent potential negative effects on the environment and human health.

WARNING
- Do not attempt to install or service this product by yourself. Installation or servicing of this product by persons without training and experience in electronic equipment and automotive accessories may be dangerous and could expose you to the risk of electric shock, injury or other hazards.
- Do not attempt to operate the unit while driving. Make sure to pull off the road and park your vehicle in a safe location before attempting to use the controls on the device.

CAUTION
- Do not allow this unit to come into contact with moisture and/or liquids. Electrical shock could result. Also, damage to this unit, smoke, and overheating could result from contact with liquids.
- Always keep the volume low enough to hear outside sounds.
The Pioneer CarStereo-Pass is for use only in Germany.
- This product is evaluated in moderate and tropical climate condition under the Audio, video and similar electronic apparatus - Safety requirements, IEC 60065.
CAUTION
This product is a class 1 laser product classified under the Safety of laser products, IEC 60825-1:2007.
CLASS 1 LASER PRODUCT
If you experience problems
Should this unit fail to work properly, please contact your dealer or nearest authorized PIONEER Service Station.
Getting Started
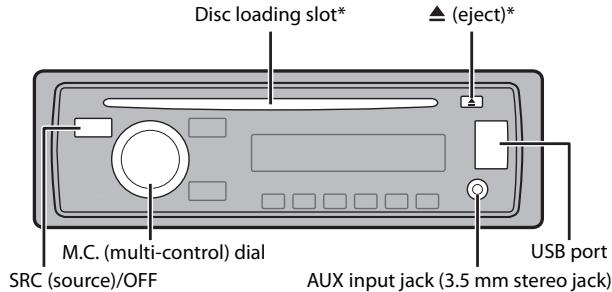
Basic operation
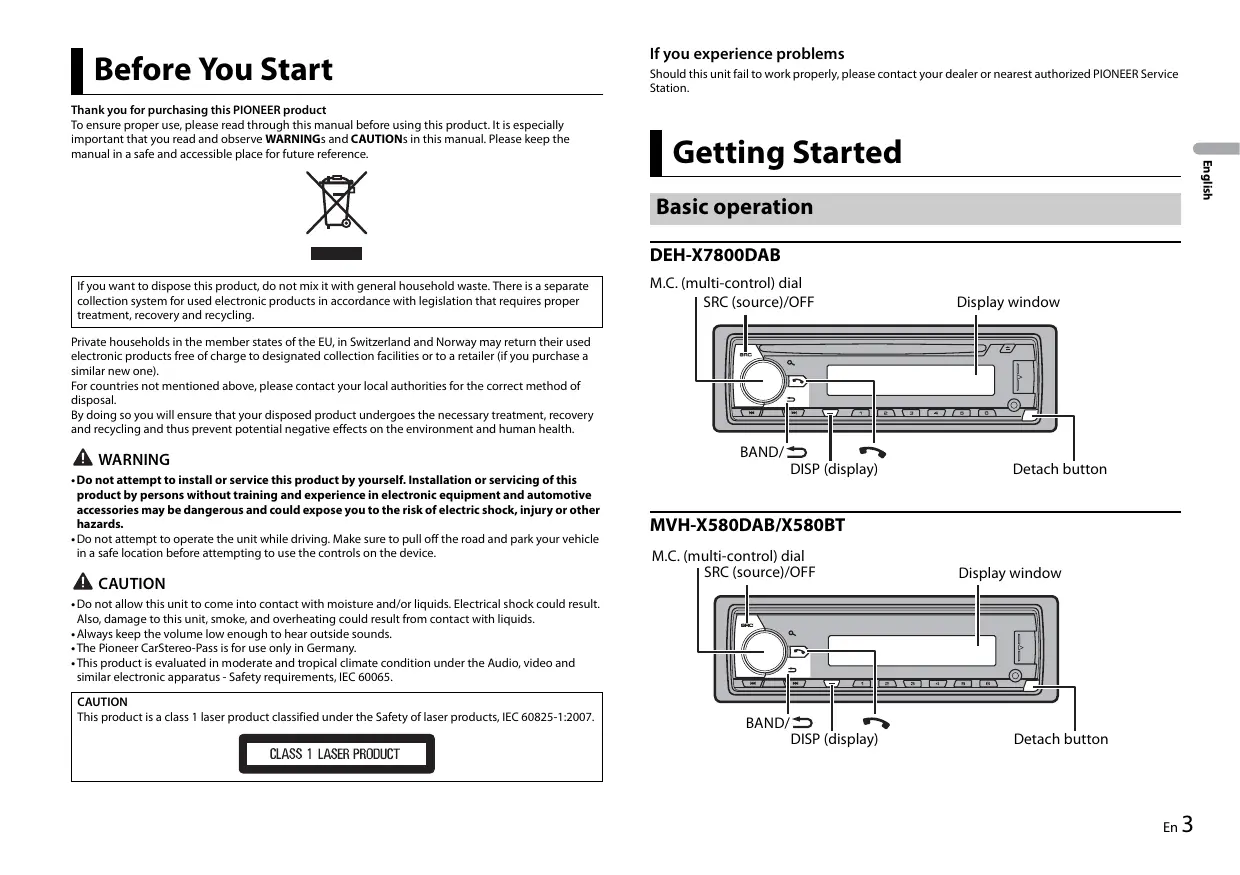
DEH-X7800DAB
M.C. (multi-control) dial
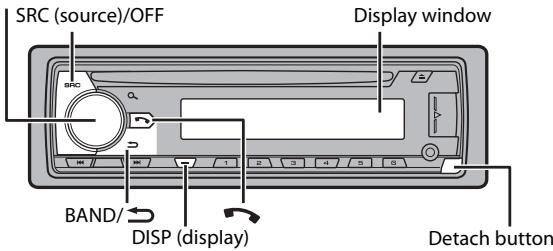
MVH-X580DAB/X580BT
M.C. (multi-control) dial
Frequently used operations
The available buttons vary depending on the unit.
| Purpose | Operation |
| Turn on the power* | Press SRC/OFF to turn on the power.
Press and hold SRC/OFF to turn off the power. |
| Adjust the volume | Turn the M.C. dial. |
| Select a source | Press SRC/OFF repeatedly. |
| Change the display information | Press DISP repeatedly. |
| Return to the previous display/list | Press BAND/→. |
| Return to the normal display from the menu | Press and hold BAND/→. |
| Answering/ending a call | Press ↕. |
- When this unit's blue/white lead is connected to the vehicle's auto-antenna relay control terminal, the vehicle's antenna extends when this unit's source is turned on. To retract the antenna, turn the source off.
Display indication
The following indication may vary depending on the unit.
| Indication | Description |
| » | Appears when a lower tier of the menu or folder exists. |
| I | Appears when a Bluetooth telephone is connected to this unit by HFP (Hands Free Profile) (page 9) and flashes while the telephone is on hold. |
| J | Appears when a Bluetooth audio player is connected to this unit by A2DP (Advanced Audio Distribution Profile) (page 9). |
| P | Appears when the Q button is pressed. |
| TP | Appears when a traffic program is received. |
| TA | Appears when the TA (traffic announcements) function is set (page 16). |
| S.RTrV | Appears when the sound retriever function is set (page 16). |
| XX | Appears when random/shuffle play is set (except when BT AUDIO is selected as the source). |
| ← | Appears when repeat play is set (except when BT AUDIO is selected as the source). |
| @ | Appears when the iPod control function is set (page 9). |
| @ | Appears when a Bluetooth connection is made (page 9). |
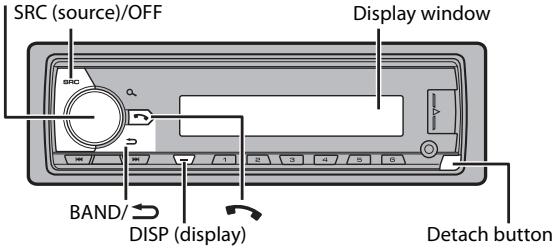
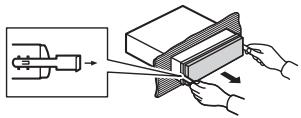
Detaching the front panel
Detach the front panel to prevent theft. Remove any cables and devices attached to the front panel and turn off the unit before detaching it.
Detach

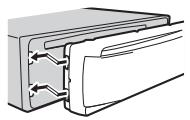
Attach

Important
- Avoid subjecting the front panel to excessive shock.
- Keep the front panel out of direct sunlight and high temperatures.
- Always store the detached front panel in a protective case or bag.
Resetting the microprocessor
The microprocessor must be reset in the following situations:
- Before using this unit for the first time after installation
- If the unit fails to operate properly
- When strange or incorrect messages appear on the display
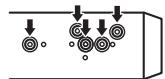
1 Remove the front panel (page 4).
2 Press the RESET button with a pointed instrument longer than 8 mm.
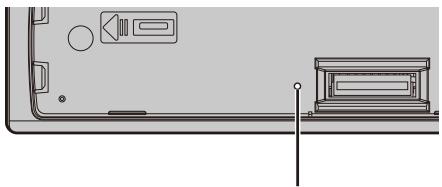
RESET button
When you turn the ignition switch to ON after installation, the setup menu appears in the display.
Do not use the unit in standard mode when a speaker system for network mode is connected to the unit. Do not use the unit in network mode when a speaker system for standard mode is connected to the unit. This may cause damage to the speakers.
1 Turn the M.C. dial to select the options, then press to confirm.
To proceed to the next menu option, you need to confirm your selection.
| Menu Item | Description |
| LANGUAGE
[ENG](English),
[PYC](Russian),
[TUR](Turkish) | Select the language to display the text information from a compressed audio file. |
| CLOCK SET | Set the clock.
1 Turn the M.C. dial to adjust the hour, then press to confirm.
The indicator moves to the minute setting automatically.
2 Turn the M.C. dial to adjust the minute, then press to confirm. |
| FM STEP
[100], [50] | Select the FM tuning step from 100 kHz or 50 kHz. |
| DAB ANT PW
[ON] | Supply power to a DAB antenna. Select this when using the optional DAB antenna (AN-DAB1, sold separately) with the unit. |
| [OFF] | No power is supplied to a DAB antenna. Select this when using a passive antenna with no booster. |
| SPEAKER MODE
[STANDARD],
[NETWORK] | Switch between two operation modes: the 2-way network mode (NETWORK) and the standard mode (STANDARD) according to the connections you have established. For details on operation modes, see page 14.
After selecting the appropriate mode, turn the M.C. dial to select [YES], then press to confirm.
• You cannot complete the setup menu without setting the [SPEAKER MODE].
• Once the speaker mode is set, this setting cannot be changed unless the default settings of this product are restored. Restore the default settings to change the speaker mode setting (refer to SYSTEM RESET on page 6). |
[QUIT:YES] appears when all the settings have been made.
To return to the first item of the setup menu, turn the M.C. dial to select [QUIT:NO], then press to confirm.
3 Press the M.C. dial to confirm the settings.
When [DAB ANT PW] is set to [ON], [UPDATED LIST] appears in the display and the service list will be updated.
NOTE
These settings other than [SPEAKER MODE] can be made at any time from the SYSTEM settings (page 17) and INITIAL settings (page 5).
Canceling the demonstration display (DEMO OFF)
1 Press the M.C. dial to display the main menu.
2 Turn the M.C. dial to select [SYSTEM], then press to confirm.
3 Turn the M.C. dial to select [DEMO OFF], then press to confirm.
4 Turn the M.C. dial to select [YES], then press to confirm.
INITIAL settings
1 Press and hold SRC/OFF until the unit turns off.
2 Press and hold SRC/OFF to display the main menu.
3 Turn the M.C. dial to select [INITIAL], then press to confirm.
4 Turn the M.C. dial to select an option, then press to confirm.
NOTE
The options vary depending on the unit.
| Menu Item | Description |
| FM STEP[100], [50] | Select the FM tuning step from 100 kHz or 50 kHz. |
| REAR-SP[FUL] | Select when there is a full-range speaker connected to the rear speaker output leads. |
| [SW] | Select when there is a subwoofer connected directly to the rear speaker output leads without any auxiliary amplifier. |
| SYSTEM UPDATE[SYSTEM INFO], [S/W UPDATE] | Select [SYSTEM INFO] to confirm the latest system information on the unit.Select [S/W UPDATE] to update the unit to the latest software and initialize the unit settings. For details on the latest software and updating, visit our website. |
| DAB ANT PW
[ON] | Supply power to a DAB antenna. Select this when using the optional DAB antenna (AN-DAB1, sold separately) with the unit. |
| [OFF] | No power is supplied to a DAB antenna. Select this when using a passive antenna with no booster. |
| SYSTEM RESET
[YES], [CANCEL] | Select [YES] to initialize the unit settings. The unit will be restarted automatically.
(Some of the settings may be retained even after resetting the unit.) |
Digital Audio Broadcasting (DAB)
(Only for DEH-X7800DAB/MVH-X580DAB)
To receive DAB signals, connect a DAB antenna (AN-DAB1) (sold separately) to the unit.
Seeking a service component
1 Press SRC/OFF to select [DIGITAL RADIO].
2 Press BAND/ to select the band from [D1], [D2] or [D3].
3 Press / to select a service component.
NOTE
Press and hold 1 then release to seek an available service. Scanning stops when the unit receives a service.
To select service component from service lists
1 During DAB reception, press .
Displays the list of all service components. Press again to search for a service component alphabetically.
2 Select a service component from the list you selected, then press the M.C. dial to confirm.
NOTE
You can update the service list by pressing and holding . To cancel updating, press again.
Presetting service components
To store service components
1 While receiving the service component you want to store, press and hold one of the number buttons (1 / to 6 / ) until it stops flashing.
To receive stored service components
1 Select the band, then press a number button (1 / to 6 / 一
Pause/Time shift functions
The unit stores recent broadcasts in the memory automatically. The memory capacity of this unit varies depending on the bit rate of the service component used. The approximate memory capacity is five minutes for 192 kbps.
To pause/resume
1 While receiving the service component, press and hold DISP.
To use the time shift function
1 While receiving the service component, press and hold BAND/
2 Press (skip back one minute)/ (skip forward one minute) to adjust the playback point.
Radio
The tuner frequencies on this unit are allocated for use in Western Europe, Asia, the Middle East, Africa and Oceania. Use in other areas may result in poor reception. The RDS (radio data system) function only works in areas that broadcast RDS signals for FM stations.
Receiving preset stations
1 Press SRC/OFF to select [RADIO].
2 Press BAND/ to select the band from [FM1], [FM2], [FM3], [MW] or [LW].
3 Press a number button (1/∧ to 6/←).
NOTE
You can select a preset channel by pressing and turning the M.C. dial.
TIP
The / buttons can be also used to select a preset station when [SEEK] is set to [PCH] in the FUNCTION settings (page 16).
Best stations memory (BSM)
The six strongest stations are stored on the number buttons (1 / to 6 / 一
1 After selecting the band, press the M.C. dial to display the main menu.
2 Turn the M.C. dial to select [FUNCTION], then press to confirm.
3 Turn the M.C. dial to select [BSM], then press to confirm.
To seek a station manually
1 After selecting the band, press to select a station.
Press and hold / then release to seek an available station. Scanning stops when the unit receives a station. To cancel seek tuning, press / .
NOTE
[SEEK] needs to be set to [MAN] in the FUNCTION settings (page 16).
To store stations manually
1 While receiving the station you want to store, press and hold one of the number buttons (1 / to 6 / ) until it stops flashing.
NOTE
You can select a preset channel by pressing and turning the M.C. dial. After selecting a channel, press and hold the M.C. dial to store a station.
Using PTY functions
The unit searches for a station by PTY (program type) information.
1 Press and hold during FM reception.
2 Turn the M.C. dial to select a program type from [NEWS/INFO], [POPULAR], [CLASSICS] or [OTHERS].
3 Press the M.C. dial.
The unit begins to search for a station. When it is found, its program service name is displayed.
NOTES
To cancel the search, press the M.C. dial.
- The program of some stations may differ from that indicated by the transmitted PTY.
- If no station is broadcasting the type of program you searched for, [NOT FOUND] is displayed for about two seconds and then the tuner returns to the original station.
PTY list
For more details about PTY list, visit the following site:
http://www.pioneer.eu/eur/products/25/121/tech/CarAudio/PTY.html
CD/USB/iPod/AUX
NOTE
CD function is not available for MVH-X580DAB/X580BT.
Playing back
Disconnect headphones from the device before connecting it to the unit.
- Not equipped for MVH-X580DAB/X580BT
CD
1 Insert a disc into the disc loading slot with the label side up.
To eject a disc, stop playback first then press .
USB devices (including Android™)/iPod
1 Open the USB port cover.
2 Plug in the USB device/iPod using an appropriate cable.
NOTE
To automatically switch to [USB] source when a USB device/iPod is connected to the unit, set [USB AUTO] to [ON] in the SYSTEM settings (page 18).
CAUTION
Use an optional Pioneer USB cable (CD-U50E) to connect the USB device as any device connected directly to the unit will protrude out from the unit, which could be dangerous.
Before removing the device, stop playback.
AOA connections
For details on AOA connection, see page 13.
MTP connection
A device installed with Android OS 4.0 or later can be connected to the unit via MTP, using the cable supplied with the device. However, depending on the connected device and the numbers of the files in the device, audio files/songs may not be able to be played back via MTP. Note that MTP connection is not compatible with WAV file formats and FLAC file formats, and cannot be used with the MIXTRAX function.
NOTE
If you use an MTP connection, [ANDROID WIRED] needs to be set to [MEMORY] in the SYSTEM settings (page 18).
AUX
1 Insert the stereo mini plug into the AUX input jack.
2 Press SRC/OFF to select [AUX] as the source.
NOTE
If [AUX] is set to [OFF] in the SYSTEM settings, [AUX] cannot be selected as a source (page 18).
Operations
You can make various adjustments in the FUNCTION settings (page 15). Note that the following operations do not work for an AUX device. To operate an AUX device, use the device itself.
| Purpose | Operation |
| Select a folder/album*1 | Press 1/∧ or 2/∨. |
| Select a track/song (chapter) | Press ↘ or ↗. |
| Fast forward or reverse*2 | Press and hold ↦ or ↗. |
| Purpose | Operation |
| Search for a file from a list | 1 Press to display the list.2 Turn the M.C. dial to select the desired file (folder) name or category, then press to confirm.3 Turn the M.C. dial to select the desired file, then press to confirm.Playback starts. |
| View a list of the files in the selected folder/ category*1 | Press the M.C. dial when a folder/category is selected. |
| Play a song in the selected folder/ category*1 | Press and hold the M.C. dial when a folder/ category is selected. |
| Alphabetical search (iPod only) | 1 Press to display the list.2 Turn the M.C. dial to select the desired category list, then press to enter the alphabetical search mode.(Turning the M.C. dial twice also enters the alphabetical search mode.)3 Turn the M.C. dial to select a letter, then press to display the alphabetical list.To cancel alphabetical search, press BAND/ ➔. |
| Repeat play | Press 6/ ➔. |
| Random/shuffle play | Press 5/ ➔. |
| Shuffle all play (iPod only) | Press and hold 5/ ➔. |
| Pause/resume playback | Press 4/ PAUSE. |
| Return to root folder (CD/USB only)*1 | Press and hold ➔. |
| Switch between compressed audio and CD- DA (CD only) | Press BAND/ ➔. |
1 Compressed audio files only
2 When you use the fast forward or reverse function while playing a VBR file, the playback time may be not correct.
Useful functions for iPod
Link play mode
You can access songs based on the artist, album, or genre currently playing.
1 While listening to a song, press and hold to enter the link play mode.
2 Turn the M.C. dial to select the mode ([ARTIST], [ALBUM], [GENRE]), then press to confirm.
The selected song/album will be played after the currently playing song.
NOTE
The selected song/album may be canceled if you use functions other than those from the link play mode (e.g. fast forward and reverse).
iPod control
You can control the unit via a connected iPod.
The following iPod models are not compatible with this function.
- iPod nano 1st generation, iPod with video
1 Press BAND/ during playback, then select the control mode.
[CONTROL iPod]: The unit's iPod function can be operated from the connected iPod.
[CONTROL AUDIO]: The unit's iPod function can only be operated by the buttons on the unit. In this mode, the connected iPod cannot be turned on or off.
NOTES
- Switching the control mode to [CONTROL iPod] pauses song playback. Use the connected iPod to resume playback.
- The following operations are still accessible from the unit, even if the control mode is set to [CONTROL iPod].
- Pause, fast forward/reverse, song/chapter selection
- The volume can only be adjusted from the unit.
About MIXTRAX (USB/iPod only)
The MIXTRAX function creates a non-stop mix of your music library, accompanied by illumination effects. For details on MIXTRAX settings, see page 19.
NOTES
- This function is not compatible with an Android device connected via MTP.
Depending on the file/song, sound effects may not be available.
- Turn the MIXTRAX function off if the illumination effects it produces interfere with driving.
1 Press 3/MIX to turn MIXTRAX on/off.
Bluetooth
Bluetooth connection
Important
If three or more Bluetooth devices (e.g. a phone and separate audio player) are connected, they may not work properly.
1 Turn on the Bluetooth function of the device.
2 Press to display the phone menu.
3 Turn the M.C. dial to select [BT SETTING], then press to confirm.
4 Turn the M.C. dial to select [ADD DEVICE], then press to confirm. The unit starts to search for available devices, then displays them in the device list.
To cancel searching, press the M.C. dial.
- If the desired device is not in the list, select [RE-SEARCH].
- If there is no device available, [NOT FOUND] appears in the display.
5 Turn the M.C. dial to select a device from the device list, then press to confirm. Press and hold the M.C. dial to switch the displayed device information between the Bluetooth device address and device name.
6 Select [Pioneer BT Unit] shown in the device display.
7 Make sure the same 6-digit number appears on this unit and the device, then select "Yes" on the device.
NOTES
- [DEVICE FULL] appears if the unit has already been paired with three other devices. In this case, delete one of the paired devices. See [DEL DEVICE] or [GUEST MODE] in the Bluetooth settings (page 9).
- Depending on the device, the PIN code is required in step 7. In this case, input [0000].
TIP
The Bluetooth connection can be also made by detecting the unit from the Bluetooth device. To do so, [VISIBLE] in the Bluetooth settings needs to be set to [ON]. For details on a Bluetooth device operations, refer to the operating instructions supplied with the Bluetooth device.
Bluetooth settings
| Menu Item | Description |
| DEVICELIST | Display the list of paired Bluetooth devices. “*” appears on the device name when the Bluetooth connection is established. |
| DEL DEVICE
[DELETE YES],
[DELETE NO] | Delete the device information. |
| ADD DEVICE | Register a new device. |
| A.CONN
[ON], [OFF] | Select [ON] to connect to a Bluetooth device automatically. |
| VISIBLE
[ON], [OFF] | Select [ON] so that a Bluetooth device can detect the unit when the unit is connected via Bluetooth to another device. |
| PIN CODE | Change the PIN code.
1 Press the M.C. dial to display the setting mode.
2 Turn the M.C. dial to select a number.
3 Press the M.C. dial to move the cursor to the next position.
4 After inputting the PIN code, press and hold the M.C. dial.
After inputting the PIN code, pressing the M.C. dial returns you to the PIN code input display, and you can change the PIN code. |
| DEV. INFO | Switch the device information on the display between the device name and Bluetooth device address. |
| GUEST MODE
[ON], [OFF] | Select [ON] to move to the [DEL DEVICE] screen automatically when the unit has already been paired with three devices. |
| A.PAIRING
[ON], [OFF] | Select [ON] to pair the unit and iPhone automatically when an iPhone is connected to the unit via USB. (This function may not be available depending on the version of iOS you are using.) |
Bluetooth telephone
First, make a Bluetooth connection with the Bluetooth telephone (page 9). Up to two Bluetooth telephones can be connected simultaneously.

Important
- Leaving the unit on standby to connect to your phone via Bluetooth while the engine is not running can drain the vehicle's battery.
- Be sure to park your vehicle in a safe place and apply the parking brake before operation.
To make a phone call
1 Press to display the phone menu.
When two phones are connected, a phone name appears first then a phone menu will display. To switch to another phone, press again.
2 Turn the M.C. dial to select [RECENTS] or [PHONE BOOK], then press to confirm. If you select [PHONE BOOK], proceed to step 4.
3 Turn the M.C. dial to select [MISSED], [DIALLED] or [RECEIVED], then press to confirm.
4 Turn the M.C. dial to select a name or phone number, then press to confirm. The phone call starts.
To answer an incoming call
1 Press when a call is received.
TIP
When two phones are connected to the unit via Bluetooth and there is an incoming call while one phone is being used for a call, a message will appear in the display. To answer that incoming call, you need to end the existing call.
Basic operations
| Purpose | Operation |
| End a call | Press▶. |
| Reject an incoming call | Press and hold▶ when a call is received. |
| Switch between the current caller and a caller on hold | Press the M.C. dial. |
| Cancel a caller on hold | Press and hold▶. |
| Adjust the volume of the caller's voice (When private mode is on, this function is not available.) | Turn the M.C. dial during the call. |
| Turn the privacy mode on or off | Press BAND/▶ during the call. |
To preset phone numbers
1 Select a phone number from a phone book or call history.
2 Press and hold one of the number buttons (1 / to 6 / ·)
The contact is stored in the selected preset number.
To make a call using a preset number, press one of the number buttons (1/∧ to 6/÷), then press the M.C. dial.
Voice recognition (Only for iPhone)
This function is only available when an iPhone equipped with voice recognition is connected to the unit via Bluetooth.
1 Press and hold to activate the voice recognition mode.
2 Press the M.C. dial and then talk into the microphone to input voice commands.
To exit the voice recognition mode, press BAND/
NOTE
For details on the voice recognition features, refer to the manual supplied with your iPhone.
Phone menu
| Menu Item | Description |
| RECENTS
[MISSED] | Display the missed call history. |
| [DIALLED] | Display the dialed call history. |
| [RECEIVED] | Display the received call history. |
| PHONE BOOK*1 | Display the contacts which have been transferred from your phone. Set [VISIBLE] in the Bluetooth settings to [ON] to browse the contacts via this unit. |
| PRESET 1-6 | Recall the preset phone numbers. You can also recall the preset phone numbers by pressing one of the number buttons (1/∧ to 6/←). |
| A.ANSR*2
[ON], [OFF] | Select [ON] to answer an incoming call automatically. |
| R.TONE
[ON], [OFF] | Select [ON] if the ring tone does not come out from the car speakers. Depending on the connected phone, this function may not work. |
| PB INVIT | Invert the order of names in the phone book (name view). |
| PB A.SYNC
[ON], [OFF] | Select whether or not to transfer the contacts from your phone automatically when your phone is connected to the unit.
·When connected for the first time, the contacts from your phone are transferred automatically, regardless of the [PB A.SYNC] setting.
·If you switch from [ON] to [OFF], the auto synchronization will not be performed on the next connection.
·If you switch from [OFF] to [ON], the auto synchronization will be performed when your phone is connected to the unit.
·During the auto synchronization, you cannot cancel the synchronization, even if you select [OFF]. |
| BT SETTING | You can adjust various settings for Bluetooth connections. For details on Bluetooth settings, see page 9. |
1 The contacts on your phone will normally be transferred automatically when the phone is connected. If they are not, use your phone to transfer the contacts.
2 If two phones are connected, this function does not work on incoming calls that are received while one of the phones is being used for a call.
Bluetooth audio
Important
-
Depending on the Bluetooth audio player connected to this unit, the available operations will be limited to the following two levels:
-
A2DP (Advanced Audio Distribution Profile) can only play back songs on your audio player.
-
AVRCP (Audio/Video Remote Control Profile) can perform functions such as playback, pause, select song, etc.
-
The sound of the Bluetooth audio player will be muted when the phone is in use.
- When the Bluetooth audio player is in use, you cannot connect to a Bluetooth telephone automatically.
- Depending on the type of Bluetooth audio player you have connected to this unit, operation and information displayed may vary based on availability and functionality.
1 Make a Bluetooth connection with the Bluetooth audio player.
2 Press SRC/OFF to select [BT AUDIO] as the source.
3 Press BAND/ to start playback.
Basic operations
You can make various adjustments in the FUNCTION settings (page 15).
| Purpose | Operation |
| Fast forward or reverse | Press and hold |← or >|. |
| Select a track | Press |← or >|. |
| Repeat play* | Press 6/→. |
| Random play* | Press 5/××. |
| Pause/resume playback | Press 4/PAUSE. |
| Search for a file from a list | 1 Press Q to display a list.
2 Turn the M.C. dial to select the desired folder name, then press to confirm.
3 Turn the M.C. dial to select the desired file, then press to confirm.
Playback starts. |
- Depending on the connected device, these operations may not be available.
App Mode
You can enjoy listening to an application on an iPhone/Android device via the unit. In some cases, you can control an application by using the unit.
For details on compatible devices, visit our website.

Important
Use of third party apps may involve or require the provision of personally identifiable information, whether through the creation of a user account or otherwise, and for certain applications, the provision of geolocation data.
ALL THIRD PARTY APPS ARE THE SOLE RESPONSIBILITY OF THE PROVIDERS, INCLUDING WITHOUT LIMITATION COLLECTION AND SECURITY OF USER DATA AND PRIVACY PRACTICES. BY ACCESSING THIRD PARTY APPS, YOU AGREE TO REVIEW THE TERMS OF SERVICE AND PRIVACY POLICIES OF THE PROVIDERS. IF YOU DO NOT AGREE WITH THE TERMS OR POLICIES OF ANY PROVIDER OR DO NOT CONSENT TO THE USE OF GEOLOCATION DATA WHERE APPLICABLE, DO NOT USE THAT THIRD PARTY APP.
For iPhone users
This function is compatible with iPhones and iPod touches installed with iOS 5.0 or later.
For Android device users
This function is compatible with devices that have Android OS 2.3 or later installed.
NOTE
PIONEER IS NOT LIABLE FOR ANY THIRD PARTY APPS OR CONTENT, INCLUDING WITHOUT LIMITATION THEIR ACCURACY OR COMPLETENESS. THE CONTENT AND FUNCTIONALITY OF SUCH APPS ARE THE SOLE RESPONSIBILITY OF THE APP PROVIDER.
Playback of an application via the unit
1 Connect this unit with the mobile device.
iPhone via USB (page 8)
- iPhone/Android device via Bluetooth (page 9)
2 Press the M.C. dial to display the main menu.
3 Turn the M.C. dial to select [SYSTEM], then press to confirm.
4 Turn the M.C. dial to select [PHONE CONNECT], then press to confirm.
5 Turn the M.C. dial to select one of the below, then press to confirm.
- Select [IPHONE/IPOD] for iPhone.
- Select [ANDROID] for Android device.
6 Turn the M.C. dial to select one of the below.
- Select [Wired] for the USB connection.
- Select [BLUETOOTH] for the Bluetooth connection.
NOTE
When the connection setting is changed, a message that lets you know that the connection setting had been changed will appear in the display. Press the M.C. dial and turn the M.C. dial to select [SRC OFF :YES], then press to confirm. The unit turns off automatically and the setting is executed.
7 Press SRC/OFF to select [APP].
8 Operate the mobile device to start up the application.
Basic operations
You can make various adjustments in the FUNCTION settings (page 15).
| Purpose | Operation |
| Select a track | Press ↓ or ▷. |
| Fast forward or reverse | Press and hold ↓ or ▷. |
| Pause/resume playback | Press BAND/→. |
Spotify®
Spotify is a music streaming distribution service not affiliated with Pioneer. More information is available at http://www.spotify.com.
The Spotify application is available for iPhone and Android phones, please visit https:// support.spotfly.com/ for the latest compatibility information.
To enjoy Spotify as you drive, first download the Spotify app to your iPhone or Android device. You can download it on the iTunes App Store or Google Play™. Choose a free account or a paid Premium account, either in the app or at Spotify.com. A Premium account gives you more features, like offline listening.
Important
- This product incorporates Spotify software which is subject to 3rd party licenses found here: www.sparky.com/connect/third-party-licenses.
- For information on the countries and regions where Spotify can be used, take a look at https://www.spotify.com/us/select-your-country/.
Listening to Spotify
Update the firmware of the Spotify application to the latest version before use.
1 Connect this unit with the mobile device.
- iPhone via USB (page 8)
- iPhone/Android device via Bluetooth (page 9)
If you choose a USB connection, proceed to step 6.
2 Press SRC/OFF to select [SPOTIFY].
3 Press and hold BAND/ to display [PHONE CONNECT].
4 Turn the M.C. dial to select one of the below, then press to confirm.
- Select [IPHONE/IPOD] for iPhone.
- Select [ANDROID] for Android device.
5 Turn the M.C. dial to select [BLUETOOTH] for iPhone/Android device via Bluetooth.
NOTE
When the connection setting is changed, a message that lets you know that the connection setting had been changed will appear in the display. Press the M.C. dial and turn the M.C. dial to select [SRC OFF :YES], then press to confirm. The unit turns off automatically and the setting is executed.
6 Press SRC/OFF to select [SPOTIFY].
7 Launch the Spotify application on the mobile device and start playback.
Basic operations
You can make various adjustments in the FUNCTION settings (page 15).
NOTE
The available operations may vary according to the type of contents (trackalbum/artist/playlist/radio) you want to play.
| Purpose | Operation |
| Skip a track | Press ↓ or ➔. |
| Search for a track from a list | 1 Press Ⓞ (list) to display the list.
2 Turn the M.C. dial to select the desired category, then press to confirm.
3 Turn the M.C. dial to select the desired file, then press to confirm.
Playback starts. |
| Pause/resume playback | Press 4/PAUSE. |
| Thumbs Up (Only for radio) | Press 1/▲. |
| Thumbs Down (Only for radio) | Press 2/∨. |
| Random play (Only for track/album/artist/playlist) | Press 5/XXX. |
| Repeat play (Only for track/album/artist/playlist) | Press 6/←. |
| Purpose | Operation |
| Start a radio channel based on the song currently being played. | 1 Press and hold (list) to start a radio.
2 Press the M.C. dial.
This function may not be available depending on the selected song. |
NOTE
Some functions of Spotify may not be operated from the unit.
Using Pioneer ARC APP
You can operate the unit from Pioneer ARC APP installed on an iPhone/Android device. In some cases, you can control aspects of the application, such as source selection, pause, etc., by using the unit.
For details on what operations are available on the application, see the application's help section.
WARNING
Do not attempt to operate the application while driving. Make sure to pull off the road and park your vehicle in a safe location before attempting to use the controls on the application.
For iPhone users
This function is compatible with iPhones (iPhone 5 or later) and iPod touches installed with iOS 8.0 or later.
You can download Pioneer ARC APP on iTunes App Store.
For Android device users
This function is compatible with devices that have Android OS 4.1 or later installed and also support AOA (Android Open Accessory) 2.0.
You can download Pioneer ARC APP on Google Play.
NOTE
Some Android devices connected via AOA 2.0 may not work properly or emit sounds due to their own software design, regardless of the OS version.
Making a connection with Pioneer ARC APP
1 Connect this unit with the mobile device.
- iPhone/Android device via USB (page 8)
- iPhone/Android device via Bluetooth (page 9)
2 Press the M.C. dial to display the main menu.
3 Turn the M.C. dial to select [SYSTEM], then press to confirm.
4 Turn the M.C. dial to select [PHONE CONNECT], then press to confirm.
5 Turn the M.C. dial to select one of the below, then press to confirm.
- Select [IPHONE/IPOD] for iPhone.
- Select [ANDROID] for Android device.
6 Turn the M.C. dial to select one of the below.
- Select [Wired] for the USB connection.
- Select [BLUETOOTH] for the Bluetooth connection.
Proceed to step 10 if you select the USB connection for iPhone or the Bluetooth connection.
NOTE
When the connection setting is changed, a message that lets you know that the connection setting had been changed will appear in the display. Press the M.C. dial and turn the M.C. dial to select [SRC OFF :YES], then press to confirm. The unit turns off automatically and the setting is executed.
7 Repeat steps 2 to 3.
8 Turn the M.C. dial to select [ANDROID WIRED], then press to confirm.
9 Turn the M.C. dial to select [APP CONTROL] for an Android device connected via USB.
If [ON] is selected in [P.APP AUTO ON] (page 18), Pioneer ARC APP on the Android device starts automatically, and all the steps are finished.
NOTE
If Pioneer ARC APP has not been installed on your Android device yet, a message that prompts you to install the application will appear on your Android device. Select [OFF] in [P.APP AUTO ON] to clear the message (page 18).
10 Press SRC/OFF to select any source.
11 Launch Pioneer ARC APP on the mobile device.
NOTE
You can also launch the application by pressing and holding the M.C. dial if you select the USB connection for iPhone or the Bluetooth connection.
Listening to music on Android
1 Press SRC/OFF to select [ANDROID].
Basic operations
| Purpose | Operation |
| Select a track | Press ↓ or ↑. |
| Fast forward or reverse | Press and hold ↓ or ↑. |
| Pause/resume playback | Press 4/PAUSE. |
Audio adjustments
You can also make various adjustments in the AUDIO settings (page 16).
Operation modes
This unit features two operation modes: network mode and standard mode. You can switch between modes as desired (page 5).
Network mode
You can create a 2-way + SW multi-amp and multi-speaker system with high range speaker, middle range speaker and subwoofer for reproduction of high, middle and low frequencies (bands).
Standard mode
You can create a 4-speaker system with front and rear speakers or front speakers and subwoofoers, or a 6-speaker system with front and rear speakers and subwoofoers.
Adjusting the cut-off frequency value and the slope value
You can adjust the cut-off frequency value and the slope value of each speaker. The following speakers can be adjusted.
Network mode:
[HIGH] (high-range speaker HPF), [MID HPF] (middle-range speaker HPF), [MID LPF] (middle-range speaker LPF), [SUBWOOFER]
Standard mode:
[FRONT], [REAR], [SUBWOOFER]
NOTE
[SUBWOOFER] can only be selected when [ON] is selected in [SUBWOOFER] (page 16).
1 Press the M.C. dial to display the main menu.
2 Turn the M.C. dial to select [AUDIO], then press to confirm.
3 Turn the M.C. dial to select [CROSSOVER], then press to confirm.
4 Turn the M.C. dial to select the speaker unit (filter) to be adjusted, then press to confirm.
5 Turn the M.C. dial to select [HPF] or [LPF] according to the speaker unit (filter), then press to confirm.
6 Turn the M.C. dial to select an appropriate cut-off frequency for the speaker unit (filter) selected in step 4, then press to confirm.
Network mode:
[1.25K] to [12.5K] (if you choose [HIGH] or [MID LPFI])
[25] to [250] (if you choose [MID HPF] or [SUBWOOFER])
Standard mode:
[50HZ] to [200HZ]
7 Turn the M.C. dial to select an appropriate slope for the speaker unit (filter) selected in step 4.
Network mode:
[-6] to [-24] (if you choose [HIGH], [MID HPF] or [MID LPF])
[-12] to [-36] (if you choose [SUBWOOFER])
Standard mode:
[-6] to [-24]
Settings
You can adjust various settings in the main menu.
Press the M.C. dial to display the main menu.
2 Turn the M.C. dial to select one of the categories below, then press to confirm.
FUNCTION settings (page 15)
- AUDIO settings (page 16)
SYSTEM settings (page 17)
ILLUMINATION settings (page 19)
- MIXTRAX settings (page 19)
3 Turn the M.C. dial to select the options, then press to confirm.
FUNCTION settings
The menu items vary according to the source.
| Menu Item | Description |
| S.FOLLOW DAB
[ON], [OFF] | Search for another ensemble that supports the same service component with better reception. If no alternative service component can be found or reception remains poor, the unit will automatically switch to an identical FM broadcast. |
| SOFTLINK*1*2 DAB
[ON], [OFF] | If the reception of the service component being received becomes poor, the unit will automatically switch to a station with a similar broadcast. |
| PROGRAM TYPE DAB
[NEWS/INFO], [POPULAR], [CLASSICS], [OTHERS] | Displays the program type information. |
| ENSEMBLE DAB | Displays the list of relevant ensembles. |
| FM SETTING RADIO
[TALK], [STANDARD], [MUSIC] | Match the sound quality level with the broadcast signal conditions of the FM band signal. (Available only when FM band is selected.) |
| BSM RADIO | Store the six strongest stations on the number buttons (1/∧ to 6/←) automatically. |
| REGIONAL RADIO
[ON], [OFF] | Limit the reception to the specific regional programs when AF (alternative frequencies search) is selected. (Available only when FM band is selected.) |
| LOCAL RADIO
FM: [OFF], [LV1], [LV2], [LV3], [LV4]
MW/LW: [OFF], [LV1], [LV2] | Restrict the tuning station according to the signal strength. |
| Menu Item | Description |
| TA | DAB | RADIO | | |
| [DAB+RDS TA] | Receive current traffic information for DAB and RDS (DAB has priority) if available. |
| [RDS TA ONLY] | Receive current traffic information for only RDS if available. |
| [TA OFF] | Disables this function. |
| AF | RADIO | | | |
| [ON], [OFF] | Allow the unit to retune to a different frequency providing the same station. (Available only when FM band is selected.) |
| NEWS | RADIO | | | |
| [ON], [OFF] | Interrupt the currently selected source with news programs. (Available only when FM band is selected.) |
| SEEK | RADIO | | | |
| [MAN], [PCH] | Assign |▶ or ➔ buttons to seek the stations one by one (manual tuning) or select a station from the preset channels. |
| SAVE | SPOTIFY | | | |
| | | | Store the information about the song currently being played to your music list on Spotify. |
| UNSAVE | SPOTIFY | | | |
| | | | Remove the song information stored in [SAVE]. |
| SEL DEVICE | iPod | APP | BT AUDIO | SPOTIFY |
| | | | Connect a Bluetooth device in the list. |
| S.RTRV | CD | USB | iPod | APP BT AUDIO ANDROID SPOTIFY AUX |
| [1] (effective for low compression rates), [2] (effective for high compression rates), [OFF] | Enhance compressed audio and restore rich sound. |
| AUDIO BOOK | iPod | | | |
| [FASTER], [NORMAL], [SLOWER] | Change the playback speed. (Not available when [CONTROL iPod] is selected in the control mode.) |
| Menu Item | Description |
| PAUSE APP | Pause or resume playback. |
| PLAY BT AUDIO | Start playback. |
| STOP BT AUDIO | Stop playback. |
1 Only available in areas where [SOFTLINK] function is supported.
2 Not available when [S.FOLLOW] function is turned off.
AUDIO settings
| Menu Item | Description |
| EQ SETTING |
| [SUPER BASS], [POWERFUL], [NATURAL], [VOCAL], [CUSTOM1], [CUSTOM2], [FLAT] | Select or customize the equalizer curve.
• When you select a setting other than [CUSTOM1] and [CUSTOM2], you can also customize the equalizer curve by pressing and holding the M.C. dial, then store the customized equalizer curve in [CUSTOM1]. |
| Select an equalizer band and level for further customizing. Equalizer band: [50HZ] to [12.5kHz] Equalizer level: [-6] to [+6] |
| FADER*1 (Only for standard mode) | Adjust the front and rear speaker balance. |
| BALANCE | Adjust the left and right speaker balance. |
| SUBWOOFER |
| [ON], [OFF] | Set to [ON] when using a subwoofer speaker. |
| SUBWOOFER*2 |
| [NOR], [REV] | Select the subwoofer phase. |
| SPEAKER LEVEL |
| Network mode: [HIGH L], [HIGH R], [MID L], [MID R], [SUBWOOFER] | Select a speaker unit (filter) and adjust the output level. |
| Standard mode: [FRONT L], [FRONT R], [REAR L], [REAR R], [SUBWOOFER] | Each value you have adjusted changes when you change the [POSITION] setting (page 17). |
| Output level: [-24] to [10] | |
| CROSSOVER |
| Select a speaker unit (filter) to adjust the HPF or LPF cut-off frequency and the slope for each speaker unit. For details on the [CROSSOVER] setting, see page 14. |
| POSITION |
| [OFF], [FRONT LEFT] (front seat left), [FRONT RIGHT] (front seat right), [FRONT] (front seats), [ALL]* Only for standard mode | Select a listening position to adjust the speakers' output levels automatically and add a delay time that corresponds to the number and locations of occupied seats. |
| TIME ALIGNNMNT |
| [INITIAL], [OFF], [CUSTOM] | Select or customize the time alignment settings to reflect the distance between the listener's position and each speaker. |
| Select a type of speaker and adjust the speaker distance for further customizing in [CUSTOM]. | Select [INITIAL] to initialize the setting value. |
| Network mode: [HIGH L], [HIGH R], [MID L], [MID R], [SUBWOOFER] | Select [OFF] to reset all setting values to 0. |
| Standard mode: [FRONT L], [FRONT R], [REAR L], [REAR R], [SUBWOOFER] | The [CUSTOM] setting is available when [FRONT LEFT] or [FRONT RIGHT] is selected in [POSITION] (page 17). |
| Speaker distance (cm): [350] to [0.0] | The [CUSTOM] setting is not available when [OFF] is selected in [SUBWOOFER] (page 16). |
| SAVE SETTINGS |
| [YES], [CANCEL] | Save to later recall the following sound settings at their current values: [CROSSOVER], [SPEAKER LEVEL], [EQ SETTING], [POSITION], [TIME ALIGNNMNT], [BASS BOOST], [SUBWOOFER]. |
| LOAD SETTINGS |
| Load the sound settings, when you have already performed [SAVE SETTINGS]. |
| Menu Item | Description |
| BASS BOOST |
| [0] to [+6] | Select the bass boost level. |
| LOUDNESS |
| [OFF], [LOW], [MID], [HI] | Compensate for clear sound at low volume. |
| AUTO LV CTRL |
| [OFF], [MODE1], [MODE2] | Adjust the difference in volume levels among sources or audio files automatically. |
| SLA |
| [+4] to [-4] | Adjust the volume level for each source except FM.
Each of the below combinations are set to the same setting automatically.
· When making a USB connection, set USB, iPod, ANDROID, SPOTIFY, and APP.
· When making a Bluetooth connection, set BT AUDIO, iPod, ANDROID, SPOTIFY, and APP. |
1 Not available when [SW] is selected in [REAR-SP] in the INITIAL settings (page 5).
2 Not available when [FUL] is selected in [REAR-SP] in the INITIAL settings (page 5).
SYSTEM settings
You can also access to these menus when the unit is turned off.
| Menu Item | Description |
| LANGUAGE |
| [ENG](English), [PYC](Russian), [TUR](Turkish) | Select the language to display the text information from a compressed audio file. |
| CLOCK SET |
| Set the clock (page 5). |
| 12H/24H |
| [12H], [24H] | Select the time notation. |
| BEEP TONE |
| [ON], [OFF] | A beep can be heard when any button is pushed. Select [OFF] to disable this function. |
| INFO DISPLAY |
| [SOURCE/BTINFO], [SOURCE/SPEANA], [CLOCK/BTINFO], [CLOCK/SPEANA], [LEVEL METER], [SPEANA], [OFF] | Display the item on the sub information display.
·When [SOURCE/SPEANA] or [CLOCK/SPEANA] is selected, display the antenna instead of the speana on the radio source. |
| DOT DISPLAY |
| [SPEANA], [ICON] | Select [SPEANA] or [ICON] to appear on the left side of the display. |
| AUTO PI |
| [ON], [OFF] | Search for a different station with the same programming, even if using a preset station. |
| AUX |
| [ON], [OFF] | Set to [ON] when using an auxiliary device connected to the unit. |
| BT AUDIO |
| [ON], [OFF] | Set the Bluetooth signal on/off. |
| SPOTIFY |
| [ON], [OFF] | Set to [ON] when using the Spotify function. |
| PW SAVE* |
| [ON], [OFF] | Reduce the battery power consumption. Turning on the source is the only operation allowed when this function is on. |
| BT MEM CLEAR |
| [YES], [CANCEL] | Clear the Bluetooth device data (device list, PIN code, call history, phone book, preset phone numbers) stored in the unit. [CLEARED] appears when data is successfully deleted. |
| Menu Item | Description |
| PHONE CONNECT
[IPHONE/IPOD], [ANDROID] | Select the type of device ([IPHONE/IPOD] or [ANDROID]) and the appropriate connection method ([Wired] or [Bluetooth]) according to your device.
·When [BLUETOOTH] is selected, USB connections cannot be made regardless of the current Bluetooth connection to the unit.
·Select [ANDROID] when you connect the mobile device other than iPhone or Android.
·When the setting is changed, [USB AUTO] (page 18) is automatically performed if [USB AUTO] is set to [ON]. |
| ANDROID WIRED
[MEMORY], [APP CONTROL] | Select the appropriate connection method for an Android device.
·This setting is not available when [BLUETOOTH] is selected in [PHONE CONNECT]. |
| P.APP AUTO ON
[ON], [OFF] | Select [ON] to automatically launch Pioneer ARC APP when an Android device is connected to the unit via AOA. (Not available when [MEMORY] is selected in [ANDROID WIRED].) |
| USB AUTO
[ON], [OFF] | Select [ON] to automatically switch to [USB] source when a USB device/iPod is connected to the unit.
Select [OFF] when a USB device/iPod is being connected to the unit just for charging. |
- [PW SAVE] is canceled if the vehicle battery is disconnected and will need to be turned back on once the battery is reconnected. When [PW SAVE] is off, depending on connection methods, the unit may continue to draw power from the battery if your vehicle's ignition does not have an ACC (accessory) position.
ILLUMINATION settings
| Menu Item | Description |
| COLOUR |
| [KEY COLOUR], [DISP COLOUR],
[BOTH COLOUR] | Select color for the keys/display of the unit from
12 preset colors, [SCAN] or [CUSTOM]*.
• [SCAN]: Cycle through a variety of colors
automatically.
• [CUSTOM]*:
1 Press and hold the M.C. dial until the color
setting display appears.
2 Set the primary color (R (red)/G (green)/B
(blue)) and brightness level ([0] to [60]).
You cannot select a level below 10 for all three
of R (red), G (green), B (blue) at the same time.
You can also customize the preset colors. Select
one of the preset colors, then press and hold the
M.C. dial until the color setting display appears.
* The CUSTOM setting is only available for [KEY
COLOUR] and [DISP COLOUR]. |
| DIM SETTING |
| [SYNC ILLUMI], [SYNC CLOCK],
[ON], [OFF] | Change the display brightness. |
| BRIGHTNESS |
| [1] to [10] | Change the display brightness.
The available setting ranges differ depending on
[DIM SETTING]. |
| PHONE COLOUR |
| [FLASHING] | Select the key color when a call is received.
Applies the color set by [KEY COLOUR]. |
| [FLASH FX1] to [FLASH FX6] | Cycle through a variety of colors automatically. |
| [OFF] | No change in key color made. |
| ILLUMI FX |
| [ON], [OFF] | The illumination effect can be seen when:
– there is an incoming call
– you are on a phone call
– a CD is inserted/ejected
The illumination effect will activate when the
ACC power is turned on/off regardless of this
setting. |
MIXTRAX settings
| Menu Item | Description |
| SHORT PLAYBCK |
| [1.0 MIN], [1.5 MIN], [2.0 MIN], [2.5 MIN], [3.0 MIN], [OFF] | Select the length of the playback time. |
| FLASH AREA |
| [KEY/DISPLAY], [KEY], [OFF] | Select the area for the illumination effect. When [OFF] is selected, the color set under the ILLUMINATION settings (page 19) is used as the display color. |
| FLASH PATTERN |
| [SOUND LEVEL 1] to [SOUND LEVEL 6] | Change the illumination effect according to the sound and bass level. The flash pattern changes according to the sound level. |
| [LOW PASS 1] to [LOW PASS 6] | The flash pattern changes according to the bass level. |
| [RANDOM1] | The flash pattern changes randomly according to the sound level mode and low pass mode. |
| [RANDOM2] | The flash pattern changes randomly according to the sound level mode. |
| [RANDOM3] | The flash pattern changes randomly according to the low pass mode. |
| DISPLAY FX |
| [ON], [OFF] | Set the MIXTRAX special effects on/off. |
| CUT IN FX |
| [ON], [OFF] | Turn the MIXTRAX sound effects on/off while manually changing the tracks. |
Connections/Installation
Connections
In the following, "NW" represents network mode and "STD" represents standard mode. According to the connections you have established, change the speaker mode to standard mode (STD) or network mode (NW) (page 5).

Important
- When installing this unit in a vehicle without an ACC (accessory) position on the ignition switch, failure to connect the red cable to the terminal that detects operation of the ignition key may result in battery drain.

ACC position

No ACC position
- Use of this unit in conditions other than the following could result in fire or malfunction.
-Vehicles with a 12-volt battery and negative grounding.
- When speaker output is used by 4 channels, use speakers over 50 W (maximum input power) and between 4 Ω to 8 Ω (impedance value). Do not use 1 Ω to 3 Ω speakers for this unit.
- When rear speaker output is used by 2 of subwoofer, use speakers over 70W (maximum input power).
* Please refer to connections for a connection method.
- To prevent a short-circuit, overheating or malfunction, be sure to follow the directions below.
- Disconnect the negative terminal of the battery before installation.
- Secure the wiring with cable clamps or adhesive tape. Wrap adhesive tape around wiring that comes into contact with metal parts to protect the wiring.
- Place all cables away from moving parts, such as the shift lever and seat rails.
- Place all cables away from hot places, such as near the heater outlet.
- Do not connect the yellow cable to the battery by passing it through the hole to the engine compartment.
- Cover any disconnected cable connectors with insulating tape.
-Do not shorten any cables.
- Never cut the insulation of the power cable of this unit in order to share the power with other devices. The current capacity of the cable is limited.
- Use a fuse of the rating prescribed.
- Never wire the negative speaker cable directly to ground.
-
Never band together negative cables of multiple speakers.
-
When this unit is on, control signals are sent through the blue/white cable. Connect this cable to the system remote control of an external power amp or the vehicle's auto-antenna relay control terminal (max. 300mA 12 V DC). If the vehicle is equipped with a glass antenna, connect it to the antenna booster power supply terminal.
- Never connect the blue/white cable to the power terminal of an external power amp. Also, never connect it to the power terminal of the auto antenna. Doing so may result in battery drain or a malfunction.
- The black cable is ground. Ground cables for this unit and other equipment (especially, high-current products such as power amps) must be wired separately. If
they are not, an accidental detachment may result in a fire or malfunction.
- The graphical symbol —— placed on the product means direct current.
This unit
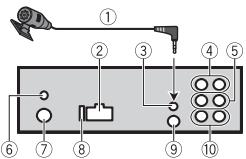
① Microphone (3m)
② Power cord input
③ Microphone input
(4) Rear output (STD) or middle range output (NW)
⑤ Front output (STD) or high range output (NW)
⑥ DAB antenna input To receive DAB signals, connect a DAB antenna (AN-DAB1) (sold separately) to the unit.
⑦ Antenna input
⑧ Fuse(10A)
⑨ Wired remote input Hard-wired remote control adapter can be connected (sold separately).
Subwoofer output
Power cord
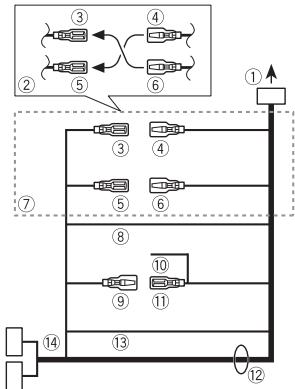
① To power cord input
② Depending on the kind of vehicle, the function of ③ and ⑤ may be different. In this case, be sure to connect ④ to ⑤ and ⑥ to ③
③ Yellow Back-up (or accessory)
4 Yellow Connect to the constant 12 V supply terminal.
⑤ Red Accessory (or back-up)
6 Red Connect to terminal controlled by the ignition switch (12 V DC).
⑦ Connect leads of the same color to each other.
⑧ Black (chassis ground)
9 Blue/white The pin position of the ISO connector will differ depending on the type of vehicle. Connect 9 and 11 when Pin 5 is an antenna control type. In another type of vehicle, never connect 9 and 11.
⑩ Blue/white
Connect to the system control terminal of the power amp (max. 300 mA 12 V DC).
① Blue/white
Connect to the auto-antenna relay control terminal (max. 300mA12VDC
② Speaker leads
White: Front left (STD) or high range left (NW)
White/black: Front left (STD) or high range left (NW)
Gray: Front right (STD) or high range right (NW)
Gray/black: Front right (STD) or high range right (NW)
Green: Rear left (STD) or middle range left (NW)
Green/black: Rear left (STD) or middle range left (NW)
Violet: Rear right (STD) or middle range right (NW)
Violet/black: Rear right (STD) or middle range right (NW)
13 Orange/white
Connect to a car's illumination signal.
ISO connector
In some vehicles, the ISO connector may be divided into two. In this case, be sure to connect to both connectors.
NOTES
- Change the initial menu of this unit. Refer to [REAR-SP] (page 5). The subwoofer output of this unit is monaural.
- When using a subwoofer of 2 , be sure to connect the subwoofer to the violet and violet/black leads of this unit. Do not connect anything to the green and green/black leads.
Power amp (sold separately)
Perform these connections when using the optional amplifier.
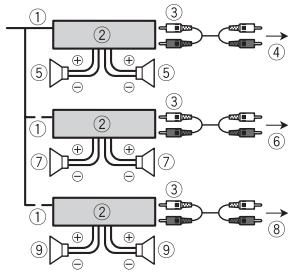
① System remote control Connect to blue/white cable.
② Power amp (sold separately)
③ Connect with RCA cables (sold separately)
④ To rear output (STD) or middle range output (NW)
⑤ Rear speaker (STD) or middle range speaker (NW)
⑥ To front output (STD) or high range output (NW)
⑦ Front speaker (STD) or high range speaker (NW)
⑧ To subwoofer output
⑨ Subwoofer
Installation
Important
- Check all connections and systems before final installation.
- Do not use unauthorized parts as this may cause malfunctions.
- Consult your dealer if installation requires drilling of holes or other modifications to the vehicle.
-
Do not install this unit where:
-
it may interfere with operation of the vehicle.
-it may cause injury to a passenger as a result of a sudden stop.
-
The semiconductor laser will be damaged if it overheats. Install this unit away from hot places such as near the heater outlet.
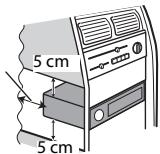
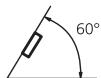
- Optimum performance is obtained when the unit is installed at an angle of less than 60^ .
- When installing, to ensure proper heat dispersal when using this unit, make sure you leave ample space behind the rear panel and wrap any loose cables so they are not blocking the vents.
Leave ample space
DIN mount installation
1 Insert the supplied mounting sleeve into the dashboard.
2 Secure the mounting sleeve by using a screwdriver to bend the metal tabs (90^) into place.
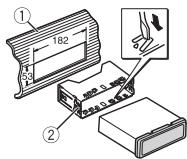
① Dashboard
② Mounting sleeve
- Make sure that the unit is installed securely in place. An unstable installation may cause skipping or other malfunctions.
When not using the supplied mounting sleeve
1 Determine the appropriate position where the holes on the bracket and the side of the unit match.
2 Tighten two screws on each side.
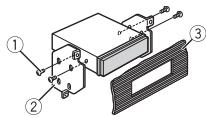
① Tapping screw (5 mm × 9 mm, not supplied with product)
② Mounting bracket
③ Dashboard or console
Removing the unit (installed with the supplied mounting sleeve)
1 Remove the trim ring.
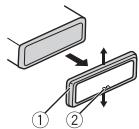
① Trim ring
② Notched tab
- Releasing the front panel allows easier access to the trim ring.
- When reattaching the trim ring, point the side with the notched tab down.
2 Insert the supplied extraction keys into both sides of the unit until they click into place.
3 Pull the unit out of the dashboard.
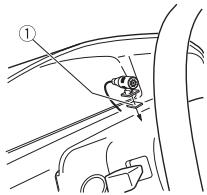
Installing the microphone
The microphone should be placed directly in front of the driver at a suitable distance to pick up their voice clearly.
CAUTION
It is extremely dangerous to allow the microphone lead to become wound around the steering column or shift lever. Be sure to install the microphone in such a way that it will not obstruct driving. It is recommended to use the clamps (sold separately) to arrange the lead.
NOTE
Depending on the vehicle model, the microphone cable length may be too short when you mount the microphone on the sun visor. In such cases, install the microphone on the steering column.
To install on the sun visor
1 Fit the microphone lead into the groove.
① Microphone lead
② Groove
2 Install the microphone clip on the sun visor.
Lowering the sun visor reduces the voice recognition rate.
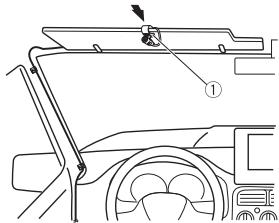
① Microphone clip
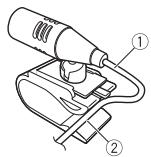
To install on the steering column
1 Slide the microphone base to detach it from the microphone clip.
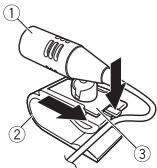
① Microphone
② Microphone clip
③ Microphone base
2 Install the microphone on the rear side of the steering column.
① Double-sided tape
Troubleshooting
The display automatically returns to the normal display.
No operations have been made for about 30 seconds.
- Perform an operation.
The repeat play range changes unexpectedly.
Depending on the repeat play range, the selected range may change when another folder or track is being selected or during fast forwarding/reversing. -Select the repeat play range again.
A subfolder is not played back.
Sub folders cannot be played when [FLD] (folder repeat) is selected.
- Select another repeat play range.
The sound is intermittent.
→ You are using a device, such as a cellular phone, that may cause audible interference.
- Move electrical devices that may be causing the interference away from the unit.
The sound from the Bluetooth audio source is not played back.
There is a call in progress on a Bluetooth-connected cellular phone.
- The sound will be played back when the call is terminated.
A Bluetooth-connected cellular phone is currently being operated.
- Stop using the cellular phone.
→ The connection between the unit and the cellular phone is not established correctly after a call made by a Bluetooth-connected cellular phone.
- Make a Bluetooth connection between the unit and the cellular phone again.
Error messages
Common
AMP ERROR
→ This unit fails to operate or the speaker connection is incorrect.
→ The protective circuit is activated.
- Check the speaker connection.
Turn the ignition switch OFF and back to ON again. If the message remains, contact your dealer or an authorized Pioneer Service Station for assistance.
NO XXXX (NO TITLE, for example)
There is no embedded text information.
- Switch the display or play another track/file.
DABtuner
ANTENNA ERROR
The antenna connection is incorrect.
- Check the antenna connection.
Turn the ignition switch OFF and back to ON again. If the message remains, contact your dealer or an authorized Pioneer Service Station for assistance.
CD player (Only for DEH-X7800DAB)
ERROR-07, 11, 12, 17, 30
→ The disc is dirty.
Clean the disc.
The disc is scratched.
-Replace the disc.
ERROR-07, 10, 11, 12, 15, 17, 30, A0
→ There is an electrical or mechanical error.
- Turn the ignition switch OFF and back to ON, then back to the CD player.
ERROR-15
→ The inserted disc is blank.
-Replace the disc.
ERROR-23
Unsupported CD format.
-Replace the disc.
FORMAT READ
→ Sometimes there is a delay between the start of playback and when you start to hear any sound.
- Wait until the message disappears and you hear sound.
NO AUDIO
→ The inserted disc does not contain any playable files.
-Replace the disc.
SKIPPED
→ The inserted disc contains DRM protected files.
- The protected files are skipped.
PROTECT
All the files on the inserted disc are embedded with DRM.
-Replace the disc.
USB device/iPod
FORMATREAD
→ Sometimes there is a delay between the start of playback and when you start to hear any sound.
- Wait until the message disappears and you hear sound.
NO AUDIO
→ There are no songs.
- Transfer the audio files to the USB device and connect.
The connected USB device has security enabled.
Follow the USB device instructions to disable the security.
SKIPPED
The connected USB device contains DRM protected files.
- The protected files are skipped.
PROTECT
All the files on the connected USB device are embedded with DRM.
-Replace the USB device.
N/A USB
The connected USB device is not supported by this unit.
- Disconnect your device and replace it with a compatible USB device.
HUB ERROR
The USB device connected via a USB hub is not supported by this unit.
- Connect the USB device directly to this unit using a USB cable.
CHECK USB
The USB connector or USB cable has short-circuited.
- Check that the USB connector or USB cable is not caught in something or damaged.
The connected USB device consumes more than maximum allowable current.
- Disconnect the USB device and do not use it. Turn the ignition switch OFF and back to ACC or ON. Connect only compliant USB devices.
→ The iPod operates correctly but does not charge.
- Make sure the connection cable for the iPod has not shorted out (e.g., not caught in metal objects). After checking, turn the ignition switch OFF
and back to ON, or disconnect the iPod and reconnect.
ERROR-19
Communication failed.
Perform one of the following operations, then return to the USB source.
- Turn the ignition switch OFF and back to ON.
- Disconnect the USB device.
- Change to a different source.
iPod failure.
- Disconnect the cable from the iPod. Once the iPod's main menu is displayed, reconnect the iPod and reset it.
ERROR-23
USB device was not formatted properly.
- Format the USB device with FAT12, FAT16 or FAT32.
ERROR-16
The iPod firmware version is old. Update the iPod version.
iPod failure.
- Disconnect the cable from the iPod. Once the iPod's main menu is displayed, reconnect the iPod and reset it.
STOP
There are no songs in the current list.
- Select a list that contains songs.
NOT FOUND
No related songs.
- Transfer songs to the iPod.
No Bluetooth device found.
- Connect the unit and iPod via Bluetooth (page 9).
CONN. Failed PRESS BAND KEY TO RETRY
Bluetooth connection with iPod failed.
-Press BAND/ to make a connection again.
DISCONNECTED PRESS BAND KEY TO RETRY
Bluetooth connection with iPod failed.
-Press BAND/ to make a connection again.
Bluetooth device
ERROR-10
The power failed for the Bluetooth module of the unit.
- Turn the ignition switch OFF and back to ACC or ON.
Apps
No Bluetooth device found.
- Connect the unit and the device via Bluetooth (page 9).
CONN. Failed PRESS BAND KEY TO RETRY
Bluetooth connection failed.
-Press BAND/ to make a connection again.
DISCONNECTED PRESS BAND KEY TO RETRY
Bluetooth connection failed.
-Press BAND/ to make a connection again.
CHECKAPP
Connection to the application failed.
- Follow the instructions that appear on the screen.
STARTUPAPP
→ The application has not started running yet.
- Operate the mobile device to start up the application.
Spotify
No Bluetooth device found.
- Connect the unit and the device via Bluetooth (page 9).
CONN. Failed PRESS BAND KEY TO RETRY
Bluetooth connection failed.
- Press BAND/ to make a connection again.
CHECK APP PRESS BAND KEY TO RETRY
Connection to the Spotify application failed.
- Press BAND/ to make a connection again.
DISCONNECTED PRESS BAND KEY TO RETRY
Bluetooth connection lost.
- Press BAND/ to make a connection again.
CHECKAPP
Connection to the Spotify application failed.
- Follow the instructions that appear on the screen.
Handling guidelines
Discs and player
- Use only discs that feature either of the following two logos.

DIGITAL AUDIO


DIGITAL AUDIO
- Use 12-cm discs.
- Use only conventional, fully circular discs.
- The following types of discs cannot be used with this unit:
-DualDiscs
-8-cm discs: Attempts to use such discs with an adaptor may cause the unit to malfunction.
- Oddly shaped discs
- Disks other than CDs
- Damaged discs, including discs that are cracked, chipped or warped
- CD-R/RW discs that have not been finalized
- Do not write on or apply chemicals to the surface of the discs.
- To clean a CD, wipe the disc with a soft cloth outward from the center.
- Condensation may temporarily impair the player's performance. Let it rest for about one hour to adjust to a warmer temperature. Also, wipe any damp discs off with a soft cloth.
- When using discs that can be printed on label surfaces, check the instructions and the warnings of the discs. Depending on the discs, inserting and ejecting may not be possible. Using such discs may result in damage to this equipment.
- Do not attach commercially available labels or other materials to the discs.
- The discs may warp making the disc unplayable.
The labels may come off during playback and prevent ejection of the discs, which may result in damage to the equipment.
USB storage device
-
Connections via USB hubs are not supported.
-
Firmly secure the USB storage device before driving. Do not let the USB storage device fall onto the floor, where it may become jammed under the brake or accelerator pedal.
-
Depending on the USB storage device, the following problems may occur.
-
Operations may vary.
-
The storage device may not be recognized.
- Files may not be played back properly.
The device may cause audible interference when you are listening to the radio.
iPod
- Do not leave the iPod in places with high temperatures.
- Firmly secure the iPod when driving. Do not let the iPod fall onto the floor, where it may become jammed under the brake or accelerator pedal.
- The settings of the iPod such as the equalizer and repeat play are changed automatically when the iPod is connected to the unit. Once the iPod is disconnected, those settings will return to the original settings.
- Incompatible text saved on the iPod will not be displayed by the unit.
Compressed audio compatibility
- Only the first 32 characters can be displayed as a file name (including the file extension) or a folder name.
- The unit may not work properly depending on the application used to encode WMA files.
-
There may be a slight delay at the start of the playback of audio files embedded with image data, or audio files stored on a USB device with numerous folder hierarchies.
-
Russian text to be displayed on this unit should be encoded in one of the following character sets: - Unicode (UTF-8, UTF-16)
- A character set other than Unicode that is used in a Windows environment and is set to Russian in the multi-language setting
CAUTION
- Pioneer cannot guarantee compatibility with all USB mass storage devices, and assumes no responsibility for any loss of data on media players, smartphones, or other devices while using this product.
- Do not leave discs or a USB storage device in any place that is subject to high temperatures.
WMA files
| File extension | .wma |
| Bit rate | 48 kbps to 320 kbps (CBR), 48 kbps to 384 kbps (VBR) |
| Sampling frequency | 32 kHz, 44.1 kHz, 48 kHz |
| Windows MediaTM Audio Professional, Lossless, Voice/DRM Stream/Stream with video | Not compatible |
MP3 files
| File extension | .mp3 |
| Bit rate | 8 kbps to 320 kbps (CBR), VBR |
| Sampling frequency | 8 kHz to 48 kHz (32 kHz, 44.1 kHz, 48 kHz for emphasis) |
| Compatible ID3 tag version | 1.0, 1.1, 2.2, 2.3, 2.4 (ID3 tag Version 2.x is given priority over Version 1.x.) |
| M3u playlist | Not compatible |
| MP3i (MP3 interactive), mp3 PRO | Not compatible |
WAV files
- WAV file formats cannot be connected via MTP.
| File extension | .wav |
| Quantization bits | 8 and 16 (LPCM), 4 (MSADPCM) |
| Sampling frequency | 16 kHz to 48 kHz (LPCM), 22.05 kHz and 44.1 kHz (MS ADPCM) |
AAC files
| Compatible format | AAC encoded by iTunes |
| File extension | .m4a |
| Sampling frequency | 11.025 kHz to 48 kHz |
| Transmission rate | 16 kbps to 320 kbps, VBR |
| Apple Lossless | Not compatible |
| AAC file bought from the iTunes Store (.m4p file extension) | Not compatible |
FLAC files
- FLAC file formats cannot be connected via MTP.
- FLAC files may not be playable, depending on the encoder.
| File extension | ;.flac |
| Sampling frequency | 8/11.025/12/16/22.05/24/32/44.1/48/96 kHz |
| Quantization bit rate | 16/24 bit |
| Channel mode | 1/2 ch |
Disc (DEH-X7800DAB only)
- Regardless of the length of the blank section between the songs from the original recording, compressed audio discs play with a short pause between songs.
| Playable folder hierarchy | Up to eight tiers (A practical hierarchy is less than two tiers.) |
| Playable folders | Up to 99 |
| Playable files | Up to 999 |
| File system | ISO 9660 Level 1 and 2, Romeo, Joliet |
| Multi-session playback | Compatible |
| Packet write data transfer | Not compatible |
USB device
- There may be a slight delay when starting playback of audio files on a USB storage device with numerous folder hierarchies.
| Playable folder hierarchy | Up to eight tiers (A practical hierarchy is less than two tiers.) |
| Playable folders | Up to 1 500 |
| Playable files | Up to 15 000 |
| Playback of copyright-protected files | Not compatible |
| Partitioned USB device | Only the first partition can be played. |
iPod compatibility
This unit supports only the following iPod models. Supported iPod software versions are shown below. Older versions may not be supported.
Made for
-iPod touch (1st through 6th generation)
-iPod classic
- iPod with video
-iPod nano (1st through 7th generation)
-iPhone 6s
iPhone 6s Plus
iPhone 6
iPhone 6 Plus
iPhone 5s
iPhone 5c
iPhone 5
iPhone 4s
iPhone 4
iPhone 3GS
iPhone 3G
-iPhone
- Operations may vary depending on the generation and/or software version of the iPod.
- Users of iPod with the Lightning Connector should use the Lightning to USB Cable (supplied with iPod).
- Users of iPod with the Dock Connector should use the CD-IU51. For details, consult your dealer.
Refer to the iPod manuals for information about the file/format compatibility.
- Audiobook, Podcast: Compatible
CAUTION
Pioneer accepts no responsibility for data lost on the iPod, even if that data is lost while this unit is used.
Sequence of audio files
The user cannot assign folder numbers and specify playback sequences with this unit. Sequence of audio file depends on the connected device.
Note that the hidden files in a USB device cannot be played back.
Example of a hierarchy

Level 1 Level 2 Level 3 Level 4
01 to 05: Folder number
① to ⑥: Playback sequence
Russian character chart
D:Display C:Character
| D: C | D: C | D: C |
| R:A | Б:B | Б:B |
| F:Γ | Д:Д | Ε:E,Ε |
| *:Ж | З:З | И:И,И |
| K:К | Л:Л | М:М |
| H:H | Ω:О | П:П |
| P:P | С:C | Т:Т |
| Y:Y | Ф:Ф | Ч:Х |
| U:U | Ч:Ч | Ш:Ш,Ш |
| Ž:Ž | Η:ΗΙ | Б:Б |
| Ž:Э | Η:Ю | Ч:Я |
Copyright and trademark
Bluetooth
The Bluetooth® word mark and logos are registered trademarks owned by Bluetooth SIG, Inc. and any use of such marks by PIONEER CORPORATION is under license. Other trademarks and trade names are those of their respective owners.
iTunes
Apple and iTunes are trademarks of Apple Inc., registered in the U.S. and other countries.
WMA
Windows Media is either a registered trademark or trademark of Microsoft Corporation in the United States and/or other countries.
This product includes technology owned by Microsoft Corporation and cannot be used or distributed without a license from Microsoft Licensing, Inc.
FLAC
Copyright © 2000-2009 Josh Coalson
Copyright © 2011-2014 Xiph.Org
Foundation
Redistribution and use in source and binary forms, with or without modification, are permitted provided that the following conditions are met:
- Redistributions of source code must retain the above copyright notice, this list of conditions and the following disclaimer.
- Redistributions in binary form must reproduce the above copyright notice, this list of conditions and the following disclaimer in the documentation and/or other materials provided with the distribution.
Neither the name of the Xiph.org Foundation nor the names of its contributors may be used to endorse or promote products derived from this
software without specific prior written permission.
THIS SOFTWARE IS PROVIDED BY THE Copyright HOLDERS AND
CONTRIBUTORS "AS IS" AND ANY EXPRESS OR IMPLIED WARRANTY, INCLUDING, BUT NOT LIMITED TO, THE IMPLIED
WARRANTIES OF MERCHANTABILITY AND FITNESS FOR A PARTICULAR PURPOSE ARE DISCLAIMED. IN NO EVENT SHALL THE FOUNDATION OR COLNTRIBUTORS BE LIABLE FOR ANY DIRECT, INDIRECT, INCIDENTAL, SPECIAL, EXEMPLARY, OR CONSEQUENTIAL DAMAGES (INCLUDING, BUT NOT LIMITED TO, PROCEDURE OF SUBSTITUTE GOODS OR SERVICES;LOSS OF USE, DATA, OR PROFITS; OR BUSINESS INTERRUPTION) HOWEVER CAUSED AND ON ANY THEORY OF LIABILITY, WHETHER IN CONTRACT, STRICT LIABILITY, OR TORT (INCLUDING NEGLIGENCE OR OTHERWISE) ARISING IN ANY WAY OUT OF THE USE OF THIS SOFTWARE, EVEN IF ADVISED OF THE POSSIBILITY OF SUCH DAMAGE.
iPod & iPhone
iPhone, iPod, iPod classic, iPod nano, and iPod touch are trademarks of Apple Inc., registered in the U.S. and other countries. Lightning is a trademark of Apple Inc. "Made for iPod" and "Made for iPhone" mean that an electronic accessory has been designed to connect specifically to iPod or iPhone, respectively, and has been certified by the developer to meet Apple performance standards. Apple is not responsible for the operation of this device or its compliance with safety and regulatory standards. Please note that the use of this accessory with iPod or iPhone may affect wireless performance.
Android & Google Play
Android, Google Play, and the Google Play logo are trademarks of Google Inc.
MIXTRAX
MIXTRAX is a trademark of the PIONEER CORPORATION.
Spotify®
SPOTIFY and the Spotify logo are among the registered trademarks of Spotify AB. Compatible mobile digital devices and premium subscription required, where available, see http://pioneer.eu/spotify.
T-Kernel 2.0
This product uses the source code of T-Kernel 2.0 under T-License 2.0 granted by T-Engine Forum (www.tron.org).
MP3
Copyright (C) 1998-2009 PacketVideo
Licensed under the Apache License,
Version 2.0 (the "License"); you may not use this file except in compliance with the License.
You may obtain a copy of the License at
http://www.apache.org/licenses/License-2.0
Unless required by applicable law or agreed to in writing, software distributed under the License is distributed on an "AS IS" BASIS, WITHOUT WARRANTY OR CONDITIONS OF ANY KIND, either express or implied.
See the License for the specific language governing permissions and limitations under the License.
Specifications
General
Power source: 14.4 V DC (10.8 V to 15.1 V allowable)
Grounding system: Negative type
Maximum current consumption: 10.0 A
Dimensions (W× H× D)
DIN
Chassis: 178mm× 50mm× 165mm
Nose: 188mm× 58mm× 16mm
D
Chassis: 178mm× 50mm× 165mm
Nose: 170mm× 46mm× 16mm
Weight: 1kg (DEH-X7800DAB), 0.7kg
(MVH-X580DAB/X580BT)
Audio
Maximum power output:
- 50W × 4ch / 4 (for no subwoofer)
- 50 × 2 ch / 4 + 70 W × 1 ch / 2 (for subwoofer)
Continuous power output:
22W× 4 (50Hz to 15000 Hz, 5 %
THD, 4 Ω load, both channels driven)
Load impedance: 4 (4 to 8 (2 for 1 ch) allowable)
Preout maximum output level: 2.0 V
Equalizer (13-Band Graphic Equalizer): Frequency: 50 Hz/80 Hz/125 Hz/200 Hz/315 Hz/500 Hz/800 Hz/1.25 kHz/2 kHz/3.15 kHz/5 kHz/8 kHz/12.5 kHz Gain: ±12 dB (2 dB step)
High pass filter (Standard mode):
Frequency: 50Hz / 63Hz / 80Hz / 100
Hz/125 Hz/160 Hz/200 Hz
Slope: -6 dB/oct, -12 dB/oct, -18 dB/
oct, -24 dB/oct, OFF
Subwoofer/Low pass filter (Standard mode):
Frequency: 50 Hz/63 Hz/80 Hz/100
Hz/125 Hz/160 Hz/200 Hz
Slope: -6 dB/oct, -12 dB/oct, -18 dB/ oct, -24 dB/oct, OFF
Gain: +10 dB to -24 dB (1 dB step)
Phase: Normal/Reverse
Speaker level (Standard mode):
+10 dB to -24 dB (1 dB step)
Time alignment (Standard mode): 0 cm to 350 cm (2.5 cm/Step)
Bass boost (Standard mode):
Gain: +12 dB to 0 dB
High pass filter (HIGH) (Network mode):
Frequency: 1.25kHz / 1.6kHz / 2kHz
2.5 kHz/3.15 kHz/4 kHz/5 kHz/6.3 kHz/
8 kHz/10 kHz/12.5 kHz
Slope: -6 dB/oct, -12 dB/oct, -18 dB/ oct, -24 dB/oct
High pass filter (MID) (Network mode):
Frequency: 25Hz / 31.5Hz / 40Hz / 50
Hz/63 Hz/80 Hz/100 Hz/125 Hz/160
Hz/200 Hz/250 Hz
Slope: -6 dB/oct, -12 dB/oct, -18 dB/
oct, -24 dB/oct, OFF
Low pass filter (MID) (Network mode):
Frequency: 1.25kHz / 1.6kHz / 2kHz
2.5 kHz/3.15 kHz/4 kHz/5 kHz/6.3 kHz/
8 kHz/10 kHz/12.5 kHz
Slope: -6 dB/oct, -12 dB/oct, -18 dB/
oct,-24 dB/ocf,OFF
Subwoofer (Network mode):
Frequency: 25Hz / 31.5Hz / 40Hz / 50
Hz/63 Hz/80 Hz/100 Hz/125 Hz/160
Hz/200 Hz/250 Hz
Slope: -12 dB/oct, -18 dB/oct, -24 dB/
oct,-30 dB/oct, -36 dB/oct, OFF
Gain: +10 dB to -24 dB (1 dB step)
Phase: Normal/Reverse
Speaker level (Network mode):
+10 dB to -24 dB (1 dB step)
Time alignment (Network mode):
0 cm to 350 cm (2.5 cm/Step)
Bass boost (Network mode):
Gain: +12 dB to 0 dB
CD player
(DEH-X7800DAB)
System: Compact disc audio system
Usable discs: Compact disc
Signal-to-noise ratio: 94 dB (1 kHz) (IEC-A network)
Number of channels: 2 (stereo)
MP3 decoding format: MPEG-1 & 2 Audio Layer 3
WMA decoding format: Ver. 7, 7.1, 8, 9, 10, 11 (2 ch audio) (Windows Media Player)
AAC decoding format: MPEG-4 AAC (iTunes encoded only) (Ver. 10.6 and earlier)
WAV signal format: Linear PCM & MS ADPCM (Non-compressed)
USB
USB standard specification: USB 2.0 full speed
Maximum current supply: 1 A
USB Protocol:
MSC (Mass Storage Class)
MTP (Media Transfer Protocol)
AOA (Android Open Accessory) 2.0
File system: FAT12, FAT16, FAT32
MP3 decoding format: MPEG-1 & 2 Audio Layer 3
WMA decoding format:Ver.7,7.1,8,9,10
11 (2 ch audio) (Windows Media
Player)
AAC decoding format: MPEG-4 AAC (iTunes
encoded only) (Ver. 10.6 and earlier)
FLAC decoding format: v1.3.0 (Free
Lossless Audio Codec)
WAV signal format: Linear PCM & MS
ADPCM (Non-compressed)
FM tuner
Frequency range: 87.5 MHz to 108.0 MHz
Usable sensitivity: 11 dBf (1.0 μV/75 Ω,
mono, S/N: 30 dB)
Signal-to-noise ratio: 72 dB (IEC-A network)
MWtuner
Frequency range: 531 kHz to 1602 kHz
Usable sensitivity: 25 V (S/N: 20 dB)
Signal-to-noise ratio: 62 dB (IEC-A network)
LWTuner
Frequency range: 153 kHz to 281 kHz
Useable sensitivity: 28 V (S/N: 20 dB)
Signal-to-noise ratio: 62 dB (IEC-A network)
DABtuner
Frequency range (Band III): 174.928 MHz to 239.200 MHz (5 A to 13 F)
Frequency range (L Band): 1452.960 MHz
to 1490.624 MHz (LA to LW)
Usable sensitivity (Band III): -100 dBm
Usage sensitivity (L Band): -100 dBm
Signal-to-noise ratio: 85 dB
Bluetooth
Version: Bluetooth 3.0 certified
Output power: +4 dBm Maximum (Power class 2)
Frequency band(s): 2400 MHz to 2483.5
MHz
Bluetooth profiles:
GAP (Generic Access Profile)
SDAP (Service Discovery Application
Profile)
HFP (Hands Free Profile) 1.6
PBAP (Phone Book Access Profile)
A2DP (Advanced Audio Distribution
Profile)
AVRCP (Audio/Video Remote Control
Profile) 1.5
SPP (Serial Port Profile) 1.1
NOTE
Specifications and the design are subject
to modifications without notice.
Table des matieres
Raccordements/Installation 22
Molette M.C. (multi-controle)
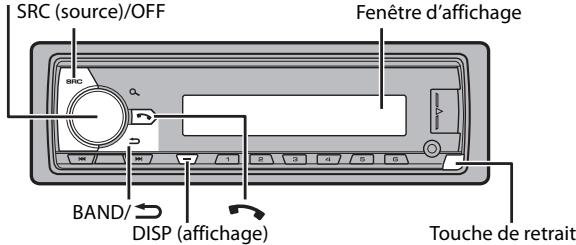
L'application Spotify est disponible pour les téléphones iPhone et Android. Veuillez consultez https://support).(https://support).(https://support).(https://support).(https://support).(https://support).(https://support).(https://support).(https://support).(https://support).(https://support).(https://support).(https://support).(https://support).(https://support).(https://support).(https://support).(https://support).(https://support).(https://support).(https://support).(https://support).(https://support).(https://support).(https://support).(https://support).( https://support.(https://support.(https://support.(https://support.(https://support.(https://support.(https://support.(https://support.(https://support.(https://support.(https://support.(https://support.(https://support.(https://support.(https://support.(https://support.(https://support.(https://support.(https://support.(https://support.(https://support.(https://support.(https://support.(https://support.(https://support.(https://support.( https://support.(https://support.(https://support.(https://support.(https://support.(https://support.(https://support.(https://support.(https://support.(https://support.(https://support.(https://support.(https://support.(https://support.(https://support.(https://support.(https://support.(https://support.(https://support.(https://support.(https://support.(https://support.(https://support.(https://support.(https://support;(https://support;(https://support;(https://support;(https://support;(https://support;(https://support;(https://support;(https://support;(https://support;(https://support;(https://support;(https://support;(https://support;(https://support;(https://support;(https://support;(https://support;(https://support;(https://support;(https:/support;(https:/support;(https:/support;(https:/support;(https:/support;(https:/support;(https:/support;(https:/support;(https:/support;(https:/support;(https:/support;(https:/support;(https:/support;(https:/support;(https:/support;(https:/support;(https:/support;(https:/support;(https:/support;(https:/support;(https:/support;(https:/support;(https:/support;(https:/support;(https:/support;(https://support;(https:/support;(https:/support;(https:/support;(https:/support;(https:/support;(https:/support;(https:/support;(https:/support;(https:/support;(https:/support;(https:/support;(https:/support;(https:/support;(https:/support;(https:/support;(https:/support;(https:/support;(https:/support;(https:/support;(https:/support;(https:/support;(https:/support;(https:/support;(https://support;(https://support;(https:/support;(https:/support;(https:/support;(https:/support;(https:/support;(https:/support;(https:/support;(https:/support;(https:/support;(https:/support;(https:/support;(https:/support;(https:/support;( https :/www . com/ / a n d / a n d / a n d / a n d / a n d / a n d / a n d / a n d / a n d / a n d / a n d / a n d / a n d / a n d / a n d / a n d / a n d / a n d / a n d / a n d / a n d / a n d / a n d / a n d / a n d / a n and / a n and / a n and / a n and / a n and / a n and / a n and / a n and / a n and / a n and / a n and / a n and / a n and / a n and / a n and / a n and / a n and / a n and / a n and / a n and / a n and / a n and / a n and / a n and / a n and / a n
Raccordements/Installation
Raccordements
ERROR-07, 11, 12, 17, 30
ERROR-07, 10, 11, 12, 15, 17, 30, A0
Copyright © 2000-2009 Josh Coalson
Copyright © 2011-2014 Xiph.Org
Foundation
Copyright (C) 1998-2009 PacketVideo
Pente: -6 dB/oct, -12 dB/oct, -18 dB/ oct, -24 dB/oct, OFF
Caisson de graves/filtre salle-bas (mode standard):
Pente: -6 dB/oct, -12 dB/oct, -18 dB/ oct, -24 dB/oct, OFF
Pente: -6 dB/oct, -12 dB/oct, -18 dB/ oct, -24 dB /oct
Filtre salle-haut (MOYEN) (mode reseau): Fréquence: 25 Hz/31,5 Hz/40 Hz/50 Hz/63 Hz/80 Hz/100 Hz/125 Hz/160 Hz/200 Hz/250 Hz
Pente: -6dB /oct, -12dB /oct, -24dB /oct, OFF
Filtre salle-bas (MOYEN) (mode réseau): Fréquence: 1,25 kHz/1,6 kHz/2 kHz/2, 5 kHz/3,15 kHz/4 kHz/5 kHz/6,3 kHz/8 kHz/10 kHz/12,5 kHz
Pente: -6 dB/oct, -12 dB/oct, -18 dB/ oct, -24 dB/oct, OFF
Caisson deravess (mode reseau): Frquence:25Hz/31,5Hz/40Hz/ 50Hz/63Hz/80Hz/100Hz/125Hz/ 160Hz/200Hz/250Hz Pente:-12dB/oct,-18dB/occt,-24dB/ oct,-30dB/occt,-36dB/occt,OFF
Phase :normale/inverse
AOA (Android Open Accessory) 2.0
A2DP (Advanced Audio Distribution Profile)
AVRCP (Audio/Video Remote Control Profile) 1.5
SPP (Serial Port Profile) 1.1
REMARQUE
Digital Audio Broadcasting (DAB) 6
Radio. 6
CD/USB/iPod/AUX 7
Bluetooth 10
Modalità app. 12
Spotify 13
Digital Audio Broadcasting (DAB)
(Solo per DEH-X7800DAB/MVH-X580DAB)
Best stations memory (BSM)
ERROR-07, 11, 12, 17, 30
ERROR-07, 10, 11, 12, 15, 17, 30, A0
Copyright © 2000-2009 Josh Coalson
Copyright © 2011-2014 Xiph.Org Foundation
Copyright (C) 1998-2009 PacketVideo
Pendenza: -6 dB/oct, -12 dB/oct, -18 dB/oct, -24 dB/oct, OFF
Pendenza: -6 dB/oct, -12 dB/oct, -18 dB/oct, -24 dB/oct, OFF
Pendenza: -6 dB/oct, -12 dB/oct, -18 dB/oct, -24 dB/doc
Pendenza: -6 dB/oct, -12 dB/oct, -18 dB/oct, -24 dB/oct, OFF
Pendenza: -6 dB/oct, -12 dB/oct, -18 dB/oct, -24 dB/oct, OFF
Pendenza: -12 dB/oct, -18 dB/oct, -24 dB/oct, -30 dB/oct, -36 dB/oct, OFF
Guadnado:da +10 dB a-24 dB (passo 1 dB)
Fase:normale/inversa
Specifica standard USB: USB 2.0 full speed
MSC (Mass Storage Class)
MTP (Media Transfer Protocol)
AOA (Android Open Accessory) 2.0
File system: FAT12, FAT16, FAT32
GAP (Generic Access Profile)
SDAP (Service Discovery Application Profile)
HFP (Hands Free Profile) 1.6
PBAP (Phone Book Access Profile)
A2DP (Advanced Audio Distribution Profile)
AVRCP (Audio/Video Remote Control Profile) 1.5
SPP (Serial Port Profile) 1.1
NOTA
Digital Audio Broadcasting (DAB) 6
Radio. 6
CD/USB/iPod/AUX 7
Bluetooth 9
Modo app 12
Spotify 13
Digital Audio Broadcasting (DAB)
(Solo para DEH-X7800DAB/MVH-X580DAB)
Alternatively, you can use the following two methods to create a sound from a text.
Modos de funciona
Esta�性質を指定。This is the most common way to define a variable. It can be any value, such as a number or a string.
Modo de red
Alternatively, you can choose to do the rest of your work.
ERROR-07, 10, 11, 12, 15, 17, 30, A0
Copyright © 2000-2009 Josh Coalson
Copyright © 2011-2014 Xiph.Org Foundation
Copyright (C) 1998-2009 PacketVideo
Curva: -6 dB/oct, -12 dB/oct, -18 dB/
oct,-24 dB/oc,OFF
Curva: -6 dB/oct, -12 dB/oct, -18 dB/ oct, -24 dB/oct, OFF
Curva: -6 dB/oct, -12 dB/oct, -18 dB/ oct, -24 dB/oct
Curva: -6 dB/oct, -12 dB/oct, -18 dB/ oct, -24 dB/oct, OFF
Filtro de caso bajo (MID) (Modo de red): Frecuencia: 1,25 kHz/1,6 kHz/2 kHz/2, 5 kHz/3,15 kHz/4 kHz/5 kHz/6,3 kHz/8 kHz/10 kHz/12,5 kHz
Curva: -6 dB/oct, -12 dB/oct, -18 dB/ oct, -24 dB/oct, OFF
Subwoofer (Modo de red):
Frecuencia: 25Hz / 31,5Hz / 40Hz / 50
Hz/63 Hz/80 Hz/100 Hz/125 Hz/160
Hz/200 Hz/250 Hz
Curva:-12 dB/oct, -18 dB/oct, -24 dB/ oct,-30 dB/oct,-36 dB/oct, OFF
ERROR-07, 10, 11, 12, 15, 17, 30, A0
Copyright (C) 1998-2009 PacketVideo
AOA (Android Open Accessory) 2.0
GAP (Generic Access Profile)
SDAP (Service Discovery Application
Profile)
HFP (Hands Free Profile) 1.6
PBAP (Phone Book Access Profile)
A2DP (Advanced Audio Distribution
Profile)
AVRCP (Audio/Video Remote Control
Profile) 1.5
SPP (Serial Port Profile) 1.1
HINWEIS
Digital Audio Broadcasting (DAB) 6
Radio 6
Cd/USB/iPod/AUX 7
Bluetooth 10
App-modus 12
Spotify 13
KLASSE 1 LASERPRODUCT
Bij problemen
Digital Audio Broadcasting (DAB)
Best stations memory (BSM)
ERROR-07, 10, 11, 12, 15, 17, 30, A0
Copyright (C) 1998-2009 PacketVideo
Helling: -6 dB/oct, -12 dB/oct, -18 dB/ oct, -24 dB/oct, UIT
Helling: -6 dB/oct, -12 dB/oct, -18 dB/ oct, -24 dB/oct, UIT
Helling: -6 dB/oct, -12 dB/oct, -18 dB/ oct, -24 dB/ oct
Helling: -6 dB/oct, -12 dB/oct, -18 dB/ oct, -24 dB/oct, UIT
Helling: -6 dB/oct, -12 dB/oct, -18 dB/ oct, -24 dB/oct, UIT
Subwoofer (networkmodus):
Frequentie: 25Hz / 31,5Hz / 40Hz / 50
Hz/63 Hz/80 Hz/100 Hz/125 Hz/
160 Hz/200 Hz/250 Hz
Helling: -12 dB/oct, -18 dB/oct, -24 dB/
oct, -30 dB/oct, -36 dB/oct, UIT
Bass boost (Netwerkmodus):
Gain: +12 dB tot 0 dB
Cd-speler
(DEH-X7800DAB)
System: Compact Disc Audio
MSC (Mass Storage Class)
MTP (Media Transfer Protocol)
AOA (Android Open Accessory) 2.0
Bestandsystem: FAT12, FAT16, FAT32
MP3-decoderingsformaat: MPEG-1 & 2 Audio Layer 3
WMA-decoderingformula:Versie 7,7.1,8, 9,10,11 (2-kanaalsaudio) (Windows Media Player)
GAP (Generic Access Profile)
SDAP (Service Discovery Application Profile)
HFP (Hands Free Profile) 1.6
PBAP (Phone Book Access Profile)
A2DP (Advanced Audio Distribution
Profile)
AVRCP (Audio/Video Remote Control
Profile) 1.5
SPP (Serial Port Profile) 1.1
OPMERKING
JI3EPHbI IPOdyKT KJACC 1
PpB03HnKHOBeHNn npo6nem
PnH ennoLaKab X bOa6eT OTOI 3NIAEINB CBKNITEc b TOPCOBIM pIepCTABNTENEM KOMPAHINIPOHN3BOIDATAJI IN C NIIKAINAMC SEBPCHNIM PYNKTHOM PIONEER.
Hauano pa60tbl
Ochobhbie onepaun
DEH-X7800DAB
Pernylantop M.C. (Mnroo3aauHoe ynpabneHne)

DISP (dɪnʌpɪneɪ)
KhONka oTcoeDInHeHnA
MVH-X580DAB/X580BT
Perylantop M.C. (Mhoro3aauHoe ynpabJeHne)
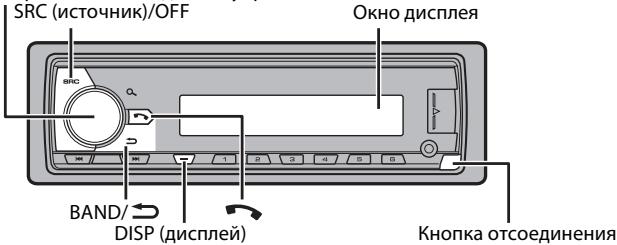
Yacto nCnoNb3yEmble onepaunn
IOctynHbIe KHOKNKMOrY OTNIuHaTcB 3aBUNMOCTN OT YcTPOINCTBa.
PpneM npeBapuTeIbHO yCTaHOBJIeHHbIX CtAHcN
KHOKNIO MOXHO TAKKHe NcONoB3OBaTb DnA Bb6Opa IpeBaPHTeHbO yCTaHOBLeHHo CTaHcN,ecnI dIpaMaTePa [SEEK] yCTaHOBLeHo 3NaueHne [PCH] B hAcTpoiKaX FUnction (ctp.17).
3anomnHaHne lyuushx cTaHcN (BSM)
3aKaJdoNcNoBNOKHOKNoCoXpAHeOJHaN3IeCTnPaDIOCTaHcN C HauJIyUIM KaueCTbOM npMeMa (c 1/An o6/).
1 Pocne Bb6opa nooCb haxmnte peryraTOp M.C. nra oTo6paXeHn rnaBHoro MeHIO.
2ПовернITE M.C.dЯь bbl6opa [FUNCTION],3aTeM haxmteДЯ NOIHTBepKdEHHN.
3ПовернITE M.C.dЯь bbl6opa [BSM],3aTeM haxmite dner noptBepxdeHn.
Ponck cTaHcN BpyHyIO
1 Pocne Bb6opa noJocbl haxmITE I/ / I JnB yB6opa cTahun.
Haxmnte u ydepxnbaiTe I /, 3aTeM OTnycTne TdI NaONcKa DoCTynHO tAnz. POnCK OCTaHOBNTcR, KOrDa YcTpoJcTBo BblOpJHIT npIeM CTaHzN. DJIr OTMeHbI NOnCKa HaxmTe I /
ПРИМЕЧАНЕ
Дляnapametpa [SEEK] Heo6xodmO yctaHOBuTb 3haeHne [MAN] B hacptpoiKaX FUNCTION (ctp.17).
CoxpaHenne cTahmBpyHyIO
1 Bo BpemnepMa cTahun, KOTOpyU Tpe6yETc coxpaHntb, haxmnte u ydepKmbte OHy n3 YncIOBbIX KHOJOK (c 1/An no 6/), noka mrraHne He npekpatNTc.
ПРИМЕЧАНЕ
Bb MoKete b6bPat npdcyTahOBHeHbn KaHAN, HAKAB Q nOboPAuBHAR peryNtOp M.C. Iocne Bb6oPaKa hana KAMMe TgUePkXBeAte peryNtOp M.C. dIaCOxPAHEH CTsAnu.
IcnoJIb3OBAHneФyHKmI PTY
UcpoCTBO BbInoJIHReT nonck taHun no HhOpMaun PTY (Tn nporpaMbbl).
1 HauKMte u yedeKbBaTe BO BpeMa npneMa FM.
2 ПовернITE М.С. Ддя Быбopa Типа nporpaMMьИЗ [NEWS/INFO], [POPULAR], [CLASSICS] ИИ [OTHERS].
3 Haxmte peryIaTOp M.C..
UcTpoCTBO HauHET NocK CTaHcUN. IocNe haoXoJeHnC tHaUN OTo6pa3ntc HaaBaHne npOrpAMMHO cnJxkbI.
PIMMEUHNA
-TO6bI OTMeHHTb NONCK, HAXMNTe M.C..
- PnorgpAMMbHEKOTOBPbXaPNOCTAHNZMIoYrOTlNHaTbCOr OTnpORpAMM, yka3AHHbX B nepedaaEMOM KOJE PTY.
- EÇİN N ÜDAMA ÜS CEAŞÜMÜ HEEPENPÖRPGAMMbI HUXYHÖRG TUNA,TO HA JIMCINEE B TÜEHNE PIPMEHPO DABX CSEYB 6yEDT NOKAZHO [NOT FOUND], I 3aTEM TÜHEP NEPEJET B PEXIM PIPEMA CTAHUM, C KOTOPB 6bID NAHAT NOICK.
Cnncok PTY
YtO6bI n3Bney dNCK, OCTaHOBNTE BOCnpon3BeDHeHne, 3aTeM Haxmnte A.
UcTpoIcTbA USB (BkIouaY Android™)/iPod
1 OtkpoTe KpbiIsky npTo USB.
2 PoiKJIouHte yCTpoIcTBO USB/iPod c nOmoBIO COOTBeTcTByIOJero Ka6eIa.
ПОНМЕЧАНЕ
ДавгОНТМЕСКОГЕ рекпLOУЕЧИЙ НА.TСМОЧN[USB], КORDу СТСТСВ ДБ/ЮР NOДКLOПЕНО K rANHOBUM YUSOPTCYB, YCTAHOBITEДУ [USB AUTO] ZHAHENIE[ON ] N haTropKIAx SYSTEM (ctp. 20).
BHUMAHNE
Icnobn3yte IoponnhtenBnH na6eB Pioneer USB (CD-U50E)JnnaoKIOUeHNHaYCTPOCTBA USB, NOCKOblky NIOO6e YTOPOCTBO, NOKIOUeHNHO HneOpCTeBHeNKO K rAaBHOMy UcyTOCTBy, Bydet BbCTynatB, YTO MOKET pIeCTaBJIrBo aNoCHOT.
Ipeed n3BnueHneM yctpoiCTBa OCTaHOBInTe BOCnpOn3BeDeHne.
Iopknloeynna AOA
CobepweHne TelefoHHbIX Bbl3OB0B
1 Haxmnte, 4TO6bI OTO6pa3ntb MeHIO TenefoHa.
PnI pKJIueHmDyX TepeOHOB ChaHa OTo6pa3ITc Ha3BaHHe TepoHa, a 3aTe m erO MeHIO. I napeKJIueHmHa pyroT epeOH HaxMnte eue pa3.
2 ПовернITE ренилар М.C. Ддь Вьбopa [RECENTs] uIN [PHONE BOOK], 3aTeM naxmite Дд поТВерждени.
PnBbIbope [PHONE BOOK] npeiunTe K wary 4.
KOMIJIAHN PIONEER HE HECET OTBETCTBEHHOCTN 3A IPINJIOJXEHH NIN COJEPKIMMOE, IPIEIOCTABJIENHEO CTOPOHHHMNA PA3PABOTNUKAMN, BKJIQUAY INX JOCTOBEPHOCTB IN PIJIHOTY. 3A COJEPKIMHO M ANDHKLIIOHAJIbHOCTB TAKINX IPINJIOJXEHH HECYT OTBETCTBEHHOCTb PA3PABOTNUKIPINIOJIOXEHH
IcnoJIb3OBAHnE npniloXeHnHa yCTpoiCTBe
1 PioKnIouHte daHHeoe yctpoiCTBO K Mo6NlbHomy yctpoiCTBY.
iPhone uepe3 USB (ctp. 8)
- UCTPOIcTBo iPhone/Android uepe3 Bluetooth (ctp. 10)
2 Haxmte M.C.ДЯ OTO6paXeHnI rnaBHOrO MeNo.
3ПовернITE M.C.dЯь bby6opa [SYSTEM],3aTeM haxmite dny noptbepxdeHn.
4 Повернite ретуларop M.C. Дя Вьбoga [PHONE CONNECT], затем нажмITE посторжденья.
5 Nobeprnite peryIaTOp M.C. nla BbI6pa OAnHoro n3 cneDyUOux npaMeTpOB, 3aTEM HaxMnTe IJn NOITBepKdEHN.
Bb mokeTe 3aRpy3ntb Pioneer ARC APP b iTunes App Store.
ot [1.25K] do [12.5K] (pnp Bb6ope [HIGH] mnn [MID LPF])
OT [25]do [250] (npn Bb6ope [MID HPF] nnn [SUBWOOFER])
CtahdaptThbI peXIM:
OT [50HZ]do[200HZ]
7 ПовернITE рERYЯТОР M.C. ДЯ ВьБбора COOTBETCTBYUошей КруTN3HbДИНAMNKA (ФИЛТра), ВьБраннORO B WARE 4.
Cetebon pexum:
ot[-6]do-24
ot[-12]do-36
CtanhdpThbipexm:
ot[-6] do[-24]
Hactpoikn
B rIaBHOM MeHIO MoXHO NaCTpOHTb pa3nUHbIe npaMeTpbl.
1 Haxmte M.C.ДЯ OTO6paXeHnI rnaBHorO MeNo.
2 ПовернITE M.C. Дя Вьбopa odнй n3 cleyuquix kateropni, 3aTeM haxmite dny noTbePckdHn.
- Hactpoikn FUNCTION (ctp. 16)
- Hactpoikn AUDIO (ctp. 18)
- Hactpoien System (ctp. 19)
- HactpoienI LLLUMINATION (ctp. 20)
- NaCTpOuKn MIXTRAX (ctp. 21)
3 Nobepnite M.C.ДЯ Bb6opa napametpoB,3aTeM Haxmnte JIe noTbpeKdEHH.
Hactpoikn FUNCTION
JemehtbMeHIO OTNIuHaOTcB 3aBnCmOCTN OT NCTOCHNA.
Jaee "NW" o63nHaaet cTeBoi peXIM, a "STD" -CTAndapThbI peXIM. B COOTBETCTBm C yCTaHOBLeHHbIMN POKJIIOUeHNeHM N3MeHInTe peXIM DnHAMKna Ha cTaNdApThbI (STD) nnn ceTbeoN (NW) (ctp. 5).

Baxho
-Пиустановке дан Horo уст的一项В abTomobile,когдлочахогани He haxoДNTСВь nOLOXeHn ACC (akceCyap),OTCYTCBne noKlnouHey Kpachoro KaBJEN K TePMHany, KOTOpbI yfKICpyET nONOxEHme KIOVA aZaHnAHn,MOKet npuBcTeN Ka p3paJKe AKKyMnIToPа.

B noIoxeHn ACC

BHeNoIPOJeHnA ACC
- IcNoIb3OBAHne DaHHoro yCtpoiCTBa VBcIOBIAx,OTNlUChbIX OYka3AHbIX, MoJEt pIbECTN K NOpaKy IINNeHCNPabRHOctI.
-AbTomo6nIcakkymyTApTOH0 6atapee12BnOtpuAteIbHbIM 3a3EmJIHeM.
- Ecnn BbXoD dINHAMnKc INONb3yETc4 4 KaHaNAMi, INONb3yTe INANAMKn MOOHOCTbIO 60JeE 50BT (MaCKmAmBHaB XOdHnMAOIOHCTb) n COPTOBIEHnEM OT 4 Ω do 8 Ω (3NaueHne CONPOTIBeHnE). He INONb3yTe dN daHHORO YoCTPOIcTBa DInHAMnKc c CONPOTIBeHnEM 1-3 Ω.
-Korda BbXoD 3aHrero DnHAMKAc nCnOlb3yeTc aBaByfepom C conPOTBHeHMeN 2 O, cnOlb3yIte
ДИнhamик 6оле 70Вt (MaKcImaJIbHЯ BXOДHA MOUHOCtBJ).
* CM. Podkniochennia Дял blybopa cootBETcByuIero cnocOsa podkniochennia.
- BoɪmɪdʒeKʌHʌne KOPOTKOrO 3ʌmɪbʌkHʌnɪya, nɛperpeBaɪnɪ HɪN Eɪn CɪpərBʌHɒctɪn
coɪnɪdʒaɪtæ Cneɪyʊniəe Yʊkəaɪnɪya.
- Nipeid yctahOBKOtKNOUHTOropuIaBHyIO KEMMoy Batapei.
-3aKpeHnTe npoBODa c nOmoUbIO 3aKmOB dnn Ka6eJIe NIII KneIKoN KeNTbI. O6epHnTe KneKyIO neHTy BOKpyr npoBOD, KOtOpBle KacaOTcA MeTaNJIueCKIN XaCTeI, DnI 3aUNITbI npoBOD.
-Уберпе BCE кабени поадьше о
денихшистся састей, takних касьчаг
песлочени перацу
нарравлишке садени.
-Убени Кабелюдльшо DT мет с
новышенч.TмпраТуpoи,
Наример пechк.
- He nokkIyouaIte JeKtbl Ka6bIb K 6atapeu NTem npocOBBaHnraERO uepe3 OTBepCTne B DnBraTeBbHbI O tCEK.
-3aKnneIte HenoKlnOeHHbIe pa3bEmbl Ka6eBaN3oHToEN.
-HeykopauNbaiTeKa6eJn.
-He HapuwaIte mOJauZIO KabEna NtAHaNJa DAnHOro YcTPOCTBa DnI NtAHaNJa DpyrNv XcTPOCTB. EMKoCTb KABEna YBIAJIeTc OrpAnuHcHNO.
-ИсноьзуITE плавкIM npedoxpaHNTel COOTBECTBHyOJero HOMNHaja.
- He zambikaiye otprnudatehblny kabeIb IINHAMKOB HENOCpeDCTBeHHO Ha 3EMNILO.
- Cénbêbábaïe BMEcTe OTRpIaTeIbHbIe KaEBHe NECKOBLKxIN DmHaMKNOb.
Korda yctpoictBO BKIOUeHc, CINHaIbI ynpabneHnO nTnPaBnIOTCn NO CINHEM/ 6enOMy Ka6eJIb. NpcklouHte DaHnbI Ka6eJIb K ydaJIeHOMy npaBnEHIO CNCTeMoB BHeuHero ycNInTeJ IIN TepMNHaJIY pENEHORo ynpabNeHnA bATOMaUeCKoA aHTENbI aBTOMoBnIa (MaKc.300MA,12BnoCT.toKa).Ecln aBTOMoBnIb OChaueH aHTENHOB, BCTPOEHNO BLo6OBoE cTeKNLO, PNDIOUChITE eK TepMNHaJIy PtTaHnA aHTENHOrO yCINNTeJIa.
Hnkorga He npoklouaTe cnHn/6bnI npoBOD K termHany nTaNAn BHeuHero ycNInTeA. TaKxe Hnkorga He npoklouaTe erO K termHany nTaNAn ABTomATnuecko anTeHNb. B npOTNBHom cnyae 3TO MOket npINBeCTNo npOTEKAHO 6atapen nn ee HneCnpABHOCTo.
- UcpHbI Ka6eIb 3a3eMJIe. Ka6eIi 3a3eMJIeN IJn DAHHORO YcTPOINCTBa n DpyroE o6obpyoBAnHe (oc6eHHO yCTPOINCTBa BVICOKOro HANPJIeKHeN, HApIMep ycInlTeN) He0xOdIMO noKnIOuAbt OteINbHO. B npOTNbHOM Cnyae CnyaHoe OTKIIouChEn MoKETnpBBeCTn KNoxyapUHm HENCnPabBOHct.
「pαρανηκεκή CUMBON—— haɪn³dɛnɪn OθΗΑητη ΜΟΝΤΗΝΥΚΤΟΚ
Даанhoe устюптов
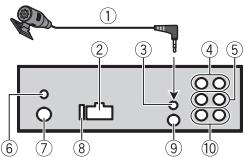
① MUKPOΦOH (3 M)
② Bxod shHypa nItaHn
③ BxodДЯ MKNKPOΦOHa
④ 3aDnBbXoD (STD) nIi BbXoCpeDnHex qactOT (NW)
⑤Передни ВьхOD(STD)ини ВьхODВерхнixЧастOT(NW)
⑥ BbXoIdIaHTeHHbDAB DnIpoJyueHnCirHAnIOB DAB npKIOUHTe aHTeHNy DAB (AN-DAB1) (npNo6petaTcT OTeNbHO) K yCTPOINCTBY.
⑦ BxOД nIЯ aHTeHHbI
⑧ПредoxpanHTeIb(10A)
⑨ BxOJIy npOBoHOrO npbTa DY CIOa moXHO nOxDKlNOuHTb npOBoHoi aanTep Npno6peTaetc OTDenBHO).
10 BbIXoI ca6ByΦepa
Uhyp nHTAHNA
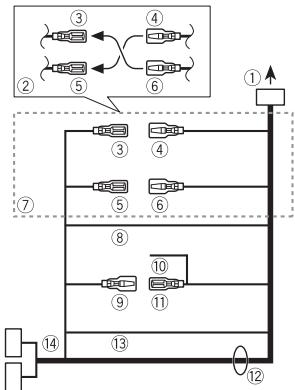
① BoBxOДshHypa nHTaHnA
② B3aBNCIMOCTNOTUNAABTOMO6nla YHKUIN ③ N ⑤ MORYTOTNIuA TbCB. A TOM Cnyaae NOKIOUHTe ④ K ⑤ N ⑥ K ③
③ XeJtbl Pe3epBbHn (nnn onu)
④ XeNtbiB BbIOnHnAteNoKlnOuChHeN K TepMnHaJIy C NoCToRrHHbIM HAnPraJHexnEM 12 B.
⑤ KpacHbI
Onuia (nii pe3epBbhi)
⑥ KpacHbI
yctaHOBOUHaJwaXTa He
ncn0nb3yeTc8
1 OnpeJeIte noLoXeHne, npn KOTOpOM COBnaJaIO TOBepCTN B
KpOnHTeHe c OTBepCTnMn C6Oky UCTpoIcTBA.
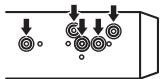
2 3aTaNHTe no 6OKam Dba BnHTa.
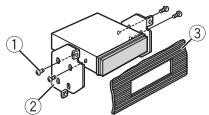
① Camope3(5MM×9MM, He npinnaaraTcKyctpoiCTby)
② KpeEnxHbI KPOHHTeH
③Пиборна пань ИИКонсь
I3BneueHene yctpoNCTBa (yCTaHOBJIeHHORO C NOMOJbHO npINaRaemoy YCTaHOBOUHOJ WaxTbl)
1 CHIMMTE OKAHTOBKY.
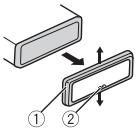
① OkaHTOBKa
②Лапka с заубрнhami
- ПгСЧтпниpeдэнниэн
-облчаяетдoc'tун К OKАТОВЕ.
- Пп NOВТОПОН YUCTAHOBKE OKАТБКИ NOВЕРНITE панел bCTOPOHc c3a3y6penHол nankoB HN13.
2 BCTaBbTe npIiIaRaemIe KJIouN IINBIIeueHnIO o6EIM CTOpOHAM UcTPOIeBaTO OJIeNHa.
3 PToTHeTe yctpoIcTBo n3 np6OpHoi naHEni.

YctaHOBKa MMKpOfoHa
Minkpofoh Heo6xOIMO yCTaHaBnBaTb HneOpceDCTBEHO HAnpOTN B OVDIeNA HoCOBTcETByUOpem PaCtOHN DnIpaBnHOrO fKNCIPOBAHn rOJICA.
BHIMAHHE
3aNyTbBaHne npoB0da MmKpOfoHa BOKpy PynEBoi KOHOnKi NnI pByara nepeKIOUeHn IpeReda MoKeT npBBeCTN K BO3NHOKBHeHNO Qe3BbUH IOAChOH CNTyaCIN. UcTaHbNtBaHTe MmKpOfoh TAKIM O6p3OM, QT6bI OH Ne MeuAn YnpABAJrT ATOBmIoEM. PeKoMeHJeTcN cONNoBtOBaTb 3aKImb (PnO6pTeAOTcN OTdEnHo) dNfMkCaun npoB0da
PIMMEAHNE
B HeKoToBbIX MoDJIaX ABTOMo6UneIe
dIIHnA KaBJIe MNKpOfoHa MOKeT
OKa3aTbCra HeIOCTaTOHOnI dJIy cTaHOBNk
MNkofoHa NaCONHe3aunTHbI
Ko3bIpeK. B 30m cIyuae yCTaHOBnTe
MNkofoHn Ha pyNeByIO CTOnKy.
YctaHOBka Ha
COINHue3aunTHbIKo3bipeK
1 BCTaBtpe npoBoMnKpOfoHa B Jxeno6.
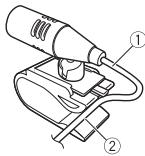
① UHypMUKPC
② XeNo6
2 YctaHOBnTe 3aXIM MmKpOfoHa Ha COINHcE3aunTHbI KO3bIpEK.
UcTaPaHeHne HEnCnpaBHOCTeI
Дисглеловатуматемпк ВOBЗрааетсь в БХОДК的新PEUMK.
→B TeueHne 30 cekyHn He 6bIbO BbIOnHeNo HnKaKnx Opeaun.
-BbIOnHnTe onepaunIO.
Iana30n nobtophoro BocnpOn3BedeHnCAmOppon3BbHNO 1MehReTcA.
→B3aBcNcMOnCTO Bb6paHnHO DmaPAnoHa NOBtporHO BCNPON3BeDHeN OH MOKET NImeHЯTcP Ni PbB6ope dpyroI paKn IIN DOpOJkN, a TAKKe pnppeMeTKe BnepeH/na3d.
- BbEepnte MAnanaoh NOBTOPHORO BOCPNONBEEHNeIue pae 3.
Bloxhenna nanka He Bocnpon3bOuNTc.
→BLOXeHbIe nankn He BocnpOn3BovTc,ecnbl6paH nnapaoh [FLD] (noBtopHoe BocnpOn3BedeHme npAn).
- BvBepriate apyro diyn aana30 nOBTOPHOBOGOCNPOM3BEDHNA.
IMeOTcI NOMEXN 3Byka.
→IcnoBb3yetcB yctpoiCTBO,HanPIMep,coTobbl TeJeΦOH,KOTOpoe MOKETBb3bIb8bJyMOJBIO NEMXf.
-уберпгпьборы, Вьзьвацшп
номEXи, OTЭТОВУСТРОИСТВА.
He Bocnpo3BODTc8ByK cystpOCTBa Bluetooth,ncnlo3yemoroB kaeCTBe nctOCHNA CIRHHLA.
→PojkIQUHEnHyUpe3 Bluetooth TelenFOH 3AHRT 3BOKHOM.
-Bo306HOBNTcNocne3aBepHeNn 3BOHNKa.
→Подклочевский Стеленов В даньш的大 мост entM nCOnNoJIb3yETcR.
-He nCnoB3yTe B 3TO BpEma Tenefoh.
→C nOmoIbIy noIckIIOueHOro uepe3 Bluetooth tenefoha6blnpoIbnBedeHn cpa3y c6bpoIe 3BOHKo. Bpe3yIbTate 3TOrO coEINHeHne MeKJy daHNbIM yCTPOJIcTBOM I MO6InbHbIM TelefoHOM 6blno 3aBepeHo HENpRaBInbHO.
- BocctaHOBITE CoeINHEnHE MekJy UCTPOIcTBOM Bluetooth mObIbHbIM TENEFOHOM.
Coo6eHn8 o6 own6kax
067ne
AMP ERROR
UcTpoIcbTO He paObaTe anI IHNpABUNbHO NOcDoEINHEN HnAMNK.
→Cpa6oTaIa zenb 3aunTbl.
-Поверьт,поркюунлднhamК.
ERROR-07, 11, 12, 17, 30
→ДиСКЗагрЯЗнEH.
-OuNCTNTe DnCK.
→ДиСК ПОцapапан.
-3aMeHnTe DNCK.
ERROR-07, 10, 11, 12, 15, 17, 30, A0
OTBECTBENHOCTNaTOTEPODAHbIXHa iPod,JaTe eCmIe TnDaHbIe 6yDyt NOTEPABHO BVPEMNCIONb3OBaHINA DAHHOY UcTPOECTBA.
PocneIOBaTeIbHOCtB BocnpOn3BeDeHnaydnofoaIIOB
PoiIb3ObaTeIb He MoKeT HaHaHuAaTb
HOMepa nAnok IYcTaHAbJnBaTb
PiocNeIbOaTeIbHoCTb BOCpOni3BeDeEHNc O
nOMouBIO DaHnHO yCToPcTBA.
PiocNeIbOaTeIbHoCTb ayDIOphiAIIOB
3aBVCHT OT NODKLIuOHHeHOro yCToPcTBA.
O6patITte BnHMaHne, UTO CKpItbE paJIbIb
Ha yCToPcTiBe USB BOCpOni3BecTn
HEBO3MOXHO.
Ppimep nepapxnn
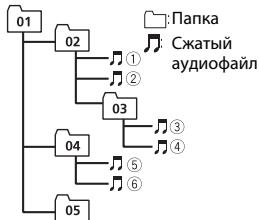
Level 1 Level 2 Level 3 Level 4
ot 01 do 05:Homep nankn
①do ⑥:TocneoBaTeIbHOCTb
BocnpOn3BeDHeH
Ta6nua cMBOJOBdЯ pyccKOrO y3bIka
| D: C | D: C | D: C |
| \( \bar{r} : A \) | \( \bar{\mathcal{E}} : \bar{B} \) | \( \bar{\mathcal{I}} : \bar{B} \) |
| \( \bar{r} : \Gamma \) | \( \bar{I} : \bar{I} \) | \( \bar{E} : \bar{E},\bar{E} \) |
| \( \bar{s} : \bar{X} \) | \( \bar{z} : \bar{3} \) | \( \bar{H} : \bar{N},\bar{N} \) |
| \( \bar{k} : \bar{K} \) | \( \bar{m} : \bar{I} \) | \( \bar{n} : \bar{M} \) |
| \( \bar{H} : \bar{H} \) | \( \bar{O} : \bar{O} \) | \( \bar{I} : \bar{I} \) |
| \( \bar{P} : \bar{P} \) | \( \bar{L} : \bar{C} \) | \( \bar{T} : \bar{T} \) |
| \( y : y \) | \( \bar{q} : \bar{\Phi} \) | \( \bar{u} : \bar{x} \) |
| \( \bar{u} : \bar{U} \) | \( \bar{v} : \bar{U} \) | \( \bar{w} : \bar{W},\bar{W} \) |
| \( \bar{z} : \bar{b} \) | \( \bar{h} : \bar{b} \) | \( \bar{b} : \bar{b} \) |
| \( \bar{z} : \bar{e} \) | \( \bar{H} : \bar{U} \) | \( \bar{R} : \bar{R} \) |
D:Дисплейс:Буква
AbTopcKoe npaBOu TOBapHbIe 3HaKn
Bluetooth
Bluetooth® (CNOBO NOROTINB) ABNIECTCARETCA3PERINCTPPOBAHBM TOBABHBM 3NAKOM INpHnADNEKJNT KOMAHNNI BLuTooth SIG, Inc.;ICN0Lb3OBAHne PIONEER CORPORATION 3TnxTOBAbHx 3NAKOB pApeSeHO COOTBCTCYUOeNIpuEN3Ne.IPouCeTOBAbHte 3NAK INTOPBBoB HAmEHOBAHy PPnHAdNEKAT COOTBCTCYUQIM BnAedJIbCaM.
iTunes
Apple i iTunes rablaotc troprobimn 3nakam KomnaHnn Apple Inc., 3apernctpnpobaaHbIMn B CUA n dpyrnx cTpaHax.
WMA
Windows Media -3to
3aperticnpobHnAaTropobarMapka nIi
tropobarMapka Microsoft Corporation B
CUHA n/nnI npyrux ctpaHax.
B daHHoN i3dEInn IcNoIb3yOToC
texHoJIoNn, pinnAdneXaUme
kopnpaunm Microsoft, KOTOpBHe
pa3peaTaTeC nCpNoB3ObaTb nIi
pacnPoCTpaHrTa 6e3 mIueHsIn OT
Microsoft Licensing, Inc.
FLAC
© 2000-2009 Josh Coalson
© 2011-2014 Xiph.Org Foundation PacnpoctpaeneHne u nCpOJIb3OBAHn BVNe IcXoDJIbIX KoOBd NmIb6NAnHPaFoiNBo, C MoDiuФИKauZIMMn NmI 6e pA3peJwaeTcrPi coBcIIOJeHn Cnedyouxix yCNOBII:
-BpacnpoctpaHREMOMHCXODHOMKoDe DOLJXHO6bITcOxApaHENoYBEDommeHne 06 ABTOPCKM npabe, HactOJIuN CnICOK yCLOBNIyCNOBNAOBgOrpaHueHOn OTBTCTBEHNOCTN.
-Пи распocрстораньбн
фαιно 0683aTeльно BOCрposn3BedeHne
ВышуonymуTORO ybeDOMhenHЯ 06
aTOPCKOMnpabe,HaTcOraцero cInckca
ycnobm n npnbEeHbIX HNjke ycnoBm
OB orpAHHeHN OTBETCTBEHHOCTN B
DOKyMeHTaUNn N/INI dpynx
COnpoBOdntelbHbIX MaTePnaJax.
-HaimeboBaHne Xiph.org Foundation n
MMeHa yuaCTNtIKoB He DoJIKNbI
ICNoTbOBAtBcA JnI NaIDeRPKn NIN
PnoDBeHHeTOBAPoB, CO3aDHbIX C
npIMHeHmE MAnHORo PporpAMMHOrO
ObecneChEny,6e3 npDeBaprITeBHO
PiCbMeHHoro pa3peSeHHn
npABo06NaadatJe.
DAHHOI PINEOCTABJRETCNIPABOOBIAJATEJAMNI COABTOPAMNU"KAKECTb"HEPNEOCTABJRENTHKAKNX RBHxNJN
IIOJPA3MYEBAEMBIX TAPAHNTI IPIPOIHOCTN DJIPOJAKU NII
KOHKPETHOGIOJIb3OBAHNI. HINPIKNAKXOBCTOReTBeCBXA
YIPRAPBIAIOUINE I COABTOPB IHE HECYT OTBETCTBEHHOCTN3A PIPMbie,
KOCBEHHBIE, CJIYNAHBIIE, IJTPAOFHBIIE
IINI NOCIEДYIOUISE YBbIKTN (BKJIQUOVAH
HO HE OTPAHINUBBAc 3ATPATAMN HA
NPIO6PETEHNE 3AMEHIEOUIXTOBAPOB IN YCSJTV,YPATOTON
BO3MOXKHOCTNI CIVIOBBAHOHIN, NOTEPEI DAHHBH, YNUTUEHHON
BbIOfDbI NJIbIOBMnYbIbTKAMN BPEyJBTATE NPIOCTAHOBKN
JERTEJIbHOCTU), BO3HNIKAIOUIHE HA OCHOBEO COTLAUEHNEH, HECEHNI
OTBTCTBEHTHOCTM INI HAPUYEHHA 063ATATEJIbCTB (BKIIIOUAR
HEBPEKHOCTb) PNIIMCTOB3OBAHIN DAHHOPOIPOPTPAMMHO
OBCEJNEHEN,DAKSEECIN KOMIANTAHBbJIa PINEVNIPEXDEHAO
BO3MOXHOCTN TAKOTO yUeP5A.
iPod & iPhone
iPhone, iPod, iPod classic, iPod nano n iPod touch JBRAHOTCA TOBAPBIMN 3NAKAMN KOMPANIN Apple Inc., 3apenctpnpoBAHbIMN B CUSA n npyrnx CTpaHax.
Lightning YBnTcT Toprobim 3HaKOM KOMNaHm Apple Inc.
"Made for iPod"и"Made for iPhone" 03nauaet,чтэлкгоньн рпборбbln pa3pa6b0tah cцью podknioquhenia onpepeeneho K iPod nii iPod
COOTBECTBHENO, H. IMNECTA
CEPTNDMUKAOKAUPa3pa6OHTNKA O
COOTBETCTBNN CTEXHNUECKNMM
xapaKTePrcntnKaMmApple.Apple He Hecet OTBeTCTBENHOCTN3a pabOTy DAHORO yCTpoICTBa NN ercoOTBcTbNE Co CTaNdaptAm NO TEXNHke 6eONApCHOIN NppeYJTNBbIMN HOpMaMn
PtoKoJyIcTa, 6bpaTHe BnIMaHne, YTO nCNOJb3OBAHNe DAnHOrO npN6Opa C Pod mN iPhone MoKeT OTPuCaTeNbHO cKa3BaBbCbHa KaueCTBe 6ecnpoBDoHOB CB3N.
Android & Google Play
Android, Google Play and Google Play Play Play Play Play Play Play Play Play Play Play Play Play Play Play Play Play Play Play Play Play Play Play Play Play Play Play Play Play Play Play Play Play Play Play Play Play Play Play Play Play Play Play Play Play Play Play Play Play Play Play Play Play Play Play Play Play Play Play Play Play Play Play Play Play Play Play Play Play Play Play Play Play Play Play Play Play Play Play Play Play Play PlayPlayPlayPlayPlayPlayPlayPlayPlayPlayPlayPlayPlayPlayPlayPlayPlayPlayPlayPlayPlayPlayPlayPlayPlayPlayPlayPlayPlayPlayPlayPlayPlayPlayPlayPlayPlayPlayPlayPlayPlayPlayPlayPlayPlayPlayPlayPlayPlayPlayPlayPlayPlayPlayPlayPlayPlayPlayPlayPlayPlayPlayPlayPlayPlayPlayPlayPlayPlayPlayPlayPlayPlayPlayPlayPlayPlayPlayPlayPlayPlayPlayPlayPlayPlayPlayPlayPlayPlayPlayPlayPlayPlayPlayPlayPlayPlayPlayPlayPlayPlayPay
MIXTRAX
MIXTRAX JЯWIETCA TOPROBO MAPKÖ PIONEER CORPORATION.
Spotify®
SPOTIFY n JorotnIP Spoty JraJhotc 3aerIcnTprpOboHbIM TOpOBMbIM Mapkamm SpOTy AB. IJnaIyUeHcy cINsCA coBMeCTmMbIX MObIbX bYctpoIcTB N CBeHeN O npemymoIPOdNcke, ecn npmeHmO, cm. http:// pioneer.s/potfly.
CepinHbI Homep
Ha 3TOM pncyHke noka3aHa nHΦopMaun o Mecaue ngoede n3rOToBnHry yctpoCTBa.

Data n3roTOBneHnO6OpydoBaHn
P1-ToDn3rOToBnEHHa
| Гов | 2001 | 2002 | 2003 | 2004 | 2005 | 2006 | 2007 | 2008 | 2009 | 2010 |
| Симboл | A | B | C | D | E | F | G | H | I | J |
| Гов | 2011 | 2012 | 2013 | 2014 | 2015 | 2016 | 2017 | 2018 | 2019 | 2020 |
| Симboл | К | L | M | N | O | P | Q | R | S | T |
P2-Mecau3rOToBLeHnA
| Месац | 1 | 2 | 3 | 4 | 5 | 6 | 7 | 8 | 9 | 10 | 11 | 12 |
| Символ | A | B | C | D | E | F | G | H | I | J | K | L |
T-Kernel 2.0
ДанньйnpodnykИСПОЛБ3уET KOD
ИСТОЧИКа T-Kernel 2.0 полциевим T-
License 2.0,празоставеньй Форумом T-
Engine (www.tron.org).
MP3
(C) 1998-2009 PacketVideo
LmuehenpOBAHO nImuEHNn Apache, Bepnra 2.0 ("MunenHnra");3anpeuHcNcONb3OBaTb daHHbI aHn,ecn OH He COOTBeTCTByET yCNOBnAM LmUeHnN. KOnIO MUeHnMI MOxHO NOpUyNTb IOn aDpecy
http://www.apache.org/licenses/License-2.0
Kpome cnuyaeB, npdeymOTpeHbIX 3aKOHOM nIINMcbMeHNbIM pa3peWeHnEM, nporgamMHOe6ceNeHne npedeOtabJIeTcno NIIueH3NI "KAK ECTb" B3 KAKIX-JIIBO rAPAHTI
COCTOHHJIIOBOFOPODA,ABHbIXIINI npOpa3yMeBaembIX.
CM.LiuehenIOI pya nonyuHenia KOHKeTbIX pa3peHEnB OTOHOENn 3bIKOB orpaHnueHEn B pAmkax daHHoI Liuehen3m.
TexHnueckne xapakTepncTnKu
067ne
NCTOCHNK NITAHNA: 14,4B NOCT. TOKA (DOnyctMbIy dHaIa3OH oT 10,8 B DO 15,1 B)
YcIneHne:ot+12d6do0d6
ФильтbpervxHmXчaTOT(HIGH)(ceteBOY pEKHM)
KyTn3Ha: -6 dB/OKT, -12 dB/OKT, -18 dB/OKT, -24 dB/OKT
Kpyt3nHa:-6 dB/OKT,-12 dB/OKT,-18 dB/OKT,-24 dB/OKT,BblKI
Kpyt3nHa:-6 dB/OKT,-12 dB/OKT,-18 dB/OKT,-24 dB/OKT,BblKI
Ca6ByΦep (ceTeBoi peXm):
Yactota: 25 /31,5 /40 /50 /63
Tg/80 Tg/100 Tg/125 Tg/160 Tg/200
Tg/250 Tg
Kpytn3Ha: -12 dB/OKT, -18 dB/OKT, -24
ДБ/OKT, -30 ДБ/OKT, -36 ДБ/OKT, BblKЛ
YcunenHe:ot+10d5do-24d5(war 1 d6)
AOA (Android Open Accessory) 2.0
Фаловая систema: FAT12, FAT16, FAT32
Φopmat ΦeokdouropaBAnH ΦaIIOB MP3: MPEG-1 n 2 Audio Layer 3
Формат д ekдоговань сдлов WMA: Веся 7,7,1,8,9,10,11 (2 куаю) (Поигрьвател Windows Media)
Φompat ΜεύκορουΒΑΝΗ φαιδΟΑ:C: MPEG-4 AAC (tόλκον B κούρουΒα
iTunes) (Bercs 10.6 n 6oJee paHra)
Формат京都разовлиЯ FLAC:v1.3.0 (Free Lossless Audio Codec)
Φopmat cnrHana WAV: Linear PCM n MS ADPCM (6e3 kOmnpcecnn)
Tiohep FM
Дианазон счот: ot 87,5 МГιdo 108,0 МГι
ПОНЗHAЯ YUBYCTBNTENBHOCTb:11ДБΦ(1,0MKB/75MO,MOH,OTHOWEHcRTHA/YUМ:30ДБ)
OTHOUHNE CUNHAN/WHM:72 dB (cetbIEC-A)
Tiohep MW
Duaana3OH yactoT:OT531KfUdo1602KfU
Pone3na YyBCTBntbHcOtB: 25 MKB (OTHOWEHne CnHaN/7uM: 20 d6)
OTOHWEHNE cnTHaN/zhym: 62 db (cetb IEC-A)
Tiohep LW
Дианазончадт:OT153KФdo281KФ
ПОНЕЗЧУВСТВЕЛЕЛБСТОВ:28МКВ (OTOHOUHENE CHINHAU/YUM:20ДБ)
OTOHWEHNE CnTHAN/uyM: 62 I6 (cetb IEC-A)
Tkohep DAB
PBAP (Phone Book Access Profile)
A2DP (Advanced Audio Distribution Profile)
AVRCP (Audio/Video Remote Control Profile) 1.5
SPP (Serial Port Profile) 1.1
Приимechanical:
B cooTBeCTBmO cToTaBc 53aKoHa
PocnckoΦeepaunio Oa3aunTe npab
ntpoBeTbeN' N oocTahOBHeHem
npaBtEnbCTBa PocnckoΦeepaunu Np
720 ot 16.06.97 kOMmaHra Pioneer Europe NV
orobapBaet cIeDyooi cspok Cnyk6bl
n3dien,ofnuaAalbNo nocTbAReMbEx h a
pocnckn pblhok.
ABOTMObHbAra 3eKnTPOHnka:6 net
Pioune H3dien (hauShnHKn, MnkPofoBu n
t.n.)5 net
ПРИМЕЧАНО
XapakTeprcIeTkn KOKCTpyKUNA MORYT 6bIb N3MeHeHb 6e3 ppeBaprTeBbHoro ybeDOMLeHnA.
-ДанhoeуctpoiCTBOпpon3BedeHO Taunanhe.
http://www.pioneer-car.eu
Visit www.pioneer-car.co.uk (or www.pioneer-car.eu) to register your product.
Visitez www.pioneer-car.fr (ou www.pioneer-car.eu) pour enregistrer votre apparéil.
Si prega di visitare il site www.pioneer-car.it (o www.pioneer-car.eu) per registrar il prodotto.
Visite www.pioneer-car.es (o www.pioneer-car.eu) para registrar su produit.
Zum Registrieren Ihres Produktés besuchen Sieitte www.pioneer-car.de (oder www.pioneer-car.eu).
Bezoek www.pioneer-car.nl (of www.pioneer-car.eu) om uw producte te registrieren.
Посетитewe.pioneer-rus.ru (ил www.pioneer-car.eu) досяпстраши приобравенно Вами идени.
Pioneer CarStereo-Pass
28-8, Honkomagome 2-chome, Bunkyo-ku, Tokyo 113-0021, Japan
Kopnpaun PaonHrp
1-1, CnH-Ogypa, CaaBaa-Ky, r, KaBaCaKIn, npedeKtypa KaHaraba, 212-0031, JnoHH
ИМнортep OOO “ПИОHEP PUC"
105064, Рoscя, r. Мскьа, Нжни Сухалын поевлok, dom 5,сторенice 19
Тел.: +7(495) 956-89-01
PIONEER EUROPE NV
Haven 1087, Keetberglaan 1, B-9120 Melsele, Belgium/Belgique
TEL: (0) 3/570.05.11
PIONEER ELECTRONICS (USA) INC.
P.O. Box 1540, Long Beach, California 90801-1540, U.S.A.
TEL: (800) 421-1404
PIONEER ELECTRONICS OF CANADA, INC.
340 Ferrier Street, Unit 2, Markham, Ontario L3R 2Z5, Canada
TEL: 1-877-283-5901
TEL: 905-479-4411
PIONEER ELECTRONICS ASIACENTRE PTE. LTD. 2 Jalan Kilang Barat, #07-01, Singapore 159346 TEL: 65-6378-7888
PIONEER ELECTRONICS AUSTRALIA PTY. LTD. 5 Arco Lane, Heatherton, Victoria, 3202 Australia TEL: (03) 9586-6300
PIONEER ELECTRONICS DE MEXICO, S.A. de C.V. Blvd.Manuel Avila Camacho 138 10 piso Col.Lomas de Chapultepec, Mexico, D.F. 11000 TEL:55-9178-4270