
DVP3880 - DVD player PHILIPS - Free user manual and instructions
Find the device manual for free DVP3880 PHILIPS in PDF.
| Product type | DVD player |
| Brand | Philips |
| Model | DVP3880 |
| Dimensions (W×H×D) | 360 × 42 × 209 mm |
| Net weight | 1.32 kg |
| Power supply | 230 V, 50 Hz |
| Power consumption | Less than 10 W (active), less than 0.4 W (standby) |
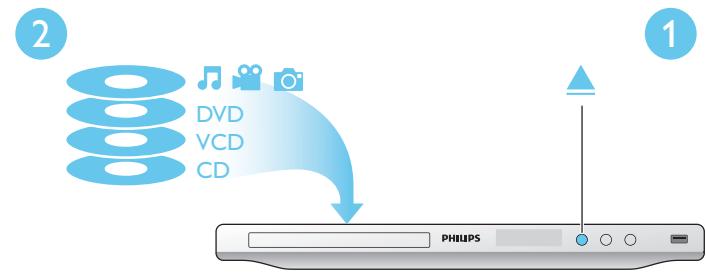
| Compatible discs | DVD, DVD-Video, VCD, SVCD, Audio CD, DVD±R/RW, DVD±R DL, CD-R/RW (max. 648 files) |
| Video file formats | .avi, .divx, .mp4, .xvid |
| Audio file formats | .mp3, .wma |
| Image file formats | .jpg, .jpeg, .peg (JPEG-EXIF) |
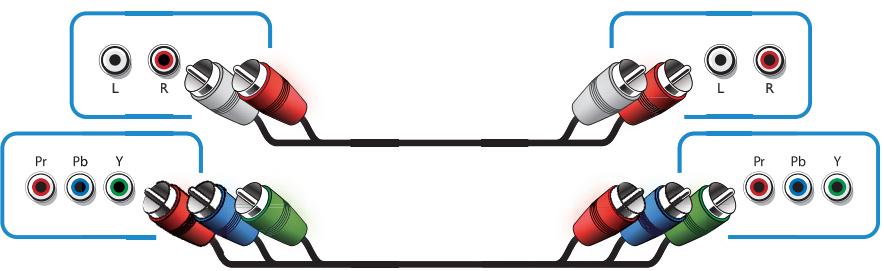
| Video outputs | Composite, Component, HDMI (480i/p, 576i/p, 720p, 1080i, 1080p) |
| Audio outputs | Analog 2-channel, Digital coaxial, HDMI audio |
| Main features | DivX playback, CD to MP3 conversion, parental control, EasyLink HDMI-CEC, PBC, photo slideshow with music |
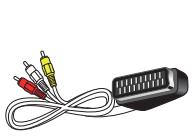
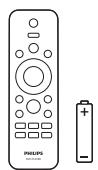
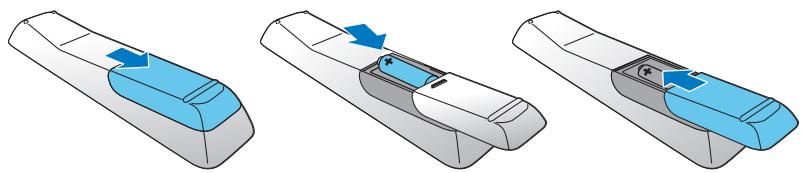
| Supplied accessories | Remote control with battery, audio/video cables, user manual |
| Maintenance and cleaning | Clean with a soft, dry cloth; do not use solvents. Do not open the casing. |
| Safety | Risk of electric shock: do not remove the casing. Refer servicing to a professional. |
| Spare parts and repairability | Not supplied; contact an authorized Philips service center. |
Frequently Asked Questions - DVP3880 PHILIPS
User questions about DVP3880 PHILIPS
0 question about this device. Answer the ones you know or ask your own.
Ask a new question about this device
Download the instructions for your DVD player in PDF format for free! Find your manual DVP3880 - PHILIPS and take your electronic device back in hand. On this page are published all the documents necessary for the use of your device. DVP3880 by PHILIPS.
USER MANUAL DVP3880 PHILIPS
ABOUT DIVXVIDEO: DivX® is a digital video format created by DivX, Inc. This is an official DivX Certified device that plays DivX video. Visit www.divx.com for more information and software tools to convert your files into DivX video.
ABOUT DIVXVIDEO-ON-DEMAND: This DivX Certified® device must be registered in order to play DivX Video-on-Demand (VOD) content. To generate the registration code, locate the DivX VOD section in the device setup menu. Go to vod.divx.com with this code to complete the registration process and learn more about DivXVOD.
DivX, DivX Certified and associated logos are registered trademarks of DivX, Inc. and are used under license.

HIGH-DEFINITION MULTIMEDIA INTERFACE
HDMI, the HDMI logo, and High-Definition Multimedia Interface are trademarks or registered trademarks of HDMI licensing LLC in the United States and other countries.
DOLBY DIGITAL
Manufactured under license from Dolby Laboratories. Dolby and the double-D symbol are trademarks of Dolby Laboratories.

'DVD Video' is a trademark of DVD Format/Logo Licensing Corporation.

1


HDMI

TV OUT


Y Pb Pr

COAXIAL

AUDIO OUT

2

HDMI


HDMI


HDMI
Pr PbY+AUDIO OUT L/R


TV OUT


TV OUT


L

R

VIDEO
3
4
5


SOURCE


6


Contents
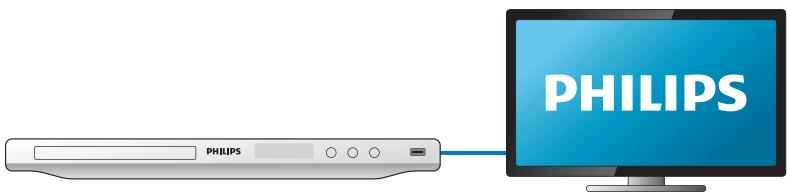
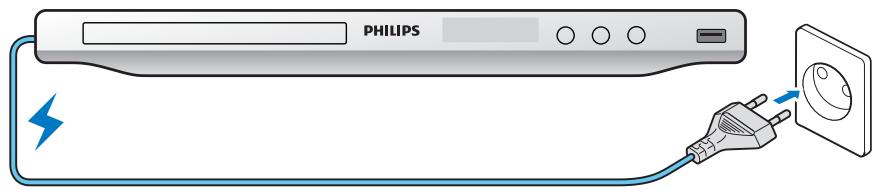
Connect and play 3
Control and play. 8
Photo and music slideshow 10
Options 11
Convert audio CD to MP3 files. 12
Philips EasyLink. 13
Setup 14
General setup 14
Video setup. 15
Audio setup 16
Preference. 17
Software update 19
Troubleshooting. 20
Specifications 22

Note
- When "X" appears, it means that this operation is unavailable for the current media or at the current time.
| Media | Function | Button / Action |
| Stop the play | Pause or resume the play | ▶II |
| Skip to the previous/next title, chapter, track, or file | ▶IV / ▷I | |
| Select an audio language or audio channel | AUDIO | |
| Select a subtitle language | SUBTITLE | |
| Return to the home page | ▲ | |
| Return to the root menu | → BACK | |
| Return to the disc menu | DISC MENU | |
| Enable or disable the PBC (playback control) feature | DISC MENU | |
| Return to PBC menu | When PBC is enabled, press → BACK. When PBC is disabled, press DISC MENU. | |
| Select a repeat mode | 1) Press REPEAT/REPEAT A-B. 2) Press ←/▶. | |
| Repeat a specific section within a track | 1) Press REPEAT/REPEAT A-B twice to select the start point. 2) Press REPEAT/REPEAT A-B again to select the end point. · To resume the normal play, press ▷I. | |
| DVD VIDEO | Skip to a title or chapter | 1) Press GOTO. 2) Press ▲/▼ to enter the title/chapter number. 3) Press OK to confirm. |
| CONTRACT DISC HURRICAN | Skip to a track | 1) Disable PBC. 2) Press GOTO. 3) Press ▲/▼ to enter the track number. 4) Press OK to confirm. |
| Search backward/forward fast | Press ▲/▲▶ repeatedly to select a speed. | |
| Search forward slowly | Press ▲ repeatedly to select a speed. | |
| Search backward slowly | Press ▼ repeatedly to select a speed. | |
| Zoom in or out | Press ▲. • To pan through an enlarged photo, press ▲/▼/▲▶. | |
| Rotate a photo | Press ▲/▼/▲▶. | |
| Preview photos | 1) Press ▷ BACK during photo slideshow. 2) Press ▲/▼/▲▶ to select a thumbnail. | |
| Switch between Fun Mode (pictures in color) and Simple Mode (pictures in black and white) | Press DISC MENU during photo slideshow. | |

Note
- You can only play DivX videos that were rented or purchased with DivX® registration code of this player. (Refer to "Setup" > "General Setup" > [DivX(R) VOD Code])
- Subtitle files with the following filename extensions (.srt, .smi, .sub, .ssa, .ass) are supported but not displayed in the file list.
- The subtitle filename has to be the same as the filename of the DivX video (the file extension excluded).
- The DivX video file and the subtitle file must be saved under the same directory.
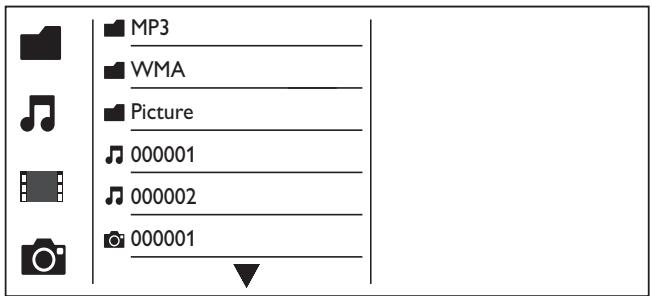
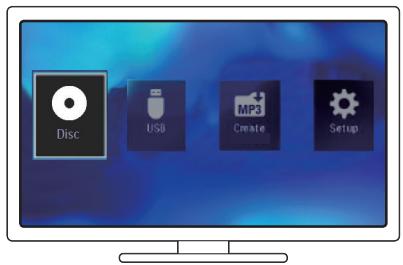
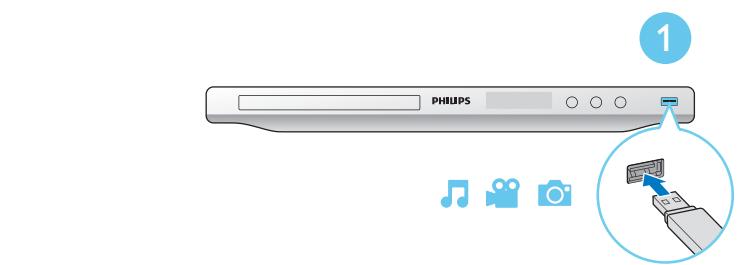
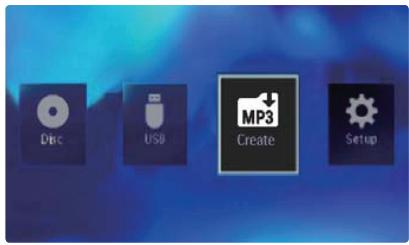
1 Press / to select , and then press OK.
All supported folders and files are listed.
2 Press / to select a music file, and then press OK to start playing.
If the music file is saved in a folder or sub folder, access its directory first.
3 Press / to select a picture file, and then press OK to start the slideshow.
If the picture file is saved in a folder or sub-folder, access its directory first.
To stop the slideshow, press
To stop the music, press again.

Note
- Music and picture files must be stored on the same disc or USB storage device.
- If a large number of files are complied onto one disc or USB storage device, it requires longer time to read and display the content.
- This player can only display digital camera pictures with JPEG-EXIF format, which is widely used in digital cameras. It cannot display Motion JPEG, nor pictures in formats other than JPEG. Sound clips associated with pictures cannot be displayed either.
- If a JPEG picture is not recorded as an "exif" type file, its thumbnail picture is displayed as "blue mountain".
During play, press : OPTIONS to access the following items.
| Media | Setting item | Function |
| DVD VIDEO | [Info] | Display the play information. |
| VIDEO COMPAINT VIDEO | [PBC] | Enable or disable PBC. |
| VIDEO Aspect ratio | [Aspect ratio] | Select a display ratio of picture on TV. |
| VIDEO Volume | [Volume] | Adjust the volume level. |
| VIDEO Angle | [Angle] | Select an available camera angle. |
| 0 | [Colour] | Select Fun Mode (pictures in color) or Simple Mode (pictures in black and white). |
| 0 | [Photo preview] | Display the thumbnail of photos. |
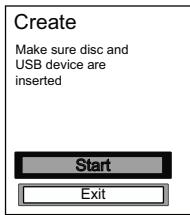
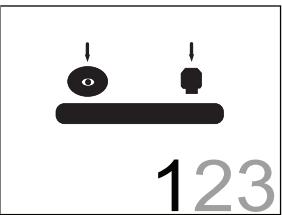
Follow the on-screen instructions to complete the process.
The created MP3 files are saved in a folder named "PHILIPS".

Note
- DTS CDs and copy-protected CDs cannot be converted.
- A write-protected or encrypted USB storage device cannot be used to store MP3 files.
This player supports Philips EasyLink which uses the HDMI CEC (Consumer Electronics Control) protocol. You can use a single remote control to control EasyLink compliant devices that are connected through HDMI.

Note
- Philips does not guarantee 100% interoperability with all HDMI CEC devices.
Make sure that HDMI CEC feature is enabled on the TV and other connected devices (see the user manual of the TV or other devices for details).
1 Press
2 Select , and then press OK.
3 Select [Video] > [HDMI Setup] > [EasyLink Setup].
4 Select [On] under the following options: [EasyLink], [1 Touch Play], and [1 Touch Standby]. EasyLink is enabled.
One Touch Play
When you play a disc, the TV automatically switches to the correct video input channel.
One Touch Standby
When you press and hold (standby) on the remote control of this player, this player and all connected HDMI CEC devices (if they support one-touch standby) switch to standby simultaneously.
| General | Disc Lock | · Unlock |
| OSD Language | · Auto (ENG) | |
| Video | Sleep Timer | · Off |
| Auto Standby | · On | |
| Audio | DivX(R)VOD Code | · Registration |
| Preferences |
Press OK to access the lower-level menu.
- Press BACK to return to the upper-level menu.

Note
- When a menu item is grayed out, it means that its setting cannot be changed at the current state.
General setup
| General | Disc Lock | · Unlock |
| OSD Language | · Auto (ENG) | |
| Video | Sleep Timer | · Off |
| Auto Standby | · On | |
| Audio | DivX(R)VOD Code | · Registration |
| Preferences |
[Disc Lock] - Restrict the play of a disc (maximum 20 discs can be locked).
[Lock] - Lock the current disc. To play or unlock this disc, you must enter the password.
[Unlock] - Play all discs.
[OSD Language] - Select a language for on-screen menu.
[Sleep Timer] - Set a period of time for the player to switch to Eco-power standby mode automatically.
[Auto Standby] - Enable this feature to automatically switch to Eco-power standby mode after 15 minutes of inactivity.
[DivX(R) VOD Code] - Display the DivX® registration code and deregistration code.

Note
- Go to www.divx.com/vod for how to register your player and rent or purchase DivX videos.
DivX videos rented or purchased by this registration code can be played only on this player.
Play a locked disc
When you load a locked disc, [Please enter password] is displayed, and "0" is displayed as the first digit of the password.
1 Press / to set a value (0 to 9) to the first digit.
2 Press▶.
3 Repeat step 1-2 to enter the 6-digit password.
4 Press OK to confirm.

Tip
- Refer to "Setup" > "Preference" > [Password] for how to change the password.
Video setup
| General | TV System | PAL |
| Aspect Ratio | 4:3 Pan Scan | |
| Video | Progressive | Off |
| Picture Setting | Standard | |
| Audio | HD JPEG | On |
| HDMI Setup | ||
| Preferences |
[TV System] - Select a TV system that matches your TV. By default, this setting matches common TVs in your country.
[Aspect ratio] - Select a display ratio that matches your TV screen.
[Progressive] - Enable or disable the progressive scan mode on this player.
[Picture Setting] - Select a predefined setting for picture color, or customize the setting.
[HD JPEG] - Enable this feature to view high-definition pictures through HDMI connection.
[HDMI Setup] - Set the options for HDMI connection.
[Resolution] - Select a resolution for high definition videos.
- [HDMI Deep Color] - Create vivid images with more color details when the video content is recorded in Deep Color and the TV supports this feature.
- [Wide Screen Format] - Select a display format for wide screen videos.
- [EasyLink Setup] - This player supports Philips EasyLink which uses the HDMI CEC (Consumer Electronics Control) protocol. You can use a single remote control to control EasyLink compliant devices that are connected through HDMI.
- [EasyLink] - Enable or disable the EasyLink feature.
[1 Touch Play] - After you enable this feature, the connected HDMI CEC TV automatically switches to the HDMI input channel when you play a disc.
[1 Touch Standby] - After you enable this feature, you can press and hold on the remote control of your player to switch all connected HDMI CEC devices to standby mode simultaneously.

Note
Refer to "Philips EasyLink" for details.
Audio setup
| General | Analogue Output | • Stereo |
| Digital Audio | ||
| Video | HDMI Audio | • On |
| Audio Sync | ||
| Audio | Volume | |
| Sound Mode | ||
| Preferences | Night Mode | • Off |
[Analogue Output] - Adjust this setting for audio output through AUDIO OUT L/R.
- [Stereo] - Compress multi-channel Dolby digital sound to stereophonic sound.
- [LT/RT] - Compress multi-channel Dolby digital sound to 2-channel surround sound.
[Digital Audio] - Adjust this setting for audio output through COAXIAL/DIGITAL OUT.
[Digital Output] - Select a type of digital output.
[Off] - Disable digital output.
[All] - Support multi-channel audio formats.
[PCM] - Downmix to two-channel audio signal.
- [LPCM Output] - Select the LPCM (Linear Pulse Code Modulation) output sampling rate.

Note
- [LPCM Output] setting is changeable only when [Digital Output] is set as [PCM].
- The higher the sampling rate, the better the sound quality.
[HDMI Audio] - Enable or disable the audio output through HDMI cable.
[Audio Sync] - Set a delay time for audio output when you play a video disc.
[Volume] - Set the default volume level.
[Sound Mode] - Select a preset sound effect.
[Night Mode] - Equalize loud sound and soft sound. Enable this feature to watch DVD movies at a low volume at night.

Note
Applicable to Dolby Digital encoded DVD discs only.
Preference
| General | Audio | · English |
| Subtitle | · Off | |
| Video | Disc Menu | · English |
| Parental Control | · 8 Adult | |
| Audio | PBC | · On |
| Password | · Change | |
| Preferences | DivX Subtitle | · Standard |
| Version Info | ||
[Audio] - Select an audio language.
[Subtitle] - Select a language for subtitle.
[Disc Menu] - Select a language for disc menu.

Note
- For some DVDs, the subtitle or audio language can only be changed from the disc menu.
- For a language that is not listed, select [Others]. Check the list of language codes (see "Language Code"), and then enter the respective language code.
[Parental Control] - Select a rating level to restrict the play of discs to children. These discs must be recorded with rating levels.

Note
- To play a DVD disc that has a rating level higher than your setting, enter the password first. (Refer to "Setup" > "General setup" > "Play a locked disc" for details)
- The rating levels are country-dependent. To allow all discs to be played, select [8 Adult].
Some discs have ratings printed on but are not recorded with ratings. This function has no effect on such discs.
[PBC] - Enable or disable the PBC (playback control) feature.
[Password] - Change the password for playing discs that are locked or restricted with rating levels.

Note
- If you forget the password, enter "136900" before you set a new password.
Change the password
1 Select [Preference] > [Password] > [Change], and then press OK.
The interface for changing password is displayed.
2 Press OK again.
"0" is displayed behind [Old Password] as the first digit of old password.
3 Press / to set a value (0-9) to the first digit.
4 Press▶.
5 Repeat steps 3-4 to enter the 6-digit old password.
6 Repeat steps 3-4 to enter the new password behind [New Password].
7 Repeat steps 3-4 to enter the new password behind [Confirm PWD].
[DivX Subtitle] - Select a character set that supports the subtitle of your DivX video.
[Version Info] - Display the information about software version of this player.
[Default] - Reset all settings to factory default, except for the settings for [Disc Lock], [Parental Control], and [Password].
Check the current software version of this player, and then go to the Philips website for information about software update.
Check the current software version
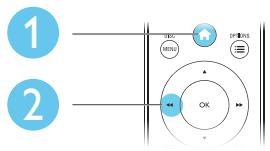
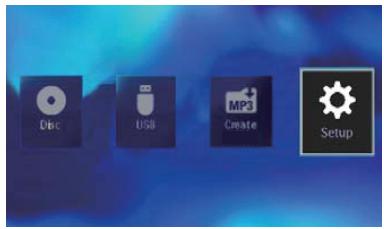
1 Press
2 Select , and then press OK.
3 Select [Preference] > [Version Info], and then press OK.
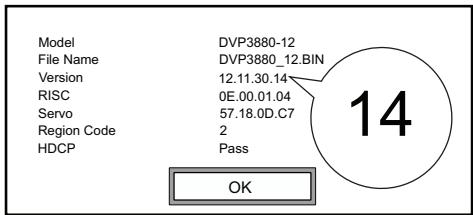
4 Write down the last two digits "XX" behind [Version].
The version of current software is VXX.

Note
- Power supply must not be interrupted during software update.
Perform the update
1 Go to www.philips.com/support.
2 Search for support information with "DVP3880/12" as the keywords.
3 Click the search result to display available support information.
4 Read the Firmware Upgrade Readme File and follow the instructions to complete the software update.

Warning
- Risk of electric shock. Never remove the casing of the player.
To keep the warranty valid, never try to repair the player yourself.
If you have problems using this player, check the following points before you request service. If you still have a problem, register your player and get support at www.philips.com/welcome.
If you contact Philips, you will be asked for the model and serial number of this player. The model number and serial number are on the back of this player. Write the numbers here:
Model No.
Serial No.
No picture.
Refer to the TV user manual for how to select the correct video input channel.
- Switch to the default mode if the progressive scan setting or the TV system setting is changed.
No picture on HDMI connection.
- If this player is connected to an unauthorized display device, the audio/video signal cannot be output.
If the HDMI cable is faulty, replace it with a new HDMI cable.
If you have changed the setting for HDMI video resolution, switch to its default mode.
No sound output from the TV.
- Make sure that the audio cables are connected to the audio input sockets that are grouped with the selected video input sockets.
No audio output from the loudspeakers of the connected external audio device (for example, stereo system, amplifier receiver).
Make sure that the audio cables or coaxial cable are correctly connected.
- Switch the audio device to correct audio input source.
No sound on HDMI connection.
- If the connected device is non-HDCP compliant or only DVI-compatible, no sound can be heard from the HDMI output.
Make sure that [HDMI Audio] is set to [On].
No sound during DivX video playback.
The audio codes are not supported.
Disc cannot be played.
Make sure that the disc is clean and correctly loaded.
Make sure that this player supports the disc (see "Product specifications").
Make sure that the recorded disc is finalized and the format of recorded files are supported.
Recorded files (JPEG, MP3, WMA) cannot be played or read.
Make sure that the file was recorded in the format of UDF, ISO9660, or JOLIET.
Make sure that the number of files does not exceed the limitation (648 files maximum).
Make sure that the JPEG file extension is .jpg, JPG, .jpeg, or .JPEG.
Make sure that the MP3/WMA file extension is .mp3, .MP3, .wma, or .WMA.
The contents of the USB storage device cannot be read.
The format of this USB storage device is not supported.
DivX video files cannot be played.
Make sure that the DivX video file is complete.
Make sure that the file extension is correct.
- DRM-protected video files that are stored on a USB flash drive cannot be played through an analog video connection (for example, composite, component, and scart). Transfer the video content onto a supported disc, or use an HDMI connection to play these files.
DivX subtitles are not displayed correctly.
- Make sure that the subtitle filename is the same as the video filename.
Make sure that the DivX video file and the subtitle file are saved under the same directory. - Select the character set that supports the subtitle. (Refer to [Preference] > [DivX Subtitle])
EasyLink does not work.
Make sure that EasyLink feature is enabled on the TV.
Make sure the settings for [EasyLink] are correct.

Note
- Specifications are subject to change without notice
Region code
| DVD region code | Countries |
| Europe |
Playable media
Disc
DVD,DVD-Video,VCD,SVCD,Audio CD
DVD+R/+RW, DVD-R/-RW, DVD+R/-R DL (Dual Layer), CD-R/-RW (Maximum number of files: 648)
File
Video: .avi, .divx, .mp4, .xvid
Audio:.mp3,wma
Picture: jpg.jpeg
USB storage device
- Compatibility: Hi-Speed USB (2.0)
Class support: MSC (Mass Storage Class)
File system:FAT16,FAT32
Maximum number of albums/folders: 300
Maximum number of tracks/titles: 648
Video
Signal system: PAL, NTSC
Composite video output: 1 Vp-p (75 Ohm)
- Component video output: 0.7 Vp-p (75 Ohm)
HDMI output: 480i, 480p, 576i, 576p, 720p, 1080i, 1080p
Audio
2-channel analog output
AUDIO OUT L&R:2 Vrms (47k Ohm)
Digital output: 0.5 Vp-p (75 Ohm)
Coaxial
HDMI output
Sampling frequency:
MP3: 8 kHz, 11 kHz, 12 kHz, 16 kHz, 22 kHz, 24 kHz, 32 kHz, 44.1 kHz, 48 kHz
WMA: 44.1 kHz, 48 kHz
- Constant bit rate:
MP3: 8 kbps - 320 kbps
WMA: 64 kbps - 192 kbps
Main unit
Dimensions (W× H× D) .. 360× 42× 209 (mm)
Net Weight: 1.32kg
Power
Power supply rating: 230V ;50Hz
Power consumption: < 10W
Power consumption in standby mode: < 0.4W
Accessories supplied
Remote control and one battery
Audio/Video cables
- User Manual
Laser specification
Type: Semiconductor laser InGaAlP (DVD), AlGaAs (CD)
Wave length: 658 nm (DVD), 790 nm (CD)
Output Power: 7.0mW (DVD), 10.0mW (VCD/CD)
- Beam divergence: 60 degrees
Indholdsfortegnelse
MP3: 8 kHz, 11 kHz, 12 kHz, 16 kHz, 22 kHz, 24 kHz, 32 kHz, 44 kHz, 48 kHz
WMA:44.1kHz,48kHz
- Konstant bithastighed:
MP3: 8 kbps - 320 kbps
WMA: 64 kbps - 192 kbps
Hovedenhed
Mäl (B × H × D): 360 × 42 × 209 (mm)
Nettovægt: 1,32 kg
Tend/sluk
Ström Forsyning: 230V 50 Hz
Strømforbrug: < 10 W
Strømforbrug i standbytilstand: < 0,4 W
Specification for laser
Type: Halvleder-laser InGaAlP (DVD), AlGaAs (CD)
Bolgelaengde: 658 nm (DVD), 790 nm (CD)
Udgangseffekt: 7,0 mW (DVD), 10,0 mW (VCD/CD)
Stråleafvigelse: 60 grader
Inhaltsangabe
MP3: 8 kHz, 11 kHz, 12 kHz, 16 kHz, 22 kHz, 24 kHz, 32 kHz, 44,1 kHz, 48 kHz
WMA:44.1kHz,48kHz
Konstante Bitrate:
MP3: 8 kHz, 11 kHz, 12 kHz, 16 kHz, 22 kHz, 24 kHz, 32 kHz, 44 kHz, 48 kHz
WMA: 44,1 kHz, 48 kHz
Vakiobittinopeus:
MP3:8-320kbps
WMA:64-192kbps
Päalaite
Mitat (L× K× S) .. 360× 42× 209mm
Nettopaino: 1,32 kg
Virta
MP3: 8 kHz, 11 kHz, 12 kHz, 16 kHz, 22 kHz, 24 kHz, 32 kHz, 44 kHz, 48 kHz
WMA:44.1kHz,48kHz
Bitrate costante:
MP3: 8 kbps - 320 kbps
WMA: 64 kbps - 192 kbps
Unità principale
Dimensioni (L× A× P) .. 360× 42× 209mm
- Peso netto: 1,32kg
Alimentazione
Alimentazione: 230V ;50Hz
Consumo energetico: < 10W
Consumo energetico in modalità standby: < 0,4W
MP3: 8 kHz, 11 kHz, 12 kHz, 16 kHz, 22 kHz, 24 kHz, 32 kHz, 44 kHz, 48 kHz
WMA: 44,1 kHz, 48 kHz
MP3: 8 kHz, 11 kHz, 12 kHz, 16 kHz, 22 kHz, 24 kHz, 32 kHz, 44,1 kHz, 48 kHz
WMA: 44,1 kHz, 48 kHz
Taxa de bits constante:
MP3: 8 kbps - 320 kbps
WMA: 64 kbps - 192 kbps
Unidade principal
Dimensoes (L× A× P) .. 360× 42× 209 (mm)
- Peso liquido: 1,32 kg
Corrente
- Classificacao da alimentacao: 230V 50 HZ
Consumo de energia: < 10 W
Consumo de energia no modo de espera: < 0,4W
- Se Philips Easylink for mer information.
Ljudinställning
| General | Analogue Output | • Stereo |
| Digital Audio | ||
| Video | HDMI Audio | • On |
| Audio Sync | ||
| Audio | Volume | |
| Sound Mode | ||
| Preferences | Night Mode | • Off |
MP3: 8 kHz, 11 kHz, 12 kHz, 16 kHz, 22 kHz, 24 kHz, 32 kHz, 44 kHz, 48 kHz
WMA: 44,1 kHz, 48 kHz
USE OF CONTROLS OR ADJUSTMENTS OR PERFORMANCE OF PROCEDURES OTHER THAN THOSE SPECIFIED HEREIN MAY RESULT IN HAZARDOUS RADIATION EXPOSURE.
CAUTION:
VISIBLE AND INVISIBLE LASER RADIATION WHEN OPEN AND INTERLOCK DEFEATED. DO NOT STARE INTO BEAM.
LOCATION:
INSIDE, NEAR THE DECK MECHANISM.
Italia


- DOLBY DIGITAL
- 2
- Contents
- Note
- One Touch Play
- One Touch Standby
- Play a locked disc
- Tip
- Video setup
- Audio setup
- Change the password
- Check the current software version
- Perform the update
- Warning
- No picture.
- No picture on HDMI connection.
- No sound output from the TV.
- No audio output from the loudspeakers of the connected external audio device (for example, stereo system, amplifier receiver).
- No sound on HDMI connection.
- No sound during DivX video playback.
- Disc cannot be played.
- Region code
- Playable media
- Disc
- File
- USB storage device
- Video
- Audio
- Main unit
- Power
- Accessories supplied
- Laser specification
- Indholdsfortegnelse
- Hovedenhed
- Tend/sluk
- Specification for laser
- Inhaltsangabe
- Päalaite
- Virta
- Unità principale
- Alimentazione
- Unidade principal
- Corrente
- Ljudinställning
- CAUTION:
- LOCATION:
- Italia
Brand : PHILIPS
Model : DVP3880
Category : DVD player