
PT3012 - Yogurt maker AMICA - Free user manual and instructions
Find the device manual for free PT3012 AMICA in PDF.
| Brand | Amica |
| Model | PT3012 |
| Product Type | Yogurt maker and steam cooker |
| Power supply | AC 220-240 V, 50-60 Hz |
| Power | 755-900 W |
| Display screen | LCD |
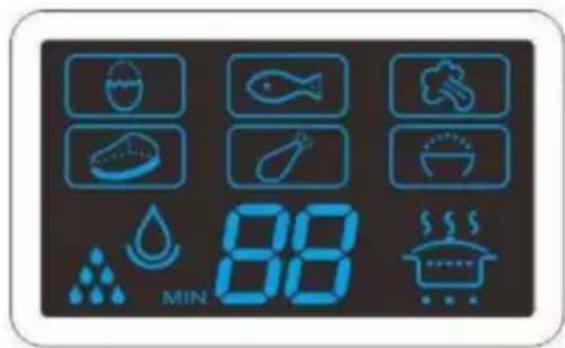
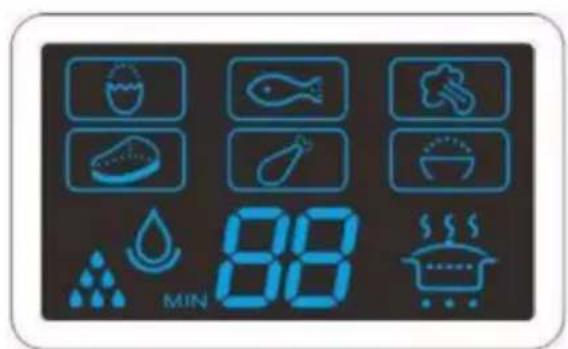
| Number of automatic programs | 7 (Eggs, Fish, Vegetables, Meat, Chicken, Rice, Keep warm) |
| Adjustable timer | 1 to 99 minutes |
| Water tank capacity | 1.1 liters |
| Number of steam containers | 3 |
| Rice/soup bowl included | Yes |
| Automatic temperature maintenance | Yes (approx. 20 minutes) |
| Water level sensor | Yes |
| Overheat protection | Yes |
| Automatic shut-off | Yes (standby and after cooking) |
| Power cord length | 1 meter |
| Container material | Stainless steel |
| Care and cleaning | Hand wash with mild detergent; do not put in dishwasher |
| Descaling | Every 15 hours of steam cooking with white vinegar |
| Included accessories | 3 steam containers, rice bowl, drip tray, diffuser, filling nozzle |
Frequently Asked Questions - PT3012 AMICA
User questions about PT3012 AMICA
0 question about this device. Answer the ones you know or ask your own.
Ask a new question about this device
Download the instructions for your Yogurt maker in PDF format for free! Find your manual PT3012 - AMICA and take your electronic device back in hand. On this page are published all the documents necessary for the use of your device. PT3012 by AMICA.
USER MANUAL PT3012 AMICA
SAFETY INSTRUCTIONS FOR USE
Note! To reduce the risk of fire, electric shock or personal injury, read this manual carefully before using the appliance.
Children do not realize the dangers that can arise when using electrical appliances; therefore keep the kettle out of reach of children.
- Do not immerse the body of the appliance in water or other liquids. Immersing in water may cause an electric shock.
- If water spills on the external components of the appliance, dry it thoroughly before switching back on.
- Do not use the appliance if it shows any signs of damage to the power cord, or if the appliance has been dropped on the floor.
- After use, always pull out the plug from the socket, and also in case of any malfunction or before cleaning.
- When pulling out the plug from the wall outlet, never pull by the cord, only the plug, holding the socket with your other hand.
- This is a class I electrical shock protection appliance, and therefore power outlet to which it is connected to must be equipped with grounding pin.
- Do not attempt to remove any parts of the housing.
- To prevent damage to the power cord, do not place it over sharp edges or close to hot surfaces.
- Do not expose the appliance to rain or humidity, and do not use it outdoors. Do not operate the appliance with wet hands.
- If the power cord or plug is damaged, it should be replaced by a professional repair shop in order to avoid hazard.
- Never leave the appliance plugged in to power without supervision.
- This appliance is not intended for use by persons (including children) with physical, mental or sensory handicaps, or by persons inexperienced or unfamiliar with the appliance, unless under supervision or in accordance with the instructions as communicated to them by persons responsible for their safety. Children shall not play with the appliance.
- Using attachments that were not supplied with the product may cause damage to the appliance.
- Before use, extend and straighten the power cord.
- Do not use an extension cord which does not meet the applicable electrical standards and regulations.
- Do not attempt to remove any parts of the housing or insert any objects into the appliance.
- Never fill the appliance with water above the maximum level indicated.
- Disconnect the appliance from the power supply be
fore adding water to the reservoir.
- Unplug the appliance from the wall socket before adding water to the reservoir.
- Empty the water reservoir after use.
- When placing the appliance on a base, make sure it is stable.
The appliance generates a large amount of hot steam during operation. Always use oven mitts to avoid burns. Always pick up the lid slowly making sure steam will escape away from you.
- Make sure the baskets are stacked on the appliance correctly, fit well and are stable.
- Before taking the appliance apart, make sure it has cooled down completely.
- Do not move the appliance containing hot food.
Under no circumstances should you touch the steam chamber — it is very hot.
- During cooking do not reach into the appliance. To check the temperature take the food out with a long spoon or fork. Do not lean over the appliance during operation.
- Do not use the appliance near furniture, as hot steam can damage the surfaces.
- Do not use the appliance when not fully assembled.
- The appliance generates heat. Be cautious when using the appliance.
- Unplug the appliance from the power outlet and wait until it cools down before
cleaning.
The appliance is designed for cooking food — do not use it for any other purpose.
- Appliance components are not suitable for washing in the dishwasher.
- Do not add to the water any sugar, salt, pepper, spices, wine, olive oil and other such additives. This can irreversibly damage the appliance.
- Warning: there is a risk of burns from escaping steam. Observe all safety precautions when using the appliance.
- Electrical requirements: Make sure that the voltage indicated on the nameplate corresponds to that of your home electrical mains. Alternating current must be used, typically marked .
In accordance with European Directive 2012/19/EU and Polish legislation regarding used electrical and electronic goods, this appliance is marked with the symbol of the crossed-out waste container. This marking indicates that the appliance must not be disposed of together with other household waste after it has been used.
The user is obliged to hand it over to waste collection centre collecting used electrical and electronic goods. The collectors, including local collection points, shops and local authority departments provide recycling schemes.
Proper handling of used electrical and electronic goods helps avoid environmental and health hazards resulting from the presence of dangerous components and the inappropriate storage and processing of such goods.
SPECIFICATION:
Model - PT 3011 / PT 3012
Rated voltage - AC 220-240V ~ 50-60Hz
Rated power - 755-900 W
Display - YES - LCD
Power cord - 1 m
Automatic cooking programmes - YES / 7
Time control - YES / 1-99 min
Automatic keep food warm - YES
Water level sensor - YES
Water reservoir - 1.1 L
Number of baskets - 3
Rice or soup bowl - YES
Overheating protection - YES
Power cord storage - YES
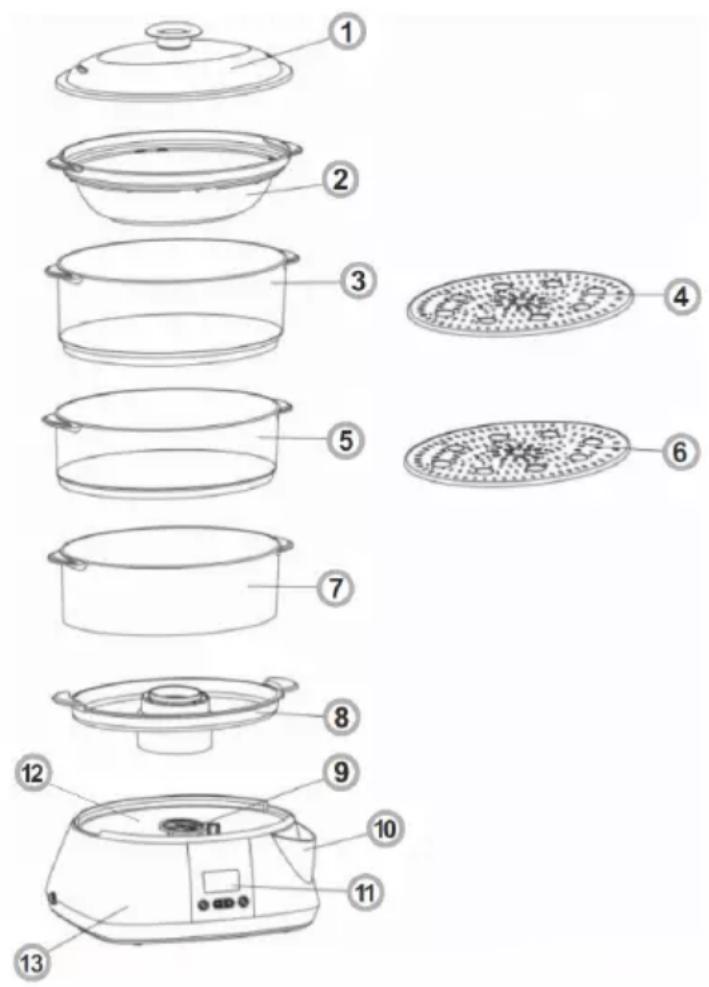
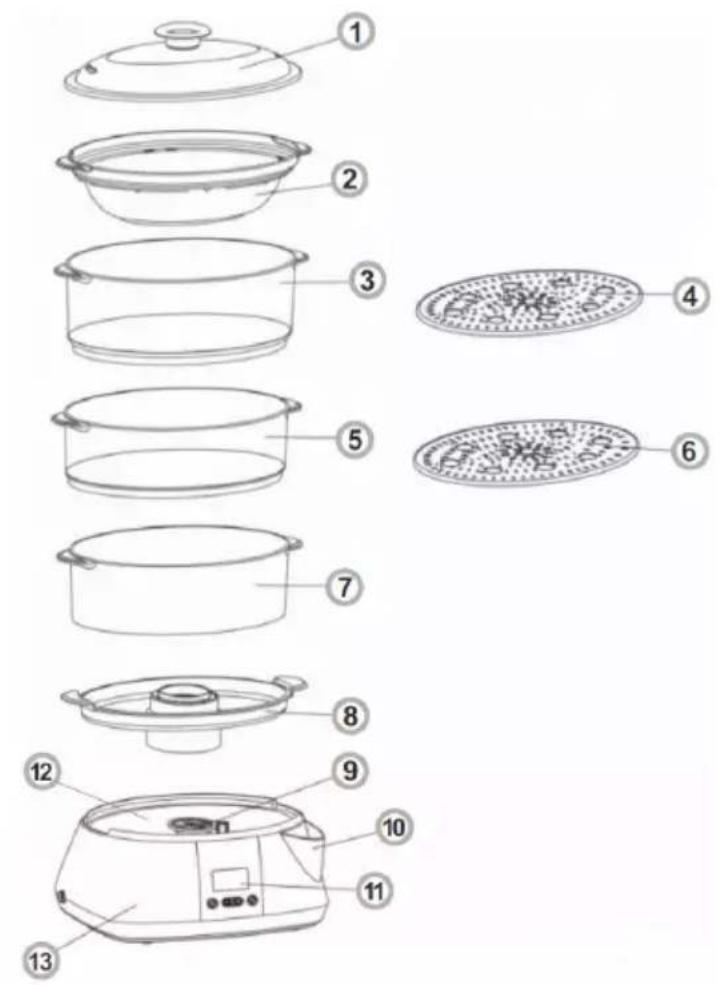
FEATURES AND COMPONENTS
- Lid with venting holes
- Rice or soup bowl
- Top steaming basket
-
Base of the top basket (detachable)
5.Middle steaming basket -
Base of the middle basket (detachable)
- Bottom steaming basket
- Drip tray
- Diffuser
- Water inlet with scale
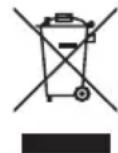
- Control panel with LCD display
- Water reservoir
- Motor unit
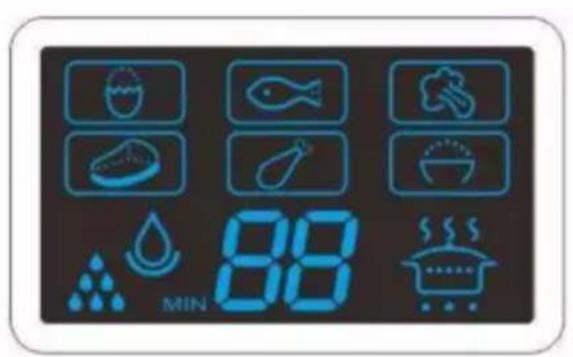
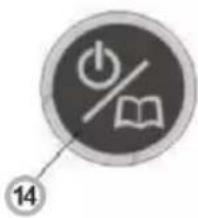
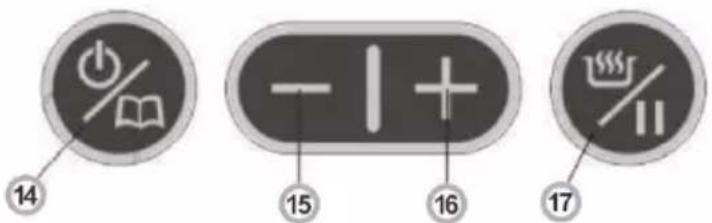
- On / off switch; menu button
- Reduce time "
16.Add time ^ 喜 + ^ 喜
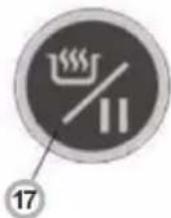
17.Start/pause

BEFORE FIRST USE:
- Unpack the appliance and check if the kit contains all the accessories.
- Remove any protective film and tape.
- Wash all elements (except the base unit with water reservoir) in warm water and mild detergent, then wipe dry with a cloth.
- Wipe the base unit with a damp cloth, then dry thoroughly.
COOKING:
- Place the appliance on a stable, flat surface.
- Pour enough water into the reservoir. Do not exceed the maximum water level in the reservoir. Depending on the method of filling pay attention to the "MIN" and "MAX" marks inside the reservoir and the water inlet.
- Place the drip tray with flavour infuser in the appliance and make sure that it is installed firmly in place.
- Depending on the amount of food you want to cook, place the appropriate number of baskets with food in the correct order (fit correct bases in baskets). Make sure the assembled appliance is stable. Place larger items of food that will take more time to cook in the bottom basket.
There is strainer in the middle of the drip tray where you can put fresh or dried herbs to spice up your dishes.
-
Connect the appliance to the power supply. The appliance will be in standby mode. The display will light up with all the symbols, and you will hear a beep. The appliance is be ready to set the cooking programme.
-
Set the desired programme and then press
- Within 30 seconds, the appliance will produce steam, the symbol will flash on the display. Timer will start countdown and when programme ends the symbol will be displayed.
- When cooking programme ends you will hear two beeps and the appliance will start to keep food warm. This takes about 20 minutes. The keep food warm symbol is shown on the display, the timer countdown starts until 63hown. You will then hear five beeps and the appliance will turn off after one minute.
- Using oven mitts or a towel gently lift the lid. Use caution because a large amount of steam accumulated inside the baskets will be released.
While steam coking you can add or reduce the cooking time using the -1+ buttons. You can also adjust time in keep food warm mode. Press START / PAUSE to pause the programme while steam cooking. To end a programme press START / PAUSE button and then On/Off switch.
SET A COOKING PROGRAMME:
The appliance features 7 cooking programmes. Press to select a programme. You will hear a beep and appropriate symbol will be displayed:
| Programme Symbol shown on the display | Cook Time [min] |
| Egg | 12 |
| Fish | 15 |
| Vegetables | 20 |
| Meat | 30 |
| Chicken | 35 |
| Rice 40 | ||
| Keep food warm | 10 |
USE THE KEEP FOOD WARM FUNCTION:
The keep food warm function activates automatically at the end of the cooking programme. It can also be set manually. When you select the keep food warm function, the relevant indicator will appear on the display and the time remaining until the function is turned off. At the end of the programme will be shown on the display, you will hear five beeps and the appliance will turn off after 1 minute.
CUSTOM COOKING TIME:
- You can set custom cooking time from 1 minute to 99 minutes.
- When you start the appliance with default settings, adjust cooking time using the I ons.
- When you select the desired cooking time press to start the cooking process.
THE AUTO OFF
- The appliance turns off automatically when it is plugged in and not in use (standby mode). The appliance will turn off after about 1 minute of inactivity and you will hear a beep.
- The appliance will also turn off after the keep food warm function completes.
- The appliance will auto power off when you select a programme, set the off-timer but do not confirm by pressing the button.
- To resume cooking, press
FILL THE WATER RESERVOIR
- You need to periodically add water during steam cooking.
- Add water to the reservoir when water level approaches the "MIN" level at the water inlet.
- When there is not enough water in the reservoir you will hear a beep and the flashing symbol will be shown on the display.
- When you add more water the beeping will stop and the symbol will be turned off.
CLEANING AND CARE:
- Before cleaning, make sure the appliance is disconnected from the power source and has cooled completely.
- Do not immerse the base unit in water or other liquid. Wash the interior with a cloth and a little mild detergent. Wipe the external base unit surfaces with a damp cloth. Wipe dry.
- Do not use abrasive powder detergents to clean the appliance components. Use a mild detergent and warm water.
- Appliance components are not suitable for washing in the dishwasher.
- Always wash all appliance elements after use.
- Pay particular attention to clean the base unit around the diffuser and the float sensor - dirty float sensor may indicate low water level although there is enough water in the tank.
DESCALE THE APPLIANCE
- Regular descending prolongs the appliance life.
- After every 15 hours of steam cooking (steaming only, keeping food warm does not count) the indicator will be displayed to remind you to descale the appliance.
-
Follow these steps to descale the appliance once you finish steam cooking:
-
Add white vinegar in the water reservoir to the "MAX" mark. Do not use any chemicals or other substances.
- Assemble the appliance according to the relevant instructions.
- Plug the appliance into a power outlet.
- Set the cooking time to 25 minutes. If white vinegar starts to boil over, turn off the appliance, allow it to cool and reduce the amount of vinegar in the reservoir.
- After descending, initiate the cooking process multiple times, changing the water every 5 minutes to eliminate the vinegar odour.
POKNY K BEZPEČNÉMU POUŽÍVÁNÍ
HOMHaJIHa MOUHOCT-755-900W
Ducnnei -DA/LCD
3axpaHbau Ka6eJ \~1m
ABTomatuHn nporpamn 3a rotBehe -DA/7
Taimep-DA/1-99min
ABTomatnuHNOndbpxKaHeHa TemnepaTpaTa -A
DaTnK 3a HnBO Ha BODaTa - DA
KoHTeHep 3a B0da-1,11
Bpoi KOHTeHepn-3
Kyna 3a opn3 nnn cyna - DA
3aunTa OT nperpBaHe - DA
THe3do 3a npn6npaHa Ha Ka6eNa - DA
OBOPYDABAHIECTPOEHA YPEDA:
- Kanakc BENTnlaaunOHn OTBOPN
- Kyna 3a opn3 nnn cyna
- TOpEn KOHTeHep 3a rotBeHe Ha npa
4.Долна осноа Ha rophnna KOHTeHep (cbaIaIca ce)
5.CpeDenKoHTeHep3a roTBeHe Ha npa
6.Долна осноа на среднию контейнор (свашиа ce)
7.Долен контейнера за ratовени на па - Tabuuka 3a c6bupahe Na Boda
9.Дифузер - OTbOp 3a HauNbAHe Ha BODa Cbc CkaJa
- Панел за уравлике с LCD дислай
- Pe3epBoap 3a BOda
- Kopnyc ha ypeda
- ByToH 3a BKNIOUBAHe / N3KNIHOVAHe; ByToH 3a MEHIO
- KoHTpOHa BpeMeTo " -
- KoHTpOJ Ha BpeMeTo " ^+
- Byton cTap/Tay3a

PENEI PbPBOTO N3NOJ3BAHE:
- Pa3onakobaiTe ypea n npoBepeTe, daN KOMnIeKTBcBdbpKa BCnKn akcecoapn.
- OtcpaheTe BCnK3aunTHn IeHTN 3aunTHo FOJIO.
3.ИЗМиTe BCчКеЕмENTHa KOMПЛeKTa (cИЗКИочЕнe Ha pe-zeрьараза 3a BOda) cToTnla BOda nДобавka OT HearpeCnBEn Mneu npenapat, CLEd KoETo rN NOCDcyWeTe C KbPna.
4.ИЗТРИЕСВАЖHAКБРЯpeЗЕРBOAPA3a BOДAи cTapATEHOrnoNDCyWEte.
TOTBEHE:
- NocTaBete ypeDa Bbpxy paBHa, cTaNHa NOBbpxHOCT.
2.Cnomouta Ha co6ctBcD CnPeTe Heo6xOJIMOTO KOJIueCTBO BDA B pe3epBoapa, KaTO He HADBnBaBATE O3HaeHOTOMAKCmAMHO HNO B pe3epBoapa. B 3aBNCMocT OT HaunHa HA HanbIbAHe Ha pe3epBoapa o6bpHete BHImaHne Ha O3HaeHnTa ,MIN" n ,MAX" OT BbTpewHata CTpaHa Ha pe3epBoapa n Bbpxy OTbopa 3a HAnBaHe Ha BODa.
- NocTabete TabuKata 3a cb6npaHe Ha B0da B Kopnyca Ha ypeHa ne ce yBepeTe, Ye DbTa eIemEHTa 3a CTabnHn.
4.B3aBnCmOcT OT KOJIueCTBOTo XpaHa, KOeTO NCKaTe Da nprirotBNTe, NOCTABeTe CbOTBeTHN6pO KoHTeHepn 3a XpaHa B CbOTBeTHNaocLEoBaTEHOCCT (KOHTeHepnTe Tp8Ba NpeDapntEnHO Da 6bDat CrNo6eHN CBc CbOTBeCTBaUHTe NM OCHOB).PpOBepTe, DAIn cIaTa KOHCTpyKUns eCTaNla. Cna3BaHTe npabNlOTO No-ROJEMITE AICTN, KOITc CE HJXDArT OT NOBEe BpeMe 3a rotBeHe, Da CE HamnPa TB Ha-NDoHNIG KOHTeHep.
B cpeHaT aact Ha TabuKaTa 3a cb6paHae Ha B0da ce HAMnpa CnTO, Bbpxy KoTe MoKeTe Da NoCTabNTe PpeCHN NIN CyUeHN NOI npAKn 3a O6OratBaHe Ha BKyca Ha pNroTBAHata XpHa.
- BkIIOUeTe ypeDa KbM 3axpaHBAHeTo, ypeBt ABTOMaTHUHO ue npemHe B peKIM rOTOBHOCT, BbpXy ekpaHa ue CBeTHa BCuKN CmBOIn N ue 6bDe reHepnpaH 3ByKOB CNrHaN "6nN". YpeBt Ue 6bDe rTOB 3a HAcTpoKa Ha CbOTBEHTHa Tnporpama.
6.3aAaTe cBtBETHa nporpaMa, CneKoETO HATNCHE6yTOH 3a da 3anoYHeTe rOtBeHTo.
- B pamknte Ha 30 cekyHn ypeBt 1ue 3anoHne da rehepnpa npap, Bbpy dncnner Ha ypeDa 1ue 3anoHne da Mira cmbol, 1ue 3ano- Hte OTbpoBaHe Ha BpeMeTo DO 3abbpwBaHe Ha pa6oTata Ha ypeD MNHYta CneMnHYta, DOKATO Bbpy dncnner Ce NOBn CmBOL 8. Korato roTbeHto Ha npapa 3abbpwn, 1ue 6bde rehepnpan DByKpaTeH 3byKOB CNrHaN" N UpeBt ABTOMATNo Oe BKIOUHNyHKnraTa 3a NoDbPkaHe HA TOnnHATA. Pa6Ota Ta 3n FyHKnna IPOBnKaBA OKOLO 20 MNTH. DeIcTBNeTo H a FyHKnraTa 3a NoDbPkaHe HA TOnnHnA 1ue 6bde CNrHaN3npaHO Cbc CmBOLa Bbpx Dncnner, 1ue 3anoHne OTbpoBaHe Ha BpeMeTo DO 3abbpWBAHe Ha DeIcTBNeTo H a FyHKnnaIa 3ue 6bde CNrHaN3npaHO C nEeKpTaH 3byKOB CNrHaN" 6bn", a CneI n3TuHane Ha eDnMa MNHTa OT HeepnpaHn CnHAn ypeBt ABOTMAuHNO 1ue CE NkIOUH.
9.ИЗнOL3BAйк KyxHEnK pKabNcI INI KbpNa NOBdHrTe BnMaTeJIHO KAnaka KaTo 6bDeTe MHORO BHIMaTeJIH, 3aIoTO npINOBdIraHe Ha Kanaka ce OCBO6OxKaDaBa rOlAmo KOInYeCTBO napa,HaTpyNaHa BbTpE B KOHTeHepTe.
IbpeMe Ha rotBeHe Ha napa MoKeTe Da yBelenuBaTe Nn daHa
MaJIaBaTe BpeMeTo Ha pa6ota c NmOuTa Ha 6yToHnTe -1+ .No
BpeMe Ha deNCTBHe Ha yHKnraTc 3a NOnDbpxaHe Ha TOnIIHa pe
rylnpaHTo Ha BpeMeTo CbIo TaKa e Bb3MoKHO. Korato ypeDtPa
bOtN, c HATNCaHe Ha 6yToH CTAPT/NAY3A MoKeTe Da cnPete paO
tata Ha ypeJa. PbHOTo N3KnIOUbaHe Ha 3aDaJeHATA IpOrpama ce
i3bPwBa c HATNCaHe Ha 6yToH CTAPT/NAY3A, CneJ KoETo Tpr6Ba
da HATNChe ToHa 3a BKIOUbaHe/u3KnIOUbaHe.
HACTPOIKA HA IPOIPORAMATA 3A TOTBEHE:
YpeBt e 060pyBaH c6c 7 He3aBnCmN nporpam. 3a da npomeHne nporpamata, Tp6Ba Da n3no3BaTe 6yToH cKa CmaHa Ha nporpamata 6bDe CnHaIImn3npaHa C6c 3ByKOB CnHaJ "6nIn" n C6c CbOTBeTeH CmBOJ Bbpxy DncJIeR Ha ypeJa:
KohaiTeca, 10 npncTpi INOBHICTO OXOJIO.
He nepecyBaIte npncTpi3 rapraOIO iKeIo.
Hi B ykomy pa3i He moxHa TopkaTnCry Do napoBoi Ka-Mepn, BOHa dYxke rapya.
-Пд час пиroToBaHн He npocobYte pyknВ npicTpii,ДЯпepeBipKn TempepaTyprn BNTaRHiTb iJxy DOBROIO IOKKOIO abO BndeJIKOIO,He HaxINJaITecHaI npicTpoem NiDчac po6OTn.
He BnKOpncToBnyTe npntpii 6iJa cTIn a6o waΦ, rapya napa MoKe noShkoDHTN NOBepxHi.
He BnKOpNCToBvIe npNCTpii 6e3 BCTaHOBJIeHnx KOMNoHEHTiB.
- Ппсстрий reнеруе Високу Temперату, ДотримуITEСЯ BCIX OCOBЛВИX 3axODIБ 6e3пеки пи робoti 3 ппстpoЕМ.
- Ppeo CnB BID'EDHaT NOro BiD XNBHeHr Ta DoyeKaTNCb DOKN BIN NOBHICTO OXOJIOHe.
- Ппсстрий пиз nauseю дя rotyвання подуктів xapуBaHHЯ Ha napi, BnKOpncTaHЯ ИOrO B iHux ziJax HeIoNyCTnme.
KoDhen 3 eIemEnTIB haBopy He MoXHa MNTN B NocyDoMnHi MaunHi.
He doaBaTe y Body kOHNx doabok, TaKnx YK UyKOp, cInb, nepeCb, cneuB, BnHO, OJIa Ta iHsi NODi6HIDobabKn. Ze MoKe npN3BeCTn Do He3BOPoTHOro NO-ShKOJXeHHa PnCtpoI0.
Ybara: icHye pu3nk OTPMaHHa ONIKIB napoH, 0OBHXODHTb 3 npncTPOH. OToPmUyTeC8 BCix 3anobixHNX 3axOdiB pID qac BnKOpNCTaHHa npncTPOH.
BnMOrn Do eNeKTpKn: CnId nepeBipNTn, uHn HAppyra, nOdaHa B Ta6JnUcI HOMiHaJIbHnX 3NaueHb, BiDnOBiJaE napaMeTpam DomaHbOi eNeKTpomepexi, npN cboMy XnBJIeHHr NOBnHNO MaTn No3NaueHnR ~ (3mHnCTpym).
Ue npctpi BIDNOBIOHO Do Ebponecboi DnpeKtnBu 2012/19/EC i noBcboKO 3aKOHy npo BNOPcTaHe eek Tpnuhe Ta eekTPOHHe OblaHaHHNo3HaueHm CMBOLOM nepeKpcEneHOro KOHTeHepa IaBixOdb. Take MapkyBaHH NoBIDom, 0u ce npctpi nicra 3aBepWeHH TepMHy Horo BNOPcTaHn He MoXHa BKNDaTH pa3OM 3IHUnMn N6bYTOBHMn BiXdoAMN.
Kopntybaa 306ob'3aahn BiDnTu Horo y BiNobIHn NyHKT 360py BiXODIB eEeKtpnHoro Ta eEeKtpoHHoro 06naHaHH. NHyHKTN 360py, 3OKPema, MiccEBI NYHTN, MaRaNHN I paOHNI NyHKTN yTBPOIOb BiNOBiDHy CnCTeMy, UO DO3BOJAE 3daBAtn ce O6naDaHHa. BiNobIDne NOBDOxHeHH 3 BkOpNCtAHm EeKtpuHHMa T a EeKtpoHHM 06NaDAHHAM Do3BOJIe YHNNHTN WkIDINBHX dA 3doPOB'JIOHN H IOBkiIIra HaCNIKB, Aki MoKyTB 6Ty CNpNUHeHi HAHBICTIO He6e3neuHX KOMNoHEHtIB T a HEnpaBnblHM 36epirHnM i nepepo6koTO Takoro 06naDaHHa.
TEXHIUHIXAPAKTEPNCNUK:
MoeB-PT3011/PT3012
HomHaBHa Hanpyra - AC 220-240 B ~ 50-60 T
HOMHaJIbHa NOTyXHiCtB - 755-900 BT
Ducnnei-TAK/LCD
山HypXnBLeHHa 1M
ABTomatnHi nporpamn npiroTybaHHa-TAK/7
Taimep-TAK/1-99XB
ABTomatnHaPiDtpmka Temnepaotyp - TAK
DatvnK pIBH BODN-TAK
Pe3epByap nIy BOn -1,1
KilbkiCtbo KOHTeHepiB-3
Yama d#a pncy a6o cyny-TAK
3axnCT BiD neperpiBaHHN - TAK
BiDcikIyKaBeJIIOJHINBHeHHA-TAK
OBIAHAHHHI KOHCTPYKUII PNUCTPOIO
- Kpniuka 3 BeHTnlauiHmO TBopamN
- Yaawa dnia pncy a6o cyny
- Bepxhi napobni KOHTeHep
- HxKHa 6a3a BepXbOTo KOHTeHepa (3HIMHa)
- Cepedhi napOBn KOHTeHep
- HxKHa 6a3a cepdHbO KoHTeHepa (3HIMHa)
- HxHnI napOBn KOHTeHep
8.ПДДОн ДЯЗ 360ру кpaneь
9.ДиФу3op
10.3aIINBHa roPIOBnHa dIy BoDn 3i WkaJIoU - NylbT ynpablinHH 3 piKOKpncTaIiHm DnCnJIeEM
- Pe3epByap IJIa BOi
- Kopnyc npnctropo
- BMnKaU/BmNka: KhONka MeHIO
- KoHTpOlep yacy"-"
- KoHTpOlep yacy"-"
- Bmkaay nycn/nay3a
NEPEDI NEPIHM BVKOPNCTAHHIM:
- PɔsnaKyIte npicpti i nepeBipTe, uHa6ip MICTNb Bci akcecyapn.
2.3HIMITb yci 3axnChi nIIBK Ta cTpiuKN. - Bmnte Bci elementn ha6opy (kpm pe3epbyapa Ira BOu) TeIIO BOHO 3 M'AKM MNIOUM 3ac06om, NOTIM BNTpItb IX HacyxO TKAHNOIO.
4.Пopotрпь pe3epByap ДЯ BODи BOLOrOIO TKAHNHO, a NOTIM peTeIbHNo Horo BnCyuHb.
PNIOTYBAHH
- Nomicitb npncpii Ha piBHy, CTiKy NOBepxHIO.
- BnKOpncToBMyOuH BlaChy NocdyHy, HAnHte B pe3epByap noTpi6Hy KInbKiCtB Bodn, He nepeBnUyTe MaKcMaIbHn pIBeHb BoDn B pe3epByapi. 3aJIeKHO BiC cnOCo6y HanOBHeHHpe3epByapa,
3BepHitb ybary ha no3haKn «MIN» i «MAX», no3haeHi BCEpeDInHi pe3epByapa Ta Ha 3aJIbHI roPIOBHi DIA BODI.
3. BctaHOBtB nIDOnIg KpaneIb Ha Kopnyc npnaIy Ta nepeKoHaiTeC, 0o O6uDba eIemEnT CTOrTb Cta6IbHo.
4. 3aJIeKHO BID KINbKOcTi iKi, Aky BN XOyete npnroTyBaTn, PO3MICITb BiINOBiHy KINbKICtB KOHTeHepiB IJN xApOuBX nPoDyKTiB Y npaBnIbHOMy NopAiky (KOHTeHepi CnId 3a3dAneriDb 3'EdHaTN 3 BiNobiHNMn 6a3Am). NepekoHaIteCg, OIO BcR KOHCTpyKzI CTiKa. Ra npaBnlo, CtpaBn, Aki 6ilbwi I roTyIOTbc DOBwe, CnI d NOMiataIn B HauHHKCh KoHTeHep.
Yuehtpi niDOnHy e ciTka, KyuMoXHa NOKlaCTn CbiXi a6o cyweHi TpaBn 36araueHH iKi.
5.Пдкючтbpncptpi Do dkepepa KnBHeHH, npncptpi aTOMaTHUHO nepeIe B pexm OuykyBaHH, Ha ekpaHI 3acBITbCBAc CmBOHIN I npO3ByuHt 3ByKOBn CnHAn. Pnpctpi 6yde roTobn do BCTAHOBLeHH BiNDOBiDHOI nporpamN.
6. BctaHOBiB BiIDNObiDHy nporpamy, a NOTIM HaTnCHiTb KhoNky . 06po3noatnpirotoybaHH iKi.
7. IpoTAROM 30 cekyHn npncptpi noHe Bnpo6nTn napy,Ha nCnnie npncptpo 6nmae CnBBOI, NOHETbcra 3BOPOTn BiNlIK Do KInu pOBoTn npncptpoXbUNHa 3a XbUNHO, NOK Ha DnCnEi He 3'ABNTBCnBcNBOI
8. Koln npouec npnoTuyBaHH Ha napy 3aKiHHTbcra, Bn noCyTe Dba «rYdkn», i npncpii ABTomTuH NopeJe Do fynKcii niDTPmKn Tenla. Lc yHNKciu Tpnae np6bn3HO 20 xBnLInH. FynKcii NiDTPmKn TENla 6yde no3HaHe CmBOIOM Ha DCnIe, NOHETbC 3BOPOTnH BiNkdo 3aKinHeHH FynKcii NiDTPmKn Tena, DOKn He 3'ABNTcbc CmBON 3BepWeHH ciE fynKcii 6yde NOBIOMLeHo n'YtMa 3ByKOUMn CnHArAmu, npncpi ABOMTuHOBMKHeTbcryepeOdy XBNiHy nicra 3ByKOBOrO cnHAnly.
9. BnKopncToBvOuyn pyKaBnuKn a6o pyuHnK, oBepeXHo NiDhImiTb KpNkUy, 6yDbTe Oc06bnBO oBepeXHi, oCkiNbKn NiDhTTR KpnIe KBNBilbHnE BeNky KJIbKicTb Napn, 1o HaKoNHyETbcra BCEpeDiHi KOHTeHepiB.
Y npoueci npirotoybaHHa napy BN MoKeTe 36Ibwnu a6o 3MeHNu qac npirotoybaHHa 3a DOnomoroIO KHOOK , ppaOe fHyKUJIpiTpIMKn TEIIa, TAKOX MOKJIInBe HalaWtBuHHa cacy. Pid ac po60Tu npicToPO nicra HaTnCKaHH KONKN IYCK/ PAUY3A MOXHa np3yINHHTu po60Tu npicToPO.Bn6paH nporpaMy MOXHa NOBHCtTO BmMKHyTN, HATNCyBUnk KHONky NYCK/PAY3A,a NOTIM KONKY BBIMKHeHHB/BmMKHeHH.
HAJIAU TYBAHHI PPOPAMI TOTYBAHHI.
Pnncpii Mae 7 He3aJIeKHHx nporpaM. BnKOpNCtOByTe KONky DJIa 3mHn nporpaM, KOJHy 3MiHy nporpaM6yde CnHaI3yBaTn 3ByKOBu CNHaI 忍 d k i BiIDNOBIDHn CnMBoN Ha nCnNei npnCTpO:
BDALEHHRAHKINY3PNCPTPOIO:
- PeryIaRhe BuaIaJIeHHHaKIny 3 npIcTpoH npOIOBKe TepMnH Ioro clyk6n.
-
Yepe3 KOxHi 15 roHn roYBaHHa (Iiue npiroTBAHH Ha napy, fHKi niTpumKn Tena He BXoNtB B ceu cac) Ha nCnnei 3'ABJLaeTcBc CmBOJ, knn HaraDye Bam npo HeobxidHicb BuaJeHHa KaNpy 3 npncToHO.
3.Писязавершенилanyшенипnpогрмвноконайт haBeDEHnKHe di,io6 ouHCTHT npCtpi BiD hakiny: -
Hanobhirtb pe3epByap IJI BODI 6IIMM OUToM DO N03HaKN «MAX», He BnKOpncTOBvYTe IJI YcBOrO JKOdHnx XIMiKaTIB a6o IHwix peoyBNH.
Po3mictb yci enemeHTn, 0o BXOaTb DO Ha6opy, 3riHHO 3 BiIOBIDHMN NYHKaMn IHCTpykui.
-ПдклочьпсчридоМерекиЖИВileHЯ.
BctahOBiTbvac npiroTyBaHHa 25 XBNHn, kkuo KINJIyHn 6I- nOcET Bnteue 3 npncTpIO, BmKHiTb npncTpI, DooekaTeca OXoJIoXHeHH i 3MeHwITb KInkictb OTu TY peepbyapi. - Picna 3aBepWeHH BndaIeHH HaKIny KInbKa pa3iB 3anycTitb npouec npnroTyBaHH, 3mHIOOuN BoDy KOxHi 5 XBnIH, 0o6 no36yTnc 3anaxy ouTy.
INDICATII CU PRIVIRE LA SIGURANTA DE UTILIZARE
- SAFETY INSTRUCTIONS FOR USE
- SPECIFICATION:
- FEATURES AND COMPONENTS
- BEFORE FIRST USE:
- COOKING:
- SET A COOKING PROGRAMME:
- USE THE KEEP FOOD WARM FUNCTION:
- CUSTOM COOKING TIME:
- THE AUTO OFF
- FILL THE WATER RESERVOIR
- CLEANING AND CARE:
- DESCALE THE APPLIANCE
- POKNY K BEZPEČNÉMU POUŽÍVÁNÍ
- OBOPYDABAHIECTPOEHA YPEDA:
- PENEI PbPBOTO N3NOJ3BAHE:
- TOTBEHE:
- HACTPOIKA HA IPOIPORAMATA 3A TOTBEHE:
- TEXHIUHIXAPAKTEPNCNUK:
- OBIAHAHHHI KOHCTPYKUII PNUCTPOIO
- NEPEDI NEPIHM BVKOPNCTAHHIM:
- PNIOTYBAHH
- HAJIAU TYBAHHI PPOPAMI TOTYBAHHI.
- BDALEHHRAHKINY3PNCPTPOIO:
- INDICATII CU PRIVIRE LA SIGURANTA DE UTILIZARE
Brand : AMICA
Model : PT3012
Category : Yogurt maker