FD 3011 - Kettle AMICA - Free user manual and instructions
Find the device manual for free FD 3011 AMICA in PDF.
User questions about FD 3011 AMICA
0 question about this device. Answer the ones you know or ask your own.
Ask a new question about this device
Download the instructions for your Kettle in PDF format for free! Find your manual FD 3011 - AMICA and take your electronic device back in hand. On this page are published all the documents necessary for the use of your device. FD 3011 by AMICA.
USER MANUAL FD 3011 AMICA
natural_image
White water heater with label 'HEAT FROTH' and brand 'Amica' on the side (no other text or symbols visible)PL INSTRUKCJA OBSŁUGI 2
EN USER MANUAL 6
CS NÁVOD K OBSLUZE 10
SK NÁVOD NA OBSLUHU 14
text_image
Diagram of a mechanical device with labeled parts 3, 4, and a central rotating componentURZĄDZENIE MOŻE BYĆ WYKORZYSTANE DO:
natural_image
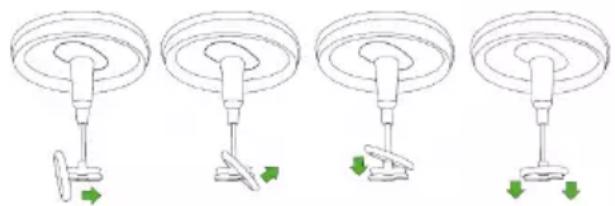
Four sequential diagrams showing a mechanical device with red arrows indicating motion or force direction (no text or symbols)Montaż pierścienia:
natural_image
Four identical line drawings of a mechanical device with green directional arrows indicating motion or force (no text or symbols)SAFETY INSTRUCTIONS FOR USE Note! To minimize the risk of fire, electric shock or injury:
- Carefully read this instruction before using the appliance.
- The appliance becomes hot during operation. When turned off some parts may still be hot for some time.
- Children do not realize the dangers that can arise when using electrical appliances; therefore keep the appliance out of reach of children.
- Do not immerse the appliance or its base in water or other liquids. Immersing in water may cause an electric shock.
- If water spills on the external components of the appliance, dry it thoroughly before switching back on.
- Do not touch wet surfaces in contact with the appliance connected to power supply, immediately disconnect it from the mains.
- Do not use the appliance if it shows any signs of damage to the power cord, or if the appliance has been dropped on the floor.
- After use, always pull out the plug from the socket, and also in case of any malfunction, before cleaning or before changing accessories.
- When pulling out the plug from the wall outlet, never pull by the cord, only the plug, holding the socket with your other hand.
• The milk frother is a class I
electrical shock protection appliance, and therefore power outlet to which it is connected to must be equipped with grounding pin.
- Do not attempt to remove any parts of the housing.
- To prevent damage to the power cord, do not place it over sharp edges or close to hot surfaces.
- Do not expose the appliance to rain or humidity, and do not use it outdoors.
- Do not operate the appliance with wet hands.
- If the power cord or plug is damaged, it should be replaced by a professional repair shop in order to avoid hazard.
- Using attachments that were not supplied with the product may cause damage to the appliance.
- Never place the appliance on hot surfaces.
- Never leave the appliance plugged in to power without supervision.
- The appliance is designed for heating and frothing milk — do not use it for any other purpose.
- Never fill the appliance below the minimum and above the maximum mark.
- This appliance can be used by children aged 8 years and older or by persons with physical, mental or sensory handicaps, or by those who are inexperienced or unfamiliar with the appliance, provided they are
supervised or have been in- structed how to safely use the appliance and are familiar with risks associated with the use of the appliance. Ensure that chil- dren do not play with the ap- pliance. Do not allow children to clean and maintain the ap- pliance unless they are 8 years or older and are supervised by a competent person.
- Keep the appliance away from children under 8 years of age when it is hot or not completely cooled down.
- Unplug the appliance from the power outlet and wait until it cools down before cleaning.
- Never plug to a wall outlet with wet hands, this may cause electric shock.
- It is not recommended to use extension cords to connect the appliance to the power outlet.
- Ensure that the appliance is used on a clean, dry and level surface.
• Take caution when cleaning the attachments. - Pull the plug from the wall outlet before replacing accessories.
• Always use the appliance with the base and lid in place. - Before use, check that the lid is securely attached.
- Before you put the plug into the wall outlet, make sure your hands are dry.
- Do not use the appliance if attachments are not secured.
• After use, disconnect the appliance from the power supply.
- Do not remove the lid during appliance operation.
- Wait until the frothing wand stops completely before you open the lid. Otherwise, the appliance will not operate properly and may be damaged.
Electrical requirements:
Make sure that the voltage indicated on the nameplate corresponds to that of your home electrical mains. Alternating current must be used, typically marked \~.
In accordance with European Directive 2012/19/EU and Polish legislation regarding used electrical and electronic goods, this appliance is marked with the symbol of the crossed-out waste container. This marking indicates that the appliance must not be disposed of together with other household waste after it has been used. The user
is obliged to hand it over to waste collection centre collecting used electrical and electronic goods. The collectors, including local collection points, shops and local authority departments provide recycling schemes. Proper handling of used electrical and electronic goods helps avoid environmental and health hazards resulting from the presence of dangerous components and the inappropriate storage and processing of such goods.
SPECIFICATION:
Model - FD 3011
Rated voltage: 220-240 V\~, 50-60 Hz
Rated power: 450W
Capacity: 0,5l
Protection class: I
Power cord: \~0,75m
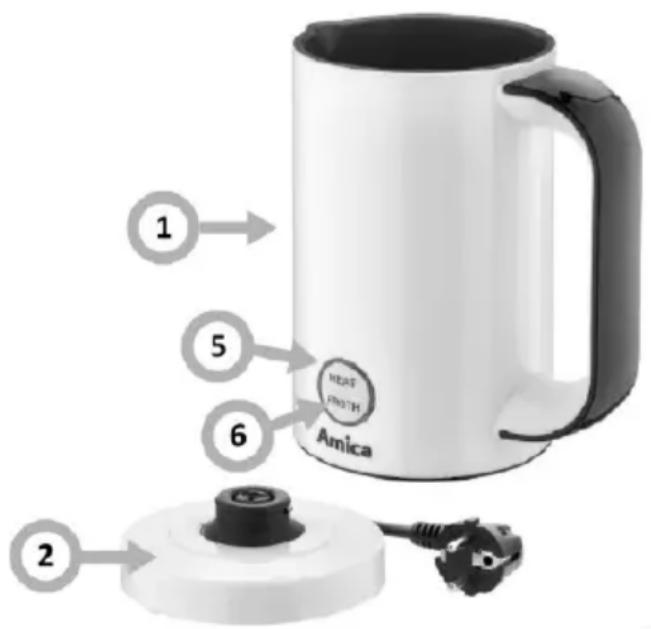
FEATURES AND COMPONENTS
- Pitcher
- Base
- Lid with frothing wand
- Frothing ring wand
- Heat milk
- Milk Frother button
text_image
1 5 6 HEAT FROTH Amica 2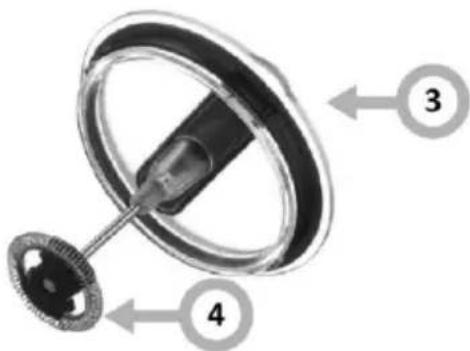
text_image
Diagram of a mechanical component with labeled parts 3, 4, and a gear-like shaft assemblyUSE THE APPLIANCE TO:
-Froth and heat milk (press the FROTH button once)
-Heat the milk (press the HEAT button once)
-Froth milk (press the FROTH twice)
BEFORE FIRST USE:
- After unpacking the appliance, make sure that all the attachments are included and there are no visible signs of damage.
- Before first use, wash all parts that come in contact with the food in hot water.
- Do not wash the pitcher or base in water. Clean the pitcher and base using a damp cloth and then wipe dry.
- Depending on application use the appropriate attachment: -Mixing unit - used for heating milk without foaming. It prevents milk from sticking to pitcher walls. Frothing wand (coil) - used for frothing milk with or without heating
Note! While the appliance is operating, the speed of the frothing wand varies. This is normal and does not indicate damage to the appliance.
HEAT AND FROTH MILK
- Place the base on a level and stable surface.
- Place the frothing ring wand on the mixing unit.
- Fill the pitcher with a sufficient amount of milk.
NOTE! Frothed milk increases its volume. The maximum quantity of milk, which can be frothed is about 100 ml. Use full-fat milk with 3.2% fat content for frothing.
- Place the lid with frothing wand on the pitcher.
- Place the pitcher on its base.
- Connect the plug to a power outlet. The power indicator will light up blue.
- Press the FROTH button once, the colour of the power indicator turns red and the appliance will turn on. The milk will be heated and frothed until it reaches the temperature of 65^ C (+/- 10^ C). When the mixing unit with frothing wand stops rotating, the power indicator will turn back to blue.
- The appliance will stop automatically after 120 seconds.
- Open the lid — your heated and frothed milk is ready.
- The power indicator turns off when the appliance is not used for about 15 minutes.
- Always unplug the appliance when you don't use it.
- Do not leave the appliance unattended until completely cool.
FROTH MILK (DO NOT HEAT)
- Follow the first 6 steps from the "Heat and froth milk" section.
- Press the FROTH button twice (within 2 seconds), the colour of the power indicator will flash in blue and the appliance will turn on. Frothing wand will rotate, but there will be no heating. The appliance will complete frothing after about 1.5 minutes. The power indicator will be blue.
NOTE! Frothed milk increases its volume. The maximum quantity of milk, which can be frothed is about 100 ml.
Use full-fat milk with 3.2% fat content for frothing.
- Open the lid — your frothed milk is ready.
- The power indicator turns off when the appliance is not used for about 15 minutes.
- Always unplug the appliance when you don't use it.
- Do not leave the appliance unattended until completely cool.
HEAT MILK
- Place the base on a level and stable surface.
- Fill the pitcher with a sufficient amount of milk.
NOTE! The maximum quantity of milk, which can be heated is about 200ml.
- Close the lid with the mixing unit.
- Place the pitcher on its base.
- Connect the plug to a power outlet, the power indicator lights blue.
- Press the HEAT button once, the colour of the power indicator turns red and the appliance will turn on. The milk will be heated until it reaches the temperature of 65^ C (+/- 10^ C). When the mixing unit stops rotating, the power indicator will turn back to blue.
- The appliance will stop automatically after 150 seconds.
- Open the lid — your heated milk is ready.
NOTE! Mixing unit does not froth milk, but it prevents the milk from sticking to the heating element and pitcher walls.
- The power indicator turns off when the appliance is not used for about 15 minutes.
- Always unplug the appliance when you don't use it.
- Do not leave the appliance unattended until completely cool.
NOTE! There is a scale with maximum capacities for the relevant functions to help you measure the milk. You can stop heating and frothing by pressing any button once.
Do not remove the lid during appliance operation. Wait until the frothing wand stops completely before you open the lid. Otherwise, the appliance will not operate properly and may be damaged.
Allow the appliance to cool for 5 minutes after each cycle, otherwise, the overheating protection will activate (after five continuous cycles). When overheating protection activates the power indicator will flash red and the appliance will not operate. After about 5-10 minutes overheating protection will deactivate and you can continue to use the appliance.
CLEANING AND CARE:
- Before cleaning, make sure the appliance is disconnected from the power source and completely cold.
- Do not use abrasive or harsh cleaning agents.
- Do not immerse the pitcher or its base in any liquid. Wipe the parts with a damp cloth and dry with a towel.
- Wash frothing wand and the mixing unit in warm water after each use.
- Wash the lid in warm water with a little of mild detergent.
- Thoroughly dry all parts.
-Wash the frothing wand after each use.
-The lid with mixing unit are dishwasher safe.
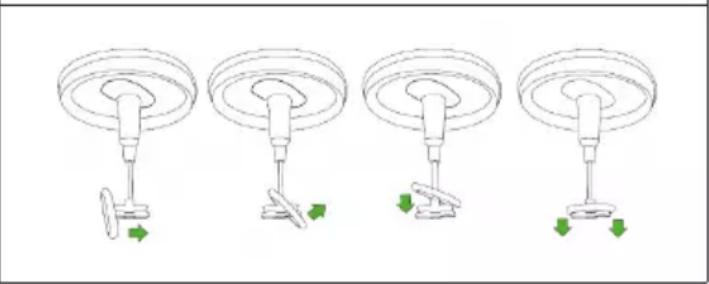
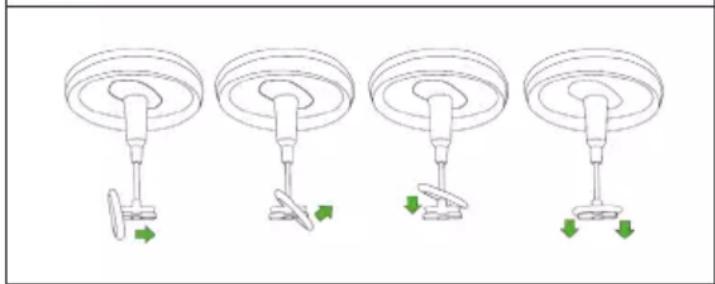
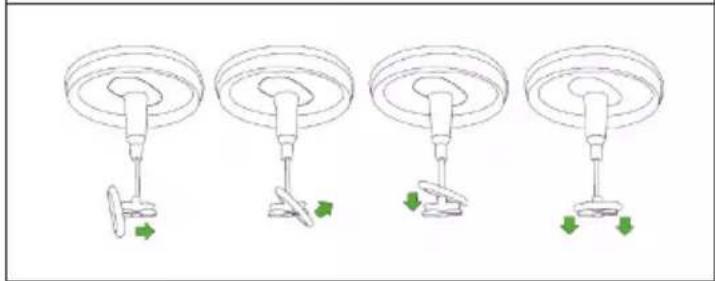
NOTE! Be careful when installing, removing and washing the frothing ring wand (do not squeeze or stretch the frothing ring wand).
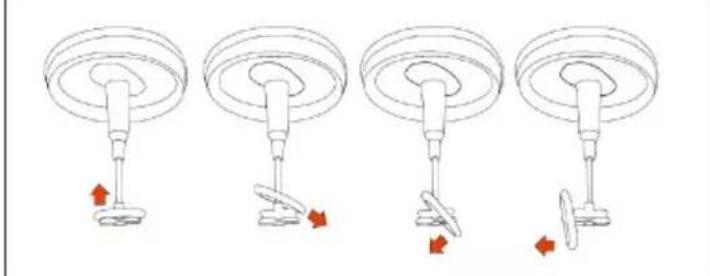
Remove the frothing ring wand:
natural_image
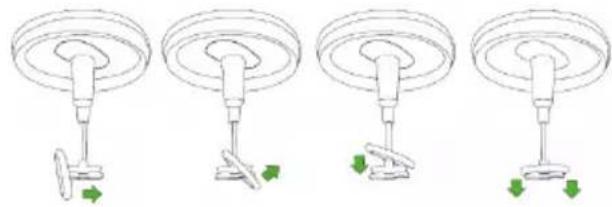
Four sequential diagrams showing a mechanical device with red arrows indicating motion or force direction (no text or symbols)Install the frothing ring wand:
natural_image
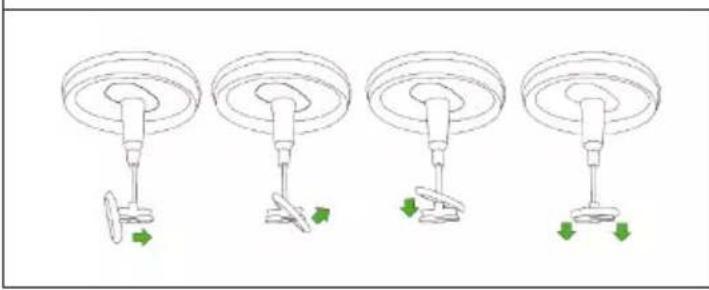
Four sequential diagrams showing a mechanical device with green arrows indicating motion or force direction (no text or symbols)POKYNY K BEZPEČNÉMU POUŽÍ-VÁNÍ
natural_image
Four sequential diagrams showing a mechanical device with red arrows indicating motion or force direction (no text or symbols)Montáž kroužku:
natural_image
Four identical line drawings of a mechanical device with green directional arrows indicating motion or force (no text or symbols)POKYNY TÝKAJÚCE SA BEZPEČNÉ- HO POUŽÍVANIA
Pozor! Aby ste minimalizovali riziko vzniku požiaru, zásahu el. prúdom, úrazu či nehody:
text_image
Diagram of a mechanical device with labeled parts 3, 4, and a central rotating componentPRÍSTROJ MOŽNO POUŽIŤ NA:
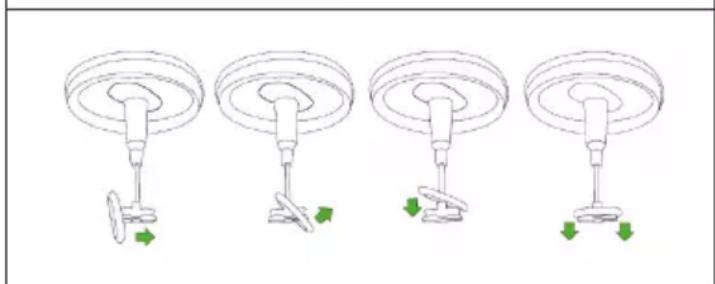
natural_image
Four sequential diagrams showing a mechanical device with red arrows indicating motion or force direction (no text or symbols)Montáž krúžku:
natural_image
Four sequential diagrams showing a mechanical or electrical component with green arrows indicating motion direction (no text or symbols)text_image
Diagram of a mechanical device with labeled parts 3, 4, and a central rotating shaftDAS GERÄT KANN VERWENDET WERDEN:
natural_image
Four sequential diagrams showing a mechanical device with red arrows indicating motion or force direction (no text or symbols)natural_image
Four sequential diagrams showing a mechanical device with green arrows indicating motion or force direction (no text or symbols)INDICATIONS CONCERNANT LA SÉCURITÉ D'UTILISATION
text_image
Diagram of a steering wheel with labeled parts 3 and 4, showing internal components and directional arrows.L'APPAREIL PEUT ÊTRE UTILISÉ POUR :
natural_image
Four sequential diagrams showing a mechanical device with red arrows indicating motion or force direction (no text or symbols)natural_image
Four sequential diagrams showing a mechanical device with green arrows indicating motion or force direction (no text or symbols)INDICACIONES REFERENTES A LA SEGURIDAD DE USO
text_image
Diagram of a mechanical device with labeled parts 3, 4, and a central rotating shaftnatural_image
Four sequential diagrams showing a mechanical device with red arrows indicating motion or force direction (no text or symbols)Montaje del anillo:
natural_image
Four identical diagrams showing a mechanical device with green arrows indicating motion or force direction (no text or symbols)ПРЕПОРЬКИ ОТНОСНО БЕЗО- ПАСНОСТТА НА УПОТРЕБА
text_image
Diagram of a mechanical component with labeled parts 3, 4, and a central rotating shaftnatural_image
Four sequential diagrams showing a mechanical device with red arrows indicating motion or force direction (no text or symbols)Монтаж на пръстена:
natural_image
Four sequential diagrams showing a mechanical device with green arrows indicating motion or force direction (no text or symbols)A BIZTONSÁGOS HASZNÁLATRA VONATKOZÓ FELTÉTELEK
text_image
Diagram of a mechanical device with labeled parts 3, 4, and a central rotating componentA KÉSZÜLÉK ALKALMAZHATÓ:
text_image
Diagram of a mechanical component with labeled parts 3, 4, and a central shaft-like structureПРИЛАД МОЖНА ВИКОРИСТОВУВАТИ ДЛЯ:
natural_image
Four sequential diagrams showing a mechanical device with red arrows indicating motion or force direction (no text or symbols)Монтаж кільця: