
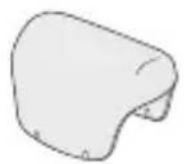
ES2053 - Epilator PANASONIC - Free user manual and instructions
Find the device manual for free ES2053 PANASONIC in PDF.
| Product type | Electric epilator |
| Brand | Panasonic |
| Model | ES2053 |
| Use | Dry or wet use (in the shower/bath) |
| Power supply | Mains 220-240 V, 50-60 Hz via charger |
| Battery type | Built-in rechargeable Ni-MH |
| Charging time | 12 hours (first charge or inactivity >6 months: 20 hours) |
| Runtime | Approx. 30 minutes |
| Included heads | Epilation head and shaving head ES2055 |
| Epilation speeds | 2 (1: slow, 2: fast) |
| Noise level (epilation) | 69 dB(A) |
| Noise level (shaving) | 63 dB(A) |
| Weight (with epilation head) | Approx. 185 g |
| Dimensions (body) | 6.1 × 14.3 × 4.0 cm |
| Included accessories | Charger RE7-44, cleaning brush, pouch |
| Maintenance | Rinse with water, clean with provided brush |
| Replacement parts | Outer foil: every year; inner blade: every 2 years |
| Safety | Use on healthy skin; do not use on lesions, eczema, varicose veins, etc. |
| Recycling | Ni-MH batteries: do not dispose of with household waste, take to a recycling center |
Frequently Asked Questions - ES2053 PANASONIC
User questions about ES2053 PANASONIC
0 question about this device. Answer the ones you know or ask your own.
Ask a new question about this device
Download the instructions for your Epilator in PDF format for free! Find your manual ES2053 - PANASONIC and take your electronic device back in hand. On this page are published all the documents necessary for the use of your device. ES2053 by PANASONIC.
USER MANUAL ES2053 PANASONIC
natural_image
Illustration of a handheld device with a screen and lens, shown in grayscale without any text or symbols.Operating Instructions Epilator
Model No. ES2053/ES2055
Contents
| English 2 | Suomi 82 |
| Deutsch 10 | Polski 90 |
| Français 18 | Česky 98 |
| Italiano 26 | Slovenčina 106 |
| Español 34 | Română 114 |
| Nederlands 42 | Magyar 122 |
| Português 50 | Türkçe 131 |
| Norsk 58 | Русский 139 |
| Svenska 66 | Українська 147 |
| Dansk 74 |
Before operating this unit, please read these instructions completely and save them for future use.
▶ Before use
- Make sure skin is clean before and after use. Failure to do so might cause infection and inflammation.
- Do not use the appliance if you have eczema, rashes, sensitive skin, proneness to infections, varicose veins, diabetes, hemophilia or poor blood clotting or other skin conditions.
- Using just before swimming and sports activities or sharing with other persons might result in bacteria entering the skin and causing damage and inflammation.
- Turning on the appliance without an epilation or shaver head (ES2055) attached might cause finger injury, hair entanglement in the spinning gears or mechanical malfunction.
-
The followings might cause sensitive skin damage, injury, inflammation, pain, bleeding, and severe pain.
-
Using the appliance if the epilation discs, the skin protector or the outer foil have been damaged.
- Using on or near your face, genitals, warts, pimples, bruises, rashes, wounds or loose skin.
- Applying strong pressure to the skin, repeatedly moving over the same area or using a jabbing motion.
- Using before or during menstruation, pregnancy, about one month after giving birth, when ill and when your skin is sunburned etc.
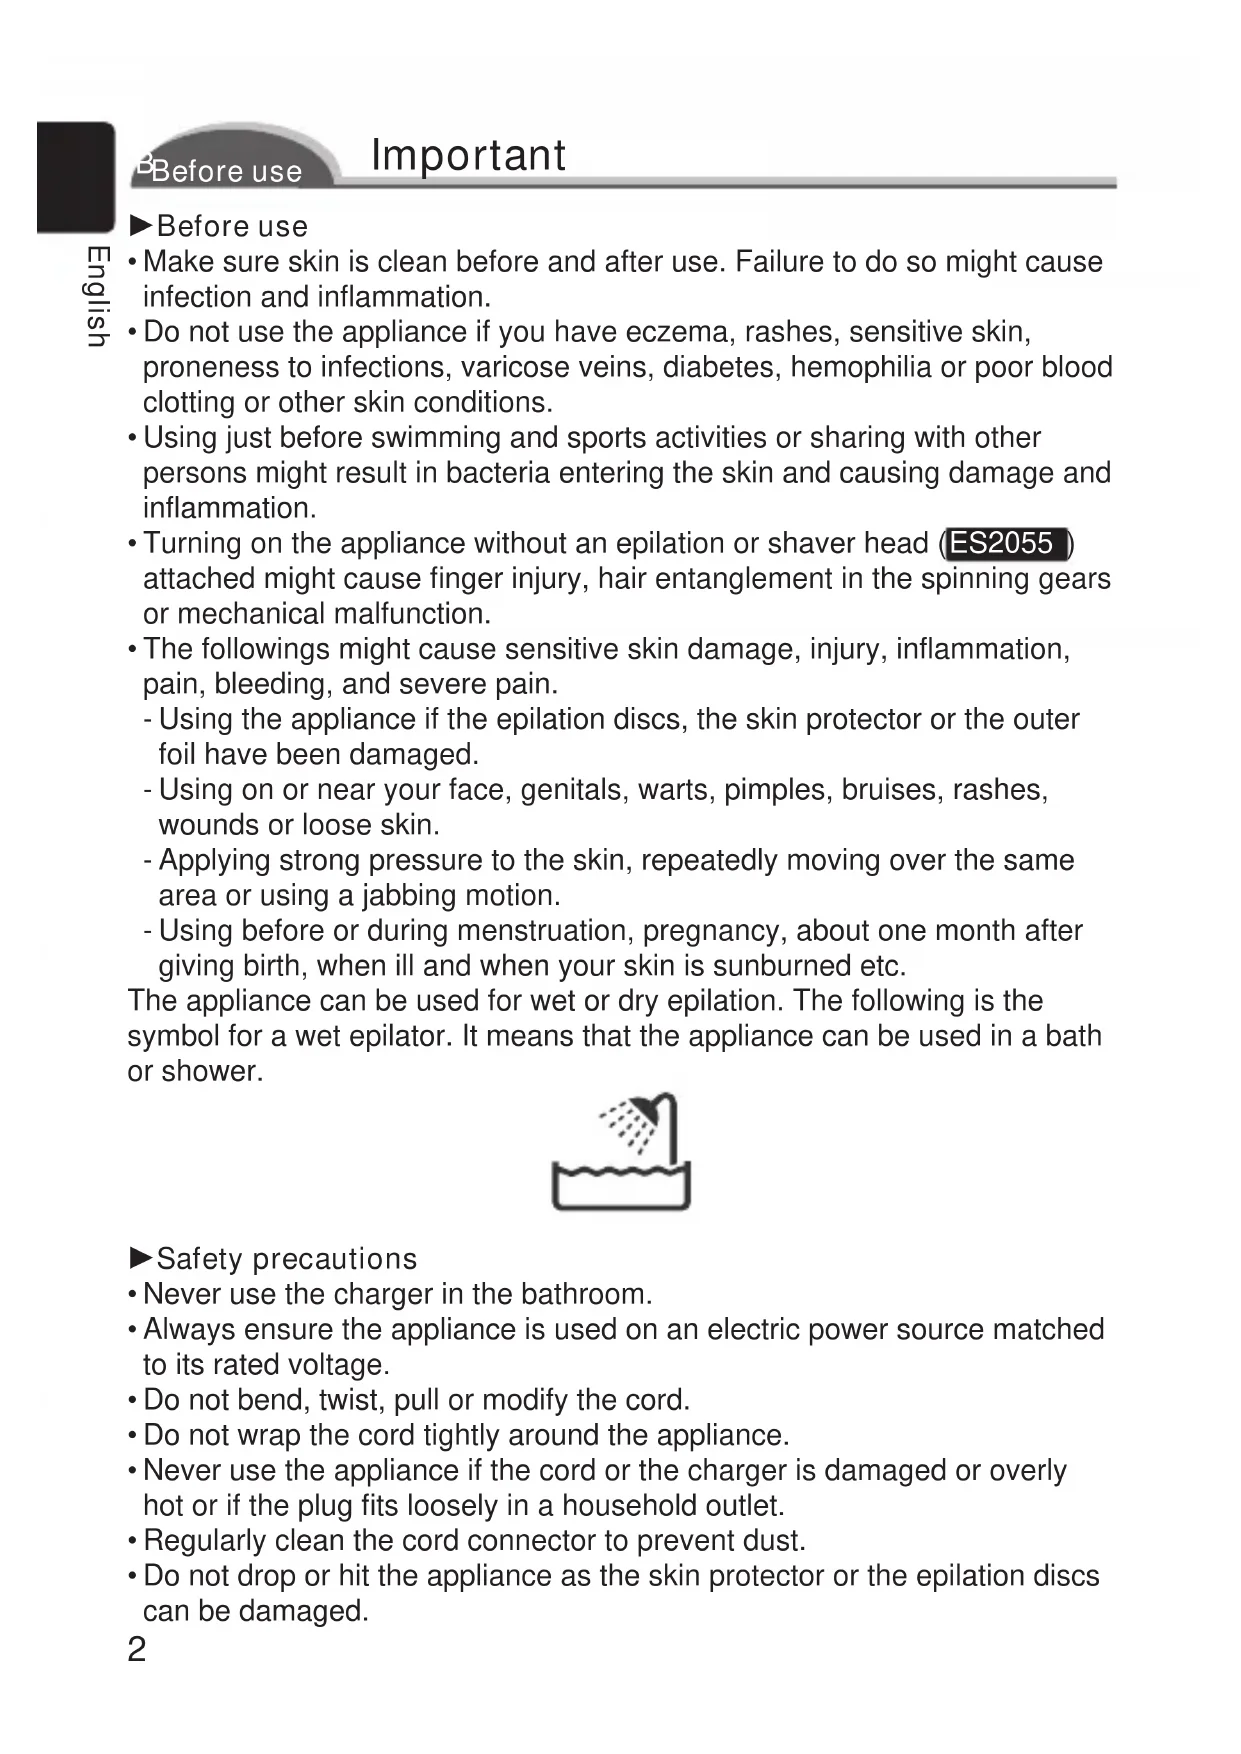
The appliance can be used for wet or dry epilation. The following is the symbol for a wet epilator. It means that the appliance can be used in a bath or shower.
▶ Safety precautions
- Never use the charger in the bathroom.
- Always ensure the appliance is used on an electric power source matched to its rated voltage.
- Do not bend, twist, pull or modify the cord.
- Do not wrap the cord tightly around the appliance.
- Never use the appliance if the cord or the charger is damaged or overly hot or if the plug fits loosely in a household outlet.
- Regularly clean the cord connector to prevent dust.
-
Do not drop or hit the appliance as the skin protector or the epilation discs can be damaged.
-
The movement of the discs makes some noise but this is perfectly normal.
- This appliance is not intended for use by persons (including children) with reduced physical, sensory or mental capabilities, or lack of experience and knowledge, unless they have been given supervision or instruction concerning use of the appliance by a person responsible for their safety. Children should be supervised to ensure that they do not play with the appliance.
- Do not leave the appliance near sinks, bathrooms or other high-humidity areas where it could be exposed to water and moisture after use.
- The followings might cause mechanical malfunction.
- Using nail polish remover, benzine, alcohol, etc. to clean the appliance.
- Leaving the appliance where it will be exposed to high temperatures or direct sunlight.
- Contact an authorized service center if the epilator or the cord get damaged.
Before use
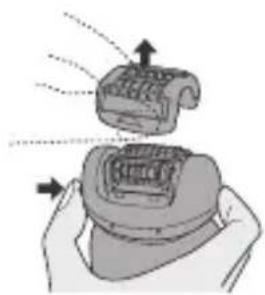
Changing the head ES2055
- Remove the head while holding the head release button.
- Push the head until it clicks.
B Charging
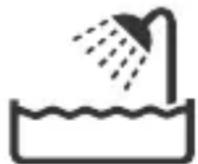
Charging the appliance
- Plug the charger into the epilator (a) and a household outlet (b).
- Charge the appliance for approximately 12 hours. (The charging light stays on even after 12 hours.)
- The epilator can be used for approximately 30 minutes after 12 hours charge.
- When the appliance is being charged for the first time or when it has not been used for over 6 months, charge for approximately 20 hours.
- The charge light may not come on after a few minutes in some cases. However, it will come on eventually if you continue charging.
- The appliance can be left plugged in after it is fully charged without deteriorating the battery life.
- If the appliance is repeatedly charged before the batteries are completely discharged, battery life may deteriorate. (Memory effect)
- Charge and use the appliance in a temperature between 5 - 40 °C.
-
The charger can be positioned in a vertical or horizontal position.
-
This epilation head is for legs/arms, so do not use it to your underarms and bikini-line.
-
Trim your hair before epilating for the first time or if you have not epilated for a long time.
-
Wet your skin.
- Remove the cap.
-
Wet the discs and place a small quantity of liquid body soap on the discs.
-
Turn the switch on to the 1 or 2 position and then epilate. (1=low speed epilation/2=high speed epilation)
- Foam makes the epilator slide better, so you can move it fast. Always wash the discs well after use to remove any residual soap.

Dry epilation
You can also epilate without wetting your skin or the discs.
B
Using
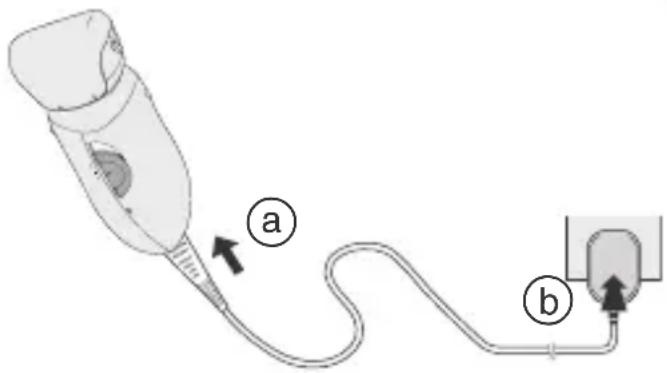
For best epilation results
Apply the epilator at a right angle to your skin and press gently while moving it slowly against the hair growth.
- When using the appliance, pull your skin taut where the area is prone to sagging (on the inside of the knees and elbows).
- Rub your skin to lift short hair.
- Move the epilator with the side that has the foam keeper facing the front.
- Do not remove the frame of the epilation head.
- Do not use if your hair is longer than 5 mm.
- Reddening might appear for your first use. Cool towel will help if you feel pain or there is a rash.
- We recommend regular use of massage sponges or exfoliation to prevent ingrown hair.

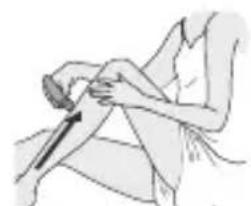
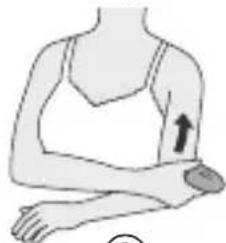
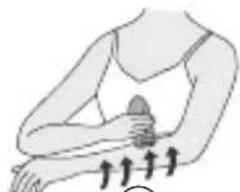
Moving the appliance correctly
①Legs: Upwards from the bottom of the leg.
②Arms: Inwards from the outside of the arm.
③Upper arms: Upwards from the bottom of the upper arms.
natural_image
Illustration of a person performing a knee press or massage technique (no text or symbols visible)①

natural_image
Illustration of a person performing a physical exercise with upward arrows indicating movement (no text or symbols)②

English

natural_image
Illustration of a person's arm with an arrow indicating movement or pressure point (no text or symbols)③

Shaving
Wet/foam Shaving ES2055
- Attach the shaver head.
- Wet your skin.
- Shaving with soap lather makes the skin slippery for a closer shave.
- Do not use shaving cream, skin cream or skin lotion as it will clog the blades.
- Turn the switch on to the 1 or 2 position.
(1=low speed shaving/2=high speed shaving)
- Hair removal is easier and less painful when the hair is short.
- Slide the pop-up trimmer switch up to cut long hair.
- Press gently so that the whole of the blade is in close contact with the skin and the surface of the blade does not move up and down.

Shaving the bikini line with the bikini comb
Place the bikini comb onto the shaver head and slide trimmer up.
- When the bikini comb is in place, make sure the comb is in close contact with the skin.

Dry shaving
You can also shave without wetting your skin or the discs.
B Cleaning
Cleaning the epilator
Switch off and unplug the appliance before cleaning.
• Always unplug the charger from a household outlet and from the epilator before cleaning the appliance.
- Wipe the main body only with a dry cloth. The use of alcohol etc. might cause discoloration or deformation of the main body.
• Always attach the caps when storing the epilator.

Washing your epilator
Always clean the frames and discs after use to keep them in a hygienic state.
• Take care not to damage the skin protector during cleaning.
1
natural_image
Illustration of a hand holding a device with arrows indicating motion or force (no text or symbols)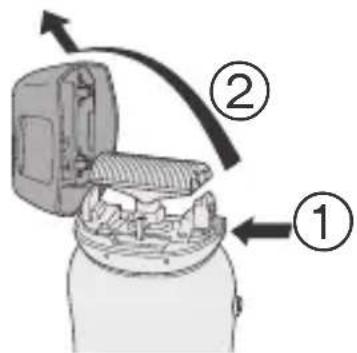
2-4
natural_image
Illustration of a hand using a tool to press or install a mechanical component, showing two views (no text or symbols present)
natural_image
Illustration of a hairdryer with two legs, showing mechanical components and spray (no text or symbols)- Remove the frame by pushing the frame release button.
- Apply liquid hand soap to the discs and blade.
- Turn the switch on and then wet the discs to create foam.
-
Wash the head with water to clean hair.
-
Do not use hot water.
-
If soap is not completely washed away, then a white deposit can accumulate and prevent the blades from moving smoothly.
-
Turn the switch off, wipe the appliance with a dry cloth and dry it well.

Cleaning your epilator with the supplied brush
You can also clean the epilation head and the shaver head (ES2055) with the cleaning brush.
natural_image
Illustration of four steps of installing or adjusting a mechanical component, showing hand positioning and assembly (no text or symbols)Replace the shaving foil and the inner blade when you notice reduced shaving performance. Never remove the outer foil of the shaver head for any other reason than to change it.

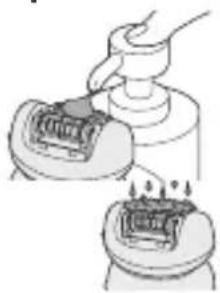
Removing the outer foil
While pushing the outer foil gently with the fingers, use a fingernail to release the plastic panel ⓑ on the blade from the catches Ⓐ on the inside of the frame.

Fitting the new outer foil
Hold the outer foil so that the surface with the plastic panel ⓑ (i.e. the surface that will come into contact with the inner blade) faces upward and then insert it into the frame so that the catches ⓐ on the frame fit into the holes on the foil.
• We recommend replacing the outer foil every year and the inner blade every two years.

For environmental protection and recycling of materials
This epilator contains Ni-MH batteries.
Please make sure that the battery is disposed of at an officially assigned location, if there is one in your country.

Removing the built-in rechargeable batteries
The batteries in this epilator are not intended to be replaced by consumers. However, they can be replaced at an authorized service center.
The procedure below shows how to remove the batteries so that they can be disposed of.
- Unplug the charger from the epilator before disassembling it.
- Turn the switch on to the 1 or 2 position until the batteries are completely discharged.
- Using a screwdriver, disassemble the unit in the following order.
- Please take care not to short-circuit the batteries.
Perform steps ① to ⑧ to disassemble the epilator.
Specifications
Power supply AC 220 - 240 V, 50-60 Hz
Charging time 12 hours
Batteries Ni-MH
Power consumption Approx. 1 W (When charging.)
Weight Epilator
(Approx. 185 g with the epilation head)
(Approx. 170 g with the shaver head) ES2055
Airborne Acoustical Noise
Epilation head: 69 (dB(A) re 1pW)
Shaver head: 63 (dB(A) re 1pW) ES2055
Subject to change without notice.
This product is intended for house-hold use only.
READ ALL INSTRUCTIONS BEFORE USE
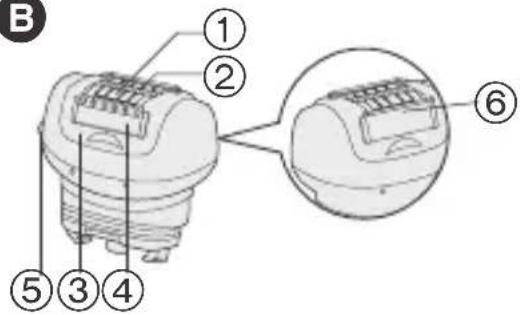
A
B
C
D

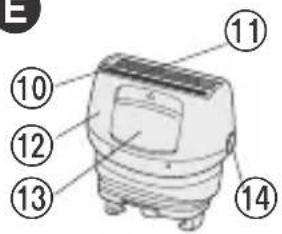
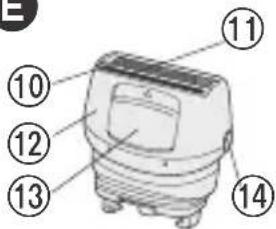
E

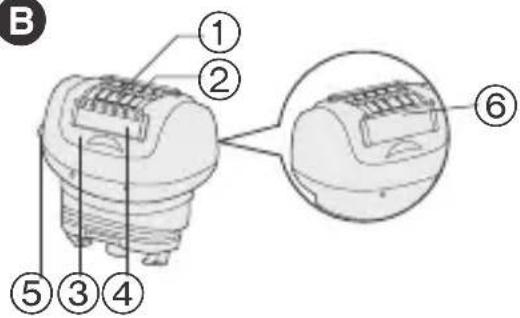
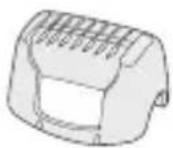
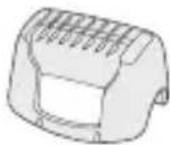
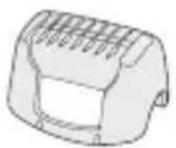
A Protection cap
B Epilation head
① Epilation discs (inside)
② Skin protector (metal part on the outside)
③ Frame
④ Foam keeper
⑤ Frame release button
⑥ Foam wiper
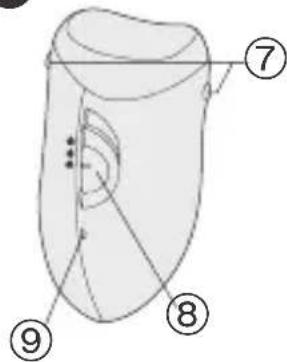
© Main body
⑦ Head release button
⑧ On/off switch
⑨ Charging light
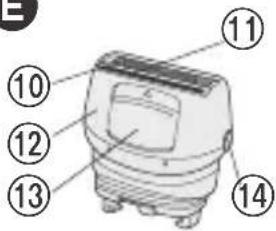
D Bikini comb ES2055
E Shaver head ES2055
⑩ Outer foil
⑪ Trimmer
⑫ Frame
⑬ Pop-up trimmer switch
⑭ Frame release button
Accessories:
Charger (RE7-44), cleaning brush and pouch
(Please do not use accessories any other than the accessories provided.)
natural_image
Illustration of a person performing a knee press or massage technique (no text or symbols visible)①

natural_image
Illustration of a person performing a physical exercise with upward arrows indicating movement (no text or symbols)②

natural_image
Illustration of a person's arm with an arrow indicating movement or pressure point (no text or symbols)③
Rasur
Nass-/Schaumrasur ES2055
natural_image
Illustration of four steps of a mechanical assembly or tooling process, showing hand positioning and disassembly (no text or symbols present)D

E
natural_image
Illustration of a person performing a knee press or massage technique (no text or symbols visible)①

natural_image
Illustration of a person performing a wrist massage with motion arrows (no text or symbols)②

natural_image
Illustration of a person's arm with an arrow indicating movement or pressure point (no text or symbols)③
Rasage
Rasage mouillé/mousse ES2055
(1 = rasage lent/2 = rasage rapide)
natural_image
Illustration of four steps of a mechanical assembly or tooling process, showing hand positioning and disassembly (no text or symbols present)
Français

Spécifications
D

E

natural_image
Illustration of a person performing a knee press or massage technique (no text or symbols present)①

natural_image
Illustration of a person performing a wrist massage with motion arrows indicating movement (no text or symbols)②

natural_image
Illustration of a human arm with an arrow indicating pressure or movement (no text or symbols)③
Rasatura
Rasatura a umido/con schiuma ES2055

Specifiche
D

E
natural_image
Illustration of a person performing a knee press or massage technique (no text or symbols visible)①

natural_image
Illustration of a person performing a wrist massage with motion arrows (no text or symbols)②

natural_image
Illustration of a person's arm with an arrow indicating movement or pressure point (no text or symbols)③
Afeitado
natural_image
Illustration of four steps of a mechanical assembly or tooling process, showing hand positioning and disassembly (no text or symbols present)Sustitución

D

E

natural_image
Illustration of a person performing a knee press or massage technique (no text or symbols visible)①

natural_image
Illustration of a person performing a wrist massage or exercise with directional arrows indicating movement (no text or symbols)②

natural_image
Illustration of a person's arm with an arrow indicating pressure or movement (no text or symbols)③
Scheren
Nat/schuim scheren ES2055
1. Bevestig de scheerkop.
natural_image
Illustration of four steps of a mechanical assembly or tooling process, showing hand positioning and disassembly (no text or symbols present)
Specifications
Voeding 220–240 V wisselstroom, 50–60 Hz
Oplaadtijd 12 uur
Batterijen Ni-MH
natural_image
Simple line drawing of a trash bin with crossed x and y symbols (no text or labels)A

B
C

D

E

A Beschermdop
B Epileerkop
natural_image
Illustration of a person performing a knee press or massage technique (no text or symbols visible)①

natural_image
Illustration of a person performing a wrist massage with motion arrows indicating movement (no text or symbols)②

natural_image
Illustration of a human arm with an arrow indicating movement or pressure point (no text or symbols)③
Rapar
natural_image
Illustration of four steps of a mechanical assembly or tooling process, showing hand positioning and disassembly (no text or symbols present)Substituição

Especificações
D

E

Bruk
natural_image
Illustration of a person performing a knee press or massage technique (no text or symbols present)①

natural_image
Illustration of a person performing a wrist massage with motion arrows (no text or symbols)②

natural_image
Illustration of a person's arm with an arrow indicating a specific area (no text or symbols present)③
Barbering
Våt/skum-barbering ES2055
natural_image
Illustration of four steps of a mechanical assembly or tooling process, showing hand positioning and disassembly (no text or symbols present)
natural_image
Illustration of a hand holding a small electronic component, showing internal components and assembly steps (no text or symbols)
Montere den nye ytre folien
Spesifikasjoner
Strømforsyning AC 220–240 V, 50–60 Hz
Ladetid 12 timer
Batterier Ni-MH
D

E
A Beskyttelsesdeksel
B Hårfjerningshode
natural_image
Illustration of a person performing a knee press or massage technique (no text or symbols visible)①

natural_image
Illustration of a person performing a wrist massage with motion arrows (no text or symbols)②
natural_image
Illustration of a person's arm with an arrow indicating a specific area (no text or symbols present)③
Rakning
natural_image
Illustration of four steps of assembling a battery pack, showing mechanical assembly and cleaning (no text or symbols)Byte

Specifikationer
D

E

natural_image
Illustration of a person performing a knee press or massage technique (no text or symbols present)①

natural_image
Illustration of a person performing a wrist massage with motion arrows (no text or symbols)②

natural_image
Illustration of a person's arm with an arrow indicating movement or pressure point (no text or symbols)③
Barbering
Våd/skumbarbering ES2055
natural_image
Illustration of four steps of a mechanical assembly or tooling process, showing hand positioning and disassembly (no text or symbols present)Udskiftning

Montering af nyt ydre folie
Specifikationer
Strømforsyning AC 220 - 240 V, 50-60 Hz
D
E

natural_image
Illustration of a person performing a knee press or massage technique (no text or symbols visible)①

natural_image
Illustration of a person performing a wrist massage with motion arrows (no text or symbols)②

natural_image
Illustration of a person's arm with an arrow indicating movement or pressure point (no text or symbols)③
Karvojen ajaminen
natural_image
Illustration of four steps of a mechanical assembly or tooling process, showing hand positioning and disassembly (no text or symbols present)Vaihto
Ulomman teräverkon vaihtaminen ES2055

Tekniset tiedot
D

E

natural_image
Illustration of a person performing a knee press or massage technique (no text or symbols visible)①

natural_image
Illustration of a person performing a wrist massage with motion arrows (no text or symbols)②

natural_image
Illustration of a person's arm with an arrow indicating upward movement (no text or symbols)③
Golenie
natural_image
Illustration of four steps of a mechanical assembly or tooling process, showing hand positioning and disassembly (no text or symbols present)Polski!
Wymiana

Dane techniczne
D

E

natural_image
Illustration of a person performing a knee press or massage technique (no text or symbols visible)①

natural_image
Illustration of a person performing a wrist massage with motion arrows (no text or symbols)②

natural_image
Illustration of a person's arm with an arrow indicating upward movement (no text or symbols)③
Holení
natural_image
Illustration of four steps of a mechanical assembly or tooling process, showing hand positioning and disassembly (no text or symbols present)Výměna

Technické údaje
D
E

natural_image
Illustration of a person performing a knee press or massage technique (no text or symbols visible)①

natural_image
Illustration of a person performing a wrist massage with motion arrows (no text or symbols)②

natural_image
Illustration of a human arm with an arrow indicating movement or pressure point (no text or symbols)③
Holenie
Holenie namokro/s penou ES2055
1. Nasad'te holiacu hlavicu.
natural_image
Illustration of four steps of a mechanical assembly or tooling process, showing hand positioning and disassembly (no text or symbols present)Výmena

Technické údaje
Napájanie 220–240 V stried., 50–60 Hz
Dížka nabíjania 12 hodín
Akumulátory Ni-MH
Spotreba asi 1 W (pri nabíjaní)
Hmotnost' Epilátor
(asi 185 g s epilačnou hlavicou)
(asi 170 g s holiacou hlavicou) ES2055
D

E
natural_image
Illustration of a person performing a knee press or massage technique (no text or symbols visible)①

natural_image
Illustration of a person performing a wrist massage with motion arrows (no text or symbols)②

natural_image
Illustration of a person's arm with an arrow indicating upward movement (no text or symbols)③
Funcția de ras
natural_image
Illustration of four steps of a mechanical assembly or tooling process, showing hand positioning and disassembly (no text or symbols present)Înlocuire

Specificații
D

E

natural_image
Illustration of a person performing a knee press or massage technique (no text or symbols visible)①

natural_image
Illustration of a person performing a wrist massage with motion arrows (no text or symbols)②

natural_image
Illustration of a person's arm with an arrow indicating movement or pressure point (no text or symbols)③
Borotválkozás
natural_image
Illustration of four steps of a mechanical assembly or tooling process, showing hand positioning and disassembly (no text or symbols present)Csere

D

E

A Védősapka
B Epilálófej
natural_image
Illustration of a person performing a knee press or massage technique (no text or symbols present)①
natural_image
Illustration of a person performing a wrist massage with motion arrows (no text or symbols)②

natural_image
Illustration of a person's arm with an arrow indicating a specific area (no text or symbols present)③
Tıraş olma
Islak/köpüklü tıraş ES2055
natural_image
Illustration of four steps of a mechanical assembly or cleaning procedure, showing hand positioning and disassembly (no text or symbols present)Değiştirme
Özellikler
D
E

A Koruyucu kapak
B Epilasyon başlığı
natural_image
Illustration of a person performing a seated leg press or massage technique (no text or symbols visible)①
natural_image
Illustration of a person performing a physical exercise with upward arrows indicating movement (no text or symbols)②

natural_image
Illustration of a person's arm with an arrow indicating movement or pressure point (no text or symbols)③
Бритьё
natural_image
Illustration of four steps of a mechanical assembly or tooling process, showing hand positioning and disassembly (no text or symbols present)
D
E

natural_image
Illustration of a person performing a knee press or massage technique (no text or symbols visible)①

natural_image
Illustration of a person performing a wrist massage with motion arrows (no text or symbols)②

natural_image
Illustration of a human arm with an arrow indicating movement or pressure point (no text or symbols)③
Гоління
natural_image
Illustration of four steps of a mechanical assembly or repair process, showing hand positioning and disassembly (no text or symbols present)Заміна

Wanbao Base Shiguang Road, Panyu District, Guangdong, 511495 CHINA
Звуковий шум
D
E

Information on Disposal for Users of Waste Electrical & Electronic Equipment (private households)
natural_image
Symbol of a trash bin with crossed lines and a blank rectangular base (no text or labels)This symbol on the products and/or accompanying documents means that used electrical and electronic products should not be mixed with general household waste.
For proper treatment, recovery and recycling, please take these products to designated collection points, where they will be accepted on a free of charge basis.
Alternatively, in some countries you may be able to return your products to your local retailer upon the purchase of an equivalent new product.
Disposing of this product correctly will help to save valuable resources and prevent any potential negative effects on human health and the environment which could otherwise arise from inappropriate waste handling. Please contact your local authority for further details of your nearest designated collection point.
Penalties may be applicable for incorrect disposal of this waste, in accordance with national legislation.
For business users in the European Union
If you wish to discard electrical and electronic equipment, please contact your dealer or supplier for further information.
Information on Disposal in other Countries outside the European Union
This symbol is only valid in the
European Union.
If you wish to discard this product, please contact your local authorities or dealer and ask for the correct method of disposal.
Deutsch
natural_image
Symbol of a waste bin with no text or labels, crossed by diagonal lines and a solid rectangle below (no readable text or symbols)natural_image
Symbol of a trash bin crossed with no visible text or labelsnatural_image
Symbol of a trash bin with crossed lines indicating no waste or discharge (no text or labels)natural_image
Symbol of a trash bin with no text or labels, crossed by diagonal lines and a solid black rectangle below (no readable text or symbols)natural_image
Symbol of a trash bin crossed with no text or numbers, representing waste sorting or disposal (no text present)natural_image
Symbol of a trash bin with crossed lines indicating no waste or restriction, and a solid black rectangle below (no text or labels)natural_image
Symbol of a trash bin crossed with no visible text or labelsnatural_image
Symbol of a trash bin with crossed lines indicating no waste or restriction, and a solid black rectangle below (no text or labels)natural_image
Symbol of a waste bin with crossed lines indicating no waste, and a solid black rectangle below (no text or labels)natural_image
Symbol of a trash bin crossed with no text or numbers, representing waste sorting or disposal (no text present)natural_image
Symbol of a trash bin with crossed lines indicating no waste or discharge (no text or labels)natural_image
Symbol of a trash bin crossed with two crossed lines, no text or numbers presentnatural_image
Symbol of a trash bin with crossed lines indicating no waste or restriction, and a solid black rectangle below (no text or labels)natural_image
Symbol of a trash bin with no text or labels, crossed by diagonal lines and a solid black rectangle below (no readable text or symbols)natural_image
Symbol of a trash bin with crossed lines indicating no waste or discharge (no text or labels)natural_image
Symbol of a trash bin crossed with no text or labels, accompanied by a black rectangle below (no readable text or symbols)natural_image
Symbol of a trash bin with crossed lines indicating no waste or discharge, and a solid black rectangle below (no text or labels)natural_image
Symbol of a trash bin crossed with two crossed lines, no text or numbers present


- ▶ Before use
- ▶ Safety precautions
- Before use
- Changing the head ES2055
- B Charging
- Charging the appliance
- Dry epilation
- B
- Using
- For best epilation results
- Moving the appliance correctly
- Shaving
- Wet/foam Shaving ES2055
- Shaving the bikini line with the bikini comb
- Dry shaving
- B Cleaning
- Cleaning the epilator
- Washing your epilator
- Cleaning your epilator with the supplied brush
- Removing the outer foil
- Fitting the new outer foil
- For environmental protection and recycling of materials
- Removing the built-in rechargeable batteries
- Rasur
- Nass-/Schaumrasur ES2055
- Rasage
- Rasage mouillé/mousse ES2055
- Rasatura
- Rasatura a umido/con schiuma ES2055
- Afeitado
- Sustitución
- Scheren
- Nat/schuim scheren ES2055
- Bevestig de scheerkop.
- Rapar
- Substituição
- Bruk
- Barbering
- Våt/skum-barbering ES2055
- Montere den nye ytre folien
- Rakning
- Byte
- Våd/skumbarbering ES2055
- Udskiftning
- Montering af nyt ydre folie
- Karvojen ajaminen
- Vaihto
- Ulomman teräverkon vaihtaminen ES2055
- Golenie
- Wymiana
- Holení
- Výměna
- Holenie
- Holenie namokro/s penou ES2055
- Nasad'te holiacu hlavicu.
- Výmena
- Funcția de ras
- Înlocuire
- Borotválkozás
- Csere
- Tıraş olma
- Islak/köpüklü tıraş ES2055
- Değiştirme
- Бритьё
- Гоління
- Заміна
- Information on Disposal for Users of Waste Electrical & Electronic Equipment (private households)
- For business users in the European Union
- Information on Disposal in other Countries outside the European Union
- Deutsch
Brand : PANASONIC
Model : ES2053
Category : Epilator