
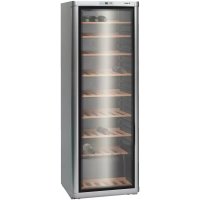
KTW18V80GB - Wine cellar BOSCH - Free user manual and instructions
Find the device manual for free KTW18V80GB BOSCH in PDF.
| Product type | Wine cellar |
| Brand | Bosch |
| Model | KTW18V80GB |
| Capacity | Up to 18 bottles |
| Adjustable temperature range | From +8°C to +12°C (middle setting 3), settings 1 to 5 |
| Climate class | N, ST, T (ambient from +16°C to +43°C) |
| Power supply | 220-240 V / 50 Hz |
| Refrigerant | R600a (flammable) |
| Interior lighting | Yes, with switch |
| Shelves | Wooden |
| Activated charcoal filter | Yes, annual replacement recommended |
| Defrosting | Automatic |
| Door opening direction reversal | Not possible |
| Cleaning | Warm water and dish soap; do not use steam cleaners |
| Safety | Do not use electrical appliances inside; do not use sharp objects for defrosting |
Frequently Asked Questions - KTW18V80GB BOSCH
User questions about KTW18V80GB BOSCH
0 question about this device. Answer the ones you know or ask your own.
Ask a new question about this device
Download the instructions for your Wine cellar in PDF format for free! Find your manual KTW18V80GB - BOSCH and take your electronic device back in hand. On this page are published all the documents necessary for the use of your device. KTW18V80GB by BOSCH.
USER MANUAL KTW18V80GB BOSCH
Information concerning disposal 15
Gettingtoknow yourappliance 16.....
Installing the appliance 16
Aligningtheappliance. 16
Noteambienttemperature and ventilation 17
Connecting the appliance 17
Switchingontheappliance 18
Selecting the temperature 18.. Placing bottles in the refrigerator 18
Use temperature zones in the refrigerator compartment!19
Practical tips for storing wine 19
Drinking temperatures 20
Switchingoff anddisconnecting the appliance 20
Cleaning the appliance 20
Activated charcoal filter 21
Tips for saving energy 21
Operatingnoises 21.
Eliminatingminor faults yourself 22
Customerservice 23
fr Table des matieres
Please read the operating and installation instructionscarefully.
They contain important information on how to install, use and maintain the appliance.
Keep all documentation for subsequent use or for the next owner.
Technicalsafety
- This appliance contains a small quantity of environmentally-friendly but flammable R600a refrigerant. Ensure that the tubing of the refrigerant circuit is not damaged during transportation and installation. Leaking refrigerant may cause eye injuries or ignite.
Ifdamagehasoccurred
- Keep naked flames and/or ignition sources away from the appliance.
- Thoroughly ventilate the room for several minutes.
- Switch off the appliance and pull out the mains plug or switch off the fuse.
- Notify customer service.
The more refrigerant an appliance contains, the larger the room must be. Leaking refrigerant can form a flammable gas-air mixture in rooms which are too small.
The room must be at least 1m^3 per8 g of refrigerant. The amount of refrigerant in your appliance is indicated on the rating plate inside the appliance.
- Only customer service may change the power cord and carry out any other repairs. Improper installations and repairs may put the user at considerable risk.
Importantinformationwhen usingtheappliance
- Never use electrical appliances inside the appliance (e. g. heaters, electric ice makers, etc.). Risk of explosion!
- Never use a steam cleaner to defrost or clean the appliance. The steam may penetrate electrical parts and cause a short-circuit.
Riskofelectricshock!
- Do not use pointed or sharp-edged implements to remove frost or layers of ice.
You could damage the refrigerant tubing. Leaking refrigerant may ignite or cause eye injuries. - Do not store products which contain flammable propellants (e.g. spray cans) or explosive substances in the appliance. Explosion hazard!
- Do not stand or support yourself on the base, drawers or doors, etc.
- Before defrosting or cleaning the appliance, switch off the appliance, pull out the mains plug or switch off the fuse.
Pull on the mains plug, not on the power cord.
- Bottles which contain a high percentage of alcohol must be sealed and stored in an upright position.
- Keep plastic parts and the door seal free of oil and grease. Otherwise, parts and door seal will become porous.
-
Never cover or block the ventilation openings for the appliance.
-
People who have limited physical, sensory or mental abilities or inadequate knowledge must not use this appliance unless they are supervised or given meticulous instructions.
Childreninthehousehold
- Keep children away from packaging and its parts. Danger of suffocation from folding cartons and plastic film!
- Do not allow children to play with the appliance!
- If the appliance features a lock, keep the key out of the reach of children.
Generalrequirements
This appliance is only intended for the storageofwine.
This appliance is intended for domestic use in private households and for a domestic environment.
The appliance has been interference-suppressed in compliance with EU Directive 2004/108/EC.
The refrigerant circuit has been tested for leaks.
This product complies with the relevant safety regulations for electrical appliances (EN 60335/2/24).
Information concerningdisposal
Disposal of packaging
The packaging protects your appliance from damage during transit. All packaging materials are environmentally friendly and recyclable. Please contribute to a better environment by disposing of packaging materials in an environmentally-friendly manner.
Please ask your dealer or inquire at your local authority about current means of disposal.
Disposal of your old appliance
Old appliances are not worthless rubbish! Valuable raw materials can be reclaimed by recycling old appliances.
This appliance is labelled in accordance with European Directive 2002/96/EG concerning used electrical and electronic appliances (waste electrical and electronic equipment - WEEE). The guideline determines the framework for the return and recycling of used appliances as applicable throughout the EU.
Warning
Redundant appliances:
1.Pulloutthemsainsplug.
2. Cut off the power cord and discard with the mains plug.
Refrigerators contain refrigerants and the insulation contains gases. Refrigerant and gases must be disposed of properly. Ensure that tubing of the refrigerant circuit is not damaged prior to proper disposal.
Gettingtoknowyour appliance
Please fold out the illustrated last page. These operating instructions refer to several models.

The illustrations may differ.
Fig. 1
*notallmodels
1On/Offbutton
2Interiorlight
3Lightswitch
4Woodenshelf
5Condensationoutlet
6Temperatureselectionbutton
7Temperaturesettingdisplay
8Activatedcharcoalfilter
Installingtheappliance
Install the appliance in a dry, well ventilated room. The installation location should neither be exposed to direct sunlight nor near a heat source, e.g. a cooker, radiator, etc. If installation next to a heat source is unavoidable, use a suitable insulating plate or observe the following minimum distances to a heat source:
3 cm to electric or gas cookers.
30 cm to an oil or solid-fuel cooker.
Changingoverthedoorhinges
The door hinges on this appliance cannot be changed over.
Aligningtheappliance
Fig. 2
Place the appliance in the designated location and align.
The front screw feet can be adjusted.
Noteambient temperature and ventilation
The climatic class can be found on the rating plate. It specifies the ambient temperatures at which the appliance may beoperated.
| Climaticcategory | Permittedambient temperature |
| N+16°Cto32°C | |
| ST+16°Cto38°C | |
| T+16°Cto43°C |
Attention
The room temperature must not drop below +16^ . Otherwise the refrigerator compartment will become too cold and perishable items may be damaged.
Ventilation
Fig. 3
The heated air on the side panels of the appliance must be able to escape freely. Otherwise, the refrigerating unit must work harder and the power consumption is increased.
For this appliance there must be a 4 cm gap between the wall and adjacent furniture.
This distance is also required so that the door can be opened by at least 90^ .
Connecting the appliance
After installing the appliance, wait at least 1 hour until the appliance starts up. During transportation the oil in the compressor may have flowed into the refrigeration system.
Before switching on the appliance for the first time, clean the interior of the appliance (see chapter Cleaning).
The socket must be close to the appliance and must be freely accessible even after the appliance has been installed.
Connect the appliance only to 220-240 V/50 Hz alternating current via a correctly installed earthed socket. The socket must be fused with a 10 A to 16A fuse.
If the appliance is to be operated in a non-European country, check on the rating plate whether the indicated voltage and current type correspond to the values of your mains supply. The rating plate is situated in the bottom left-hand side of the appliance. The power cord may be replaced by a technicianonly.
Warning
Never connect the appliance to electronic energy saver plugs or to power inverters which convert the direct current to 230V alternating current (e.g. solar equipment, power supplies on ships).
Switchingonthe appliance
Press the On/Off button Fig. 1/1.
The appliance starts refrigerating.
Interior light is switched on when the door isopen.
At the factory the appliance has been set tothemi ddlesetting(3)
Operatingtips
While the refrigerating unit is running, beads of water or hoarfrost form at the back of the refrigerator compartment.
This is quite normal. It is not necessary to scrape off the frost or wipe off the beads of water. The rear panel defrosts automatically. The condensation collects in the drainage channel Fig. 4 and is conveyed to the refrigerating unit where it evaporates.
Selecting the temperature
The temperature can be set from 1-5. Press button Fig. 1/6 for 3 seconds until display flashes. Then keep pressing the button until the required setting is displayed.
The last setting is saved.
Setting 1, low cooling capacity.
Setting 5, maximum cooling capacity
At a setting of 3 a refrigerator compartment temperature of +8^ to +12^ is reached depending on the ambient temperature and load.
Refrigeratingcapacity
The temperature in the refrigerator compartment may rise temporarily if loaded with fairly large amounts of food.
Placingbottlesintherefrigerator
Note when loading products:
Depending on the model, a max. number of bottles can be stored on the bottle shelves, see loading example, Figs. 9 and 10. This number of bottles can be stored if the bottles are placed with their necks facingforwards.
- To ensure good air circulation in the appliance, the bottles should not be stored opposite each other or touch the rear panel of the refrigerator compartment.
- The indicated number of bottles may vary depending on the shape and size of the bottles.
- The area at the bottom is not very deep on account of the motor compartment. Drinks cans or short wine bottles can be stored.
For presentation purposes it is also possible to store the wine bottles upright, Fig. 5.
Usablecapacity
Information on the usable capacity can be found inside your appliance on the ratingplate.
Usetemperaturezones intherefrigerator compartment!
The air circulation in the appliance produces different refrigeration zones:
The warmest zone is at the top.
The coldest zone is at the bottom.
Arrangedrinks
Store different types of wine from top to bottom according to the following sequence:
Haevy red wines
- Rose and light red wines
- Whitewine
Champagne and sparkling wines
It is recommended to serve the wine a few degrees colder than the required drinking temperature, as the wine warms up quickly when poured into glasses.
Practical tips for storing wine
- Unpack bottles of wine - do not leave in crates or cardboard boxes - before storing in the refrigerator compartment.
- Place old bottles so that the cork is always wet. There should never be an air gap between the wine and the cork.
- The open bottle shelves are especially suitable because they do not interrupt the air circulation. As a result, the atmospheric humidity which condenses on the bottles quickly dries again.
- Before the wine is drunk, it should be "warmed up" (chambre):
- Place e.g. rosé wine on the table approx. 2-5 hours before drinking, red wine 4-5 hours before drinking. The wine will then be at the correct drinking temperature. Sparkling wine and Champagne should be cooled in the refrigerator shortly before drinking.
- Remember that wine should always be cooled slightly lower than the ideal serving temperature, as its temperature increases by 1 to 2^ as soon as it is poured into a glass!
Drinkingtemperatures
The correct serving temperature is crucial for the taste and therefore your enjoyment of the wine.
We recommend serving wine at the following drinking temperatures:
| Typeofwine | Drinking tempera-ture |
| Bordeauxred | 18 °C |
| Côtes du Rhône red/Barolo | 17 °C |
| Burgundyred/ Bordeauxred | 16 °C |
| Port | 15 °C |
| YoungBurgundyred | 14 °C |
| Youngredwine | 12 °C |
| YoungBeaujolais/all white wines with little residual sugar | 11 °C |
| Old white wines/Chardonnay | 10 °C |
| Sherry | 9 °C |
| Youngwhitewines fromlatevintage | 8 °C |
| WhitewinesLoire/Entre-deux-Mers | 7 °C |
Switchingoffand disconnectingthe appliance
Switchingofftheappliance
Press the On/Off button Fig.1/1.
Refrigerating unit and the light switch off.
Disconnecting the appliance
If the appliance is not used for a prolonged period:
- Switching off the appliance.
- Pull out the mains plug or switch off the fuse.
- Cleaning the appliance.
- Leave the appliance door open.
Cleaningtheappliance
Proceedasfollows:
- Pull out the mains plug or switch off thefuse!
- Wipe the door seal with clear water only and then wipe dry thoroughly.
- Clean the appliance with lukewarm water and a little washing-up liquid. The water must not drip onto the controlsorlight.
- After cleaning: reconnect and switch ontheappliance.
Note
Do not use abrasive or acidic cleaning agents and solvents.
Regularly clean the condensation channel and drainage hole, Fig. 4, so that the condensation can flow out. Clean the condensation channel with cotton buds, etc.
Water used for cleaning must not run through the drainage hole into the evaporation pan.
Activated charcoal filter
Picture 6
The activated charcoal filter provides air exchange and improved odour in the appliance.
We recommend that you replace the filter once a year.
Replacement filters are available from the after-sales service.
Tips for saving energy
- Install the appliance in a dry, well ventilated room, but not in direct sunlight and not near a heat source (e.g. radiator, cooker, etc.). If required, use an insulating plate.
- Open and close the door as briefly as possible.
- Allow drinks to cool down before placing in the appliance!
- Occasionally clean the rear of the appliance with a vacuum cleaner or paint brush to prevent an increased power consumption.
Operatingnoises
Normalnoises
Humming - refrigerating unit is running.
Bubbling, gurgling or whirring noises - refrigerant is flowing through the tubing.
Clicking - motor is switching on or off.
Preventingnoises
Theapplianceisnotlevel
Please align the appliance with a spirit level. Use the height adjustable feet or place something under the feet.
Theapplianceisnotfree-standing
Please move the appliance away from adjacent units or appliances.
Drawersorstorageareaswobble or stick
Please check the removable parts and, if required, reinsert them.
Bottlesorreceptaclesaretouching eachother
Please move bottles or receptacles away from each other.
Eliminating minor faults yourself
Beforeyoucallcustomerservice:
Please check whether you can eliminate the fault yourself based on the following information.
Customer service will charge you for advice, even if the appliance is still under guarantee!
| Fault | PossiblecauseRemedialaction | |
| Temperaturesdiffers greatlyfromtheset value. | Insomecasesitisadequatetoswitch offtheappliancefor5 minutes. Ifthetemperatureistoohighwait a few hoursandcheckwhetherthe temperaturehasapproachedtheset value. Ifthetemperatureistoolowcheck the temperatureagainthenextday. | |
| Light does not function. | The bulb is defective. | Change the bulb Fig. 7/A 1.Pullouthemainsplugor disconnectthefuse. 2.Removethebulbcoverfromthe rear. 3.Changethebulb:Replacementbulb 220-240a.c.,E14bulbholder,see defectivebulbforwattage. |
| Lightswitchissticking. Fig. 7/B. | Checkwhetheritcanremoved. | |
| Flooroftherefrigerator compartmentiswet. | Thecondensation drainagepipeisblocked Fig. 4. | Cleanthecondensationchanneland the outlet(see“Cleaningtheappliance”) |
| Theapplianceinterior is notcold. | Applancedooropened frequently. Alotofbottleswere placedintheappliance. | Donotopenthedoorunnecessarily. wait2-3days. |
| Fault | RemedialactionPossiblecause | |
| Refrigeratorhasno coolingcapacity. | Appliancehasswitched off. | PresstheOn/Off-buttonFig. 1/1. |
| Powerfailure;theusehas beenswitchedoff;the mainsplughasnotbeen insertedproperly. | Checkwhetherthepowerison,check thefuses. | |
Customer service
Please check your telephone book or the customer-service list for your nearest customer-service facility. When contacting customer service, please ALWAYS quote the product number (E-number) and production number (FD-number) of your appliance.
These numbers can be found on the rating plate. Fig. 8
To prevent unnecessary call-outs, please assist customer service by quoting the product and production numbers. This will save you additional costs.
Repair order and consultation if faults occur:
GB08448928979
Calls from a BT landline will be charged at up to 3 pence per minute. A call set-up fee of up to 6 pence may apply.
IE014502655
US8009442904toll-free
The attached after-sales service directory contains the contact data for all countries.
De warmste zone is bovenin
- fr Table des matieres
- Technicalsafety
- Ifdamagehasoccurred
- Importantinformationwhen usingtheappliance
- Riskofelectricshock!
- Childreninthehousehold
- Generalrequirements
- Information concerningdisposal
- Disposal of packaging
- Disposal of your old appliance
- Warning
- Gettingtoknowyour appliance
- Installingtheappliance
- Changingoverthedoorhinges
- Aligningtheappliance
- Noteambient temperature and ventilation
- Attention
- Ventilation
- Fig. 3
- Connecting the appliance
- Switchingonthe appliance
- Operatingtips
- Selecting the temperature
- Refrigeratingcapacity
- Placingbottlesintherefrigerator
- Usablecapacity
- Usetemperaturezones intherefrigerator compartment!
- Arrangedrinks
- Practical tips for storing wine
- Drinkingtemperatures
- Switchingoffand disconnectingthe appliance
- Switchingofftheappliance
- Disconnecting the appliance
- Cleaningtheappliance
- Note
- Activated charcoal filter
- Picture 6
- Tips for saving energy
- Operatingnoises
- Normalnoises
- Preventingnoises
- Theapplianceisnotlevel
- Theapplianceisnotfree-standing
- Drawersorstorageareaswobble or stick
- Bottlesorreceptaclesaretouching eachother
- Eliminating minor faults yourself
- Beforeyoucallcustomerservice:
- Customer service
Brand : BOSCH
Model : KTW18V80GB
Category : Wine cellar