
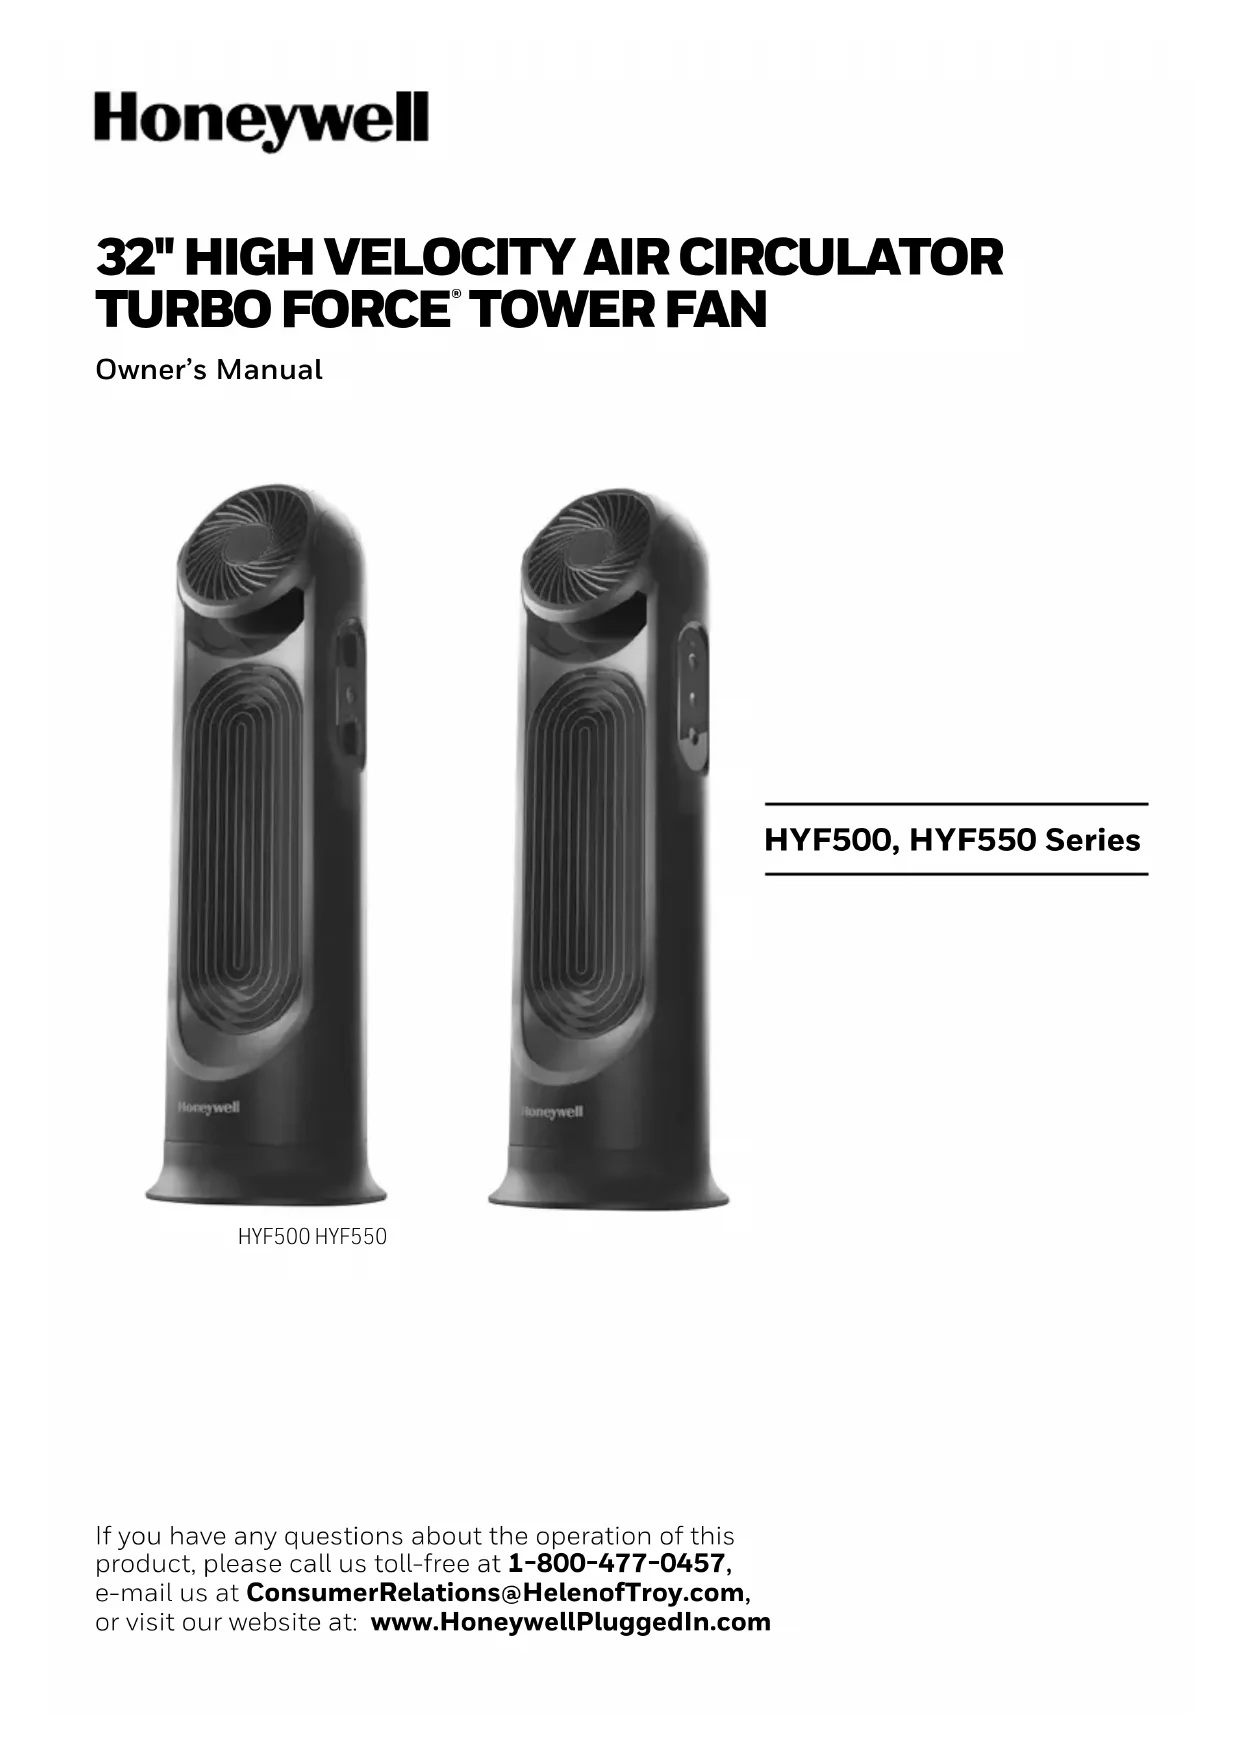
HYF500 - Fan HONEYWELL - Free user manual and instructions
Find the device manual for free HYF500 HONEYWELL in PDF.
| Product type | Air circulation fan |
| Model | HYF500 (also available HYF550) |
| Usage | Household, indoor |
| Power supply | 120 V AC, 60 Hz |
| Number of fans | 2 (upper and lower) |
| Speeds | 3 per fan (high, medium, low) |
| Oscillation | Yes, with oscillation button |
| Tilting | Tilting head up to 90° |
| Control type | Manual (HYF500) or electronic with remote control (HYF550) |
| Safety fuse | Yes, 2.5 A, 125 V (replaceable) |
| Maintenance | Clean with a soft cloth, vacuum cleaner or compressed air; do not immerse |
| Safety | Polarized plug, do not use extension cord, do not place near flames |
| Warranty | 1 year limited |
| Certifications | FCC Part 15, RSS-210 (Canada) |
| Customer service | 1 800 477-0457 / consumerrelations@HelenofTroy.com |
| Included accessories | Base, locking nut, remote control (HYF550) |
Frequently Asked Questions - HYF500 HONEYWELL
User questions about HYF500 HONEYWELL
0 question about this device. Answer the ones you know or ask your own.
Ask a new question about this device
Download the instructions for your Fan in PDF format for free! Find your manual HYF500 - HONEYWELL and take your electronic device back in hand. On this page are published all the documents necessary for the use of your device. HYF500 by HONEYWELL.
USER MANUAL HYF500 HONEYWELL
HYF500, HYF550 Series
READ AND SAVE THESE SAFETY INSTRUCTIONS BEFORE USING THIS FAN
WARNING - READ AND SAVE THESE OPERATING AND SAFETY INSTRUCTIONS BEFORE USING THIS FAN. IF YOU DO NOT UNDERSTAND THESE INSTRUCTIONS OR PRODUCT LABELS PLEASE CALL OUR CONSUMER RELATIONS REPRESENTATIVES AT 1-800-477-0457 FOR ASSISTANCE BEFORE USING THIS PRODUCT.
When using electrical appliances, basic precautions should always be followed to reduce the risk of fire, electric shock, and injury to persons, including the following:
- Use this fan only as described in this manual. Other use not recommended as it may cause fire, electric shock, or injury to persons.
- This product is intended for household use ONLY and not for commercial, industrial or outdoor use.
- To protect against electric shock, DO NOT place fan in window, DO NOT immerse unit, plug, or cord in water, and DO NOT spray unit with liquids.
- This appliance has a polarized plug (one blade is wider than the other). To reduce the risk of electric shock, this plug is intended to fit only one way in a polarized outlet. If the plug does not fit fully in the outlet, reverse the plug. If it still does not fit, contact a qualified electrician. DO NOT attempt to defeat this safety feature.
- Close supervision is necessary when any appliance is used by or near children.
- Turn the fan OFF and unplug the fan from the outlet when not in use, when moving the fan from one location to another, and before cleaning.
- To disconnect the fan, first turn the unit OFF, grip the plug and pull it from the wall outlet. NEVER pull the plug by the cord.
-
DO NOT operate the fan in the presence of explosive and/or flammable fumes.
-
DO NOT place the fan or any parts near an open flame, cooking, or other heating appliance.
- DO NOT use any product with a damaged cord or plug, any product that malfunctions, or any product that has been dropped or damaged in any manner (see warranty).
- Avoid contact with moving fan parts.
- The use of attachments not recommended by the manufacturer may be hazardous.
- Place the fan on a dry, level surface.
- DO NOT hang or mount fan on a wall or ceiling.
- DO NOT operate if the fan housing is damaged.
- A loose fit between the AC outlet (receptacle) and plug may cause overheating and a distortion of the plug. Contact a qualified electrician to replace loose or worn outlet.
- DO NOT operate any fan with a damaged cord or plug. Discard any damaged fan, or request a return authorization to return to Kaz USA, Inc. for examination and/or repair.
- DO NOT run fan cord under carpeting. DO NOT cover cord with throw rugs, runners, or similar coverings. DO NOT route cord under furniture or appliances. Arrange cord away from traffic areas and where it will not be a tripping hazard.
- DO NOT use an extension cord or power strip with this fan.
- SAVE THESE INSTRUCTIONS
WARNING: TO REDUCE THE RISK OF FIRE OR ELECTRIC SHOCK, DO NOT USE THIS FAN WITH ANY SOLID-STATE SPEED CONTROL DEVICE, OTHER THAN THE ONE SUPPLIED.
Keep batteries away from children. This product contains a lithium button/coin cell battery. If a new or used lithium button/coin cell battery is swallowed or enters the body, it can cause severe internal burns and can lead to death in as little as 2 hours. ALWAYS completely secure the battery compartment. If the battery compartment does not close securely, stop using the product, remove the batteries, and keep it away from children. If you think batteries might have been swallowed or placed inside any part of the body, seek immediate medical attention. The cells shall be disposed of properly, including keeping them away from children; and even used cells may cause injury.
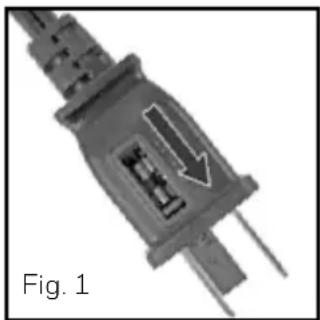
FUSED SAFETY PLUG - FOR US MODELS ONLY
This fan features a fused safety plug which is designed to cut off electric current to the fan if an electrical fault occurs. Please see below for more information on how to properly use your fan and replace the safety plug fuse, if needed.
USER SERVICING INSTRUCTIONS
- If your fan loses power and you suspect that the fuse on your fan has blown, grasp plug and remove from the receptacle or other outlet device. DO NOT unplug by pulling on cord.
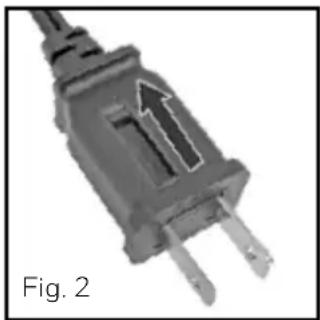
- Slide fuse cover, located on the top of the plug, towards the prongs of the plug. (Fig. 1)
- Carefully remove the blown fuse and snap a new fuse into place. To Reduce the Risk of Fire, replace fuse only with 2.5 Amp, 125 volt fuse. Fully close the fuse door by sliding back into place. (Fig. 2) Discard the blown fuse. The plug should now be ready for normal use.
- To Reduce the Risk of Fire, DO NOT replace attached plug. Discard product if the attached plug is damaged.
- If you need further information on how or when to replace the fuse in the safety plug, please contact Helen of Troy Consumer Relations Department by visiting our website at www.HoneywellPluggedIn.com/fans or calling 1-800-477-0457.
INTRODUCTION
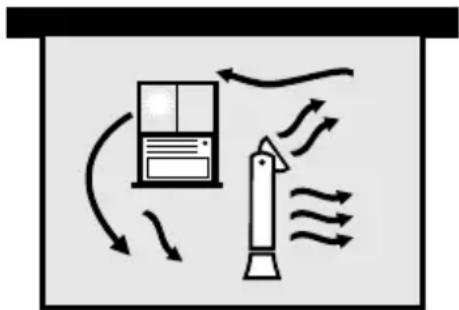
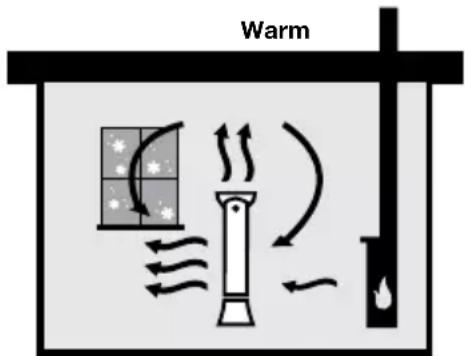
FOR ENERGY SAVINGS ALL YEAR
Honeywell Air Circulator Fans can help save energy and lower monthly bills all year round. Our air circulators increase distribution of cooler air from your air conditioner or warmer air from your heating system, creating a vortex of air flow for increased comfort. Increased air flow allows the air conditioner and heating systems to be used at lower settings to help save you money.
Summer Cool Winter
In the summer:
Circulate cool air by using with window or central air conditioning.
In the winter:
Circulate warm air. Position your air circulator in an open location for upward air movement. Run it on a low setting to move the hotter air from the ceiling and circulate the warmer air throughout the room.
In the winter:
Use with other heat sources, such as wood stoves, baseboard heaters, and/or vents to help circulate the warm air throughout the room.
ASSEMBLY INSTRUCTIONS
A. BASE ASSEMBLY
- Align the front and back base pieces and gently push the halves until the pieces snap securely together. (Fig 3).
B. SECURING THE TOWER FAN TO THE BASE
- At the base of the housing, remove the locking nut and set aside (Fig. 4)
- Carefully lift the fan housing (Fig. 5) and place the power cord through the center of the base.
- Lower the fan housing into the base (Fig. 6).
- Take the locking nut and thread the power cord through the locking nut and move the nut up the power cord, (Fig.7). Attach the locking nut to the fan housing by turning clockwise until fully tightened.
- The fan cord can exit either side of the base; choose which one is closer to your outlet. (Fig. 8)
- The back of this fan is intentionally closed. This allows the air intake and exit to happen at the front grille. This aerodynamic cross-flow design harnesses the Turbo Force® power of your fan!
Note: DO NOT operate the tower fan unless it is in its proper, upright position.
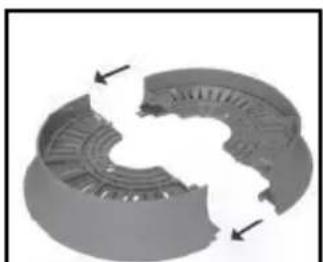
Fig. 3
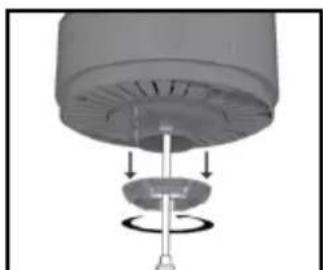
Fig.4 Fig.5
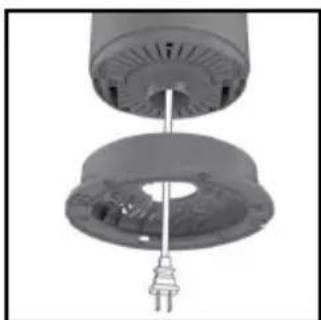
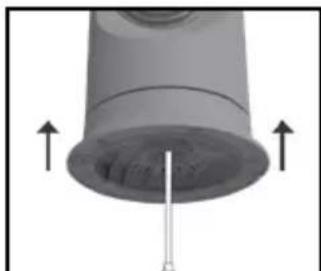
Fig. 6
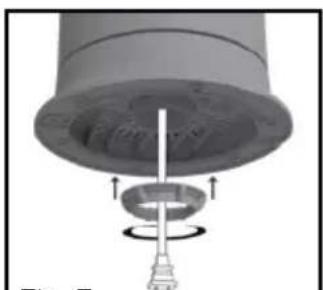
Fig. 7
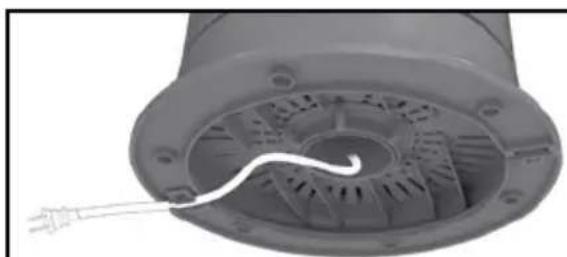
Fig. 8
OPERATION
- Be sure the fans are in the off position.
- Place your fan on a dry, level surface.
- Plug the power cord into a polarized 120-volt AC wall outlet, your fan is now ready to be used.
- To move the fan, turn the fans to OFF, unplug the unit from the wall outlet and pick the unit up by the concealed handle located at the back of the top fan.
HYF500 FEATURES - MANUAL CONTROL
Individual controls allow you to operate each fan independently.
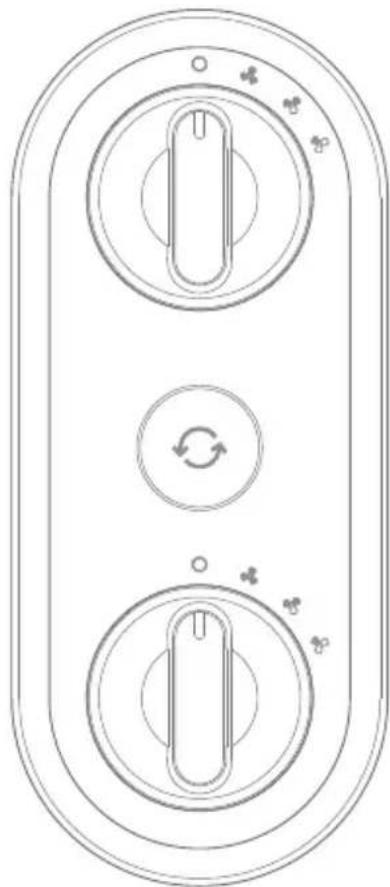
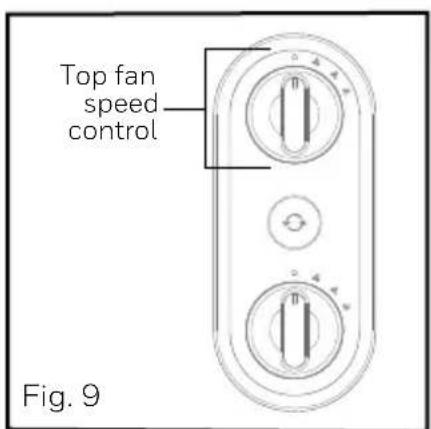
TOP FAN SPEED CONTROL
Turn the control knob to the desired fan speed High ( ) Medium ( ) Low ( ) and off ( Fig. 9).
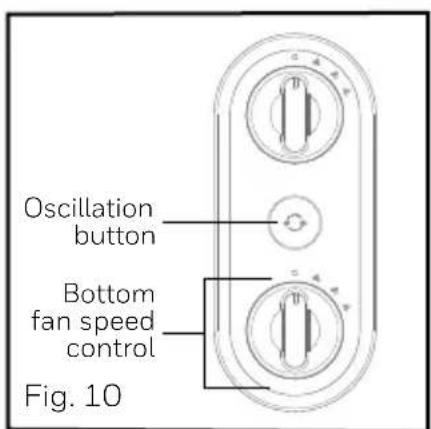
BOTTOM FAN SPEED CONTROL
Turn the control knob to the desired fan speed: High ( ) Medium ( ) Low ( ) and off (Fig. 10).
90^ PIVOT
The adjustable pivot of the top fan head allows for you to angle the airflow where you need it most. The top fan head also pivots to 90^ allowing for room air circulation (Fig. 11).
OSCILLATION
To activate the oscillation feature, press the oscillation button once. Press the oscillation button again to turn the oscillation feature off. (Fig 10).

HYF550 FEATURES - ELECTRONIC CONTROLS
Individual controls allow you to operate each fan independently.
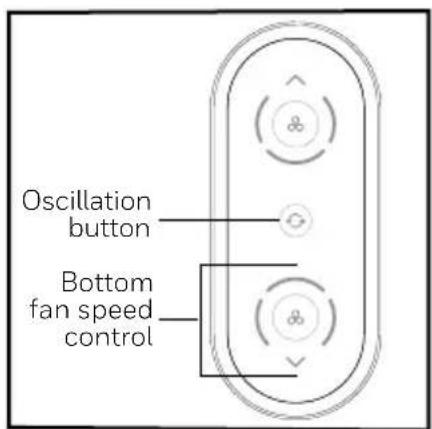
ON/OFF AND TOP FAN SPEED CONTROL
To turn the unit on and adjust the speed press the ( ) Press the () once for Low, press again for Medium and press again for the High setting, pressing once more turns the unit off. (Fig. 12).
ON/OFF BOTTOM FAN SPEED CONTROL
To turn the unit on and adjust the speed press the ( ) press the () once for Low, press again for Medium and press again for the High setting, pressing once more turns the unit off. (Fig. 13).
90^ PIVOT
The adjustable pivot of the top fan head allows for you to angle the airflow where you need it most. The top fan head also pivots to 90^ allowing for room air circulation.
OSCILLATION
To activate the oscillation feature, press the oscillation button once. Press the oscillation button again to turn the oscillation feature off. (Fig. 13).

HYF550 REMOTE CONTROL OPERATION
To activate the battery, simply pull the plastic tab
ON/OFF AND SPEED CONTROL
To turn the unit on and adjust the speed setting, press the fan button () repeatedly for low, medium, high and off. Each fan is operated independently, select the fan speed setting for each unit that meets your needs.
OSCILLATION
To activate the oscillation feature, press the oscillation button (O) once. Press the oscillation button again to turn the oscillation feature off.
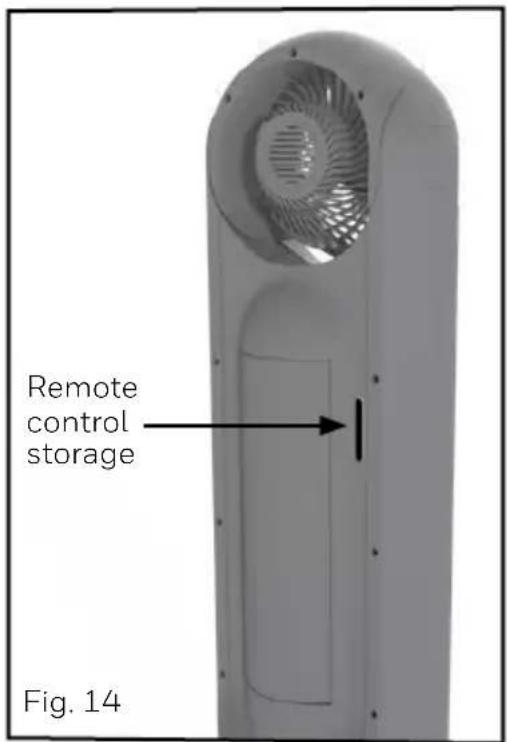
Remote Control Storage
When it is not in use, the remote control may be stored in the recessed area in the back of the fan. (Fig. 14).

WARNING: Chemical Burn Hazard.
Keep batteries away from children. This product contains a lithium button/coin cell battery.
See page 3.

USER SERVICING INSTRUCTIONS
CLEANING AND STORAGE
- Ensure the fan is turned off and unplugged.
- Use only a soft cloth to gently wipe the outer surfaces of the fan clean.
- To clean between the grille and fan blade area, we recommend using a pipe cleaner, flexible dust wand, vacuum cleaner, or compressed air to gently remove the dust.
- To clean the rear housing use a soft dry cloth.
- DO NOT immerse the fan in water and NEVER allow water to drip into the motor housing.
- DO NOT use gasoline, paint thinner, or other chemicals to clean the fan.
- For storage, you may leave the fan assembled and covered to protect it from dust. Store the fan in a cool, dry place.
CUSTOMER SERVICE
Questions or comments
Call us toll-free at: 1-800-477-0457
E-mail: consumerrelations@HelenofTroy.com
Or visit our website at: www.HoneywellPluggedIn.com/fans
Please be sure to specify the model number.
NOTE: IF YOU EXPERIENCE A PROBLEM, PLEASE CONTACT CONSUMER RELATIONS FIRST OR SEE YOUR WARRANTY. DO NOT RETURN TO THE ORIGINAL PLACE OF PURCHASE. DO NOT ATTEMPT TO OPEN THE MOTOR HOUSING YOURSELF,DOING SO MAY Void YOUR WARRANTY AND CAUSE DAMAGE TO THE FAN OR PERSONAL INJURY
In the USA:
THIS DEVICE (HYF500/HYF550 SERIES ONLY) COMPLIES WITH PART 15 OF THE FCC RULES
NOTE: This equipment has been tested and found to comply with the limits for a Class B digital device, pursuant to Part 15 of the FCC Rules. These limits are designed to provide reasonable protection against harmful interference in a residential installation. This equipment generates, uses, and can radiate radio frequency energy and, if not installed and used in accordance with the instructions, may cause harmful interference to radio communications. However, there is no guarantee that interference will not occur in a particular installation. If this equipment does cause harmful interference to radio or television reception, which can be determined by turning the equipment off and on, the user is encouraged to try to correct the interference by one or more of the following measures:
- Reorient or relocate the receiving antenna.
- Increase the separation between the equipment and receiver.
- Connect the equipment into an outlet on a circuit different from that to which the receiver is connected.
- Consult the dealer or an experienced radio/TV technician for help.
Please note that changes or modifications of this product not expressly approved by the party responsible for compliance could void the user's authority to operate the equipment.
CUSTOMER SERVICE (continued)
In Canada:
This device complies with Industry Canada license - exempt RSS-210
Operation is subject to the following 2 conditions:
- This device may not cause interference, and
- This device must accept interference, including interference that may cause undesired operation of the device.
1 YEAR LIMITED WARRANTY
You should first read all instructions before attempting to use this product.
A. This 1 year limited warranty applies to repair or replacement of product found to be defective in material or workmanship. This warranty does not apply to damage resulting from commercial, abusive, unreasonable use or supplemental damage. Defects that are the result of normal wear and tear will not be considered manufacturing defects under this warranty. KAZ USA, INC. IS NOT LIABLE FOR INCIDENTAL OR CONSEQUENTIAL DAMAGES OF ANY NATURE. ANY IMPLIED WARRANTY OF MERCHANTABILITY OR FITNESS FOR A PARTICULAR PURPOSE ON THIS PRODUCT IS LIMITED IN DURATION TO THE DURATION OF THIS WARRANTY. Some jurisdictions do not allow the exclusion or limitation of incidental or consequential damages or limitations on how long an implied warranty lasts, so the above limitations or exclusions may not apply to you. This warranty gives you specific legal rights, and you also may have other rights which vary from jurisdiction to jurisdiction. This warranty applies only to the original purchaser of this product from the original date of purchase.
B. At its option, Kaz will repair or replace this product if it is found to be defective in material or workmanship. Defective product should be returned to the place of purchase in accordance with store policy. Thereafter, while within the warranty period defective product may be returned to Kaz.
C. This warranty does not cover damage resulting from any unauthorized attempts to repair or from any use not in accordance with the instruction manual.
Questions or comments
Call us toll-free at: 1-800-477-0457 or
E-mail: consumerrelations@HelenofTroy.com
Or visit our website at:
www.HoneywellPluggedin.com/fans
Please be sure to specify a model number.
Please go to
www.HoneywellPluggedIn.com/register and register your product under the Customer Care Center and receive product information updates and new promotional offers.
NOTE: IF YOU EXPERIENCE A PROBLEM, PLEASE CONTACT CONSUMER RELATIONS FIRST OR SEE YOUR WARRANTY. DO NOT RETURN THE PRODUCT TO THE ORIGINAL PLACE OF PURCHASE. DO NOT ATTEMPT TO OPEN THE MOTOR HOUSING YOURSELF, DOING SO MAY VOID YOUR WARRANTY AND CAUSE DAMAGE TO THE PRODUCT OR PERSONAL INJURY.
Honeywell
VENTILATEUR TURBO FORCE à HAUTE VÉLOCITÉ DE 32 PO
Séries HYF500, HYF550
Series HYF500, HYF550
For responsible recycling, please visit:
RECYCLE NATION
www.RecycleNation.com
© 2020 All rights reserved.
Kaz USA, Inc., a Helen of Troy Company, 400 Donald Lynch Blvd., Suite 300, Marlborough, MA 01752
Distributed by: Kaz Canada, Inc., a Helen of Troy Company 6700 Century Ave., Suite # 210, Mississauga ON L5N 6A4
Honeywell is a trademark of Honeywell International Inc., and is used under license by Helen of Troy Limited.
TurboForce® is a registered trademark owned by Helen of Troy Limited.
www.RecycleNation.com