
HSF600W - Fan HONEYWELL - Free user manual and instructions
Find the device manual for free HSF600W HONEYWELL in PDF.
| Product Type | Pedestal fan with remote control |
| Brand | Honeywell |
| Model | HSF600W |
| Color | White |
| Adjustable height | Yes, Twist & Lock system (approx. 100-130 cm) |
| Blade diameter | Approximately 30 cm (estimated) |
| Weight | Approximately 5 kg (estimated) |
| Power supply | 120 V, 60 Hz, 2.5 A (fuse 125 V 2.5 A) |
| Power | Approximately 50 W (estimated) |
| Speeds | Multiple (touch control and remote control) |
| Timer | 1, 2, 4 or 8 hours |
| Oscillation | Yes, can be enabled/disabled by button |
| Remote control | Yes, with AAA batteries (not included) |
| Control panel | Touch with automatic brightness dimmer |
| Plug type | Polarized with safety fuse (2.5 A, 125 V) |
| Noise level | Noise reduction technology (estimated 45-55 dB) |
| Maintenance and cleaning | Wipe with a soft damp cloth; front grille removable |
| Safety | Plug with fuse, overload protection, auto shut-off |
| Warranty | 1 year limited |
| Use | Household use only |
Frequently Asked Questions - HSF600W HONEYWELL
User questions about HSF600W HONEYWELL
0 question about this device. Answer the ones you know or ask your own.
Ask a new question about this device
Download the instructions for your Fan in PDF format for free! Find your manual HSF600W - HONEYWELL and take your electronic device back in hand. On this page are published all the documents necessary for the use of your device. HSF600W by HONEYWELL.
USER MANUAL HSF600W HONEYWELL
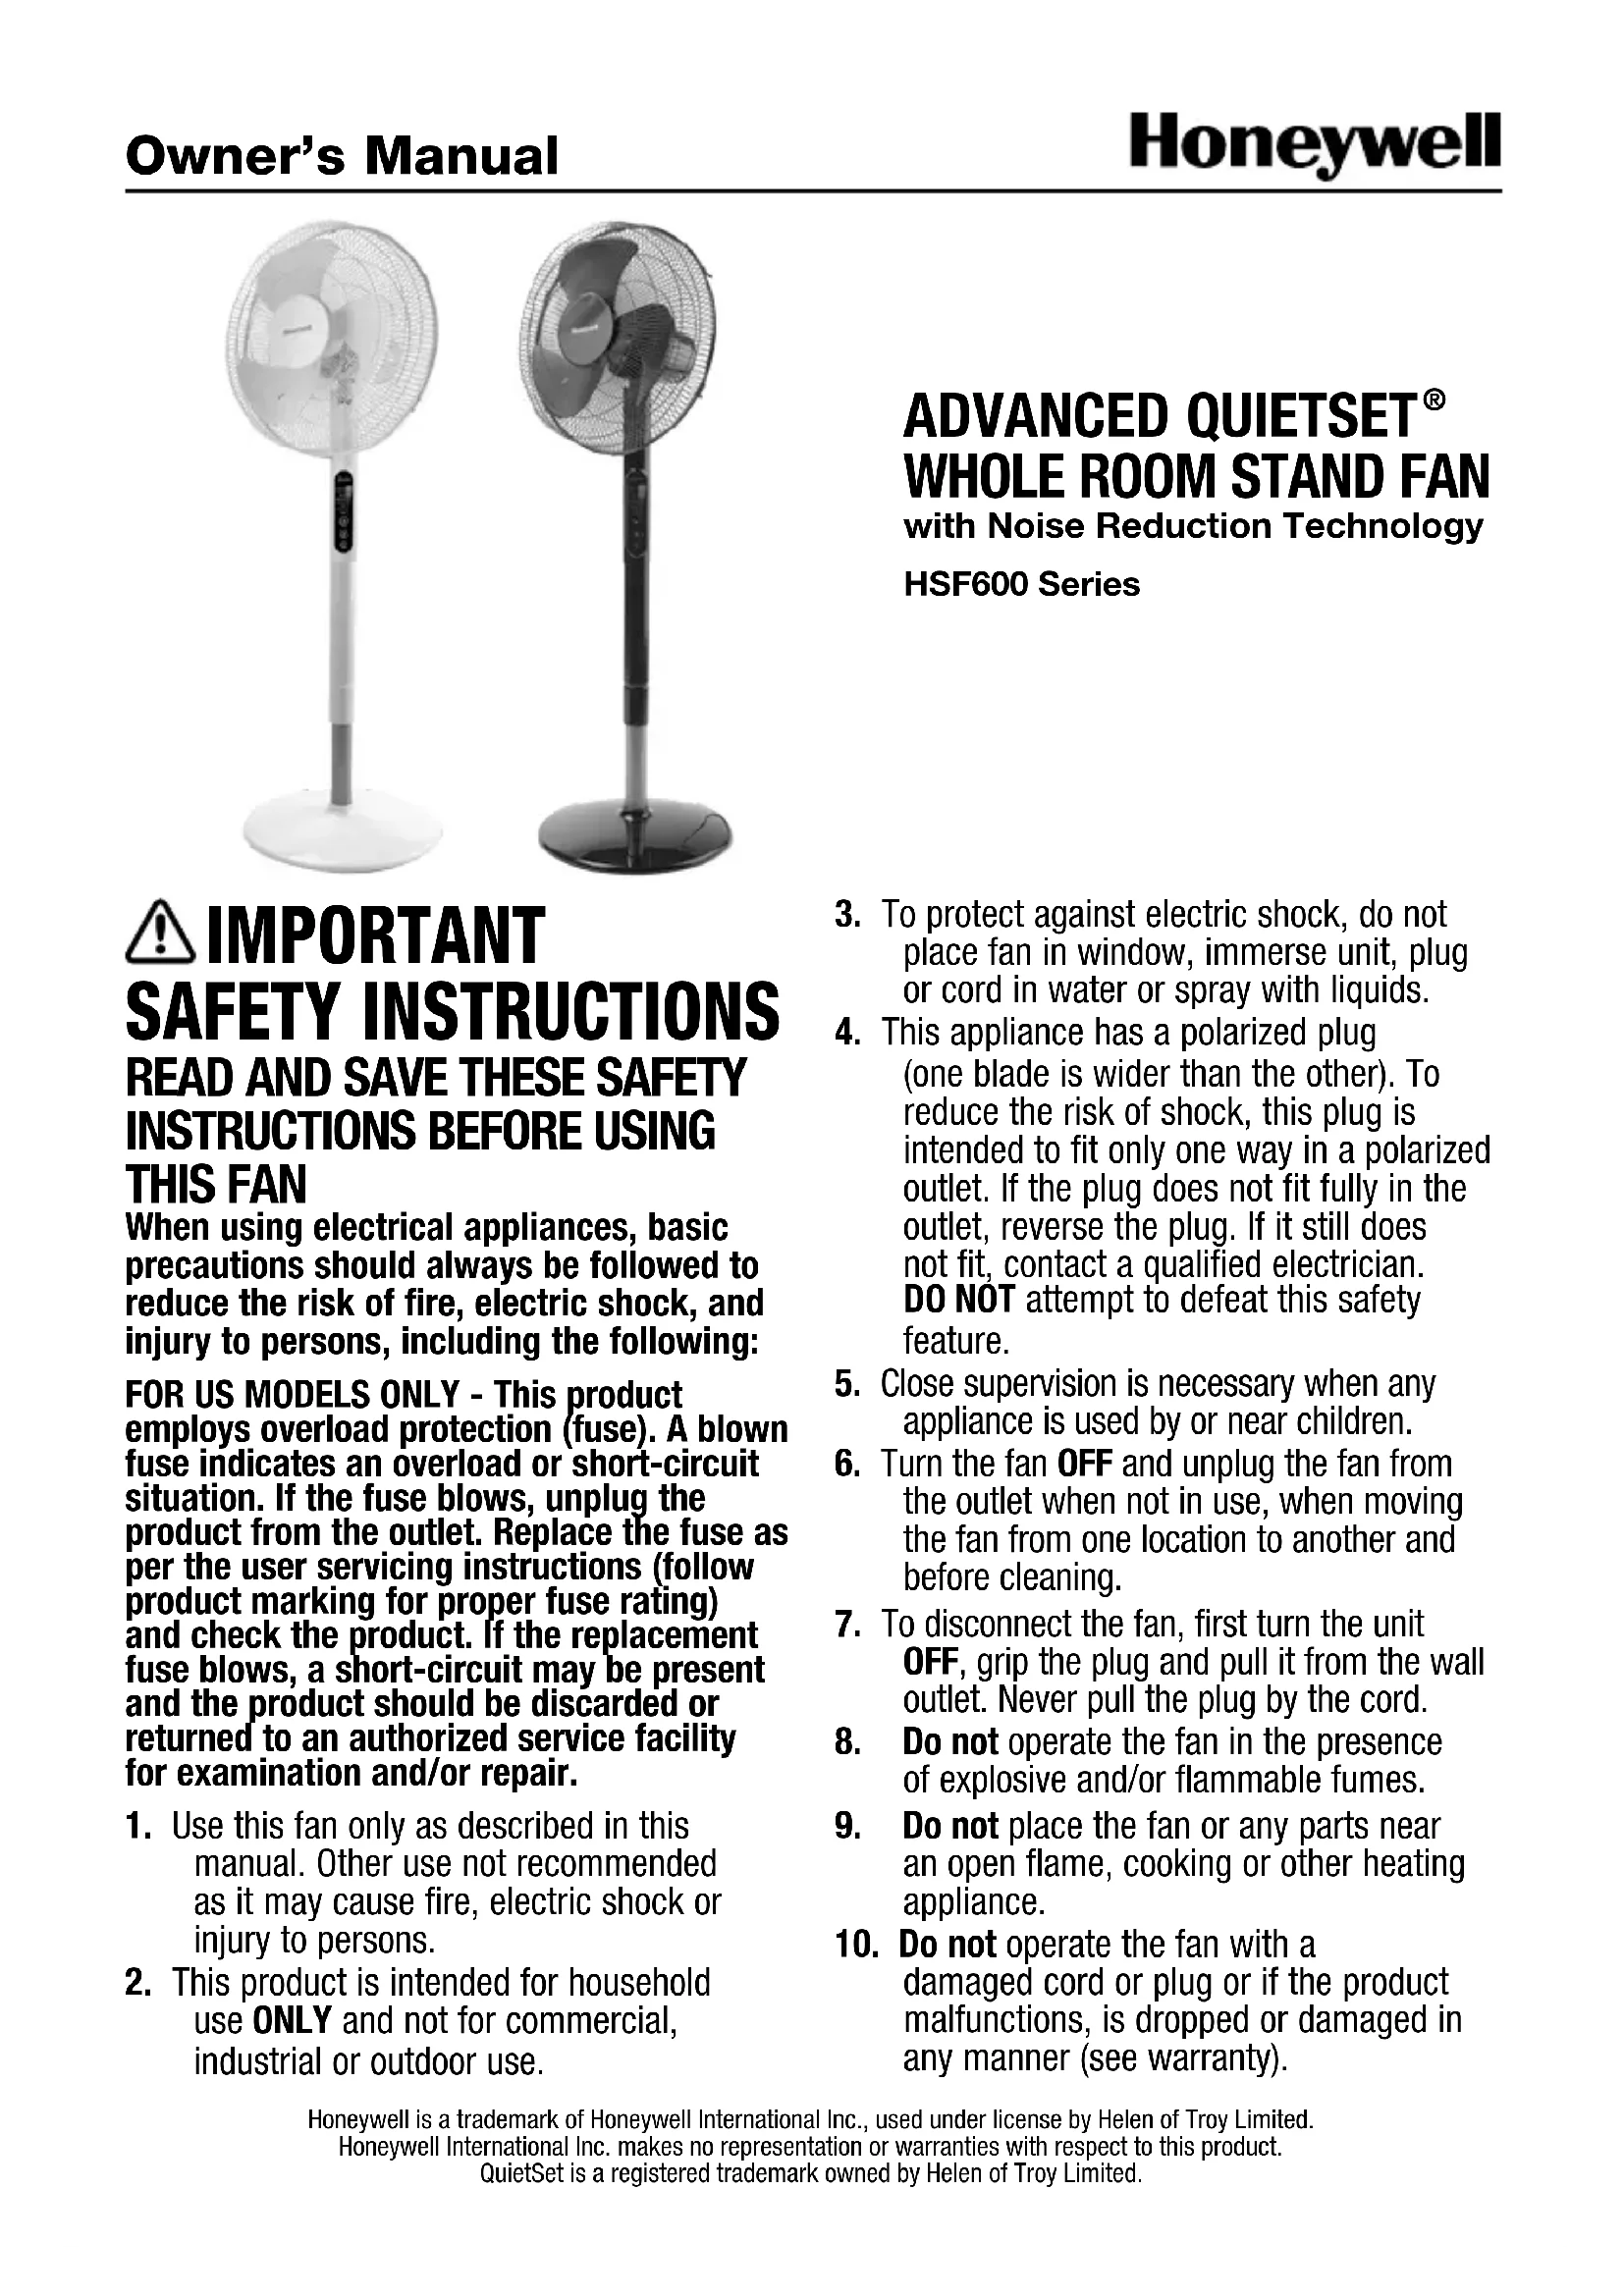
ADVANCED QUIETSET® WHOLE ROOM STAND FAN with Noise Reduction Technology HSF600 Series
IMPORTANT SAFETY INSTRUCTIONS READ AND SAVE THESE SAFETY INSTRUCTIONS BEFORE USING THIS FAN
When using electrical appliances, basic precautions should always be followed to reduce the risk of fire, electric shock, and injury to persons, including the following:
FOR US MODELS ONLY - This product employs overload protection (fuse). A blown fuse indicates an overload or short-circuit situation. If the fuse blows, unplug the product from the outlet. Replace the fuse as per the user servicing instructions (follow product marking for proper fuse rating) and check the product. If the replacement fuse blows, a short-circuit may be present and the product should be discarded or returned to an authorized service facility for examination and/or repair.
- Use this fan only as described in this manual. Other use not recommended as it may cause fire, electric shock or injury to persons.
-
This product is intended for household use ONLY and not for commercial, industrial or outdoor use.
-
To protect against electric shock, do not place fan in window, immerse unit, plug or cord in water or spray with liquids.
- This appliance has a polarized plug (one blade is wider than the other). To reduce the risk of shock, this plug is intended to fit only one way in a polarized outlet. If the plug does not fit fully in the outlet, reverse the plug. If it still does not fit, contact a qualified electrician. DO NOT attempt to defeat this safety feature.
- Close supervision is necessary when any appliance is used by or near children.
- Turn the fan OFF and unplug the fan from the outlet when not in use, when moving the fan from one location to another and before cleaning.
- To disconnect the fan, first turn the unit OFF, grip the plug and pull it from the wall outlet. Never pull the plug by the cord.
- Do not operate the fan in the presence of explosive and/or flammable fumes.
- Do not place the fan or any parts near an open flame, cooking or other heating appliance.
-
Do not operate the fan with a damaged cord or plug or if the product malfunctions, is dropped or damaged in any manner (see warranty).
-
Do not use an extension cord or power strip with this fan.
- Avoid contact with moving fan parts.
- The use of attachments not recommended by the manufacturer may be hazardous.
- Place the fan on a dry level surface.
- Do not hang or mount fan on a wall or ceiling.
- Do not operate if the fan housing is damaged.
-
A loose fit between the AC outlet (receptacle) and plug may cause overheating and a distortion of the plug. Contact a qualified electrician to replace loose or worn outlet.
-
Do not operate any fan with a damaged cord or plug. Discard any damaged fan, return the fan to the retailer where the fan was purchased, or request a return authorization to return to Kaz, Inc. for examination and/or repair.
- Do not run fan cord under carpeting. Do not cover cord with throw rugs, runners, or similar coverings. Do not route cord under furniture or appliances. Arrange cord away from traffic areas and where it will not be tripped over.
WARNING: To Reduce The Risk of Fire or Electric Shock, Do Not Use This Fan With Any Solid State Speed Control Device
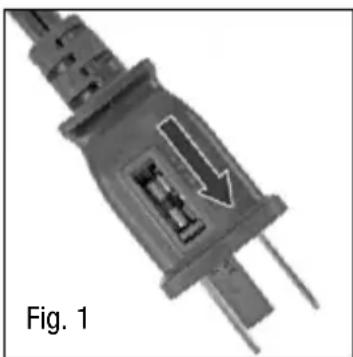
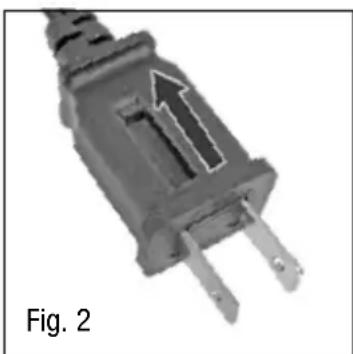
FUSED SAFETY PLUG - FOR US MODELS ONLY
This fan features a fused safety plug which is designed to cut off electric current to the fan if an electrical fault occurs. Please see below for more information on how to properly use your fan and replace the safety plug fuse, if needed.
USER SERVICING INSTRUCTIONS
- If your fan loses power and you suspect that the fuse on your fan has blown, grasp plug and remove from the receptacle or other outlet device. Do not unplug by pulling on cord.
- Slide fuse cover, located on the top of the plug towards the prongs of the plug. (Fig. 1)
- Carefully remove the blown fuse and snap a new fuse into place. To Reduce the Risk of Fire, replace fuse only with 2.5 Amp, 125 volt fuse. Fully close the fuse door by sliding back into place. (Fig. 2) Discard the blown fuse. The plug should now be ready for normal use.
- To Reduce the Risk of Fire, do not replace attachment plug. Contains a safety device (fuse) that should not be removed. Discard product if the attachment plug is damaged.
- If you need further information on how or when to replace the fuse in the safety plug, please contact Kaz Consumer Relations Department by visiting our website at www.honeywellpluggedin.com/fans or calling 1-800-477-0457.
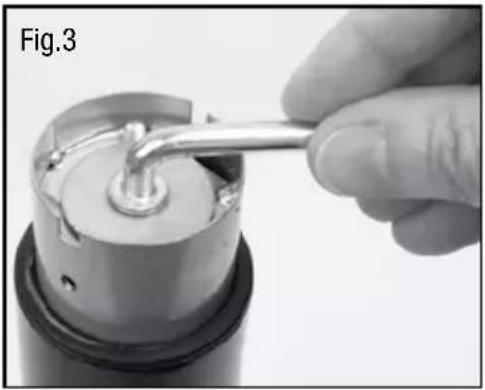
A. BASE ASSEMBLY
- Remove the L shaped bolt (counter clockwise) and washer from the bottom of the silver fan pole. (Fig. 3).
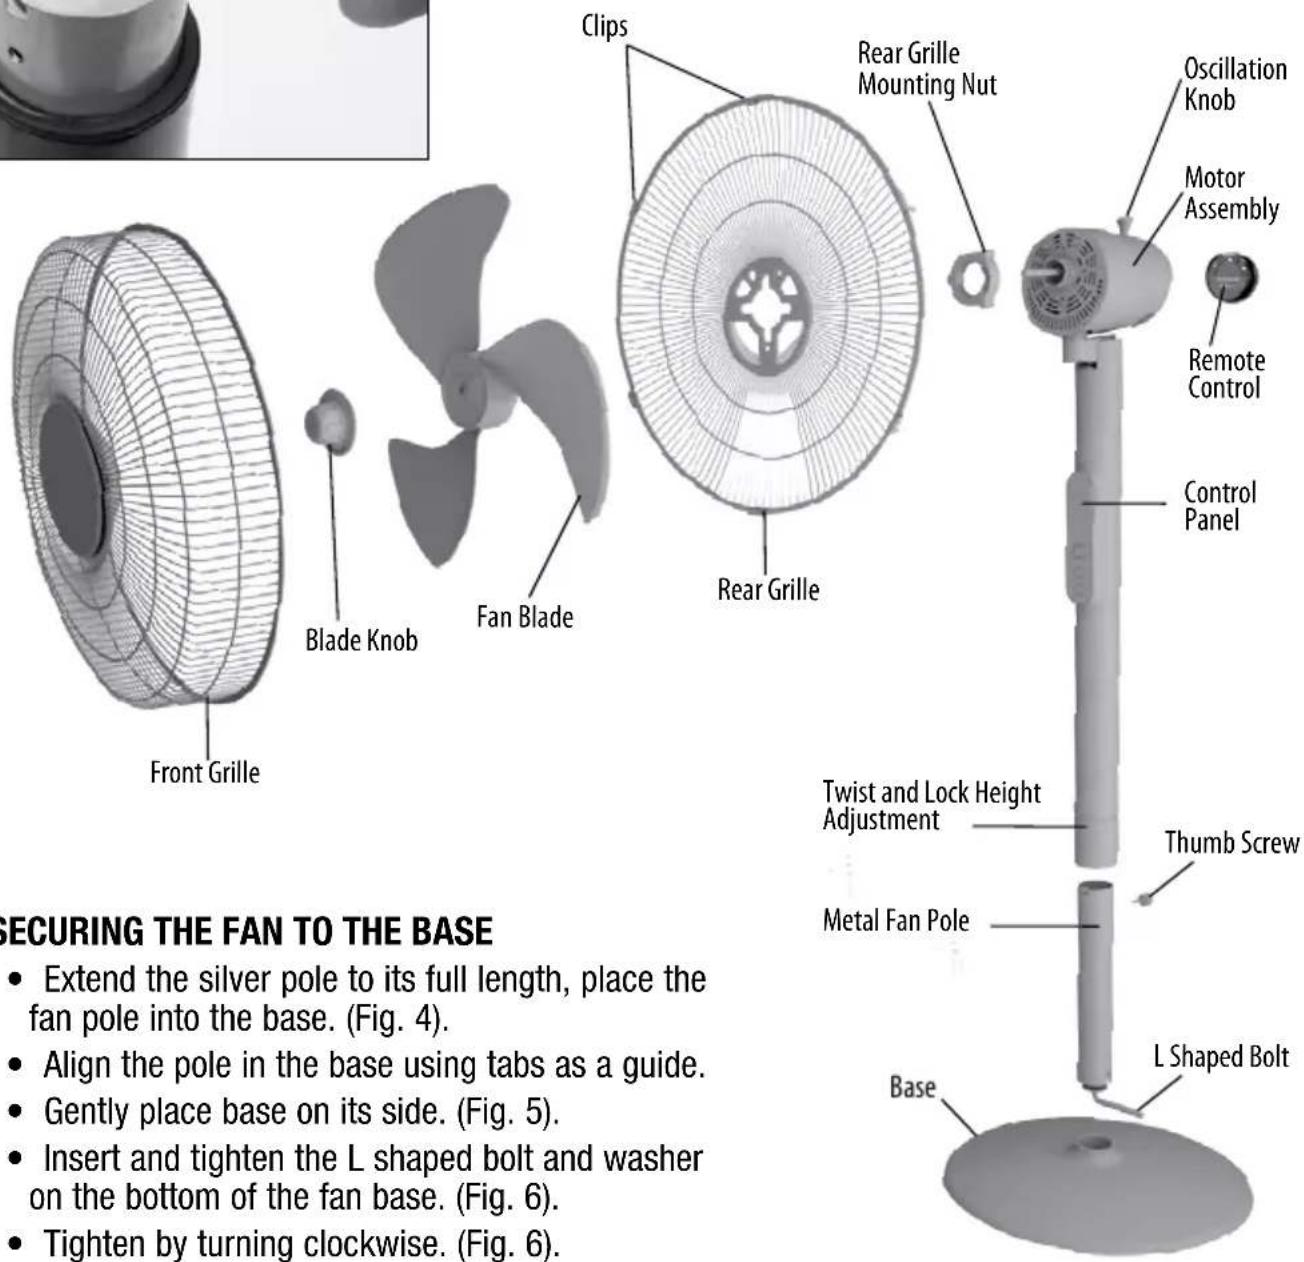
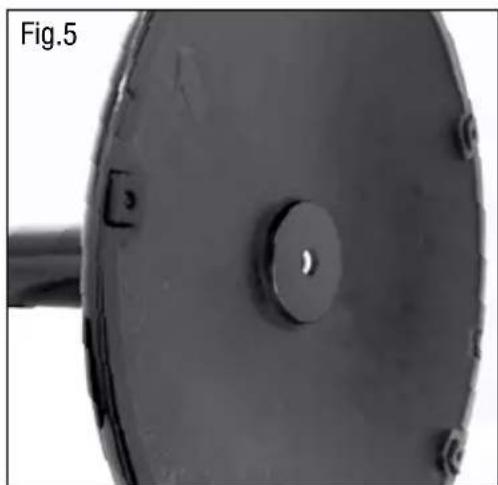
B. SECURING THE FAN TO THE BASE
- Extend the silver pole to its full length, place the fan pole into the base. (Fig. 4).
- Align the pole in the base using tabs as a guide.
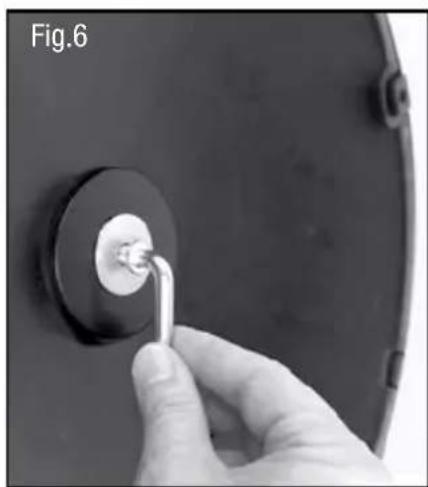
Gently place base on its side. (Fig. 5). - Insert and tighten the L shaped bolt and washer on the bottom of the fan base. (Fig. 6).
- Tighten by turning clockwise. (Fig. 6).

ASSEMBLY INSTRUCTIONS (continued)
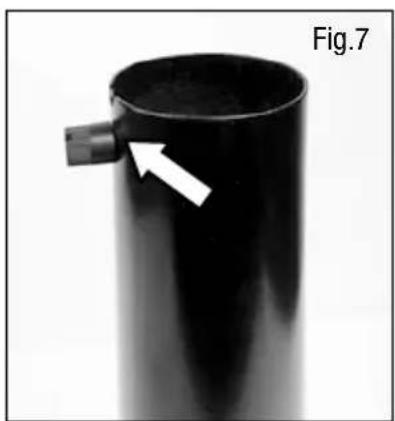
C. ASSEMBLING THE UPPER PORTION OF THE FAN
- Remove the thumb screw from the lower portion of the fan motor assembly by turning it counter-clockwise (Fig. 7)
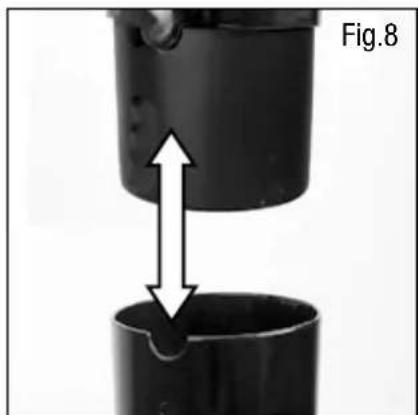
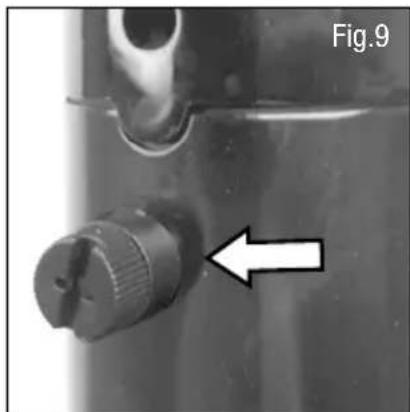
- Insert the Fan Motor Assembly into the Fan Pole (Fig. 8), once both halves are aligned reinsert the thumb screw (Fig. 9) and tighten by turning clockwise.
- Circular Rear Grille Mounting Nut will come attached to the Motor Assembly. Remove it by turning COUNTER-CLOCKWISE. You will re-attach the Rear Grille Mounting Nut later (Fig. 10).
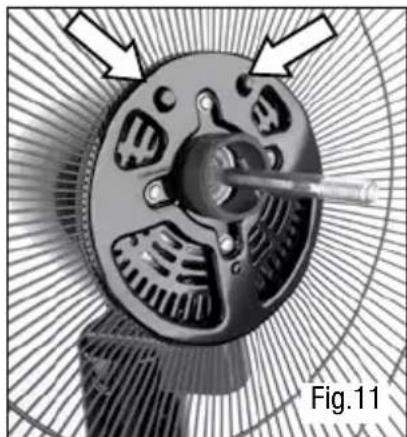
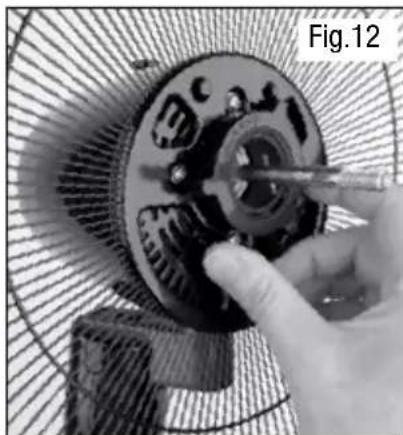
- Place the Rear Grille onto the Motor Housing, making sure the 2 holes in the center of the Rear Grille fit over the 2 raised knobs on the Motor Housing (Fig. 11). Now place the Rear Grille Mounting Nut onto the center of the fan, and tighten by turning it CLOCKWISE (Fig. 12).

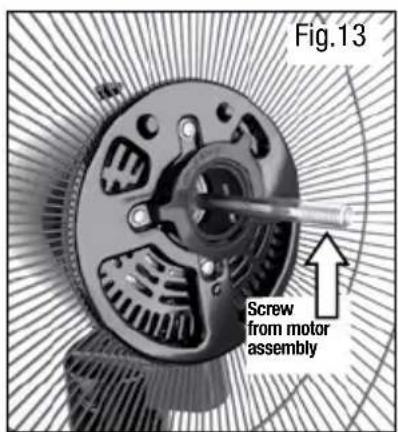
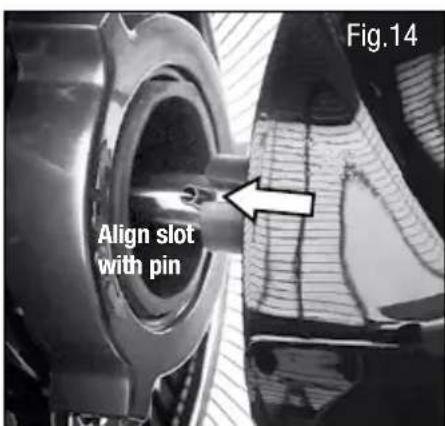
- Align hole in center of Fan Blade with the screw extending from the Motor Assembly (Fig. 13). Make sure that the 2 slots on the back of the Fan Blade align with the bars extending from the shaft surrounding the screw attached to the Motor Assembly. (Fig. 14). Then push the Fan Blade into place.
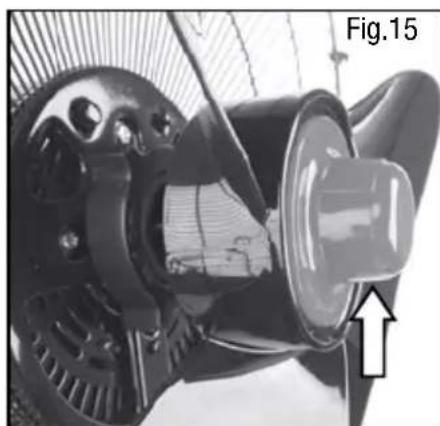
- Attach the blade knob on the center of the fan, tighten by turning COUNTER CLOCKWISE (Fig. 15).
ASSEMBLY INSTRUCTIONS (continued)
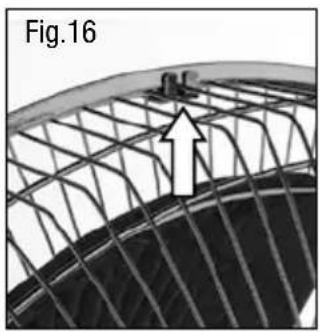
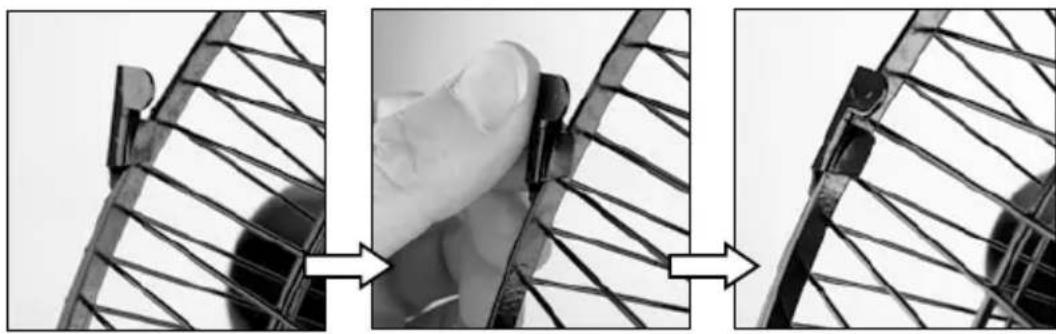
- Properly align the Front Grille with the Rear Grille (Fig. 16). To secure the Front Grille onto the fan, raise the built-in clips around the Front Grille and fasten these clips onto the Rear Grille.
D. DETERMINING THE HEIGHT OF THE FAN
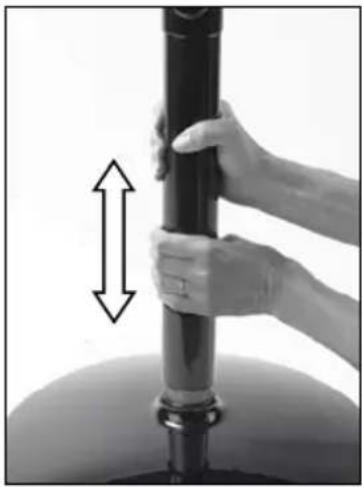
The unique Twist & Lock™ height adjustment feature lets you choose the perfect height for your cooling needs. Twist the top pole and either pull up or push down to find your ideal height then twist again to lock in place. (see label on back of fan pole);
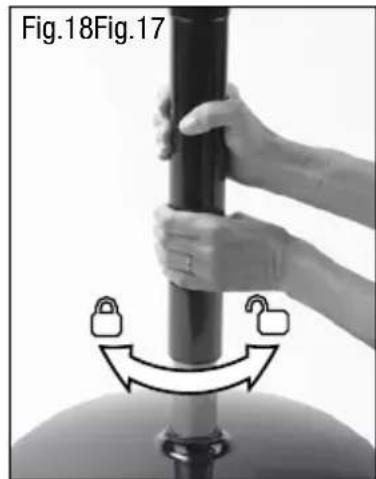
- Securely grasp the top portion of the pole and twist counter clockwise to unlock.
- Pull up or push down to adjust height (placing your foot or hand gently on the base will help with the height adjustment) (Fig 17).
Once you have selected the desired height, twist clockwise until you feel the pole lock into place. (Fig 18).
DO NOT USE THE SCREW on the pole for height adjustment.
REMOTE CONTROL BATTERY INSTALLATION/REPLACEMENT INSTRUCTIONS
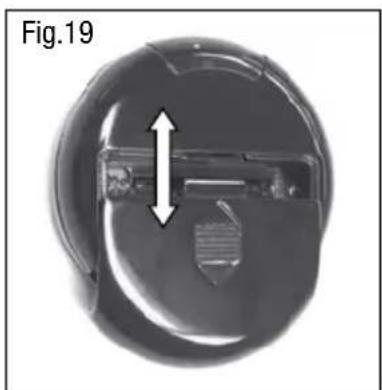
A. Remove battery door by sliding downward in direction of arrow.
B. Insert 2 AAA batteries (not included) into the remote following the directional guides in the recessed slots (Fig. 19).
C. Replace battery door by sliding upward opposite of arrow direction until door snaps in place.
NOTE: DO NOT MIX OLD AND NEW BATTERIES. DO NOT MIX ALKALINE, STANDARD (CARBON-ZINC) OR RECHARGEABLE (NICKEL-CADMIUM)BATTERIES.
SEE RECYCLERS IN YOUR AREA FOR PROPER DISPOSAL OF BATTERIES.
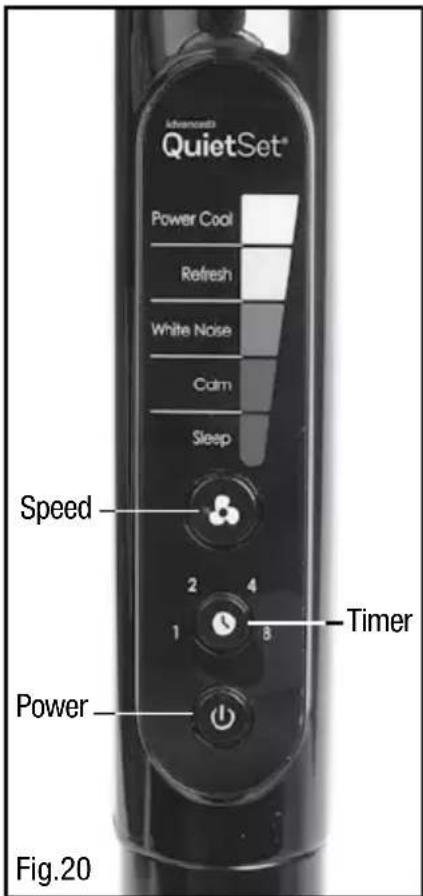
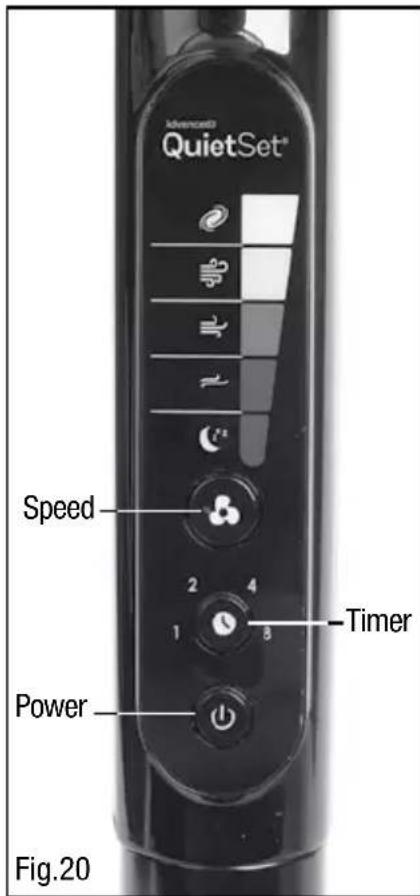
To turn fan on, press the Power button (O) located at the bottom of the control panel (Fig. 20).
SPEED CONTROL
To adjust the speed up or down, press the Fan Speed button (A) repeatedly to increase level (Fig. 20).
TIMER
Choose from 1, 2, 4, or 8 hour settings by performing the following function (Fig. 20):
1 hour: Press the Timer button (O) once.
2 hours: Press the Timer button twice.
4 hours: Press the Timer button a third time.
8 hours: Press the Timer button a fourth time.
Press the Timer button a fifth time to turn the Timer feature off.
Model HSF600B, HSF600W
Model HSF600BC, HSF600WC
AUTO DIM LIGHT FEATURE
Control panel light automatically dims to 50% brightness after 15 seconds and resumes to 100% brightness when settings are changed.
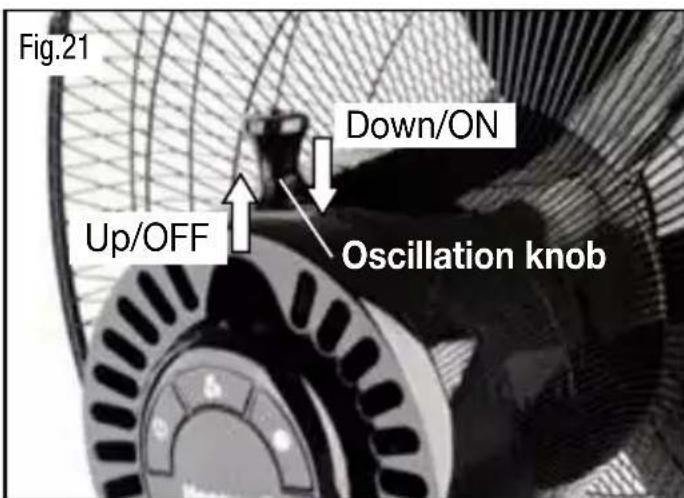
OSCILLATION
- Oscillation Knob is located on the top panel of the Motor Housing.
- To START fan oscillation, push the Oscillation Knob DOWN.
- To STOP fan oscillation, pull the Oscillation Knob UP. (Fig. 21).
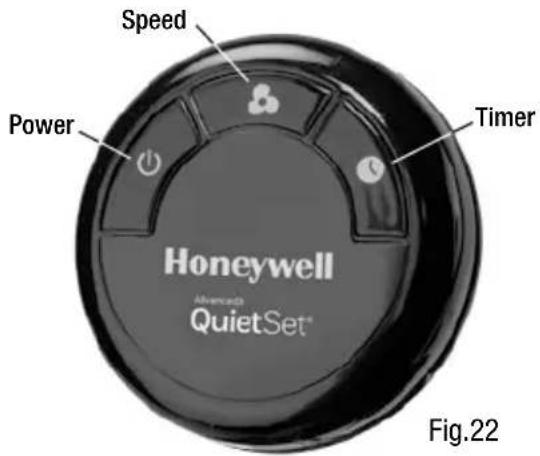
Remove remote control from the back of the fan. The remote control will not work while in the fan housing. Press the Power button (O) once to turn the fan on. Press the Power button a second time to turn the fan off (Fig.22).
SPEED CONTROL
To adjust the speed up or down, press the Fan Speed button (A) repeatedly to increase level.
TIMER
Choose from 1, 2, 4, or 8 hour settings by performing the following function (Fig.22):
1 hour: Press the Timer button (once.
- 2 hours: Press the Timer button twice.
- 4 hours: Press the Timer button a third time.
- 8 hours: Press the Timer button a fourth time.
Press the Timer button a fifth time to turn the Timer feature off (Fig. 22).
USERServICINGINSTRUCTIONS
CLEANING AND STORAGE
- Be sure your fan is in the OFF position.
- Unplug the fan before cleaning.
- Use only a soft, damp cloth to gently wipe the fan clean.
- DO NOT immerse the fan in water and never allow water to enter the Motor Housing.
DO NOT use gasoline, paint thinner or other chemicals to clean the fan.
REMOVAL OF THE FRONT GRILLE FOR CLEANING
- Remove the Front Grille by releasing the Grille clips.
- Unscrew the Blade Knob by turning it CLOCKWISE (REVERSE THREAD).
Pull the Fan Blade away from the Motor Housing.
Gently wipe the Fan Blade and Grilles with a soft, damp cloth. - Assemble the fan by following the last three steps in the ASSEMBLY INSTRUCTIONS.
STORAGE
- For storage disassemble and clean the fan carefully as instructed. Store the fan in its original box. You may also leave the fan fully assembled and covered with plastic to protect it from dust. Store your fan in clean, dry place.
CONSUMER RELATIONS
CUSTOMER SERVICE
Questions or Comments
Call us toll-free at: 1-800-477-0457
E-mail: consumerrelations@kaz.com
Or visit our website at: www.HoneywellPluggedIn.com/fans
Please be sure to specify model number.
1 YEAR LIMITED WARRANTY
You should first read all instructions before attempting to use this product.
A. This 1 year limited warranty applies to repair or replacement of product found to be defective in material or workmanship. This warranty does not apply to damage resulting from commercial, abusive, unreasonable use or supplemental damage. Defects that are the result of normal wear and tear will not be considered manufacturing defects under this warranty. KAZ IS NOT LIABLE FOR INCIDENTAL OR CONSEQUENTIAL DAMAGES OF ANY NATURE. ANY IMPLIED WARRANTY OF MERCHANTABILITY OR FITNESS FOR A PARTICULAR PURPOSE ON THIS PRODUCT IS LIMITED IN DURATION TO THE DURATION OF THIS WARRANTY.
Some jurisdictions do not allow the exclusion or limitation of incidental or consequential damages or limitations on how long an implied warranty lasts, so the above limitations or exclusions may not apply to you. This warranty gives you specific legal rights, and you also may have other rights which vary from jurisdiction to jurisdiction. This warranty applies only to the original purchaser of this product from the original date of purchase.
B. At its option, Kaz will repair or replace this product if it is found to be defective in material or workmanship.
C. This warranty does not cover damage resulting from any unauthorized attempts to repair or from any use not in accordance with the instruction manual.
Call us toll-free: 1-800-477-0457 or e-mail: consumerrelations@kaz.com
Please be sure to specify a model number located on the box and the back and bottom of your unit.
To register your product, please go to www.honeywellpluggedin.com/register to register your product under the Customer Care Center and receive product information updates and new promotional offers.
NOTE: IF YOU EXPERIENCE A PROBLEM, PLEASE CONTACT CONSUMER RELATIONS FIRST OR SEE YOUR WARRANTY. DO NOT RETURN THE PRODUCT TO THE ORIGINAL PLACE OF PURCHASE. DO NOT ATTEMPT TO OPEN THE MOTOR HOUSING YOURSELF, DOING SO MAY VOID YOUR WARRANTY AND CAUSE DAMAGE TO THE PRODUCT OR PERSONAL INJURY.

VENTILATEUR SUR PIED DE POINTE QUIETSETMD POUR UNE PIECE ENTIÈRE
MISE EN MARCHE/ARRET
Honeywell is a trademark of Honeywell International Inc., used under license by Helen of Troy Limited. Honeywell International Inc. makes no representation or warranties with respect to this product.
© 2016 All rights reserved.
Kaz USA, Inc., a Helen of Troy Company
Marlborough, MA 01752
Imported and Distributed by: Kaz Canada Inc., a Helen of Troy Company
6700 Century Avenue, Suite 210, Mississauga, Ontario L5N 6A4
Contact us at 1-800-477-0457 or www.honeywellpluggedin.com/fans
For Responsible recycling, please visit:
RECYCLE NATION
www.RecycleNation.com
www.RecycleNation.com
Helen of Troy
CREATIVE DEPARTMENT ARTWORK SPECIFICATIONS
Brand: Honeywell
Category: Fans
Model: HSF600 Series
Artwork Part #: A001013R2
Die Line Part #: NA
Oracle Desc.: OWNER'S MANUAL, KAZ Artwork HSF600 Series
Subject: Owners Manual
Region:US,CA
Flat Size: IN: W 11 x H 8
MM: W x H
Folded Size: W 5.5 x H 8
Scale: 1/1
Material: 70g wood paper
Page count: 28
Revision: 12
Date: 17FEB17
Release Date: 16NOV16
Rerelease Date: 17FEB17
Colors:
Dielines (Do not print)
Black 100%

Quality Requirement of Artwork and Quality Clarification Process of Artwork Printing: Meet Eng-QS-06&02
Kaz USA, Inc., a Helen of Troy Company Creative Services
Marlborough, MA 01752, USA
+1 508 490 7000

- ADVANCED QUIETSET® WHOLE ROOM STAND FAN with Noise Reduction Technology HSF600 Series
- IMPORTANT SAFETY INSTRUCTIONS READ AND SAVE THESE SAFETY INSTRUCTIONS BEFORE USING THIS FAN
- FUSED SAFETY PLUG - FOR US MODELS ONLY
- USER SERVICING INSTRUCTIONS
- BASE ASSEMBLY
- SECURING THE FAN TO THE BASE
- ASSEMBLY INSTRUCTIONS (continued)
- ASSEMBLING THE UPPER PORTION OF THE FAN
- DETERMINING THE HEIGHT OF THE FAN
- REMOTE CONTROL BATTERY INSTALLATION/REPLACEMENT INSTRUCTIONS
- SPEED CONTROL
- TIMER
- AUTO DIM LIGHT FEATURE
- OSCILLATION
- USERServICINGINSTRUCTIONS
- CLEANING AND STORAGE
- REMOVAL OF THE FRONT GRILLE FOR CLEANING
- STORAGE
- CONSUMER RELATIONS
- CUSTOMER SERVICE
- Questions or Comments
- YEAR LIMITED WARRANTY
- You should first read all instructions before attempting to use this product.
- VENTILATEUR SUR PIED DE POINTE QUIETSETMD POUR UNE PIECE ENTIÈRE
- MISE EN MARCHE/ARRET
- RECYCLE NATION
- Helen of Troy
- CREATIVE DEPARTMENT ARTWORK SPECIFICATIONS
- Model: HSF600 Series
- Colors:
Brand : HONEYWELL
Model : HSF600W
Category : Fan