
HES200 - Camera PANASONIC - Free user manual and instructions
Find the device manual for free HES200 PANASONIC in PDF.
User questions about HES200 PANASONIC
0 question about this device. Answer the ones you know or ask your own.
Ask a new question about this device
Download the instructions for your Camera in PDF format for free! Find your manual HES200 - PANASONIC and take your electronic device back in hand. On this page are published all the documents necessary for the use of your device. HES200 by PANASONIC.
USER MANUAL HES200 PANASONIC
Operating Instructions
INTERCHANGEABLE LENS FOR DIGITAL CAMERA
Model No. H-ES200
Lumix
Please read these instructions carefully before using this product, and save this manual for future use.

MICRO FOURTHRDS
POWER
0.I.S.

LEICA
OGELMARIT

NANO
SURFACE COATING

SPLASH/DUST PROOF
EBC
DVQX1304ZB
F1017KD1058
Contents
Information for Your Safety 2
Precautions. 3
Supplied Accessories 4
Names and Functions of Components 5
Attaching/Detaching the Lens 6
Attaching/Removing the 1.4× Teleconverter 7
Focus Preset Function 8
Using the Tripod Mount 9
Cautions for Use. 10
Troubleshooting 10
Specifications 11
Information for Your Safety
Keep the unit as far away as possible from electromagnetic equipment (such as microwave ovens, TVs, video games, radio transmitters, high-voltage lines etc.).
- Do not use the camera near cell phones because doing so may result in noise adversely affecting the pictures and sound.
- If the camera is adversely affected by electromagnetic equipment and stops functioning properly, turn the camera off and remove the battery and/or the connected AC adaptor. Then reinsert the battery and/or reconnect the AC adaptor and turn the camera on.
DVQX1304
The lens can be used with a digital camera compatible with the lens mount standard for the "Micro Four Thirds™ System".
- It cannot be mounted on the Four Thirds™ mount specification camera.
- The digital camera illustrations in these operating instructions show DC-G9 as an example.
- The appearance and specifications of products described in this manual may differ from the actual products you have purchased due to later enhancements.
- Micro Four Thirds™ and Micro Four Thirds Logo marks are trademarks or registered trademarks of Olympus Corporation, in Japan, the United States, the European Union and other countries.
- Four Thirds™ and Four Thirds Logo marks are trademarks or registered trademarks of Olympus Corporation, in Japan, the United States, the European Union and other countries.
- G MICRO SYSTEM is an interchangeable lens type digital camera system of LUMIX based on a Micro Four Thirds System standard.
- LEICA is a registered trademark of Leica Microsystems IR GmbH. ELMARIT is a registered trademark of Leica Camera AG. The LEICA DG lenses are manufactured using measurement instruments and quality assurance systems that have been certified by Leica Camera AG based on the company's quality standards.
- Other names of systems and products mentioned in these instructions are usually the registered trademarks or trademarks of the manufacturers who developed the system or product concerned.
-If you see this symbol
Disposal of Old Equipment
Only for European Union and countries with recycling systems

This symbol on the products, packaging, and/or accompanying documents means that used electrical and electronic products must not be mixed with general household waste.
For proper treatment, recovery and recycling of old products, please take them to applicable collection points in accordance with your national legislation. By disposing of them correctly, you will help to save valuable resources and prevent any potential negative effects on human health and the environment. For more information about collection and recycling, please contact your local municipality. Penalties may be applicable for incorrect disposal of this waste, in accordance with national legislation.
Precautions
Lens Care
-
This lens has a dust-proof and splash-proof construction. When using it, please be careful of the following. If the lens is not working properly, consult the dealer or your nearest Service Centre.
-
Please attach the lens to a dust-proof and splash-proof digital camera. The lens is not designed to be dust-proof
ENGLISH
and splash-proof when attached to a digital camera without dust-proofing and splash-proofing.
- When attaching or removing the lens, be careful so that foreign materials such as sand, dust, and water droplets do not adhere to or enter the lens mount rubber, contact points, digital camera and lens.
- This lens is not waterproof and cannot be used to record underwater. For splash-proofing, the lens is constructed to resist the entry of water. If splashes of water etc. do adhere to the lens, wipe after use with a soft dry cloth.
- To improve the dust-proofing and splash-proofing of this lens, a lens mount rubber is used in the mounting portion. After changing the lens a number of times, you may find that the lens mount rubber has marked the mount portion of the digital camera body, which does not affect its performance.
For information on changing the lens mount rubber, contact your nearest Service Centre. - Do not press the lens with excessive force.
-
When there is dirt (water, oil, and fingerprints, etc.) on the surface of the lens, the picture may be affected. Lightly wipe the surface of the lens with a soft, dry cloth before and after taking pictures.
-
To prevent dust and other particles from accumulating on or entering the lens, attach the lens rear cap when the lens is not in use.
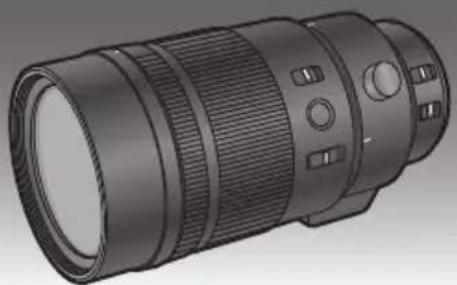
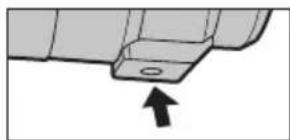
- To protect the lens contact points ①, do not place the lens with its mount surface facing down. In addition, do not allow the lens contact points to become dirty.
About Condensation (Fogging of the Lens)
- Condensation occurs when the ambient temperature or humidity changes. Please be careful, as it may cause the lens to become dirty and lead to mould and malfunctioning.
- If condensation occurs, turn the power off and leave it for about two hours. Once the camera acclimatizes to the surrounding temperature the condensation will go away naturally.
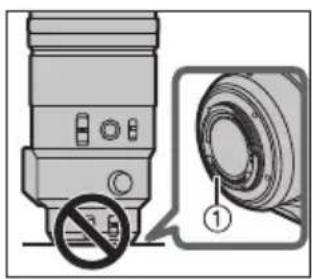
Supplied Accessories
Product numbers correct as of November 2017. These may be subject to change.
DMW-TC14*1
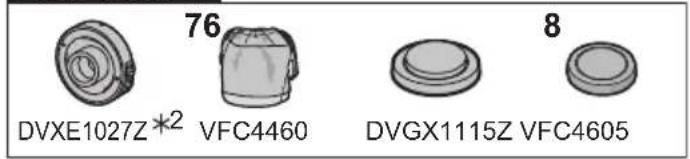
1 Lens Pouch
6 1.4× Teleconverter
2 Lens Hood
7 Lens Pouch
3 Lens Cap
8 Lens Cap
4 Lens Rear Cap
9 Lens Rear Cap
5 External tripod mount
1 The 1.4 × Teleconverter (DMW-TC14) is scheduled to be sold as an optional accessory.
2 It is available for purchase as a package that includes a lens cap and a lens rear cap.
- The lens rear cap and lens cap are attached to the interchangeable lens and 1.4 × Teleconverter at the time of purchase.
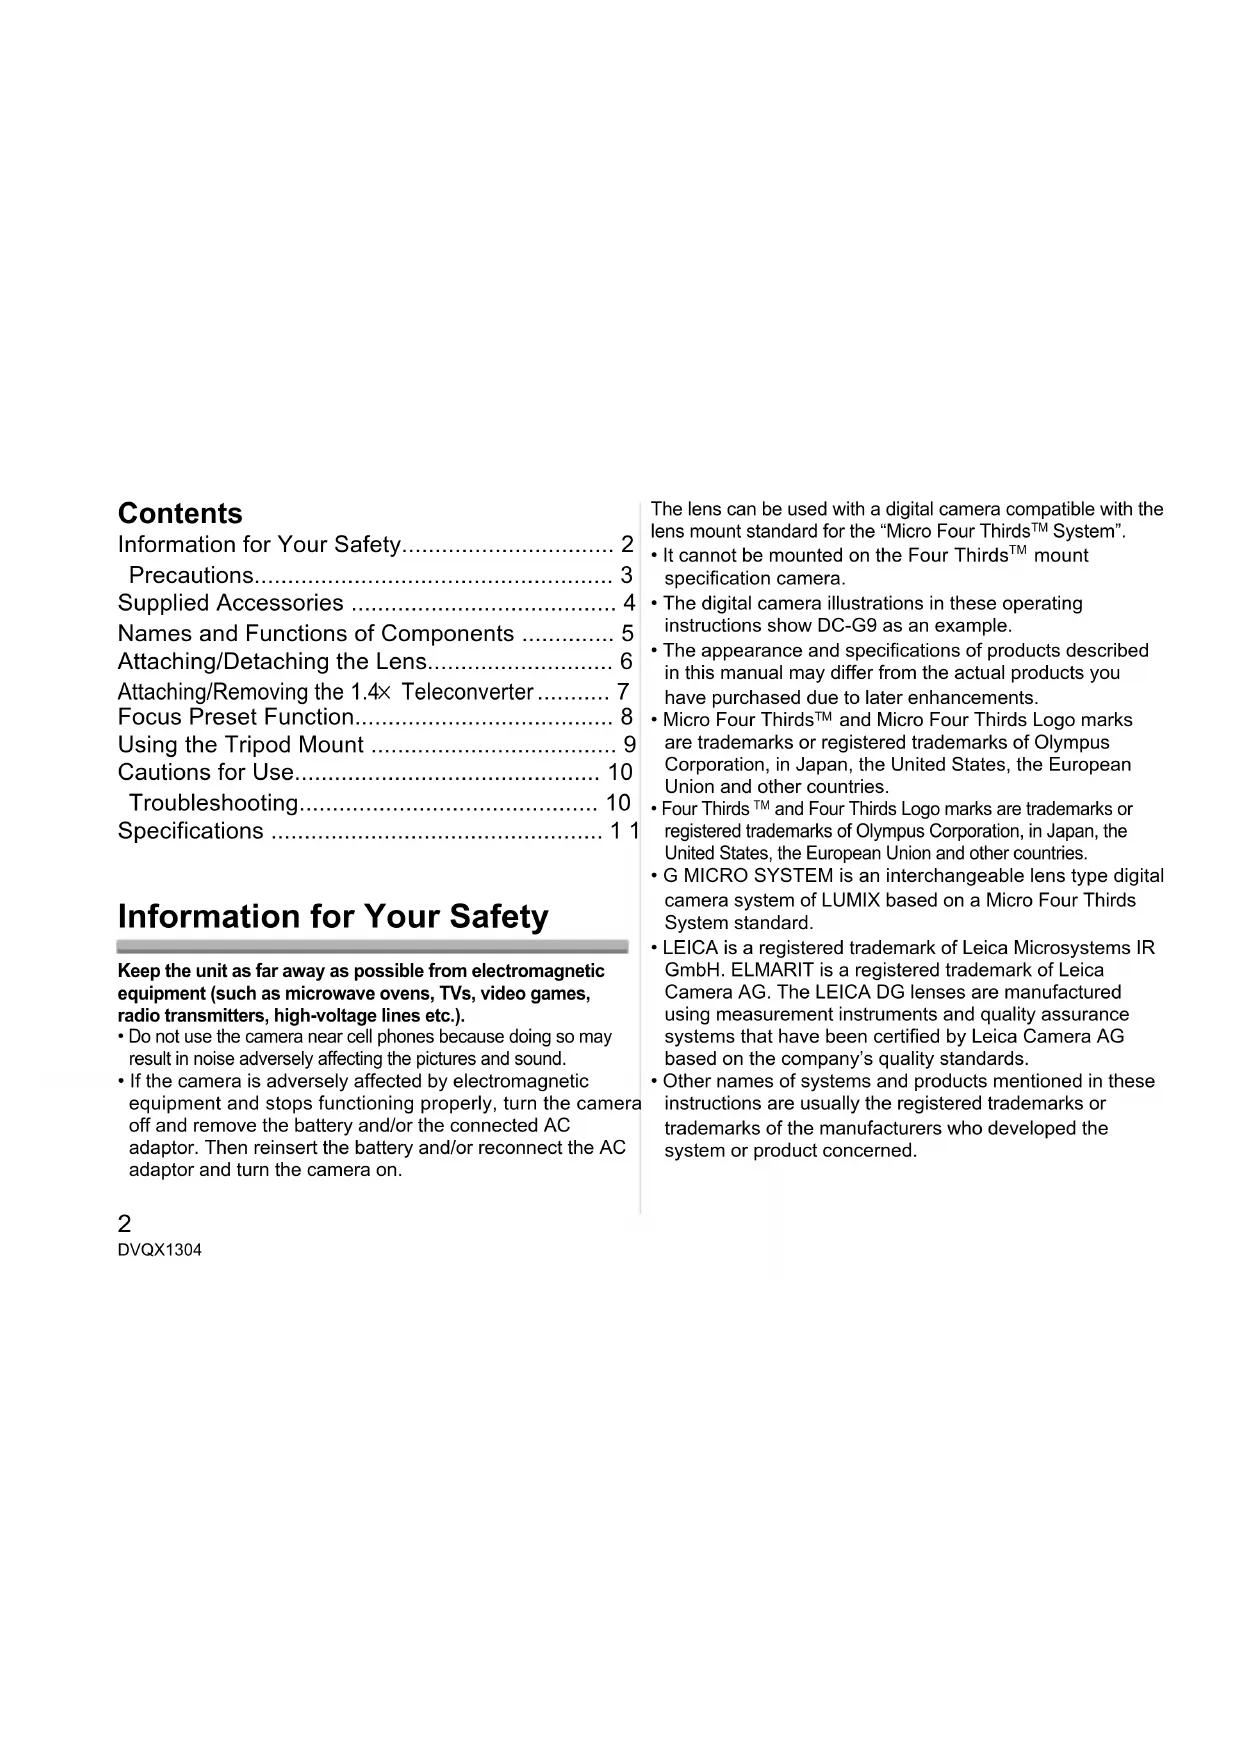
Names and Functions of Components
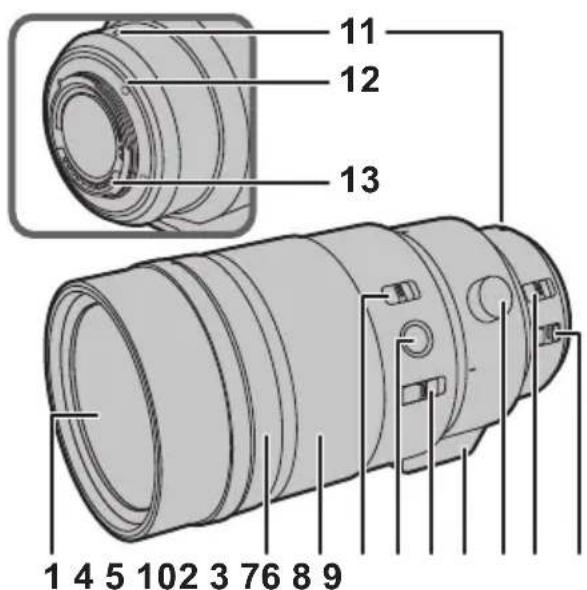
1 Lens surface
2 Aperture ring
Rotate this to adjust the aperture value.
- If you set the camera to Aperture-Priority AE Mode or Manual Exposure Mode, the aperture value of the ring will be enabled.
- If you set the position of the aperture ring to [A], the aperture value of the camera will be enabled.
3 Focus ring
Rotate to focus when taking pictures with manual focus (MF).
4 Focusing distance range selector switch
[FULL]: It can focus between the ranges of 1.15 m (3.8 feet) to .
[3m-∞]: It can focus between the ranges of 3.0 m (9.8 feet) to . The speed of focusing with auto focus will be faster.
5 Focus button (P8)
6 Focus selector switch (P8)
7 Tripod mount (P9)
8 Orientation locking knob (P9)
9 [AF/MF] switch
This allows you to switch between Auto Focus (AF) and Manual Focus (MF).
- When either the [AF/MF] switch of the lens or the setting of the camera is set to [MF], Manual Focus (MF) is enabled.
10 O.I.S. switch
When the lens is attached to the camera the stabiliser function is set to activate if the O.I.S. switch is set to [ON].
- We recommend setting the O.I.S. switch to [OFF] when using a tripod.
11 Lens fitting mark
12 Lens mount rubber
13 Contact points

Note
- Operational sound may be recorded when Auto Focus is operated while recording a motion picture. If the sound bothers you, we recommend performing recording with a function such as Manual Focus (MF) to lock the focus.
- If you set the O.I.S. to [ON] when recording a motion picture, operating sounds may be recorded. If they become bothersome, we recommend setting the O.I.S. switch to [OFF] and mounting the camera on a tripod.
1.4×Teleconverter
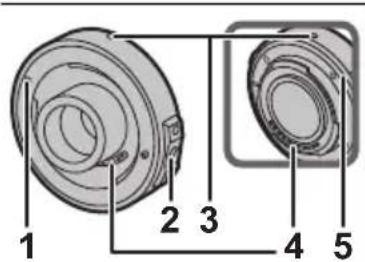
1 Fitting mark
2 Lens release button
3 Lens fitting mark
4 Contact points
5 Lens mount rubber
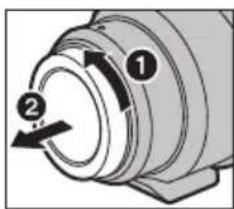
Attaching/Detaching the Lens
For information on how to attach and remove the lens, refer to the operating instructions for your digital camera.
- Before attaching or detaching the lens, check that the digital camera is turned off.
Before attaching the lens to the digital camera, remove the lens rear cap. (1, 2)
- To prevent dust and other particles from accumulating on or entering the lens, be sure to attach the lens cap/lens rear cap after detaching the lens from the digital camera.
Attaching Filters
- If you use two or more filters at the same time, part of a recorded image may darken.
- It is possible to attach the lens cap or the lens hood with the filter already attached.
- It is not possible to attach a conversion lens or adaptor to the lens surface and use it in combination with this lens. Do not attach any items other than filters. Doing so may result in lens damage.
Attaching the Lens Hood
1 Rotate the lens hood screw in the direction of the arrow to loosen it ( ①).
2 Insert the lens hood until it stops (2).
3 Rotate the lens hood screw in the direction of the arrow to fasten the lens hood securely (3).

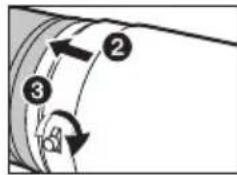

Note
- When using the lens with the lens hood, check if the lens hood screw has become loose.
- When taking pictures with the flash with the lens hood attached, the lower portion of the screen may turn dark and the control of the flash may be disabled because the photo flash may be obscured by the lens hood. We recommend detaching the lens hood.
- When carrying, the lens hood can be temporarily attached in the reverse direction.
- Do not carry the lens by holding only the lens hood.

Attaching/Removing the 1.4 × Teleconverter
The teleconverter can be used in combination with this lens (H-ES200). (As of November 2017)
- For the most up-to-date information on compatible lenses, other than this lens, check the Panasonic website.
- Do not attach any parts other than a compatible lens. Doing so may damage the lens or teleconverter or adversely affect its performance.
- Before attaching or removing the teleconverter, verify that the digital camera is turned off.
- Remove the lens cap and the lens rear cap.
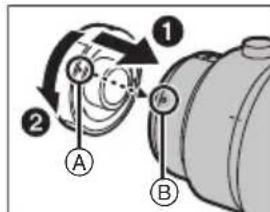
To attach the teleconverter
1 Align the fitting mark A on the teleconverter with the lens fitting mark B on the lens 1), and rotate the teleconverter in the arrow direction until a clicking sound is heard.2
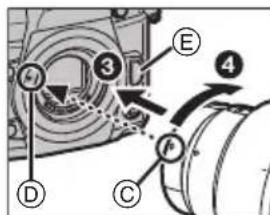
2 Align the lens fitting mark ⑤ on the teleconverter with the lens fitting mark ⑦ on the digital camera () , and rotate the lens in the arrow direction until a clicking sound is heard.
- When attaching the lens to the digital camera, do not press the lens release button (E) and the lens release button on the teleconverter.
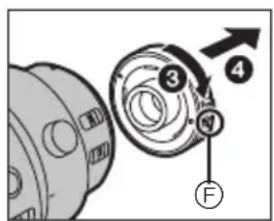
To remove the teleconverter
1 While pressing and holding the lens release button ⑥ on the digital camera, rotate the lens fitted with the teleconverter in the arrow direction until it stops and remove it (1, 2).
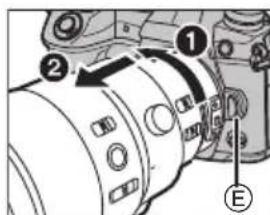
2 While pressing and holding the lens release button on the teleconverter, rotate the teleconverter in the arrow direction until it stops and remove it (3, 4).

Note
- When the teleconverter is mounted, the aperture will be set to a value one step greater than the index value on the aperture ring.
- When updating the lens firmware to the latest version, remove the teleconverter before performing the update.
Focus Preset Function
You can call up a focus position stored in the memory of the lens. In addition, the focus can be locked.
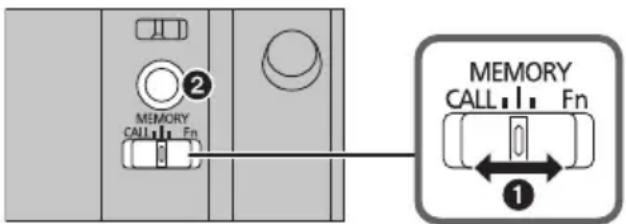
(To store a focus position in the lens memory)
1 Set the focus selector switch to [MEMORY] (1).
2 Adjust the focus to the position you want to store in the memory.
3 Press the focus button (2) to store the focus position in the memory.
- The focus position stored in the memory will remain in effect until you store a new position in the memory.
(To call up the focus position stored in the memory)
4 Set the focus selector switch to [CALL] (1).
5 Press the focus button (2) to call up the focus position stored in the memory. - [MF] is temporarily enabled while the focus button is pressed and held.
- Even when the focusing distance range selector switch is set to [3m - ] , a focus position within the 3.0m range can be called up. If you release the focus button, however, the focus position will move to the limit position (3.0m) .
- We recommend setting the focusing distance range selector switch to [FULL] when using the focus preset function.
Locking the focus
1 Set the focus selector switch to [Fn] (1).
2 Press the focus button (2).
- The focus is locked while the focus button is pressed and held.
- You can also call up a function set on a digital camera that supports the [Fn] function.

Note
- Before removing the lens, verify that the digital camera is turned off. If the lens is removed while the digital camera is turned on, the focus position will not be stored in the memory.
Using the Tripod Mount
When using a tripod, attach it to the tripod mount of the lens.
We recommend that you avoid attaching the tripod to the tripod mount of the digital camera to prevent lens
damage that may occur when carrying the lens.
-
In the following cases, before attaching a tripod, attach the supplied external tripod mount to the lens:
-
When the lens or digital camera comes in contact with the tripod
-
When a battery grip that comes in contact with the tripod is used
Attaching the external tripod mount (supplied)
1 Insert the external tripod mount attachment screw into the tripod mount of the lens. (1)
2 Rotate the external tripod mount attachment screw in the direction of the arrows to fasten it firmly.
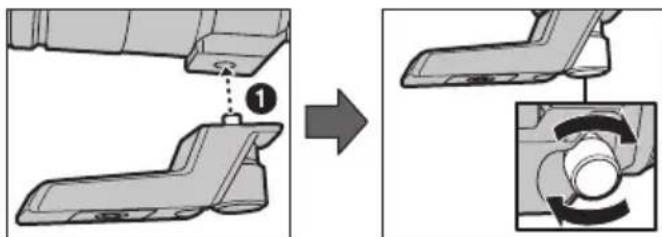
-
Check that the external tripod mount attachment screw is not loose before use.
-
Do not strike or apply strong pressure to the external tripod mount.
Changing the vertical/horizontal orientation
You can loosen the orientation locking knob (1) to rotate the lens together with the digital camera (2).
This way, you can quickly switch between the vertical and horizontal orientation while the tripod is in use.
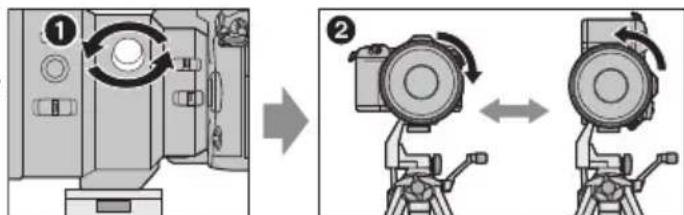
After changing the orientation, tighten the orientation locking knob firmly and check that it is not loose.
Cautions for Use
Take care not to drop or knock the lens. Also take care not to put a lot of pressure on the lens.
- Take care not to drop the bag that you inserted the lens in as it may strongly shock the lens. The camera may stop operating normally and pictures may no longer be recorded. Also, the lens may be damaged.
- When carrying the digital camera with the lens attached, hold both the digital camera and the lens.
When using pesticides and other volatile substances around the camera make sure that they do not get onto the lens.
- If such substances get onto the lens they can damage the exterior case or cause the paint to peel.
Do not point the lens at the sun or other strong light sources.
- This could cause the lens to collect an excessive amount of light, resulting in fire and malfunction.
-
Avoid using or storing the lens in any of the following locations as this may cause problems in operation or malfunctioning:
-
In direct sunlight or on a beach in summer
- In locations with high temperatures and humidity levels or where the changes in temperature and humidity are acute
- In locations with high concentrations of sand, dust or dirt
-Where there is fire - Near heaters, air conditioners or humidifiers
-Where water may make the unit wet
-Where there is vibration - Inside a vehicle
Refer also to the operating instructions of the digital camera.
- When the unit is not going to be used for a prolonged period, we recommend storing with a desiccant (silica gel). Failure to do so may result in performance failure caused by mold, etc. It is recommended that you check the unit's operation prior to use.
- Do not leave the lens in contact with rubber or plastic products for extended periods of time.
- Do not touch the lens contact point. Doing so can cause failure of the unit.
- Do not disassemble or alter the unit.
Do not use benzine, thinner, alcohol or other similar cleaning agents to clean the lens glass or exterior cabinet.
- Using solvents can damage the lens or cause the paint to peel.
- Wipe off any dust or fingerprints with a soft, dry cloth.
- Use a dry, dust cloth to remove dirt and dust on the lens mount rubber, focus ring, or aperture ring.
- Do not use a household detergent or a chemically treated cloth.
Troubleshooting
When I turn on or off the camera or when I shake the lens, I hear a sound, for example a rattling sound. When I take pictures of a bright subject, such as a subject outside, or when I take pictures with a large aperture value, the lens makes a sound.
- This is the sound of lens or aperture movement and is not a malfunction.
Specifications
Specifications are subject to change without notice.
| INTERCHANGEABLE LENS FOR DIGITAL CAMERA "LEICA DG ELMARIT 200 mm/F2.8/POWER O.I.S." | 1.4× Teleconverter | |
| Focal length | f=200 mm (35 mm film camera equivalent: 400 mm) | 1.4× that of the attached lens. |
| Aperture type | 9 diaphragm blades/circular aperture diaphragm | - |
| Maximum aperture | F2.8 (When the 1.4× Teleconverter is attached: F4.0) | - |
| Minimum aperture value | F22 (When the 1.4× Teleconverter is attached: F22) | - |
| Lens construction | 15 elements in 13 groups (2 ED lenses) | 6 elements in 4 groups |
| Nano surface coating Yes - | ||
| In focus distance | [FULL]: 1.15 m (3.8 feet) to ∞ / [3 m-∞]: 3.0 m (9.8 feet) to ∞ (from the focus distance reference line) | - |
| Maximum image magnification | 0.2× (35 mm film camera equivalent: 0.4×) | - |
| Optical image stabilizer | Available | - |
| O.I.S. switch | Available (Switching ON/OFF) | - |
| [AF/MF] switch | Available (Switching AF/MF) | - |
| Mount | "Micro Four Thirds Mount" | - |
| Angle of view | 6.2° (When the 1.4× Teleconverter is attached: 4.4°) | - |
| Filter diameter | 77 mm | - |
| Max. diameter | Ø87.5 mm (3.4 inch) | Ø58 mm (2.3 inch) |
| Overall length | Approx. 174 mm (6.9 inch) (from the tip of the lens to the base side of the lens mount) | Approx. 22 mm (0.87 inch) (from the tip of the lens to the base side of the lens mount) |
| Mass | Approx. 1245g (2.74 lb) (excluding the external tripod mount) | Approx. 120 g (0.26 lb) |
| Operating temperature | -10 °C to 40 °C (14 °F to 104 °F) | -10 °C to 40 °C (14 °F to 104 °F) |
| Dust-proof and splash-proof | Available | Available |
Panasonic Warranty
-
Subject to the conditions of this warranty Panasonic or its Authorised Service Centre will perform necessary service on the product, without charge for parts or labour, if in the opinion of Panasonic the product is found to have a manufacturing defect within one (1) year or (12 months) (the "warranty period") from the date of purchase appearing on your purchase receipt.
-
This warranty only applies to Panasonic products purchased in Australia and sold by Panasonic Australia, it's Authorised Distributors, or Dealers, and only where the products are used and serviced within Australia or its territories. Warranty cover only applies to the services that are carried out by a Panasonic Authorised Service Centre and only if valid proof of purchase is presented when the warranty service is requested.
-
This warranty only applies if the product has been installed and/or used in accordance with the manufacturer's recommendations (as noted in the operating instructions) under normal use and reasonable care (in the opinion of Panasonic). The warranty does not cover damage, malfunction or failure resulting from use of incorrect voltages, incorrect installation, accident, misuse, neglect, build-up of dirt or dust, abuse, maladjustment of customer controls, mains supply problems, thunderstorm activity, infestation by insects or vermin, tampering or repair by unauthorised persons (including unauthorised alterations), exposure to abnormally corrosive conditions, or any foreign object or matter having entered the product.
-
This warranty does not cover the following items unless the fault or defect existed at the time of purchase:
(a) Consumable parts (b) Covalent parts
(c) Worn or damaged parts (d) Information stored on Hard Disk Drives, Optical Discs, USB Devices, SD Cards, Tapes (e) DTV reception issues caused by TV Aerial / Cabling / Wall socket(s)
- Some products may be supplied with Ethernet connection hardware. The warranty is limited on such products and will not cover:
(a) Internet and or DLNA connection / setup related problems. (b) Access fees and or charges incurred for internet connection.
(d) Any indirect or consequential costs associated with the incorrect use or misuse of the hardware, its connection to the internet or any other device.
- To claim warranty service, when required, you should:
Contact Panasonic's Customer Care Centre on 132 600 for Service Centre information.
- Comm in the opening and acceptance times with the Authorised Service Centre that you choose.
- Then send or take the product to a Panasonic Authorised Service Centre together with your proof of purchase
Any freight and insurance costs associated with the transport of the product to and/or from your nearest Authorised Service Centre must be arranged and paid for by you.
- The warranties hereby conferred do not extend to, and exclude, any costs associated with the installation, deinstallation or re-installation of a product, including costs related to the mounting, de-mounting or remounting of any screen, (and any other ancillary activities), delivery, handling, freightiing, transportation or insurance of the product or any part thereof or replacement of and do not extend to, and exclude, any damage or loss occurring by reason of, during, associated with, or related to such installation, de-installation, re-installation or transit.
Panasonic Authorised Service Centres are located in major metropolitan areas and most regional centres of Australia,
product, please telephone our Customer Care Centre on 132600 or visit our website and use the Service Centre Locator. In addition to your rights under this warranty, Panasonic products come with consumer guarantees that cannot be excluded under the Australian Consumer Law. If there is a major failure with the product, you can reject the product and elect to have a refund or to have the product replaced or if you wish you may elect to keep the goods and be compensated for the drop in value of the goods. You are also entitled to have the product repaired or replaced if the product fails to be of acceptable quality and the failure does not amount to a major failure.
If there is a major failure in regard to the product which cannot be remedied then you must notify us within a reasonable period by contacting the Panasonic Customer Care Centre. If the failure in the product is not a major failure then Panasonic may choose to repair or replace the product and will do so in a reasonable period of time from receiving notice from you.
THIS WARRANTY CARD AND THE PURCHASE DOCKET (OR SIMILAR PROOF OF PURCHASE) SHOULD BE RETAINED BY THE CUSTOMER AT ALL TIMES
e assistance regarding warranty conditions or any other enquiries, please visit the Panasonic
Australia website www.panasonic.com.au or contact by phone on 132 605. If phoning in, please ensure you have your operating instructions available.
Panasonic Australia Pty. Limited
ACN 001 592 187 ABN 83 001 592 187
1 Innovation Road, Macauzio Park, NSW 21113
www.panasonic.com.au
PRO-031-F11 Issue: 5.0
Inhalt
10 Interruptor O.I.S.
XpaHnte np6op BdaJN OT nCTOCHNKOB 3JIeKTPOMarHTHO n3JIyueHn (HaNPmep, MKNPOBOJHOBbIX Neey, TeJeBn3OpOB, O6OpyDoBaHn dIa BnDeoHrp,
paDnonepeDaTmKOB, BBICOKOBOJbTHbIX JHHN N T.D.).
- He noIb3yItecb foToKaMepoB 65Jn3n COToBbIX TeJefoHOB, TaK KaK TeJeOhoHb MoYr Bbl3BaTb NOMEXN, OTPUaTeJIbHO Cka3bIbAIOuNEcRa Ha KaYeCTBe CHIMKOB u 3Byka.
- EcInKaMepa IOnDBepraetcH eratubHomy BInnaHHIO 3JIeKTPomarHHTHO n3JlyueHn INpecTaET pa60TaTb HOpMaIbHo, BblKnIOUHTe KaMepy, n3BNeKeNTe 6aTapeo n/ nnN IOdkHNoeHHbI CeTeBOI aDanTe npemeHHoro Toka.
3aTeM CHOBA BCTaBbTe 6aTapeH W/IN CHOBA NOKIOHNTe ceTeBOI aAnTep nepemEHORo TOKa N BKIOHNTe Kamepy.
ObekTNMOKETNCIOB3OBAbCcUΦpOBOKaMepo, COBmecTUMO Co cTaHApTOM KpeJIeHnO obekTNOB "Micro Four ThirdsTM System".
He npedycmTopeHa erO yctaHOBKa Ha foTOkAmepbI co CneuФkaunen KpEnnEnn Four Thirds TM.
Ha nIJIIOCTpaunx LcnpoBoi KaMepb I DaHbIX INHCTpyKuynx no 3KcNpyataun B KaueeTbe npmepa nokaah DC-G9.
BHeuHn BnCn CneunKauin npOyKTOB, OINcaHHbE BDaHHOM pyKOBOCTBE, MOrY OTJInuHaTbCaOT paKaTNUeCKHX npNo6peTeHHbIX npOyKTOB BBnDy 60Je e No3DHnx yJyUWeHn.
- Micro Four Thirds™ n 3HaKn IoroTnna Micro Four Thirds
- YBJIaIOTcY TOBapHbIMN 3HaKaAMN INN
- 3apeRicCTpnpoBaHHbIMN TOBapHbIMN 3HaKaAMN Olympus
Corporation B JAnOHIN, CoeDInHeHHbIX UToTax,
Ebponeckom CoO3e n dpynx cTpaHax.
Four Thirds n 3aKn norotuna Four Thirds ABnHOTc TOBapbIMN 3HaKaAMn INI 3apeNCTpnpoBaHHbIMN TOBapbIMN 3HaKaAMn Olympus Corporation B JnoHm, CoedInHeHHbIX UtaTax, Ebponeckom CoO3e n dpynx cTpaHax.
G MICROSYSTEM ABNReTcCnCTeMoI OBeKTHOB CMeHHOro Tnna Dnra UOpBoBix Kamep LUMIX,pa3pa6OtaHHoHa OCHObe cTaNapTa Micro Four Thirds System.
- LEICA Альперсда заразсдаховьим Товарьим 3нakOM
Leica Microsystems IR GmbH. ELMARIT Альперсда заразсдаховьим Товарьим 3нakOM Leica Camera AG.Оьектугы LEICA DG npoиьогятс с
Инользоваим ИмМерп用电ьх пиборови систем
КоHTрona Качева, captnфцлоровьх Leica Camera AG ha ochobe корпоратьх Тpeбованьи К可不是у.
Дугпе Ha3BaHnI CnCTeM n npOdyKTOB, yNOMaHTbIe B daHHo INHcTpykUIM NO 3KcNlYaTaUIM, O6bIuHO RAJIaHTcR 3apeINCTpnpOBaHHbIMN TOBapHbIMN 3HaKaAMn INI IN TOBapHbIMN 3HaKaAMn pOnI3BoDInTeJei, KOTOpbIe pa3pa6OtaIIyNOMaHyTuO CnCTeM y INI npOdyKT.
Ppabnna 3Kcnnyataun
YXo3a06bekTNBOM
YdaHHoroobBeKtNbIbJIeHEnpOnHcaEmoe 6pb3ro3aunuHHeOncnHHeHne.IpnNCnONb3OBaHNIObeKtNbCo6JIOdaIte ONnCAHHbIe daane peKOMeHdaCIN.EcInObBeKtNBpaOtaET HenpABnBHO,oBpaNTecbBnyHKT npodaxnNn6JnxKaunn CepBnChbI ueHtp.
- PnKpeTnTe oBeKTNB K nbIeHepOnHuaemO n 6pb3ro3aunuueHHo uΦpOBou φOTOKamepe. Ecnn 6bekTNB PnKpeNTb K uΦpOBou φOTOKamepe 6ez xapaKTEpcNTk nbIeHepOnHuaeMOCTn n 6pb3ro3aunuueHHocTn, OH nepecTaHeT 6bITb nbIeHepOnHuaeMbIM n 6pb3ro3aunuueHHbIM.
-Пикpenля ИИн CHIMMA OБьektNB, cneДITE 3a TeM, YTO6bl INHOPOHBIe YAcTNUB, HAnPIMep NecOK, nbJIb I KAnIIN BOJBI, He NonaII HA NOBepxHOCTb IIN IPOHNI BHYtpb pe3INHOBOrO yNIOHTHNEJBHOrO KOJIbca OБьektNBa, KOHTaKToB, UΦpOBoB ΦOTOKaMEpbIu OБьektNBa.
-Даньи obekTNB HeЯBJIeTcB OBOHepOnHuaembIM. 4TO kacaetc6pb3ro3aunuieHHoCTN,KOHCTpykUra obekTnBa HeDonyckaet npOHKnHOBeHnBHyTp bOdbI. Ecnn Ha obekTNB nonaayT KaNN BOBdy n.T..nocne nCNoJb30BaHn npOTpntEero cyxOy MmKoY TkaHbIO.
-ДяушенипilehenpoHuaeMoCTnI 6pb3ro3aunuueHHocT DaHHoroObekTuBaMeCTe npKpenHeHnICNoJIb3yETcpe3HOBoe yNJOTHTeJIbHOe
KoJIbO oBekTnBa. Iocne HeoDHOkPaTHo CMeHbI
06BeKTnBa MOxHO 3aMetNtB NOBJIeHne OTNeuATKa OT
pe3INHOBO rYIpOTHTeJIbHOrO KOJIbua O6BeKTnBa B MecTe
PpIKpeJIeHnRA O6BeKTnBa Ha KOpNyce cUcfoBoi KaMepbl.
3To He BInraet Ha ee pa6Ot.
3a INΦopMaunE O CmHe pe3INHOBO rYIpOTHTeJIbHOrO KOJIbua
06BeKTnBa O6paAaTEcB B6nJaIIM CepBNCbH yCHTp.
-HeJIb3a CNJIbHO HAXIMaTb Ha 06BeKTHB.
B cnuyae nonaahan Ha nobepxhoctb obbeKTnBa rpa3n (BOdbi, Macna, OTneauKOB nanbcuE BNT. ) KaueCTBO CHIMKA MOXET yxydunbcra. Cneyet octopoxHo BitepeTb NOBepxHOCTb obeKTHBa MmKo cyxO TkaHbIO nepec cEmKO.
KoIaObKeTnB He IcNoJIb3yETcR,HaJeHbTe Ha Hero 3aDHIIO KpbIiKy OBeKTnBa,YTO6bI PbIINHKn IN DpyrIe YACTuBi He CKaIIINBaNNCb Ha OBeKTnBe H He NOnaJaIN BHyTpB.
-TO6bI 3aUNITb KOHTaKtbl 06bEKnBa ① ,He CTaBBTe 06bEKNB MOHTaXHoi NOBepxHOCTbIO BHN3.Kpome
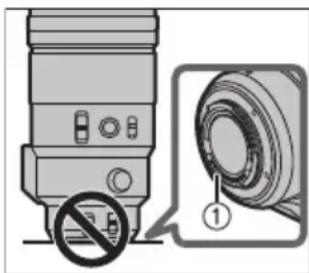
Toro, He DonnyckaIte 3aRpa3HeHnKOHTaKToB O6bekTInBa.
(KaK BbI3BaTb COxpaHeHHoe B NaMrtn NOJoxKeHne fokycnpOBKn)
4 YcTaHOBnTe NepeKJIIOuHaTeIb Bbl6Opa OKycnPoBKn Ha [CALL] (1).
5 HaxmTe KhoNky fokycnpoBkn (2), YTo6bl BbI3BaTb COxpaHeHHoe B nAmrtn NoJIOKeHne fokycnpOBkn.
-Пин Нжати и удрхьаньи конк Фокусювки Временно BKлочаertс [MF].
-Дажевсунуаусетанови похлочаелдиana30haФokychoro pacctoHnHa [3m-∞],MOXHO BbI3BaTbNOJIOxHneФOKcnpOBKnВпpeJeaxДиana30Ha3,0M.OdHako,ecInOTnyCTnTBKONKyФokcnpOBKn,NOLoxHneФOKcnpOBKnпepemecntTCBпpeJIbHOe NOJIOxHne(3,0M).
- Ppi nCnObl3OBaHmI ΦyHKUIN NpeBapnteJbHO 3aDaHHoI ΦokycnpOBKn peKomeHdyeTcra YCTaHOBuTb nepeKluOaTeNb Dnana30Ha φokychoro paccToHnHa [FULL].
CTapaTecb He poHrTa H He ydaprtb o6bektNB. TaKKe CTapaTecb He noBepraTb o6bektNB Ype3MepHomy daBJIeHHIO.
CJIeIte 3a TEM, YTO6bI He ypoHnTB CymKy, B KOTopyHO Bbl NIOIOXIMN O6BeKTHB, NCKOJbKy 3TO MOKeT npINBeCTN K NOBpeXDeHNIO O6BeKTHBa. KaMepa MoKeT nepeCTaTB HopMaNbHO pa60TaTB, n DaJIbHeiJaA 3aIINCb CHIMKOB MOKeT OKa3aTBcR HEBO3MOXHOI.
-ПипегнockецфровсфOTOKampeblcnpkpenHbIMObbeKTUBOMdepknte OndOBpeMeHHOцфpoByIOФOTOKamepyNObbeKtNB.
Pn nCnoB3OBAHnn neCTNuIDOB n dpynx JeTyuX BeueCTB B6Jn3n KaMepbI y6eINTecb, YTO OHn He nonaiaOT Ha 06bektB.
- Ppi nnonaHaHa oBeKtNB TaKeBHeuecTBA MoryT NOBpeDHTb OBeKtNB HIN pNBECTN KOTcJNaBaHnIO Kpackn.
He hampabTne 06bekTNb Ha coJIHcE nn npyRn nCTOCHNK CNJbHO rCBeta.
3TO MOKETIINBECTN KIOCTYINHEHNO Ype3MepHORO KOJNUeCTBa CBETA N Bb13BaTb BO3rOpAHNE INHHeCNpABHOCTb.
- Ⅲ6eraIte IcnoJIb3OBAHnI INxpaHeHnI O6beKTHBa B KAKOM-JIN60 N3 nepeUncJIeHHbIX MeCT, T. K. 3TO MOXET npNBecTn K npo6Iemam B pa6Ote INJ HenCnpaBHOCTN:
-IOB03dEeCTBnEMnpMbIX COJIHeHbIX JyueHnHa nIeKeJeTOM
-B MeCTHOCTX C BbICOKO BnaxHoCTbHO Bo3DyA N BblcOKIMN TEMnepaTpaMn, INI C pe3KIMN nepenadaMn TEMnpaTpby INBnaXHOCTN
-B MeCTHOCTX C BbICOKIMN KOHcEHTpaUNMn neCKa, PbINn INI rpr3N
- Pn cpa6aTbIbAHN BCnblUKN
-Bo3ne o6orpeBaTeNei, KOHnIuHOHePoB uJIn yBnaXnHTeNei
-Γ De BO3MOXHO HAOKaHne yCTPOJCTBa
-ΓДe npucytByeT Bn6paun
-BaTOMo6nne
Cm. TaKke HnHCTpykunno 3KcNpyataunu nDpOBOKaMepbl.
- Ecni KaMepa He 6yET NcNoIb3OBAbTcB TteYeHne DnITeJIbHO BpemEH, peKOMeHdyETcX pAHHTb ee BMeCTe C BnARoNOrNTiTeEM (CNIkAareHEM).HeBblONJIHHeHne DaHHoI peKOMeHdaaUN MoKet PpINBeCTN K HApUWeHNIO TexHueckmX xapakTepNCtIK BBNDy oBaP3OBAHn INeceHn T.Д.П配电HcNIOb3OBAbT,peKOMeHdyETcN PpOBepaTb paBOTocNOC6HoCTb yCTPOINCTBa NOcNE TaKOrO DnITeJIbHO rXpaHEHn.
He octabnIte 06bekTnB B KOHTaKTe C pe3HOBbIMN INI pnaCTIKOBbIM npOdyKTAMn Ha npOdoJIkNTeIbHbI NepNOB BpeMeHN.
He npkaacTecb K3neKtpueckm KOHTaTam yctpoiCTba. 3TO MOKeT BbI3BaTb c6oB B erO pa6ote.
- 3anpeaaetcra36npaTb INN BHCNTb N3MeHeHnB aannapat.
He nCnoB3yIte 6eH3nH, pactBOpHTeJIb, cInpT n DpyrIe noo6HbIe MOIOUne CpeCTBa dIra OUnCTKn annapata.
-Использоване pactвориел MOкет NOВpeДNTb 6бекTNB ИЛ ПИВecTи KOTСлANBaHиЮ Кpackn.
- BbItnpaIte nbIb n Cnebl nIbueB MrgKo cyXO TkaHbIO.
- YdaIaIte rpa3b nNbIb cpe3nHOBOrO yNIOHTHeIbHOro KOJIbUa o6BeKTHBa, KONbUa fokycuPObKN i KOJIbUa dNaΦparMbI C NOMouBIO cyxO CaΦETKn DnA NbIN.
3aPpeaetcnaonb3OBaTbMOUuue cpeCTBa HnXmNueckn 6pbOtaHHyTOKaHb.
YcTpaHHeHne HEnCnpaBHOCTeI
PnBkIIOUeHnn Nn BbIKIOUeHnn KAmepbl N6o cotpcHnn 06BeKTHBa pa3daetcraTakOn 3ByK, KaK dpe63kaHne. Pn CbeMke npKO rnpdMeta, HAnpImep BHe NOMeueHHN, Nn PnCbEmKe C 6OJIbWIM NOKa3aTeJEM DnaΦparMbI O6BeKTHB N3daET 3ByK.
3Byk Bo3HnKaet B pe3yIbTaTe DnBKeHn DnaΦpaarmbl 06BeKtNBa H He RaJIeTc HEnCnpaBHOCTbIO.
TexHnueckne xapaKTepeNCTnKN
Texnueckne xapaKTePncTnKMOrYt 6bITb n3MeHeHbI 6e3 yBeDoMJIeHnA.
Manufactured by: Panasonic Corporation
Kadoma, Osaka, Japan
Importer for Europe: Panasonic Marketing Europe GmbH
Panasonic Testing Centre
Winsbergring 15, 22525 Hamburg, Germany
Panasonic Corporation
Web Site: http://www.panasonic.com
© Panasonic Corporation 2017