
NR920HBR - Radio Soundmaster - Free user manual and instructions
Find the device manual for free NR920HBR Soundmaster in PDF.
| Brand | Soundmaster |
| Model | NR920HBR |
| Product type | Digital radio DAB+/FM |
| Frequency bands | FM: 87.5 - 108 MHz DAB: 174 - 340 MHz |
| Mains power supply | AC 230 V ~, 50 Hz |
| Battery power supply | DC 6 V (4 UM-2 / C batteries) |
| Power consumption | 12 Watts |
| Number of presets | 10 DAB stations + 10 FM stations |
| Antenna | Telescopic antenna |
| Loudspeakers | Built-in |
| Display | LCD screen |
| Main functions | Automatic and manual search, presets, station information display (DLS, RDS), volume control, mono/auto FM mode |
| Maintenance and cleaning | Clean with a dry cloth only. Do not use detergents or abrasive products. |
| Safety | Do not open the device. Risk of electric shock. Refer servicing to qualified personnel. Do not expose to moisture or heat sources. Use only indoors. |
| Spare parts and repairability | No user-serviceable parts. Contact an authorized service center for repairs. Used batteries must be recycled. |
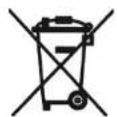
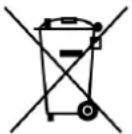
| Environment | Do not dispose of with household waste. Recycle at appropriate collection points. |
| Dimensions (estimated) | Approximately 250 x 150 x 100 mm |
| Weight (estimated) | Approximately 1 kg |
Frequently Asked Questions - NR920HBR Soundmaster
User questions about NR920HBR Soundmaster
0 question about this device. Answer the ones you know or ask your own.
Ask a new question about this device
Download the instructions for your Radio in PDF format for free! Find your manual NR920HBR - Soundmaster and take your electronic device back in hand. On this page are published all the documents necessary for the use of your device. NR920HBR by Soundmaster.
USER MANUAL NR920HBR Soundmaster
natural_image
Black-and-white photo of a vintage radio with a mesh grille and control knobs (no visible text or symbols on the device body)DEUTSCH
ENGLISH
FRANÇAIS
NEDERLANDS
ITALIANO
NORSK
SVENSK
text_image
Technical diagram of a device front panel with numbered components and internal layout viewsDo not dispose of this product with the normal household waste at the end of its life cycle. Return it to a collection point for the recycling of electrical and electronic devices. This is indicated by the symbol on the product, user manual or packaging.
The materials are reusable according to their markings. By reusing, recycling or other forms of utilization of old devices you make an important contribution to the protection of our environment.
Please contact your local authorities for details about collection points.

WARNING
Risk of electric shock Do not open!

Caution: To reduce the risk of electric shock, do not remove the cover (or back). There are no user serviceable parts inside. Refer servicing to qualified service personnel.
This symbol indicates the presence of dangerous voltage inside the enclosure, sufficient enough to cause electric shock.

This symbol indicates the presence of important operating and maintenance instructions for the device.
Safety, Environmental and Setup Instructions
- Use the device in dry indoor environments only.
- Protect the device from humidity.
- Do not open the device. RISK OF ELECTRIC SHOCK! Refer opening and servicing to qualified personnel.
- Connect this device to a properly installed and earthed wall outlet only. Make sure the mains voltage corresponds with the specifications on the rating plate.
• Make sure the mains cable stays dry during operation. Do not pinch or damage the mains cable in any way. - A damaged mains cable or plug must immediately be replaced by an authorized service center.
- In case of lightning, immediately disconnect the device from the mains supply.
- Children should be supervised by parents when using the device.
- Clean the device with a dry cloth only.
Do NOT use CLEANING AGENTS or ABRASIVE CLOTHS!
- Do not expose the device to direct sunlight or other heat sources.
• Install the device at a location with sufficient ventilation in order to prevent heat accumulation. - Do not cover the ventilation openings!
• Install the device at a safe and vibration-free location. - Install the device as far away as possible from computers and microwave units; otherwise radio reception may be disturbed.
- Do not open or repair the enclosure. It is not safe to do so and will void your warranty. Repairs only by authorized service/ customer center.
- Only use mercury and cadmium-free batteries.
- Used batteries are hazardous waste and NOT to be disposed of with the household waste!!! Return the batteries to your dealer or to collection points in your community.
- Keep batteries away from children. Children might swallow batteries. Contact a physician immediately if a battery was swallowed.
- Check your batteries regularly to avoid battery leakage.
- Batteries shall not be exposed to excessive heat such as sunshine, fire or the like.
- CAUTION: Danger of explosion if battery is incorrectly replaced Replace only with the same or equivalent type
Used batteries are hazardous waste and NOT to be disposed of with the household waste! As a consumer you are legally obligated to return all batteries for environmentally responsible recycling - no matter whether or not the batteries contain harmful substances *).
Return batteries free of charge to public collection points in your community or to shops selling batteries of the respective kind.
Only return fully discharged batteries.
*) marked Cd = cadmium, Hg = mercury, Pb = lead
soundmaster®
CONTROL KEYS
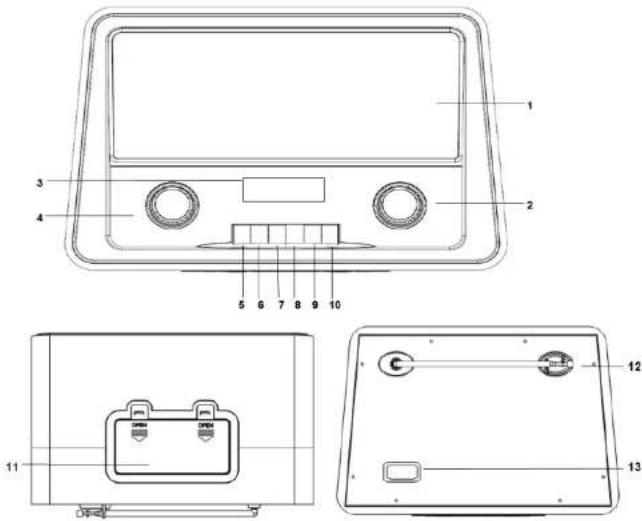
| 1. Speakers 9. MENU button | |
| 2. TUNNING / ENTER button 10. PROGRAM / PRESET button | |
| 3. LCD display 11. Battery Compartment | |
| 4. VOLUME button 12. Antenna | |
| 5. POWER button 13. AC socket | |
| 6. DAB+/FM button | |
| 7. SCAN button | |
| 8. INFO button | |
NR920 / English Instruction Manual
Quick Guide
| Controls | Mode | |
| DAB+ | FM | |
| POWER Press to power ON. Hold it to Power OFF. | ||
| DAB+/FM | Press to toggle between DAB+/ FM Mode | |
| SCAN | Press to perform a full scan | Press to forward scan for next available station |
| Press and hold to backwards scan for the next available station | ||
| INFO | Press to toggle through various station information | |
| MENU | Press to for Menu option | |
| PROGRAM/PRESET | Press and hold to set a preset station | |
| Press to recall a preset | ||
| ENTER | Press to confirm the option | |
| TUNING | Rotate clock wise: Go to the next station/option | Rotate clock wise: Increase frequency by one step (0.05MHz) |
| Rotate anti- clock wise: Go to the previous station/option | Rotate anti- clock wise: Press to decrease frequency by one step (0.05MHz) | |
| VOLUME | Rotate clock wise: increase the volume level | |
| Rotate anti- clock wise: decrease the volume level | ||
soundmaster®
AC OPERATION
Before operation, please make sure that the VOLTAGE mentioned on the unit is same as the voltage of your local area. Unravel the AC power cord, insert one end into the AC socket on the set and the other end into a standard AC outlet..
ATTENTION
-
Do not plug or unplug the power cable while you have wet hands;
-
If you plan not to use the unit for a long time, disconnect the power cable from the wall outlet;
-
When disconnecting the power cord from the wall outlet, do not pull on the cord in order to avoid shock risks caused by damaged cable.
BATTERY OPERATION
Disconnect the AC Cord Set completely. Open the Battery Compartment Door and insert 4 pieces UM-2 "C" size batteries into the battery compartment with battery polarity as shown inside the battery compartment.
INITIAL START-UP
When using your Digital radio for the first time, please follow the below steps:
1. Connecting the power cord to the main socket, or put 4 x C size batteries into the battery compartment, to power the radio.
2. Extend the telescopic aerial completely.
3. Press the POWER button to turn the radio on. The radio will perform an initial DAB+ scan to search for the available radio stations.
4. Once the scan is complete, the first station will be play. You can change stations using the UP and DOWN buttons, or by stopping on the station you wish to listen to.
Remark:
If no stations are found, switch the radio off and move it to a location with a stronger signal. When you switch the radio back on it will automatically repeat the scan process.
DAB+ MODE
Press the DAB+/FM button to set the radio to DAB+ mode.
Performing a Full Scan:
- Press the SCAN button to perform a full scan
Note: When first used, your Digital radio scanned the DAB band for available stations. The station services found were then stored in your radio's memory. You can rescan the band at anytime if you move to a different area or just refresh the stored list of available stations.
The scanning process will take a few minutes. The number of services found during the scan will be shown at the right side of the display.
After the scan, the radio will re-tune to the last station playing if it is available. Alternatively, you can continue to browse for another station.
NR920 / English Instruction Manual
Performing a Manual Tuning:
- Press MENU button and rotate the TUNNING button to select "Manual Tune" and press Enter to confirm.
- Rotate the TUNNING button toggle through the frequencies to tune a station.
- Press the Enter button to confirm the frequency and exit from "Manual Tuning".
Note: The multiplex channel number and frequency is displayed. If a station multiplex exists on this
frequency, the multiplex name will also be displayed and the first station in the multiplex will play.
FM MODE
Press the DAB+/FM button to set the radio to FM Mode.
Auto Tuning:
- To scan upwards, press the SCAN button to tune the next available station.
- To scan downwards, press and hold the SCAN button to tune the next available station.
Note: Tuning will stop automatically when the next station is reached.
Manual Tuning:
- Press the UP and DOWN button to tune up or down the frequency by MHz.
FM MONO / AUTO Mode
In FM mode, press ENTER to toggle through MONO or AUTO Mode.
ANCILLARY FUNCTIONS
- Preset function
The Digital radio can store up to 10 DAB and 10 FM stations as presets for instant access to your favorite stations.
Storing a station preset:
- Tune your Digital radio to the station you wish to store as a preset.
- Press and hold the PRESET button until "Preset Empty 1" appears with the number flashing.
- Using the UP and DOWN buttons, select the preset number you wish to use and press ENTER button to store that station into the radio memory.
Note: When you store a preset, the preset number and "Stored" will be displayed to confirm the number you selected. You can choose a preset number that is already in use. The new station details will over-write the stored station.
Recalling a preset station
- Press the PRESET button until the first preset appears.
- Using the UP and DOWN buttons, scroll through the station presets.
-
Press the ENTER button to select the station you wish to listen to.
-
Browse station Information
Press the Info button repeatedly to view information transmitted by the station in DAB / FM modes.
soundmaster®
NR920 / English Instruction Manual
| DAB+ mode FM mode | |
| 1.DLS Information 1. RDS Information | |
| 2.Program Type 2. Program Type | |
| 3.Signal Strength 3. Signal Strength | |
| 4.Multiplexer name 4. Channel Frequency | |
| 5.Frequency | 5. Audio Mode |
| 6.Audio Bit Rate | 6. Time and Date |
| 7.Time and Date |
DLS (Dynamic Label Segment): This is a scrolling message giving real-time information – song titles, news headlines, or detail of the program and is provided by the broadcaster. Audio Bit Rate: This displays the digital audio bit rate being received. Program Type: This describes the style of the program being broadcast Multiplex number.
3. System Reset
- Press MENU button and rotate the TUNNING button to select "System Reset".
- Press ENTER when prompted to perform the system reset.
The radio will return to DAB mode and perform an initial DAB+ scan on start-up. Note: Any presets or setting stored will be permanently deleted.
4. Prune
You may remove all unavailable stations from the list.
- In DAB mode Press MENU button and rotate the TUNING button to select "Prune".
- Press ENTER button to confirm.
SPECIFICATIONS
Frequency Range: FM 87.5 - 108 MHz
DAB: 174 -340 MHz
Power Supply: AC 230V \~ 50Hz
DC 6V (UM-2 x 4)

Specifications are subject to change without further notice.
PROTECTION DE L'ENVIRONNEMENT
natural_image
Silhouette of a person using a ladder to lift a flag, enclosed in a circular frame (no text or symbols)*) markerade Cd = kadmium, Hg = kvicksilver, Pb = bly

soundmaster®
Hereby, Wörlein GmbH declares that this device is in compliance with the essenal requirements and other relevant provisions of Direcve 2014/53/EU.
A copy of the Declaraon of Conformity may be obtained at the following locaon:
Wörlein GmbH, Gewerbestrasse 12, D 90556 Cadolzburg, Germany
Email: info@woerlein.com
Tel.: +49 9103 71 67 0
