
SBCSP370 - Headphones PHILIPS - Free user manual and instructions
Find the device manual for free SBCSP370 PHILIPS in PDF.

| Product Type | Remote controlled on/off switch |
| Brand | Philips |
| Model | SBCSP370 |
| Power supply | Mains 230 V |
| Maximum power | 1000 W |
| House code | Adjustable from A to P (16 positions) |
| Unit code | Adjustable from 1 to 16 |
| Remote control compatibility | Philips SBC SR315 |
| Number of remote control channels | 8 (unit codes 1-8) |
| Group function | Yes, via button 5 |
| Manual control | Front on/off button |
| Dimensions (approx.) | 10 x 5 x 5 cm |
| Weight (approx.) | 150 g |
| Material | Plastic |
| Color | White |
| Maintenance | Clean with a dry, soft cloth |
| Safety | Do not exceed 1000 W; do not use with high-power appliances |
| Repairability | Call a qualified professional |
| Use | Indoor use only |
| Included accessories | User manual |
Frequently Asked Questions - SBCSP370 PHILIPS
User questions about SBCSP370 PHILIPS
0 question about this device. Answer the ones you know or ask your own.
Ask a new question about this device
Download the instructions for your Headphones in PDF format for free! Find your manual SBCSP370 - PHILIPS and take your electronic device back in hand. On this page are published all the documents necessary for the use of your device. SBCSP370 by PHILIPS.
USER MANUAL SBCSP370 PHILIPS
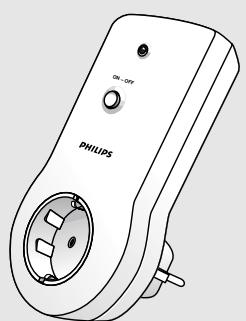
SBC SP 370 – Power Switch
natural_image
Line drawing of a Philips remote control device with buttons and ports (no text or symbols on the device itself)Instructions for use
Mode d'emploi
natural_image
Illustration of a mechanical device with two articulated arms and a base, no text or symbols present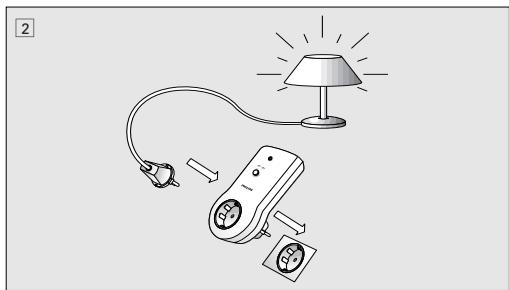
natural_image
Illustration of a lamp connected to a remote control device with power plug (no text or symbols)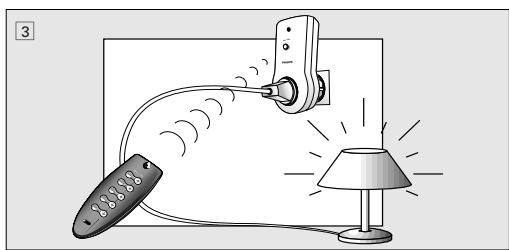
natural_image
Illustration of a lamp connected to a remote via cable, with no text or symbols presentEnglish
INTRODUCTION
Congratulations on your purchase of the Philips Power switch (SBC SP370). This switch can be used together with a Philips Power remote control (SBC SR315). With the Power Remote Control system you can operate electrical appliances (e.g. lamps, coffee-maker etc.) in and around your house via the remote control without getting out of your chair! Before connecting an appliance to the Power switch, please read this document carefully.
QUICK REFERENCE
- Make sure the house code of the new Power switch is the same as with the used remote control (fig. 1).
- Connect the Power switch to a mains power outlet (fig. 2)
3 Select the appliance, e.g. a lamp, you want to control and plug it into the Power switch (fig. 2).
- Check the power consumption of the selected appliance before plugging it into the Power switch. This Power switch can control appliances with a maximum power rating of 1000 Watts!
- If the selected appliance has its own ON/OFF switch, make sure it is switched on.
- Use the remote control to operate the appliance (fig. 3). The Power switch operates with button 1 as its default setting. If the right side (+) of the button is pressed, the appliance switches on. If the left side (-) of the button is pressed, the appliance switches off again.
English
CHANGING HOUSE CODE
The house code is meant to prevent interference with the Power Control System of your neighbour. The Power switch will only respond to signals with the correct house code. This means the house code of the Power switch should be set to the same position as with the used remote control. To change the house code (fig. 1):
- Unscrew the battery door at the rear of the remote control.
- Check the position of the house code switch inside the remote control.
- Adjust the house code of the Power switch by turning the house code selection wheel at the rear of the switch (A-P) with a screwdriver.
- Please note that the selected house-code for the remote control and Power switch(es) should be the same! The house code's default setting is A.
CHANGING UNIT CODE
A unit code should be set on the Power switch. The selected unit code corresponds to the button which has to be pressed on the remote control. If for example, unit-code 3 is set, the Power switch is operated via the 3rd button on the remote control. The unit code's default setting is 1. To change the unit code (fig. 1):
- Set the unit code of the Power switch by turning the unit code selection wheel at the rear of the plug (1-16) with a screwdriver.
- The Power switch is operated by pressing the correct button on the remote control.
- It is possible to activate more Power switches at the same time by selecting the same unit code.
English
Note: Although the unit code on the Power switch can be set from 1 to 16, the remote control can only operate Power switches with unit code set from 1 to 8.
- To operate Power switches with unit code 1-4, the toggle switch on the remote control should be set to the left (1-4).
- The first 4 buttons on the remote control correspond with unit code 1 to 4 respectively.
- If the toggle switch on the remote control is set to the right (5-8), the first 4 buttons correspond with unit code 5 to 8 respectively.
INSTALLATION
Your appliance must be connected to the Power switch before you can control it with the remote control (fig. 2).
- Select the appliance (e.g. a lamp) you want to control and plug it into the Power switch (fig. 2).
- Please check the power consumption of the selected appliance. The Power switch can control appliances with a maximum power rating of 1000 Watts!
- If the selected appliance has its own ON/OFF switch, make sure it is switched on.
English
OPERATION
The connected appliance can now be operated via the remote control (fig. 3). If correct house code has been set, the Power switch is operated with button 1 by default.
- If the right side (+) of the button is pressed, the appliance switches on. If the left side (-) of the button is pressed, the appliance switches off again.
= If unit code has been changed, the Power switch is operated with another button on the remote control!
The Power switch can also be operated with the last button of the remote control (ALL). This button is designed to operate more Power switches at the same time.
- Set the GROUP toggle switch on the rear of the Power switch to the right side (= ON). The switch will now respond when the 5th button (ALL) of the remote control is pressed. If the right side (+) of the button is pressed, the appliance switches on. If the left side (-) of the button is pressed, the appliance switches off again.
MANUAL OPERATION
The Power switch has a button for manual operation. This means that your appliance can still be operated without the remote control.
- Press button at the front of the Power switch once.
– The Power switch switches on. - Press button at the front of the Power switch once again.
– The Power switch switches off again.
Français
1. INTRODUCTION
FONCTIONNEMENT MANUEL
natural_image
Completely black image with no visible content or text.| Guarantee certificateIdentieficatiekaart Garantibeviset | Certificat de garantieCertificado de garantiaTakuutodistus | Garantie Certificato di garanziaEyyúnonKarta gwarancyjna | ||
| year | warranty | ár | garanti | |
| jaar | garantie | año | garantia | |
 | Jahr | Garantie | ano | garantia |
| année | garantie | anno | garanzia | |
| xρόνος | εγγύηση | rok | gwarancja | |
Type:
Serial nr.:
Date of purchase - Date d'achat - Kaufdatum - Koopdatum - Fecha de compra - Data da compra - Data di acquisto - Købsdato - kjøpedato - inköpsdato - Ostopaivå - Ημερομηνία αγοράς- data zakupu
19
Dealer's name, address and signature Nom, adresse et signature du revendeur Name, Anschrift und Unterschrift des Handlers. Naam, adres en handtekening v.d. handelaar. Nombre, dirección y firma del distribuidor. Nome, indirizzo e firma del fornitore Nome, morada e assinatura da loja
Forhrhandlerens navn, adresse og underskrift Återförsäljarens namn, adress och namnteckning Myyjän nimi, osoite ja allekirjoitus, Ονοματεπώνυμο, διεύθυνση και υπογραφή του εμπ. προμηθευτή Nazwisko, adres i podpis sprzedawcy


TCText/RR/9807
Brand : PHILIPS
Model : SBCSP370
Category : Headphones