DTX250 - Weather Station Cresta - Free user manual and instructions
Find the device manual for free DTX250 Cresta in PDF.
| Product type | Radio-controlled weather station |
| Brand | Cresta |
| Model | DTX250 |
| Station power supply | 2 AAA 1.5V batteries (not included) |
| Outdoor sensor power supply | 2 AAA 1.5V batteries (not included) |
| Outdoor sensor frequency | 433 MHz |
| Display | White VA display |
| Clock | DCF77 radio-controlled, automatic summer/winter time switch |
| Time display | 12 or 24 hour formats |
| Time zones | 24 adjustable (-12 to +12) |
| Calendar | Perpetual until 2099 |
| Alarm | With snooze function (5 minutes) |
| Weather forecast | 4 icons: sunny, partly sunny, cloudy, rainy |
| Barometer | Atmospheric pressure with 12-hour history (hPa and Hg) |
| Indoor temperature | Range: 0°C to +50°C |
| Outdoor temperature | Range: -20°C to 60°C |
| Humidity | Indoor and outdoor display with trend |
| Max/min values | Indoor/outdoor temperature and humidity |
| Indoor comfort index | Symbols: Comfortable, Dry, Humid |
| Backlight | Activation via SNOOZE/LIGHT button (5 seconds) |
| Low battery indicator | For station and outdoor sensor |
| Number of sensors supported | Up to 3 outdoor sensors |
| Maintenance | Clean with a soft, dry cloth. Do not use abrasive products. |
| Safety | Use only for intended purpose. Replace all batteries at the same time. Do not expose to moisture. |
Frequently Asked Questions - DTX250 Cresta
User questions about DTX250 Cresta
0 question about this device. Answer the ones you know or ask your own.
Ask a new question about this device
Download the instructions for your Weather Station in PDF format for free! Find your manual DTX250 - Cresta and take your electronic device back in hand. On this page are published all the documents necessary for the use of your device. DTX250 by Cresta.
USER MANUAL DTX250 Cresta
natural_image
Blue geometric logo resembling a stylized letter 'C' or bracket (no text or symbols)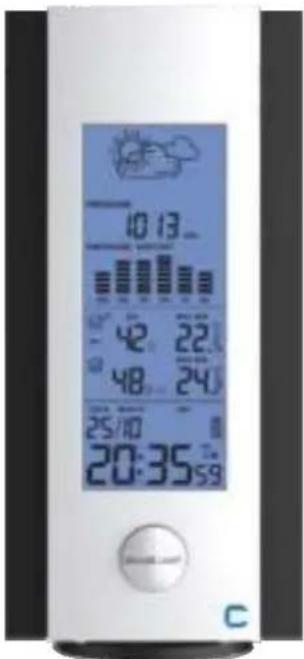
text_image
10:13 42 22 48 24 25/10 20:35 59 C
natural_image
White electronic device with a digital display and 'C' label (no readable text or symbols beyond the label)DTX250
NL. WEERSTATION
EN. WEATHER STATION
FR. STATION MÉTÉO
DE. WETTERSTATION
GEBRUIKSAANWIJZING
USER MANUAL
MODE D'EMPLOI
BEDIENUNGSANLEITUNG
GEBRUIKSAANWIJZING
info@cresta-international.com
www.cresta-smarf.com
Tel: +31 20 6932932
A = MAX/MIN B = + DG = MODE E = CHANNEL
natural_image
Line drawing of a device with an open panel and a plug inserted into a socket (no text or symbols)BASIS BEDIENING
DRAADLOZE VERBINDING MET DE BUITEN SENSOR
We thank you for buying one of our radio-controlled weather stations. It shows your confidence in our brand and our products. Please be assured you have bought a high-quality product which you will enjoy using for many years to come.
If you require technical support and or have questions about the functioning of the product, please contact our After Sales Service via the email address mentioned here under:
CRESTA INTERNATIONAL B.V.
ROLBRUGWEG 4
NL-1332 AS ALMERE
info@cresta-international.com
www.cresta-smart.com
Tel: +31 20 6932932
Read this manual thoroughly before first use, even if you are familiar with this type of product.
It provides you several tips to make optimal use of your product. Keep this manual, your receipt and packaging in a safe place for future reference.
SAFETY PRECAUTIONS
Please only use this product for its design purpose. Do not use for any other purpose.
Before the first use inspect the product to make sure it is not damaged. In case you have a doubt please contact our After Sales Service via the above-mentioned email address.
If the batteries need to be renewed, please renew all batteries. Do not mix old - and new batteries. Preferably replace the old batteries by new batteries of one type; we advise to use alkaline batteries.
SPECIFICATIONS OF YOUR WEATHER STATION
- Your weather station is equipped with 6 operation buttons: MODE, +, -, MAX/MIN, CHANNEL, SNOOZE/ LIGHT.
• Radio Controlled Clock
• Automatic receipt of the DCF 77-time signal to display the most accurate time
• Automatic switch from Summer - to Wintertime vice versa
• Time display selectable in 12 - or 24 hours format
• 24 adjustable time zones selectable (-12 / + 12)
• Continuous perpetual calendar up to 2099
• Display of Date, Month and Weekday
• Display of Weekday available in English
• Alarm with snooze function with 5 minutes alarm interruption
• 4 weather forecasts: sunny, slightly cloudy, cloudy, rainy
• Barometer and data of 12 hours history for air pressure - Indoor /outdoor temperature and humidity
• Minimum / Maximum of temperature and humidity
• Thermometer measuring range inside: °C to +50 °C, outside -20°C\~60 °C
• Temperature display selective in °C or °F - Low battery indication
- Blue display lighting
- Battery: 2 x AAA, LR03, 1.5V – not included
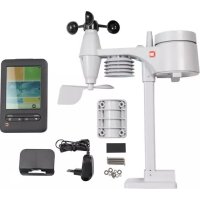
Outdoor sensor:
• Frequency: 433 MHz
- Battery: 2 x AAA, LR03, 1.5 – not included
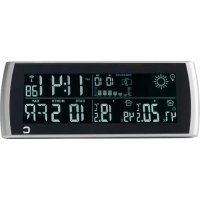
EXPLANATION OF THE WEATHER STATION SYMBOLS
text_image
1 2 3 4 5 6 7 8 9 10 11 12 13 14 15 16 17 18 19 20 21 22 10:00 12:39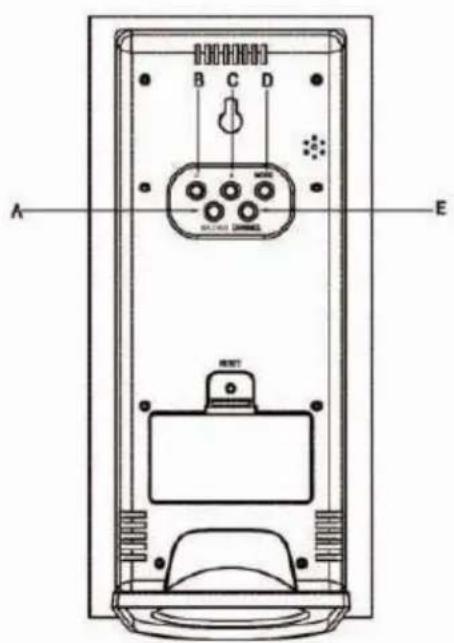
text_image
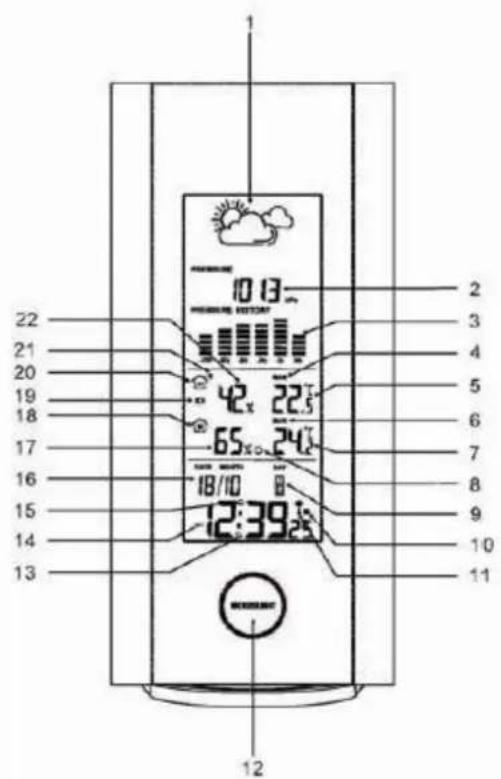
A B C D E RINT- Weather 2. Air pressure 3. Bar for barometer 4. Max/Min TEM and HUM for outdoor 5. Outdoor temperature 6. Max/Min.for indoor TEM and HUM 7. Indoor temperature 8.Comfort 9. Day of week 10. Summer time 11. RCC symbol 12. Snooze/Light 13. Snooze symbol 14. Time 15. Alarm 16. Date/Month 17. Indoor humidity 18. Indoor 19. Low battery for outdoor sensor 20. Outdoor 21. RF symbol 22. Outdoor humidity
A=MAX/MIN B=- C= + D=MODE E=CHANNEL
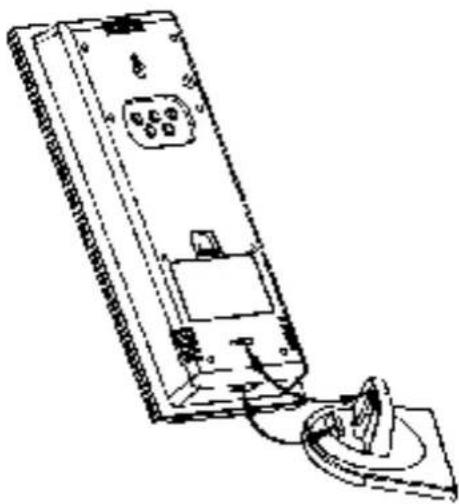
The below picture shows how to connect the stand with the main unit.
natural_image
Line drawing of a device with a circular component inserted into a housing (no text or symbols)INITIAL OPERATION
- Open the battery compartment located on the rear side of the devices. Place the batteries in the battery compartment. Observe the shown polarity.
- The station is now connecting to the outdoor sensor. This process takes about 3 minutes. Then the display shows the outdoor temperature and humidity, in case of failure of reception, pls press "CHANNEL" for more than 3 seconds to receive again.
- the automatic receiving of the DCF time signal begins after 3 minutes of outdoor reception.
- This RCC reception process is going on, the flashing symbol "radio tower" appears in the time display area at the same time.
- Once the time signal receiving is successful, the display shows the symbol "radio tower" continuously and stops flashing.
If, due to bad reception, or no RCC automatic time reception is possible, follow the steps below to set the time manually.
MANUAL TIME SET-UP
The most important is to quit the reception of the radio controlled signal by holding together “-” for 3 seconds in case of the “radio tower” symbol is flashing before set-up
- Press and hold the "MODE" key for 3 seconds.
- The display for the year is flashing. Use "+" and "-" to select the year.
- Press "MODE" to confirm.
• The display for the month is flashing. Use "+" and "-" to select the month. -
Press "MODE" to confirm.
-
The display for the date is flashing. Use "+" and "-" to select the date.
- Press "MODE" to confirm.
- The display for the time zone is flashing. Use “+” and “-” to select the time zone (-12 to +12).
- Press "MODE" to confirm.
- The display for the hour is flashing. Use “+” and “-” to select the hour.
- Press "MODE" to confirm.
- The display for the minutes is flashing. Use "+" and "-" to select the minutes.
- Press "MODE" to confirm.
INFORMATION:
- The clock automatically changes from the set-up mode to the time display mode if no keys are pressed for 20 seconds.
- Explanation for the time zone display:
You can manually adjust the clock to the time zone of a country (up to 1500km distance to Frankfurt/Main) where the clock receives the DCF signal but where the actual time differs from the time received.
If, e.g. the time in a given country is 1 hour ahead of the German time, set the time zone display to 01. The clock is now DCF controlled but the time showing is one hour ahead.
DAILY ALARM SET-UP
- Press "MODE" to switch from the time display to the AL display
- Press and hold the "MODE" key for 3 seconds, the flashing alarm time is shown
- The hour display of the alarm time is flashing. Use "+" and "-" to select the hour.
- Press "MODE" to confirm.
- Then follow the minutes. Use "+" and "-" to select the minutes, Press "MODE" to confirm.
DAILY ALARM ON / OFF
- When the AL alarm time is showing, press “-” to activate the alarm with the alarm symbol showing in the display
- Press “-” again to cancel the alarm when in AL
INFORMATION:
- The clock automatically changes from set-up mode to time mode if no keys are pressed for 30 seconds.
• The alarm sounds for 2 minutes if no key is pressed to stop it.
SNOOZE FUNCTION
To activate the snooze function, please follow the steps below
- Press the key "SNOOZE/LIGHT", while the alarm sounds, to activate the snooze function.
• If the snooze function is activated, a Snooze symbol is flashing. - The alarm repeats after 5 minutes.
- The snooze function can be stopped by pressing any key.
12/24 HOURS MODE
The time display can be in 12 - AM/PM - or 24 hours mode. Press “+” for exchange between 12/24 hours.
°C/°F TEMPERATURE DISPLAY
The temperature display can be in °C or °F. Press “-” to switch between the mode.
MAX./ MIN. FOR THE INDOOR/OUTDOOR TEMPERATURE AND HUMIDITY
Press "MAX/MIN" for displaying the indoor/outdoor max./min. temperature and humidity.
WEATHER FORECAST

SUNNY

SLIGHTLY CLOUDY

CLOUDY
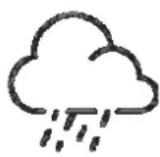
RAIN
ATTENTION: as the weather is forecasted by temperature, humidity and air press only, the display will have discrepancy with the actual weather.
BAROMETER AND BAR DATA AND DATA OF HISTORY FOR THE PAST 12 HOURS OF AIRPRESSURE.
Air pressure can be in hPa and shows the past 12 hour air pressure.
ILLUMINATION
Press the key "SNOOZE/LIGHT" to activate the display illumination for 5 seconds.
LIVING SPACE HUMINDITY
The weather station uses saved data to determine the humidity in the living space and shows the respective symbols.


comfortable dry humid
LOW BATTERY CONDITION DISPLAY
The weather station displays the low battery condition symbol to remind the batteries of the outdoor sensor need to be exchanged.
• Outdoor sensor low battery condition display: in the outdoor area of the display
WIRELESS CONNECTION TO THE OUTDOOR SENSOR
- Press the key "CHANNEL" to select a channel. You can read the data of up to 3 sensors at one weather station.
- Press and hold the "CHANNEL" key for 3 seconds to search for the outdoor sensor.
RECEPTION OF THE RADIO CONTROLLED SIGNAL
- The DCF time signal search starts automatically about 3 minutes after the battery exchange. The "radio tower" signal is flashing.
- Press “-” for more than 3 seconds to enter or quit the Radio controlled signal reception
- The clock synchronizes with the DCF time signal automatically and daily from AM 1:00 to 3:00 to correct potential time deviations each hour. If the synchronization is unsuccessful – the “radio tower” symbol disappears, a further synchronization attempt is made from 4:00 and 5:00 until success. This process is repeated up until 5:00 AM. If still not success, daily reception stops.
INFORMATION
• The flashing "radio tower" symbol stands for DCF radio signal reception has started.
- Continuous "radio tower" symbol stands for DCF radio signal reception has been successful.
- Please observe a minimal distance of 2.5m to sources of interference such as televisions or computer screens.
- The radio signal reception is weaker in rooms with concrete walls, e.g. in the basement and in office buildings. For extreme cases, please put the clock near a window.
- There are less atmospheric disturbances at night. A radio time signal reception is usually possible at that time. One synchronisation per day is sufficient to keep the time display accuracy at 1 second.
TIP
You can adjust the time manually in case the clock cannot receive the DCF time signal due to interferences, large distance to the sender, obstructions like mountains, etc. As soon as the time signal can be received, the clock will be adjusted automatically. Time signal sender coverage up to 1500km distance to Frankfurt/Main.
ENVIRONMENT FRIENDLY DISPOSAL
The European Directive 2002/96/EC on Waste Electrical and Electronic Equipment – WEEE – requires that old household electrical appliances must not be disposed of in the normal unsorted municipal waste stream. Old appliances must be collected separately to optimise the recovery and recycling of the materials they contain and reduce the impact on human health and the environment.
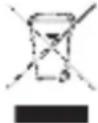
The crossed out “wheeled bin” symbol on the product reminds you of your obligation that when you dispose of the appliance, it should be separately collected. Contact your local authority for information concerning the correct disposal of your old appliance.
PRINTING ERRORS AND MODIFICATIONS RESERVED
MODE D'EMPLOI
info@cresta-international.com
www.cresta-smarf.com
Tel: +31 20 6932932
natural_image
Line drawing of a remote control panel with cable and socket (no text or symbols)COMMANDES DE BASE
natural_image
Simple line drawing of a cloud with sun rays, labeled 'SEMI ENS' below (no additional text or symbols)
text_image
OLEILLÉ CO
text_image
UVERTPLUVIEUX
info@cresta-international.com
www.cresta-smart.com
$$ A = M A X / M I N \quad B = - \quad + C = D = M O D E \quad E = C H A N N E L $$