
DTX600 - Weather Station Cresta - Free user manual and instructions
Find the device manual for free DTX600 Cresta in PDF.


| Product Type | Weather Station |
| Brand | Cresta |
| Model | DTX600 |
| Dimensions (Main Unit) | Approx. 150 x 100 x 50 mm |
| Weight (Main Unit) | Approx. 0.5 kg |
| Power Supply | 2 x AAA batteries (not included) or USB power adapter |
| Display Type | LCD with backlight |
| Indoor Temperature Range | 0°C to 50°C (32°F to 122°F) |
| Outdoor Temperature Range (Remote Sensor) | -20°C to 60°C (-4°F to 140°F) |
| Humidity Measurement Range | 20% to 95% RH |
| Barometric Pressure Range | 700 to 1100 hPa |
| Wireless Sensor Range | Up to 100 meters (open space) |
| Time Setting | Radio-controlled DCF77 (Europe) or manual |
| Alarm Function | Yes, with snooze |
| Weather Forecast | Yes, based on barometric pressure trend |
| Memory | Min/Max values record |
| Mounting | Table stand or wall mount |
| Maintenance | Clean with soft dry cloth; avoid liquids |
| Safety Precautions | Use only specified batteries; do not expose to extreme temperatures |
| Spare Parts Availability | Remote sensors available from manufacturer |
| Manual Language | English (PDF download available) |
Frequently Asked Questions - DTX600 Cresta
User questions about DTX600 Cresta
0 question about this device. Answer the ones you know or ask your own.
Ask a new question about this device
Download the instructions for your Weather Station in PDF format for free! Find your manual DTX600 - Cresta and take your electronic device back in hand. On this page are published all the documents necessary for the use of your device. DTX600 by Cresta.
USER MANUAL DTX600 Cresta
Thank you for purchasing this device, Please read the operating instructions carefully to familiarize yourself with the features and modes of operation before using the instrument.
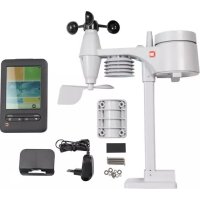
Package Contents
Carefully unpack and remove the contents:
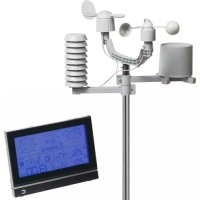
• 1x weather station main unit
• 1x stainless steel mast
• 1x thermo-hygro sensor
- 1x rain sensor
• 1x wind speed sensor
• 1x wind direction sensor
- Mounting screws
• Stainless steel accessory for fixing the mast and screws.
Technical Details
• Six keys: MODE, +, -, ALARM, ALERT, SNOOZE/LIGHT
• Radio controlled clock
• Automatic receiving of time signal DCF77 to display exactest time
• Automatically switches to/from daylight saving time (summer/winter time)
• Time display in 12/24 format
• +/-12 total 24 adjustable time zones
• Continuous perpetual calendar up to 2099
• Display of Date, Month and Day of week
• Day of week display available in 7 languages, i.e. German, English, Italian, French, Dutch Spanish, Danish.
• Dual alarm with snooze function (5 minutes alarm interruption)
• 5 weather forecast: sunny, partly sunny, cloudy, rainy, storm.
• Barometer and bar and data of 12 hours history for air pressure
• Indoor /outdoor temperature and humidity with trend
• Max./min. of temperature and humidity
• Thermometer measuring range inside:°C to +50 °C, outside -20°C\~60 °C
• Temperature display elective in °C or °F
• Temperature alert for indoor and outdoor
• Living space humidity
- Moon phase
• Wind speed in mph /kmh, wind speed 0\~256kmh
• Wind direction in 16 directions
• Rainfall in mm and inch and display of 1hour, 24hour, TOTAL.
Rain volum: (0\~999.9MM)
• Low battery indication
• Blue background illumination LED.
• Main unit batteries: 2 x AA, LR06, 1.5V
Outdoor sensor:
• Frequency: 433 MHz
• Transmission range: 100 meters in open area.
** Actual distance may be varied depending upon the environment, it will be shortened if with interference, such as concrete wall etc.
• Batteries: 2 x AA, LR06 1.5V
Installation
• Installing the Batteries
- Open the main unit battery cover located at the back of the unit and insert 2XAA batteries into the battery compartment and close the battery cover.
- Pull away the shower proof casing of the thermo-hrgro sensor to reveal the 2 sockets.(for the wind sensor and rain sensor)
- Connect the attached cables 1. cable from wind speed sensor insert into the socket of wind direction sensor 2. cable from wind direction and cable from rain sensors to the corresponding sockets of the thermo-hygro sensor by clicking them into place. Make sure that rain and wind cables are connected to the correct sockets.
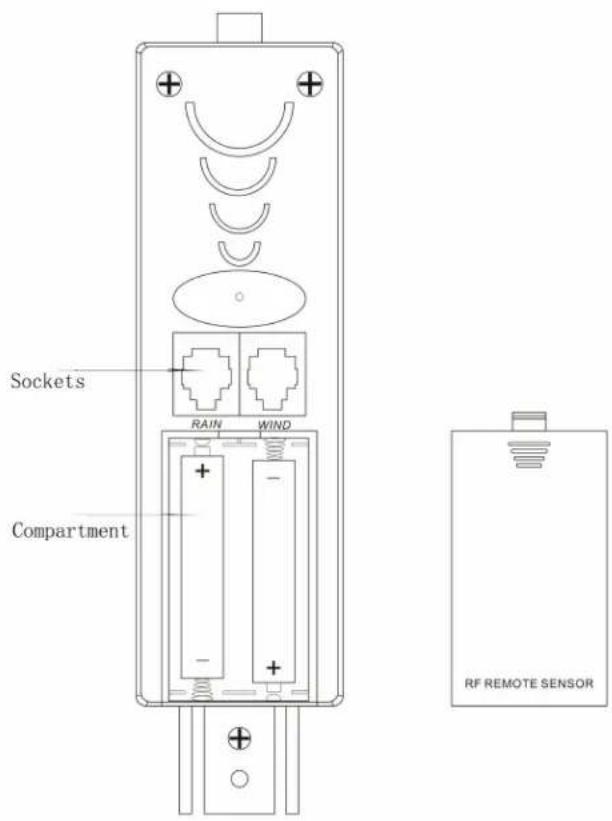
NOTES:
- First insert the batteries of main unit, then insert the batteries of the outdoor sensor in 3 minutes after the main unit is powered on, to assure of the sensor data received well. In case of the outdoor sensor data received failure, pls press ALARM key for more than 3 seconds to synchronize the RF signal.
• Every time the batteries are replaced, the main unit will lose all the weather data.
- Every time the batteries are replaced, the thermo-hygro sensor will synchronize with the main Unit again. you must press the ALARM key for more than 3 seconds to synchronize the RF signal.
• In case of any failure of RF, pls reset the sensor to and press ALARM receive again.
- Mounting the main unit
The main unit can be placed onto any flat surface or wall mounted at the desired location by Hanging hole. It is important to check that the radio signal can be received before mounting.
• Mounting the outdoor sensor onto the stainless steel mast
For accurate results, the outdoor sensor mast should be securely mounted onto a horizontal surface and in an open area away from trees and other coverings where rainfall or wind speed may be reduced causing inaccurate reading.
- Mounting the wind speed sensor to the first plastic bracket: first check the wind-fan can rotate freely before fixing. The wind speed sensor should now be mounted onto the bracket provided to allow the wind to travel around the sensor unhindered from all directions. please follow the below display:

natural_image
Pure mechanical diagram showing a lever system with pulleys and weights, no text or symbols present- Mounting the wind direction sensor to the first plastic bracket: first check the wind direction sensor before fixing, there is one cable from wind speed sensor, please insert it into the socket under the wind direction sensor. please follow the below display:

natural_image
Pure mechanical diagram showing a lever mechanism with no text, numbers, or symbols- Mounting the rain sensor to the second plastic bracket: there are vertical engraved lines at the bottom edge of the round cover and the sensor part, you only need adjust the two line into one position, then turn clockwise, the rain sensor part will be connected well, then fix them with 4 screws onto the plastic bracket (don't use only 2 screws) please follow the below display:

natural_image
Pure technical line drawing of a mechanical assembly without any text, numbers, or symbols- Mounting the thermo-hygro sensor to the third plastic bracket: once the wind sensors and rain sensor are fixed onto the bracket, connect the cables to the corresponding thermo-hygro sensor sockets with the plugs, so that data can be transmitted to the main unit, then put the house-like cover onto the thermo-hygro sensor, please follow the below display:

Note: please don't put in or take off the plug very offen, or put the plug outside in the air so long time to avoid any damage of the plug, if so, there will be bad connection.
- Mounting all the sensors onto the stainless steel mast and fix the whole parts at outdoor open area :(note: please make sure all the cables are connected well into the sockets)

LCD overview


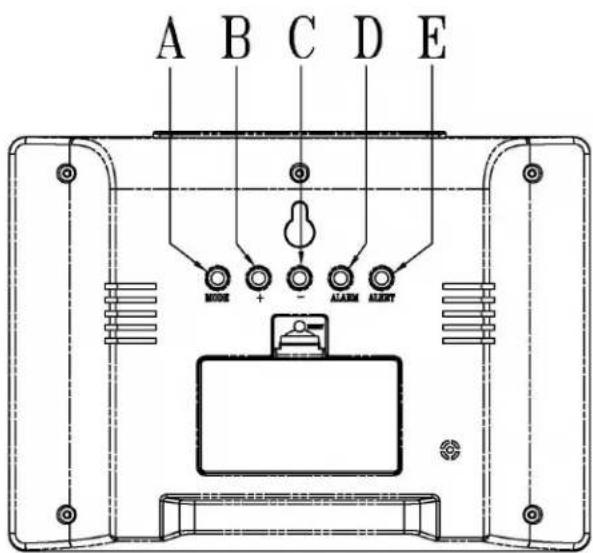
- Weather Forecast 2. Living space humidity 3. Indoor humidity trend 4. Indoor low battery 5. Rainfall 6. Air Pressure 7. Wind direction 8. Date 9. Wind speed 10. Month 11. Day of week 12. Moon Phase 13. Dual alarm 14. Time 15. RCC symbol 16. Summer time 17. Outdoor low battery 18. Outdoor humidity 19. Outdoor humidity trend 20. Indoor humidity 21. Outdoor temperature 22. Outdoor temperature alert
23. RF symbol 24. Indoor temperature alert 25. Outdoor temperature trend 26. Indoor temperature 27. Indoor temperature trend
A=MODE B= + C=- D= ALARM E= ALERT F=SNOOZE/LIGHT
Initial Operation
• After inserting the batteries, the main unit will connect with the outdoor sensor by RF signal. The RF signal symbol at the out area will flash.
- This process takes about 3 minutes. Then the display shows the outdoor temperature / humidity/wind speed/wind direction/rainfall, in case of failure of reception, pls press "ALARM" for more than 3 seconds to receive again.
• the automatic receiving of the DCF radio signal begins after 3 minutes of outdoor RF reception.
- This RCC reception process is going on, the flashing symbol "radio tower" appears in the time display area at the same time.
- Once radio signal receiving is successful, the display shows the symbol "radio tower" continuously.no flashing.
If, due to bad reception, or no RCC automatic time reception is possible, follow the steps below manually.
Manual time set-up(Please also follow the steps to choose some setting, such as 12/24hour, time zone, languages etc.)
- Press and hold key "MODE" for 3 seconds.
• The 12/24 hour flashing. Use “+” and “-” to select - Press "MODE" to confirm.
- The display for the time zone is flashing. Use “+” and “-” to select the time zone (-12 to +12).
- Press "MODE" to confirm.
• The DM/MD flashing, Use “+” and “-” to select - Press "MODE" to confirm.
• The display for the year is flashing. Use “+” and “-” to select the year. - Press "MODE" to confirm.
• The display for the month is flashing. Use“+” and “-” to select the month. - Press "MODE" to confirm.
• The display for the date is flashing. Use “+” and “-” to select the date. - Press "MODE" to confirm.
• The display for the hour is flashing. Use “+” and “-” to select the hour. - Press "MODE" to confirm.
• The display for the minutes is flashing. Use “+” and “-” to select the minutes.. - Press "MODE" to confirm.
- The language selection for the display of the weekdays is flashing. Use “+” and “-” to select the language.
- Press "MODE" to confirm
• The C/F for temperature flashing, Use “+” and “-” to select. - Press "MODE" to confirm.
• The hpa/inhg for air pressure flashing, Use “+” and “-” to select. - Press "MODE" to confirm.
• The mm/inch for rainfall and kmh/mpg flashing, Use “+” and “-” to select. - Press "MODE" to confirm.
Information:
- The clock automatically changes from set-up mode to time display mode if no keys are pressed for 20 seconds.
- Explanation for the time zone display: You can manually adjust the clock to the time zone of a country (up to 1500km distance to Frankfurt/Main) where the clock receives the DCF signal but where the actual time differs from the time received.
If, e.g. the time in a given country is 1 hour ahead of the German time, set the time zone display to 01. The clock is now DCF controlled but the time is one hour ahead.
Daily alarm set-up
- Press "MODE" to switch from time display to A1 display
- Press and hold the key "MODE" for 3 seconds, the flashing alarm time are shown
- The hour display of the alarm time is flashing. Use “+” and “-” to select the hour. Press “MODE” to confirm.
- then follow the minutes. Use “+” and “−” to select the minutes, Press “MODE” to confirm.
• The same setting as for A2.
Daily alarm on/off
- 1st press "ALARM" to activate the alarm 1 with alarm symbol showing.
- 2^nd press "ALARM" cancel the alarm 1, then activate the alarm 2 with alarm symbol showing
- 3^rd press "ALARM" to activate the alarm1 and alarm 2 with alarm symbol showing.
• 4 ^th press “ALARM” cancel all the alarms
Information:
- The clock automatically changes from set-up mode to time mode if no keys are pressed for 20 seconds.
• The alarm sounds for 2 minutes if no key is pressed to stop it.
Snooze function
To activate the snooze function, follow the steps below
- Press the key "SNOOZE/LIGHT", while the alarm sounds, to activate the snooze function.
• If the snooze function is activated, alarm symbol is flashing.
• The alarm repeat after 5 minutes.
• The snooze function can be stopped by pressing any key.
12/24 hours mode
- The time display can be in 12 (AM/PM) or 24 hours mode, please follow the manual set-up to select
°C/°F temperature display
• The temperature display can be in °C or °F, please follow the manual set-up to select.
Max./ Min. for the indoor/outdoor temperature and humidity
- Press “+” for displaying of indoor/outdoor max./min. of temperature and humidity, hold “+” for more than 3 seconds to clear up the max./min.
Temperature alert set-up
- Press “ALERT” for more than 3 seconds, the upper limit of inside temperature is flashing, use “+” and “−” to set the maximum alert temperature.
- Press "ALERT", the lower limit of inside temperature is flashing, use "+" and "-" to set the minimum alert temperature.
- Press “ALERT”, the upper limit of outside temperature is flashing, use “+” and “−” to set the maximum alert temperature.
- Press “ALERT”, the lower limit of outside temperature is flashing, use “+” and “-” to set the minimum alert temperature.
- When the alert is activated, the alert symbol will be shown.
Temperature alert on/off
Press and hold the key "ALERT" to set the temperature alert on or off.
- Alert on: Temperature alert symbol shown in display
- Alert off: Temperature alert symbol goes out.
Information
- The set-up process cannot be completed if the maximum temperature selected is lower than the minimum selected temperature.
- The minimum temperature selected must at least be 1^ below the maximum selected temperature.
5 Weather forecast
Sunny
Slightly Sunny
Cloudy
Rainy
Storm
Remarks: as the weather is forecasted by air pressure only, The display will have discrepancy with the actual weather sometime.
Barometer and bar and data of history for the past 12 hour of air pressure.
Air pressure can be in hPa and inHg, and have bar of the past 12 hours.
Wind speed in mph/kmh (0\~256kmh)
- The wind speed can be shown in mph and kmh, please follow the manual set-up to select mph/kmh, the display of the speed is updated in case of the sensor updated every 1 minuities.
Wind direction
- There will be 16 wind directions, the display of the direction is updated in case of the sensor updated every 1 minutes
Rainfall display (0\~999.99mm)
- Rain fall can be shown in mm and inch, please follow the manual set-up to select the mm/inch.
- Press “-” to show the rainfall in 1 hour, press again 24 hours, then TOTAL.
- Press “-” for more than 3 seconds to clear up the volum accordingly, such as if showing 1 hour, clear up the data in 1 hour, others unchanged, if showing 24 hours, clear up the data in 24 hour, others unchanged.
- The max. of the rainfall is up to 999.99mm (99.99inch), the display is flashing in case of the max., you have to clear up the data by hand, otherwise, the data can not be updated any more.
Illumination
- Press the key "SNOOZE/LIGHT" to activate the display illumination for 8 seconds.
Moon phase display
The weather station uses saved data to show the moon phase

A B C D E F G H
A: New moon
D: increasing 3/4
G: Last half
B: increasing crescent
E: Full moon
H: decreasing crescent
C: First half
F: decreasing 3/4
Living space humidity
The weather station uses saved data to determine the humidity in the living space and shows the respective symbols.

comfortable, dry, humid
Low battery condition display
The weather station displays the low battery condition symbol to remind the batteries of the weather station or the outdoor sensor need to be exchanged.
• Weather station low battery condition display: within indoor area of the display
• Outdoor sensor low battery condition display: in the outdoor area of the display
RF connection to the outdoor sensor
- Press and hold the key "ALARM" for 3 seconds to search for outdoor sensor, the RF signal symbol at the outside area will flashing when trying to connect. RF reception is weaker in rooms with concrete walls (e.g. in the basement) and in office buildings, the distance will be shorten if have interference. For extreme cases, please put the main unit near a window
Reception of radio controlled signal
- DCF radio signal search starts automatically about 3 minutes after battery exchange. The "radio tower" signal is flashing.
- Press“+”, “-”for more than 3 seconds to enter or quit the Radio controlled signal reception
- The clock synchronizes with the DCF radio signal automatically and daily from AM 1:00 to 3:00 to correct potential time deviations each hour. If the synchronization is unsuccessful ("radio tower" symbol disappears), a further synchronization attempt is made From 4:00 and 5:00 until success. This process is repeated up until 5:00 AM. If still not success, daily reception stop.
Information
- Flashing "radio tower" symbol stands for DCF radio signal reception started.
• Continuous “radio tower” symbol stands for DCF radio signal reception successful. - Please observe a minimal distance of 2.5m to sources of interference such as televisions or computer screens.
• The radio signal is weaker in rooms with concrete walls (e.g. in the basement) and in office buildings. For extreme cases, please put the main unit near a window. - There are less atmospheric disturbances at night. A radio time signal reception is usually possible at that time. One synchronisation per day is sufficient to keep the time display accuracy at 1 second.
Tip
You can adjust the time manually in case the clock cannot receive the DCF radio signal (due to interferences, large distance to the sender, obstructions like mountains, etc.) As soon as the radio signal can be received, the clock will be adjusted automatically.
Radio signal sender coverage up to 1500km distance to Frankfurt/Main.
IMPORTANT
We thank you for your confidence in CRESTA and are convinced that this product will give you years of trouble-free use. Should your device not function properly and/or if you have a question about the functionality, then a professional team is standby to have your product serviced in a quick and skilful way. In order to do this quickly and efficiently we ask you to contact us thru below channels and drop your question/complaint with us, before going back to the shop. Our helpdesk will give you an answer. In case they cannot solve your complaint, you will be given an RMA (repair authorisation) number. With this, you can go back to the sales point where your repair will be handled.
Via website: www.cresta.nl under 'Support'
Via email: info@cresta.nl
Via telephone : +31 20 5608940
- Package Contents
- Technical Details
- Outdoor sensor:
- Installation
- - Mounting the main unit
- • Mounting the outdoor sensor onto the stainless steel mast
- RF symbol 24. Indoor temperature alert 25. Outdoor temperature trend 26. Indoor temperature 27. Indoor temperature trend
- Initial Operation
- Manual time set-up(Please also follow the steps to choose some setting, such as 12/24hour, time zone, languages etc.)
- Information:
- Daily alarm set-up
- Daily alarm on/off
- Snooze function
- 12/24 hours mode
- °C/°F temperature display
- Max./ Min. for the indoor/outdoor temperature and humidity
- Temperature alert set-up
- Temperature alert on/off
- Information
- Weather forecast
- Barometer and bar and data of history for the past 12 hour of air pressure.
- Wind speed in mph/kmh (0\~256kmh)
- Wind direction
- Rainfall display (0\~999.99mm)
- Illumination
- Moon phase display
- Living space humidity
- Low battery condition display
- RF connection to the outdoor sensor
- Reception of radio controlled signal
- Tip
- IMPORTANT
Brand : Cresta
Model : DTX600
Category : Weather Station