DTX690 - Weather Station Cresta - Free user manual and instructions
Find the device manual for free DTX690 Cresta in PDF.
| Product type | Digital weather station |
| Brand | Cresta |
| Model | DTX690 |
| Main unit power supply | 3 AAA (LR03) 1.5V batteries |
| Outdoor sensor power supply | 2 AA (LR06) 1.5V batteries |
| Outdoor sensor frequency | 868 MHz |
| Transmission range | Up to 100 m in open space |
| Indoor temperature measurement range | 0°C to +50°C |
| Outdoor temperature measurement range | -20°C to 60°C |
| Display | LCD with blue LED backlight |
| Clock | Radio-controlled clock DCF77, 12/24h, time zone, calendar up to 2099 |
| Dual alarm | Yes, with snooze function |
| Weather forecast | 5 icons: sunny, partly cloudy, cloudy, rain risk, storm risk |
| Barometer | Atmospheric pressure with last 12 hours graph |
| Humidity | Indoor and outdoor with max/min values |
| Wind | Speed (0-256 km/h) and direction (16 directions) |
| Rainfall | 0-999.9 mm, 1h/24h/total display |
| Moon phase | 8 phases displayed |
| Backlight | 8-second timed |
| Maintenance | Clean with a soft, dry cloth. Do not use abrasive products. |
| Safety | Keep out of reach of children. Do not expose the main unit to water. Use only recommended batteries. |
| Box contents | Main unit, stainless steel mast, sensors (temperature/humidity, rain, wind, wind direction), screws, accessories |
Frequently Asked Questions - DTX690 Cresta
User questions about DTX690 Cresta
0 question about this device. Answer the ones you know or ask your own.
Ask a new question about this device
Download the instructions for your Weather Station in PDF format for free! Find your manual DTX690 - Cresta and take your electronic device back in hand. On this page are published all the documents necessary for the use of your device. DTX690 by Cresta.
USER MANUAL DTX690 Cresta
natural_image
Blue geometric logo resembling a stylized letter 'C' or block (no text or symbols)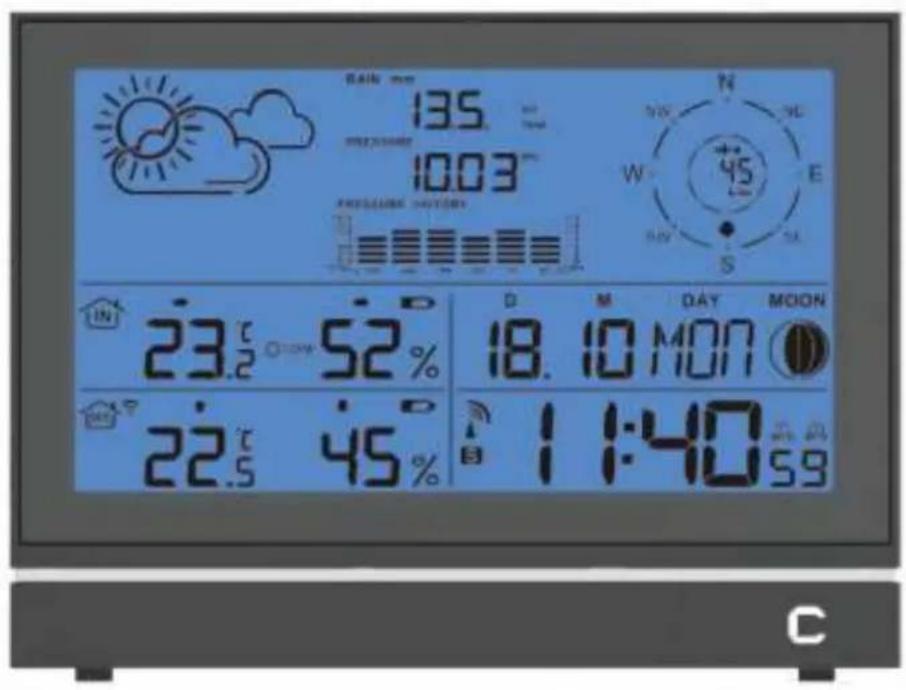
text_image
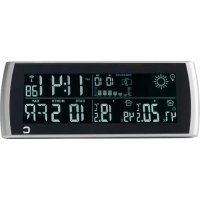
135 1003 PRESUING HOURS 23.2 52% 22.5 45% 18.10 MON 11:40 AM S S W N NE E DAY MOON 6.5 CDTX690
NL. WEERSTATION GEBRUIKSAANWIJZING EN. WEATHER STATION USER MANUAL FR. STATION MÉTÉO MODE D'EMPLOI DE. WETTERSTATION BEDIENUNGSANLEITUNG
GEBRUIKSAANWIJZING
info@cresta-international.com
www.cresta-smart.com
Tel: +31 20 6932 932
INHOUD VAN DE VERPAKKING
text_image
Sockets MAIN WIND Compartment AF METER SEMACHATTENTIE:
natural_image
Pure mechanical diagram showing a lever mechanism with no text, numbers, or symbols2. BEVESTIGEN VAN DE WINDRICHTING SENSOR OP DE EERSTE BEUGEL.
natural_image
Pure mechanical diagram showing a lever system with pulleys and a block, no text or symbols present3. BEVESTIGEN VAN DE REGENSENSOR OP DE TWEEDE KUNSTSTOF BEUGEL
natural_image
Pure mechanical diagram showing a lever and shaft assembly without any text, numbers, or symbols4. BEVESTIGEN VAN DE THERMO-HYGRO SENSOR OP DE DERDE KUNSTSTOF BEUGEL:
natural_image
Pure technical diagram of electrical insulator components without any text or symbolstext_image
plastic bracket plastic bracket plastic bracketLCD OVERZICHT:
text_image
1 2 3 4 5 6 7 8 9 10 11 27 26 25 24 23 22 21 20 19 18 17 16 15 MAX 00° 10:11' MIN MAX DAY MOON. 23.6 @ 48% 17.10 MIT 32.5 42% 12:58 32We thank you for buying our C-SMART digital weather station DTX510. It shows your confidence in our brand and our products. Please be assured you have bought a high quality product which you will enjoy using for many years to come.
Please read this instruction manual thoroughly before first use, even if you are familiar with this type of product. It gives you tips for optimal use.
If you require technical support and or have questions about the functioning of the product please send an e-mail to our after sales service; the address is listed here under. We will give you a fast reply.
CRESTA INTERNATIONAL B.V.
ROLBRUGWEG 4
NL-1332 AS ALMERE
info@cresta-international.com
www.cresta-smart.com
Tel : + 31 20 6932932
GIFTBOX CONTENTS
Carefully unpack and remove the contents:
- 1x weather station main unit /base stand
• 1x stainless steel mast
• 1x thermo-hygro sensor - 1x rain sensor
- 1x wind speed sensor
• 1x wind direction sensor - Mounting screws
- Stainless steel accessory for fixing the mast and screws.
TECHNICAL DETAILS
Your base station has the following features:
- Six keys: MODE, ALARM, ALERT, SNOOZE •LIGHT, UP, DOWN
• Radio controlled clock
• Automatic receiving of time signal DCF77 to display exactest time
• Automatically switches to/from daylight saving time (summer/winter time)
• Time display in 12/24 format
• +/-12 total 24 adjustable time zones
• Continuous perpetual calendar up to 2099
• Display of Date, Month and Day of week - Day of week display available in 7 languages, i.e. German, English, Italian, French, Dutch Spanish, Danish.
-
Dual alarm with snooze function (5 minutes alarm interruption)
-
5 weather forecast icons: SUNNY, PARTLY CLOUDY, CLOUDY, RAIN CHANCE, STORM CHANCE
- Barometer and bar and data of 12 hours history for air pressure
- Indoor /outdoor temperature and humidity with trend
• Max./min. of temperature and humidity
• Thermometer measuring range inside:°C to +50 °C, outside -20°C\~60 °C
• Temperature display elective in °C or °F
• Temperature alert for indoor and outdoor
• Living space humidity - Moon phase
• Wind speed in mph /kmh, wind speed 0\~256kmh
• Wind direction in 16 directions - Rainfall in mm and inch and display of 1 hour, 24 hour, Total. Rain volume: (0\~999.9MM)
- Low battery indication
- Blue background illumination LED.
• Main unit batteries: 3 x AAA, LR03, 1.5V
Outdoor sensor:
• Frequency: 868 MHz
• Transmission range: 100 meters in open area.
** Actual distance may be varied depending upon the environment, it will be shortened if with interference, such as concrete wall etc.
- Batteries: 2 x AA, LR06 1.5V
INSTALLATION
Installing the Batteries
- Open the main unit battery cover located at the back of the unit and insert 3XAAA batteries into the battery compartment and close the battery cover.
- Connect base stand to the unit.
- Insert 2xAA, LR06,1.5V batteries into transmitter and observe the red LED light flashing.
- Connect the attached cables for outdoor sensor: 1. cable from wind speed sensor insert into the socket of wind direction sensor 2. cable from wind direction and cable from rain sensors to the corresponding sockets of the thermo-hygro sensor by clicking them into place. Make sure that rain and wind cables are connected to the correct sockets with RAIN, WIND marks.
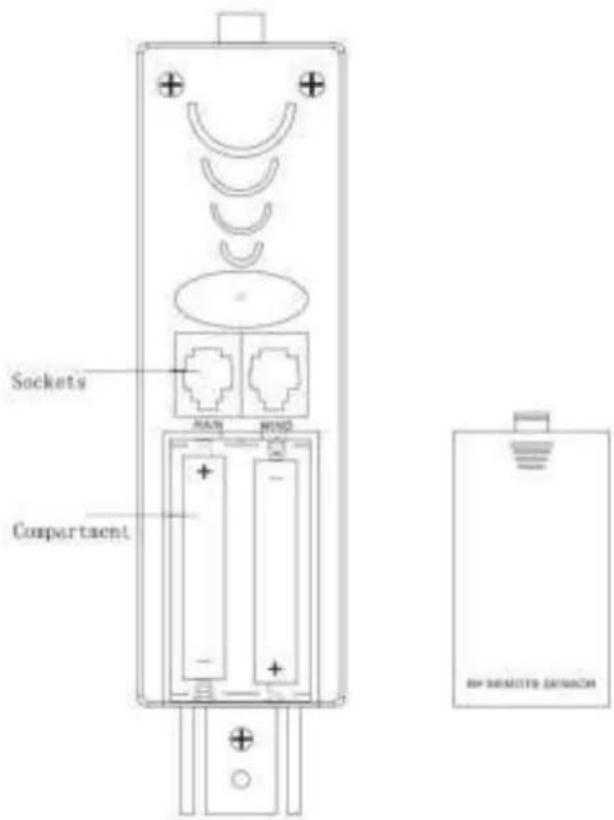
text_image
Sockets MAIN WING Compartment BIP REMOUNT EXAMACHNOTES:
- First insert the batteries of main unit, then insert the batteries of the outdoor sensor in 3 minutes after the main unit is powered on, to assure of the sensor data received well.
In case of the outdoor sensor data received failure, pls press ALARM key for more than 3 seconds to synchronize the RF signal.
• Every time the batteries are replaced, the main unit will lose all the weather data. - Every time the batteries are replaced, the thermo-hygro sensor should synchronize with the main unit again, please press the key ALARM for more than 3 seconds to synchronize the RF signal.
Mounting the main unit
- The main unit can be placed onto any flat surface or wall mounted at the desired location by Hanging hole. It is important to check that the radio signal can be received before mounting.
Mounting the outdoor sensor onto the stainless steel mast
For accurate results, the outdoor sensor mast should be securely mounted onto a horizontal surface and in an open area away from trees and other coverings where rainfall or wind speed may be reduced to cause inaccurate reading.
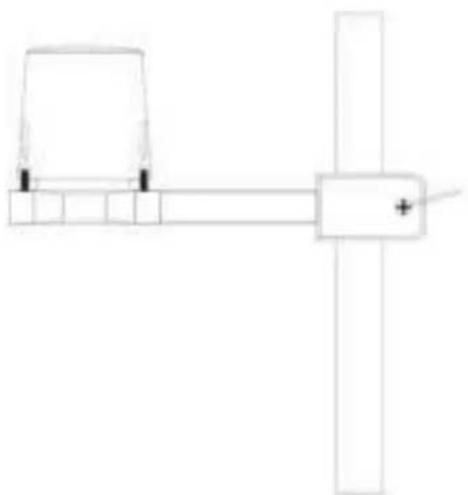
Mounting the wind speed sensor to the first plastic bracket: first check the wind-fan can rotate freely before fixing, then the wind speed sensor should be mounted onto the
bracket to allow the wind to travel around the sensor from all directions. Please follow the below display :
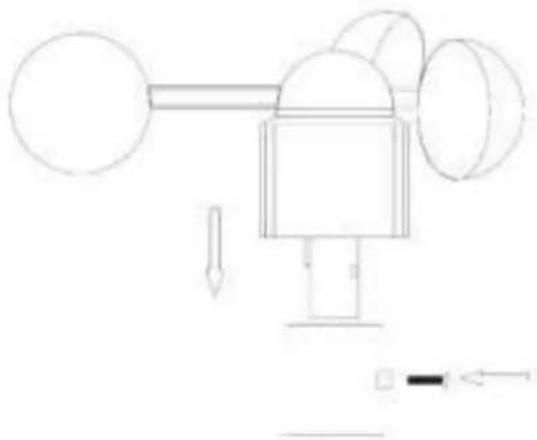
natural_image
Pure mechanical diagram showing a lever mechanism with no text, numbers, or symbolsMounting the wind direction sensor to the first plastic bracket: first check the wind direction sensor before fixing, there is one cable from wind speed sensor, please insert it into the socket under. please follow the below display:
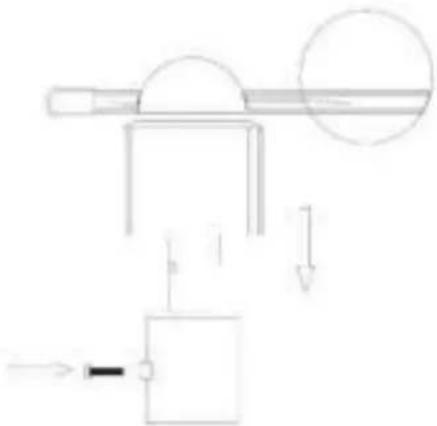
natural_image
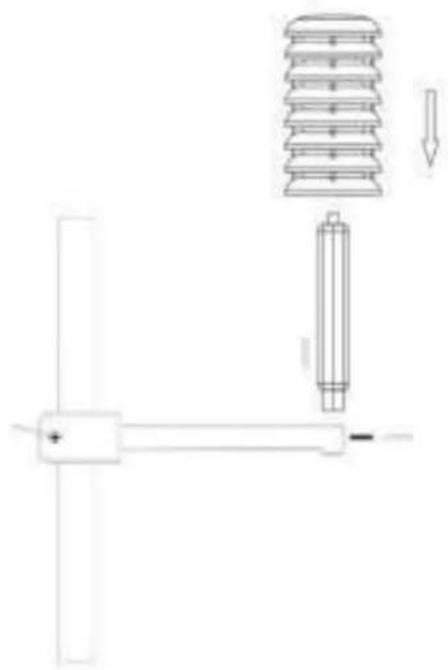
Pure mechanical diagram showing a lever system with a pulley and weights, no text or symbols presentMounting the rain sensor to the second plastic bracket: there are vertical engraved lines at the bottom edge of the round cover and the sensor part, you only need to adjust the two line into one position, then turn clockwise, the rain sensor part will be connected well, then fix them with 4 screws onto the plastic bracket ( don't use only 2 screws ) please follow the below display:
natural_image
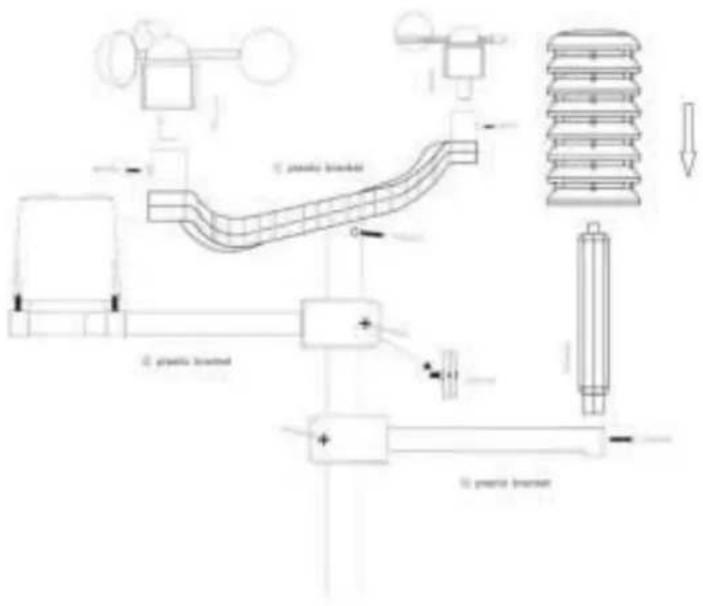
Pure electrical circuit lines without any symbolsMounting the thermo-hygro sensor to the third plastic bracket: once the wind sensors and rain sensor are fixed onto the bracket, connect the cables to the corresponding thermo-hygro sensor sockets with the plugs, so that data can be transmitted to the main unit, then put the house-like cover onto the thermo-hygro sensor, please follow the below display:
natural_image
Pure technical diagram showing a mechanical assembly with no text, numbers, or symbolsNote: please don't put in or take off the plug very offen, or put the plug outside in the air so long time to avoid any damage of the plug, if so, there will be bad connection.
Mounting all the sensors onto the stainless steel mast and fix the whole parts at outdoor open area
Note: please make sure all the cables are connected well into the corresponding sockets
text_image
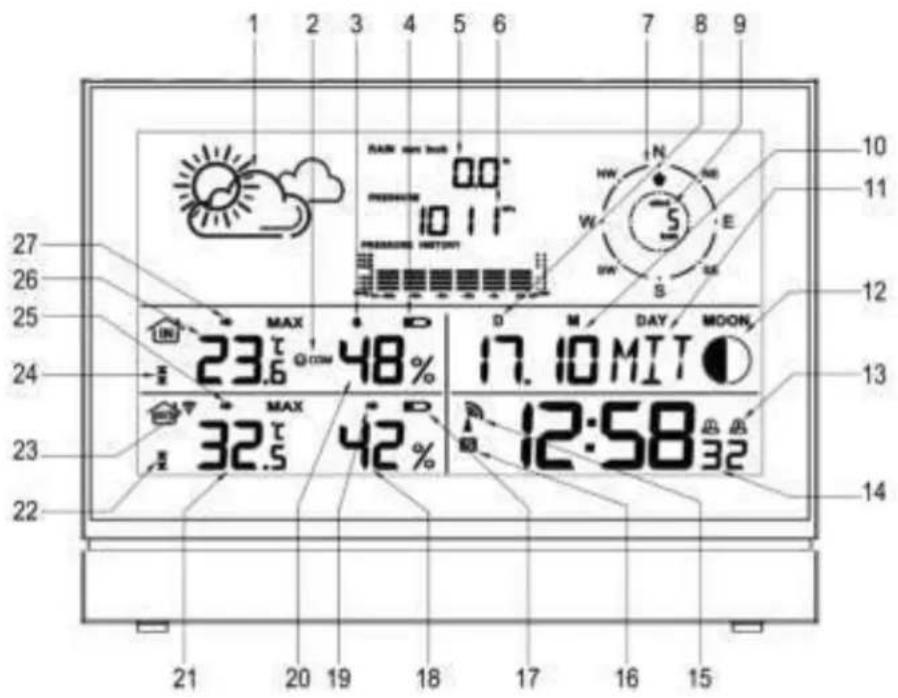
1. plastic bracket 2. plastic bracket 3. plastic bracketLCD overview :
text_image
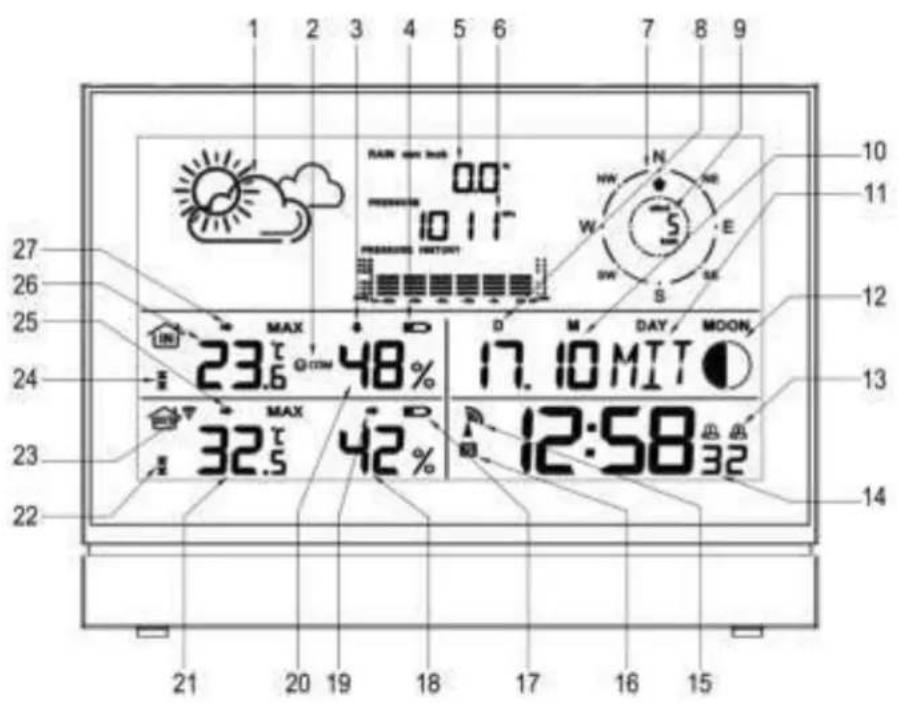
1 2 3 4 5 6 7 8 9 10 11 27 26 25 MAX 23.6 48% D D M DAY MOON. 17.10 MIT 24 MAX 32.5 42% A 12:58 32 23 22 21 20 19 18 17 16 15| Item | name | Item | name |
| 1 | Weather forecast | 15 | RCC symbol |
| 2 | Living space humidity | 16 | Summer time |
| 3 | Indoor humidity trend | 17 | Outdoor low battery |
| 4 | Indoor low battery | 18 | Outdoor humidity |
| 5 | Rainfall | 19 | Outdoor humidity trend |
| 6 | Air Pressure | 20 | Indoor humidity |
| 7 | Wind direction | 21 | Outdoor Temperature |
| 8 | Date | 22 | Outdoor temperature Alert |
| 9 | Wind speed | 23 | RF symbol |
| 10 | Month | 24 | Indoor temperature Alert |
| 11 | Day of week | 25 | Outdoor temperature trend |
| 12 | Moon Phase | 26 | Indoor temperature |
| 13 | Dual alarm | 27 | Indoor temperature trend |
| 14 | Time | ||

flowchart
graph TD
    A["MODE"] --> B["ALARM"]
    B --> C["ALERT"]
    C --> D["SNOKE • LIGHT"]
    D --> E["UP"]
    E --> F["DOWN"]
    style A fill:#f9f,stroke:#333
    style B fill:#f9f,stroke:#333
    style C fill:#f9f,stroke:#333
    style D fill:#ccf,stroke:#333
    style E fill:#ccf,stroke:#333
    style F fill:#ccf,stroke:#333
Top View:
A=MODE B=ALARM C=ALERT D=SNOOZE/LIGHT E=UP F=DOWN
INITIAL OPERATION
- After inserting the batteries, the main unit will connect with the outdoor sensor by RF signal. The RF signal symbol at the OUT area will flash.
- This process takes about 3 minutes. Then the display shows the outdoor temperature /humidity/wind speed/wind direction/rainfall, in case of failure of reception, pls press "ALARM" for more than 3 seconds to receive again.
- the automatic receiving of the DCF radio signal begins after 3 minutes of outdoor RF reception.
- This RCC reception process is going on, the flashing symbol "radio tower" appears in the time display area at the same time.
- Once radio signal receiving is successful, the display shows the symbol "radio tower" continuously. The flashing stops
If, due to bad reception, or no RCC automatic time reception is possible, follow the steps below manually.
MANUAL TIME SET UP.
Please also follow the steps to choose some setting, such as 12/24hour, time zone, language, etc.
- Press and hold key "MODE" for 3 seconds.
• The 24 hour flashing. Use "UP" and "DOWN" to select 12/24Hr - Press "MODE" to confirm.
- The display for the time zone is flashing. Use "UP and "DOWN" to select the time zone (-12 to +12).
- Press "MODE" to confirm.
• The DM/MD flashing. Use "UP" and "DOWN" to select - Press "MODE" to confirm.
- The display for the year is flashing. Use "UP" and "DOWN" to select the year.
- Press "MODE" to confirm.
- The display for the month is flashing. Use "UP" and "DOWN" to select the month.
- Press "MODE" to confirm.
- The display for the date is flashing. Use "UP" and "DOWN" to select the date.
- Press "MODE" to confirm.
- The display for the hour is flashing. Use "UP" and "DOWN" to select the hour.
- Press "MODE" to confirm.
- The display for the minutes is flashing. Use "UP" and "DOWN" to select the minutes..
- Press "MODE" to confirm.
- The language selection for the display of the weekday is flashing. Use "UP" and "DOWN" to select the language.
- Press "MODE" to confirm
- The C/F for temperature flashing. Use "UP" and "DOWN" to select.
- Press "MODE" to confirm.
- The hpa/inhg for air pressure flashing. Use "UP" and "DOWN" to select.
- Press "MODE" to confirm.
- The mm/inch for rainfall and kmh/mph flashing. Use "UP" and "DOWN" to select.
- Press "MODE" to confirm.
INFORMATION:
- The clock automatically changes from set-up mode to time display mode if no keys are pressed for 20 seconds.
- Explanation for the time zone display:
You can manually adjust the clock to the time zone of a country (up to 1500km distance
to Frankfurt/Main) where the clock receives the DCF signal but where the actual time
differs from the time received.
If, e.g. the time in a given country is 1 hour ahead of the German time, set the time zone
display to 01. The clock is now DCF controlled but the time is one hour ahead.
DAILY ALARM SET UP
- Press "MODE" to switch from time display to A1 display
- Press and hold the key "MODE" for 3 seconds, the flashing alarm time is shown
- The hour display of the alarm time is flashing. Use "UP" and "DOWN" to select the hour.
Press "MODE" to confirm. - Then follow the minutes. Use "UP" and "DOWN" to select the minutes,
Press "MODE" to confirm.
• The same setting as for A2.
DAILY ALARM ON / OFF
- 1st press "ALARM" to activate the alarm 1 with A1 symbol showing.
- 2 ^nd press “ALARM” cancel the alarm 1, then activate the alarm 2 with A2 symbol showing
- 3 ^rd press "ALARM" to activate the alarm1 and alarm 2 with alarm symbols showing.
- 4 ^th press “ALARM” cancel all the alarms
Information:
- The clock automatically changes from set-up mode to time mode if no keys are pressed for 20 seconds.
- The alarm sounds for 2 minutes if no key is pressed to stop it.
SNOOZE FUNCTION
To activate the snooze function, follow the steps below
- Press the key "SNOOZE·LIGHT", while the alarm sounds, to activate the snooze function.
• If the snooze function is activated, the alarm symbol is flashing.
• The alarm repeats after 5 minutes. - The snooze function can be stopped by pressing any key.
12/24 HOURS MODE
The time display can be in 12 showing AM/PM or 24 hours mode, please follow the manual set-up to select
°C/°F TEMPERATURE DISPLAY
The temperature display can be in °C or °F, please follow the manual set-up to select.
MAX./ MIN. FOR THE INDOOR / OUTDOOR TEMPERATURE AND HUMIDITY
Press "UP" for displaying of indoor / outdoor maximum and minimum temperatures and humidities. Please hold "UP" for more than 3 seconds to clear up the max./min.
TEMPERATURE ALERT SET-UP
- Press "ALERT" to show the alert symbol.
- Press "UP" for more than 3 seconds, the upper limit of the inside temperature is flashing. Use "UP" and "DOWN" to set the maximum alert temperature.
- Press "ALERT", the lower limit of the inside temperature is flashing. Use "UP" and "DOWN" to set the minimum alert temperature.
- Press "ALERT", the upper limit of the outside temperature is flashing. Use "UP" and "DOWN" to set the maximum alert temperature.
- Press "ALERT", the lower limit of the outside temperature is flashing. Use "UP" and "DOWN" to set the minimum alert temperature.
- When the alert is activated, the alert symbol will be shown.
TEMPERATURE ALERT ON / OFF
Press and hold the key "ALERT" to set the temperature alert ON or OFF.
- Alert on: Temperature alert symbol shown in display
- Alert off: Temperature alert symbol goes out.
Information
- The set-up process cannot be completed if the maximum temperature selected is lower than the minimum selected temperature.
- The minimum temperature selected must at least be 1°C below the maximum selected temperature.
5 Weather forecast

Sunny

Party Cloudy
Cloudy
Rating
Main Stores
SUNNY
PARTLY CLOUDY
CLOUDY
RAIN CHANCE
STORM CHANCE
Remark: The display will have discrepancy with the actual weather sometime.
BAROMETER AND BAR SHOWING THE DATA OF THE AIR PRESSURE HISTORY OF THE PAST 12 HOURS.
Air pressure can be in hPa and inHg, and shows the airpressure of the past 12 hours in a bar graphic.
When you insert the battery, the altitude reading under the PRESSURE will flash,
Use "UP" and "DOWN" to select the altitude to adjust the pressure reading.
Press"SNOOZE·LIGHT, the weather icon is flashing. Use "UP" and "DOWN" to select the actual weather.
Press "SNOOZE·LIGHT" to confirm.
Please hold "SNOOZE·LIGHT" to enter the above when normal mode.
WIND SPEED IN mph/kmh (0\~256 kmh)
The wind speed can be shown in mph and kmh, please follow the manual set-up to select mph/kmh, the display of the speed is updated in case of the sensor updated every 1 minute.
WIND DIRECTION
The wind can be shown in 16 wind directions, the display of the direction is updated in case of the sensor updated every 1 minute.
RAINFALL DISPLAY (0\~999.99mm)
- Rain fall can be shown in mm and inch, please follow the manual set-up to select the mm/inch.
- Press "DOWN" to show the rainfall in 1 hour, press again 24 hours, then TOTAL.
- Press "DOWN" for more than 3 seconds to clear up the volume accordingly, such as if showing 1 hour, clear up the data in 1 hour, others unchanged, if showing 24 hours, clear up the data in 24 hours, others unchanged.
- The max. of the rainfall is up to 999.99mm (99.99inch), the display is flashing in case of the max., you have to clear up the data by hand, otherwise, the data can not be updated any more.
ILLUMINATION
Press the key "SNOOZE·LIGHT" to activate the display illumination for 8 seconds.
MOON PHASE DISPLAY
The weather station uses saved data to show the moon phase

A B C D E F G H
A: New moon
D: increasing 3/4
G: Last half
B: increasing crescent
E: Full moon
H: decreasing crescent
C: First half
F: decreasing 3/4
LIVING SPACE HUMIDITY
The weather station uses saved data to determine the humidity in the living space and shows the respective symbols.


comfortable dry humid
LOW BATTERY CONDITION DISPLAY
The weather station displays the low battery condition symbol to remind you that the batteries of the weather station or the outdoor sensor need to be exchanged.
• Weather station low battery condition display: within indoor area of the display
• Outdoor sensor low battery condition display: in the outdoor area of the display
RF CONNECTION TO THE OUTDOOR SENSOR
- Press and hold the key "ALARM" for 3 seconds to search for the outdoor sensor. The RF signal symbol at the outside area will flash when trying to connect. The RF reception is weaker in rooms with concrete walls (e.g. in the basement) and in office buildings. The distance will be shortened if you have interference. For extreme cases, please put the main unit near a window
RECEPTION OF THE RADIO CONTROLLED SIGNAL
- The DCF radio signal search starts automatically about 3 minutes after battery exchange. The "radio tower" signal is flashing.
- Press "UP" and "DOWN" for more than 3 seconds to enter or quit the Radio controlled signal reception
- The clock synchronizes with the DCF radio signal automatically and daily from AM 1:00 to 3:00 to correct potential time deviations each hour. If the synchronization is unsuccessful ("radio tower" symbol disappears), a further synchronization attempt is made From 4:00 and 5:00 until success. This process is repeated up until 5:00 AM. If still not success, daily reception stop.
Information
- The flashing "radio tower" symbol stands for DCF radio signal reception started.
- The continuous "radio tower" symbol stands for DCF radio signal reception successful.
- Please observe a minimal distance of 2.5 m to sources of interference such as televisions or computer screens.
- The radio signal is weaker in rooms with concrete walls (e.g. in the basement) and in office buildings. For extreme cases, please put the main unit near a window.
- There are less atmospheric disturbances at night. A radio time signal reception is usually possible at that time. One synchronisation per day is sufficient to keep the time display accuracy at 1 second.
Tip
You can adjust the time manually in case the clock cannot receive the DCF radio signal (due to interferences, large distance to the sender, obstructions like mountains, etc.) As soon as the radio signal can be received, the clock will be adjusted automatically. Radio signal sender coverage up to 1500km distance to Frankfurt/Main.
ENVIRONMENT FRIENDLY DISPOSAL
The European Directive 2002/96/EC on Waste Electrical and Electronic Equipment – WEEE – requires that old household electrical appliances should not be disposed of in the normal unsorted municipal waste stream. Old appliances should be collected separately in order to optimize the recovery and recycling of the materials they contain and reduce the impact on human health and the environment.
The crossed out "wheeled bin" symbol on the product reminds you of your obligation that when you dispose of the appliance, it should be separately collected. Contact your local authority for information concerning the correct disposal of your old appliance.
MODE D'EMPLOI
info@cresta-international.com
www.cresta-smart.com
Tel: +31 20 6932932
CONTENU DE LA BOÎTE
natural_image
Pure mechanical diagram showing a lever system with three spheres and directional arrows, no text or symbols present.natural_image
Pure mechanical diagram showing a lever system with pulleys and a block, no text or symbols presentnatural_image
Pure mechanical diagram showing a lever and shaft assembly without any text, numbers, or symbolsnatural_image
Technical diagram of a mechanical assembly with a spring, insulator, and shaft (no text or labels)text_image
1. plastic bridded 2. plastic bridded 3. plastic briddednatural_image
Three simple line drawings of a smiley face, neutral mouth, and sad face (no text or symbols)confortable, sec, humide
AFFICHEUR DE PILES DÉCHARGÉES
info@cresta-international.com
www.cresta-smart.com
Tel : + 31 20 6932932