
SBCHC8390 - Hi-Fi System PHILIPS - Free user manual and instructions
Find the device manual for free SBCHC8390 PHILIPS in PDF.
| Brand | PHILIPS |
| Model | SBCHC8390 |
| Product type | Wireless FM audio system (headphone + transmitter) |
| Carrier frequency (transmitter) | Channel 1: 863.5 MHz / Channel 2: 864.5 MHz |
| Carrier frequency (headphone) | 863.2 to 864.7 MHz (manual tuning) |
| Modulation | FM (frequency modulated) |
| RF output power | < 10 mW |
| Transmission range | Up to 100 meters (360°) |
| Audio input level | 500 mVrms (1 kHz sinusoidal) |
| Transmitter power supply | 12 V DC / 200 mA, mains adapter supplied (SBC CS030/00) |
| Headphone power supply | 2 rechargeable NiMH LR03/AAA batteries (550 mAh) |
| Charging time | Approximately 16 hours for a full charge |
| Audio frequency range (headphone) | 10 – 20,000 Hz |
| Signal-to-noise ratio | > 60 dB (A-weighted) |
| Total harmonic distortion | < 0.5 % |
| Channel separation | > 30 dB |
| Connectivity | Stereo 3.5 mm audio jack input (6.3 mm adapter supplied) |
| Functions | Wireless transmission, automatic power on/off, battery charging, LED indicators (power red, charge green), manual tuning, channel selection (2 channels) |
| Safety | Warning: prolonged use at high volume can damage hearing |
| Maintenance | Clean with a damp cloth; do not use alcohol, thinner or abrasive products |
| Package contents | FM transmitter SBC HC8392, FM headphone SBC HC8395, mains adapter 12 V/200 mA, 2 NiMH AAA batteries, 3.5mm->6.3mm jack adapter, antenna tube |
Frequently Asked Questions - SBCHC8390 PHILIPS
User questions about SBCHC8390 PHILIPS
0 question about this device. Answer the ones you know or ask your own.
Ask a new question about this device
Download the instructions for your Hi-Fi System in PDF format for free! Find your manual SBCHC8390 - PHILIPS and take your electronic device back in hand. On this page are published all the documents necessary for the use of your device. SBCHC8390 by PHILIPS.
USER MANUAL SBCHC8390 PHILIPS
Wireless FM Stereo Headphone
HC8390
Let's make things better.

PHILIPS
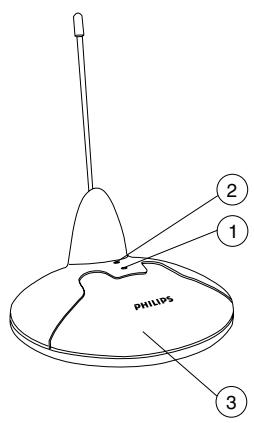
Figure 1
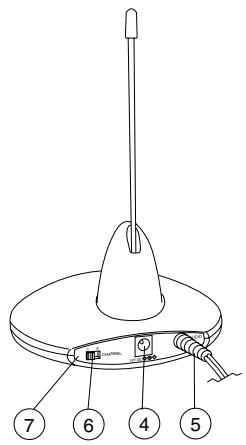
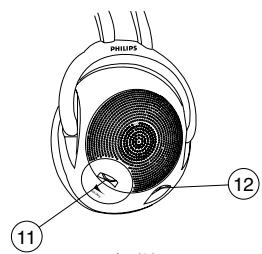
Figure 2
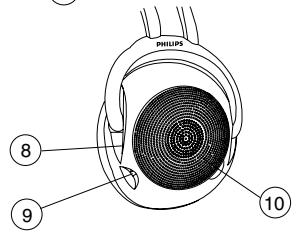
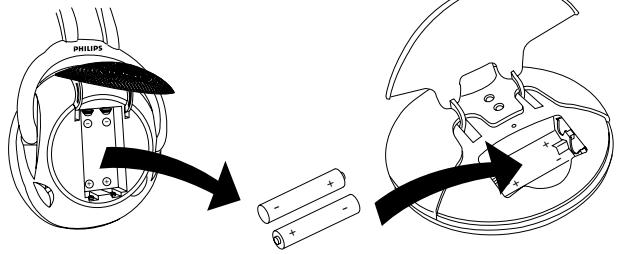
Figure 3
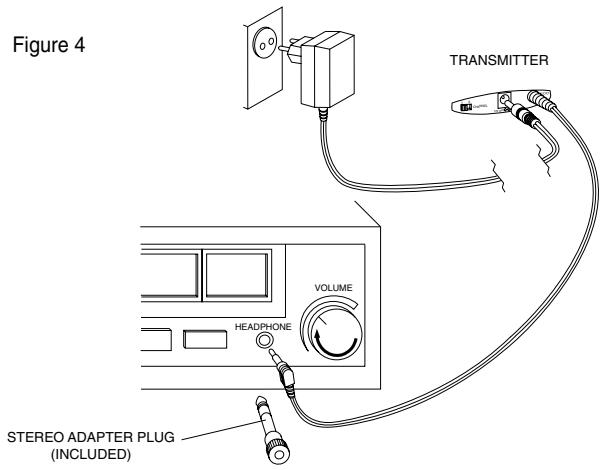
Figure 4
Index
| English | English | 4 | Svenska | 60 |
| Français | François | 11 | Norge | 67 |
| Espanol | Espanol | 18 | Suomi | 74 |
| Deutsch | Deutsch | 25 | Russký | 81 |
| Nederlands | Nederland | 32 | Polski | 88 |
| Italiano | Italiano | 39 | Magyar | 95 |
| Portugues | Português | 46 | Türkçe | 112 |
| Dansk | Dansk | 53 | Еλληνικá | 119 |
Congratulations!
You have just bought the most sophisticated FM wireless stereo sound system. This system uses the latest FM wireless technology, which gives you complete freedom of movement while enjoying your favorite music and movies. No more inconvenience from cables or headphone wires! To ensure you get the best performance from your FM wireless stereo sound system please read this manual carefully.
IMPORTANT
Read these instructions. All the safety and operating instructions should be read before using the wireless headphone system.
Check if the voltage indicated on the type plate of the adapter corresponds to the local mains voltage before connecting to the mains power supply.
Remove the batteries from the headphone's battery compartment and disconnect the adapter from the mains if the system is not in use for a long period.
Prevent fire or shock hazard: do not expose this equipment to humidity, rain, sand or excessive heat caused by heating equipment or direct sunlight.
Radio equipment for wireless audio applications is not protected against disturbance from other radio services.
IMPORTANT
Before using the FM headphone for the first time, please ensure that the batteries are fully charged for about 16 hours. This will guarantee a longer operating lifetime of the batteries.
Benefits of Philips latest RF/FM wireless technology
Wireless transmission
The FM transmitter transmits the stereo audio signal from your audio or video source to your FM headphone without wires.
Wide transmission range
Your FM headphone can receive signals up to 100 meters away.
High-frequency radio system
The FM headphone set uses a high radio frequency as the signal carrier, ensuring a very clear, sharp reception.
Automatic power on/off indicator
The FM transmitter automatically switches on and starts transmitting when audio signals are detected at the audio input (red LED). When no audio signals are detected the FM transmitter automatically switches off after a few minutes.
Rechargeable system
The FM transmitter recharges the.
headphone's built-in rechargeable LR03/ AAA NiMH batteries.Just place the batteries in
the transmitter's battery compartment.The green LED lights up during charging.
Easy transmission
The FM headphone is able to receive signals from the transmitter, even through barriers such as doors, walls and windows.
Multiple headphones with one transmitter
An additional number of headphones and/or wireless speakers can be used with a single transmitter if they:
-
operate in the 864 MHz band
-
can detect a 19 kHz pilot tone.
Please consult the appliance's electrical specification sheets for confirmation on compatibility.
Kit contents
This FM headphone system consists of the following accessories:
1×SBC HC8392 FM transmitter
1×SBC HC8395 FM headphone
1 x SBC CS030/00 12Volt / 200mA AC/DC adapter (for UK: SBC CS030/05 12 Volt/ 200 mA AC/DC adapter)
2 × rechargeable batteries LR03/AAA (NiMH), 550 mAh
1× 3.5mm plug to 6.3~mm stereo adapter plug
1 x antenna tube
Transmitter (figure 1)
1 Power indicator - lights up when audio signals are detected at the audio input.
2 Recharging indicator - the green LED lights up during recharging. Completely flat batteries will be fully charged after about 16 hours.
3 Recharging compartment - just place the batteries in the transmitter's battery compartment. The green LED lights up during recharging.
4 DC power - connect to the 12 Volt/200 mA AC/DC adapter
5 3.5 mm stereo headphone audio input - connects your FM transmitter to an audio source
6 Channel switch - select one of 2 channels for best reception. We advise you to select channel 1 as a first option.
7 Controls plate
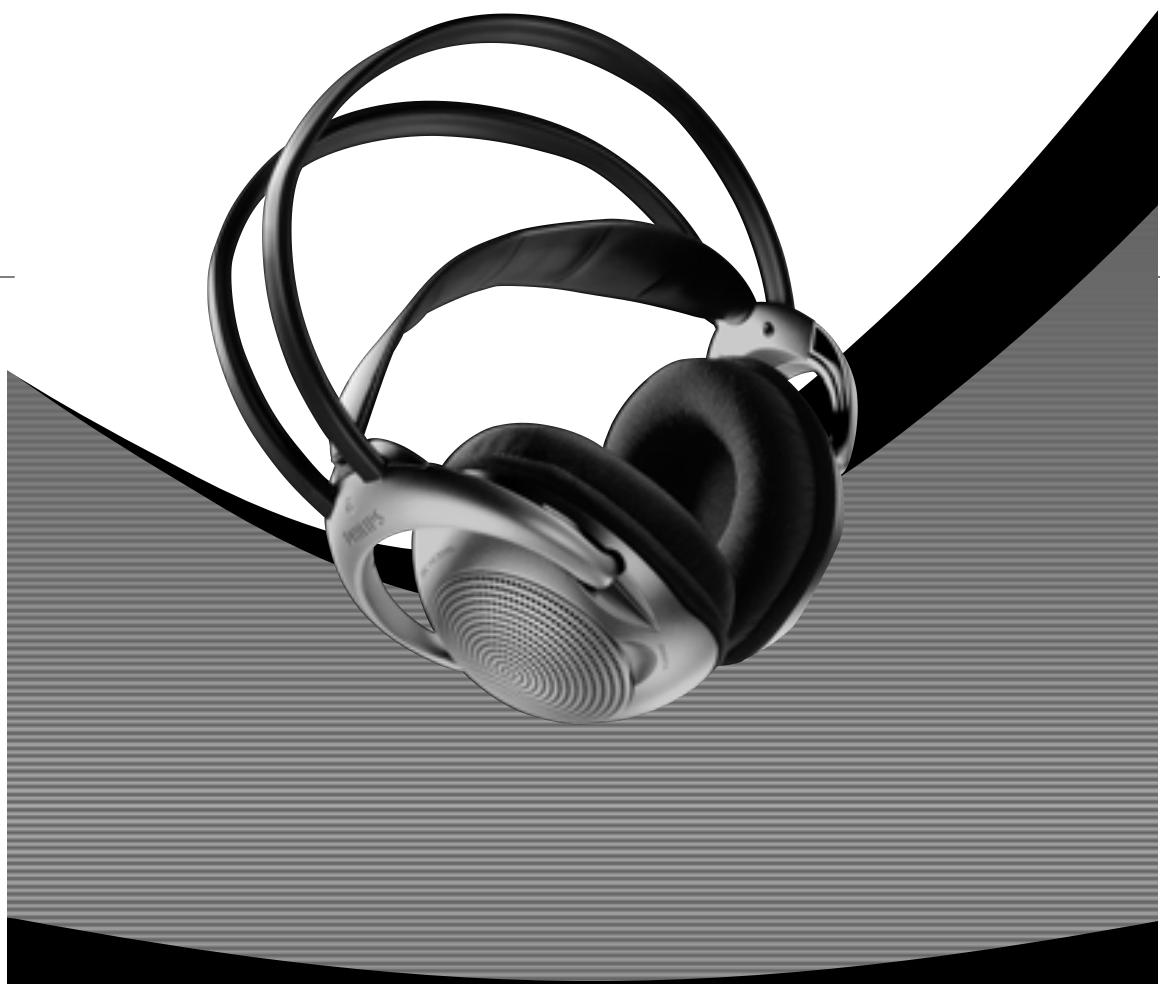
Headphone (figure 2)
8 Power indication - lights up when in use.
9 Power On/Off - slide the switch to the on or off position to switch the headphone on/off.
10 Battery compartment - open the lid, take out the batteries and put them in the transmitter's recharging compartment for recharging.
11 Volume - adjust volume to your desired listening level.
12 Tuning - turn the tuning knob until the signal is at its clearest.
Installation
Transmitter power supply IMPORTANT
Use only Philips SBC CS030/00
12 Volt/200 mA AC/DC adapter.
(For UK, use only Philips SBC CS030/05)
1 Make sure the adapter's rated voltage corresponds to the mains socket voltage.
2 Connect the DC connector of the AC/DC adapter to the 12 Volt DC power input connector located at the rear of the transmitter.
3 Connect the 12 Volt/200 mA AC/DC adapter to the mains socket.
- Always disconnect the AC/DC adapter if the transmitter is not to be used for a long period of time.
4 Insert the antenna tube in the hole, located on the top of the transmitter. Ensure that the wire which is hanging out of that hole, is guided in the antenna tube.
- Installing the antenna tube correctly, will improve the transmission range.
Headphone power supply (figure 3)
IMPORTANT
Use only rechargeable LR03/AAA NiMH batteries (preferably Philips).
Do not use NiCd batteries or alkaline batteries as these may damage your FM wireless system!
1 Check if the power button of the FM headphone is in the on position.
2 To recharge the headphone's built-in rechargeable LR03/AAA NiMH batteries, open the headphone's battery compartment. Take out the batteries and put them in the transmitter's recharging compartment for recharging.
Notes:
Completely flat batteries need approximately 16 hours to recharge.
Always remove the batteries if the headphone is not to be used for a long period of time.
Batteries contain chemical substances, so they should be disposed of properly.
Environmental Information
All redundant packing material has been omitted. We have done our best to make the packaging easily separable into two materials: cardboard and polyethylene
Your unit consists of materials which can be recycled if disassembled by a specialized company. Please observe the local regulations regarding the disposal of packing materials, exhausted batteries and old equipment.
Headphone battery replacement
IMPORTANT
Use only rechargeable LR03/AAA
NiMH batteries (preferably Philips).
Do not use NiCd batteries or alkaline batteries as these may damage your FM wireless system!
1 Open the headphone's battery compartment.
2 Take out the batteries and dispose of them properly.
3 Insert new batteries. Only use LR03/AAA NiMH batteries (preferably Philips).
4 Make sure the batteries are correctly inserted as indicated by the engraved symbols in the battery compartment.
5 Close the battery compartment.
IMPORTANT
Before using the FM headphone for the first time, please ensure that the batteries are fully charged for about 16 hours. This will guarantee a longer operating lifetime of the batteries.
Connecting the FM transmitter to a headache output of an audio source (figure 4)
1 Connect the 3.5mm stereo plug of the stereo audio cable to the headphone output of an audio source, such as TV, HiFi or PC.
- In case your audio source has a 6.3mm headphone output, use the supplied 3.5mm to 6.3 mm stereo adapter plug.
2 Switch on your audio source and carefully increase the volume of the audio source. The red power indication LED of the transmitter lights up if receiving an audio signal.
3 Switch on the headphone. You may hear a hissing sound through the headphone if the headphone is not yet properly tuned to the transmitter.
4 To tune, turn the tuning knob until the signal is at its clearest and the tuning indicator will light up.
5 Adjust the volume to the desired level with the headphone volume control.
Basic operation
When the FM transmitter is connected to a.
headphone output of an audio source..
1 Switch on your audio source and carefully increase the volume of the audio source. The red power indication LED of the transmitter lights up if receiving an audio signal.
2 Switch on the headphone. You may hear a hissing sound through the headphone if the headphone is not yet properly tuned to the transmitter.
3 To tune, turn the tuning knob until the signal is at its clearest and the tuning indicator will light up.
4 Adjust the volume to the desired level with the headphone volume control.
Troubleshooting
If a fault occurs, first check the points listed below before taking the set for repair.
If you are unable to remedy a problem by following these hints, consult your dealer or service centre.
WARNING: Under no circumstances should you try to repair the set yourself, as this would invalidate the warranty.
| Problem | Remedy |
| No sound | - Check if the AC/DC adapter is fully inserted into the AC outlet and that its DC connector is properly inserted into the 12 Volt DC input connector located at the rear of the transmitter.- Check if the headphone's on/off switch is in the on position.- Headphone batteries running low. Open the headphone's battery compartment. Take out the batteries and put them in the transmitter's recharging compartment for recharging.(See Headphone power supply)- Check if the audio source is switched on and tuned to a channel with audio.- Volume not adjusted. Adjust the volume on the audio source/ headphone to a higher level.- Adjust the headphone's tuning frequency. Turn the tuning knob until the signal is at its clearest.- Make use of the HC8392 transmitter. Some transmitters already built into other equipment may not be compatible with the HC8395 headphone because of the advanced technologies used in the HC8395 headphone. |
| Distorted sound | - Adjust the headphone's tuning frequency. Turn the tuning knob until the signal is at its clearest.- Adjust the transmitter's frequency. Select any of the 2 channels of the transmitter. Next adjust the headphone's frequency by turning the tuning knob until the signal is at its clearest.- Headphone batteries running low. Open the headphone's battery compartment. Take out the batteries and put them in the transmitter's recharging compartment for recharging.(See Headphone power supply) |
Troubleshooting
| Distorted sound | - Check the volume on audio source/ headphone is not set at too high a level. Reduce the volume.- Distance from the transmitter is too large. Move closer to the transmitter.- Interference from fluorescent lamps/ other radio sources. Move transmitter or headphone elsewhere/ change the transmitter's channel.- Make use of the HC8392 transmitter. Some transmitters already built into other equipment may not be compatible with the HC8395 headphone because of the advanced technologies used in the HC8395 headphone. |
| Maintenance | - If the headphone will not be used for a long time, please remove the batteries to prevent leakage and corrosion.- Only replace the batteries with LR03/AAA NiMH batteries (preferably Philips).- Do not leave the headphone near heat sources. Do not expose to direct sunlight, excessive dust, moisture, rain or any kind of mechanical shock.- Do not use alcohol, thinner or petroleum-based substances to clean the headphone or transmitter. Use a slightly dampened chamois cloth to clean the housing.- Do not use cleaning agents containing alcohol, spirits, ammonia or abrasives as these may harm the housing. |
Hearing Safety! Continuous use at a high volume may permanently damage your hearing.
Specifications
Regulations
| System: | Radio Frequency (RF) |
| Carrier Frequency: (Transmitter HC8392) | Channel 1: 863.5 MHz Channel 2: 864.5 MHz |
| Carrier Frequency: (Headphone HC8395) | 863.2 to 864.7 MHz (Manual tuning) |
| Modulation: | Frequency Modulation (FM) |
| Radiated Output Power: | <10m Watt |
| Effective Transmission Range: | up to100 meters, omni directional (360°) |
| Input level: | 500 mVrms (1 kHz sine wave) |
| Power supply – transmitter: | 12Volt / 200 mA DC, centre positive |
| Power supply – headphone: | 2 × LR03 (AAA) batteries (NiMH) |
| Frequency range (Headphone): | 10 – 20,000 Hz |
| Signal/Noise ratio: | > 60 dB (1 kHz sine wave ,A-weighted) |
| Distortion: | < 0.5%THD |
| Channel separation: | > 30 dB |
European Regulations
This product has been designed, tested and manufactured according the European R&TTE Directive 1999/5/EC.
Following this Directive, this product can be brought into service in the following states:
R&TTE Directive 1999/5/EC
B√
DK
E X
GR X
F√
IRL
1x
NL
A
P V
SU
s√
UK
N√
D
CH
This product complies with class 3 requirements as set down in ETS 300 445.
Felicitations!
Specifications
Régulations
| B | ✓ | DK | ✓ | E | X | GR | X | F | ✓ |
| IRL | ✓ | I | X | L | ✓ | NL | ✓ | A | ✓ |
| P | ✓ | SU | ✓ | S | ✓ | UK | ✓ | N | ✓ |
| D | ✓ | CH | ✓ |
| B | ✓ | DK | ✓ | E | X | GR | X | F | ✓ |
| IRL | ✓ | I | X | L | ✓ | NL | ✓ | A | ✓ |
| P | ✓ | SU | ✓ | S | ✓ | UK | ✓ | N | ✓ |
| D | ✓ | CH | ✓ |
1 × adattatore CA/CC 12 volt/200 mA, SBC CS30/00
2× batterie ricaricabili LR03/AAA (NiMH), 550 mAh
1 x spina adattatrice stereo da 3,5 mm a 6,3 mm
| B | ✓ | DK | ✓ | E | X | GR | X | F | ✓ |
| IRL | ✓ | I | X | L | ✓ | NL | ✓ | A | ✓ |
| P | ✓ | SU | ✓ | S | ✓ | UK | ✓ | N | ✓ |
| D | ✓ | CH | ✓ |
Transmitter (figur 1)
| B | ✓ | DK | ✓ | E | X | GR | X | F | ✓ |
| IRL | ✓ | I | X | L | ✓ | NL | ✓ | A | ✓ |
| P | ✓ | SU | ✓ | S | ✓ | UK | ✓ | N | ✓ |
| D | ✓ | CH | ✓ |
Dette Produkt overholder klasse 3 kravene, der er fastsat i ETS 300 445.
Inledning
Allman information
Grattis!
12 Volt/200 mA AC/DC adapter.
| B | ✓ | DK | ✓ | E | X | GR | X | F | ✓ |
| IRL | ✓ | I | X | L | ✓ | NL | ✓ | A | ✓ |
| P | ✓ | SU | ✓ | S | ✓ | UK | ✓ | N | ✓ |
| D | ✓ | CH | ✓ |
| B | ✓ | DK | ✓ | E | X | GR | X | F | ✓ |
| IRL | ✓ | I | X | L | ✓ | NL | ✓ | A | ✓ |
| P | ✓ | SU | ✓ | S | ✓ | UK | ✓ | N | ✓ |
| D | ✓ | CH | ✓ |
BecnpoBOAOuHaTpaHcMnccn
TpaHcMmTTep FM nepeaetcepeo 3ByKOBOI cHnA BaIeero paAno nnBnDeo nCTOuHnKa Ha BaNn HayuHnKn FM 6e3 NCIOAB0BaHn npOBoOB.
UHpOKn dHaana3oH TpaHCmCCnn
Baun HayunHK FM MoryT pinnHMaTb cnHaBb Ha paCToHnD 100M.
BbICOKOyactOTHa paAnocHCTema
Baun HauuHnKf FM NcnoA3yIOT BbICOKyIO paNIO yactOTy B KaeeCTBe HocnteA CINHaAa, cTO rapaHTnpyeT HAdEkbu NcTbI pniEeM.
A B T O M A T H U C E C K N H H A N K A T O P H I N T A H N B K A/B b i k A
TpahcmntTep FM aBTomatueckn BkIoouaetcna HauHnaeT nepeauy npn IOCTyIaehnn 3ByKObIX CNHaAOB Ha 3ByKOBOI BXoA (KpaChbI INHAnKaTOp). Ipn OTCyTCTBnN 3ByKObIX CNHaAOB TpaHcmtTep FM aBTomatueckn OTkIoouaetcyepe3 HeckoAko MNHT.
CnCTema 3apAkn
TpaHcMnTTep FM 3apJkae T BCTpoEHbIe B HayuHnKn 6aTapen LR03/AAA NiMH. IpocTo yCTaHOBnTe 6aTapen B OTdEaHne DAn 6aTapen TpaHcMnTTepa.Bo BpeMa 3apAKn 6yTe T OpeTb 3eAeHb INHANKaTOP.
Pnocta nepeDaua
Baun Haynuk FM moryt noyatb cnHaIbOT TpaHcMTTepa daKe cKB03b TaKne nperepa,b, KaK dBepn, CTehb N OKha.
HeckoaBko HayuHnKOB npn OdHOM TpaHCMTTpe
C OaHIM TpaHCMTTepOM MOKHO
NCIOA3OBA Tb HECKoAko HayuHNIKOB I/AM
6ecpOBOAoHbIX AnHaMnKOB, ECAN OHN: -pa6oTAOT B IOLoce 864 MfU
-MOTPiHMaTb KOHTPOA hBi CNrHaI
19 KfU.
AЯ npOBePKO CBMeCTMIOCTn CM 3aekTpueckne XapaKTepnCTNK yCTpOJCTBa.
CocTAb KOMIIaEkTa
Baun HaynHK FM mMeOT cAeayoune npHaAeXHOCtN
I x TpaHcmntTep SBC HC8392 FM
I x Hayshnki SBC HC8395 FM
I x aanTep SBC CS030/00 12 B/200 mA nepeMeH/NoCT
2xakmyaTOpHbIe 6aTapei LR03/AAA (NiMH),550 mAh
IXepexOaHk3,5MMHa6,3MMCTepeo
I x aHTeHHa
TpaHcMMTrep (phc.1)
7 OpraHbI ynpabAeHnHaHayuHHKn (pnc.2)
I NHAnKaTOp nHTaHn- 3aropaETc npi POnLyueHm 3ByKObBix CnHaAob Ha 3ByKObOM BXOaE.
2 INHANKaTOp 3aprAKN - BO Bpem3aprAKN 6yTeT ropeTB 3eIeHbI CN△,PiAnHOCTbIO CeBIIne 6aTaPeN 3apxKaIoTCB TeueHne 16 yacob.
3 OTaIeHHe DAn nepe3apAKn - IpoCTO yCTaHOBHTe 6aTapeN B OTaIeHHe. AIA 6aTapeN TpaHCmTTepa. Bo Bpemr 3apAkn 6ydt ropeTb 3eAeHbI CnA,
4Питаннoe NOCTOHHbIM TOKOM -noKHOHTe aAnTep 12 B/200 mA noCT/npemeh TOka
5 3ByKOBoB BxOa AAn CTepeo HayuHnKOB 3,5 MM - NOkAIOyaeT TpaHCmTTep FM K 3ByKObOMy NCTouHnky
6 NepekaOuaTea KaHaAOB -BbIbepnTe OINH n3 2 KaHaAOB dA yAUYuEHH npInema. B KaueCTBe nepBOrO bIbOpa peKoMeHdYem KaHaI I.
8 INHANKaTOp NHTAHN - TOPNT BO BpeMnICPOANb3OBaHn.
9ПитайнБКВ/Бык-пepeMeCTIte BblKIOUaTeAeB INOLOXeHnE BkN Nn BbIKA DЯ BKNIOUeHnN Nn BblKIAOuEHn HayuHnKOB.
10 OtceK DAA 6aTapei -OTKpoIe KpbIuKy, BbHbTe 6aTapeN uYcTaHOBtE INX B OTCEK 3aprAKN Ha TpaHCmTTpe 4A 3aprAKN.
IITpOMKocTb-OTpeyAInpyTe ypoBeHb TpOMKocTb DO HyKHOrO 3HaueHnIa.
12 HactpoKa -noBepHnTe pyKu NaCTpOIKNdo NOUyHeNIACTOFO CnHaAa.
3To n3geAne pa3pa6oTaHo, n3roTOBaeHo n npOBepeHO B COOTBeCTBHN C EbPonecko gnpeKTHBoR R&TTE 1999/5/EC.
B cootbetCTBn C 3TOI gHpeKTHBOH 3TO H3geAHe MOXHO HCIOAb3OBaTb B cAegyUoJx.
R&TTE Directive 1999/5/EC
B
DK
E
X
GR X
F
IRL
1
L
NL
A
P
SU
s
UK
N
D
CH√
AahHoe n3geAne cooTBcTBye Tpe6OBaHHaM Kaac yka3aHO B ETS 300 445.
Gratulacja!
R&TTE Directive 1999/5/EC
B
DK
E
X
GR X
F
IRL
1
L
NL
A
P
SU
s
UK
N
D
CH√
R&TTE Directive 1999/5/EC
| B | ✓ | DK | ✓ | E | X | GR | X | F | ✓ |
| IRL | ✓ | I | X | L | ✓ | NL | ✓ | A | ✓ |
| P | ✓ | SU | ✓ | S | ✓ | UK | ✓ | N | ✓ |
| D | ✓ | CH | ✓ |
| B | ✓ | DK | ✓ | E | X | GR | X | F | ✓ |
| IRL | ✓ | I | X | L | ✓ | NL | ✓ | A | ✓ |
| P | ✓ | SU | ✓ | S | ✓ | UK | ✓ | N | ✓ |
| D | ✓ | CH | ✓ |
- Wireless FM Stereo Headphone
- Index
- Congratulations!
- IMPORTANT
- Benefits of Philips latest RF/FM wireless technology
- Wireless transmission
- Wide transmission range
- High-frequency radio system
- Automatic power on/off indicator
- Rechargeable system
- Easy transmission
- Multiple headphones with one transmitter
- Kit contents
- Transmitter (figure 1)
- Headphone (figure 2)
- Installation
- Transmitter power supply IMPORTANT
- Headphone power supply (figure 3)
- Notes:
- Environmental Information
- Headphone battery replacement
- Connecting the FM transmitter to a headache output of an audio source (figure 4)
- Basic operation
- Troubleshooting
- European Regulations
- Felicitations!
- Transmitter (figur 1)
- Inledning
- Allman information
- Grattis!
- BecnpoBOAOuHaTpaHcMnccn
- UHpOKn dHaana3oH TpaHCmCCnn
- BbICOKOyactOTHa paAnocHCTema
- A B T O M A T H U C E C K N H H A N K A T O P H I N T A H N B K A/B b i k A
- CnCTema 3apAkn
- Pnocta nepeDaua
- HeckoaBko HayuHnKOB npn OdHOM TpaHCMTTpe
- CocTAb KOMIIaEkTa
- TpaHcMMTrep (phc.1)
- OpraHbI ynpabAeHnHaHayuHHKn (pnc.2)
- Gratulacja!
Brand : PHILIPS
Model : SBCHC8390
Category : Hi-Fi System