VSQ8ALL1 - Vacuum Cleaner SIEMENS - Free user manual and instructions
Find the device manual for free VSQ8ALL1 SIEMENS in PDF.

User questions about VSQ8ALL1 SIEMENS
0 question about this device. Answer the ones you know or ask your own.
Ask a new question about this device
Download the instructions for your Vacuum Cleaner in PDF format for free! Find your manual VSQ8ALL1 - SIEMENS and take your electronic device back in hand. On this page are published all the documents necessary for the use of your device. VSQ8ALL1 by SIEMENS.
USER MANUAL VSQ8ALL1 SIEMENS
natural_image
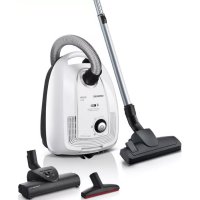
Close-up of a Siemens Q 8.0 vacuum cleaner with coiled hose and control panel (no visible text or symbols on device body)VS Q8
siemens-home.com/welcome
Register your product online
Sicherheit 2
Safety information ....3
en Instructions for use 31
Please keep this instruction manual for future reference.
When passing the vacuum cleaner on to a third party, also pass on this instruction manual.
Intended use
This appliance is intended for domestic use only and not for commercial use. Only use this vacuum cleaner in accordance with the information provided in this instruction manual. The manufacturer shall not accept any responsibility for damage caused by improper use or incorrect operation.
You must therefore note the following points.
The vacuum cleaner must only be operated with:
■ Original replacement parts, accessories or special accessories
In order to avoid invalidating the warranty, we recommend that you operate your appliance using only original filter bags.
In order to prevent injuries and damage, the vacuum cleaner must not be used for:
■ Vacuuming persons or animals.
■ Vacuumingup:
- Small creatures (e.g. flies, spiders, etc.).
- Hazardous, sharp-edged, hot or red-hot substances.
- Damp or liquid substances.
- Highly flammable or explosive substances and gases.
- Ash, soot from tiled stoves and central heating systems.
- Toner dust from printers and copiers.
Safety information
This vacuum cleaner complies with the recognised rules of technology and the relevant safety regulations.
■ The appliance may be used by children over the age of 8 years and by persons with reduced physical, sensory or mental capacity or by persons with a lack of experience or knowledge if they are supervised or have been instructed on the safe use of the appliance and they have understood the potential dangers of using the appliance.
■ Children must never play with the appliance.
■ Cleaning and user maintenance must never be carried out by children without supervision.
■ Plastic bags and films must be kept out of Instructions on disposal the reach of children and disposed of.
= There is a risk of suffocation.
Proper use
■ The vacuum cleaner must only be connected and operated as specified on the rating plate.
■ Never vacuum without the dust bag or dust container, motor protection or exhaust filter.
= This may damage the appliance.
■ Avoid vacuuming close to your head when using nozzles and tubes.
= There is a risk of injury.
■ When vacuuming stairs, the appliance must always be positioned below the user.
■ Do not use the power cord or the hose to carry or transport the vacuum cleaner.
If the power cord of this appliance is damaged, it must be replaced by the manufacturer, customer service or a similarly qualified person, in order to prevent injury.
■ Fully extend the power cord when using the vacuum cleaner continuously for several hours.
■ When disconnecting the appliance from the mains, pull the plug itself to remove it; do not pull on the power cord.
- Do not pull the power cord over sharp edges or allow it to become trapped.
■ Pull out the mains plug before carrying out any work on the vacuum cleaner.
■ Do not operate the vacuum cleaner if it is damaged. Unplug the appliance from the mains if a fault is detected.
■ For safety reasons, only authorised after-sales service personnel are permitted to carry out repairs and fit replacement parts to the vacuum cleaner.
■ Protect the vacuum cleaner from outside weather conditions, moisture and sources of heat.
■ Do not pour flammable substances or substances containing alcohol onto the filters (dust bag, motor protection filter, exhaust filter, etc.).
■ The vacuum cleaner is not suitable for use on construction sites.
= Vacuuming up building rubble may damage the appliance.
■ Switch off the appliance when it is not in use.
At the end of its service life, the appliance should immediately be rendered unusable, then disposed of in an appropriate manner.
Please note
- The mains socket must be protected by at least a 16-amp fuse.
If a fuse is tripped when you switch on the vacuum cleaner, this may be because other electrical appliances which have a high connected load are connected to the same power circuit at the same time.
To prevent the fuse from blowing, select the lowest power setting before switching the appliance on, and increase the power only once it is running.
Packaging
The packaging is designed to protect the vacuum cleaner from being damaged during transportation. It is made of environmentally friendly materials and can therefore be recycled. Dispose of packaging that is no longer required at an appropriate recycling point.
■ Oldappliances
Old appliances still contain many valuable materials. You should therefore take appliances that have reached the end of their service life to your retailer or recycling centre so that they can be recycled. For current disposal methods, enquire at a retailer or your local council.
■ Disposal of filters and dust bags
Filters and dust bags are manufactured from environmentally friendly materials. Provided they do not contain substances that are not permitted in household waste, you can dispose of them with your normal household waste.
Notes on the energy label
This vacuum cleaner is a general purpose vacuum cleaner. To achieve the declared energy efficiency and cleaning performance class on carpet, please use the interchangeable universal nozzle.
To achieve the declared energy efficiency and cleaning performance class on hard floor with nooks and crannies, please use the hard floor nozzle provided
The values provided on the energy label have been determined according to the prescribed measuring process (in accordance with EN60312-1).
fr
=>Fare for kvelning!
natural_image
Simple line drawing of an open book with a right-pointing arrow indicating the page direction (no text or symbols)Gerätebeschreibung
powerSensor Technology\*
Congratulations on your purchase of the Siemens Q8.0 vacuum cleaner.
This instruction manual describes various Q8.0 models, which means that some of the equipment features and functions described may not apply to your model. You should only use original Siemens accessories, which have been specially developed for your vacuum cleaner, in order to achieve the best possible vacuuming results.
Please keep this instruction manual for future reference. When passing the vacuum cleaner on to a third party, also pass on this instruction manual.
Fold out the picture pages.

natural_image
Simple line drawing of an open book with a right-pointing arrow on the page (no text or symbols)Your vacuum cleaner
1 Adjustable floor nozzle* (For the same functions, the appearance of the nozzle may differ from the picture)
2 Hard-floor nozzle*
3 Telescopic tube with adjusting sleeve (and accessory connection)*
4 Telescopic tube with sliding switch (and accessory connection)*
5 Crevice nozzle
6 Accessories holder
7 Upholstery nozzle
8 Hard furnishings brush (for fitting on the upholstery nozzle)*
9 Flexible hose
10 Hose handle
11 Dust bag change indicator
12 Power rotary control and on/off switch
13 Exhaust filter
14 Parking aid
15 Power cord
16 Rear flap
17 Carrying handle
18 Dust bag compartment lid
19 Storage aid (on the underside of the appliance)
20 Dust bag
21 Motor protection filter
Replacement parts and special accessories
A Dust bag
To get the most out of your appliance, we recommend using PowerProtect genuine replacement bags (VZ41FGALL).
Contents:
- 4 dust bags with fasteners
- 1 micro-hygiene filter
PLEASE NOTE
- Your appliance is a highly efficient vacuum cleaner that can only achieve its best cleaning results using genuine dust bags.
Only if high-quality dust bags are used, such as genuine Siemens dust bags, can the figures specified on the EU energy label pertaining to energy efficiency class, suction and dust retention capacity be achieved.
Additionally, using inferior quality dust bags (e.g. paper bags) can have a significant impact on the service life and performance of your appliance.
Warranty claims can only be made if genuine Siemens dust bags are used.
For more information and to order genuine Siemens dust bags, go to
www.siemens-home.com/dust-bag
B Hard-floor nozzle VZ123HD
For vacuuming hard floors (parquet, tiles, terracotta, etc.)
C Hard-floor nozzle VZ124HD
Innovative "soft & roll" hard-floor nozzle: 2 rotating brush rollers made from natural hair. Coarse dirt is not pushed away.
Before using your appliance for the first time
Fig. 1
- Push the handle onto the flexible hose and lock it in place.
Initial use
Fig. 2
a) Push the flexible hose adapter into the air intake opening in the lid until it locks in place.
b) To remove the flexible hose, press the two catches together and pull out the hose.
Fig. 3
- Push the handle into the telescopic tube until it locks into place.
- To release the connection, press the locking collar and pull out the telescopic tube.
Fig. 4
- Push the telescopic tube into the connecting piece of the floor nozzle until it locks in place.
- To release the connection, press the locking collar and pull out the telescopic tube.
Fig. 5\*
Unlock the telescopic tube by moving the sliding switch or adjusting sleeve in the direction of the arrow, and adjust to the desired length.
Fig. 6
a) Place the accessories holder in the required position on the telescopic tube.
b) Put the hard furnishings brush on the upholstery nozzle and lock it in place.
c) Use some pressure to insert the upholstery nozzle with hard furnishings brush and the crevice nozzle into the accessories holder from above or below.
Fig. 7
- Holding the power cord by the plug, pull it out to the required length and insert the plug into the mains socket.
! If using the appliance for longer than 30 minutes, pull out the power cord completely.
=>Risk of overheating and subsequent damage.
Fig. 8 Switching on and off
To switch the vacuum cleaner on or off, press the rotary control.
Fig. 9 Controlling the suction level
Turn the rotary control to infinitely adjust the suction level to the level required.
min -
For vacuuming curtains and delicate textiles

For vacuuming upholstered furniture and cushions

For vacuuming delicate rugs und for daily vacuuming of lightly soiled floors

For vacuuming durable floor coverings
max - For vacuuming hard floors and heavily soiled rugs and carpets
Vacuuming
Caution:
- Floor nozzles are subject to a certain amount of wear, depending on the type of hard floors you have (e.g. rough, rustic tiles). You must therefore check the underside of the floor nozzle at regular intervals. Worn undersides of floor nozzles may have sharp edges that can damage sensitive hard floors, such as parquet or linoleum. The manufacturer does not accept any responsibility for damage caused by worn floor nozzles.
Fig. 10
Set the adjustable floor nozzle:
■ Rugs and carpets =>

■ Hard floors/parquet =>

Fig. 11\* Vacuuming with accessories
Attach the nozzles to the suction pipe or handle as required:
a) Crevice nozzle for vacuuming crevices and corners, etc.
b) Upholstery nozzle for vacuuming upholstered furniture, curtains, etc.
c) Upholstery nozzle with attachable hard furnishings brush for vacuuming window frames, cupboards, cornicing, etc.
●After use, reinsert the crevice nozzle and upholstery nozzle into the accessories holder.
d) Hard-floornozzle
For vacuuming hard floor coverings (tiles, parquet*, etc.)
- Push the telescopic tube into the connecting piece of the hard-floor nozzle until it locks in place.
●To release the connection, press the locking collar and pull out the telescopic tube.
Fig. 12
- You can use the parking aid on the back of the vacuum cleaner if you want to stop vacuuming for a short time.
●After switching off the appliance, slide the hook on the floor nozzle into the recess on the back of the appliance.
Fig. 13
To overcome obstacles, e.g. steps, the appliance can also be carried by the handle on the appliance body.
After using the appliance
Fig. 14
•Pull out the mains plug.
- Briefly pull on the power cord and release it (the cable retracts automatically).
Fig. 15
●To store or transport the appliance, you can use the storage aid on the underside of the appliance.
- Stand the appliance upright on its end. Slide the hook on the floor nozzle into the recess on the underside of the appliance.
powerSensor technology\*
If your appliance is fitted with powerSensor technology*, this automatically ensures that the appliance is always working at its optimum power level. In conjunction with using original dust bags, this ensures minimal dust bag use and additional energy savings. powerSensor technology is always activated automatically, and does not need to be activated by the user. GALL type replacement bags (VZ4GXXLP2 / VZ41F-GALL) are required to guarantee the optimum performance of the powerSensor technology.
Changing the filter
Caution: Always switch off the appliance before
- changing the filter.
Replacing the dust bag
Fig. 16
a) If the dust bag change indicator lights up continuously when the nozzle is lifted from the floor and the highest power setting has been selected, the dust bag must be changed, even though it may not yet be full. In this case, it needs to be changed due to the type of dust which has been vacuumed.
The nozzle, suction pipe and flexible hose must not be blocked, even if this does not trigger the dust bag change indicator.
b) The handle can easily be detached from the hose to remove blockages.
Fig. 17 Opening the lid
- Open the lid by moving the locking lever in the direction of the arrow.
Fig. 18
a) Close the dust bag by pulling on the locking tab, and remove the bag.
b) Push the new dust bag into the holder until it clicks into place. When doing so, leave the dust bag folded as it was when removed from the packaging. Do not crease or kink the dust bag, and ensure that it is not pinched when the lid is closed.
Caution: The lid will only close if a dust bag has
- been inserted.
Motor protection filter
Caution: The vacuum must not be operated without
the motor protection filter.
Cleaning the motor protection filter
The motor protection filter should be cleaned regularly by tapping out the dirt and rinsing.
Fig. 19\*
Open the dust bag compartment lid. Fig. 17
- Release the motor protection filter by pulling on the side tabs and pull it out in the direction of the arrow.
●Clean the motor protection filter by tapping out the dirt.
- if it is very dirty, the motor protection filter should be rinsed.
The filter must then be left to dry for at least 24 hours.
After cleaning, refit the motor protection filter into the appliance and lock it in place at the top. Close the dust bag compartment lid.
Cleaning the foam filter
If your appliance is fitted with a filter frame and foam filter, the foam filter should be cleaned at regular intervals by tapping out the dust.
Fig. 20\*
Open the dust bag compartment lid. Fig. 17
Pull out the filter frame and foam filter in the direction of the arrow.
- Remove the foam filter from the filter frame and clean it by tapping out the dust.
After cleaning, place the foam filter back in the filter frame, insert the filter frame with foam filter in the appliance and close the dust bag compartment lid.
! Caution: The vacuum cleaner must not be operated without the motor protection filter.
Exhaust filter
The exhaust filter must be cleaned or replaced at least once a year.
Replacing the micro-hygiene exhaust filter
Fig. 21\*
- Open the rear flap.
- Unlock the filter holder by moving the locking tab in the direction of the arrow.
- Remove the foam filter* from the filter holder and tap it out.
Replace the old micro-hygiene filter with a new one. (This is included in the filter pack when you purchase original dust bags).
Insert the foam filter into the filter holder.
- Insert the filter holder into the appliance and lock it in place.
Cleaning the (H)EPA\* exhaust filter
The (H)EPA* filter is designed so that it does not need to be replaced, provided the appliance is used as intended in the household.
To ensure that the vacuum cleaner is working at its optimum power level, the (H)EPA* filter should be rinsed out after one year. The filtering action of the filter remains intact, even if the filter surface becomes discoloured.
Fig. 22\*
Open the rear flap.
Unlock the (H)EPA* filter by moving the locking tab in the direction of the arrow, and remove it from the appliance.
Tap out the filter unit and rinse it under running water.
Alternatively, the unit can be cleaned in a washing machine at max. 30 °C using a gentle programme and the lowest spin speed.
TIP: To protect other laundry items, put the filter unit into a laundry bag.
Once the (H)EPA* filter has dried completely (at least 24 hours), insert it back into the appliance and lock it in place.
Close the rear flap.
After vacuuming fine dust particles (e.g. gypsum, cement, etc.), clean the motor protection filter by tapping it out or, if necessary, replace the motor protection filter and exhaust filter.
Care
Always switch off the vacuum cleaner and disconnect the power cord from the mains before cleaning the vacuum cleaner. The vacuum cleaner and plastic accessories can be cleaned with an ordinary plastic cleaner.
Do not use abrasive materials, glass-cleaning agents or all-purpose cleaning products. Never immerse the vacuum cleaner in water.
The dust compartment can, if necessary, be cleaned with a second vacuum cleaner or simply wiped with a dry cloth or dusting brush.
Subject to technical modifications.
fr
natural_image
Simple line drawing of an open book with a right-pointing arrow indicating the page (no text or symbols present)www.siemens-home.com/dust-bag
powerSensor Technology\*
natural_image
Simple line drawing of an open book with a right-pointing arrow indicating the page (no text or symbols present)www.siemens-home.com/dust-bag
powerSensor Technology\*
natural_image
Simple line drawing of an open book with a right-handled arrow indicating rotation (no text or symbols)Beskrivelse
powerSensor Technology\*
natural_image
Simple line drawing of an open book with a right-handled arrow indicating rotation (no text or symbols)www.siemens-home.com/dust-bag
B Munnstykke for harde gulv VZ123HD
powerSensor Technology\*
natural_image
Simple line drawing of an open book with a right-pointing arrow indicating the page (no text or symbols present)Produktbeskrivning
natural_image
Simple line drawing of an open book with a right-handled arrow indicating rotation (no text or symbols)Laitteen kuvaus
www.siemens-home.com/dust-bag
B Kovien lattioiden suulake VZ123HD
Sileiden lattioiden imurointiin (parketti, laatat, terrakotta,...)
C Kovien lattioiden suulake VZ124HD
powerSensor Technology\*
natural_image
Simple line drawing of an open book with a right-pointing arrow indicating rotation (no text or symbols)powerSensor Technology\*
natural_image
Simple line drawing of an open book with a right-pointing arrow indicating the page direction (no text or symbols)powerSensor Technology\*
natural_image
Simple line drawing of an open book with a right-pointing arrow indicating the page direction (no text or symbols)Περιγραφή συσκευής
www.siemens-home.com/dust-bag
powerSensor Technology\*
natural_image
Simple line drawing of an open book with a right-pointing arrow indicating the page (no text or symbols present)Cihaz açıklaması
www.siemens-home.com/dust-bag
natural_image
Simple line drawing of an open book with a right-pointing arrow indicating the page direction (no text or symbols)Opis urządzenia
natural_image
Simple line drawing of an open book with a right-pointing arrow indicating the page direction (no text or symbols)A készülék leírása
www.siemens-home.com/dust-bag
natural_image
Simple line drawing of an open book with a right-pointing arrow indicating the page direction (no text or symbols)Описание на уреда
powerSensor Technology\*
natural_image
Simple line drawing of an open book with a right-pointing arrow indicating the page (no text or symbols present)powerSensor Technology\*
www.siemens-home.com/dust-bag
natural_image
Simple line drawing of an open book with a curved arrow indicating rotation (no text or symbols)وصف الجهاز
Jebel Ali Free Zone – Dubai
Tel.: 04 881 4401
mailto:service.uae@bshg.com
www.siemens-home.com/ae
AL Republika e Shqiperise, Albania
AERTECH SH.P.K.
Rruga Qemal Stafa
Pallati i ri perball Prokuroris se
Pergjithshme
Hyrja C Kati 10
Tirana
Tel.: 066 206 47 94
mailto:g.volina@aertech.al
HEATHERTON, Victoria 3202
Tel.: 1300 368 339
mailto:bshau-as@bshg.com
www.siemens-home.com.au
BA Bosnia-Herzegovina, Bosna i Hercegovina
"HIGH" d.o.o.
Gradačačka 29b
71000 Sarajevo
Info-Line: 061 10 09 05
Fax: 033 21 35 13
mailto:delicnanda@hotmail.com
European Trade Center Building,
5th floor
1784 Sofia
Tel.: 02 892 90 47
Fax: 02 878 79 72
mailto:informacia.servis-bg@
bshg.com
www.siemens-home.bg
+ 7 snt/min (alv 23%)
+ 17 snt/min (alv 23%)
FR France
BSH Electroménager S.A.S.
To arrange an engineer visit, to order spare parts and accessories or for product advice please visit: www.siemens-home.co.uk or call
Tel.: 0844 892 8999*
*Calls from a BT landline will be charged at up to 3 pence per minute. A call set-up fee of up to 6 pence may apply.
GR Greece, Ελλάς
BSH Ikiakes Siskeves A.B.E.
Central Branch Service
17 km E.O. Athinon-Lamias &
Potamou 20
14564 Kifisia
Unit 1 & 2, 3rd Floor
North Block, Skyway House
3 Sham Mong Road
Tai Kok Tsui, Kowloon
Hong Kong
Tel.: 2565 6151
Fax: 2565 6681
mailto:siemens.hk.service@
bshg.com
www.siemens-home.com.hk
HR Hrvatska, Croatia
BSH kućni uređaji d.o.o.
Kneza Branimira 22
10000 Zagreb
Tel:. 01 640 36 09
Fax: 01 640 36 03
mailto:informacije.servis-hr@
bshg.com
www.siemens-home.com/hr
www.siemens-home.com/hu
IE Republic of Ireland
BSH Home Appliances Ltd.
Unit F4, Ballymount Drive
Ballymount Industrial Estate
Walkinstown
Dublin 12
Service Requests, Spares and
Accessories
Tel.: 01450 2655
Fax: 01450 2520
www.siemens-home.com/ie
IL Israel, בַרְבָר
C/S/B Home Appliance Ltd.
Uliel Building
2, Hamelacha St.
Industrial Park North
71293 Lod
Tel.: 08 9777 222
Fax: 08 9777 245
mailto:csb-serv@zahav.net.il
www.siemens-home.co.il
IN India, Bhārat, भारत
BSH Customer Service
Front Office
Shop No.4, Everest Grande,
Opp. Shanti Nagar Bus Stop,
Mahakali Caves Road,
Andheri East
Mumbai 400 093
IS Iceland
Smith & Norland hf.
Noatuni 4
105 Reykjavik
Tel.: 0520 3000
Fax: 0520 3011
www.sminor.is
IT Italia, Italy
www.siemens-home.com/it
IP Turebekov Yerzhan
Nurmanovich
Jangeldina str. 15
Shimkent 160018
Tel.: 0252 31 00 06
mailto:evrika_kz@mail.ru
LB Lebanon, لبنان
Tehaco s.a.r.l
Boulevard Dora 4043 Beyrouth
P.O. Box 90449
Jdeideh 1202 2040
Tel.: 01 255 211
mailto:Info@Teheni-Hana.com
LT Lietuva, Lithuania
Baltic Continent Ltd.
Lukšio g. 23
09132 Vilnius
Tel.: 05 274 1788
Fax: 05 274 1765
mailto:info@balticcontinent.lt
www.balticcontinent.lt
LU Luxembourg
www.siemens-home.com/lu
LV Latvija, Latvia
General Serviss Limited
Bullu street 70c
1067 Riga
Tel.: 07 42 41 37
mailto:bt@olimpeks.lv
Elkor Serviss
Brivibas gatve 201
1039 Riga
Tel.: 067 0705 20; -36
Fax: 067 0705 24
mailto:domoservice@elkor.lv
www.servisacentrs.lv
MD Moldova
S.R.L. „Rialto-Studio“
ул. Щусева 98
2012 Кишинев
тел./факс: 022 23 81 80
MK Macedonia, Makedonia
GORENEC
Jane Sandanski 69 lok. 3
1000 Skopje
Tel.: 022 454 600
Mobil: 070 697 463
mailto:gorenec@yahoo.com
MT Malta
Aplan Limited
The Atrium
Mriehel by Pass
BKR3000 Birkirkara
Tel.: 025 495 122
Fax: 021 480 598
mailto:lapap@aplan.com.mt
NL Nederland, Netherlands
Unit F 2, 4 Orbit Drive
Mairangi Bay
Auckland 0632
Tel.: 09 477 0492
Fax: 09 477 2647
mailto:bshnz-cs@bshg.com
PL Polska, Poland
www.siemens-home.com/pt
*(PT 0,10 €/min., Mobile 0,25 €/min)
RO România, Romania
BSH Electrocasnice srl.
Sos. Bucuresti-Ploiesti,
nr. 19-21, sect.1
13682 Bucuresti
Tel.: 021 203 9748
Fax: 021 203 9733
mailto:service.romania@bshg.com
www.siemens-home.com/ro
RU Russia, Россия
www.siemens-home.com/sk
TR Türkiye, Turkey
BSH Ev Aletleri Sanayi
ve Ticaret A.S.
Fatih Sultan Mehmet Mahallesi
Balkan Caddesi No: 51
34771 Ümraniye, Istanbul
Tel.: 0 216 444 6688*
Fax: 0 216 528 9188
mailto:careline.turkey@bshg.com
www.siemens-home.com/tr
US United States of America
BSH Home Appliances Corporation
1901 Main Street, Suite 600
Irvine, CA, 92614
Tel.: 866 447 4363 toll-free
Fax: 949 437 7000
mailto:siemens-usa-questions@
bshg.com
www.siemens-home.com
XK Kosovo
NTP GAMA
Rruga Mag Prishtine-Ferizaj
70000 Ferizaj
Tel.: 0290 321 434
Tel.: 00377 44 172 309
mailto:a_service@
gama-electronics.com
XS Srbija, Serbia
BSH Kućni aparati d.o.o.
Milutina Milankovića 11 ^4
11070 Novi Beograd
Tel.: 011 205 23 97
Fax: 011 205 23 89
mailto:informacije.servis-sr@
bshg.com
www.siemens-home.rs
ZA South Africa
BSH Home Appliances (Pty) Ltd.
15th Road Randjespark
Private Bag X36, Randjespark
1685 Midrand – Johannesburg
Tel.: 086 002 6724
Fax: 086 617 1780
mailto:applianceserviceza@
bshg.com
www.siemens-home.com
natural_image
Symbol of a trash bin crossed with two crossed lines, no text or numbers presentde
This appliance is labelled in accordance with European Directive 2012/19/EU concerning used electrical and electronic appliances (waste electrical and electronic equipment - WEEE). The guideline determines the framework for the return and recycling of used appliances as applicable throughout the EU.
fr
natural_image
Symbol of a trash bin crossed with no text or numbers, representing waste sorting or disposal (no text present)pt
GB Conditions of guarantee
For this appliance the guarantee conditions as set out by our representatives in the country of sale apply. Details regarding same may be obtained from the dealer from whom the appliance was purchased. For claims under guarantee the sales receipt must be produced.
FR Conditions de garantie
text_image
Exploded view diagram of a vacuum cleaner with numbered parts and exploded views of the device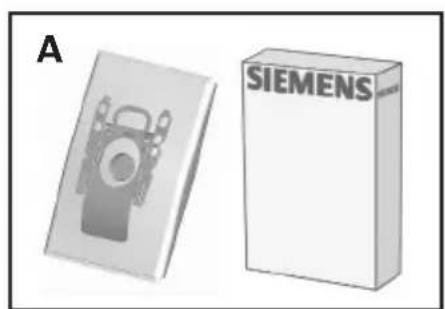
natural_image
Two 3D printing machines, one with a camera icon and the other Siemens logo (no text or symbols on the devices themselves)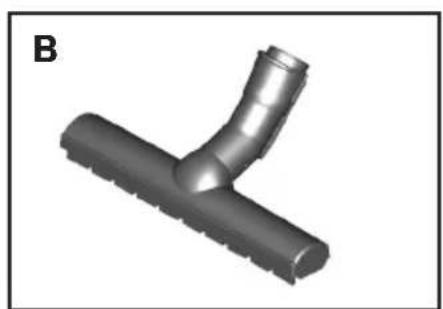
natural_image
3D rendered image of a Y-shaped pipe fitting with textured ends (no text or symbols)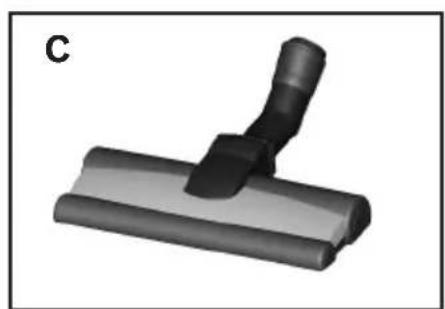
natural_image
3D rendered image of a black mechanical component with a lever, labeled 'C' in the top-left corner (no other text or symbols)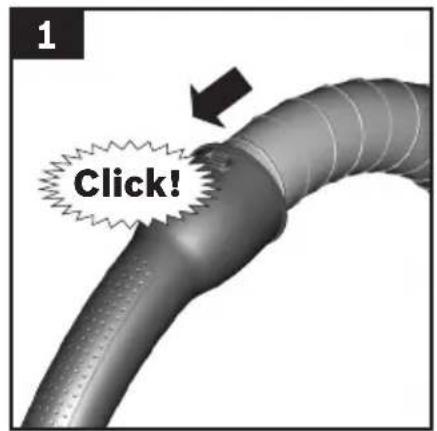
text_image
1 Click!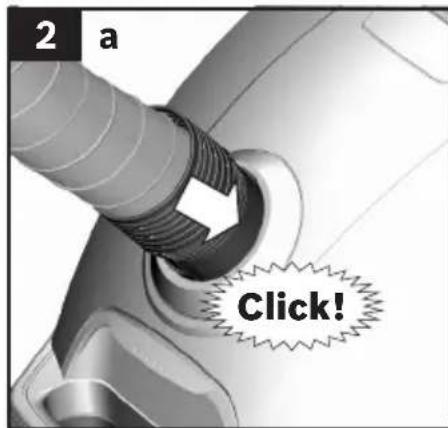
text_image
2 a Click!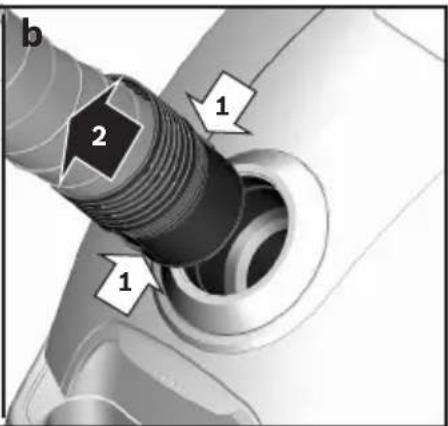
text_image
b 1 2 1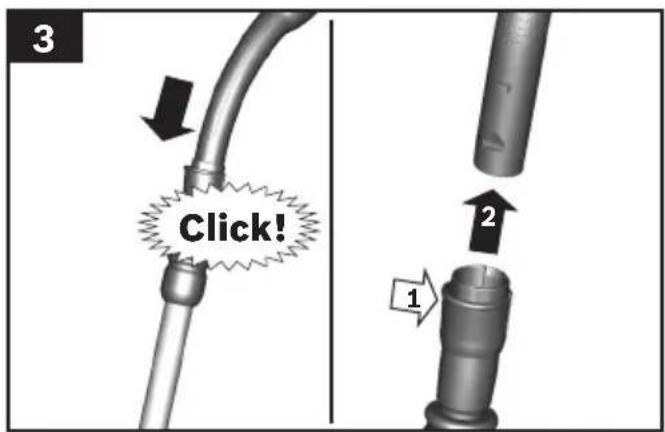
text_image
3 Click! 1 2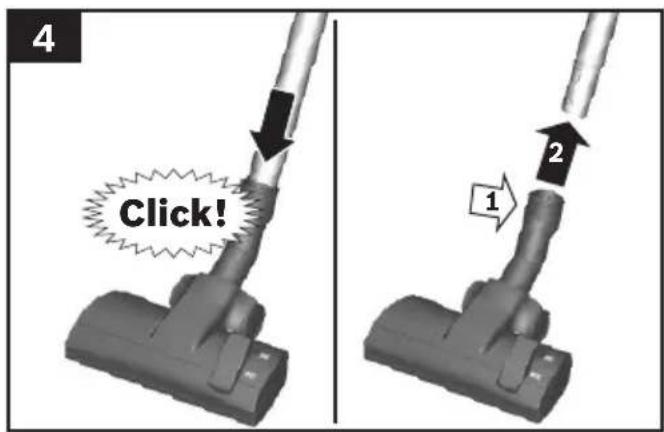
text_image
4 Click! 1 2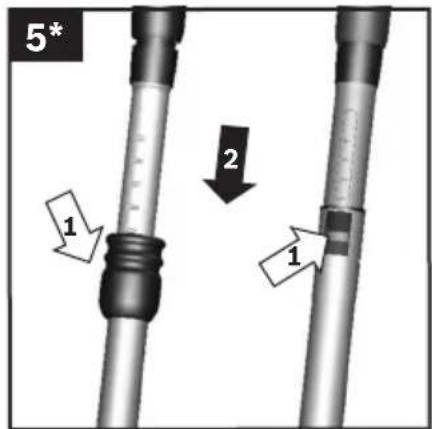
text_image
5* 1 2 1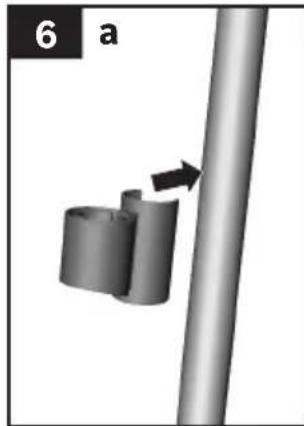
natural_image
3D diagram of a cylindrical object with an arrow pointing to it, mounted on a vertical rod (no text or symbols)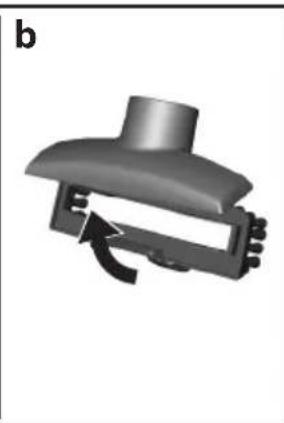
natural_image
3D rendered mechanical component with a curved arrow indicating rotation (no text or symbols)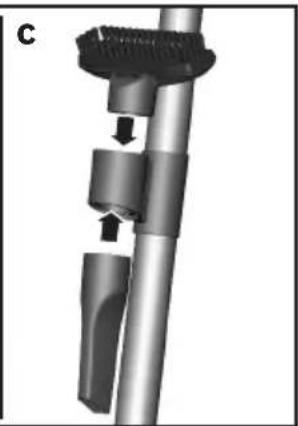
natural_image
Mechanical assembly diagram showing a threaded component inserted into a shaft with a clamped insert, labeled 'C' (no text or symbols on the diagram itself)
natural_image
Two-step diagram showing a device being inserted into an electrical socket, with no visible text or symbols.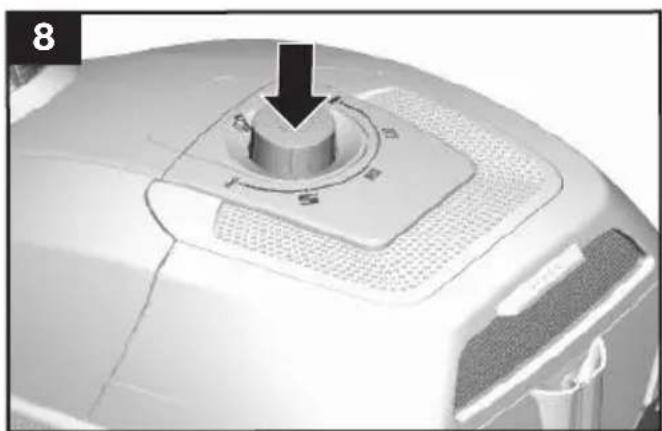
natural_image
Close-up of a mechanical component with a central knob and textured base (no visible text or symbols)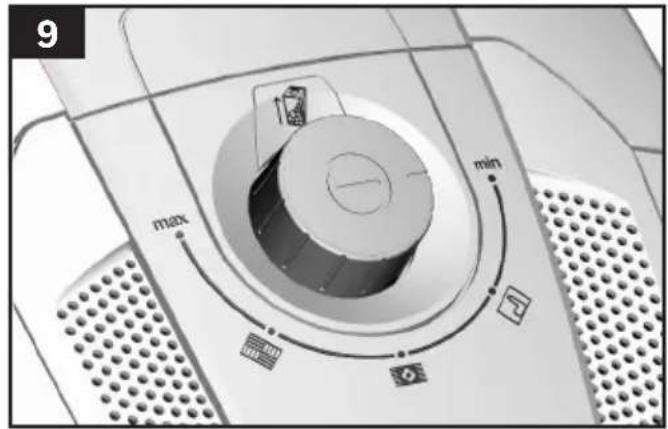
text_image
9 max min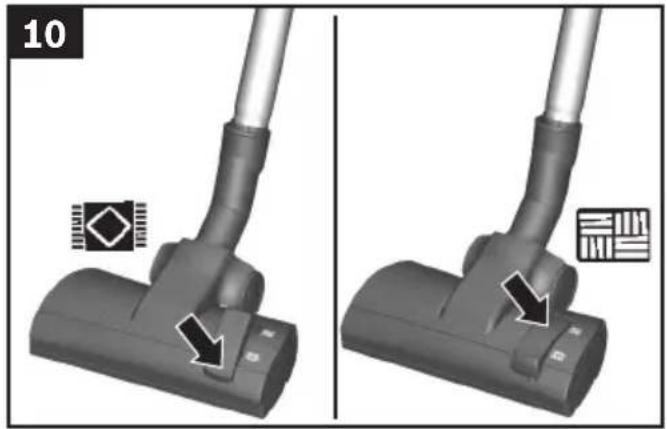
natural_image
Two black-and-white photos showing a vacuum cleaner's tip and base, with arrows indicating movement or adjustment (no text or symbols)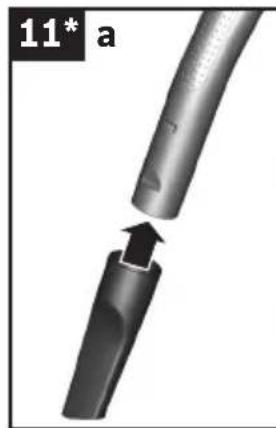
natural_image
Close-up of a metallic tool with a curved tip and an arrow indicating a process or operation (no text or symbols visible)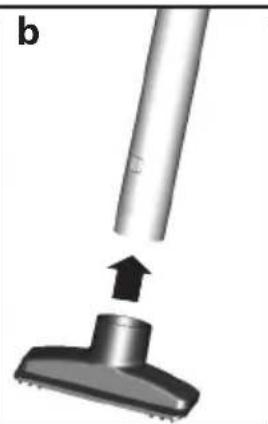
natural_image
Diagram of a vacuum cleaner with a lever and base, showing mechanical components (no text or symbols)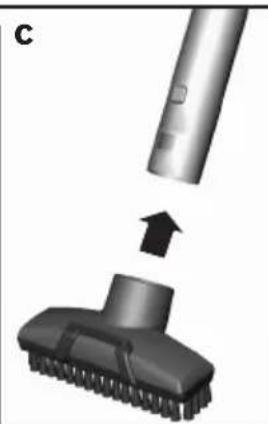
natural_image
3D illustration of a vacuum cleaner's tip and base, showing mechanical assembly (no text or symbols)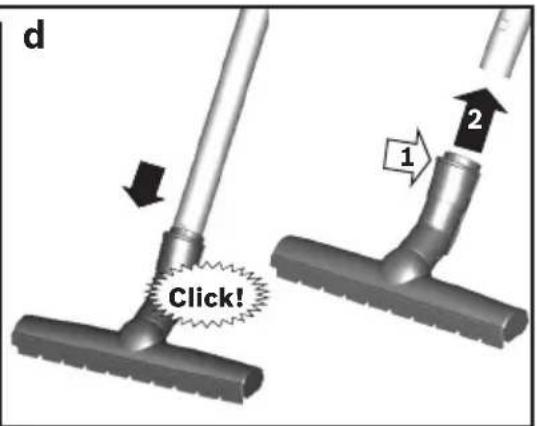
text_image
d Click! 1 2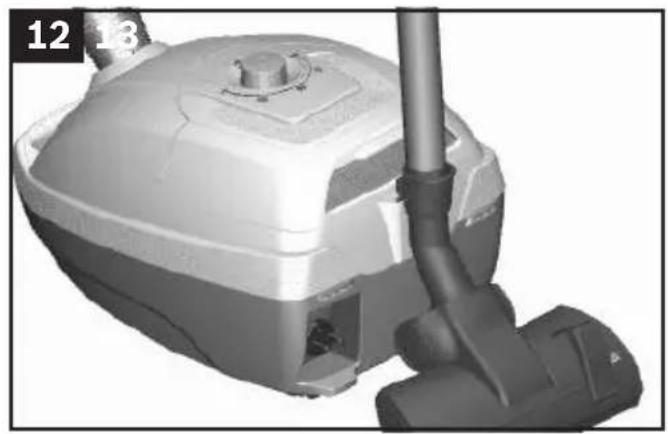
natural_image
3D rendering of a white vacuum cleaner with attached black plug and pipe (no text or symbols visible)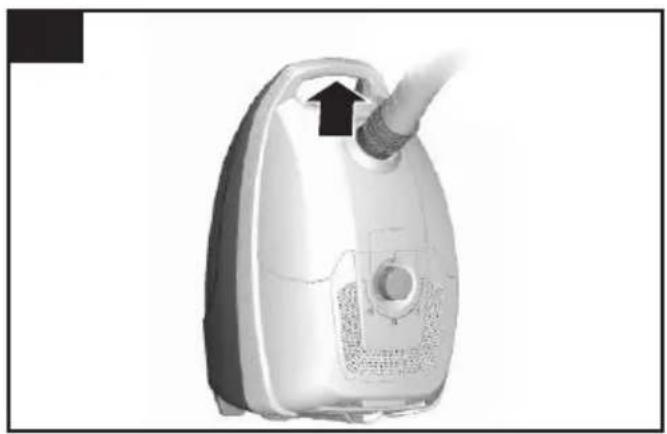
natural_image
Close-up of a white industrial vacuum cleaner with a black arrow pointing to the handle (no visible text or symbols)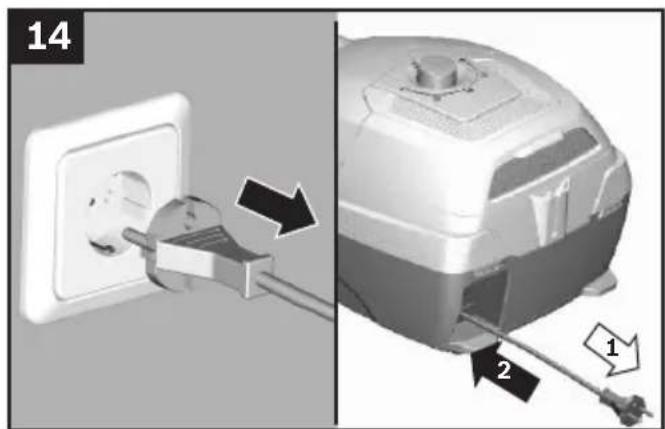
text_image
14 2 1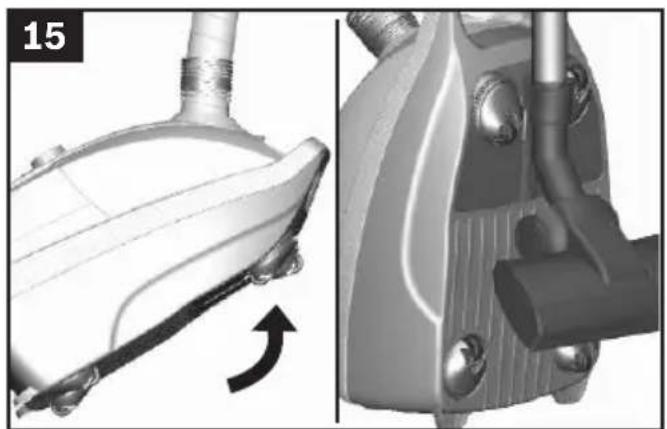
natural_image
Mechanical component assembly diagram showing a valve and housing with a curved arrow indicating rotation (no text or symbols)
text_image
16 a max min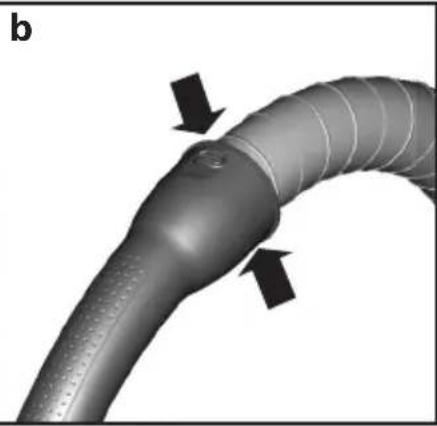
natural_image
3D rendered diagram of a curved pipe or duct with two black arrows pointing to a specific feature (no text or symbols present)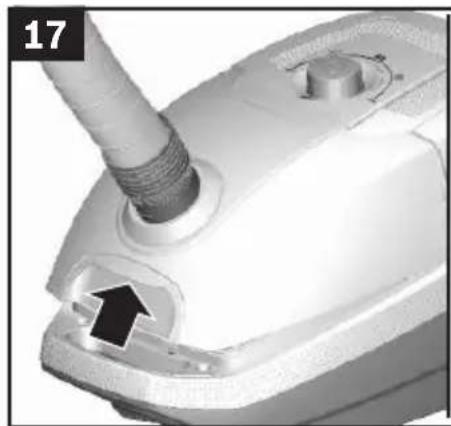
natural_image
Close-up of a white steam iron with a threaded tube and a black arrow pointing to a corner detail (no text or symbols visible)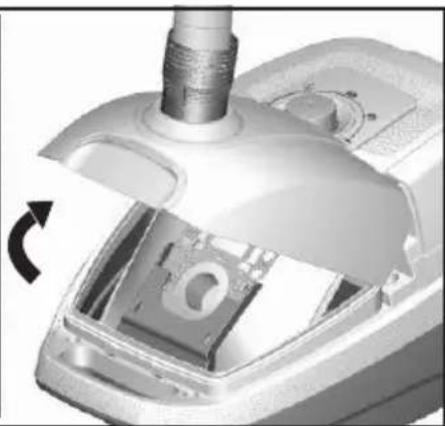
natural_image
Close-up of a mechanical device with a rotating knob and threaded component (no visible text or symbols)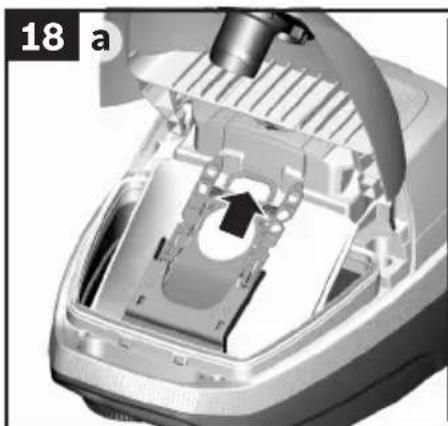
natural_image
Cutaway view of a car interior showing internal components and a highlighted part (no text or symbols visible)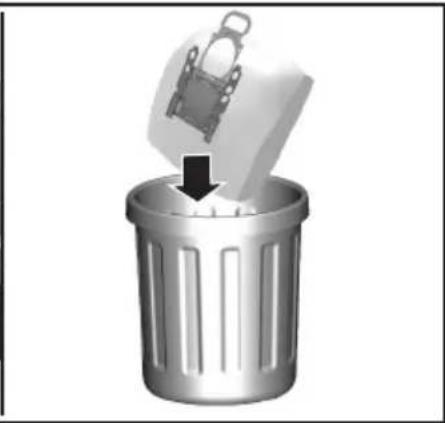
natural_image
Metal trash bin with a bag icon emerging from its top, symbolizing disposal or recycling (no text or symbols present)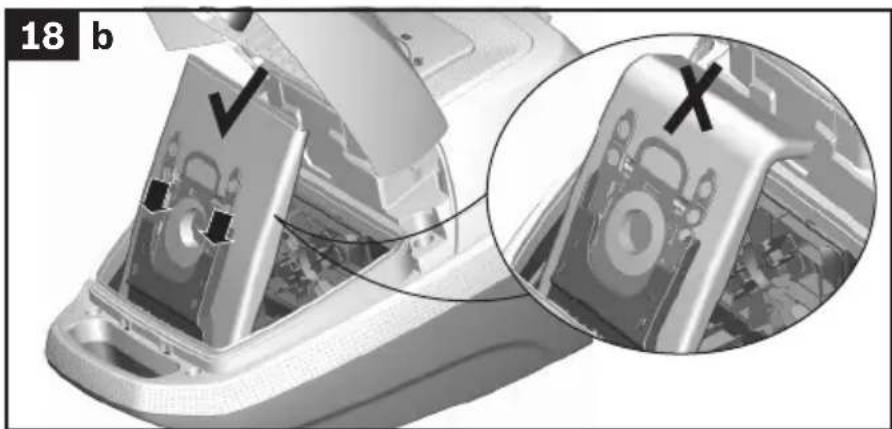
text_image
18 b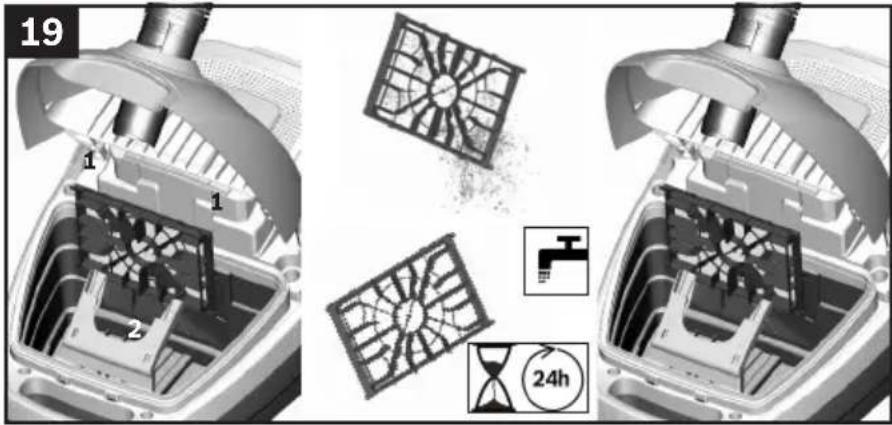
text_image
19 1 1 2 24h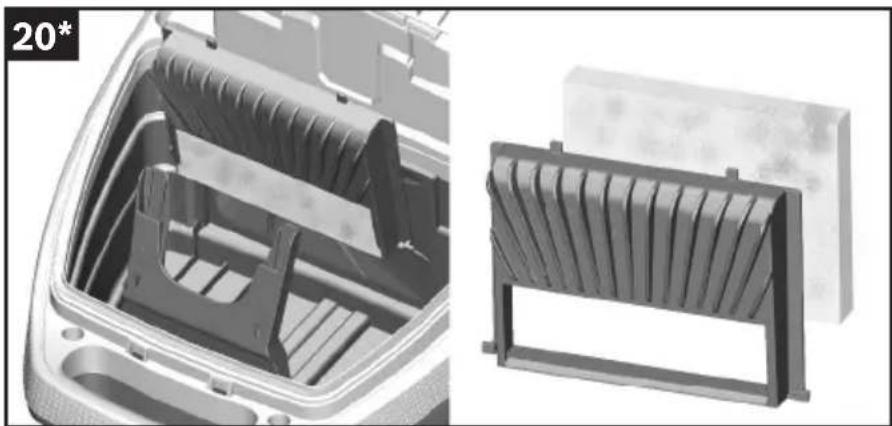
natural_image
3D mechanical assembly diagram showing internal components and a side view of a rectangular housing (no text or symbols)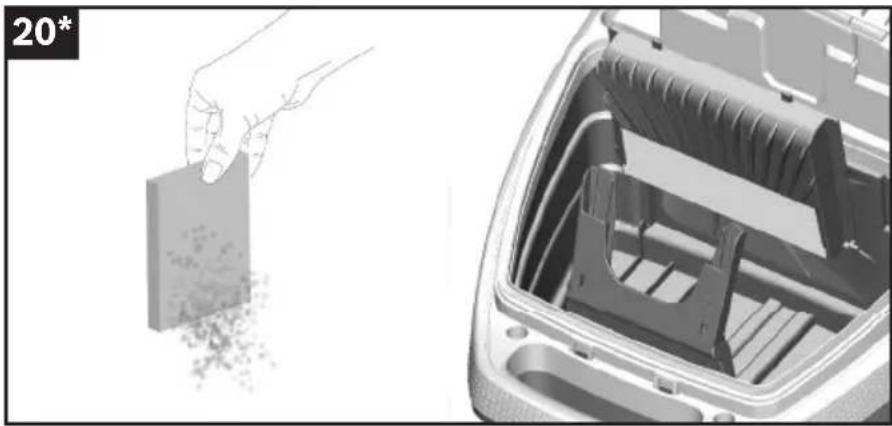
natural_image
Interior view of a refrigerator with open storage tray and hand placing lid (no text or symbols visible)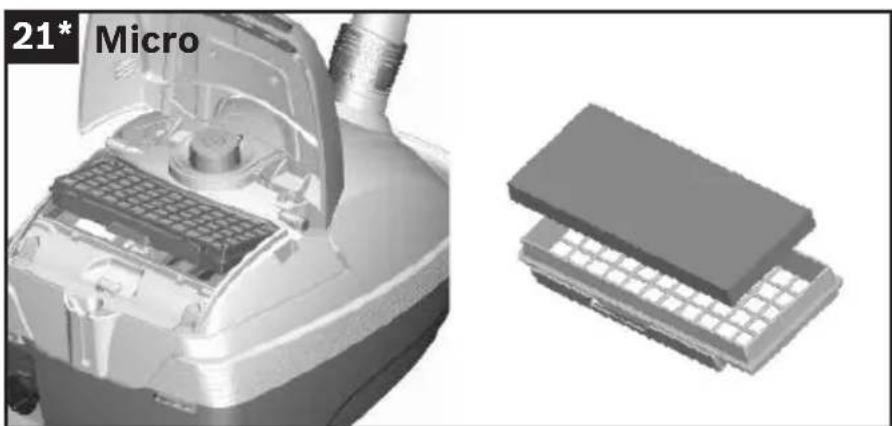
natural_image
3D rendering of a microfluidic device with internal components and a separate grid-based device (no text or symbols visible)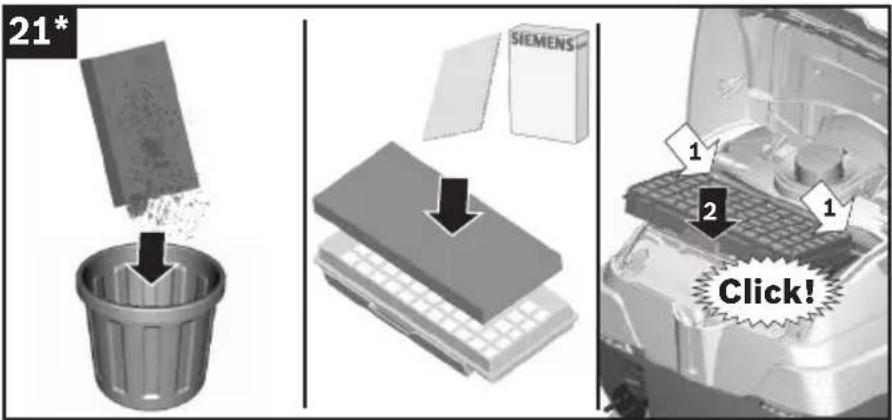
text_image
21* SIEMENS 1 2 1 Click!