
AC4004 - Air purifier PHILIPS - Free user manual and instructions
Find the device manual for free AC4004 PHILIPS in PDF.
| Product type | Air purifier |
| Brand | Philips |
| Model | AC4004 |
| Dimensions (approx.) | 45 x 25 x 45 cm (W x D x H) |
| Weight (approx.) | 5.5 kg |
| Power supply | 220-240 V, 50/60 Hz |
| Power consumption | 30 W (estimation) |
| Recommended area | Up to 20 m² |
| Filtration system | 4 stages: antibacterial pre-filter, multi-care filter, activated carbon filter, composite HEPA filter |
| Operating modes | Automatic, sleep (silent), manual (3 fan speeds) |
| Timer | Yes, adjustable by hours |
| Air quality indicator | 4 colors: Blue (very good), dark purple (good), purple (moderate), red (poor) |
| Air quality sensor | Yes, adjustable sensitivity (3 levels) |
| Cleaning | Pre-filter washable with water, body and sensor with soft cloth |
| Filter replacement | Indicator lights for replacement, safety lock if not replaced |
| Replacement filters | Multi-care filter AC4121, activated carbon filter AC4123, HEPA filter AC4124 |
| Safety | Automatic shutdown in case of malfunction, child lock (keypad lock), EMC compliance |
| Warranty | Philips international warranty (see leaflet) |
| Use | Domestic, dry and stable indoor |
Frequently Asked Questions - AC4004 PHILIPS
User questions about AC4004 PHILIPS
0 question about this device. Answer the ones you know or ask your own.
Ask a new question about this device
Download the instructions for your Air purifier in PDF format for free! Find your manual AC4004 - PHILIPS and take your electronic device back in hand. On this page are published all the documents necessary for the use of your device. AC4004 by PHILIPS.
USER MANUAL AC4004 PHILIPS
Always there to help you
Register your product and get support at www.philips.com/welcome

AC4002
AC4004
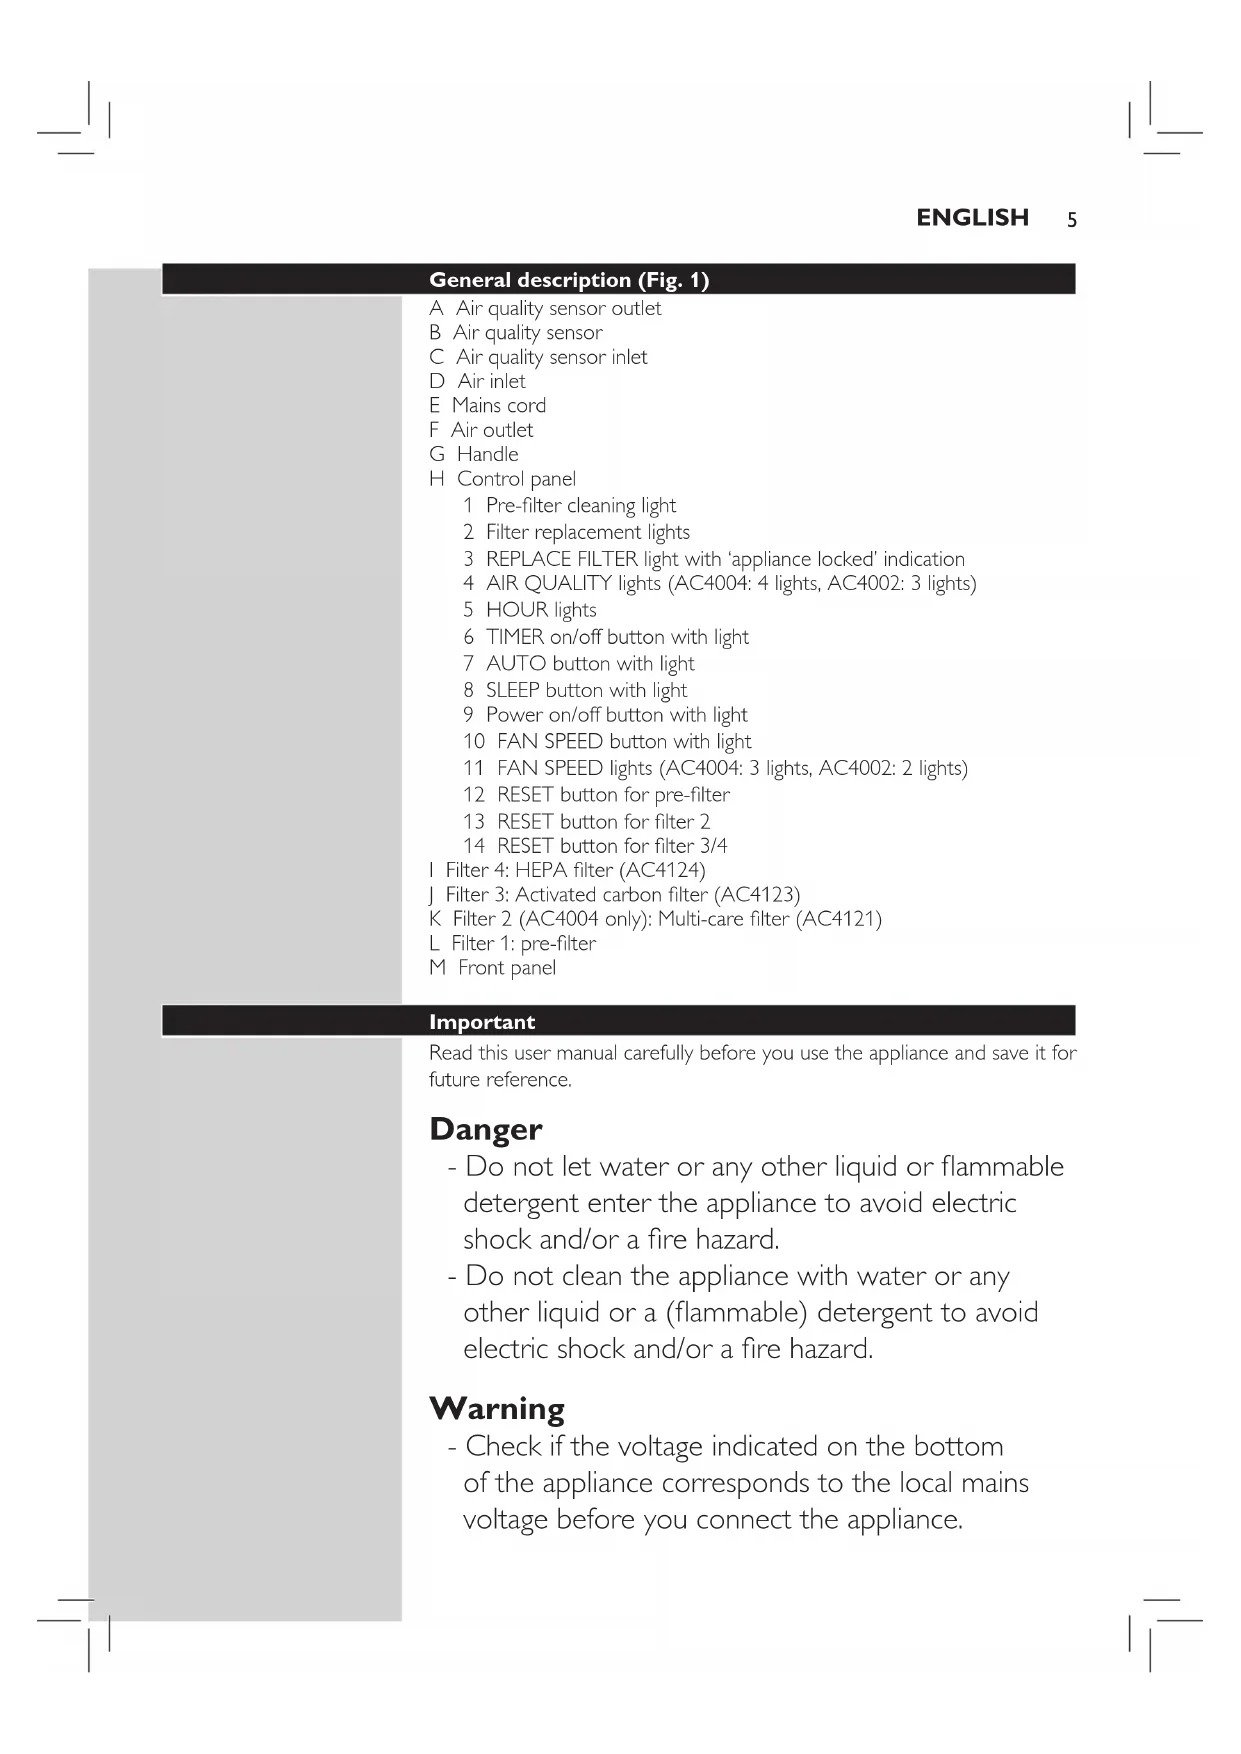
natural_image
Exterior view of a Philips air purifier device (no visible text or symbols on the device body)User manual 5
Benutzerhandbuch
Mode d'emploi 46
Congratulations on your purchase and welcome to Philips! To fully benefit from the support that Philips offers, register your product at www.philips.com/welcome.
With this new bedroom air purifier you breathe cleaner air. For the best results, place the bedroom air purifier in a room where you spend most of your time, e.g. the bedroom.
Wherever there are people, plants or pets, there are airborne particles that can affect your well-being, especially if you suffer from allergies. Because of these particles, the air inside a room may be more polluted than the air in a large city.
Normally, particles are invisible and odourless. Nevertheless, they can affect your health. The bedroom air purifier reduces the amount of animal dander and industrial pollutants in the air, and therefore improves the air quality. It also filters out ultrafine particles larger than 20 nanometres, including bacteria and some viruses. According to publications of the World Health Organization, the avian and human influenza viruses and the Legionella bacterium are larger than 20 nanometres.
Filtration in several stages
The bedroom air purifier has a unique multi-stage filtration system that ensures the best air quality:
- Stage 1: The pre-filter has been treated with antibacterial substances. It catches big particles like human hair, pet hair etc.
- Stage 2: In combination with the HEPA filter, the Multi-care filter filters out dust, pollen and ultrafine particles larger than 20 nanometres, including bacteria and some viruses. According to publications of the World Health Organization, the avian and human influenza viruses and Legionella bacterium are larger than 20 nanometres.
- Stage 3: The Activated carbon filter filters out odours and harmful gases effectively.
- Stage 4: The high-performance composite HEPA filter with antibacterial coating effectively filters out fine dust and cigarette smoke, while the antibacterial and anti-mould functions of organic antibacterial materials filter out germs and mould.
4 ENGLISH
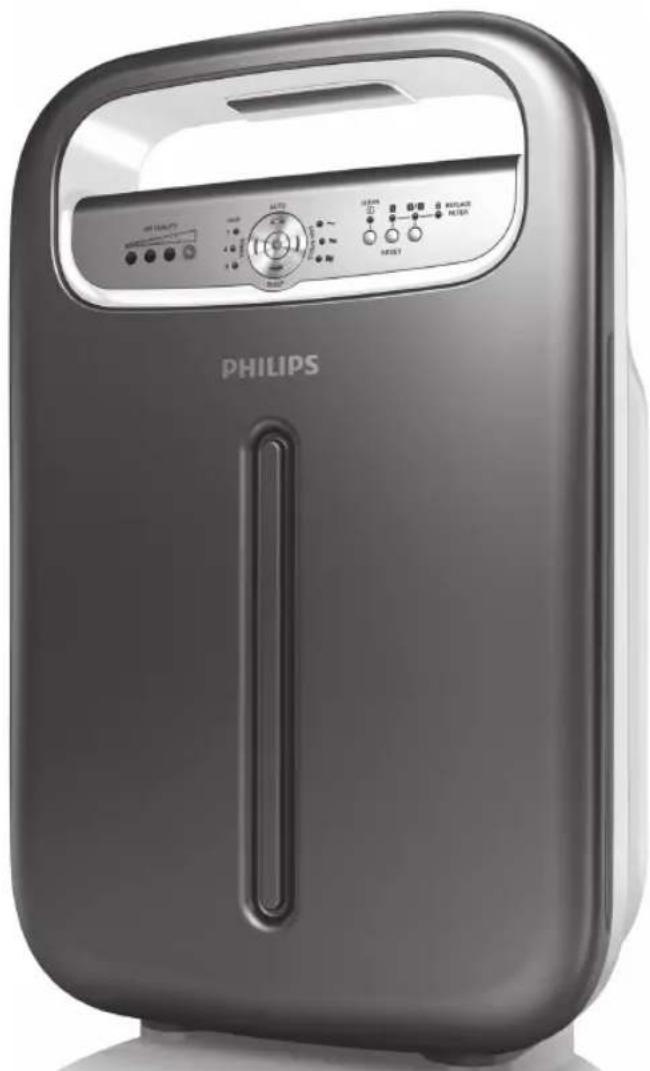
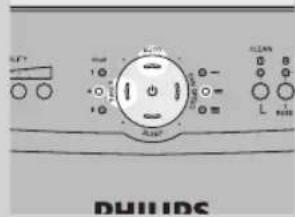
General description (Fig. 1)
A Air quality sensor outlet
B Air quality sensor
C Air quality sensor inlet
D Air inlet
E Mains cord
F Air outlet
G Handle
H Control panel
1 Pre-filter cleaning light
2 Filter replacement lights
3 REPLACE FILTER light with 'appliance locked' indication
4 AIR QUALITY lights (AC4004: 4 lights, AC4002: 3 lights)
5 HOUR lights
6 TIMER on/off button with light
7 AUTO button with light
8 SLEEP button with light
9 Power on/off button with light
10 FAN SPEED button with light
11 FAN SPEED lights (AC4004: 3 lights, AC4002: 2 lights)
12 RESET button for pre-filter
13 RESET button for filter 2
14 RESET button for filter 3/4
I Filter 4: HEPA filter (AC4124)
J Filter 3: Activated carbon filter (AC4123)
K Filter 2 (AC4004 only): Multi-care filter (AC4121)
L Filter 1: pre-filter
M Front panel
Important
Read this user manual carefully before you use the appliance and save it for future reference.
Danger
- Do not let water or any other liquid or flammable detergent enter the appliance to avoid electric shock and/or a fire hazard.
- Do not clean the appliance with water or any other liquid or a (flammable) detergent to avoid electric shock and/or a fire hazard.
Warning
- Check if the voltage indicated on the bottom of the appliance corresponds to the local mains voltage before you connect the appliance.
6 ENGLISH
- If the mains cord is damaged, you must have it replaced by Philips, a service centre authorised by Philips or similarly qualified persons in order to avoid a hazard.
- Do not use the appliance if the plug, the mains cord or the appliance itself is damaged.
- This appliance can be used by children aged from 8 years and above and persons with reduced physical, sensory or mental capabilities or lack of experience and knowledge if they have been given supervision or instruction concerning use of the appliance in a safe way and understand the hazards involved. Children shall not play with the appliance. Cleaning and maintenance shall not be made by children without supervision..
- This appliance is not a toy. Children should be supervised to ensure that they do not play with the appliance.
- Do not block the air inlet and outlet, e.g. by placing items on the air outlet or in front of the air inlet.
Caution
- This appliance is not a substitute for proper ventilation, regular vacuum cleaning or use of an extractor hood or fan while cooking.
- If the wall socket used to power the appliance has poor connections, the plug of the appliance may become hot. Make sure you plug the appliance into a properly connected wall socket.
- Always place and use the appliance on a dry, stable, level and horizontal surface.
- Leave at least 20cm free space behind and on both sides of the appliance and leave at least 30cm free space above the appliance.
- Do not place anything on top of the appliance and do not sit on the appliance.
- Do not place the appliance directly below an air conditioner to prevent condensation from dripping onto the appliance.
- Make sure all filters are properly installed before you switch on the appliance.
- Only use the original Philips filters specially intended for this appliance. Do not use any other filters.
- Avoid knocking against the appliance (the air inlet and outlet in particular) with hard objects.
- Always lift or move the appliance by the handgrip at the back of the appliance.
- Do not insert your fingers or objects into the air outlet.
- Do not use this appliance when you have used indoor smoke-type insect repellents or in places with oily residues, burning incense or chemical fumes.
- Do not use the appliance near gas appliances, heating devices or fireplaces.
- Always unplug the appliance after use and before you clean it.
- Do not use the appliance in a room with major temperature changes, as this may cause condensation inside the appliance.
- To prevent interference, place the appliance at least 2m away from electrical appliances that use airborne radio waves such as TVs, radios and radio-controlled clocks.
- When the air purifier is not used for a long time, bacteria may grow on the filters. Check the filters after a long period of disuse. If the filters are very dirty, replace them (see chapter 'Filter replacement').
8 ENGLISH
- The appliance is only intended for household use under normal operating conditions.
- Do not use the appliance in wet surroundings or in surroundings with high ambient temperatures, such as the bathroom, toilet or kitchen.
- The appliance does not remove carbon monoxide (CO) or radon (Rn). It cannot be used as a safety device in case of accidents with combustion processes and hazardous chemicals.
Electromagnetic fields (EMF)
This Philips appliance complies with all applicable standards and regulations regarding exposure to electromagnetic fields.
Before first use
Placing the filters
The appliance comes with all filters fitted inside, but you have to remove the packaging of the filters before you can use the appliance. Remove all filters, unpack them and place them back into the appliance as described below.
Tip: Place the appliance against a wall for more stability when you remove or insert filters.
Note: Make sure you insert the filters in the correct position.

natural_image
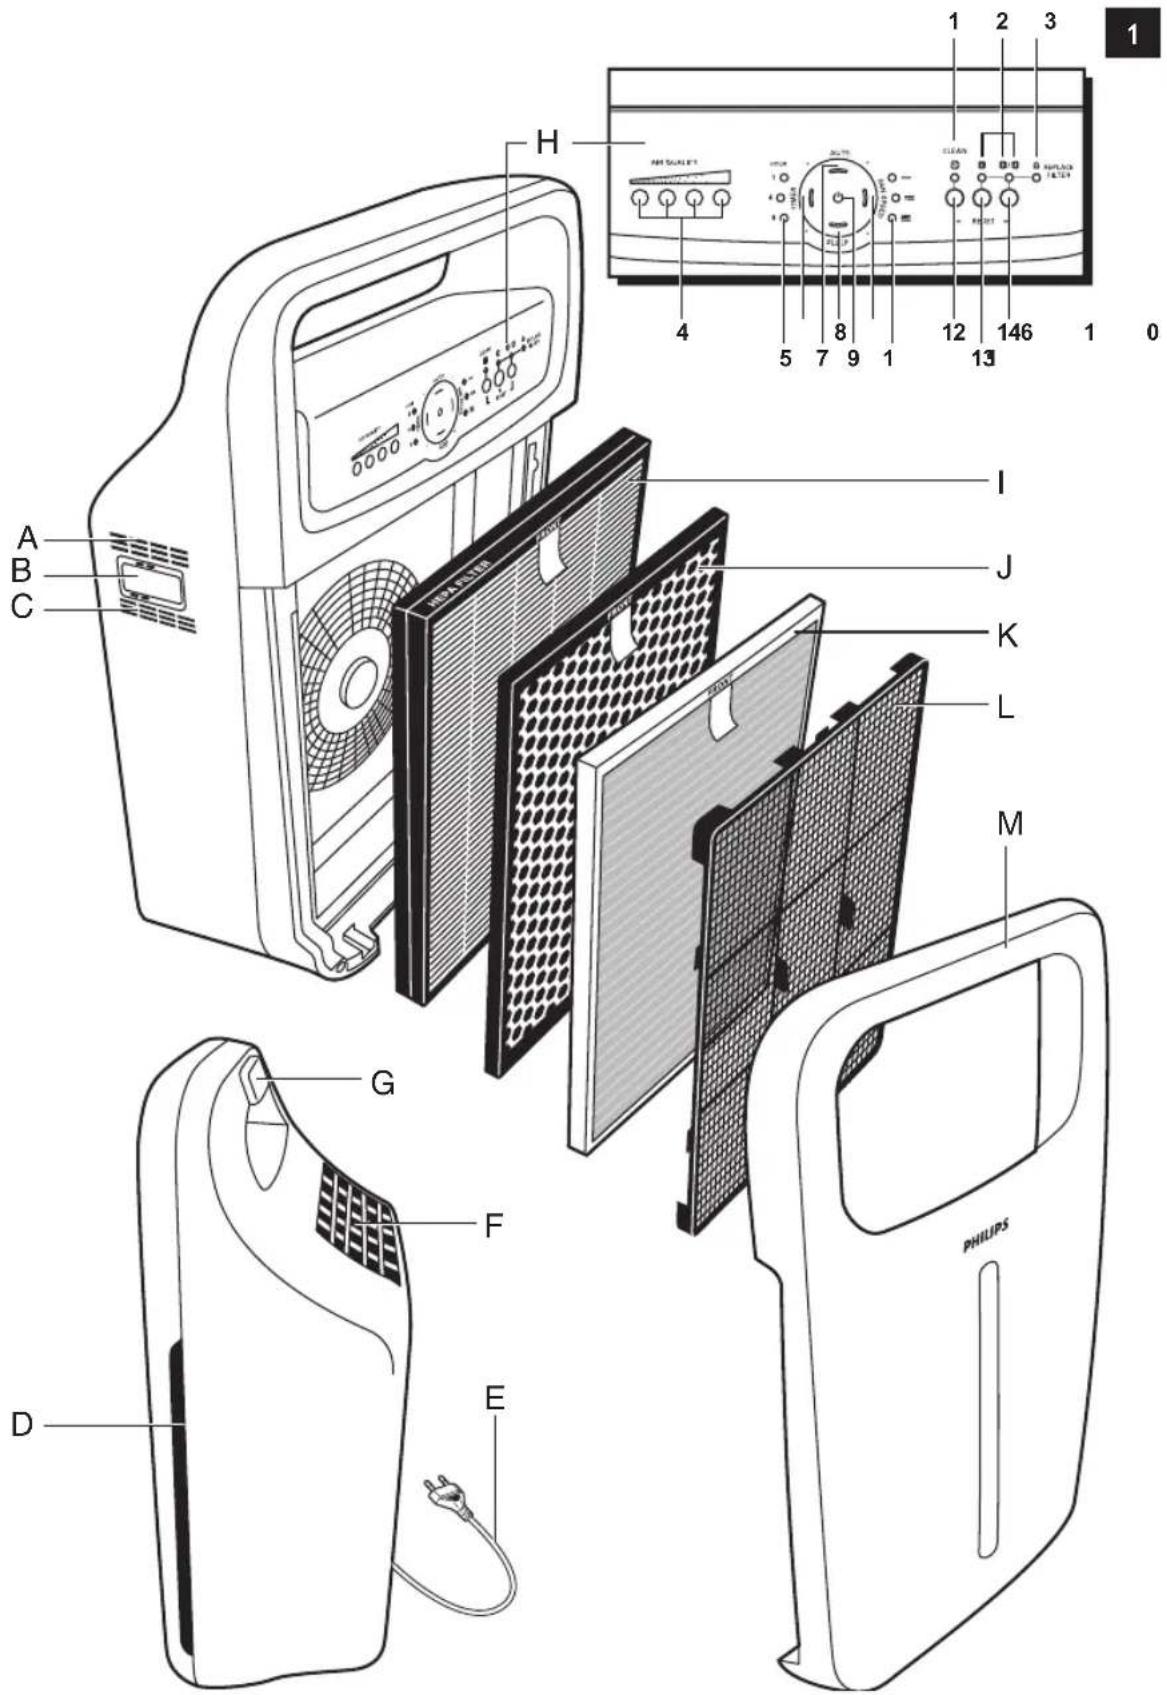
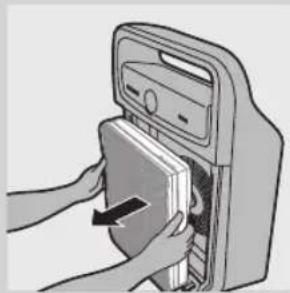
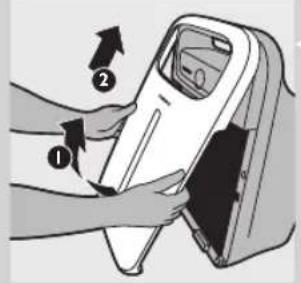
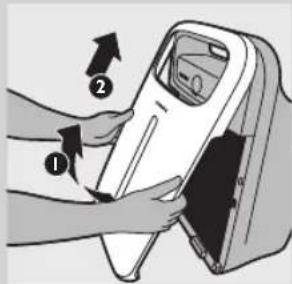
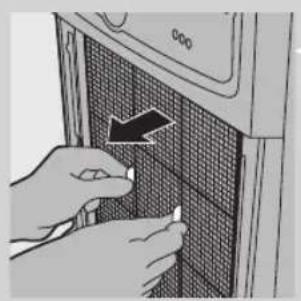
Close-up of hands installing or adjusting a grid-patterned panel on a microwave oven (no text or symbols visible)1 Place your fingers in the recesses of the side panels and gently pull the bottom of the front panel towards you. Then lift the hooks at the top of the panel out of the top of the appliance.
natural_image
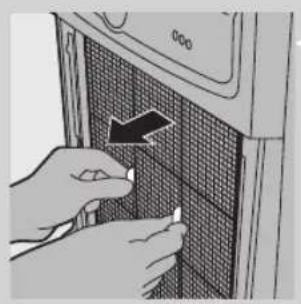
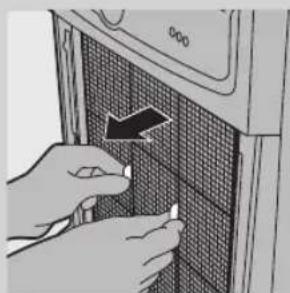
Illustration of hands inserting a card into a device (no text or symbols visible)2 To remove the pre-filter, grab the two projections and pull the filter towards you.
3 Remove all other filters from the appliance.

4 Remove all packaging material from the filters.
5 Put filter 4 (HEPA filter) back into the appliance.
Note: Make sure that the side with the tag points towards you.
6 Put filter 3 (Activated carbon filter) back into the appliance.
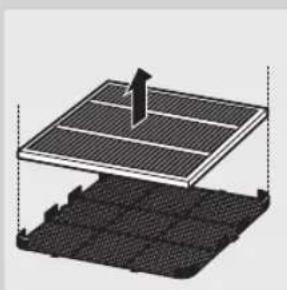
7 AC4004 only: attach filter 2 (Multi-care filter) to the back of filter 1 (pre-filter).
Note: Make sure that the front of filter 2 (Multi-care filter), that is the side with the tag, points towards the pre-filter.
8 Place filter 1 (pre-filter) in the appliance.
Note: AC4004: make sure the Multi-care filter is attached to the back of the pre-filter.
Note: Make sure that the side with the two projections points towards you.
Note: Make sure that all hooks are properly attached to the appliance.
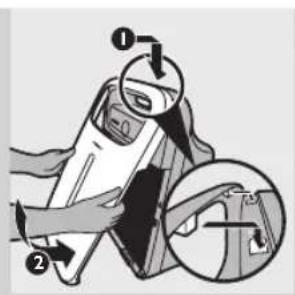
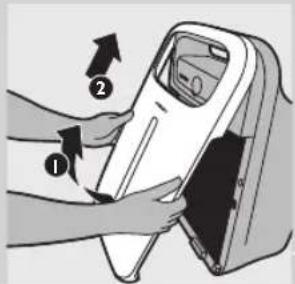
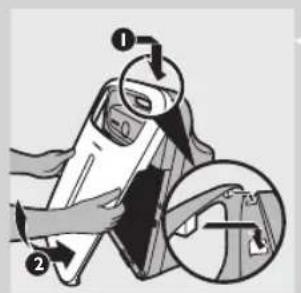
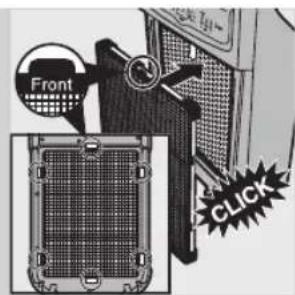
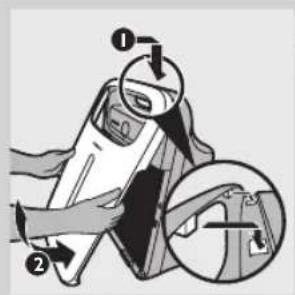
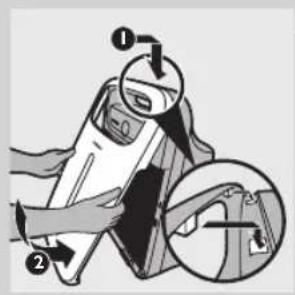
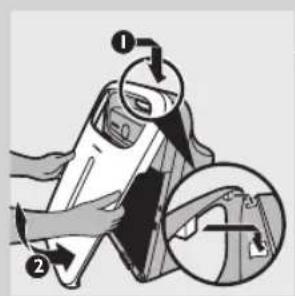
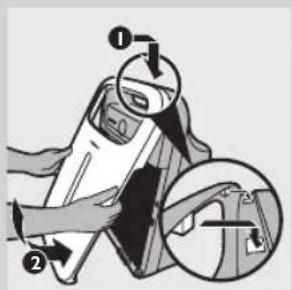
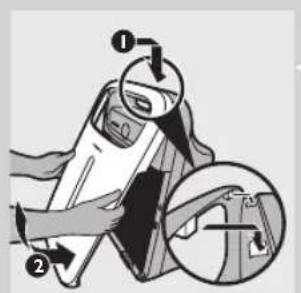
9 To reattach the front panel, insert the two hooks into the top of the appliance first (1). Then push the panel against the body of the appliance (2).
Using the appliance

1 Put the plug in the wall socket
- All lights go on and off twice and you hear a beep.
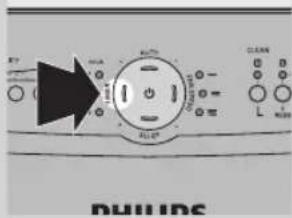
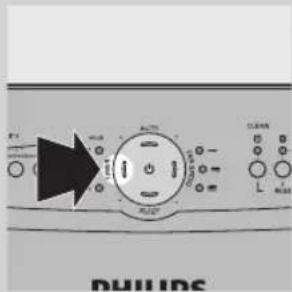
2 Press the on/off button to switch on the appliance.
- The power-on light and one of the AIR QUALITY lights on the control panel goes on.
AC4004: AIR QUALITY lights
Colour Air quality
Blue Very good
Deep purple Good
Purple Fair
Red Bad
AC4002: AIR QUALITY lights
Colour Air quality
Blue Very good
Deep purple Good
Red Bad
- The appliance automatically starts operating in the auto mode.
To switch off the appliance, press and hold the on/off button again until the power-on light goes out and unplug the appliance.
Note: When the humidity level in the room is very high, it is possible that condensation develops on the air quality sensor. As a result, the AIR QUALITY lights on the control panel may indicate that the air quality is bad even though the air quality is good. In this case, the auto mode causes the appliance to run at high fan speed. You can solve this by cleaning the air quality sensor. If condensation develops frequently during periods of high humidity, we advise you to use one of the manual speed settings.
Auto mode
When the appliance is switched on, the built-in air quality sensor automatically measures the ambient air quality. When the auto mode is activated, the appliance selects the most appropriate fan speed for the measured air quality.
Note: When you use the auto mode, you can also use the timer function (see section 'Timer function in this chapter). In this case, the AUTO light, one of the FAN SPEED lights, the TIMER light and one of the HOUR lights are on.
1 Press the on/off button to switch on the appliance.
- The appliance automatically starts operating in the auto mode.
Note: When the appliance is operating in another mode and you want to activate the auto mode, simply press the AUTO button.

- The AUTO light and one of the FAN SPEED lights go on. The FAN SPEED light indicates at which fan speed the appliance is operating.
Note: When the air quality is very good and the fan speed operates at a very low fan speed, the FAN SPEED light for the lowest speed level does not go on. In this case only the power-on light and the AUTO light are on.
Note: The built-in air quality sensor measures the air quality and automatically selects the appropriate speed setting to ensure the best possible air quality in your room. When the air is clean, the appliance stops running. When the air quality deteriorates, the appliance starts running at a low fan speed and noise level so that the energy consumption is minimised.
12 ENGLISH
Fan speed
If you do not use the auto mode, you can select the desired fan speed yourself.
Note: When you manually select a fan speed, you can also use the timer function (see section 'Timer function in this chapter). In this case, one of the FAN SPEED lights, the TIMER light and one of the HOUR lights are on.
1 Press the on/off button to switch on the appliance.
2 Press the FAN SPEED button one or more times to select the desired fan speed.
• The corresponding FAN SPEED light shows the set fan speed.
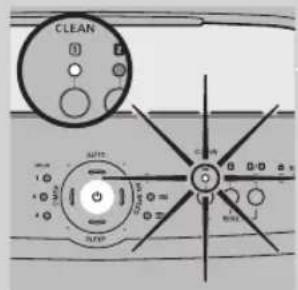
Timer function
With the timer function, you can let the appliance operate for a set number of hours. When the set time has elapsed, the appliance automatically switches off.
You can use the timer function in a number of situations:
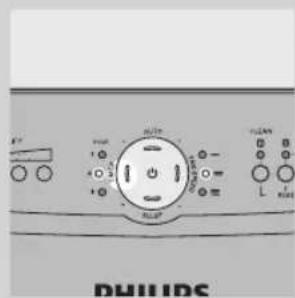
- In combination with the AUTO mode (see section 'Auto mode' in this chapter). In this case, the AUTO light, one of the FAN SPEED lights, the TIMER light and one of the HOUR lights are on.
natural_image
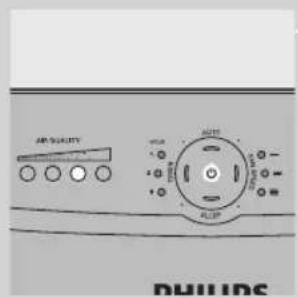
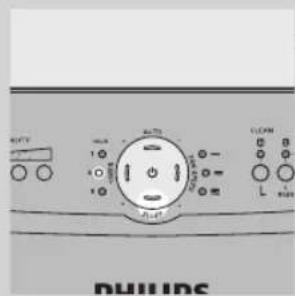
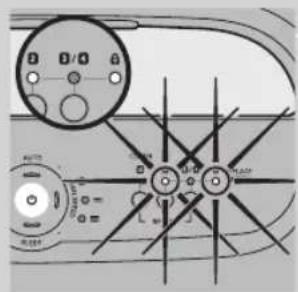
Front panel of a washing machine showing control knob, buttons, and indicator lights (no readable text or symbols)- When you choose a fan speed manually (see section 'Fan speed' in this chapter). In this case, one of the FAN SPEED lights, the TIMER light and one of the HOUR lights are on.
natural_image
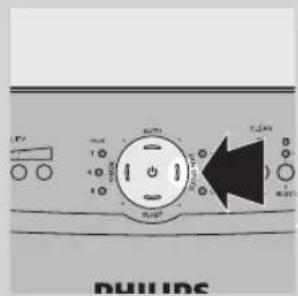
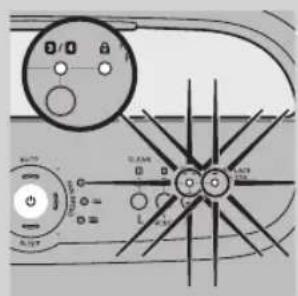
Front view of a washing machine control panel with indicator lights and buttons (no readable text or symbols)- In combination with the SLEEP mode (see section 'Sleep mode' in this chapter). In this case, the SLEEP light and one of the HOUR lights are on (but dimmed).
1 Press the on/off button to switch on the appliance.
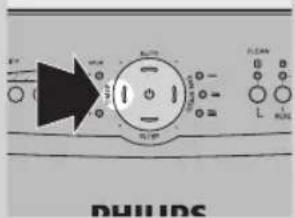
2 Press the TIMER button to activate the timer.
• The TIMER light goes on.
3 Press the TIMER button repeatedly to choose the number of hours you want the appliance to operate.
• The corresponding HOUR light goes on.
To deactivate the timer function, press the TIMER button repeatedly until the HOUR light and the TIMER light are out.
Sleep mode
When you use the appliance in sleep mode, it operates very quietly and all the lights that are on are dimmed, to allow you to sleep undisturbed.
Note: When you use the sleep mode, you can also use the timer function (see section 'Timer function in this chapter). In this case, the SLEEP light and one of the HOUR lights are on (but dimmed).
1 Press the on/off button to switch on the appliance.
2 Press the SLEEP button to activate the quiet sleep mode.
• The SLEEP light goes on.
- All other lights are off, except one of the HOUR lights if you have activated the timer function.
If you want to go back to the fan speed mode or auto mode, simply press the FAN SPEED or AUTO button. The sleep mode is then deactivated.
Adjusting the air quality sensor sensitivity
People with certain health problems (e.g. allergies or asthma) have a greater need for healthy air. For this reason, the air purifier allows you to adjust the sensitivity of the air quality sensor. When it is set to a higher sensitivity level, the appliance already starts cleaning the air at lower pollution levels to make the air even cleaner.
There are 3 sensitivity levels:
- extra sensitive
- sensitive
- standard
The air quality sensor is set to standard sensitivity. You can adjust the sensitivity of the air quality sensor in the following way:
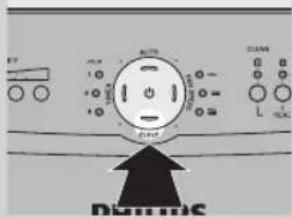
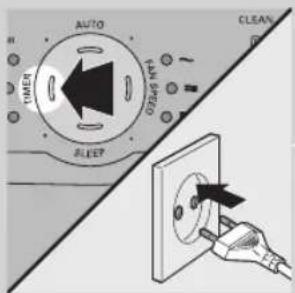
1 If the appliance is already plugged in, unplug the appliance and wait for a few minutes.
2 Press and hold the TIMER button and simultaneously put the mains plug in the wall socket.
- The appliance beeps twice and one of the HOUR lights flashes to show the current sensitivity level of the air quality sensor.
Sensitivity level:
HOUR light Sensitivity level
1hr Extra sensitive
4hrs Sensitive
8hrs Standard
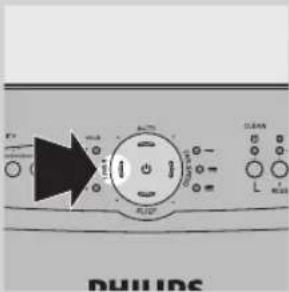
3 Press the TIMER button to adjust the sensitivity level of the air quality sensor.
• One of the HOUR lights flashes to show the set sensitivity level of the air quality sensor.
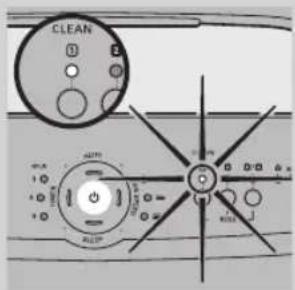
4 Press and hold the on/off button to switch off the appliance.
Note: When you change the sensitivity level, the appliance automatically starts operating at the set sensitivity level whenever you switch on the appliance.
Cleaning and maintenance
Always unplug the appliance before you clean it.
Never immerse the appliance in water or any other liquid.
Never use aggressive or flammable cleaning agents such as bleach or alcohol to clean any part of the appliance.
Only the pre-filter is washable. All other filters are NOT washable.
Body of the appliance
Regularly clean the inside and outside of the body to prevent dust from collecting on the inside and outside.
1 Wipe away dust with a soft dry cloth from the body of the appliance.
2 Clean the air inlet and the air outlet with a soft dry cloth.
Pre-filter
The pre-filter is washable.
- Clean the pre-filter when the filter cleaning light flashes to ensure optimal functioning of the appliance.
1 Unplug the appliance.
natural_image
Close-up of hands installing or adjusting a grid-patterned panel on a microwave oven (no text or symbols visible)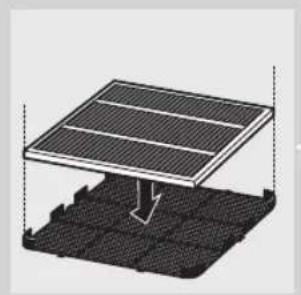
natural_image
Diagram of a solar panel installation on a grid base, showing structural layers and a downward arrow indicating compression or damage (no text or symbols present)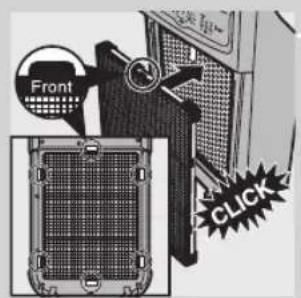
2 Place your fingers in the recesses of the side panels and gently pull the bottom of the front panel towards you. Then lift the hooks at the top of the panel out of the top of the appliance.
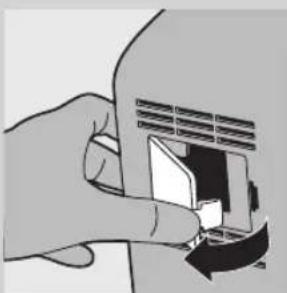
3 To remove the pre-filter, grab the two projections and pull the filter towards you.
4 AC4004 only: remove the Multi-care filter from the back of the prefilter.
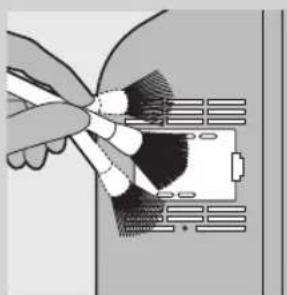
5 Wash the pre-filter under a running tap. If the pre-filter is very dirty, use a soft brush to brush away the dirt.
Tip: Alternatively, you can clean the pre-filter by removing the dust with a vacuum cleaner.
6 Air-dry the pre-filter.
Note: Make sure that the pre-filter is completely dry.
7 AC4004 only: reattach the Multi-care filter to the back of the pre-filter.
Note: Make sure that the front of the Multi-care filter is pointing towards the pre-filter.
8 Put the pre-filter back into the appliance. Attach all hooks properly to the appliance.
Note: Make sure that the side with the two projections is pointing towards you.
9 To reattach the front panel, insert the two hooks into the top of the appliance first (1). Then push the panel against the body of the appliance (2).
10 Put the plug in the wall socket.
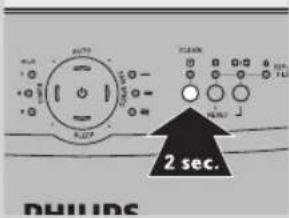
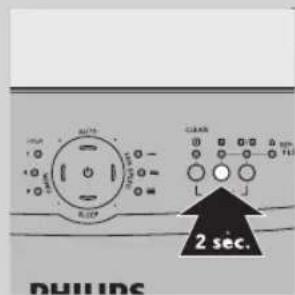
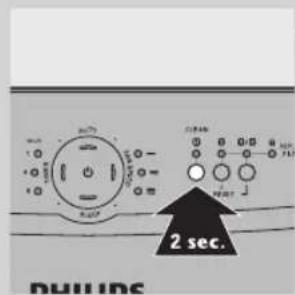
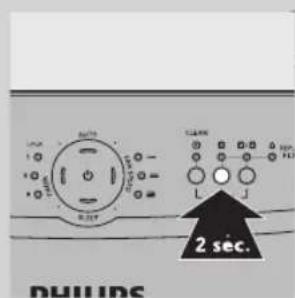
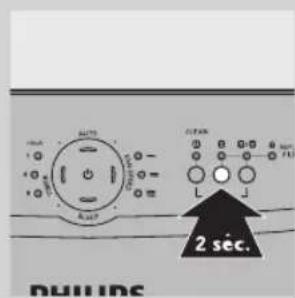
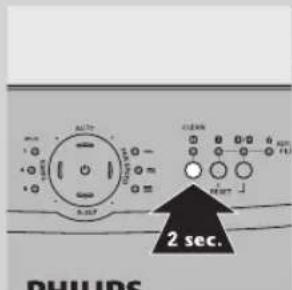
11 Press and hold the reset button for filter 1 (the button below the filter cleaning light) for 2 seconds to reset the appliance.
Air quality sensor
natural_image
Illustration of a hand inserting a cable into a device (no text or symbols visible)Clean the air quality sensor every 2 months for optimal functioning of the appliance. Clean it more frequently if you use the appliance in a dusty environment.
Note: When the humidity level in the room is very high, it is possible that condensation develops on the air quality sensor. As a result, the AIR QUALITY light on the control panel may indicate that the air quality is bad even though the air quality is good. In this case you have to clean the air quality sensor or use one of the manual speed settings.
natural_image
Illustration of a hand inserting a card into a slot (no text or symbols visible)1 Clean the air quality sensor inlet and the air quality sensor outlet with a soft brush.
2 Remove the air quality sensor cover.

natural_image
Pure electrical circuit lines without any symbols3 Clean the air quality sensor, the dust inlet and the dust outlet with a lightly moistened cotton swab.
4 Dry them with a dry cotton swab.
5 Reattach the air quality sensor cover.
Filter replacement
Filter maintenance
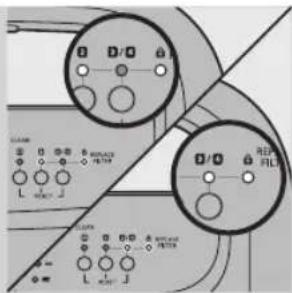
When one of the filters is almost full and has to be cleaned or replaced, the corresponding light or lights (the pre-filter cleaning light or one of the filter replacement lights together with the 'REPLACE FILTER' light) start to flash. You then have to clean or replace this filter.
This air purifier is also equipped with the Healthy air protect lock to ensure that the filters are in optimal condition when the appliance is operating. When you do not replace filter 2 (AC4004 only), filter 3 and/or filter 4, the appliance stops operating and the appliance is locked. When the appliance is locked, the filter replacement light of the filter concerned and the 'REPLACE FILTER' light light up continuously.
Filter cleaning light and filter replacement lights
The filter cleaning light and the filter replacement lights indicate which filter has to be cleaned or replaced.
- Filter cleaning light 1 flashes: you have to clean filter 1 (pre-filter). See chapter 'Cleaning' for further instructions.
- Filter replacement light 2 and the 'REPLACE FILTER' light flash: filter 2 (Multi-care filter, AC4004 only) has to be replaced.
- Filter replacement light 3/4 and the 'REPLACE FILTER' light flash: filter 3 (Activated carbon filter) and filter 4 (HEPA filter) have to be replaced.
Note: Filter 3 (Activated carbon filter) and filter 4 (HEPA filter) have a similar lifetime. Therefore they have to be replaced at the same time.
Filter replacement lock
If you do not replace a filter in time, the appliance stops operating approx. 2 weeks after the filter replacement light started flashing. When the appliance is locked, it does not operate until you have replaced the full filter and pressed the reset button.
Note: The time between the filter replacement signal and the locking of the appliance varies, depending on how often you use the appliance.
Note: When the power on/off light, filter replacement light 2 or 3/4 and the 'REPLACE FILTER' light are on continuously, the appliance is locked (see section 'Filter maintenance' in this chapter for more information).
Approximately 1 day before the appliance locks, it beeps every 30 minutes to inform you that one of the filters needs to be replaced.
When the appliance is locked, you hear a beep when you press any button. You can switch off the appliance by pressing and holding the on/off button. If the appliance is locked:
1 Check which filter needs to be replaced (see section 'Filter cleaning light and filter replacement lights' above).
2 Switch off the appliance and unplug it.
3 Replace the appropriate filter (see section 'Replacing the filters and resetting the appliance' below).
Replacing the filters and resetting the appliance
Tip: Place the appliance against a wall for more stability when you remove or insert filters.
1 Switch off the appliance and unplug it.
2 Place your fingers in the recesses of the side panels and gently pull the bottom part of the front panel towards you. Then lift the hooks at the top of the panel out of the top of the appliance.
natural_image
Close-up of hands installing or adjusting a grid-patterned panel on a device (no visible text or symbols)3 To remove filter 1 (pre-filter), grab the two projections and pull the filter towards you.
natural_image
3D diagram of a solar panel structure with a pointer and grid base, no text or symbols present4 AC4004 only: remove filter 2 (Multi-care filter) from the back of the pre-filter.

5 To remove filter 3 (Activated carbon filter), grab its tag and pull it towards you.
6 To remove filter 4 (HEPA filter), grab its tag and pull it towards you.
7 Take the filters by both sides and gently deposit them into the house hold trash bin.
Note: Do not touch the pleated filter surface, or smell the filter as it has collected pollutants from the air.
Note: Wash your hands after disposing of the used filters.
8 Put filter 4 (HEPA filter) back into the appliance.
Note: Make sure that the side with the tag points towards you.
9 Put filter 3 (Activated carbon filter) back into the appliance.
10 AC4004 only: reattach filter 2 (Multi-care filter) to the back of filter 1 (pre-filter).
Note: Make sure that the front of the Multi-care filter points towards the prefilter.
11 Put filter 1 (pre-filter) back into the appliance.
Note: Make sure that the side with the two projections points towards you.
Note: Make sure that all hooks are properly attached to the appliance.
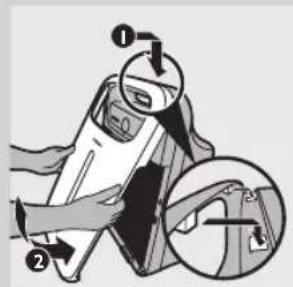
12 To reattach the front panel, insert the two hooks into the top of the appliance first (1). Then push the panel against the body of the appliance (2).
13 Put the plug in the wall socket and switch on the appliance again.
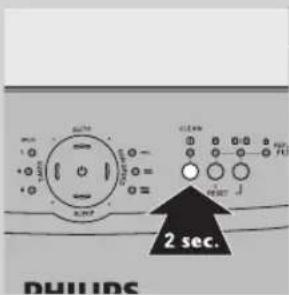
14 Press and hold the reset button below the filter replacement light of the filter you have replaced to reset the appliance.
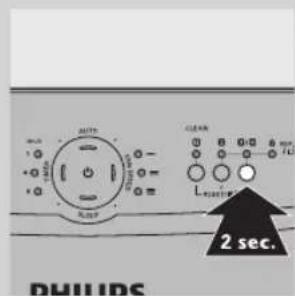
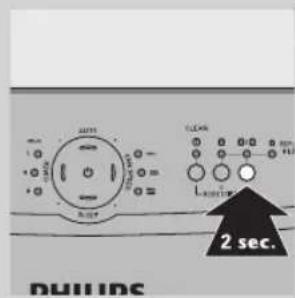
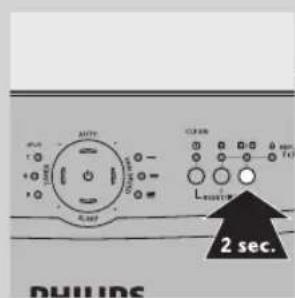
- Press and hold the reset button for filter 2 for 2 seconds if you have replaced filter 2 (Multi-care filter).
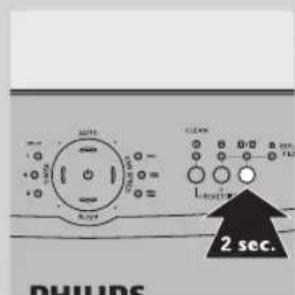
- Press and hold the reset button for filter 3/4 for 2 seconds if you have replaced filter 3 (Activated carbon filter) and 4 (HEPA filter).
- You hear a beep and the appliance starts operating in the auto mode again.
Accessories
New filters are available under the following type numbers:
Filter Type number
Filter 2: Multi-care filter AC4121
Filter 3: Activated carbon filter AC4123
Filter 4: HEPA filter AC4124
AC4002 only: adding the Multi-care filter
AC4002 comes with the pre-filter, Activated carbon filter and the HEPA filter. For this appliance, only the filter cleaning light of filter 1 (pre-filter) and the filter replacement light of filter 3 and 4 (Activated carbon filter and HEPA filter) have been activated.
If you want to enjoy the benefits of the Multi-care filter, you can purchase this filter separately (see the table above). In combination with the HEPA filter, the Multi-care filter filters out dust, pollen and ultrafine particles larger than 20 nanometres, including bacteria and some viruses. According to publications of the World Health Organization, the avian and human influenza viruses and Legionella bacterium are larger than 20 nanometres. After installing the Multi-care filter, you have to activate the filter replacement indication of filter 2 in the following way:
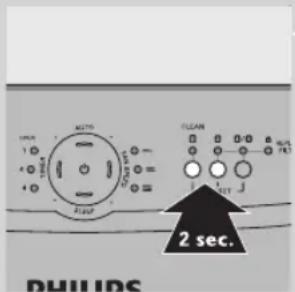
1 Simultaneously press and hold the reset button for filter 1 (pre-filter) and the reset button for filter 2 (Multi-care filter) for 2 seconds.
- To deactivate the filter replacement indication of filter 2, simultaneously press and hold the reset button for filter 1 (pre-filter) and the reset button for filter 2 (Multi-care filter) for 2 seconds.
Note: To check whether the filter replacement indication of the Multi-care filter is active or not, press the reset button for filter 2. If the filter replacement light of filter 2 goes on for a few seconds, the filter replacement indication of the Multi-care filter is active. If the filter replacement light of filter 2 does not go on, the filter replacement indication is not active.
Environment
natural_image
Symbol of a trash bin crossed with no text or numbers, representing waste sorting or disposal (no text present)- Do not throw away the appliance with the normal household waste at the end of its life, but hand it in at an official collection point for recycling. By doing this, you help to preserve the environment.
Guarantee and service
If you need information or if you have a problem, please visit the Philips website at www.philips.com or contact the Philips Consumer Care Centre in your country (you find its phone number in the worldwide guarantee leaflet). If there is no Consumer Care Centre in your country, go to your local Philips dealer.
22 ENGLISH
| Troubleshooting | |
| This chapter summarises the most common problems you could encounter with the appliance. If you are unable to solve the problem with the information below, contact the Consumer Care Centre in your country. | |
| Problem Possible solution | |
| The appliance doesn't work. | You ignored the filter replacement lights. You did not replace a filter when the corresponding filter replacement light and the REPLACE FILTER light started flashing and did not respond when the appliance started to beep every 30 minutes after approx. 2 weeks. As a result, the appliance is now locked and you have to replace the filter and reset the appliance (see chapter 'Filter replacement') so that the appliance can provide healthy air again. |
| The AIR QUALITY lights keep flashing and the appliance does not work. | There is a problem with the air quality sensor of the appliance. Please contact the Philips Consumer Care Centre in your country (you find its phone number in the worldwide guarantee leaflet). If there is no Consumer Care Centre in your country, go to your local Philips dealer. |
| No air comes out of the air outlet | The appliance is not switched on. Put the plug in the wall socket and switch on the appliance.The air quality is good and the auto mode is activated. In this case, the appliance stops operating automatically when the air is clean to save electricity. |
| The airflow that comes out of the air outlet is significantly weaker than before. | The pre-filter is dirty. Clean the pre-filter (see chapter 'Cleaning').You haven't removed all packaging material from the filters. Make sure that you have removed all packaging material. |
| The air quality does not improve, even though the appliance has been operating for a long time. | One of the filters has not been placed in the appliance. Make sure that all filters are properly installed in the following order, starting with the innermost filter: HEPA filter, Activated carbon filter, Multi-care filter (AC4004 only), pre-filter. The Multi-care filter (AC4004 only) has to be attached to the back of the pre-filter.The air quality sensor is wet. The humidity level in your room is high and causes condensation. Make sure that the air quality sensor is clean and dry (see chapter 'Cleaning'). |
| The AIR QUALITY light does not change colour even though the appliance has been operating for some time. | The air quality sensor is dirty. Clean the air quality sensor (see chapter 'Cleaning'). |
| I need cleaner air because I have an allergy. | You can change the air quality sensor sensitivity (see chapter 'Using the appliance') to make the air purifier clean the air even better. |
| The appliance is extra loud. | Please check if you have removed all the packaging material from the filters.If the appliance is still too loud, you can change the fan speed to a lower fan speed level. |
Problem Possible solution
| The appliance still indicates that I need to replace a filter, but I already did. | Perhaps you did not reset the appliance. Plug in the appliance, press and hold the reset button corresponding to the filter you have replaced. The appliance beeps if you have reset it properly. |
| When I press the SLEEP button, all lights except for the SLEEP light go out. | When you press the SLEEP button, the appliance enters the SLEEP mode, which is designed to allow you to sleep undisturbed. The appliance operates quietly and only the SLEEP light is on. If you have activated the timer, one of the HOUR lights is also on. All lights that are on in the SLEEP mode are dimmed to allow you to sleep undisturbed. |
| The appliance stops operating, although the power-on light is still on. | The built in quality sensor has determined that the air quality is good and that the air does not need to be cleaned anymore. When the air quality deteriorates, the appliance is starts running at a low fan speed and noise level so that the energy consumption is minimised. |
| The appliance does not work. The air quality light ring flashes blue, all other lights are out. | This is air particle sensor error or an air particle sensor and gas sensor error. Contact the Consumer Care Centre in your country (you find its phone number in the worldwide guarantee leaflet). If there is no Consumer Care Centre in your country, go to your local Philips dealer. |
Einführung
natural_image
Close-up of hands installing or adjusting a grid panel on a microwave oven (no text or symbols visible)natural_image
Illustration of hands inserting a card into a device (no text or symbols visible)natural_image
Illustration of a hand holding a piece of paper with an arrow indicating upward motion (no text or symbols)natural_image
Illustration of a computer tower with a CD inside, showing internal components and no text or symbols.natural_image
Illustration of a desktop air conditioner unit with ventilation grilles and control panel (no text or symbols)natural_image
Diagram of a solar panel installation on a grid base (no text or symbols)HOUR light Sensitivity level
1hr Extra sensitive
4hrs Sensitive
8hrs Standard

natural_image
Hand inserting a small component into a grid-patterned device (no text or symbols visible)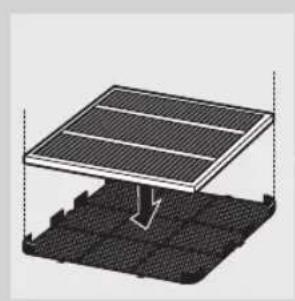
natural_image
Diagram of a solar panel mounted on a grid base, showing airflow direction (no text or symbols)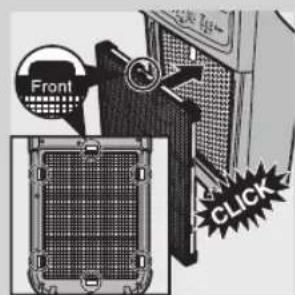
natural_image
Illustration of a hand inserting a cable into a device (no text or symbols visible)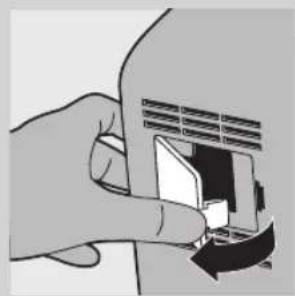
natural_image
Illustration of a hand inserting a card into a card (no text or symbols visible)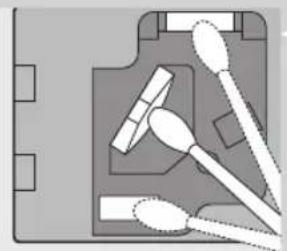
natural_image
Pure electrical circuit lines without any symbolsLuftqualitätssensor

natural_image
Close-up of hands installing a grid panel with an arrow indicating rotation (no text or symbols visible)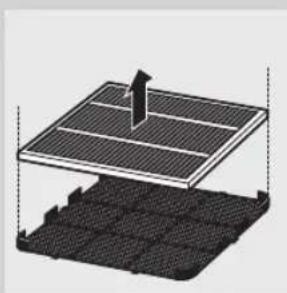
natural_image
3D diagram of a solar panel structure with a central pointer and grid base (no text or symbols)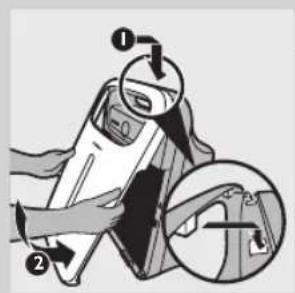
Filter 2: Multi-care filter AC4121
Filter 3: Activated carbon filter AC4123
Filter 4: HEPA filter AC4124
natural_image
Symbol of a waste bin with no text or numbers present| Fehlerbehebung | |
| In diesem Kapitel sind die häufigsten Probleme aufgeführt, die beim Gebrauch Ihres Geräts auftreten können. Sollten Sie ein Problem mithilfe der nachstehenden Informationen nicht beheben können, wenden Sie sich bitte an ein Philips Service-Center in Ihrem Land. | |
| Problem Possible solution | |
| The appliance doesn't work. | You ignored the filter replacement lights. You did not replace a filter when the corresponding filter replacement light and the REPLACE FILTER light started flashing and did not respond when the appliance started to beep every 30 minutes after approx. 2 weeks. As a result, the appliance is now locked and you have to replace the filter and reset the appliance (see chapter 'Filter replacement') so that the appliance can provide healthy air again. |
| The AIR QUALITY lights keep flashing and the appliance does not work. | There is a problem with the air quality sensor of the appliance. Please contact the Philips Consumer Care Centre in your country (you find its phone number in the worldwide guarantee leaflet). If there is no Consumer Care Centre in your country, go to your local Philips dealer. |
| No air comes out of the air outlet | The appliance is not switched on. Put the plug in the wall socket and switch on the appliance.The air quality is good and the auto mode is activated. In this case, the appliance stops operating automatically when the air is clean to save electricity. |
| The airflow that comes out of the air outlet is significantly weaker than before. | The pre-filter is dirty. Clean the pre-filter (see chapter 'Cleaning').You haven't removed all packaging material from the filters. Make sure that you have removed all packaging material. |
| The air quality does not improve, even though the appliance has been operating for a long time. | One of the filters has not been placed in the appliance. Make sure that all filters are properly installed in the following order, starting with the innermost filter: HEPA filter, Activated carbon filter, Multi-care filter (AC4004 only), pre-filter. The Multi-care filter (AC4004 only) has to be attached to the back of the pre-filter.The air quality sensor is wet. The humidity level in your room is high and causes condensation. Make sure that the air quality sensor is clean and dry (see chapter 'Cleaning'). |
| The AIR QUALITY light does not change colour even though the appliance has been operating for some time. | The air quality sensor is dirty. Clean the air quality sensor (see chapter 'Cleaning'). |
| I need cleaner air because I have an allergy. | You can change the air quality sensor sensitivity (see chapter 'Using the appliance') to make the air purifier clean the air even better. |
| The appliance is extra loud. | Please check if you have removed all the packaging material from the filters. |
Problem Possible solution
| • If the appliance is still too loud, you can change the fan speed to a lower fan speed level. | |
| The appliance still indicates that I need to replace a filter, but I already did. | Perhaps you did not reset the appliance. Plug in the appliance, press and hold the reset button corresponding to the filter you have replaced. The appliance beeps if you have reset it properly. |
| When I press the SLEEP button, all lights except for the SLEEP light go out. | When you press the SLEEP button, the appliance enters the SLEEP mode, which is designed to allow you to sleep undisturbed. The appliance operates quietly and only the SLEEP light is on. If you have activated the timer, one of the HOUR lights is also on. All lights that are on in the SLEEP mode are dimmed to allow you to sleep undisturbed. |
| The appliance stops operating, although the power-on light is still on. | The built in quality sensor has determined that the air quality is good and that the air does not need to be cleaned anymore. When the air quality deteriorates, the appliance is starts running at a low fan speed and noise level so that the energy consumption is minimised. |
| The appliance does not work. The air quality light ring flashes blue, all other lights are out. | This is air particle sensor error or an air particle sensor and gas sensor error. Contact the Consumer Care Centre in your country (you find its phone number in the worldwide guarantee leaflet). If there is no Consumer Care Centre in your country, go to your local Philips dealer. |
Introduction
natural_image
Close-up of hands installing or adjusting a grid panel on a microwave oven (no text or symbols visible)natural_image
Illustration of hands inserting a card into a device (no text or symbols visible)natural_image
Illustration of a hand holding a blank document with an upward arrow (no text or symbols)natural_image
Illustration of a hand holding a blank document with an upward arrow (no text or symbols)- ultrasensible
- sensitive
- standard
HOUR light Sensitivity level
1hr Extra sensitive
4hrs Sensitive
8hrs Standard
natural_image
Hand inserting a small component into a microwave oven with a black arrow indicating the direction (no text or symbols)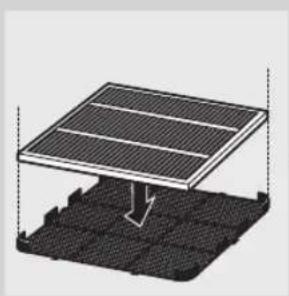
natural_image
Diagram of a solar panel mounted on a grid base, showing internal structure and airflow direction (no text or symbols)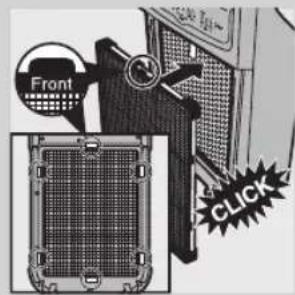
natural_image
Illustration of a hand using a tool to adjust or install a device component (no text or symbols visible)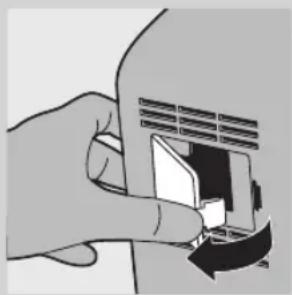
natural_image
Illustration of a hand inserting a card into a slot (no text or symbols visible)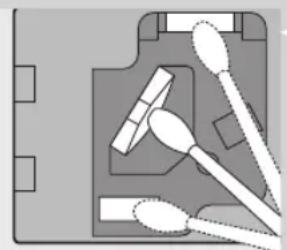
natural_image
Diagram of a medical or laboratory setup with surgical tools and equipment (no text or labels)natural_image
Hand inserting a grid into a device panel with an arrow indicating the direction (no text or symbols visible)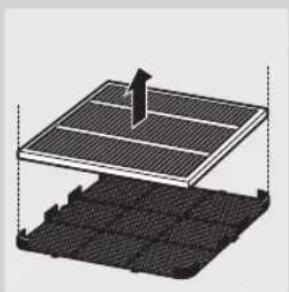
natural_image
3D diagram of a solar panel structure with an arrow indicating direction, showing layered components (no text or symbols)
Filter 2: Multi-care filter AC4121
Filter 3: Activated carbon filter AC4123
Filter 4: HEPA filter AC4124
natural_image
Symbol of a trash bin crossed with no text or numbers, representing waste sorting or disposal (no text present)| Dépannage | |
| Ce chapitre présente les problèmes les plus courants que vous pouvez rencontrer avec votre appareil.Si vous ne parvenez pas à résoudre le problème à l'aide des informations ci-dessous, contactez le Service Consommateurs Philips de votre pays. | |
| Problem Possible solution | |
| The appliance doesn't work. | You ignored the filter replacement lights. You did not replace a filter when the corresponding filter replacement light and the REPLACE FILTER light started flashing and did not respond when the appliance started to beep every 30 minutes after approx. 2 weeks. As a result, the appliance is now locked and you have to replace the filter and reset the appliance (see chapter 'Filter replacement') so that the appliance can provide healthy air again. |
| The AIR QUALITY lights keep flashing and the appliance does not work. | There is a problem with the air quality sensor of the appliance. Please contact the Philips Consumer Care Centre in your country (you find its phone number in the worldwide guarantee leaflet). If there is no Consumer Care Centre in your country, go to your local Philips dealer. |
| No air comes out of the air outlet | The appliance is not switched on. Put the plug in the wall socket and switch on the appliance.The air quality is good and the auto mode is activated. In this case, the appliance stops operating automatically when the air is clean to save electricity. |
| The airflow that comes out of the air outlet is significantly weaker than before. | The pre-filter is dirty. Clean the pre-filter (see chapter 'Cleaning').You haven't removed all packaging material from the filters. Make sure that you have removed all packaging material. |
| The air quality does not improve, even though the appliance has been operating for a long time. | One of the filters has not been placed in the appliance. Make sure that all filters are properly installed in the following order, starting with the innermost filter: HEPA filter, Activated carbon filter, Multi-care filter (AC4004 only), pre-filter. The Multi-care filter (AC4004 only) has to be attached to the back of the pre-filter.The air quality sensor is wet. The humidity level in your room is high and causes condensation. Make sure that the air quality sensor is clean and dry (see chapter 'Cleaning'). |
| The AIR QUALITY light does not change colour even though the appliance has been operating for some time. | The air quality sensor is dirty. Clean the air quality sensor (see chapter 'Cleaning'). |
| I need cleaner air because I have an allergy. | You can change the air quality sensor sensitivity (see chapter 'Using the appliance') to make the air purifier clean the air even better. |
| The appliance is extra loud. | Please check if you have removed all the packaging material from the filters. |
Problem Possible solution
| • If the appliance is still too loud, you can change the fan speed to a lower fan speed level. | |
| The appliance still indicates that I need to replace a filter, but I already did. | Perhaps you did not reset the appliance. Plug in the appliance, press and hold the reset button corresponding to the filter you have replaced. The appliance beeps if you have reset it properly. |
| When I press the SLEEP button, all lights except for the SLEEP light go out. | When you press the SLEEP button, the appliance enters the SLEEP mode, which is designed to allow you to sleep undisturbed. The appliance operates quietly and only the SLEEP light is on. If you have activated the timer, one of the HOUR lights is also on. All lights that are on in the SLEEP mode are dimmed to allow you to sleep undisturbed. |
| The appliance stops operating, although the power-on light is still on. | The built in quality sensor has determined that the air quality is good and that the air does not need to be cleaned anymore. When the air quality deteriorates, the appliance is starts running at a low fan speed and noise level so that the energy consumption is minimised. |
| The appliance does not work. The air quality light ring flashes blue, all other lights are out. | This is air particle sensor error or an air particle sensor and gas sensor error. Contact the Consumer Care Centre in your country (you find its phone number in the worldwide guarantee leaflet). If there is no Consumer Care Centre in your country, go to your local Philips dealer. |
Kipicne
Жалпы сипаттама(1-сур.)
natural_image
Close-up of hands installing or adjusting a grid-patterned panel on a microwave oven (no text or symbols visible)natural_image
Illustration of hands inserting a card into a device (no text or symbols visible)natural_image
Illustration of a hand holding a piece of paper with an upward arrow (no text or symbols)natural_image
Illustration of a hand holding a piece of paper with an upward arrow (no text or symbols)HOUR light Sensitivity level
1hr Extra sensitive
4hrs Sensitive
8hrs Standard

natural_image
Hand inserting a grid into a microwave oven with a black arrow indicating the direction (no text or symbols)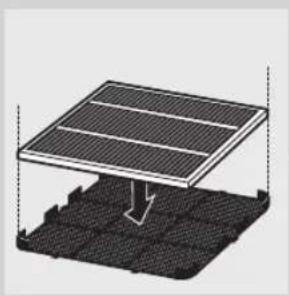
natural_image
Diagram of a solar panel installation on a grid base, showing mounting structure and grounding (no text or symbols)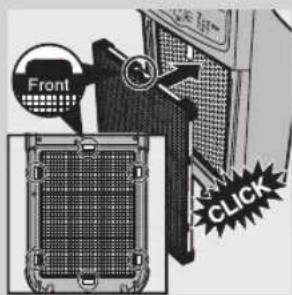
natural_image
Illustration of a hand using a tool to adjust or install a device component (no text or symbols visible)
natural_image
Illustration of a hand inserting a card into a card (no text or symbols visible)
natural_image
Pure electrical circuit lines without any symbolsАуа сапасы сенсоры
natural_image
Close-up of hands installing or adjusting a grid-patterned panel on a device (no visible text or symbols)natural_image
3D diagram of a solar panel structure with a vertical support and grid base (no text or symbols)natural_image
Illustration of a portable air conditioner unit with a mesh cover and control panel (no text or symbols visible)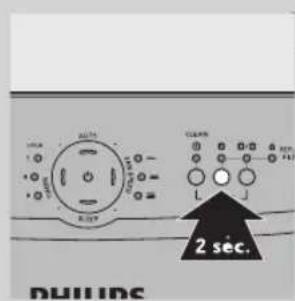
Filter 2: Multi-care filter AC4121
Filter 3: Activated carbon filter AC4123
Filter 4: HEPA filter AC4124
natural_image
Symbol of a trash bin crossed with no text or numbers, representing waste sorting or disposal (no text present)| Акаулыктарды шешу | |
| Бул тарауда кұрылғыға пайда болуы мүмкін ең көп кездесетін ақаулыктар жинақталған.Егер төменде берілген акпараттың көмегімен ақаулықты шеше алмасаңыз, елініздегі Тұтынушыларды қолдау орталығына хабарласыңыз. | |
| Problem Possible solution | |
| The appliance doesn't work. | You ignored the filter replacement lights. You did not replace a filter when the corresponding filter replacement light and the REPLACE FILTER light started flashing and did not respond when the appliance started to beep every 30 minutes after approx. 2 weeks. As a result, the appliance is now locked and you have to replace the filter and reset the appliance (see chapter 'Filter replacement') so that the appliance can provide healthy air again. |
| The AIR QUALITY lights keep flashing and the appliance does not work. | There is a problem with the air quality sensor of the appliance. Please contact the Philips Consumer Care Centre in your country (you find its phone number in the worldwide guarantee leaflet). If there is no Consumer Care Centre in your country, go to your local Philips dealer. |
| No air comes out of the air outlet | The appliance is not switched on. Put the plug in the wall socket and switch on the appliance.The air quality is good and the auto mode is activated. In this case, the appliance stops operating automatically when the air is clean to save electricity. |
| The airflow that comes out of the air outlet is significantly weaker than before. | The pre-filter is dirty. Clean the pre-filter (see chapter 'Cleaning').You haven't removed all packaging material from the filters. Make sure that you have removed all packaging material. |
| The air quality does not improve, even though the appliance has been operating for a long time. | One of the filters has not been placed in the appliance. Make sure that all filters are properly installed in the following order, starting with the innermost filter: HEPA filter, Activated carbon filter, Multi-care filter (AC4004 only), pre-filter. The Multi-care filter (AC4004 only) has to be attached to the back of the pre-filter.The air quality sensor is wet. The humidity level in your room is high and causes condensation. Make sure that the air quality sensor is clean and dry (see chapter 'Cleaning'). |
| The AIR QUALITY light does not change colour even though the appliance has been operating for some time. | The air quality sensor is dirty. Clean the air quality sensor (see chapter 'Cleaning'). |
| I need cleaner air because I have an allergy. | You can change the air quality sensor sensitivity (see chapter 'Using the appliance') to make the air purifier clean the air even better. |
| The appliance is extra loud. | Please check if you have removed all the packaging material from the filters. |
Problem Possible solution
| • If the appliance is still too loud, you can change the fan speed to a lower fan speed level. | |
| The appliance still indicates that I need to replace a filter, but I already did. | Perhaps you did not reset the appliance. Plug in the appliance, press and hold the reset button corresponding to the filter you have replaced. The appliance beeps if you have reset it properly. |
| When I press the SLEEP button, all lights except for the SLEEP light go out. | When you press the SLEEP button, the appliance enters the SLEEP mode, which is designed to allow you to sleep undisturbed. The appliance operates quietly and only the SLEEP light is on. If you have activated the timer, one of the HOUR lights is also on. All lights that are on in the SLEEP mode are dimmed to allow you to sleep undisturbed. |
| The appliance stops operating, although the power-on light is still on. | The built in quality sensor has determined that the air quality is good and that the air does not need to be cleaned anymore. When the air quality deteriorates, the appliance is starts running at a low fan speed and noise level so that the energy consumption is minimised. |
| The appliance does not work. The air quality light ring flashes blue, all other lights are out. | This is air particle sensor error or an air particle sensor and gas sensor error. Contact the Consumer Care Centre in your country (you find its phone number in the worldwide guarantee leaflet). If there is no Consumer Care Centre in your country, go to your local Philips dealer. |
Введение
natural_image
Close-up of hands installing or adjusting a grid panel with an arrow indicating rotation (no text or symbols visible)natural_image
Illustration of hands inserting a card into a device (no text or symbols visible)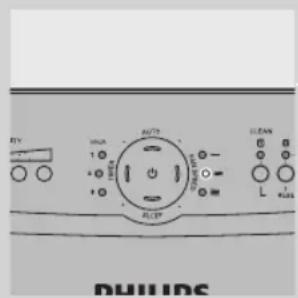
HOUR light Sensitivity level
1hr Extra sensitive
4hrs Sensitive
8hrs Standard
natural_image
Close-up of hands installing or adjusting a grid-patterned panel on a microwave oven (no text or symbols visible)
natural_image
Diagram of a solar panel installation with a downward arrow indicating compression or cooling (no text or symbols present)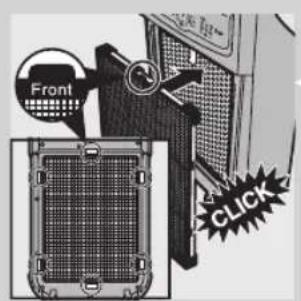
natural_image
Illustration of a hand holding a brush applying paint to a device (no text or symbols visible)natural_image
Illustration of a hand inserting a card into a card slot (no text or symbols visible)natural_image
Pure electrical circuit lines without any symbolsnatural_image
Close-up of hands installing or adjusting a grid panel with an arrow pointing to the component (no text or symbols visible)natural_image
Diagram of a solar panel installation with a stack of photovoltaic cells (no text or symbols)natural_image
Illustration of a portable air conditioner unit with a mesh cover and ventilation slots (no text or symbols)natural_image
Illustration of a computer case with a door and fan (no text or symbols visible)natural_image
Diagram of a device with a fan inside, showing internal components and an arrow indicating rotation (no text or symbols present)natural_image
Illustration of a portable air conditioner unit with mesh cover and control panel (no text or symbols)Filter 2: Multi-care filter AC4121
Filter 3: Activated carbon filter AC4123
Filter 4: HEPA filter AC4124
natural_image
Symbol of a trash bin with crossed lines indicating no waste or restriction, and a solid black rectangle below (no text or symbols)| Поиск и устранение неисправностей | |
| В данной главе описаны наиболее распространенные проблемы,которые могут возникнуть при эксплуатации прибора. Еслисамостоятельно справиться с возникшими проблемами не удается,обратитесь в центр поддержки потребителей в вашей стране. | |
| Problem Possible solution | |
| The appliance doesn't work. | You ignored the filter replacement lights. You did not replace a filter whenthe corresponding filter replacement light and the REPLACE FILTER lightstarted flashing and did not respond when the appliance started to beepevery 30 minutes after approx. 2 weeks. As a result, the appliance is nowlocked and you have to replace the filter and reset the appliance (seechapter 'Filter replacement') so that the appliance can provide healthy airagain. |
| The AIR QUALITY lightskeep flashing and the appliance does not work. | There is a problem with the air quality sensor of the appliance. Pleasecontact the Philips Consumer Care Centre in your country (you find itsphone number in the worldwide guarantee leaflet). If there is no ConsumerCare Centre in your country, go to your local Philips dealer. |
| No air comes out of theair outlet | The appliance is not switched on. Put the plug in the wallsocket and switch on the appliance.The air quality is good and the auto mode is activated. In this case, the appliance stops operating automatically when the air is clean to saveelectricity. |
| The airflow that comesout of the air outlet issignificantly weaker thanbefore. | The pre-filter is dirty. Clean the pre-filter (see chapter 'Cleaning').You haven't removed all packaging material from the filters. Make surethat you have removed all packaging material. |
| The air quality does notimprove, even thoughthe appliance has beenoperating for a long time. | One of the filters has not been placed in the appliance. Make sure thatall filters are properly installed in the following order, starting with theinnermost filter: HEPA filter, Activated carbon filter, Multi-care filter(AC4004 only), pre-filter. The Multi-care filter (AC4004 only) has to beattached to the back of the pre-filter.The air quality sensor is wet. The humidity level in your room is high andcauses condensation. Make sure that the air quality sensor is clean anddry (see chapter 'Cleaning'). |
| The AIR QUALITYlight does not changecolour even thoughthe appliance has beenoperating for some time. | The air quality sensor is dirty. Clean the air quality sensor (seechapter 'Cleaning'). |
| I need cleaner air becauseI have an allergy. | You can change the air quality sensor sensitivity (see chapter 'Using theappliance') to make the air purifier clean the air even better. |
| The appliance is extra loud. | Please check if you have removed all the packaging material from thefilters. |
| Problem Possible solution | |
| ·If the appliance is still too loud, you can change the fan speed to a lower fan speed level. | |
| The appliance still indicates that I need to replace a filter, but I already did. | Perhaps you did not reset the appliance. Plug in the appliance, press and hold the reset button corresponding to the filter you have replaced. The appliance beeps if you have reset it properly. |
| When I press the SLEEP button, all lights except for the SLEEP light go out. | When you press the SLEEP button, the appliance enters the SLEEP mode, which is designed to allow you to sleep undisturbed. The appliance operates quietly and only the SLEEP light is on. If you have activated the timer, one of the HOUR lights is also on. All lights that are on in the SLEEP mode are dimmed to allow you to sleep undisturbed. |
| The appliance stops operating, although the power-on light is still on. | The built in quality sensor has determined that the air quality is good and that the air does not need to be cleaned anymore. When the air quality deteriorates, the appliance is starts running at a low fan speed and noise level so that the energy consumption is minimised. |
| The appliance does not work. The air quality light ring flashes blue, all other lights are out. | This is air particle sensor error or an air particle sensor and gas sensor error. Contact the Consumer Care Centre in your country (you find its phone number in the worldwide guarantee leaflet). If there is no Consumer Care Centre in your country, go to your local Philips dealer. |


очиститель воздуха
ауа тазалағыш
AC4004/02
220-240V\~50-60Hz 40W
Изготовитель:
Specifications are subject to change without notice
All rights reserved.
4241 210 70193
