CL8G3SS - Monitor KRK - Free user manual and instructions
Find the device manual for free CL8G3SS KRK in PDF.
| Product Type | Active Studio Monitor |
| Brand | KRK |
| Model | CL8G3SS |
| Category | Studio Monitor |
| Power Supply | 110-120V or 220-240V ~ 60Hz, T2AL fuse |
| Power Consumption | 16 W (standby) |
| Audio Inputs | Balanced XLR, Balanced 1/4\" TRS, Unbalanced RCA |
| Tone Controls | HF Level Adjust (treble), LF Level Adjust (bass) |
| Frequency Response | Natural and balanced, reduced distortion, superior imaging |
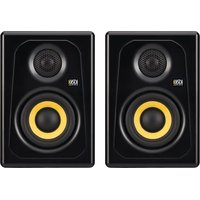
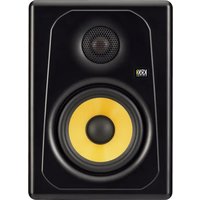
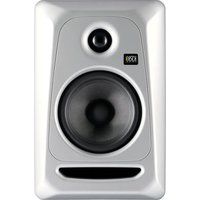
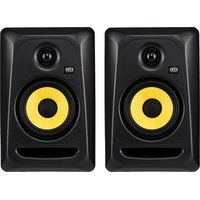
| Drivers | 8\" Woofer (mid/bass), Tweeter (high frequencies) |
| Recommended Placement | Distance 1-1.5 m between monitors, 60° angle, equilateral triangle with listening position |
| Maintenance and Cleaning | Unplug before cleaning, use a damp cloth, no liquid or spray detergents |
| Safety Instructions | Do not obstruct ventilation, do not expose to water or moisture, use a grounded outlet |
| Spare Parts and Repairability | Use only manufacturer-recommended parts; call a qualified technician |
| General Information | 3-year warranty (USA), made in California |
Frequently Asked Questions - CL8G3SS KRK
User questions about CL8G3SS KRK
0 question about this device. Answer the ones you know or ask your own.
Ask a new question about this device
Download the instructions for your Monitor in PDF format for free! Find your manual CL8G3SS - KRK and take your electronic device back in hand. On this page are published all the documents necessary for the use of your device. CL8G3SS by KRK.
USER MANUAL CL8G3SS KRK
Thank you for purchasing your new KRK Scott Storch Classic 8ss professional studio monitors. Countless pro engineers, producers, artists, and mixers from all genres—from all over the world, have used these KRK legacy-inspired Classic monitors to deliver award-winning productions globally. This monitor was engineered with over 30-years of innovation and experience in our state-of-the-art facility in California, where we create products that deliver a natural and balanced frequency response with low distortion and superior imaging.
IMPORTANT SAFETY INFORMATION
SAFETY INSTRUCTIONS
-
Read instructions - All the safety and operating instructions should be read before the product is operated.
-
Retain instructions - The safety and operating instructions should be retained for future reference.
-
Heed Warnings - All warnings on the product and in the operating instructions should be adhered to.
-
Follow Instructions - All operating and use instructions should be followed.
-
Cleaning - Unplug this product from the wall outlet before cleaning. Do not use liquid cleaners or aerosol cleaners. Use a damp cloth for cleaning.
-
Attachments - Do not use attachments not recommended by the product manufacturer as they may cause hazards.
-
Water and Moisture - Do not use this product near water-for example, near a bath tub, wash bowl, kitchen sink, or laundry tub; in a wet basement; or near a swimming pool; and the like.
-
Accessories - Do not place this product on an unstable cart, stand, tripod, bracket, or table. The product may fall, causing serious injury to a child or adult and serious damage to the product. Use only with a cart, stand, tripod, bracket, or table recommended by the manufacturer, or sold with the product. Any mounting of the product should follow the manufacturer's instructions and should use a mounting accessory recommended by the manufacturer.
-
Cart - A product and cart combination should be moved with care. Quick stops, excessive force, and uneven surfaces may cause the product and cart combination to overturn.
-
Ventilation - Slots and openings in the cabinet are provided for ventilation to ensure reliable operation of the product and to protect it from overheating. These openings must not be blocked or covered. The openings should never be blocked by placing the product on a bed, sofa, rug, or other similar surface. This product should not be placed in a built-in installation such as a bookcase or rack unless proper ventilation is provided, or the manufacturer's instructions have been adhered to.
-
Power Sources - This product should be operated only from the type of power source indicated on the marking label and connected to a MAINS socket outlet with a protective earthing connection. If you are not sure of the type of power supply to your home, consult your product dealer or local power company.
-
Power-Cord Protection - Power-supply cords should be routed so that they are not likely to be walked on or pinched by items placed upon or against them, paying particular attention to cords at plugs, convenience receptacles, and the point where they exit from the product.
-
Mains Plug - Where the mains plug or an appliance coupler is used as the disconnect device, the disconnect device shall remain readily operable.
-
Lightning - For added protection for this product during a lightning storm, or when it is left unattended and unused for long periods of time, unplug it from the wall outlet and disconnect the antenna or cable system. This will prevent damage to the product due to lightning and power-line surges.
-
Overloading - Do not overload wall outlets, extension cords, or integral convenience receptacles as this can result in a risk of fire or electric shock.
-
Flame Sources - No naked flame sources, such as lighted candles, should be placed on the product.
-
Object and Liquid Entry - Never push objects of any kind into this product through openings as they may touch dangerous voltage points or short-out parts that could result in a fire or electric shock. Never spill liquid of any kind on the product.
-
Loudspeakers - Excessive sound pressure from loudspeakers can cause hearing loss.
-
Damage Requiring Service - Unplug this product from the wall outlet and refer servicing to qualified service personnel under the following conditions:
a. When the power-supply cord or plug is damaged.
b. If liquid has been spilled, or objects have fallen into the product.
c. If the product has been exposed to rain or water.
d. If the product does not operate normally by following the operating instructions. Adjust only those controls that are covered by the operating instructions as an improper adjustment of other controls may result in damage and will often require extensive work by a qualified technician to restore the product to its normal operation.
e. If the product has been dropped or damaged in any way.
f. When the product exhibits a distinct change in performance—this indicates a need for service.
-
Replacement Parts - When replacement parts are required, be sure the service technician has used replacement parts specified by the manufacturer or have the same characteristics as the original part. Unauthorized substitutions may result in fire, electric shock, or other hazards.
-
Safety Check - Upon completion of any service or repairs to this product, ask the service technician to perform safety checks to determine that the product is in proper operating condition.
WARNING
The lightning flash with arrowhead symbol, within an equilateral triangle, is intended to alert the user to the presence of uninsulated "dangerous voltage" within the product's enclosure that may be of sufficient magnitude to constitute a risk of electric shock to persons
The exclamation point within an equilateral triangle is intended to alert the user to the presence of important operating and maintenance (servicing) instructions in the literature accompanying the
appliance.

THE EQUIPMENT MUST BE CONNECTED TO AN EARTHED MAINS SOCKET-OUTLET.
CAUTION REGARDING PLACEMENT
To maintain proper ventilation, be sure to leave a space around the unit (from the largest outer dimensions including projections) than is equal to, or greater than shown below. Top, Bottom, Front, Rear, Left, Right Sides: 10 cm
CAUTION
Changes or modifications to this equipment not expressly approved by KRK SYSTEMS for compliance could void the user's authority to operate this equipment.
CAU
To prevent electric shock, match wide blade of plug to wide slot, fully insert.
CAUTION
Marking and rating plate can be found at the rear panel of the apparatus.
WARNING
To reduce the risk of fire or electric shock, do not expose this apparatus to rain or moisture.
The apparatus shall not be exposed to dripping or splashing and that no objects filled with liquids, such as vases, shall be placed on apparatus.
Mains plug is used as disconnect device and it should remain readily operable during intended use. In order to disconnect the apparatus from the mains completely, the mains plug should be disconnected from the mains socket outlet completely.
Battery shall not be exposed to excessive heat such as sunshine, fire or the like.
CAUTION
An appliance with a protective earth terminal should be connected to a mains outlet with a protective earth connection.
IF IN DOUBT CONSULT A COMPETENT ELECTRICIAN.
NOTES ON ENVIRONMENTAL PROTECTION
At the end of its useful life, this product must not be disposed of with regular household waste but must be returned to a collection point for the recycling of electrical and electronic equipment. The symbol on the product, user's manual, and packaging point this out.
The materials can be reused in accordance with their markings. Through re-use, recycling of raw materials, or other forms of recycling of old products, you are making an important contribution to the protection of our environment.
Your local administrative office can advise you of the responsible waste disposal point.
FCC ST ATEMENT
This device complies with Part 15 of the FCC Rules. Operation is subject to the following two conditions: (1) this device may not cause harmful interference, and (2) this device must accept any interference received, including interference that may cause undesired operation.

NOTE: This equipment has been tested and found to comply with the limits for a Class B digital device, pursuant to Part 15 of the FCC Rules.
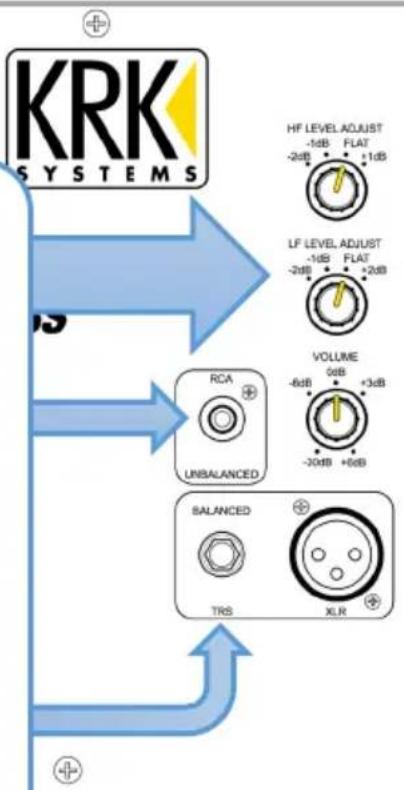
STEP 1
Set the POWER switch to 'OFF.' Connect the AC power cord (provided) to the AC inlet socket on the studio monitor and power outlet.

Warning: Incorrect AC voltage may damage the studio monitor. Make sure the AC power outlet matches the studio monitor (should state 100V\~, 110-120V\~ or 220-240V\~).
STEP 2
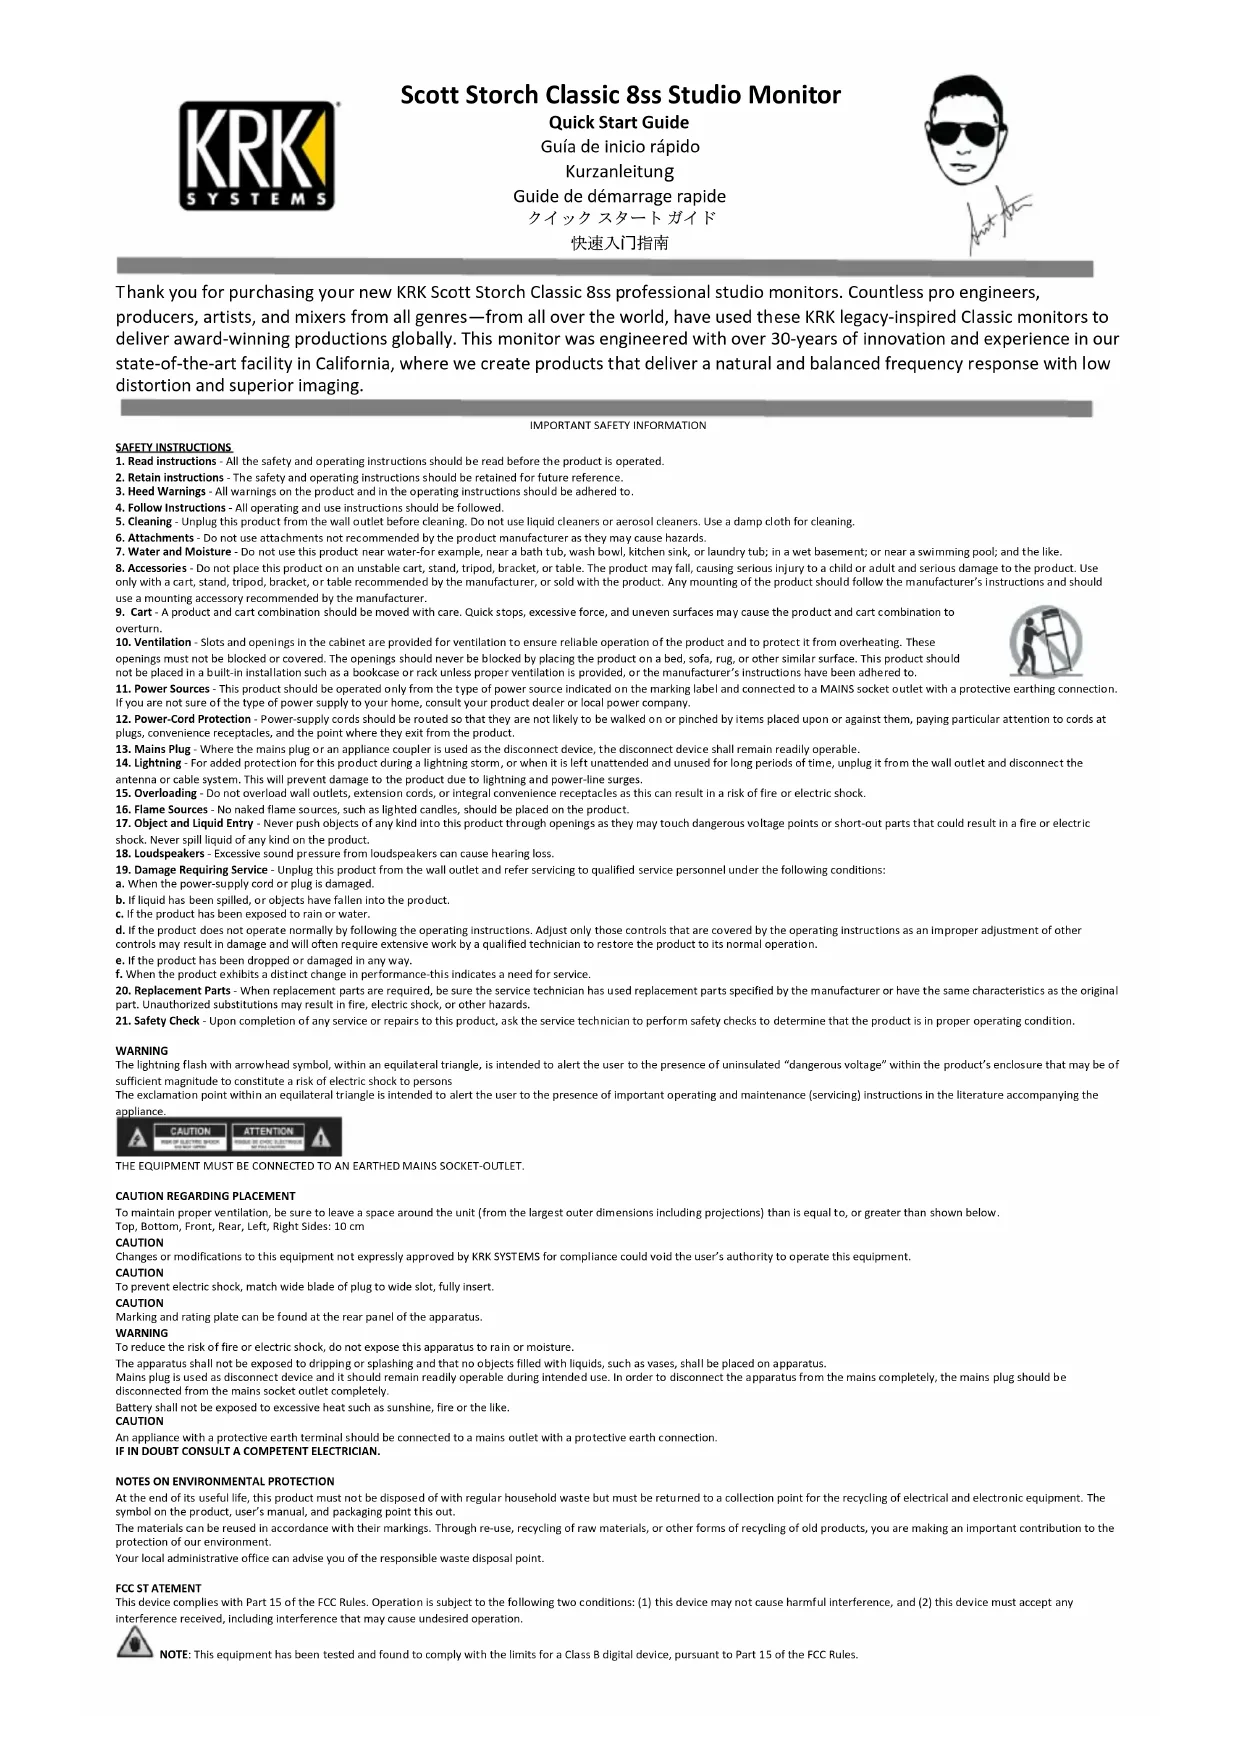
Determine the audio input signal that will be used with the studio monitors and connect the audio cable (not included) to the appropriate input. Typical connections direct to a computer or DJ gear will use the unbalanced RCA input. Connection to an audio interface or mixer will use either a balanced 14 " TRS or XLR input.
Set the volume on the input device (mixer, audio interface or computer) to minimum level.
The HF and LF LEVEL ADJUST are set at "FLAT" (factory setting).
flowchart
graph TD
    A["KRK SYSTEMS"] --> B["Input Signal"]
    B --> C["RF Level Adjustment"]
    C --> D["HF LEVEL ADJUST: -1dB FLAT +1dB"]
    C --> E["LF LEVEL ADJUST: -2dB FLAT +2dB"]
    C --> F["VOLUME: 0dB +3dB"]
    F --> G["Unbalanced: -6dB -30dB +6dB"]
    F --> H["BALANCED: TRS XLR"]
STEP 3
Set the POWER switch to 'ON' position. Play an audio track and slowly bring up the volume on the input device (mixer, audio interface or computer) to an acceptable listening level.
text_image
POWER ON OFF 160W 110V-120V~ T2AL 60HzAuto-Standby activates after 30 minutes of no activity. The Classic Series monitors will deactivate standby when it detects an input signal having an amplitude of -50dBu or greater. In quiet (low listening level) situations, adjust the gain stages by setting the Volume to '0' or lower and increase the input level of the audio source.
SYSTEM CONTROLS
VOLUME - Volume knob sets the input system gain. The usual scenario is to set the knob at the middle setting and adjust the input level from your audio source. Use the volume knob to match the left and right studio monitors.
HF ADJUSTMENT - The High Frequency adjustment may be used to tailor a listening style preference. The factory setting is flat (knob is in the FLAT position).
LF ADJUSTMENT – The Low Frequency adjustment may be used to adjust for the room acoustics and personal preference. Room acoustics may dictate which type of adjustment you need to make to retain the proper frequency response from the studio monitor. For example, placement near a wall or corner will boost the low frequencies.
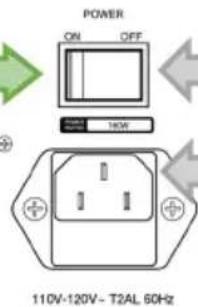
BALANCED INPUT - The XLR & TRS input jack is connected to your audio equipment outputs, such as a mixing console or audio interface. Only connect one input source at a time.
text_image
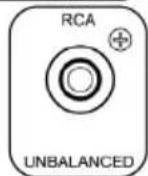
BALANCED TRS XLRUNBALANCED INPUT - The RCA input jack is connected to your audio equipment outputs, such as an audio interface, computer, DJ gear and mobile device. Only connect one input source at a time.
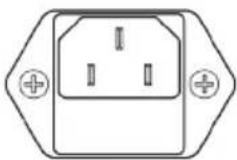
AC INPUT INLET SOCKET & FUSE HOLDER - A standard IEC-type AC Inlet Socket is used to provide power to the studio monitor. Below the socket is a fuse holder that contains two fuses (one spare).
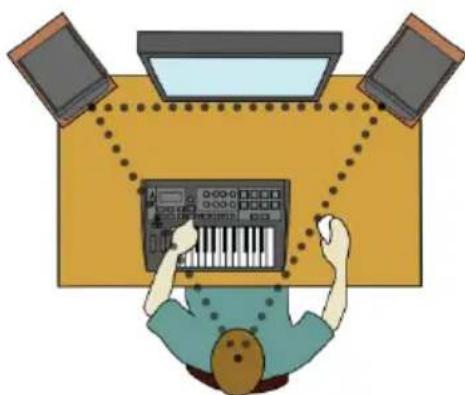
The left and right studio monitors should be approximately 1 to 1.5 meters (3 to 5 feet) apart and directed at a 60-degree angle towards the listening location. Measure the distance between the left and right studio monitors and note the listening position is equal distance to both sides. This will form an equilateral triangle. It is important that both left and right studio monitors are level matched.
The Classic series is a two-way studio monitor with a tweeter (producing high frequencies) and a woofer (producing mid and low frequencies) in one enclosure. In between the tweeter and woofer is the acoustic axis point where the full frequency range comes together. The ideal location for the acoustic axis point is located at ear level in the listening position. It is acceptable to angle the studio monitors so the acoustic axis is in the correct direction.
natural_image
Illustration of a person using a keyboard and computer, with no visible text or symbols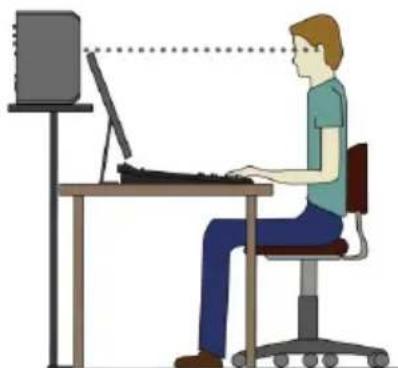
natural_image
Illustration of a person working at a desk with a computer, no text or symbols presentKRK PRODUCT WARRANTY
ABOUT YOUR WARRANTY
If used in strict accordance with KRK instructions and only for products operated in the United States, KRK Systems warrants parts and labor on all monitors and grill accessories for a period of three (3) years from the original date of purchase for all products purchased from a US Authorized Dealer. For goods purchased outside of the United States, please contact your local dealer or distributor for specific information on warranty terms and conditions. For Expose Series recording monitors, refer to the dedicated Expose Series warranty card and policy. KRK Systems warrants parts and labor on all headphones, computer audio devices, including room correction devices, for a period of one (1) year from the original date of purchase. Defective parts will be repaired under this warranty when a defect occurs under normal installation and use.
This warranty is limited to repair of parts and replacements necessitated by defective workmanship or materials. KRK accepts no responsibility for damage or malfunction which, in the sole opinion of KRK Systems, is the result of misuse, abuse, neglect, accident, shipping damage or unauthorized repair. Any such misuse, abuse, neglect, accident, shipping damage or unauthorized repair will result in the voiding of this warranty.
Except as set forth herein, KRK Systems makes no representations or warranties, whether expressed or implied, including any implied warranties of merchantability or suitability for a particular purpose, all of which are expressly waived and disclaimed hereby, as to any KRK Systems products.
In no event shall KRK Systems be liable for special, incidental, consequential, punitive, or indirect damages, including without limitation loss of profits or loss of data. For any action brought against KRK Systems, whether intort, contract or any other theory of law, in no event shall KRK Systems' liability exceed the total amount paid by the purchaser to an authorized dealer or representative for the product given rise to the underlying claim.
Some states and countries do not allow the exclusion or limitation of incidental or consequential damages, so the above limitation or exclusion may not apply to you. This warranty gives you specific legal rights, and you may also have other rights, which vary from state to state. This warranty only applies to KRK Systems products purchased by the consumer from an authorized KRK dealer.
To contact a Gibson Customer Service Representative, call 1.800.4GIBSON or email service@gibson.com. For support in Europe, please call 00+800.4GIBSON1 or email service.europe@gibson.com. All other regions, please contact 1.615.871.4500 or email service@gibson.com.

text_image
QR code image containing encoded data, no visible human-readable textwww.krkmusic.com/warranty
text_image
BALANCED TRS XLRnatural_image
Illustration of a person using a keyboard with three monitors in the background (no text or symbols)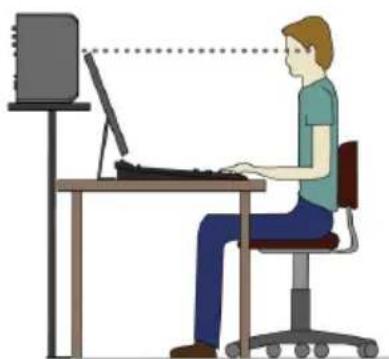
natural_image
Illustration of a person working at a desk with a computer, no text or symbols presentGARANTÍA
ACERCA DE LA GARANTÍA
text_image
QR code image containing encoded data, no visible human-readable textwww.krkmusic.com/warranty
text_image
BALANCED TRS XLRnatural_image
Illustration of a person using a keyboard and two monitors in a meeting room (no text or symbols)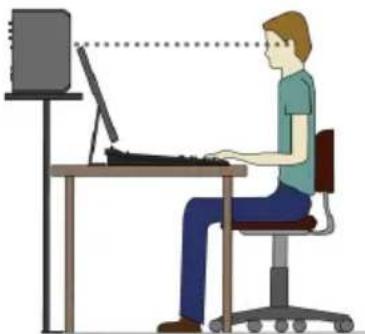
natural_image
Illustration of a person sitting at a desk using a computer, with no visible text or symbolsGARANTIE
ÜBER IHRE GARANTIE
text_image
QR code image containing encoded data, no visible human-readable textwww.krkmusic.com/warranty
flowchart
graph TD
    A["KRK SYSTEMS"] --> B["HF LEVEL ADJUST -1dB FLAT +1dB"]
    A --> C["LF LEVEL ADJUST -1dB FLAT +2dB"]
    A --> D["VOLUME 0dB +3dB"]
    A --> E["BALANCED TRS XLR"]
    A --> F["Unbalanced RCA"]
ETAPE 3
text_image
BALANCED TRS XLRnatural_image
Illustration of a person using a keyboard and computer monitor, no text or symbols present
natural_image
Illustration of a person working at a desk with a computer, no text or symbols presentGARANTIE
À PROPOS DE VOTRE GARANTIE
text_image
QR code image containing encoded data, no visible human-readable textwww.krkmusic.com/warranty
natural_image
Illustration of a person using a keyboard and computer, with no visible text or symbols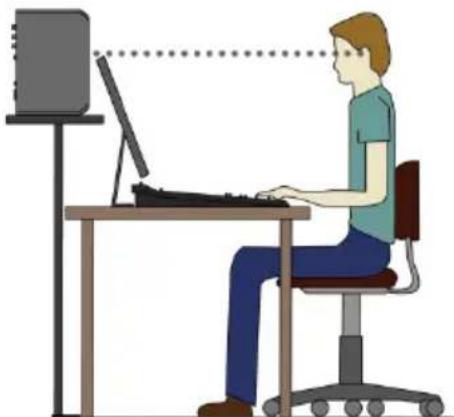
natural_image
Illustration of a person sitting at a desk using a computer, with a monitor and tower in the background (no text or symbols)保証について
text_image
QR code image containing encoded data, no visible human-readable textwww.krkmusic.com/warranty
natural_image
Illustration of a person using a keyboard and computer, with three monitors in the background (no text or symbols)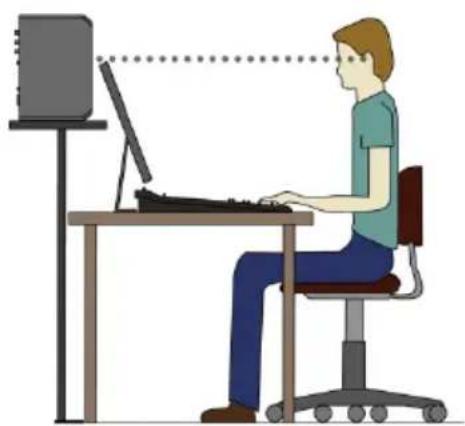
natural_image
Illustration of a person sitting at a desk using a computer, with a monitor and tower in the background (no text or symbols)保修
关于您的保修
text_image
QR code image containing encoded data, no visible human-readable textwww.krkmusic.com/warranty