
UR111 - Radio Soundmaster - Free user manual and instructions
Find the device manual for free UR111 Soundmaster in PDF.
| Product type | Clock radio |
| Brand | Soundmaster |
| Model | UR111 |
| Dimensions (approx.) | 150 x 80 x 100 mm |
| Weight (approx.) | 0.5 kg |
| Main power supply | AC adapter (DC, not included) |
| Backup power supply | 1 CR2032 lithium battery (3 V, not included) |
| Radio frequency range | FM (not specified, likely 87.5–108 MHz) |
| Number of presets | 10 FM stations |
| Main functions | FM radio, dual alarm, snooze, sleep, brightness adjustment, clock |
| Display | Digital display with battery and alarm indicators |
| Antenna | Deployable wire antenna |
| Auxiliary input | Not specified (likely 3.5 mm jack) |
| Maintenance and cleaning | Dry cloth only, no abrasive or detergent products |
| Safety | Do not open, risk of electric shock; keep out of reach of children; avoid moisture and heat sources |
| Spare parts and repairability | Not specified; repair only by an authorized center |
| General information | Importer: Wörlein GmbH, Germany. Compliant with directive 2014/53/EU. |
Frequently Asked Questions - UR111 Soundmaster
User questions about UR111 Soundmaster
0 question about this device. Answer the ones you know or ask your own.
Ask a new question about this device
Download the instructions for your Radio in PDF format for free! Find your manual UR111 - Soundmaster and take your electronic device back in hand. On this page are published all the documents necessary for the use of your device. UR111 by Soundmaster.
USER MANUAL UR111 Soundmaster
Web: www.soundmaster.de
Do not dispose of this product with the normal household waste at the end of its life cycle. Return it to a collection point for the recycling of electrical and electronic devices. This is indicated by the symbol on the product, user manual or packaging
The materials are recyclable according to their labeling. By reusing materials or other forms of recycling old devices and packaging, you are making an important contribution to protecting our environment. If necessary, remove batteries and personal data before disposal free of charge and ask your local authority about the responsible disposal point
| WARNING | ! | |
| Risk of electric shockDo not open! |
Caution: To reduce the risk of electric shock, do not remove the cover (or back). There are no user serviceable parts inside. Refer servicing to qualified service personnel.
This symbol indicates the presence of dangerous voltage inside the enclosure, sufficient enough to cause electric shock.
This symbol indicates the presence of important operating and maintenance instructions for the device
Used batteries are hazardous waste and NOT to be disposed of with the household waste! As a consumer you are legally obligated to return all batteries for environmentally responsible recycling – no matter whether or not the batteries contain harmful substances*)
Return batteries free of charge to public collection points in your community or shops selling batteries of the respective kind. Only return fully discharged batteries ^* marked Cd = cadmium, Hg = mercury, Pb = lead
- Only use mercury and cadmium-free batteries.
- Used batteries are hazardous waste and NOT to be disposed of with the household waste!!!
- Keep batteries away from children. Children might swallow batteries.
- Contact a physician immediately if a battery was swallowed.
- Check your batteries regularly to avoid battery leakage.
- Batteries shall not be exposed to excessive heat such as sunshine, fire or the like.
- CAUTION: Danger of explosion if battery is incorrectly replaced
- Replace only with the same or equivalent type

WARNING
DO NOT INGEST BATTERY, CHEMICAL BURN HAZARD
This product contains a coin/button cell battery. If the coin/button cell battery is swallowed, it can cause severe internal burns in just 2 hours and can lead to death. Keep new and used batteries away from children. If the battery compartment does not close securely, stop using the product and keep it away from children.
If you think batteries might have been swallowed or placed inside any part of the body, seek immediate medical attention.
Safety, Environmental and Setup Instructions
- Use the device in dry indoor environments only.
- Protect the device from humidity.
- This apparatus is for moderate climates areas use, not suitable for use in tropical climates countries.
- No objects filled with liquids, such as vases, shall be placed on the apparatus.
- The mains plug or an appliance coupler is used as the disconnect device, the disconnect devices shall remain readily operable.
- Connect this device to a properly installed and earthed wall outlet only. Make sure the mains voltage corresponds with the specifications on the rating plate.
- Make sure the mains cable stays dry during operation. Do not pinch or damage the mains cable in any way.
- A damaged mains cable or plug must immediately be replaced by an authorized service center.
- In case of lightning, immediately disconnect the device from the mains supply.
- Children should be supervised by parents when using the device.
- Clean the device with a dry cloth only.
- Do NOT use CLEANING AGENTS or ABRASIVE CLOTHS!
- Do not expose the device to direct sunlight or other heat sources.
• Install the device at a location with sufficient ventilation in order to prevent heat accumulation.
- Do not cover the ventilation openings!
- Install the device at a safe and vibration-free location.
- Install the device as far away as possible from computers and microwave units; otherwise radio reception may be disturbed.
- Do not open or repair the enclosure. It is not safe to do so and will void your warranty. Repairs only by authorized service/ customer center.
- No naked flame sources, such as lighted candles, should be placed on the unit.
- When you are necessary to ship the unit store it in its original package. Save the package for this purpose.
- In case of malfunction due to electrostatic discharge or fast transient (burst), remove and reconnect the power supply.
- If the unit is not using for a long period of time, disconnect it from the power supply by unplugging the power plug. This is to avoid the risk of fire.
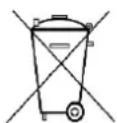
LOCATIONS OF CONTROLS
1 MEM / M+ / SET button
2 AL1 / AL OFF Alarm1 & volume down
3 AL2 / AL OFF Alarm2 & volume up
4 - (backward) button
5 + (forward) button
6 Radio ON/OFF ⏻ button
7 SNOOZE / SLEEP / DISPLAY DIMMER
button
8 Display
9 Low battery indicator
10 Alarm 1 indicator
11 Alarm 2 indicator
12 Speaker
13 DC In jack
14 Battery compartment
15 Antenna
text_image
1 2 3 4 5 6 snoze / sleep DISPLAY DIMMER 7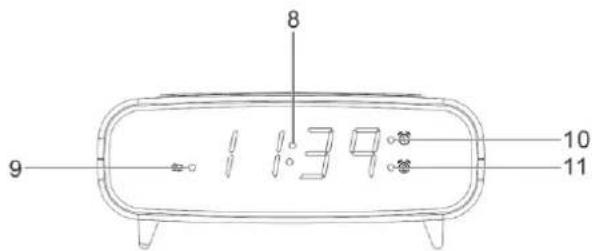
text_image
8 1:39 9 10 11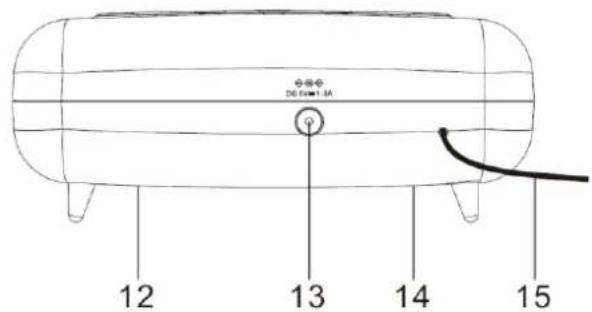
text_image
D6.5mm 1.3A 12 13 14 15GETTING STARTED
CONNECTING TO POWER
- Connect the AC adaptor to a wall socket and to the DC IN jack.
- The radio is powered and in standby mode when you see the display is switched on.
BACKUP SYSTEM
- The radio is equipped with a backup system. It requires a 3 V lithium battery (type: CR2032 not included). Insert the battery into the battery compartment and make sure the positive and negative (+ or -) sides of the battery are in contact with the corresponding terminals in the battery compartment.
- If a power cut occurs, the radio automatically switches to the battery power supply and keeps the clock and timer settings.
- To open the battery compartment, use a screwdriver to detach the screw on the compartment door.
- The battery indicator lit when the battery should be replaced
- When replacing the battery, do not disconnect the power adapter. Otherwise, all clock and alarm settings will be lost.
SETTING THE CLOCK
- In standby mode, press and hold the “MEM / M+ / SET” button to enter the clock setting mode. The display flashes.
- Setting the time: Press the “-” button to set the hour time and “+” button to set the minute time.
- Press the "MEM / M+ / SET" button to confirm setting.
USING THE ANTENNA
Unroll and extend the antenna to improve FM signal reception.
CONTROLLING THE SOUND VOLUME
While listening to the radio, press the “◀” or “◀” button to control the volume.
LISTENING TO RADIO
- Press the "Radio ON/OFF ⏻" button to switch the radio on.
- Press the “-” or “+” button to adjust frequency.
- Press and hold the “-” or “+” button to automatically tune to the next available FM station.
- Press the "Radio ON/OFF ⏻" button to switch the radio off.
SETTING PRESET STATIONS
You can store up to 10 preset stations.
- Tune to a station.
- Press and hold the "MEM / M+ / SET" button until "P01" (or the next available preset slot) shows on the display.
- Press the “-” or “+” button to select a preset number (P01-P10).
- Press the "MEM / M+ / SET" button to confirm. The preset station has been set up.
- Press the "MEM / M+ / SET" button repeatedly while listening to the radio to select a preset station. Alternatively, press the "MEM / M+ / SET" button once and then press the "-" or "+" button to select a preset station.
USING THE ALARMS
SETTING ALARMS
The radio lets you have 2 alarm settings. To set the alarms:
-
In standby mode, press and hold the "AL1 / AL OFF" or "AL2 / AL OFF" button to enter the alarm time setting mode.
-
In the alarm setting mode, press the "AL1 / AL OFF" or "AL2 / AL OFF" button repeatedly to cycle through the setting options:
Alarm time > Alarm sound source
- Setting alarm time:
Press the “-” to set the hour time and “+” button to set the minute time. Press and hold the buttons to change quickly.
- Setting alarm sound source:
Press “-” or “+” to select buzzer (bu) or radio (reception frequency is shown) as alarm sound source. The corresponding alarm indicator will turn on according to your selection.
Note: When the alarm is set to radio mode, the alarm will use the last tuned radio station.
TURNING THE ALARMS ON OR OFF
In standby mode, press "AL1 / AL OFF" or "AL2 / AL OFF" to enable or disable the respective alarm. The corresponding Alarm 1 or Alarm 2 indicator (alarm or radio) will switch on when the alarm is enabled.
DEACTIVATING A SOUNDING ALARM
- Press any "AL OFF" button to switch off a sounding alarm.
- When the alarm sounds, the corresponding Alarm 1 or Alarm 2 indicator (alarm or radio) flashes on the display.
SNOOZE
- To temporarily silence a sounding alarm, press the "SNOOZE / SLEEP" button. The alarm will sound again when the snooze period (9 minutes) is over.
- The corresponding Alarm 1 or Alarm 2 indicator (alarm or radio) flashes on the display during the snooze period.
- To cancel the snooze period and the alarm, press any "AL OFF" button.
SLEEP
- This sleep function defines the duration of time before the radio switches itself off automatically.
- When the radio is switched on, press the "SNOOZE / SLEEP" button repeatedly to select a sleep period (Options: OFF, 10, 20, 30, 40, 50, 60, 70, 80 and 90 minutes).
- The radio will automatically switch off when the sleep period is over.
- Press the "SNOOZE / SLEEP" button to check the remaining time before the radio switches off.
- Press the "Radio ON/OFF ⏻" button to cancel this function.
DISPLAY INFORMATION
- In radio mode, press the “-” or “+” button once to briefly change the display from the clock time to the current radio frequency.
DISPLAY BRIGHTNESS
- In standby mode, press the "DISPLAY DIMMER" button to change the brightness level of the display (off, low, medium or high).
IMPORTER
Germany Web: www.soundmaster.de
The current instruction manual can be downloaded from www.soundmaster.de.
Technical changes and misprints reserved.
Copyright by Woerlein GmbH, 90556 Cadolzburg, www.soundmaster.de
Duplication only with the permission of Woerlein GmbH


PROTECTION DE L'ENVIRONNEMENT

1 MEM/ M+ / SET Bouton mémoire
Email : service@soundmaster.de
Site web : www.soundmaster.de
text_image
1 2 3 4 5 6 SOT MEN No. MIL IN LFF. MIL IN LFF. - + - RACE ON LIFT snooze / sleep DISPLAY DIMMER 7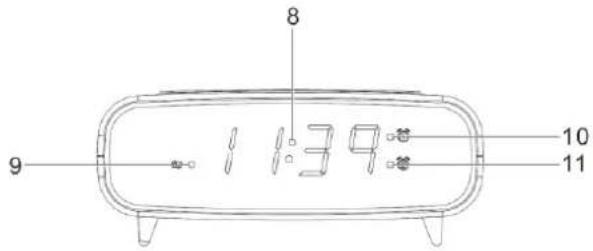
text_image
8 11:39 9 10 11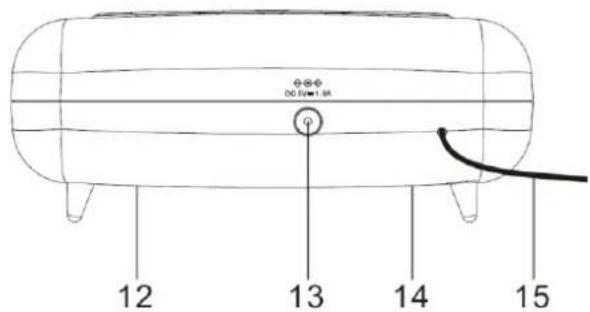
text_image
DO 5kW×1.0k 12 13 14 15AAN DE SLAG
AANSLUITEN OP DE NETSTROOM
Email: service@soundmaster.de
Website: www.soundmaster.de
Email: service@soundmaster.de
Web: www.soundmaster.de
INFORMACE NA DISPLEJI
Web: www.soundmaster.de
Web: www.soundmaster.de


Copyright by Woerlein GmbH, 90556 Cadolzburg, www.soundmaster.de
D 90556 Cadolzburg, Germany
Hereby, Wörlein GmbH declares that this device is in compliance with the essential requirements and other relevant provisions of Directive 2014/53/EU.
A copy of the declaration of conformity can be obtained from the above address.
