
B032VUA4 - Switch Tripp Lite - Free user manual and instructions
Find the device manual for free B032VUA4 Tripp Lite in PDF.

| Product Type | 4-Port KVM Switch (Keyboard, Video, Mouse) |
| Model | B032-VUA4 |
| Brand | Tripp Lite |
| Number of KVM Ports | 4 |
| Console Connectors | 1x USB keyboard, 1x USB mouse, 1x VGA (HDB-15), 1x 3.5 mm audio mini-jack |
| Computer Connectors | 4x USB Type-A for keyboard/mouse, 4x VGA (HDB-15), 4x audio mini-jack |
| Maximum Video Resolution | 2048 x 1536 |
| EDID Support | Yes (DDC2B) |
| Built-in Cable Length | 2 x 0.9 m and 2 x 1.2 m |
| Power Supply | Via computer USB port (consumption: 0.33 W at 5 VDC) |
| Operating Temperature | 0 °C to 50 °C |
| Storage Temperature | -20 °C to 60 °C |
| Operating Humidity | 0 to 80% RH non-condensing |
| Housing Material | Plastic |
| Dimensions (L x D x H) | 8.75 x 6.08 x 2.80 cm |
| Weight | 280 g |
| Port Selection | Keyboard shortcuts or mouse switching |
| Keyboard/Mouse Emulation | USB (compatible with PC, Mac, Sun, Linux) |
| Auto Scan | Yes, adjustable interval from 1 to 99 seconds (default 5 s) |
| Firmware Update | Possible via USB port (Upgrade mode) |
| Warranty | 3-year limited |
| Standards | FCC Class B, HDCP, WEEE |
Frequently Asked Questions - B032VUA4 Tripp Lite
User questions about B032VUA4 Tripp Lite
0 question about this device. Answer the ones you know or ask your own.
Ask a new question about this device
Download the instructions for your Switch in PDF format for free! Find your manual B032VUA4 - Tripp Lite and take your electronic device back in hand. On this page are published all the documents necessary for the use of your device. B032VUA4 by Tripp Lite.
USER MANUAL B032VUA4 Tripp Lite
Register your product today and be automatically entered to win an ISOBAR® surge protector in our monthly drawing!

tripplite.com/warranty

1111 W. 35th Street, Chicago, IL 60609 USA · tripplite.com/support
Copyright © 2023 Tripp Lite. All rights reserved.
Package Contents
B032-VUA4
Quick Start Guide
Product Features
Control four computers from a single USB keyboard, mouse and VGA monitor
- Compact design features built-in 4 ft. (1.2 m) cables for KVM and audio connections
- USB mouse port can be used to connect a USB 1.1 hub for peripheral sharing
Supports video resolutions up to 2048 x 1536; DDC2B
- Hotkey commands let you set OS and keyboard language
- KVM stores the monitor's EDID information to optimize display resolution
- Console mouse port emulation/bypass feature supports most mouse drivers and multi-function mice
Supports gaming keyboards and wireless keyboards/mice
HDCP compliant
- Features Hotkey and Mouse Port Switching
Supports Windows, Mac, Sun and Linux
Sun/Mac keyboard support and emulation
- No external power required
- Firmware upgradable
PC keyboard combinations emulate Sun/Mac keyboards. Sun/Mac keyboards only work with their own computers.
Optional Accessories
P502-Series VGA/SVGA Monitor Cables with RGB Coax
U222-004-R 4-Port USB 2.0 Hub
U222-007-R 7-Port USB 2.0 Hub
U222-010-R 10-Port USB 2.0 Hub
U022-Series USB 2.0 A/B Device Cables
U030-Series USB 2.0 Mini-B Cables
U050-Series USB 2.0 Micro-B Cables
System Requirements
VGA, SVGA or Multisync monitor
- USB keyboard
- USB mouse
Computer with a VGA port
Computer with USB ports
Product Overview
| No. | Component Description | |
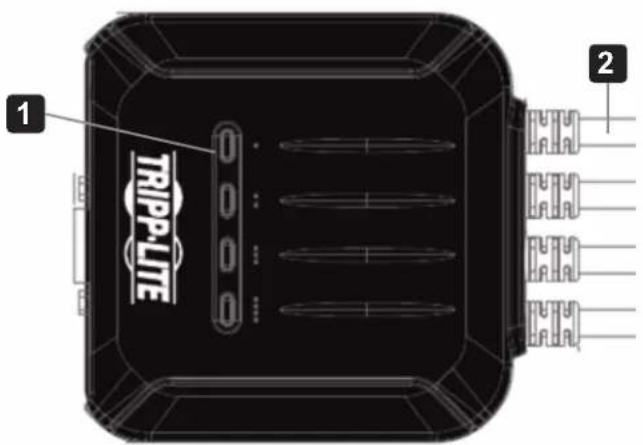
| 1 | Port LEDs | The port LEDs illuminate to indicate the computer attached to its corresponding port has the KVM focus. |
| 2 | KVM cables These cables attach to the computers in your installation. | |
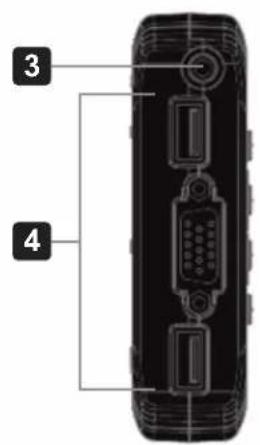
| 3 | Audio speaker jack Your console speakers plug in here. | |
| 4 | Console ports | The cables from your console monitor, USB keyboard and USB mouse plug into these ports. |
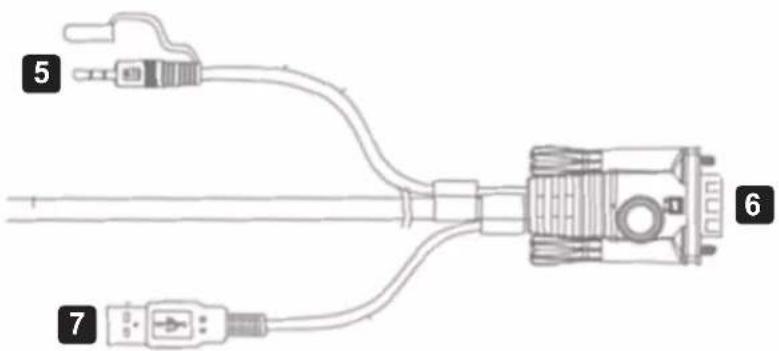
| 5 | Speaker connector | The user must plug keyboard into B032-VUA4's keyboard port for the hotkey command to function. The keyboard port indicator can be found on the bottom of unit. |
| 6 | Video connector | |
| 7 | USB keyboard / mouse connector | |
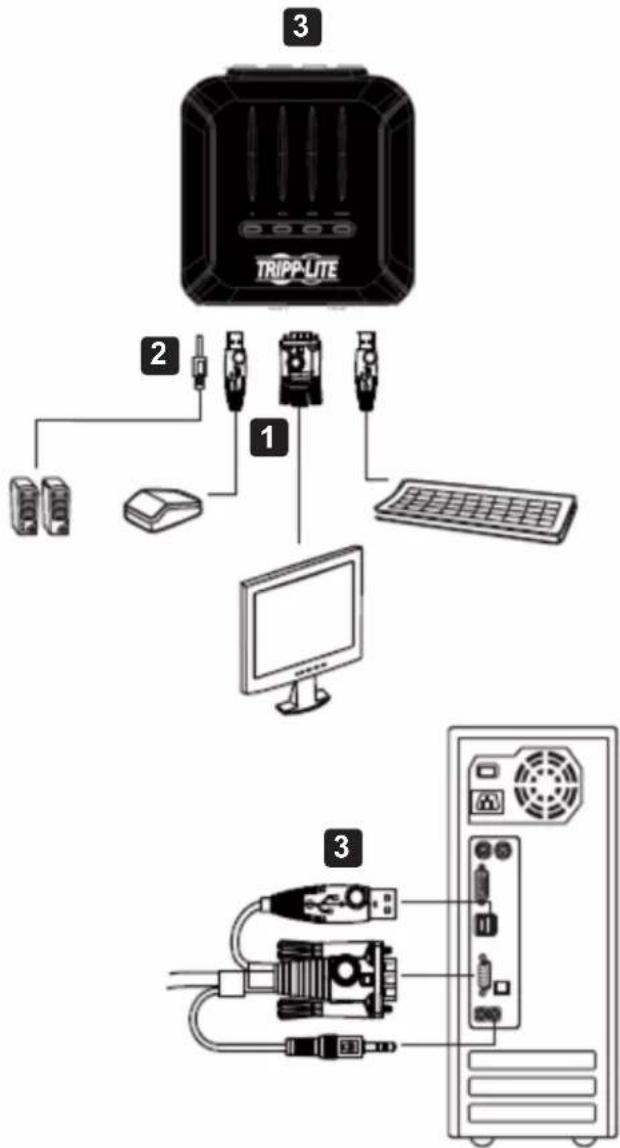
Installation
Note: Make sure the power to all devices is turned off prior to installation. You must unplug the power cords of any computers that have the Keyboard Power On Function.
1 Plug your USB keyboard, mouse and VGA monitor into the console ports on the unit.
Note: If using a wireless keyboard and mouse, the dongle must be plugged into the unit's keyboard port to use the hotkey function.
2 (Optional) A USB hub can be connected to the USB console mouse port, allowing you to add multiple USB peripherals to your installation.
Note: To ensure proper functionality, use a hub with an external power supply. The KVM's Mouse Emulation Mode must also be disabled (see the Keyboard Hotkey Commands table in this manual for details) when connecting a hub.
3 Plug your speakers into the 3.5mm speaker jack.
4 Plug the unit's built-in USB, VGA and audio cables into the computers' corresponding ports.
5 Power on your devices.
Note: The unit's default power on function will link to the first computer being powered on.
Operation
There are two ways to access computers and devices connected to the KVM switch: Mouse Port Switching and Keyboard Hotkeys.
Notes:
- When switching ports, wait a few seconds for the selected computer's video to display on the console monitor prior to switching ports again.
- Do not switch ports when a USB peripheral device is in operation.
Port Switching
All port switching operations begin by tapping the Scroll Lock key twice.
| Hotkey Action | ||
| [Scroll Lock] [Scroll Lock] + | [Enter] Brings the KVM and Audio focus from the port that currently has the KVM focus to the next port on the installation (1 to 2; 2 to 3; 3 to 4; 4 to 1) Note: If the KVM and Audio focus are on different ports, only the KVM focus switches. | |
| [n] [Enter] Brings the KVM and Audio focus to the computer attached to the corresponding Port ID. Note: Replace [n] with the port number (1, 2, 3, 4). | ||
Example 1
To bring the KVM, USB hub, and audio focus from Port 1 to Port 2:
- Press [Scroll Lock] twice.
- Press [Enter].
Example 2
To bring the KVM and audio focus from a port to a specified port number (e.g., Port 2):
- Press [Scroll Lock] twice.
- Press [2].
- Press [Enter].
Mouse Port Switching Functionality
Note: Mouse port switching is disabled by default and must be enabled via keyboard hotkey command. In addition, it is only supported when the KVM's mouse emulation mode is enabled (KVM mouse emulation is enabled by default—see the Keyboard Hotkey Commands table for details).
Invoking Hotkey Setting Mode
All hotkey operations begin by holding the Num Lock key, pressing and releasing the Minus key, then releasing the Num Lock key.
Note: If using [Num Lock] [-] conflicts with other programs, [Ctrl] [F12] can be used instead. See Hotkey Summary Table for details.
Operation
Auto Scanning
| Hotkey Action | |
| [Scroll Lock] [Scroll Lock] [A] [Enter] | Starts Auto Scan. The KVM focus cycles from port to port at 5-second intervals. |
| [Scroll Lock] [Scroll Lock] [A] [n] [Enter] | Starts Auto Scan. The KVM focus cycles from port to port at n-second intervals. Note: Replace n with a number between 1 and 99. |
Note: To exit Auto Scan, press [Esc] or [Spacebar]. Auto Scanning stops when you exit Auto Scan mode.
Hotkey Summary Table
| Combination Function | ||
| [Num Lock] [-] + [H] Toggles between the default [Num Lock][-] and alternate [Ctrl][F12] HSM invocation keys. | ||
| [T] Toggles between the | default [Scroll Lock] [Scroll Lock] and alternate [Ctrl] [Ctrl] port-switching keys. | |
| [F2] Activates Mac keyboard mapping. | ||
| [F3] Activates Sun keyboard mapping. | ||
| [F10] Activates Windows keyboard mapping. | ||
| [F4] Lists current switch settings via the paste function of a text editor. | ||
| [F5] Performs a USB keyboard and mouse reset. | ||
| [F6] [nn] [Enter] Sets the keyboard language layout. | ||
| [R] [Enter] Resets hotkeys to the default setting. | ||
| [N] Enables / disables keyboard emulation. | ||
| [u] [p] [g] [r] [a] [d] [e] [Enter] | Invokes Firmware Upgrade Mode. | |
| [Esc] or [Space Bar] | Quits Hotkey Setting Mode. | |
Keyboard Emulation
| Mac | Sun | ||
| PC Keyboard | Mac Keyboard | PC Keyboard | Sun Keyboard |
| [Shift] | Shift | [Ctrl] [T] | Stop |
| [Ctrl] | Ctrl | [Ctrl] [F2] | Again |
| [Ctrl] [F3] | Props | ||
| [Ctrl] [1] | [Ctrl] [F4] | Undo | |
| [Ctrl] [2] | [Ctrl] [F5] | Front | |
| [Ctrl] [3] | [Ctrl] [F6] | Copy | |
| [Ctrl] [4] | [Ctrl] [F7] | Open | |
| [Alt] | Alt | [Ctrl] [F8] | Paste |
| [Print Screen] | F13 | [Ctrl] [F9] | Find |
| [Scroll Lock] | F14 | [Ctrl] [F10] | Cut |
| = | [Ctrl] [1] | ||
| [Enter] | Return | [Ctrl] [2] | |
| [Backspace] | Delete | [Ctrl] [3] | |
| [Insert] | Help | [Ctrl] [4] | |
| [Ctrl] | F15 | [Ctrl] [H] | Help |
| Compose | |||
Note: When using key combinations, press and release the first key [Ctrl], then press and release the activation key.
Operation
Firmware Upgrade Utility
To upgrade the B032-VUA4 firmware:
- From a computer that is not part of your KVM installation, download the latest Firmware Upgrade package for the B032-VUA4 from triplite.com.
- Invoke Firmware Upgrade Mode [Num Lock] [-] [Upgrade]. The LEDs will flash together to indicate Firmware Upgrade Mode is in effect.
Note: While the switch is in Firmware Upgrade Mode, normal keyboard and mouse functions are suspended. You must complete the upgrade or exit Firmware Upgrade Mode to regain normal control of the console.
- Run the Firmware Upgrade Package file. The Firmware Upgrade Utility Welcome screen will appear.
- Read the License Agreement and enable I Agree button.
- Click Next to continue. The Firmware Upgrade Utility main screen will appear. All the devices capable of being upgraded by the package are listed in the Devices List panel.
- Select your device. Its description appears in the Device Description panel. Click Next to perform the upgrade. As the upgrade proceeds, status messages appear in the Status Messages panel and the progress towards completion is shown in the Progress bar.
- After the upgrade has completed, a screen will appear to inform you the procedure was successful. Click Finish to close the Firmware Upgrade Utility.
- Set up your KVM installation again. See the Installation section for details.
Upgrade Failed
If the Upgrade Succeeded screen does not appear, it means the upgrade failed to complete successfully, in which case you should return the unit to your local service center for assistance.
Troubleshooting
| Symptom Possible Cause Action(s) | ||
| Mouse and/or Keyboard not responding | Improper mouse and/or keyboard reset. | Unplug the cable(s) from the console port(s), then plug it/them back in. |
| KVM switch needs to be reset. Power off all devices on the installation; power off the KVM switch; wait five seconds; then power up. | ||
| USB devices not responding USB ports need to reset. Unplug the device's USB cable from the USB port on the switch's rear panel, then plug it back in. | ||
| Device not recognized (Windows) Windows timing problem. Unplug the KVM cable from the computer's USB port; go into Windows System Settings and remove the Unknown Device entry; plug the KVM cable back in. Windows will now recognize the device. | ||
| Cannot switch ports by pressing [Scroll Lock] twice | Keyboard is incompatible with Scroll Lock invocation. | Switch to the Alternate HSM invocation keys using hotkey [T]. |
| Cannot invoke HSM using [Num Lock][-] | Incorrect operation for invoking HSM. Hold the [Num Lock] key, press and release the [-] key, then release the [Num Lock] key. The Caps Lock and Scroll Lock LEDs will flash together to indicate that the unit is in HSM. | |
| Keyboard is incompatible with [Num Lock] invocation. | Switch to the alternate HSM invocation keys by using hotkey [H]. | |
Factory Default Settings
| Setting Default | |
| Port Switching [Scroll Lock] [Scroll Lock] | |
| Hotkey Invocation [Number Lock] + [-] | |
| Auto Scan Interval 5 seconds | |
| Port Switching Keys | ON |
| Keyboard Operating Platform | PC compatible |
Factory Default Settings
| Status | Indication |
| Off | Port is not selected |
| On | Port is connected to an active computer |
| Flashing (one) Port is connected to an active computer and is being accessed in Auto Scan Mode | |
| Flashing (all) | Firmware Upgrade Mode is invoked |
Specifications
| Function B032-VUA4 | ||||
| Computer Connections 4 | ||||
| Console Connections 1 | ||||
| Port Selection Hotkeys | ||||
| Connectors Console Ports Keyboard | 1 x USB Type A Female (White) | |||
| Video 1 x HDB-15 Female (Blue) | ||||
| Mouse 1 x USB Type A-Female (White) | ||||
| Speakers 1 x Min Stereo Jack Female (Green) | ||||
| KVM Ports Keyboard / Mouse | 4 x USB Type-A Male (White) | |||
| Video 4 x HDB-15 Male (Blue) | ||||
| Speakers 4 x Min Stereo Jack Female (Green) | ||||
| LEDs Selected 4 | (Green) | |||
| Cable Length 2 x 3 ft. (0.9 m); 2 x 4 ft. (1.2 m) | ||||
| Emulation | Keyboard /Mouse | USB | ||
| Video | 2048 x 1536; DDC2B | |||
| Scan Interval | 5 sec. | 1-99 sec. (default: 5 sec.) | ||
| Power Consumption | DC5V: 0.33W: 14BTU | DC5V: 0.9W: 8BTU | ||
| Environment | Operating Temp. | 32 - 122°F (0 - 50°C) | ||
| Storage Temp. | -4 - 140°F (-20 - 60°C) | |||
| Humidity 0-80% RH, Non-condensing | ||||
| Physical Properties | Housing | Plastic | ||
| Weight | 0.62 lb. (0.28 kg) | 1.28 lb. (0.58 kg) | ||
| Dimensions(L x W x H) | 3.44 x 2.39 x 1.10 in.(8.75 x 6.08 x 2.80 cm) | 3.7 x 3.83 x 1.02 in.(9.41 x 9.72 x 2.6 cm) | ||
Warranty and Product Registration
3-YEAR LIMITED WARRANTY
Seller warrants this product, if used in accordance with all applicable instructions, to be free from original defects in material and workmanship for a period of three (3) years from the date of initial purchase. If the product should prove defective in material or workmanship within that period, Seller will repair or replace the product, in its sole discretion. Service under this Warranty can only be obtained by your delivering or shipping the product (with all shipping or delivery charges prepaid) to: Tripp Lite; 1111 W. 35th Street; Chicago IL 60609; USA. Seller will pay return shipping charges. Visit triplite.com/support before sending any equipment back for repair. THIS WARRANTY DOES NOT APPLY TO NORMAL WEAR OR TO DAMAGE RESULTING FROM ACCIDENT, MISUSE, ABUSE OR NEGLECT. SELLER MAKES NO EXPRESS WARRANTY OTHER THAN THE WARRANTY EXPRESSLY SET FORTH HEREIN. EXCEPT TO THE EXTENT PROHIBITED BY APPLICABLE LAW, ALL IMPLIED WARRANTY, INCLUDING ALL WARRANTY OF MERCHANTABILITY OR FITNESS, ARE LIMITED IN DURATION TO THE WARRANTY PERIOD SET FORTH ABOVE; AND THIS WARRANTY EXPRESSLY EXCULES ALL INCIDENTAL AND CONSEQUENTIAL DAMAGES. (Some states do not allow limitations on how long an implied warranty lasts, and some states do not allow the exclusion or limitation of incidental or consequential damages, so the above limitations or exclusions may not apply to you. This Warranty gives you specific legal rights, and you may have other rights which vary from jurisdiction to jurisdiction). Tripp Lite; 1111 W. 35th Street; Chicago IL 60609; USA. WARNING: The individual user should take care to determine prior to use whether this device is suitable, adequate or safe for the use intended. Since individual applications are subject to great variation, the manufacturer makes no representation or warranty as to the suitability or fitness of these devices for any specific application.
PRODUCT REGISTRATION
Visit triplite.com/warranty today to register your new Tripp Lite product. You'll be automatically entered into a drawing for a chance to win a FREE Tripp Lite product!*
*No purchase necessary. Void where prohibited. Some restrictions apply. See website for details. Use of this equipment in life support applications where failure of this equipment can reasonably be expected to cause the failure of the life support equipment or to significantly affect its safety or effectiveness is not recommended. Regulatory
Compliance Identification Numbers
For the purpose of regulatory compliance certifications and identification, your Tripp Lite product has been assigned a unique series number. The series number can be found on the product nameplate label, along with all required approval markings and information. When requesting compliance information for this product, always refer to the series number. The series number should not be confused with the marking name or model number of the product
FCC Notice, Class B
This device complies with part 15 of the FCC Rules. Operation is subject to the following two conditions: (1) This device may not cause harmful interference, and (2) this device must accept any interference received, including interference that may cause undesired operation. Note: This equipment has been tested and found to comply with the limits for a Class B digital device, pursuant to part 15 of the FCC Rules. These limits are designed to provide reasonable protection against harmful interference in a residential installation. This equipment generates, uses and can radiate radio frequency energy and, if not installed and used in accordance with the instructions, may cause harmful interference to radio communications. However, there is no guarantee that interference will not occur in a particular installation. If this equipment does cause harmful interference to radio or television reception, which can be determined by turning the equipment off and on, the user is encouraged to try to correct the interference by one or more of the following measures:
Reorient or relocate the receiving antenna.
- Increase the separation between the equipment and receiver. Connect the equipment into an outlet on a circuit different from that to which the receiver is connected.
- Consult the dealer or an experienced radio/TV technician for help. Any changes or modifications to this equipment not expressly approved by Tripp Lite could void the user's authority to operate this equipment.
WEEE Compliance Information for Tripp Lite Customers and Recyclers (European Union)

Under the Waste Electrical and Electronic Equipment (WEEE) Directive and implementing regulations, when customers buy new electrical and electronic equipment from Tripp Lite they are entitled to:
- Send old equipment for recycling on a one-for-one, like-for-like basis (this varies depending on the country)
- Send the new equipment back for recycling when this ultimately becomes waste.
Tripp Lite has a policy of continuous improvement. Specifications are subject to change without notice. Photos and illustrations may differ slightly from actual products.

1111 W. 35th Street, Chicago, IL 60609 USA · triplite.com/support
22-10-229 934524_ReA
1111 W. 35th Street, Chicago, IL 60609 USA • triplite.com/support
1111 W. 35th Street, Chicago, IL 60609 USA • triplite.com/support
Copyright © 2023 Tripp Lite. NepeneetaKa 3anpeuaeTcR.
CopexHmoe ynaKOBKn
B032-VUA4
KpaTKoe pyKOBOdCTBO NOb3OBaTeJIa
XapakTepnctnKn npodykTa
- ObecneuBaet Bo3MOxHocTb ynpabHeHry YteBtpbMa KOMbIbTepaMn C eDInHO USB-KnaBnAtypbl, Mblnn n VGA-MOnHTopa
KOMnakTHa KOhCTpykUa BKNIOHaET BMOHTIpOBaHHbIe KaBeIN dInHOI 1,2 M dIy KBM- n ayDIOcoEiHHeHm - IopT USB dIy MbIiM MoKET NcNoJIb3OBAtbcra Iy IIOKIIHcHn KOnHeHTpaTopa USB 1.1 B cIeJx COBMeCTHOIcNoJIb3OBAHn IepNcpepHOro o6OpUdOBAHn
-Подэржka Видаеораразецни Do 2048 x 1536; DDC2B - Bo3MOXHOCTb φopMnPOBaHnKOMaHN C nOMOuBIO "TopaHx KnaBnU", nO3BOJHOUx 3aDaBaTb r3bIK OC n KlaBnAtypbl
- KBM-πepeknóuataenb coxpaHreB namrtn paccnpeHHbIe daHbIe ndHTnΦkaun (EDID) moHITopa c ceNbIoo onTmnaaun 3kpaHoro pa3peSeHnA
-Функцязмулци/N/6xOda npTaДЯ Мblши obecneHbaeT noДepeKky 60ЛьшИHCTBa dpaIbepOB Mblsh IN MHOFOyHKUHOHaJIbHbIX Mblsei - Póndepkka irpObBx kIaBnAtyp 6ecnpoBOnhIx kIaBnAtyp/mblSei
- COOTBETCTBNE Tpe6oBaHnM HDCP
- Bo3MOXHOCTb IcNoJIb3OBAHnIaTPOYHX"KJIaBnI NepeKeKnHoueHnI NOpTOB MbIbIO
- Побларжka OC Windows®, Mac®, Sun Linux®
- PóДeржka n эмляць klnabnatyp Sun/Mac
- OTCYCTBNE Heo6xoDnMoCTN BO BHeIHHem NCTOCHNIKe IINTAHIN
- Bo3MOxHOCtB 6bHOBJIeHnI npUINBkn
*KombnaHauZn KnaBnAtyp PIK 3myu npuyT KnabnAtpyb Sun/Mac. KnaBnAtpyb Sun/Mac yHKUHOHpyTO TOnbKO cCBOIMN CO6CTBeHHbIMN KOMNBoTePamN.
OnuHaJIbHbIe KOMnJekTyIOUne
Ka6eJIncepn P502 c Koakcnaihblmnpa3bemamn RGB nIpoKIIIOHEny VGA/SVGA-MOnHTopa
- 4-nopToBbI KOHcHTpaTOp USB 2.0, MoI. U222-004-R
- 7-nopTOBbI KOHcHTpaTOp USB 2.0 MoI. U222-007-R
- 10-nopTobvI KOHcEHTpaTOp USB 2.0 MoI. U222-010-R
- Ka6eIi cepin U022 c pa3bemamn USB 2.0 A/B
- Ka6eHn cepHn U030 c pa3bemamn USB 2.0 Mini-B
- Ka6eHn cepuN U050 c pa3bemamn USB 2.0 Micro-B
HdENTnKauHHbIe Homepa COOTBeTCTBn
B cTepnKauHn HcOTBETCTBHe HOpmatBbHm TpeoBaHnM nOOn3HaBnHn npNopeTeHHomy BAMn HdEeNIO MapKn Tripp Lite pncBoeh yHnKaIbHbIe CepnHbHn Homep. CepnHbHm Hopm pacnoJorAetcH na 3aQoCKo TaBnHke BMeCTe CO BcEMn Heo6xoDmmBIM OTMeKAMn O pnpMeK e npoe HnfOpMauei. Ppi 3anPoce HnfOpMaun o COOTBETCTBn DaHOrO HOpMaTHBbHM TpeoBaHnM oB3aTeBnO yKa3bIaBte erO cepinHbHm Homep. CepnHbHm Homep He cPeyet PyTa b cHaMeHOBaHem MApKn IIN HOMePOM ModEnI N3dEJIy
| Mac | Sun | ||
| PC-Tastatur | Mac Keyboard | PC-Tastatur | Sun-Tastatur |
| [Umschalt] | Umschalt | [Strg] [T] | Stopp |
| [Strg] | Strg | [Strg] [F2] | Erneut |
| [Strg] [F3] | Props | ||
| [Strg] [1] | [Strg] [F4] | Rückgangig | |
| [Strg] [2] | [Strg] [F5] | Front | |
| [Strg] [3] | [Strg] [F6] | Kopieren | |
| [Strg] [4] | [Strg] [F7] | Öffnen | |
| [Alt] | Alt | [Strg] [F8] | Einfügen |
| [Bildschirm drucken] | F13 | [Strg] [F9] | Finden |
| [Rollen-Taste] | F14 | [Strg] [F10] | Ausschneiden |
| = | [Strg] [1] | ||
| [Eingabe] | Zurück | [Strg] [2] | |
| [Rücktaste] | Löschen | [Strg] [3] | |
| [Einfügen] | Hilfe | [Strg] [4] | |
| [Strg] | F15 | [Strg] [H] | Hilfe |
| Compose | |||
- Package Contents
- Product Features
- Optional Accessories
- System Requirements
- Product Overview
- Installation
- Operation
- Notes:
- Port Switching
- Example 1
- Example 2
- Mouse Port Switching Functionality
- Invoking Hotkey Setting Mode
- Firmware Upgrade Utility
- Upgrade Failed
- Troubleshooting
- Specifications
- Warranty and Product Registration
- 3-YEAR LIMITED WARRANTY
- PRODUCT REGISTRATION
- Compliance Identification Numbers
- FCC Notice, Class B
- WEEE Compliance Information for Tripp Lite Customers and Recyclers (European Union)
- CopexHmoe ynaKOBKn
- XapakTepnctnKn npodykTa
- OnuHaJIbHbIe KOMnJekTyIOUne
- HdENTnKauHHbIe Homepa COOTBeTCTBn
Brand : Tripp Lite
Model : B032VUA4
Category : Switch