USER MANUAL DABMAN i560 CD Imperial
6.3 Antennenanschlüsse
Bluetooth (BT V5.0, Supports A2DP,
AVRCP profiles]
Frequenzen WiFi:2.400-2.4835GHz;
W-LAN/Bluetooth Bluetooth:2.4GHz-2.48GHz
All-In-One HiFi System with amplifier

Multilingual V1_18_10_22

TABLE OF CONTENTS
1.PREFACE 97
2.SAFETYINSTRUCTIONS 98
2.1 Explanation of symbols 98
2.2 Intended use. 100
2.3. Safety instructions 101
2.4. Operational safety 102
2.5. Connecting the device. 103
2.6. Protecting the device against damage 103
2.7.Risk of injury 104
2.8. Handling batteries 105
2.9.Cleaning the device 106
2.10. Behaviour in case of malfunction. 106
- Scope of delivery 107
4.DEVICEOVERVIEW 108
4.1 Control panel and connections 108
4.2 Front control panel 109
4.3 Connections on the back 111
4.4 Remote control 113
- CONNECTIONS 116
5.1 Connecting the loudspeakers 116
5.2 Connecting the television 117
5.3 Connecting playback devices with cinch sockets [analogue]. .118
5.4 Connecting audio output devices with cinch sockets (analogue) ..119
5.5 Connecting audio output devices with digital audio input . . .120
5.6 Connecting devices with digital audio output 121
5.7 Connecting to an internet router 122
TABLE OF CONTENTS
6.1 General operating instructions 123
6.2 Preparing the remote control 123
6.3 Antenna connections 124
6.4.Power connection 124
6.5. Menu language. 125
6.6.Date time mode 125
6.7.GMT time zone 126
6.8.Summer Zeit. 126
6.9. Standby mode 127
6.10. Location 128
6.11. Network selection 128
7. OPERATION AND SETTINGS 131
7.1 General operating instructions 131
7.1.1 Menu 131
7.1.2.Back button 131
7.1.3.List button 132
7.1.4.MODE button. 132
7.2. System 132
7.2.1.Language 133
7.2.2 Date time 133
7.2.3. Network 134
7.2.4. Alarm 136
7.2.5. Edit timer 139
7.2.6. Standby mode 139
7.2.7.Sleep timer. 140
7.2.8.Backlight. 141
7.2.9. Location setting 142
7.2.10. Software update. 142
7.2.11 Default settings. 143
7.2.12 Version 143
TABLE OF CONTENTS
- FUNCTIONS 144
8.1 DAB+ Radio 144
8.1.1 Station list. 144
8.1.2 DAB search 144
8.1.3 DAB manual search 146
8.2 FM Radio 146
8.2.1.FMstation search 146
8.2.2 FM radio operation 147
8.3Internet Radio 147
8.3Internet Radio 148
8.3.1 Selecting an internet radio station 148
8.3.2 Searching for an internet radio station 149
8.3.3 Saving radio stations 149
8.3.4 Saving radio stations to your favourites list 149
8.3.5 Local radio stations 150
8.4.Changting the volume. 151
8.5. Switching operating mode 151
8.6 AUX IN 152
8.7 UPnP 153
8.8 USB playback/multimedia 153
8.8 USB playback/multimedia 154
8.9 CD Player 154
8.10 EQ (Equalizer) 155
8.11. Weather 156
8.12. Recording radio broadcasts 157
8.12.1 Programming radio recordings. 158
8.13 Radio as a Bluetooth receiver 159
8.13.1 Establish a Bluetooth connection 159
8.13.2 Playing media via Bluetooth 159
8.13.3 Radio as Bluetooth Transmitter 160

TABLE OF CONTENTS
8.14 Changing the function of the MODE button. 161
8.15. Cloud music 161
8.16. Operation via the app 163
9.Troubleshooting. 167
E
- STORAGE 171
- TRADEMARK NOTICE 171
12.DISPOSAL. 171
12.1.Disposing of packaging 171
12.2.Disposing of the device 172
12.3.Disposing of batteries 172
- Technical data 173
- SERVICE AND SUPPORT 177
- CE seal 178
1. PREFACE
Valued customer,
thank you for choosing this product.
If your Internet radio does not work properly, it does not necessarily mean it is defective. Please do not send in the device straight away, call us!
Technical Hotline
for Germany: 02676 / 9520101
You are also welcome to send an e-mail to service@telestar.de or a fax to 02676 / 9520159.
If we are unable to solve the problem in this way, please return the device to our Service CENTER at the following address:
For Germany:
TELESTAR Service CENTER
Am Weiher 14,
56766 Ulmen
For Austria:
fsmsGmbH,
Welser StraBe 79,
A-4060 Leonding
Please read this manual carefully and keep it for future reference. If you sell or pass on the device, please make sure you also hand over the operating manual.

2. SAFETY INSTRUCTIONS
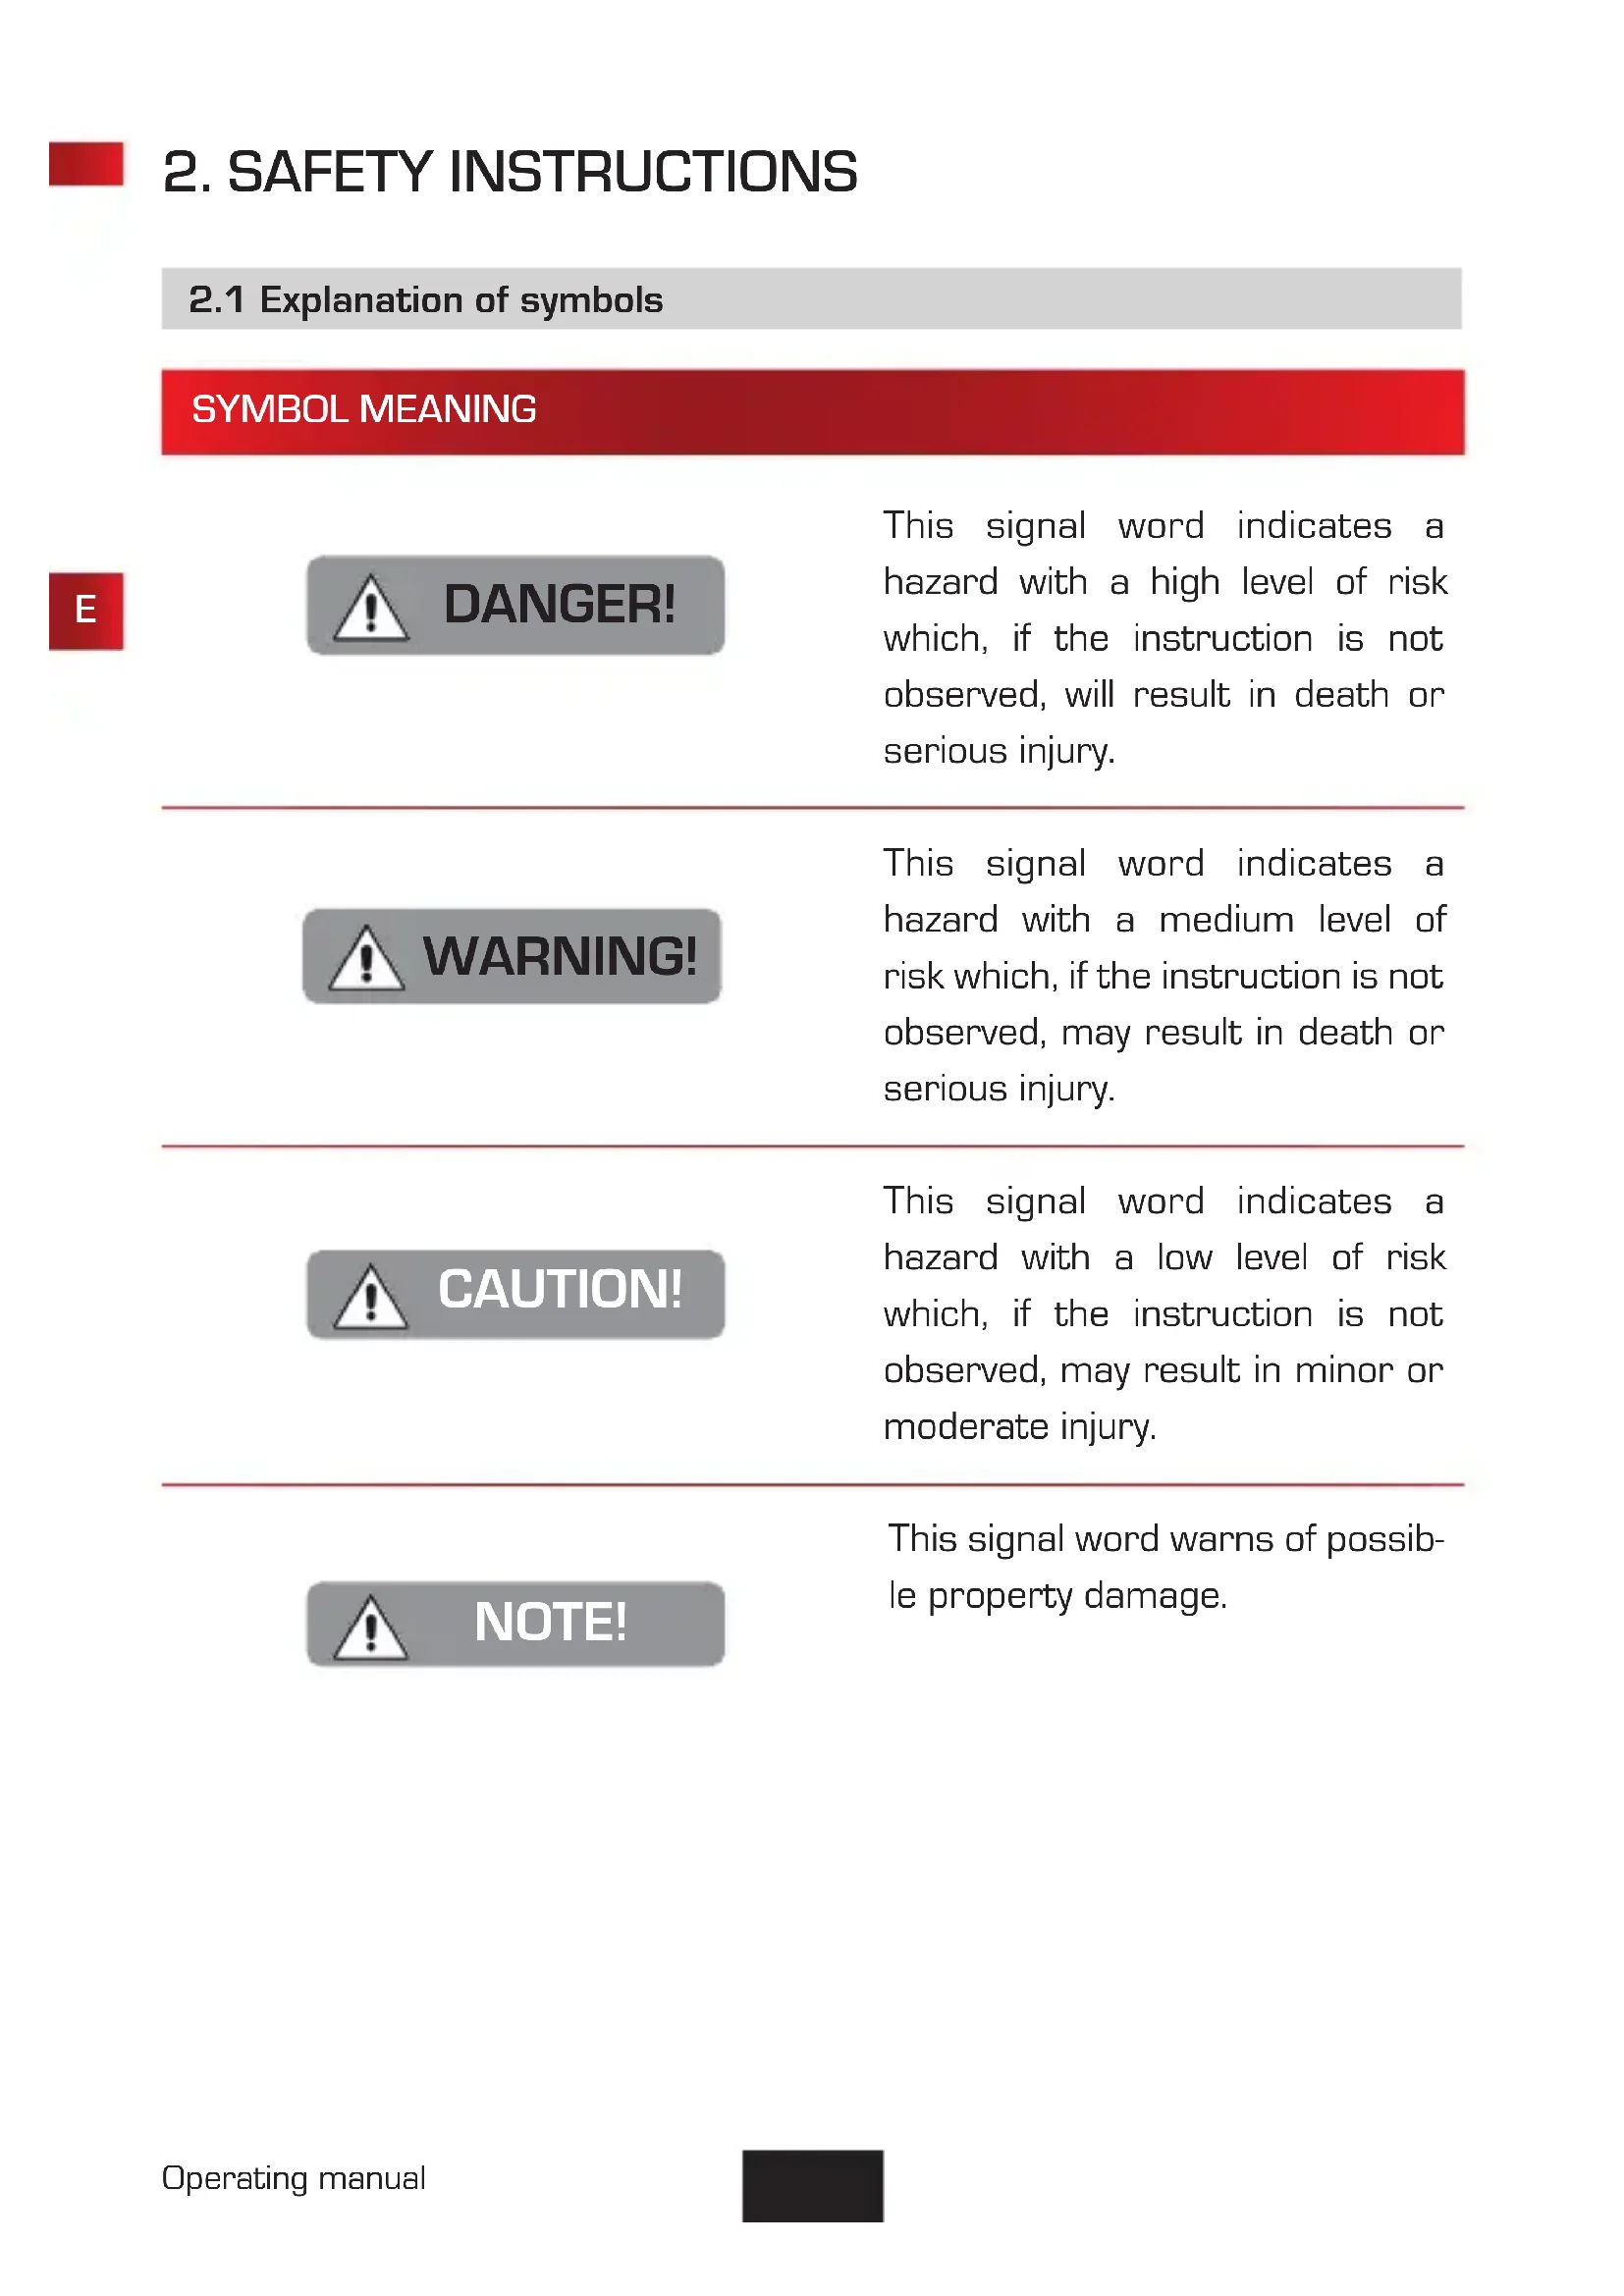
2.1 Explanation of symbols
SYMBOL MEANING
E

DANGER!
This signal word indicates a hazard with a high level of risk which, if the instruction is not observed, will result in death or serious injury.

WARNING!
This signal word indicates a hazard with a medium level of risk which, if the instruction is not observed, may result in death or serious injury.

CAUTION!
This signal word indicates a hazard with a low level of risk which, if the instruction is not observed, may result in minor or moderate injury.

NOTE!
This signal word warns of possible property damage.
2.1 Explanation of symbols
SYMBOL MEANING

This symbol indicates danger.

Protection class II Electrical devices that fall under protection class II have reinforced or double insulation to the amount of the rated insulation voltage between active and accessible parts (VDE 0100 part 410, 412.1). They usually have no connection to the protective conductor. Even if they have conductive surfaces, they are protected from contact with other live parts by reinforced or double insulation.

Products labelled with this symbol meet the requirements of the guidelines of the European Community.
2. SAFETY INSTRUCTIONS
2.1 Explanation of symbols
SYMBOL MEANING

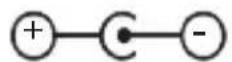
Fig. 1
Fig. 2
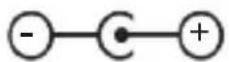
These symbols indicate the polarity of the plug for devices with hollow plugs.
A distinction is made between 2 variants
Fig. 1: Outside plus / inside minus
Fig. 2: Inside plus / outside minus

Devices with this symbol may only be operated indoors in a dry environment
2.2 Intended use
This product is a consumer electronics device.
This device serves as a receiver of DAB+, FM and internet radio and plays audio files from a USB data carrier, CD player, Bluetooth device or network drive as well as recording audio files onto a USB data carrier.
Any other use or operation of the device is
seen as not intended and may cause personal or material damages.
Do not use this device for any other purpose.
Only use the device indoors.
2. SAFETY INSTRUCTIONS
The device is intended for private, non-commercial use only. We assume that the user has some general knowledge about using electronic entertainment equipment.
Liability is excluded in the event of improper use.
Only use replacement parts and accessories that have been supplied or approved by us.
Do not convert the device and do not use any additional devices or replacement parts that have not been explicitly approved or supplied by us.
Do not use the device in potentially explosive environments.
These include fuel storage areas, tank facilities or areas in which solvents are stored or processed.
Do not use the device in areas where the air is contaminated with particles (e.g. flour or wood-chip dust)
Do not expose the device to extreme conditions, e.g. direct sunlight, high humidity, moisture, extremely high or low temperatures, open fire.
2.3. Safety instructions
Check the device before use.
The device must not be used if it is defective or damaged.
Risk of injury!
Risk of injury to children and people with reduced physical, sensory or mental ability (e.g. disabled people, elderly people with limited physical and mental ability) or a lack of experience and knowledge
Please always keep the device out of the reach of children.
This device can be used by children aged 8 years and above and persons with reduced physical, sensory or mental ability or lack of experience and/or knowledge if they are supervised or have been given instruction concerning safe use of the device and understand the hazards involved.
Never let children use the device unsupervised.
2. SAFETY INSTRUCTIONS
Do not store the used packaging materials (bags, polystyrene pieces etc.) within reach of children. Children are not allowed to play with the packaging. There is a special danger of suffocation from packaging films.

2.4. Operational safety

DANGER!
Risk of injury!
Risk of injury from electric shock from live parts.
There is a risk of electric shock or fire due to accidental short circuits.
Please check the device for damage before each use. If the device has visible damages, do not use it any more.
If you discover a technical or mechanical problem, please contact TELESTAR Service.
Only use the power adapter included in the scope of delivery!
Never open the housing of the device.
Immediately disconnect the device from the power in the event of any malfunction
If you bring the device from a cold to a warm environment, moisture can form inside the device.
In this case, wait about an hour before using it.
Unplug the device from the power socket if you are absent for a longer period and during thunderstorms.
In the event that foreign objects or liquid should enter the device take the power supply device out of the socket immediately. Have the device checked by qualified personnel before you use it again. Otherwise, there is a risk of electric shock.
2.5. Connecting the device
Only connect the device to a properly installed, earthed and electrically protected socket.
Please ensure that the power source (socket) is easily accessible.
Do not kink or crush any cable connections.
Before putting the device into operation, check whether the voltage information on the device matches the local mains voltage.
2.6. Protecting the device against damage

NOTE!
Unfavourable environmental conditions such as moisture, excessive heat or lack of ventilation can damage the device. Only use the device in dry rooms. Avoid direct proximity to: Heat sources such as radiators, open flames such as candles and devices with strong magnetic fields such as speakers.
Ensure that there is sufficient distance from other objects so that the device is not covered and adequate ventilation is always guaranteed.
Avoid direct sunlight and unusually dusty locations.
Take care to prevent moisture, water or sprays and ensure that receptacles filled with water -e.g. vases - are not placed on or near the device Do not place any heavy objects on the device.
Make sure that the appliance is not exposed to dripping or splashing water and that there are no open fire sources (e.g. burning candles) near the appliance.

2. SAFETY INSTRUCTIONS
2.7. Risk of injury

WARNING!
E
Excessive sound pressure when using earphones or headphones can cause hearing damage or loss.
Using earphones or headphones at a high volume for a long period of time can cause injury to the user.
Please check the volume before putting the earphones or headphones in or onto your ears.
Set the volume to low and only increase the volume enough that you still find it comfortable.
2.8. Handling batteries
The device is supplied with a CR 2032 battery. Only use this type of battery for the remote control. Only use the type of battery included in the delivery.

DANGER!
There is a risk of internal injury if batteries are swallowed. The battery acid in the batteries can cause injuries if it comes into contact with the skin.
After accidental swallowing or if there are signs get medical help immediately. Always keep new and used batteries away from children. Remove leaking batteries from the device immediately and clean the contacts before inserting new batteries.

WARNING!
There is a risk of explosion if batteries are used improperly.
Only use new batteries of the same type. Please never use new and old batteries together in one device.
Pay attention to the correct polarity when inserting the batteries. Never charge batteries. Batteries should only be stored in cool and dry places. Never throw batteries into fire.
If the device is not used for a long time, please remove the batteries from the device. Never expose batteries to extreme heat or direct sunlight.

2. SAFETY INSTRUCTIONS
2.9. Cleaning the device

Before cleaning, disconnect the appliance from the power supply. Use a soft, dry cloth to clean the device. Please refrain from using liquids when cleaning the device. Do not use any solvent or cleaning agents, as these may damage the surface or labelling.
2.10. Behaviour in case of malfunction
If the device malfunctions, disconnect it from the power supply and wait a few seconds. Reconnect the device to the power supply.
It may be necessary to reset to the factory settings. If this is not successful, please contact your dealer or contact TELESTAR Digital GmbH directly. You can also find more information on chapter 14.
3. SCOPE OF DELIVERY
Please remove all parts from the packaging and remove all packaging materials completely. If one or more of the specified parts is
missing, please contact:
TELESTAR Service Center
Am Weiher 14,
56766 Ulmen
e-mail: service@telestar.de
QUANTITY EXPLANATION
1 IMPERIAL
DABMAN i560 CD
1 Remote control
1 External power adapter
1 Operating Instructions
2 Short antenna black for Bluetooth and WiFi reception
1 Telescopic antenna
4. DEVICE OVERVIEW
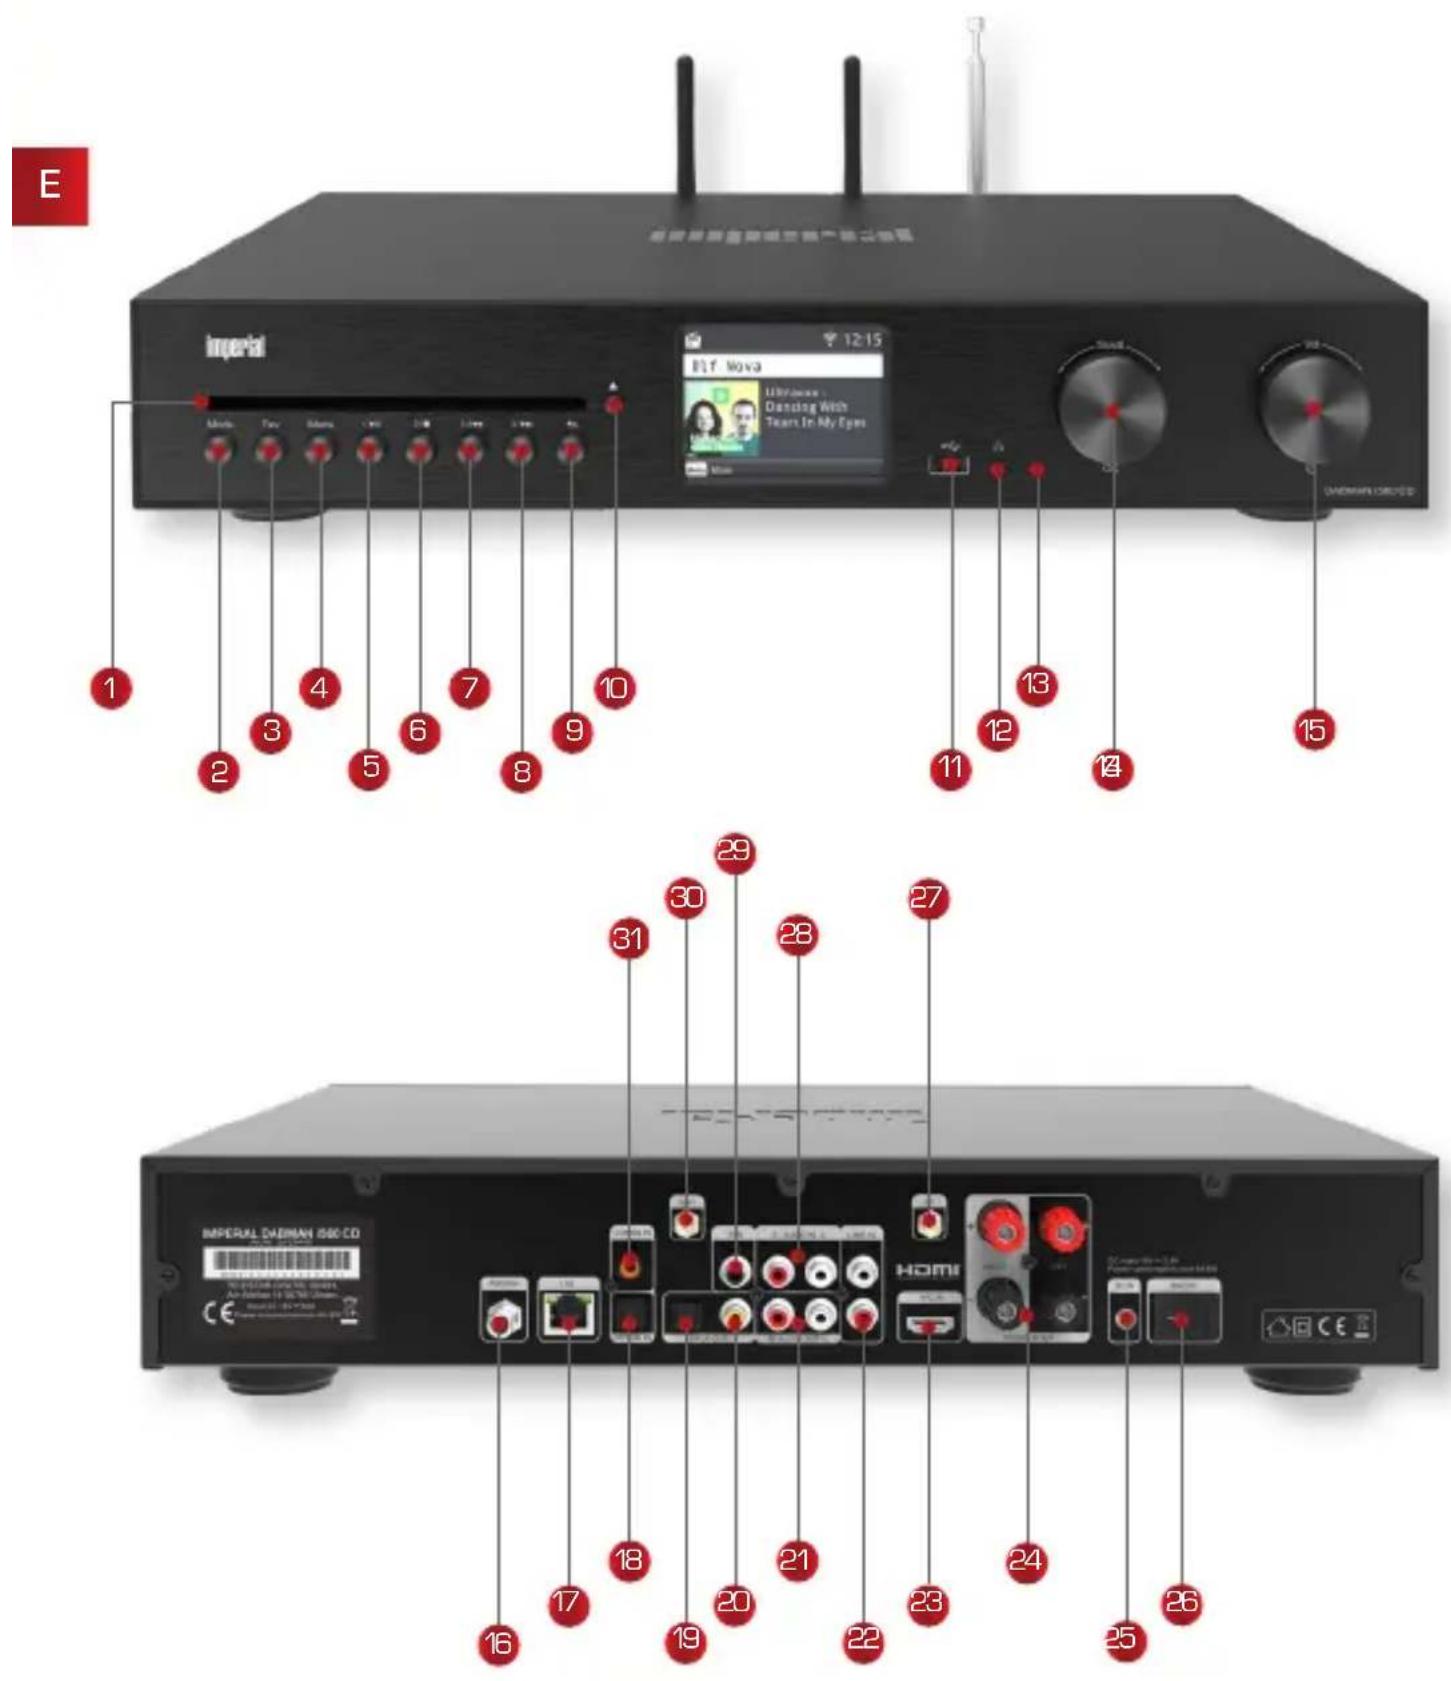
4.1 Control panel and connections
4. DEVICE OVERVIEW
4.2 Front control panel
CD drive
Insert a CD here with the printing facing up. The CD is automatically pulled in.
Mode
Switch the operating mode of the device between Internet radio, DAB+, FM, UPnP, AUX and USB here.
Switches to one of the individually stored favourite stations.
Use this button to view the device menu
Station memory slot 1/play/pause
In radio mode, switches to the 1st station memory slot.
Starts or pauses playback in USB/media/UPnP/CD mode.
6 Station memory slot 2/STOP
In radio mode, switches to the 2nd station memory slot.
Stops playback in
USB/media/UPnP/CD mode.
Station memory slot 3/previous track
In radio mode, switches to the 3rd station memory slot.
Use this button to select the previous track or
rewind in USB/media/UPnP/CD mode.
8 Station memory slot 4/next track
In radio mode, switches to the 4th station memory slot.
Use this button to select the next track or fast forward in USB/media/UPnP/ or CD mode.

4. DEVICE OVERVIEW

4.2 Front control panel
9 Back
This button takes you one step back in the menu.
10Eject
Use this button to eject a CD from the CD drive.
11 USB connection
Connect the device to a USB data carrier such as a USB hard disk or USB stick to play back or record music files from it.
12 Headphone connection
Insert headphones here to listen to the music played back from the radio through your headphones.
13 Control LED
Navigate through the menu using the knob or confirm menu entries by pressing the button.
Press this knob to switch the device on or to standby.
Adjust the volume by turning the button.
4. DEVICE OVERVIEW
4.3 Connections on the back

FM/DAB antenna
Antenna connection for the telescopic antenna included in the scope of delivery.

LAN connection
Connect the device to an existing network using a network cable to use the Internet radio function. Alternatively, the device can also be connected wirelessly via WiFi.

If required, connect the optical digital SPDIF audio output of an external device here.

Optical Digital SPDIF Audio Output
If you are using an external HiFi amplifier and it has a corresponding optical digital input, connect the SPDIF OUT socket of the i560 CD to the optical SPDIF input of this amplifier.

Electrical digital SPDIF audio output
If you are using an external HiFi amplifier and it has a corresponding electrical digital input, connect the SPDIF OUT socket of the i560 CD to the electrical SPDIF input of this amplifier.

Analogue audio output right/left
Connect the radio to a Hi-Fi amplifier or active speakers if you do not want to use the DABMAN i560 CD's speaker outputs
to route the music received from the radio to a sound system. An active subwoofer can be connected via the SUB output.

Connect the analogue audio output of an external device here if required.
4. DEVICE OVERVIEW
4.3 Connections on the back
23HDMI
This socket allows you to connect your TV via an HDMI cable to transmit the audio signal from the TV to the DABMAN i560 CD.
24 Speaker connections
Connect speakers to the device here if needed.
25 Power adapter connection
Connect the device to the power adapter (supplied) at this socket to establish the power supply for the device.
26 Power switch
Use this switch to turn the device on and off. This switch completely disconnects the device from the power supply.
Bluetooth antenna
Connection for the antenna included in the scope of delivery. The DABMAN i560 CD receives Bluetooth signals, e.g. from a mobile device (smartphone or tablet), via the antenna connected to this socket.
Connect the analogue audio output of an external device here if required.
29 Subwoofer output
Connect an external subwoofer here if required.
WiFi antenna
Connection for the included WiFi antenna to connect the device to your WiFi home network via WiFi.
Connect the electrical digital SPDIF audio output of an external device here if required.

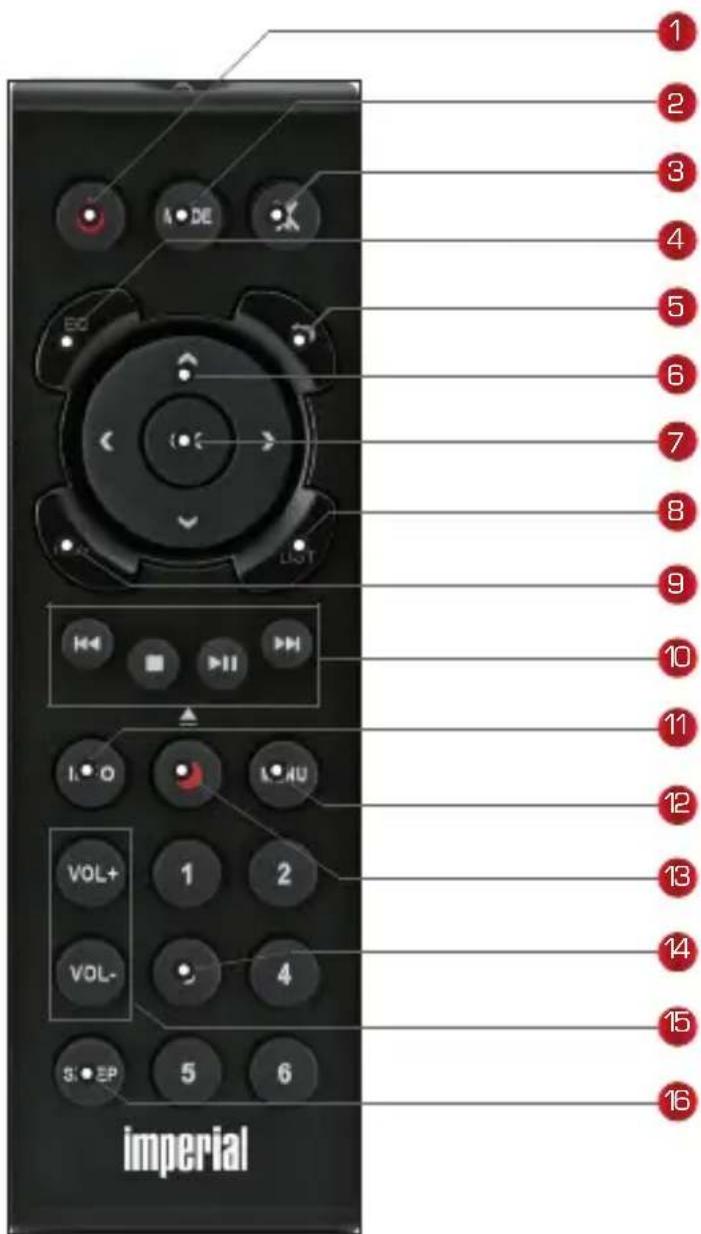
4. DEVICE OVERVIEW
4.4 Remote control
Please note:
You can use the app Sto operate compatible internet radio services via your tablet or smartphone.
The app is suitable for iOS and Android operating systems.
For more information, see chapter 8.16.


4. DEVICE OVERVIEW
4.4 Remote control
Switch the device on or off using this button.
2.Mode
Switch between different modes.
This button can be programmed with a different function. Also see chapter 8.14.
3. Mute
Mutes the device.
4. EQ equaliser function
You can activate the equaliser function with this button and and change individual sound settings.
5. Back
This button takes you one step back in the menu.
6. Navigate up/down - right/left / volume VOL+ -
Use these buttons to navigate through the menu.
Use the buttons to decrease or increase the volume.
7. OK
Use this button to confirm an entry or selection.
8. LIST/programme list
Use this button to view the radio programme list.
9. FAV+
Use this button to add a selected radio station to your favourites list.
Select previous track/ quick rewind
Stops playback
Starts or pauses playback
▶ Select next track/ fast forward
4. DEVICE OVERVIEW
4.4 Remote control
11. INFO
Shows information about the current radio programme.
Use this button to view the device menu
13. Rec/Eject
Starts recording the current radio programme onto a connected USB storage device.
Press and hold the button for more than 2 seconds to activate the timer menu to record a radio programme.
Press this button in CD player mode to eject a CD.
14. Numeric keypad
15. VOL + / VOL -
Use these buttons to increase or decrease the volume.
16. SLEEP
Press this button to set a sleep timer. The radio will switch to off after the time you have set.
5. CONNECTIONS
5.1 Connecting the loudspeakers
The DABMAN i560 CD has a built-in stereo amplifier for connecting a pair of passive speakers. (not included)

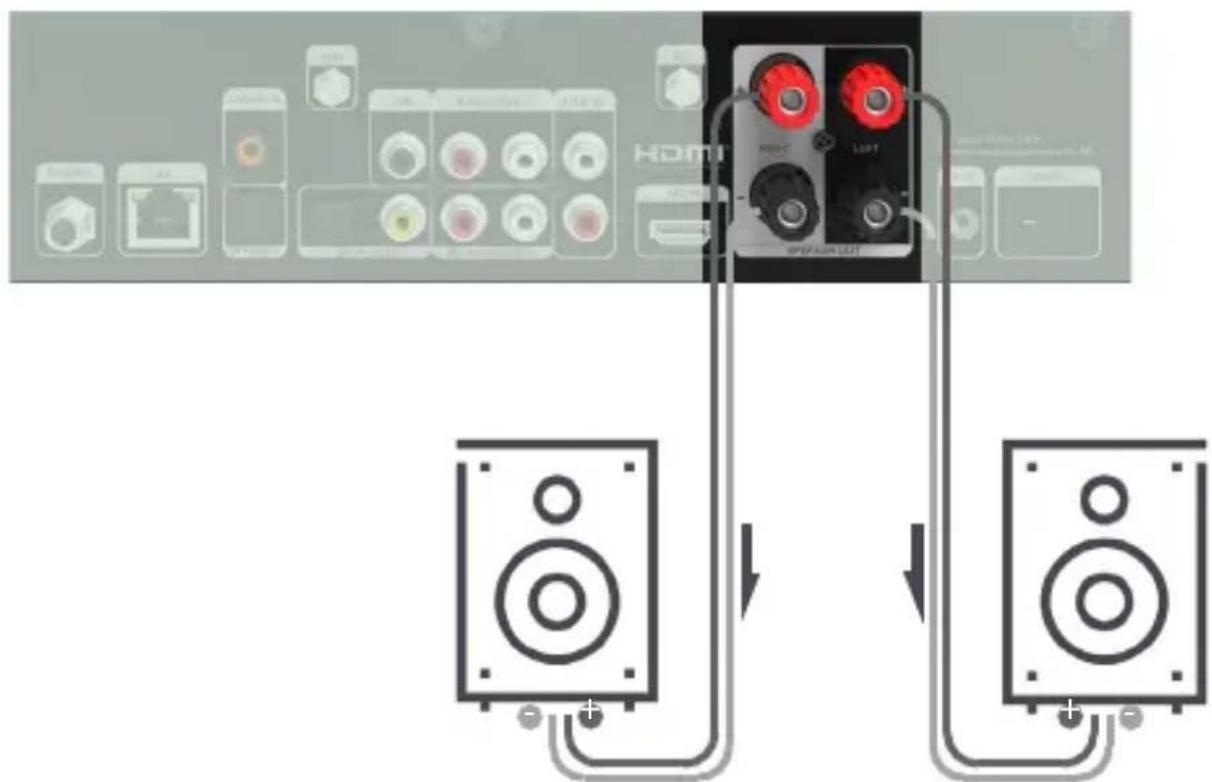

NOTE!
Switch off the radio at the power switch on the rear panel before connecting the speakers to the device.
Make sure you connect the speaker cables correctly to the speaker terminals on the DABMAN i560 CD.
Also make sure that you twist the strands of the speaker cables tightly and insert them properly into the speaker terminals.
The wires must never touch each other!
Connect the cables so that the polarities [+/-] of the speakers and the radio match.
5. CONNECTIONS
5.2 Connecting the television
You can connect your TV to the HDMI IN socket on the
DABMAN i560 CD. This allows audio signals from your connected TV to be transmitted to the DABMAN i560 CD via HDMI and played back through the connected speakers.
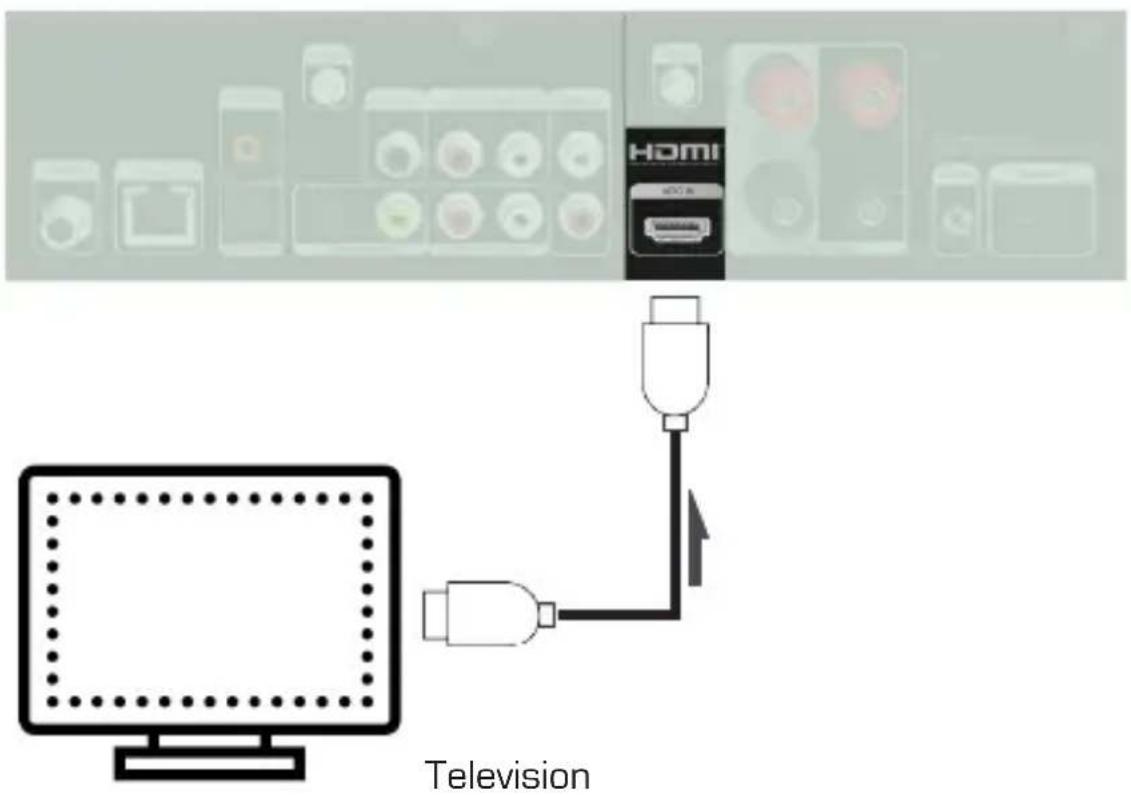
Please note:
The TV must support an HDMI ARC function. The HDMI socket of the TV set must be marked with "ARC" or "eARC". It may be necessary to activate the ARC function in the TV. Please also refer to the operating instructions of your television.
5. CONNECTIONS
5.3 Connecting playback devices with cinch sockets [analogue]
![Imperial DABMAN i560 CD - Connecting playback devices with cinch sockets [analogue] - 1](/content/2026/03/442080/images/c1e8d5d988f3045c14818a6a852979a0e26a9da5b95b0c5a52da7253082c5268.jpg)
If you want to play analogue audio from an external device through the speakers connected to the DABMAN i560 CD, connect the analogue audio output of the external device to the
LINE IN connectors on the DABMAN i560 CD. To do this, use the LINE OUT R/L ports. External devices can be for example CD players, DVD players, MP3 players, camcorders, video game consoles, satellite or cable receivers.
![Imperial DABMAN i560 CD - Connecting playback devices with cinch sockets [analogue] - 2](/content/2026/03/442080/images/8caace2ed854cff49c244c2f8b25b22bb7fb0ee559be608a5dad305d896ba095.jpg)
CD-Player/DVD-Player/MP3-Player etc.
5. CONNECTIONS
5.4 Connecting audio output devices with cinch sockets (analogue)
This connection is recommended if you want to play back audio signals from the DABMAN i560 CD (integrated CD player, receivable radio stations, USB data carriers, UPnP data) from an existing sound system with analogue audio inputs.
You can connect an audio HiFi amplifier to these LINE OUT audio outputs of the DABMAN i560 CD for example.
To do this, use the LINE OUT R/L sockets. In addition, you can operate an active subwoofer via the SUB socket.
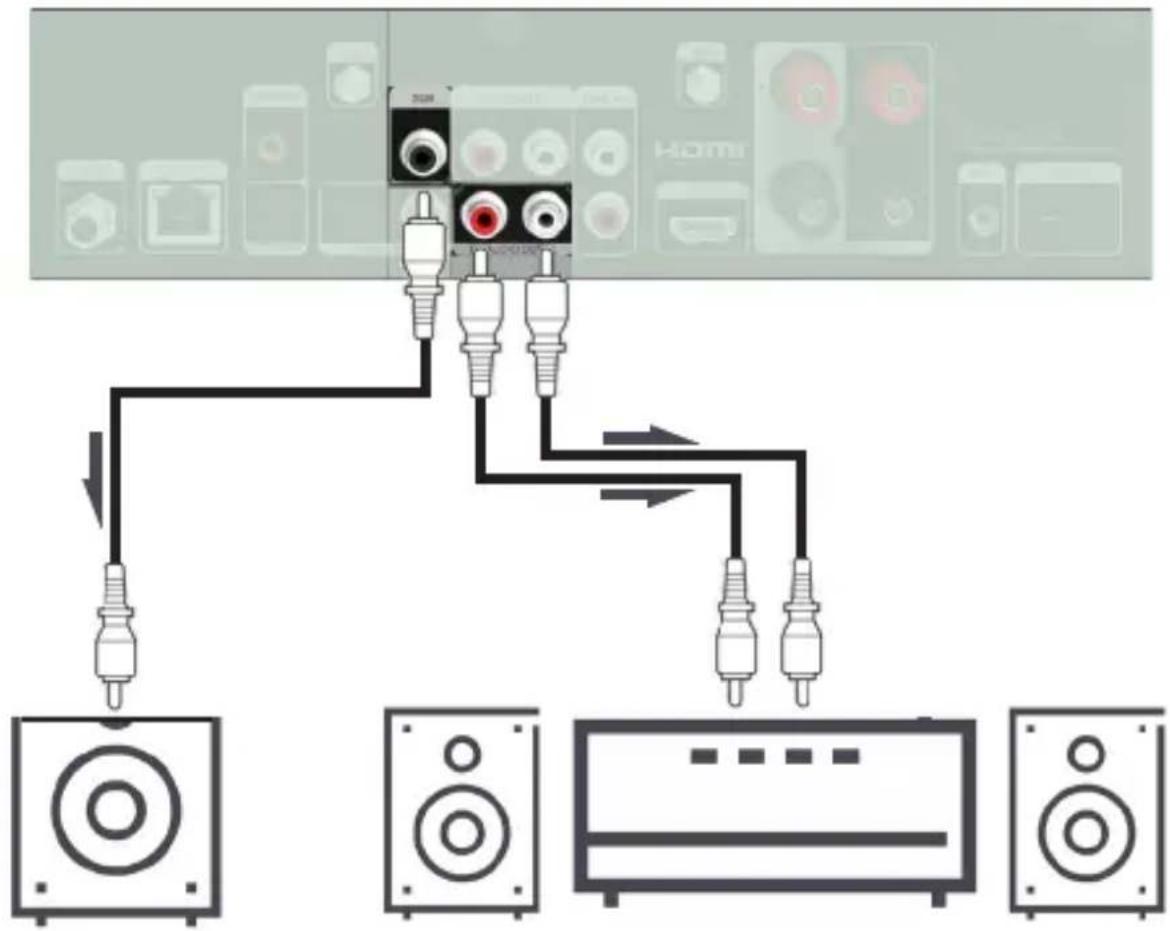
Subwoofer Sound system
5. CONNECTIONS
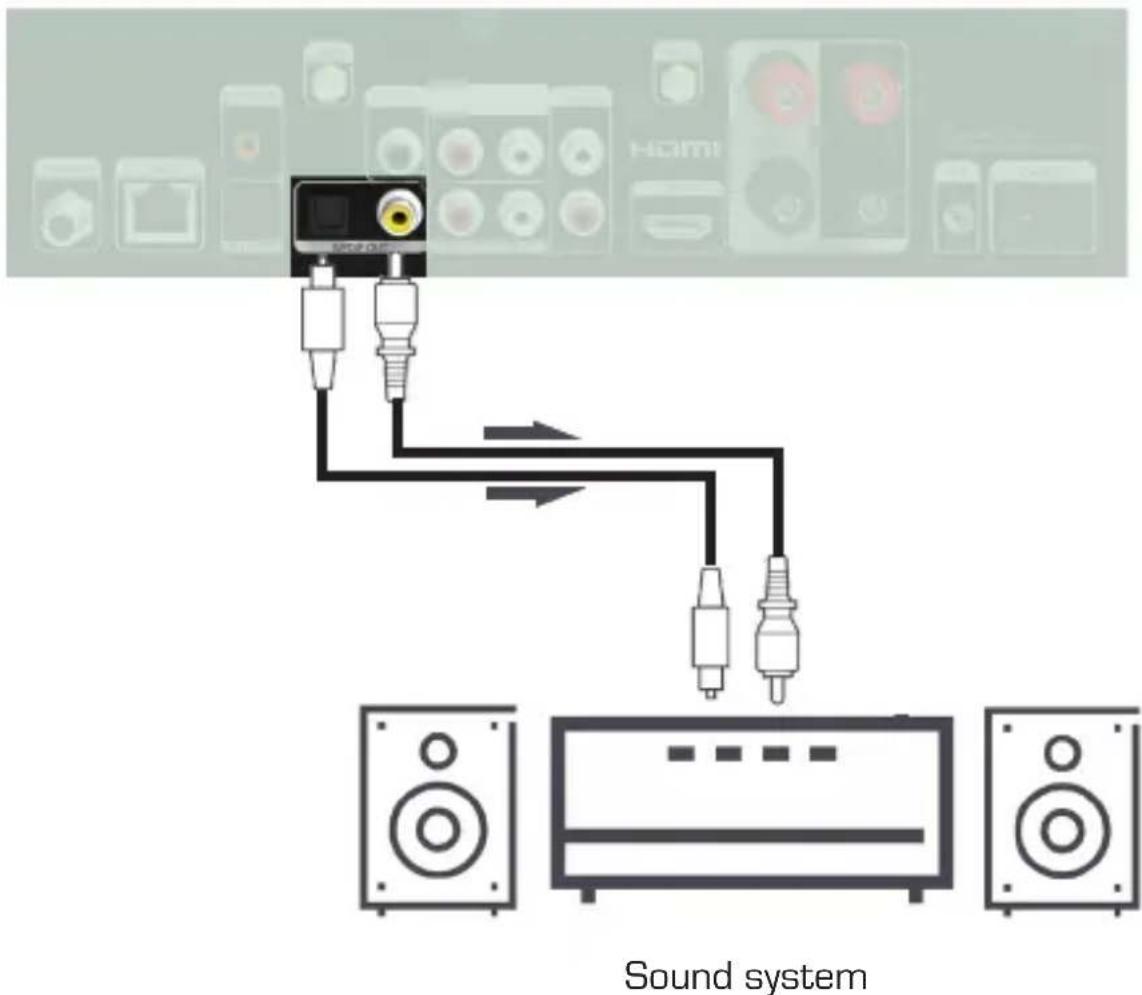
This connection is recommended if the sound from the
DABMAN i560 CD is to be played from an existing sound system with digital audio inputs.

Use one of the two digital outputs OPTICAL OUT or COAXIAL OUT on the DABMAN i560 CD if your existing HiFi amplifier has an optical or coaxial digital input SPDIF.
5. CONNECTIONS
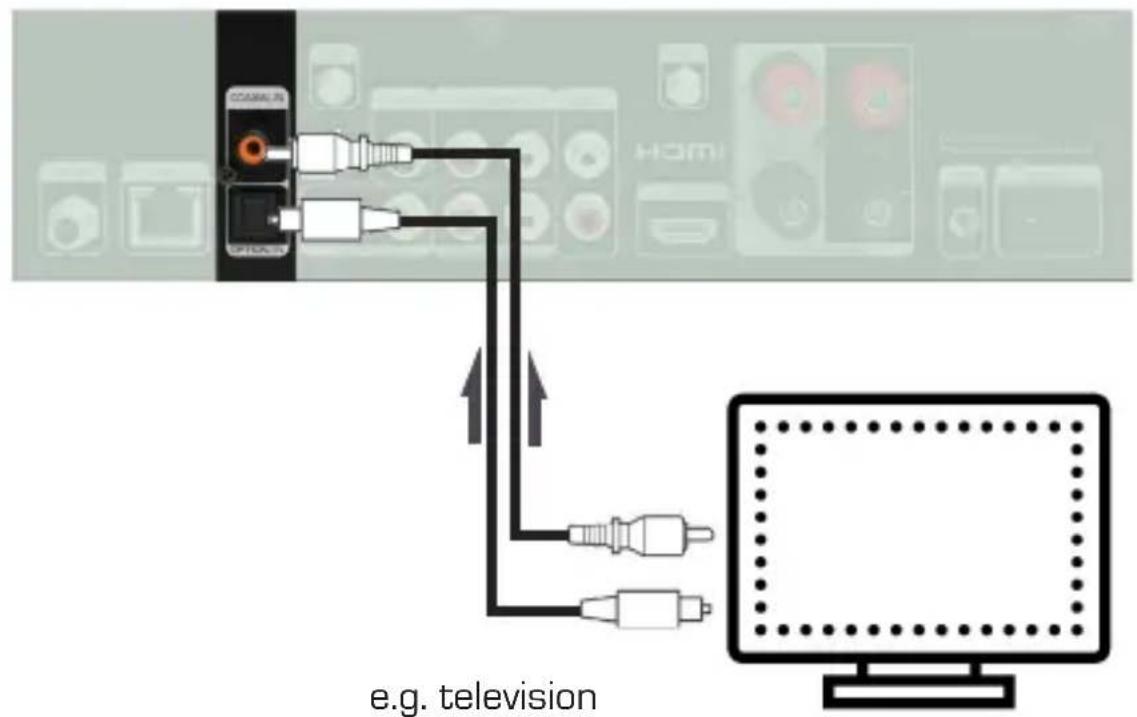
5.6 Connecting devices with digital audio output
If you want to play digital audio from an external device through the speakers connected to the
DABMAN i560 CD, connect the digital audio output of the external device (e.g. TV, Blue-Ray player, DVD player or hi-fi system) via the COAXIAL IN or OPTICAL IN connector on the DABMAN i560 CD. The digital audio signal can be transmitted via a coaxial cable or an optical fibre cable.
5. CONNECTIONS
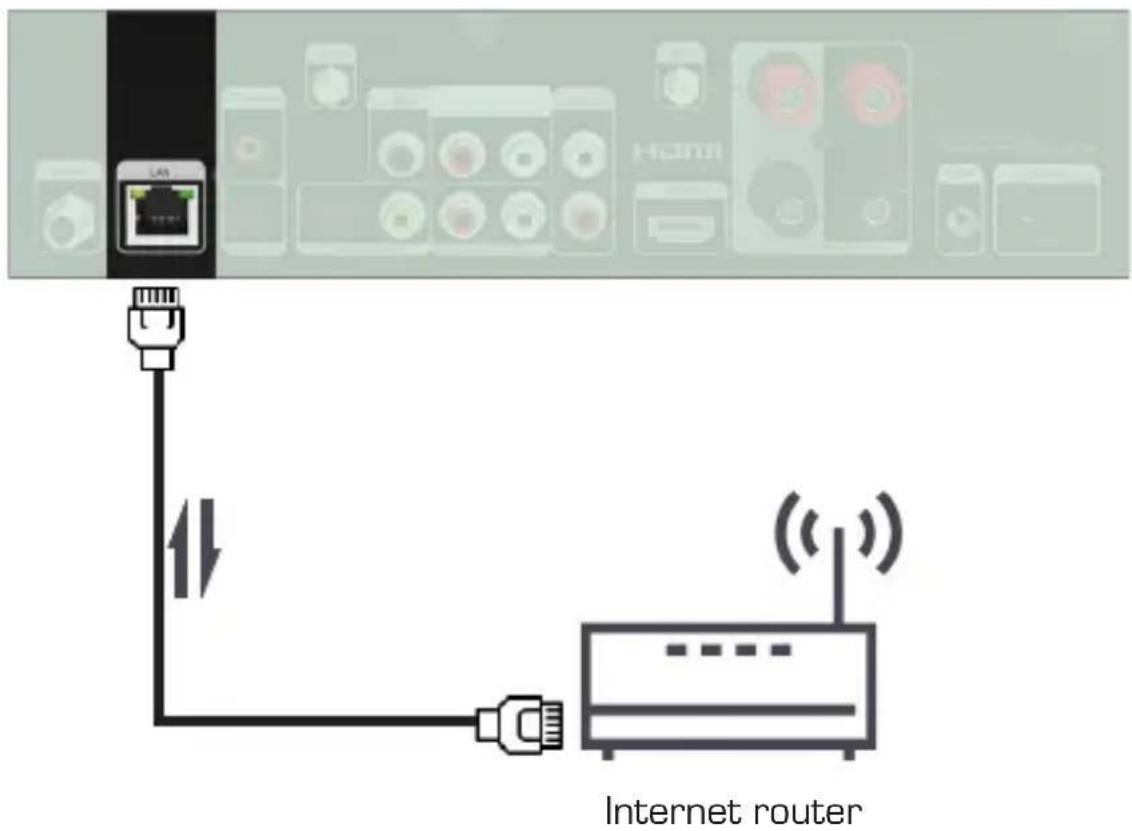
5.7 Connecting to an internet router
Connect the device here with a network cable to an existing Internet router in order to be able to use the Internet radio function or the UPnP function.
Alternatively, the device can also be connected via WiFi.

6. FIRST START-UP
6.1 General operating instructions
Switch the device on or off using the standby button on the Remote control or on the device.
You can use the VOL+ button on the remote control or turn the VOL+ knob on the device to increase the volume.
You can use the VOL- button on the remote control or turn the knob on the device to decrease the volume.
The menu items can be selected using the buttons on the remote control or using the knob on the device.
You can confirm a selection in the menu by pressing the OK button on the remote control or by pressing the dial on the device.
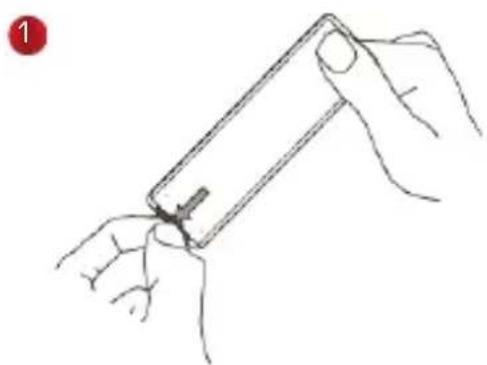
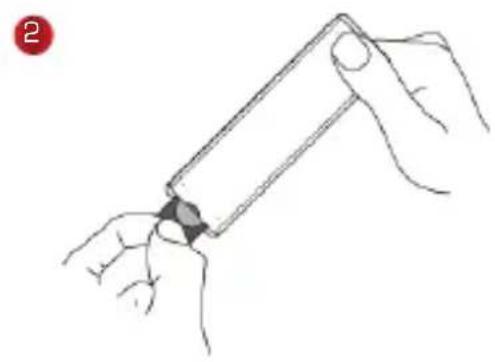
6.2 Preparing the remote control
Remove the battery transport lock on the remote control. To do so, slide the plastic slip out of the battery compartment of the remote control. ..
This establishes battery contact.
To replace the remote control battery, open the battery compartment on the back of the remote control. Pull the battery compartment out of the remote control. Remove the battery and insert a new battery of the same type.
6.2 Preparing the remote control

There is a risk of explosion if batteries are used improperly!
Please read the related safety information in Chapter 2.8.
Pay attention to the correct battery polarity!
Reinsert the battery compartment.
6.3 Antenna connections
Screw the supplied DAB+ / FM telescopic antenna to the antenna connector on the back of the device and pull out the antenna.
Screw the two black antennas included in the delivery to the BT (Bluetooth) 27 and WiFi 30 antenna connections. (See chapter 4.1)
6.4. Power connection
Connect the power adapter provided to the corresponding port on the back of the device. [chapter 4.1]. Now plug the power adapter into a 230V socket. Turn on the radio using the standby button on the remote control or on the device. The device will turn on.

Use the buttons on the remote control to select the menu language. Confirm the desired menu language with the OK button on the remote control.


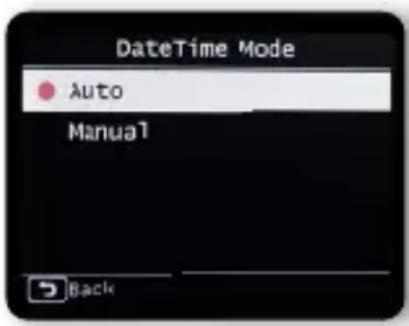
6.6. Date time mode
Select how the radio should synchronise the time here.
Use the buttons on the remote control to make the selection. Use the OK button on the remote control or press the knob on the device to confirm your selection.
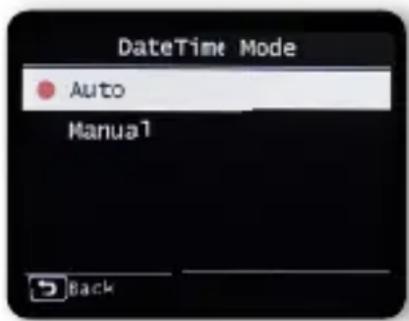
The device's factory setting is to automatically set the time.
If the device is connected to the internet via the network, the time and date are automatically synchronised.
You therefore do not have to set the time manually. You can change these settings at any time in the main menu under System.
6.7.GMT time zone
Select your time zone here. For Germany and most of Europe, select GMT + 1:00.
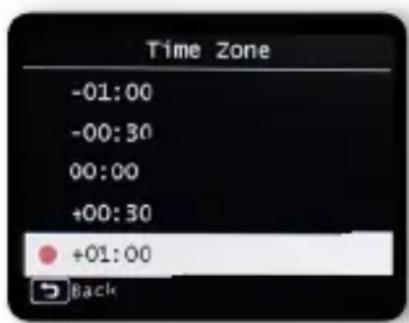
Use the buttons on the remote control to make a selection. Confirm with the OK button on the remote control or by pressing the knob on the device.
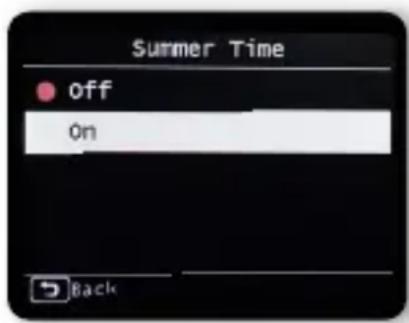
6.8.Summer Zeit
Switch on summer time here if it currently applies.
Use the buttons on the remote control to make a selection. Confirm with the OK button on the remote control or by pressing the knob on the device.
6. FIRST START-UP
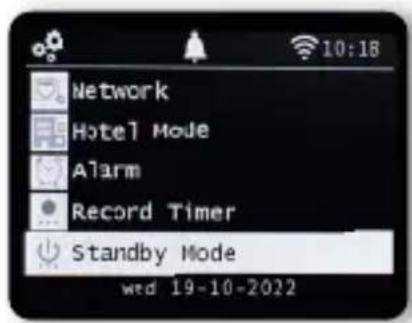
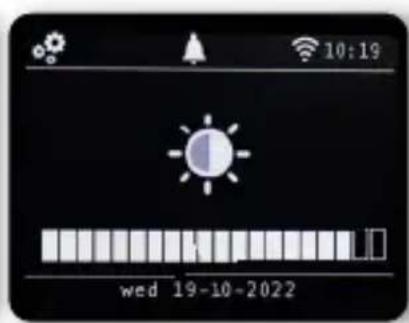
6.9. Standby mode
Here, define whether the time should be displayed when the radio is in standby mode.
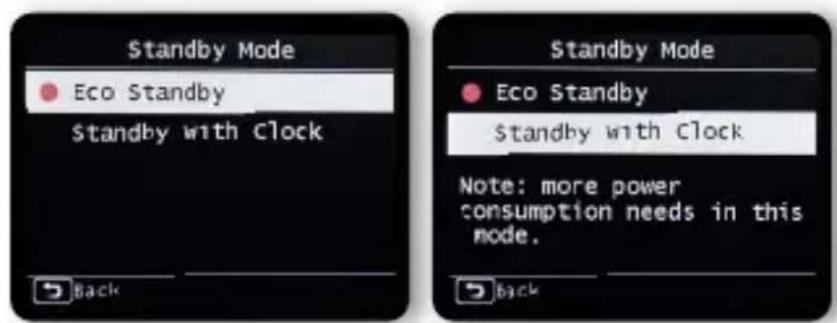

Use the buttons on the remote control to make a selection. Confirm with the OK button on the remote control or by pressing the knob on the device.

NOTE!
If 'Standby with clock' is selected, the device's power consumption will increase slightly.
6. FIRST START-UP
6.10. Location
Choose your continent and then your country in order to access internet radio broadcasts from your local stations.
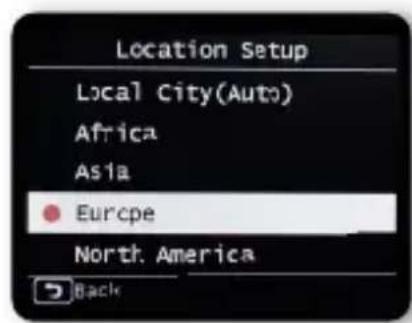
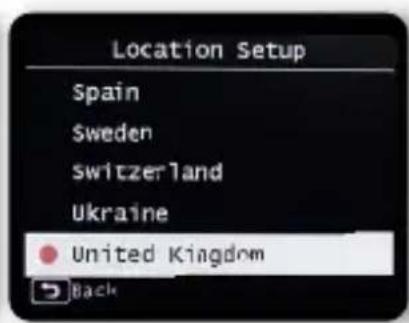
Use the buttons on the remote control to make a selection. Confirm with the OK button on the remote control or by pressing the knob on the device.
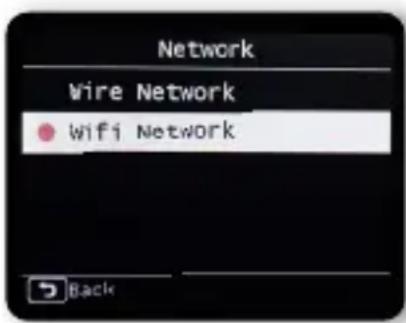
6.11. Network selection
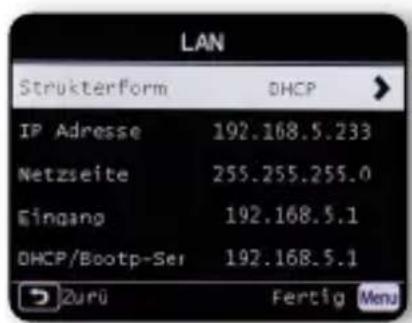
First decide whether the network connection is to be made via LAN or WiFi.
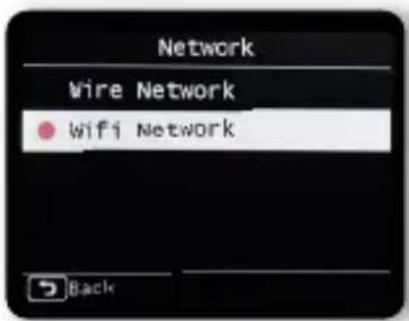
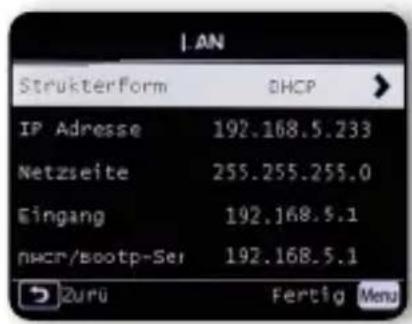
If you have connected the machine to your Internet router
with a network cable, select LAN and confirm with OK.
The radio displays the following information when the connection is successful.
6.11. Network selection
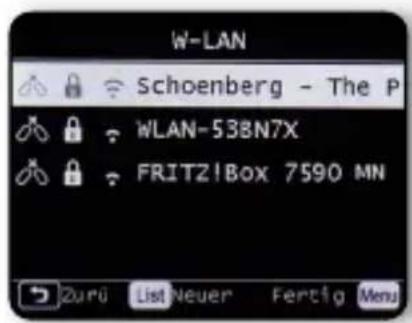
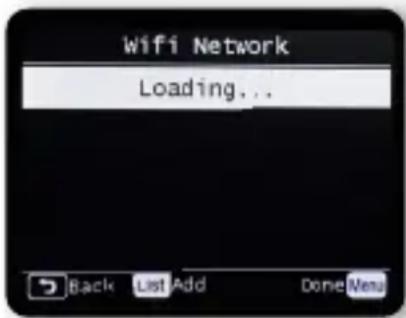
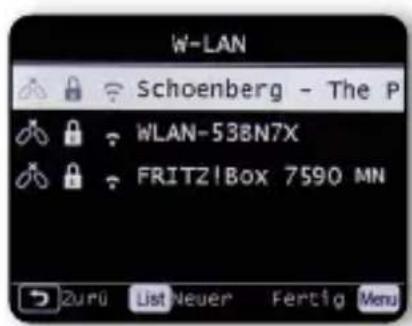
If you want to establish a network connection via WiFi, select WiFi and confirm with OK. In the next step, you will be shown all the available WiFi networks that are within range of the device.
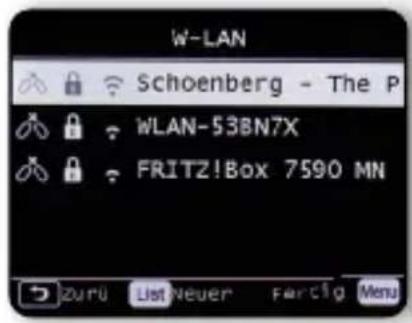
Select the network you want to connect to and confirm by pressing the OK button.
6.11. Network selection

Enter the WiFi password. You can select a symbol with the buttons on the remote control or with the knob on the device and set it with OK. Press the button or use the knob to move the cursor one step further. Confirm the entry via the OK field.
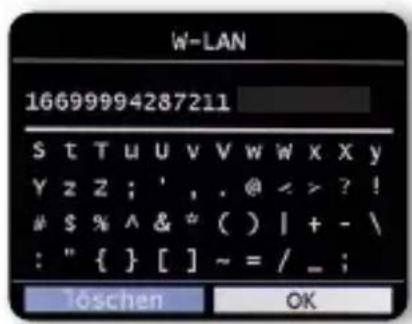
Please note that the router registration process can take some time. The setup is completed.
7. OPERATION AND SETTINGS
7.1 General operating instructions
Press the MENU button on the device or on the remote control. Regardless of current device settings, this always returns you to the main menu. Navigate the main menu using the buttons or the knob on the device.
The main menu can be split up into the following sub-points:


You can use the arrow buttons or the knob to select individual points within the menu. Confirm the selection with the OK button on the remote control or by pressing the knob on the device.
With the Back button (button 9 on the device / button on 5 on the remote control) you always go back one step in each setting.

7. OPERATION AND SETTINGS
In radio mode, pressing the List button displays an overview of radio stations you have previously listened to.

Use the MODE button to switch the different operating modes of the radio.
7.2. System
Press the MENU button on the remote control or on the device and use the buttons to select the System menu item.
Confirm the selection with the OK button on the remote control or by pressing the knob on the device. Under this menu item you can make individual settings for the device.
7. OPERATION AND SETTINGS
7.2.1. Language
Use the buttons on the remote control to select the menu language. Confirm the desired menu language with the OK button on the remote control.
7.2.2 Date time
Use the buttons on the remote control to make a selection. Confirm with the OK button on the remote control or by pressing the knob on the device.
The device's factory setting is to automatically set the time. If the device is connected to the internet via the network, the time and date are automatically synchronised. You therefore do not have to set the time manually. Select how the radio should synchronise the time here.

7. OPERATION AND SETTINGS
7.2.3. Network

For the device to function as an Internet radio, the DABMAN i560 CD must be connected to a network with Internet access.
If you have not already done so in the initial setup, you can set up a network connection under this menu item.
Press the MENU button on the remote control or on the device and use the buttons on the remote control or the control knob on the device to select the menu item System.
Confirm the selection with the OK button on the remote control or by pressing the knob on the device. Use the buttons on the remote control to select the Network menu item.
First decide whether the network connection is to be made via LAN or WiFi.
If you have connected the machine to your Internet router with a network cable, select LAN and confirm with OK.
7. OPERATION AND SETTINGS
7.2.3. Network
The radio displays the following information when the connection is successful.

If you want to establish a network connection via WiFi, select WiFi and confirm with OK.
In the next step, you will be shown all the available WiFi networks that are within range of the device.
Select the network you are connecting to and confirm with the OK button.

7. OPERATION AND SETTINGS
7.2.3. Network

Enter the WiFi password. You can select a symbol with the buttons on the remote control or with the knob on the device and set it with OK. Press the button or use the knob to move the cursor one step further. Confirm the entry via the OK field.

Please note that the router registration process can take some time.
7.2.4. Alarm
The device can be used as a radio alarm clock.
You can set up to 5 alarm times in this menu option.
To set an alarm, please proceed as follows:
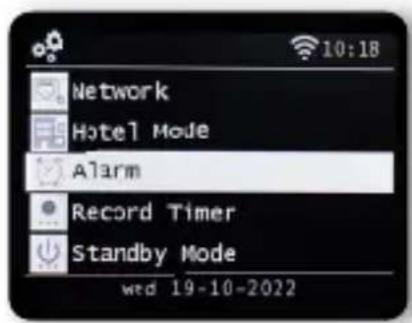
Press the MENU button on the remote control or on
the device, and using the buttons on the remote control or the control knob on the device, select the menu item System.
Use the buttons on the remote control or the knob on the device to select Alarm in the menu and press the OK button on the remote control or the knob on the device to confirm.
7. OPERATION AND SETTINGS
7.2.4. Alarm

Select one of the 5 available alarms and confirm with OK on the device or by pressing the OK button on the remote control.
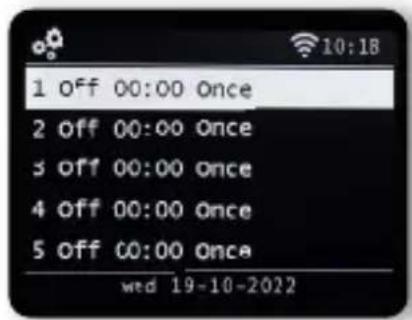
Activate the alarm clock via the Status line.
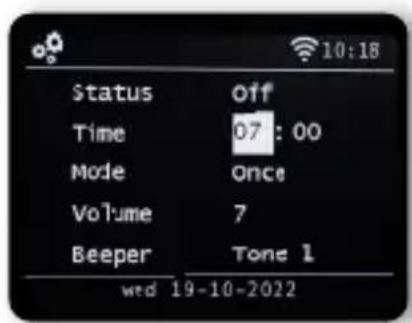

7. OPERATION AND SETTINGS
7.2.4. Alarm

In the next line, set the time for the alarm. Use the number pad on the remote control or the knob on the device.
To confirm the individual entries, they must be saved with the OK button.
Set the repetition intervals in the Date line. You can decide whether the alarm clock is activated at the set time once, daily, on weekdays or only on weekends. In the next line, set the volume for the alarm.
In the Tone line, you can choose a sound or a DAB+, internet or FM radio station to play.
Please note that at least one favourite station must be saved for the selected reception mode if choosing the radio station option.
To stop an alarm, press the button on the remote control or the device. To activate the snooze function, press any button on the device (apart from the Standby button).
7.2.4. Alarm
This pauses the alarm for 5 minutes. The alarm is reactivated after 5 minutes.
To deactivate the alarm until the following day, press the button on the device.
7. OPERATION AND SETTINGS
7.2.5. Edit timer
In this menu, you can edit a set recording timer. Please read chapter 8.12.
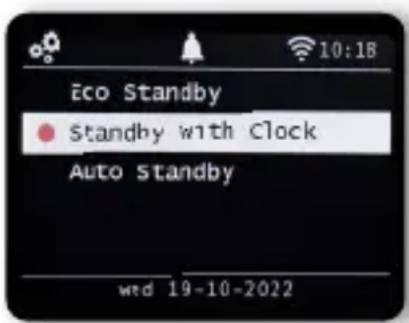
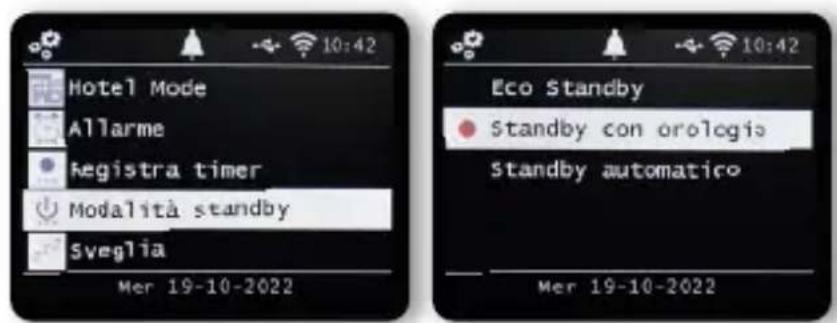
7.2.6. Standby mode
This function lets you adjust the display in standby mode.
Use the buttons on the remote control or the
on the device to select
Standby mode and then press the OK button on the remote control or confirm by pressing the knob on the device.
Select your desired function then confirm by pressing the knob on the device or the OK button on the remote control.

7. OPERATION AND SETTINGS
7.2.6. Standby mode
Eco Standby
In this mode, the device consumes very little power when in standby mode.
The time is not displayed in this standby mode.
Standby with clock
In this mode, the time is displayed in standby if you turn the device off with the standby button. This slightly increases power consumption.
Eco standby mode is activated by holding the Standby button.
Auto standby
In this mode, the device automatically switches to standby after a set time if no operation is performed during this period.
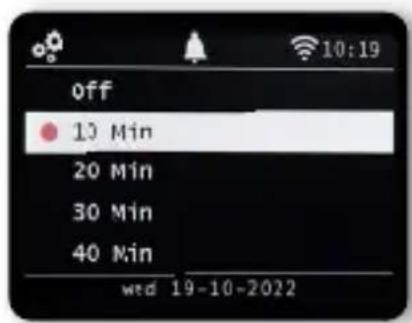
7.2.7. Sleep timer
The sleep timer function can be used to automatically switch the radio into standby mode. Use the buttons on the remote control or the control knob on the device to select Sleep timer and press the OK button on the remote control or press the control knob on the device to confirm.
7. OPERATION AND SETTINGS
7.2.7. Sleep timer
Select Off to disable this feature
or select a preset time between 10 and 120 minutes.
Confirm your entry by pressing OK on the remote control or confirm by pressing the knob on the device.

7.2.8. Backlight
This function lets you adapt the brightness of the display.
Use the buttons on the remote control or the control knob on the device to select
Backlight in the System menu and press the OK button on the remote control or the knob on the device to confirm.
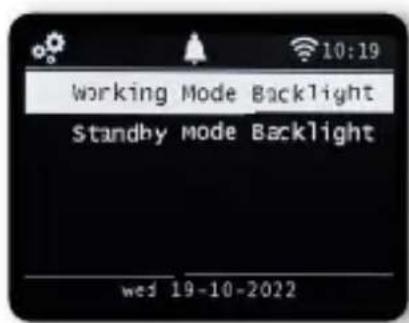
You can adjust the backlight for both operation and standby mode.
Use the buttons or the knob on the device and press OK to confirm.

7. OPERATION AND SETTINGS

7.2.9. Location setting
This setting allows you to set the region in which you are located. In this setting, the radio selects local radio stations in your area via the local radio function.
Use the buttons on the remote control or the knob on the device to select the
Location setting in the System menu and then press the ENTER button on the remote control or the knob on the
device to confirm. Then select the continent and the country in which you are located.
To improve the functions of the device, it may be necessary to update the operating software. You can use the USB interface to update the operating software of your radio, which can be downloaded from www.telestar.de if necessary.
The software provided on the website must be unzipped. The unzipped file is then transferred to an appropriate storage medium and connected to the radio via the USB port.
Please refer to the software download information for the software update procedure.
Alternatively, the update can be carried out via the network connection. In this case, select the row using Network.
7. OPERATION AND SETTINGS
7.2.11 Default settings
This part of the menu lets you restore the device's factory settings.
The device will then subsequently restart with its factory settings.
Use the buttons on the remote control or the dial on the device to select
Factory settings in the System menu then press the OK button on the remote
control or the knob on the device to confirm.
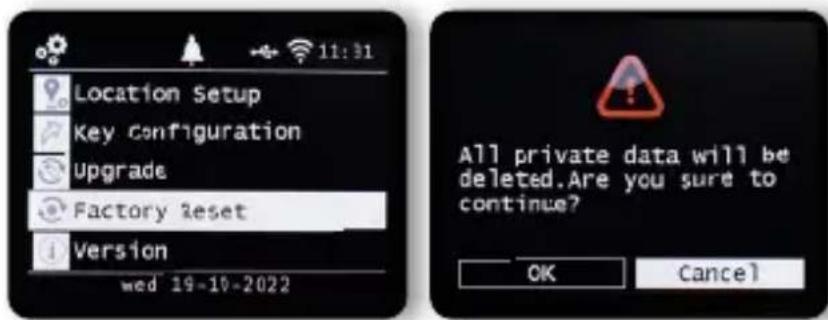
Use the OK button to confirm if you would like to restore factory settings.
Select Cancel if you want to cancel this action.
If you activate factory settings, the device will return to the settings it had at the time of delivery.
PLEASE NOTE:
All saved stations and favourites lists will be lost.
7.2.12 Version
In this menu item you can find and view information about the firmware version installed on the device.
Use the buttons on the remote control or the dial on the device to select
Version in the System menu then press the OK button on the remote control or the knob on the device to confirm.
8.1 DAB+ Radio
You can receive digitally transmitted radio stations in this radio mode.
Press the MENU button on the remote control or on the device use the buttons to select the menu item DAB/DAB+.

To confirm your selection, press the OK button on the remote control or press the knob on the device.
8.1.1 Station list
Press the List button to view the station's DAB station list. You can now use this station list to select your desired station.
Please note that a DAB station list is only available if a DAB station scan has been successfully performed beforehand.
Please also read chapter 8.1.2.
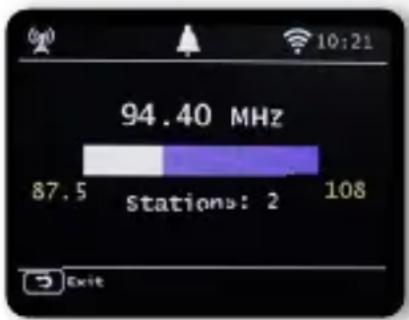
8.1.2 DAB search
To perform an automatic station search in DAB
mode,press theBack 一 button,several times if necessary.
Should the radio not yet have any programmes stored in DAB mode, a search will start automatically as soon as the radio is switched to DAB receiving mode.
8.1.2 DAB search
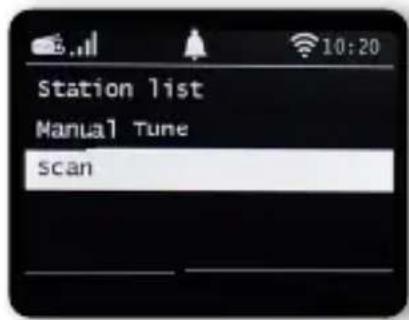

Switch to the automatic station search line and
confirm by pressing the OK button on the remote control or by pressing the knob on the device.
The radio will now automatically search for all receivable digital radio stations and then save them in a station list. You can access these as described in Chapter 8.1.1.
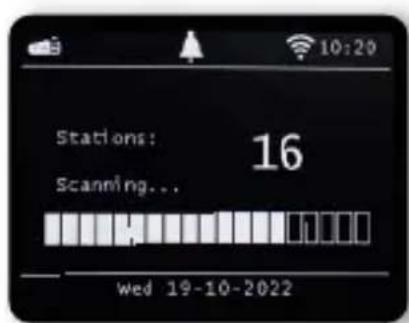
The number on the right shows the number of radio stations found. After a successful search, the radio starts playing the first station found.
8.1.3 DAB manual search
You can also search for DAB radio stations manually. You will need to know the broadcast frequency to do so. In this part of the menu, select the desired station frequency and press OK to confirm.
8.2 FM Radio
Press the MENU button on the remote control or on the device and use the buttons to select FM. In this menu you can find all relevant settings to receive radio stations via FM.
8.2.1. FM station search
When the DABMAN i560 CD is switched to FM mode for the first time, a station scan must be performed. An automatic and a manual search function are available for this.
Automatic FM search
After switching to FM, press the OK button.
The device starts the automatic station scan and saves all found channels. The device can store up to 20 FM radio stations.
8.2.2 FM radio operation
To access the stored radio stations, press the or button. Alternatively, you can also call up the first 5 stored stations using the station memory buttons on the device. If you want to change the assignment of the station memory buttons, press the station selection button 6 (see page 19) to perform a search for the next receivable station. If necessary, repeat this step until you have found the desired station. Then press the desired station selection button 1-4 (see page 19) for approx. 2 seconds. The station is now stored on this button.
8.3 Internet Radio
Use the arrow buttons to select Internet Radio in the main menu of the device and confirm the selection with the OK button on the remote control or by pressing the OK button on the device.
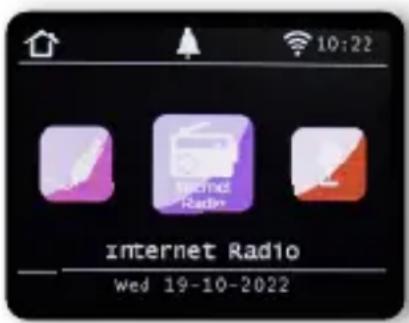
As soon as you have switched to internet radio mode, you'll be shown an overview.
8.3 Internet Radio

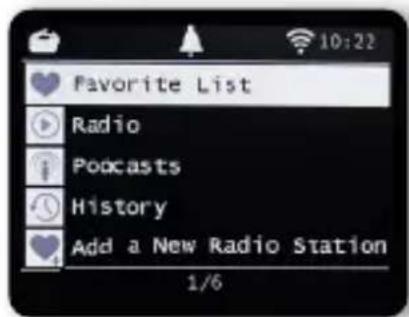
Various lists are available here.
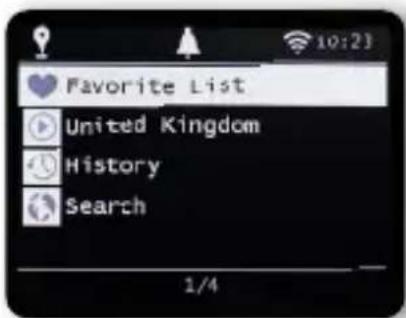
8.3.1 Selecting an internet radio station
Favourites list
This list displays all individually stored radio stations.
On how to save a radio station, please also consult Chapter 8.4.
Radio
Various radio programme lists are provided here.
Podcasts
Here you can choose from a number of radio podcasts.
Recent stations
This list shows the 40 most recent radio stations you have selected.
Search
You can use this function to search for a specific radio station.
8.3.2 Searching for an internet radio station
Select the Search line and confirm with the rotary knob on the device.
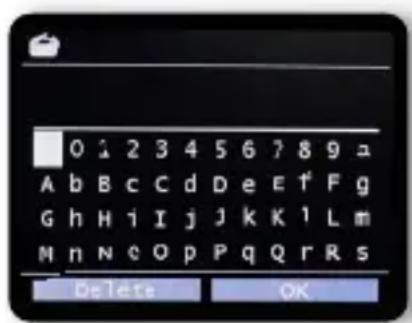
Enter the name of the radio station in the search field using the keyboard on the remote control. Use the buttons to do this.
Confirm the entry with OK. The radio will now search for all stations that match this entry. Use the buttons to choose a station and confirm by pressing the knob on the device.
8.3.3 Saving radio stations
You can store up to 4
radio stations on one station memory button. Select a radio station that you want to save and hold down the station memory button on the device on which you want to store the radio station for approx. 3 seconds.
The radio station will be saved.
You can now use this button to access the radio station.
8.3.4 Saving radio stations to your favourites list
Radio stations can be saved in a Favourites List, which can be quickly accessed with the remote control. You can save up to 10 favourite radio stations in this list.
8.3.4 Saving radio stations to your favourites list
Select a radio station that you want to save to the favourites to your favourites list.
Press the FAV+ button on the remote control.
Select a memory location number where you want to save the radio station. Hold the FAV+ button on the remote control for approx. 2 seconds. The radio station will be saved to the chosen position.
8.3.5 Local radio stations
To make it easier for you to find stations in your area in Internet radio mode, you can search for radio stations in your region in the device's menu. Use the buttons on the remote control or the knob on the device to select Local radio.
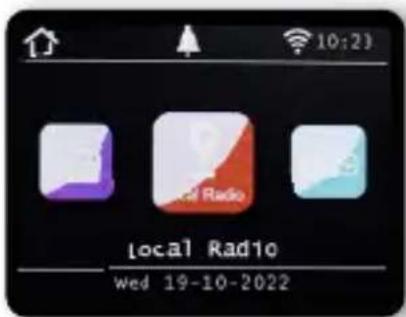
Under this menu item, there is a selection of different
radio stations is sorted according to regions, which can be called up more easily this way. You can use the buttons here to select your desired programme list. Confirm the entry with OK.
8.4. Changing the volume
Change the volume using the VOL+/VOL- buttons on the remote control or by using the knob on the device.
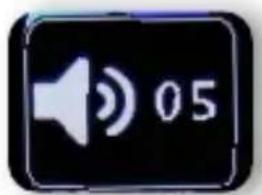

To mute the radio, press the Mute button on the remote control.
8.5. Switching operating mode
Press the MODE button on the remote control to switch between AUX, UPnP, local radio, DAB+ radio, FM radio, Cloud music, UPnP, AUX IN, multimedia, internet radio, CD player or Bluetooth operating modes
8.6 AUX IN

You can connect an external music playback device, such as an MP3 player, to the radio by connecting it to the 23 connector on the back of the device using a suitable cable and switching it on.
Press the MENU button on the remote control or on the device and use the buttons on the remote control or the knob on the device to select AUX in the menu. Confirm with OK.
Alternatively, you can switch to AUX mode by pressing the MODE button on the device repeatedly until the AUX mode is activated.
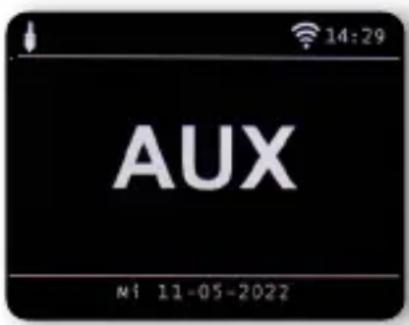
You can now play music from the external device. The control (track forward, back, stop, play) is done via the connected device.
The playback volume can be adjusted using the VOL+/VOL- buttons or the rotary control of the radio or via the external device.
8.7 UPnP
If you have connected the radio to a wireless network, you can also use the radio as a media player to play music files from connected devices in the network such as PCs or smartphones via UPnP
on the device. The devices must be integrated into the same home network for this, and the corresponding media content must be approved for sharing in the network.
To select UPnP, do the following:
Press the MENU button on the remote control or on
the device, and use the buttons on the remote control or the control knob on the device to select UPnP. Confirm with OK.
Select a track you want to play and confirm with OK.
You can play MP3 music files from a USB storage device.
To do so, insert a USB drive containing music files into the USB port 11 on the back.
Press the MENU button on the remote control or on
the device, and use the buttons on the remote control or the control knob on the device to select Multimedia. Confirm with OK.
Select a track you want to play and confirm using the knob on the device.

8.9 CD Player
The device has a CD drive that you can use to play both audio and MP3 data CDs. Press the Menu button on the remote control or on
Use the buttons or the control knob to select CD from the menu.
Insert a CD into the drive. The device will automatically load the CD. An overview of the audio tracks on the CD is displayed.
Use the buttons to select a track you want to play and confirm by pressing the dial or ENTER button on the remote control.
Use the button to skip to the next track.
Use the button to jump back one track. The pauses playback or resumes playback.
Press the EJECT button on the device to eject the CD from the drive.
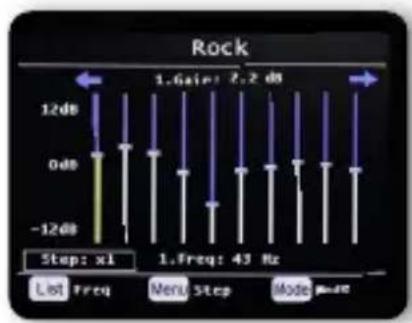
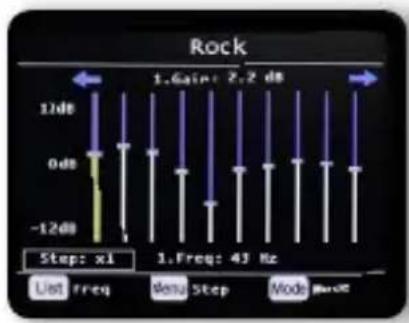
8.10 EQ (Equalizer)
In this section, you can select certain sound presets. In addition to several sound presets, you can also customise your radio's sound and save this setting under My EQ.
Use the buttons on the remote control or the rotary control on the unit to select the Equalizer menu item in the main menu and press the OK button on the remote control or confirm by pressing the rotary control on the device.
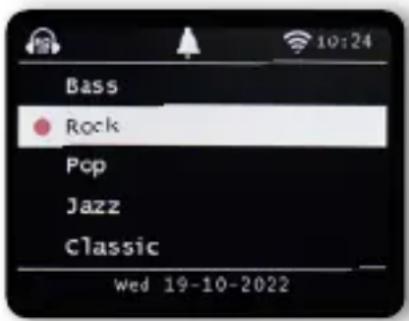
Select a sound preset using the buttons on the remote control or by using the rotary control on the device and confirm with OK on the remote control or by pressing the rotary control on the device.
Under My EQ profile you can change the radio's basic settings. Here, you can adjust the cut-off frequency for high tones (treble) and low tones (bass) to suit your taste.
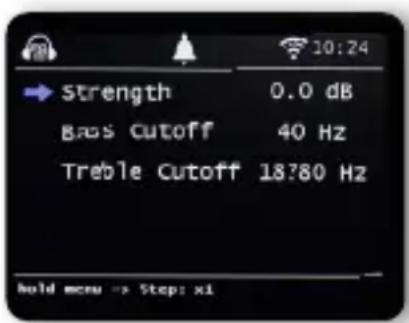
8.10 EQ (Equalizer)
Under EQ advanced settings, you can adjust various frequency ranges.

8.11. Weather
The device can display current weather information about your location.
To view the weather, select Weather in the radio's main menu then press OK to confirm.
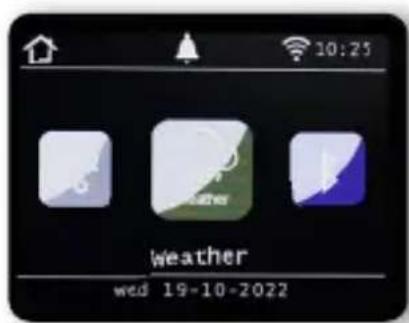
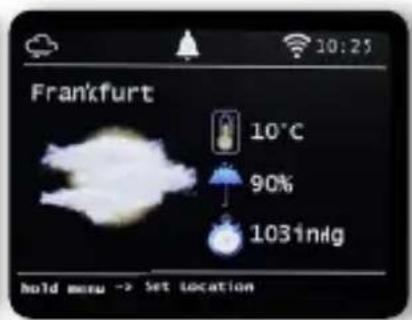
You can use the MENU button to change the location for the weather report. Enter the name of the city for which you want the latest weather information. If the device is connected to the Internet, you can view weather information on the device display.
8.11. Weather
Please note:
For the weather forecast, the device accesses an Internet server on which the weather information is stored.
Therefore, the weather data displayed may differ from the actual weather data at your location.

8.12. Recording radio broadcasts
You can use the device to
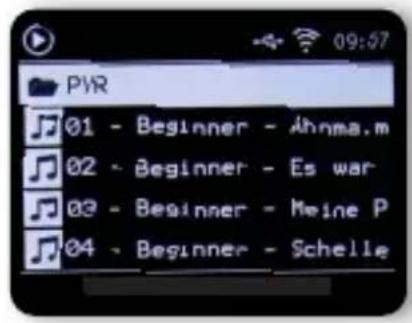
record FM DAB+ and internet radio programmes onto a connected USB data carrier.
The radio creates a folder on the connected USB data carrier in which all recordings are stored. The folder is named PVR. The files are saved in the audio format transmitted by the radio station.
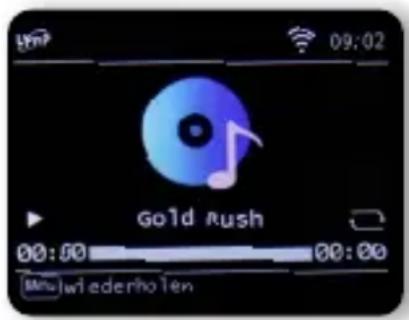
You can record a programme directly during operation
if you have connected a USB data carrier to the radio. Press the Record button on the remote control during an ongoing programme. A red recording icon will appear on the display.
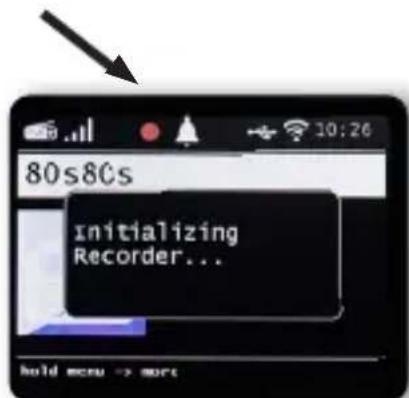
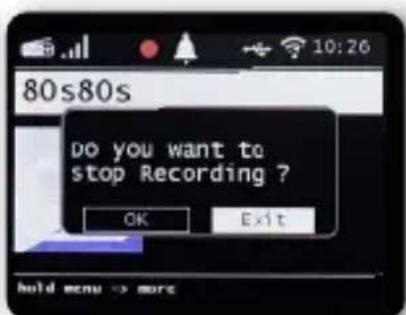
To stop recording, press the Stop button and confirm the request with OK.

8.12.1 Programming radio recordings
The radio, similar to a video or DVD recorder, can also be programmed with a timer recording to record radio broadcasts when you are not at home, for example. Hold the Record button on the device or on the remote control for more than 2 seconds.
Alternatively, select the Recording Timer item in the System menu.
Name: Select the radio programme that is to be recorded here.
Date: Enter the date on which the timer shall start.
Start time: Highlight the Start time line, press the OK
button and enter the time here using the arrow buttons on

the remote control or via the rotary control to which the timer is to be activated.
Duration: Set the recording time in hours and minutes here.
Mode: Determine whether the recording should occur only once or daily.
8.13 Radio as a Bluetooth receiver
The radio can be connected to an external device [e.g. smartphone, tablet] via Bluetooth.
The Bluetooth connection can then be used to play media (locally stored MP3 files, streamed music, online radio) from external devices via the radio. Select Bluetooth in the menu.
A Bluetooth connection must be established before you can send audio files to the radio via Bluetooth.
8.13.1 Establish a Bluetooth connection
Press the MENU button on the remote control or on the device, and select Bluetooth mode. If you have selected Bluetooth mode on the radio, it is in pairing mode and searches for Bluetooth devices to connect. Now activate the Bluetooth function on the external device to be connected (for further details, please refer to the operating manual for this device). Search for "DABMAN i560 CD" in the list of available devices, select it and establish the connection.
Once you have established a Bluetooth connection as described in chapter 8.15.1, you can play music files stored on the external device via the radio.
To do so, proceed as follows: Start music playback on the external device by activating the relevant playback function
[MP3 player etc.] or choosing a title from the relevant playback list then beginning playback.

8.13.3 Radio as Bluetooth Transmitter
The radio can also be used as a Bluetooth transmitter.
This lets you transfer audio signals from the radio via Bluetooth to suitable Bluetooth receiving devices.
[e.g. Bluetooth headphones.]
To begin Bluetooth transmission, proceed as follows:
Ensure that the Bluetooth receiver is activated and ready.
Press and hold the MENU button on the device or
remote control and select Bluetooth mode.
In Bluetooth mode, hold down the MENU button for around 2 seconds.
Switch to the Bluetooth Role line.
The radio will now search for Bluetooth receiving devices.
Select your desired receiving device from the Bluetooth list.
Confirm by pressing the dial.
This will create a Bluetooth connection with the receiving device.

NOTE!
Once a Bluetooth connection has been established with the receiving device, the radio's speakers will be deactivated. The sound can only be heard via the Bluetooth receiver in this setting.
There is a MODE button on the device itself and on the remote control, the function of which can be changed.
To adjust the function of this button to suit your needs, please proceed as follows:
Press the MENU button on the remote control or on the unit and select the System menu item with the buttons or the rotary control.
Use the OK button on the remote control or the knob on the device to confirm your selection.
Select the item Button assignment and confirm with OK.
Confirm MODE and select the function you want the MODE button to activate.
Leave the menu by pressing the Back button.
8.15. Cloud music
With the DABMAN i560 CD, you can listen to FM, Internet and DAB radio stations, as well as a wide range of Internet music streaming services. The radio supports the following streaming providers:
Amazon Music, Deezer Napster, Palco MP3, Qobuz, Soundmachine, TIDAL HIGHRESAUDIO*
[ as of printing, subject to change at any time.]
If you would like to use the services of one or more streaming services, you will need to register with the relevant provider.
You can find out more about the registration process on the relevant provider's website. Select your music streaming provider in the main menu and press OK to confirm.

8. FUNCTIONS
8.15. Cloud music
Enter your account access details into the relevant form. If you have entered everything correctly, you should now have direct access to the music service.

8.16. Operation via the app

You can use the app to operate compatible internet radio services via your tablet or smartphone.
The app is suitable for iOS and Android operating systems.
Please note:
This description corresponds to the app as at 5/2022. In the course of software updates of the app, functions or the appearance may change. To do this, download the application from the Google Play Store®
for Android ® operating systems, or via the iTunes Store for iOS ® operating systems and install the app on your smartphone.


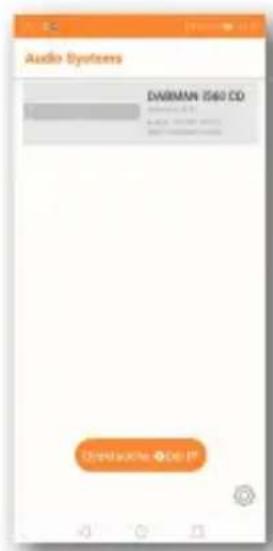
8.16. Operation via the app

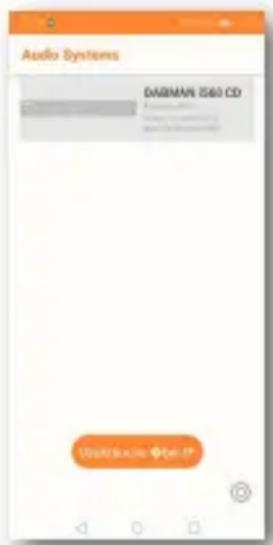
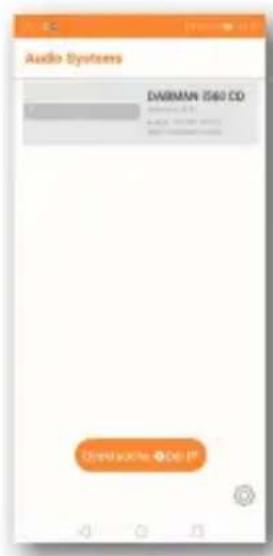
Start the app.
When starting the app, it automatically detects the radio if it is registered in the same network. The main menu of the app is structured the same way as the radio menu.
The icons used in the app are comparable to the icons in the radio menu.
Tap on the discovered radio to start the app.
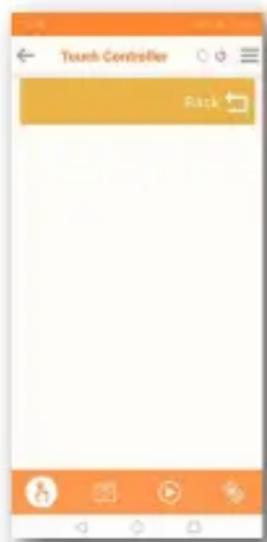
Touch Controller
You can use the touch controller to swipe right or left, up or down to control various functions, e.g. volume or programme selection.
8.16. Operation via the app
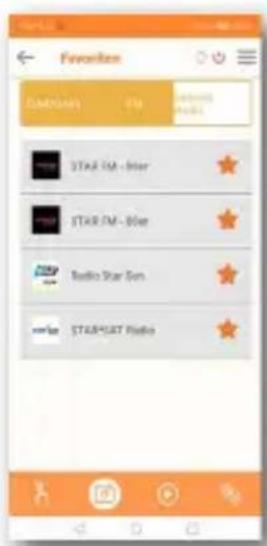
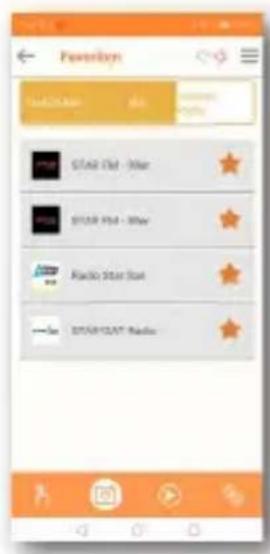
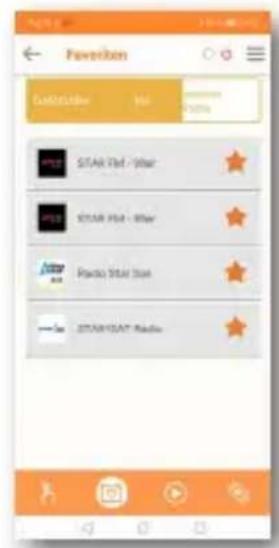
Accessing favourite stations
You can use this function to view your saved favourite radio stations. Select a favourite radio station from the list.
Favourite radio stations
can be saved to the radio as described in the radio's operating instructions.

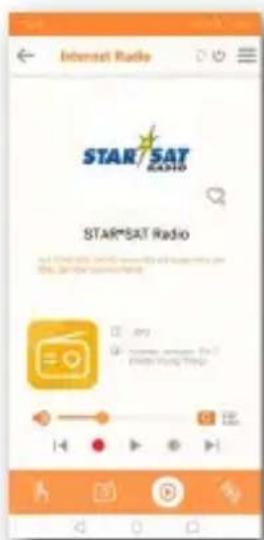
Playback function
Use this button to view current playback. Here, you can select internet, DAB + or FM radio stations. You can also change the volume here.
Here, you can begin recording to a USB data carrier. As well as the current radio station, any additional information provided by the radio station about the current programme will also be displayed.
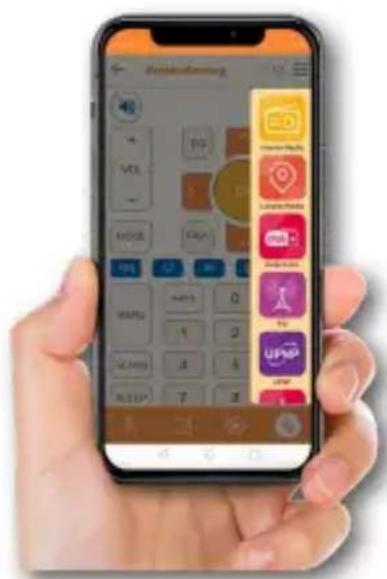
8.16. Operation via the app

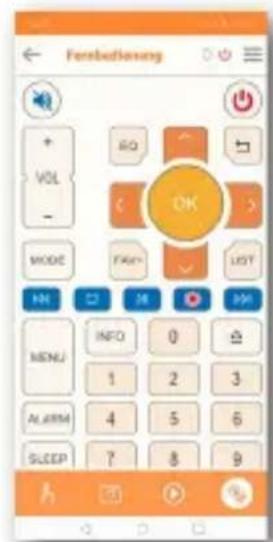
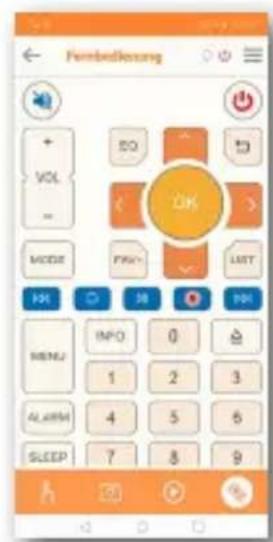
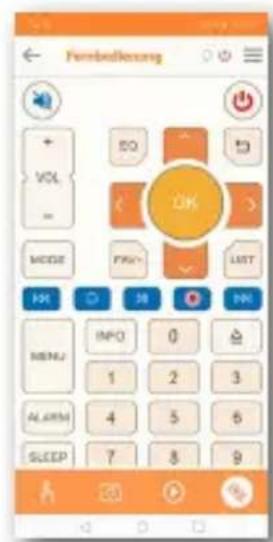
Remote control
The remote control function lets you control the radio using a virtual remote control.
To do this, tap the remote control symbol at the bottom.
You can now control all radio functions with the help of this virtual remote control.
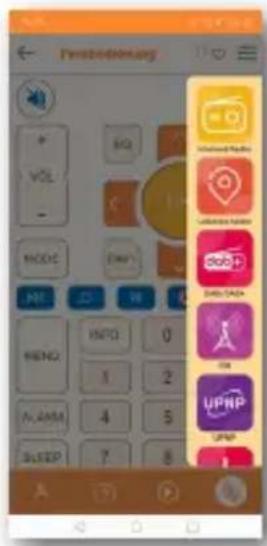
Switch operating mode
You can use this field to switch between the radio's various operating modes.
The choice of operating modes depends on the functions offered by the connected radio.
SYMPTOM POSSIBLE CAUSE & REMEDY
Display not on, radio does not react
Connect to power using the power cable provided.
Remote control does not work
Battery dead or incorrectly inserted. Please check that the batteries are inserted in the correct direction. Point the remote control at the device.
DAB+reception interrupted
No stations available Perform a search. Antenna not fully extended. Change the radio's location (e.g.nearer to a window), perform another search.
Radio programmes glitching
Change the location of the radio.
FM reception poor
Antenna not fully extended
Extend the telescopic antenna to its full length. Change the location of the radio

SYMPTOM POSSIBLE CAUSE & REMEDY
AUX playback not working
DABMAN i560 CD is in the wrong mode
Switch to 'AUX' mode
Cable connection faulty Check the cable connection between
DABMAN i560 CD and external device.
Poor audio quality when playing music
File with low bit rate. Check the audio file. Tip: For MP3 files, the bit rate should be 192Kbit/s or higher.
Volume too low Check the volume setting on the i560 CD.
Check the volume setting on the paired device from which you are playing music.
Network connection cannot be established
Check the WIFI functioning.
Activate the DHCP function of the router to which the radio is to be registered.
A firewall may be active in the network.
SYMPTOM POSSIBLE CAUSE & REMEDY
WiFi connection cannot be established
Check the availability of WiFi networks. Reduce the distance between the WiFi router and the radio.
Make sure that you are using the correct WEP/WPA password when connecting to a WiFi router.
No Internet radio stations available
Check the access points of the network and check if there is still a network connection.
If necessary, switch to another Internet radio station to check whether the network connection is still working.
The radio station is currently unavailable. The station's link has been changed or it is no longer transmitting.
USB data carrier not recognised
Make sure that the USB storage device is FAT32 formatted.
No sound is coming from the device. All other functions OK
Headphones are plugged into the device. Unplug the headphones.

SYMPTOM POSSIBLE CAUSE & REMEDY
The CD does not play or jumps during playback.
The unit is not in CD mode. Wrong CD inserted.
The CD compartment is not closed. Close the CD compartment.
The CD is inserted incorrectly. Insert a CD with the labelled side facing up.
The CD is dirty or defective. Clean the CD, use another CD. Moisture has settled in the CD compartment.
Remove the CD and leave the CD compartment open for approx. 1 hour to dry.
There is interference.
A mobile phone or other device in the vicinity of the device is emitting interfering radio waves. Remove the mobile phone or device from the
environment of the DABMAN i560 CD.
When not in use, please unplug the power adapter from the socket, disconnect the power adapter cable from the radio and store the device in a dry place protected from dust. If the device is not in use for a longer period of time, the battery must be removed from the remote control.
11. TRADEMARK NOTICE
Google Play Store® and Android® are registered trademarks of Google Inc. iTunes Store is a service mark of Apple Inc.
iOS® is a registered trademark of Cisco in the US and other countries and is used under license.
Other product and company names mentioned herein are trademarks or registered trademarks of their respective owners.
12. DISPOSAL
12.1. Disposing of packaging
The packaging consists exclusively of materials that can be recycled. Please dispose of these properly.

12.2. Disposing of the device

The symbol on the right of a crossed out waste bin indicates that this device is subject to
Directive 2012 / 19 /EU. This directive specifies that this device may not be disposed of with normal
household waste at the end of its life but must be taken to especially equipped collection points, recycling centres or waste disposal facilities. This type of disposal is free of charge. Protect the environment and dispose of waste properly. Further information is available from your local waste collection company or your city or municipal office.
12.3. Disposing of batteries
Batteries may not be disposed of with household waste. The symbol on the right means that you as a consumer are required to separately dispose of all batteries and batterypacks.
Suitable collection bins are provided at specialist retailers and numerous public facilities.
Information on the disposal of old batteries can also be found via waste disposal companies, municipal and local authorities.
This type of disposal is free of charge. Protect the environment and dispose of waste properly. An additional chemical symbol Pb (lead) or Hg (mercury) under the crossed-out bin means that the battery contains more than 0.0005% mercury or 0.004% lead.

13. TECHNICAL DATA
| INTERNET RADIO |
| Chip set | Nicent
Approx. 10,000 internet radio stations available
MP3 (bit rate up to 320 Kbits/s, sampling rate up to 48 KHz)
AAC/AAC+ (bit rate up to 320 Kbits/s, sample rate up to 48 KHz)
WMA (bit rate up to 320 Kbits/s, sampling rate up to 48 KHz)
UPnP/ DLNA compatible
IEEE 802.11b/g
WPA/WPA2/WEP (64/128 bit button) |
| Audio CODECS |
| WiFi |
| DAB/DAB+/FM | |
| DAB | Sensitivity up to -100dBm |
| DAB+ | Sensitivity up to -101dBm |
| FM | Sensitivity up to -100dBm |
| Decoding | |
| Reception range | DAB Band III 174 MHz- 240 MHz
FM 74 MHz - 108.1 Mhz |

13. TECHNICAL DATA

NETWORK
Communication interfaces WiFi IEEE 802.11b/g/n wireless; Bluetooth (BT V5.0, Supports A2DP, AVRCP profiles)
Frequencies WIFI:2.400\~2.4835GHz;
WIFI/Bluetooth Bluetooth:2.4GHz-2.48GHz
Transmission power WiFi: <20dBm; Bluetooth: Max. 8dBm
WIFI Encryption WEP, WPA, WPA2 (PSK), WPS
13. TECHNICAL DATA
CONNECTIONS
Front
USB socket (USB 2.0) Max. 1 A charging current
3.5mm jack headphone jack
Back
1 x Analogue audio output RCA L+R + subwoofer
2 x Analogue audio input cinch L+R
1 x Coaxial digital electrical audio output
1 x Optical digital audio output
1 x Coaxial digital electrical audio input
1 x Optical digital audio input#
1 x DC input for power supply (5.5 mm)
1 x Speaker output stereo R/L
1 x DAB+/FM antenna input
1 x WiFi antenna input
1x Bluetooth antenna input
1x HDMI ARC input
1x RJ45 LAN connection

13. TECHNICAL DATA

POWER SUPPLY
Manufacturer SHENZHEN SOY TECHNOLOGY CO., LTD.
Model number SOY-1800360-327-II-A
Input voltage AC 100 - 240 V
Input frequency 50Hz-60Hz
Output voltage 18V DC
Output power 3.6A
Output capacity 64.8W
Average operational efficiency
in operation 88%
Power consumption at no load ≤ 0.21W
CURRENT CONSUMPTION
Operation Max. W
Standby <1W
SIZE AND WEIGHT
Dimensions WxHxD [mm] 430 x 80 x 355
Weight 3.9 kg
REMOTE CONTROL BATTERY
Type CR 2025
14. SERVICE AND SUPPORT
Dear customer,
Thank you for choosing one of our products. Our product meets legal requirements and has been manufactured under constant quality control. The technical data corresponds to the current status at the time of printing. Changes are reserved.
The warranty period for the DABMAN i560 CD is as stipulated by law at the time of purchase. We also offer a HOTLINE telephone service with professional support.
Professional service specialists are available to answer your questions. Here, you can ask any questions you may have about IMPERIAL products and get troubleshooting suggestions.
Our technicians are available from Monday to Friday between 8 am and 4:45 pm at the following phone number:
02676/9520101
or via email: service@telestar.de
If the Service Hotline is unable to assist you, please send your
DABMAN i560 CD to the following address, preferably in its original
packaging but packaged for safe transport:
TELESTAR-DIGITALGmbH
Service Centre
Am Weiher 14 [industrial area]
56766 Ulmen
CE
E
Your device bears the CE mark and complies with all required
EU standards. Hereby TELESTAR DIGITAL GmbH declares that the device IMPERIAL DABMAN i560 CD is in compliance with the essential requirements and other relevant provisions
of EMC Directive 2014/30/EU of RoHS Directive 2011/65/EC, Low Voltage Directive 2006/95/EC, R&TTE Directive 1999/5/EC and ErP Directive 1275/2008/EC.
The Declaration of Conformity for this product is available at:
All technical data and functions described in
these operating instructions are correct at the time of printing and are subject to change without prior notice.
We assume no liability for misprints or errors.
Copying and reproduction only permitted with the express permission of TELESTAR-DIGITAL GmbH. © TELESTAR 2022
NOTES
NOTES
imperial
DABMAN i560 CD
Cher client, chere clientele,
Assistance technique
TELESTAR Service Center,
Am Weiher 14,
56766 Ulmen
Courriel:service@telestar.de
QUANTITÉ EXPLICATION
Touchememoirestation1/Play/Pause
8.2 Mode radio FM (OUC)
Acceder aux stations favorites
Chere cliente, cher client!
A Anything's gonna be the best idea to do.

Con这对于 the radio, this is a good idea. In fact, it is also true for the radio in Italy. The radio in Italy is not so easy to find and use, but it is possible to search for it by using the radio's electronic index.
In这对于 me, this is a good idea.
In这对于 you to be able to use the menu of this site you can find a great deal of information about the various options available for your home , such as
8.16. Controllo a distance tramite App

8.16. Controllo a distance tramite App

8.16. Controllo a distance tramite App
8.16. Controllo a distance tramite App

Telecomando
SINTOMO POSSIBLE CAUSA E RIMEDIO
SINTOMO POSSIBLE CAUSA E RIMEDIO
SINTOMO POSSIBLE CAUSA E RIMEDIO
SINTOMO POSSIBLE CAUSA E RIMEDIO
Bluetooth (BT V5.0, Supports A2DP, AVRCP profiles)
Frequenze WiFi:2.400-2.4835GHz;
W-LAN/Bluetooth Bluetooth:2.4GHz-2.48GHz
Codifica WEP, WPA, WPA2 [PSK], WPS
INGRESSI
Lato frontale
Lato posteriore
8.16. Bediening via app


Met de applicatie kunt uawbpatibele internetradio bedieren via tablet of smartphone.
8.16. Bediening via app
NL
Start de applicatie.
8.16. Bediening via app
8.16. Bediening via app
NL
Afstandsbediening
Bluetooth (BT V5.0, Supports A2DP, AVRCP profiles)
Frequencies Wifi: 2.400 - 2.4835 GHz;
W-LAN/Bluetooth Bluetooth:2,4GHz-2,48GHz
Zendvermogen Wifi: < 20 dBm;
Bluetooth: Max. 8 dBm
W-LAN-
versleuteling WEP, WPA, WPA2 [PSK], WPS
of via mail op: service@telestar.de