Start 16 - Microphone ANT - Free user manual and instructions
Find the device manual for free Start 16 ANT in PDF.

| Technical Features | Condenser microphone, cardioid directionality, frequency response from 20 Hz to 20 kHz, sensitivity of -38 dB. |
|---|---|
| Usage | Ideal for vocal recording, podcasts, and live streaming sessions. |
| Maintenance and Repair | Regularly clean the grille with a soft cloth, avoid exposure to excessive moisture. |
| Safety | Do not use near heat sources or water, avoid physical shocks. |
| General Information | Compatible with most audio interfaces and recorders, phantom power required. |
Frequently Asked Questions - Start 16 ANT
User questions about Start 16 ANT
0 question about this device. Answer the ones you know or ask your own.
Ask a new question about this device
Download the instructions for your Microphone in PDF format for free! Find your manual Start 16 - ANT and take your electronic device back in hand. On this page are published all the documents necessary for the use of your device. Start 16 by ANT.
USER MANUAL Start 16 ANT
1 Introduction 4
2 Description 4
2.1 Receiver 5
2.2 | Handheld microphone 6
2.3 | Beltpack transmitter 7
3 Tips to better use the system 8
4 Troubleshooting 9
5 Technical specifications 10
6 Notes 52
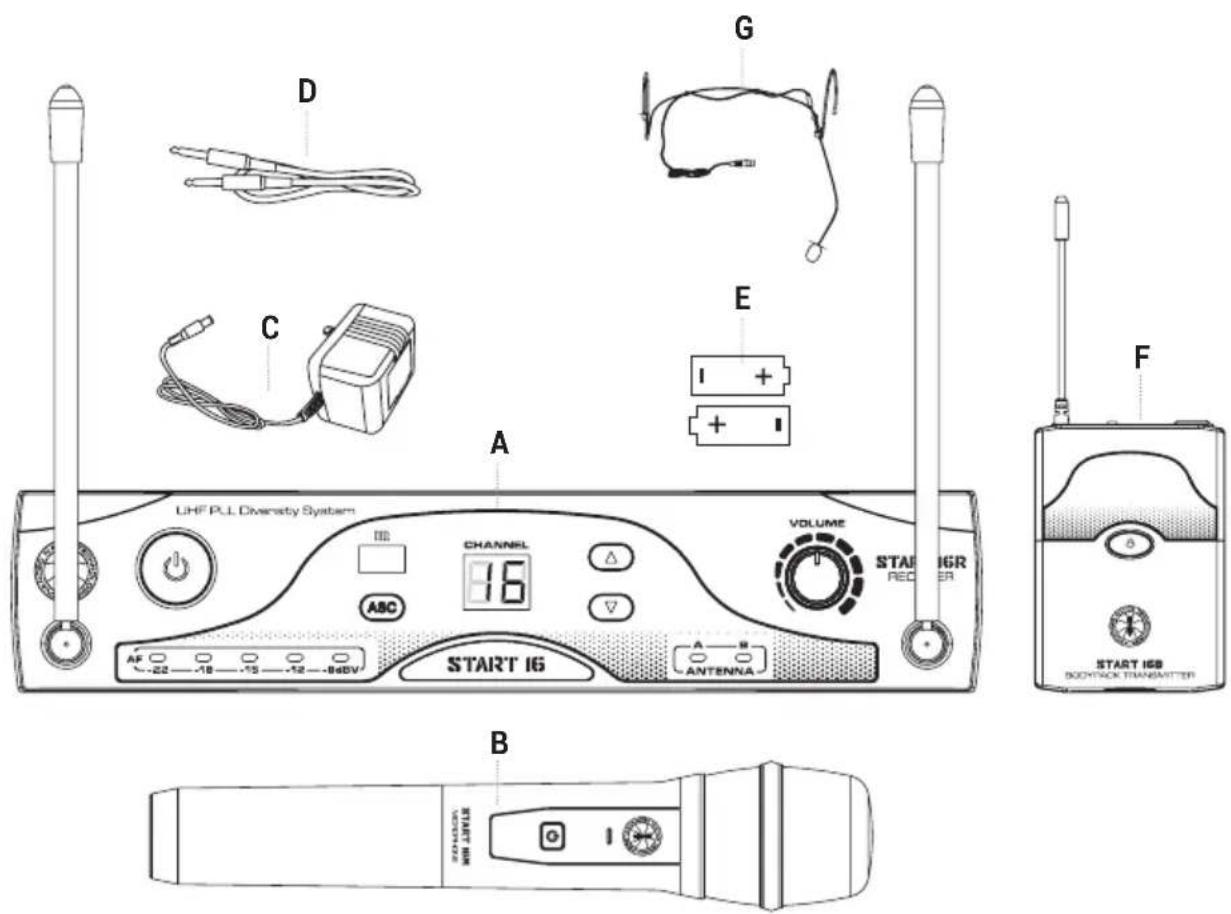
PACKAGE CONTENT
START 16HDM
Version with Handheld mic
- 1x START 16R receiver with built-in antennas - A
- 1x START 16Mw handheld dynamic microphone - B
- 1x External power adapter - C
- 1x Unbalanced 6,35mm (1/4") jack audio cable - D
- 2x 1.5 Volts AA batteries - E
- 1x User manual - Section 1
- 1x User manual - Section 2
START 16 BHS
Version with Beltpack Transmitter and Headset mic
- 1x START 16R receiver with built-in antennas - A
- 1x START 16B beltpack transmitter with built-in antenna - F
- 1x PH-90 ergonomic headset microphone - G
- 1x External power adapter - C
- 1x Unbalanced 6,35mm (1/4") jack audio cable - D
- 2x 1.5 Volts AA batteries - E
- 1x User manual - Section 1
- 1x User manual - Section 2
The warnings in this manual must be observed together with the "User manual - Section 2".
1 | INTRODUCTION
Thank you for choosing a A.N.T - Advanced Native Technologies - product!
In our START 16 "PLL Diversity" wireless systems we have put our passion and our technological background gained over the years, to offer products that meet your needs, maintaining the quality over time.
START 16 wireless systems operate in UHF band with 16 channels (frequencies). You may choose the operating frequency via buttons or via infrared using ASC feature.
Both versions of START 16R receivers adopt Diversity technology. They are equipped with two discrete antennas A and B, which are used to select at any moment the best radio signal. The antennas are fixed on the front panel of the receiver, but may be placed in an horizontal position by means of a junction present at their base.
Please, dedicate some minutes to read this instruction manual in order to quickly achieve the best performances from this product.
For safety precautions, warranty and disposal, please refer to attached Section 2.
For further information about all A.N.T products catalog, please visit our website:
www.ant-sound.com
2 | DESCRIPTION
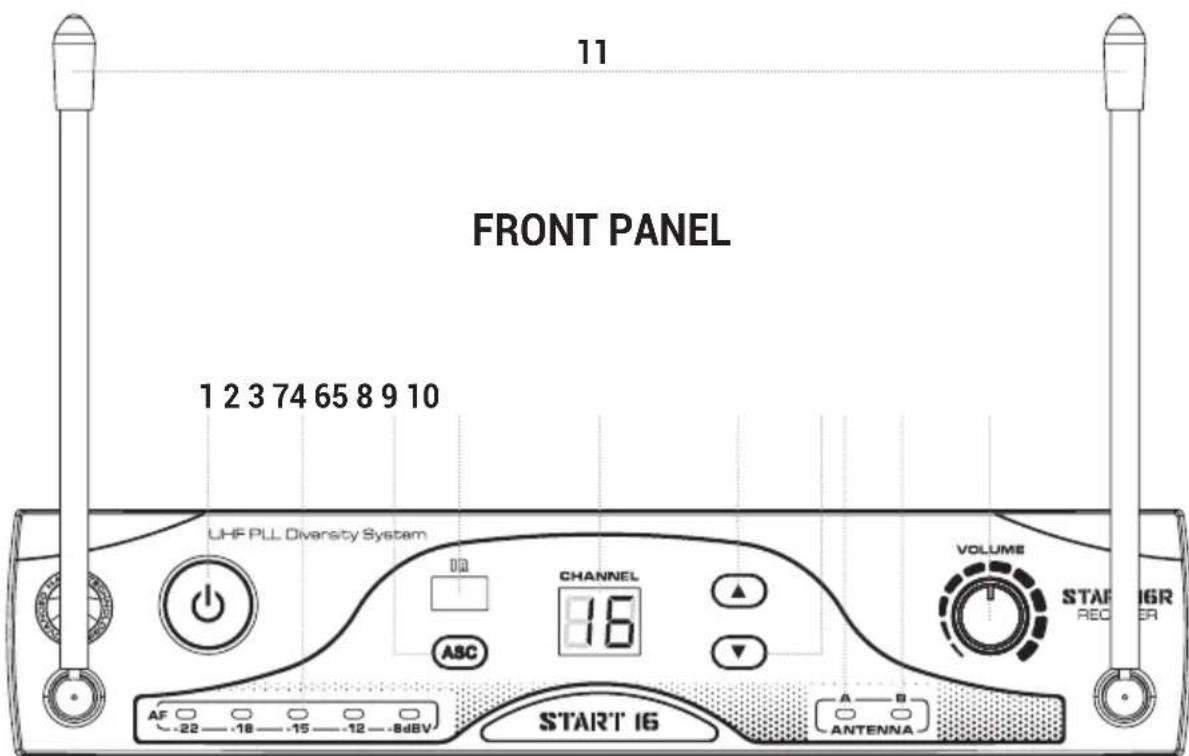
2.1 | RECEIVER - START 16R
1 POWER
Press this button on receiver front panel for 1" to turn ON/OFF the unit.
2 AF LEVEL METER
It shows the audio signal level. Avoid that the red LED (the rightmost one) remains lit continuously.
3 ASC
Press this button to achieve automatic channel (frequency) synchronization via infrared.
4 IR WINDOW IR
It allows the synchronization of the channel (frequency) with the transmitter. After pressing the ASC button, place the handheld microphone or beltpack transmitter close to this window and wait for the selected channel to stop flashing on the display. After the synchronization, the receiver's display is lit steadily on the selected channel (frequency).
5 DISPLAY
It shows the number of the activated channel.
6 UP
Press this button to scroll and select channel number in ascending mode from 01 to 16.
7DOWN
Press this button to scroll and select channel number in descending mode from 16 to 01.
8 ANTENNA A
This LED turns on automatically when the unit is receiving a better signal from the antenna A.
9 ANTENNA B
This LED turns on automatically when the unit is receiving a better signal from the antenna B.
10 VOLUME
It adjusts the output audio level.
11 ANTENNAS
For the best signal reception, please place the antennas in a vertical position.
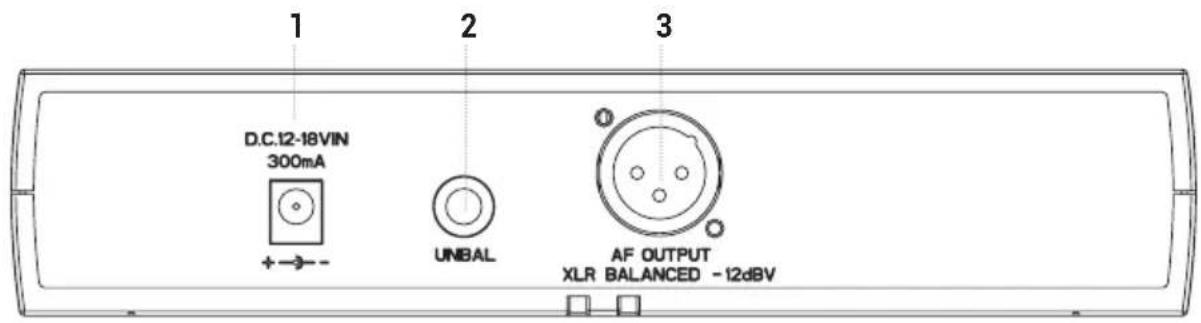
REAR PANEL
1 "DC 12-18V" POWER SOCKET
Connect to this socket only the supplied power supply.
2 UNBAL
Unbalanced audio output with 6,35mm (1/4") jack. Connect this output into an unbalanced input of your mixer.
3 AF OUTPUT
Balanced audio output with XLR-M socket. Connect this output into a balanced input of your mixer.
2.2 | HANDHELD WIRELESS MICROPHONE - START 16M

1 GRILLE
It protects the microphone capsule from impacts and/or accidental falls and it reduces the noise of the plosive.
2 POWER ON AND BATTERY STATUS INDICATOR
GREEN: Transmitter activated (ON), charged batteries.
RED: Immediately replace the batteries.
WARNING: battery life is about 8 hours, but it may vary according to the usage conditions.
3 ON/OFF①
Press this button for 3'' to turn on or off the wireless handheld microphone.
4 BATTERIES COMPARTMENT
To access the battery compartment unscrew the lid counterclockwise, and screw the lid clockwise to close it. Remove the batteries from the receiver when not in use for extended periods.
5 IR WINDOW IR
It allows the synchronization of the channel (frequency) with the receiver. After pressing the ASC button, place the bottom of the wireless microphone close to the IR window of START 16R receiver and wait for the selected channel to stop flashing on the handheld display. After the synchronization, the receiver's display is lit steadily on the selected channel (frequency).
2.3 BELTPACK TRANSMITTER - START 16B
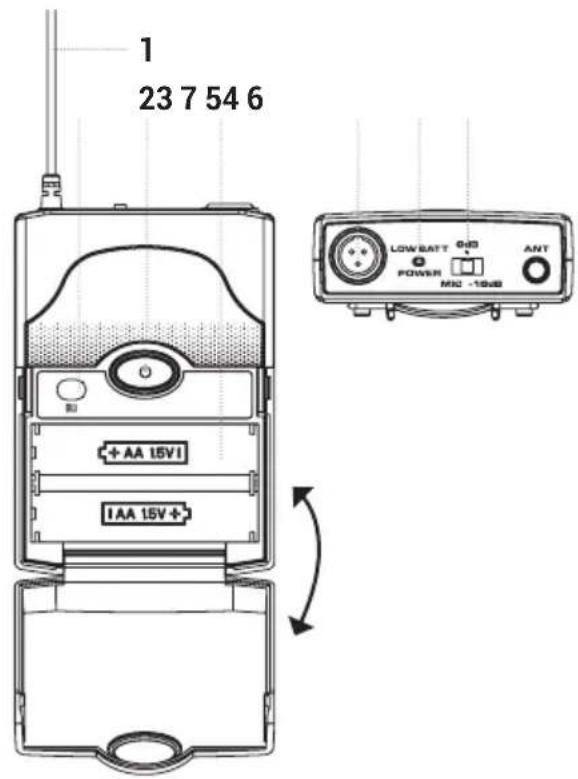
1 ANTENNA
It allows the transmission of the signal.
2 ON/OFF
Press this button for 3" to turn ON or OFF the beltpack transmitter.
3 IR WINDOWIR
It allows the synchronization of the channel (frequency) with the receiver.
After pressing the ASC button, place the beltpack transmitter close to the IR window of START 16R receiver and wait for the selected channel to stop flashing on the handset display. After
the synchronization, the receiver's display is lit steadily on the selected channel (frequency).
4 MINI XLR-M INPUT
Connected to this input the supplied PH-90 Headset or the signal of other sound sources.
5 POWER ON AND BATTERY STATUS INDICATOR
GREEN: Transmitter activated (ON), charged batteries.
RED: Immediately replace the batteries.
6 GAIN SELECTOR
There are three different gain settings:
Mic: for supplied headset microphone and other microphones
0 dB: low output level instruments
-10dB: high output level instruments
7 BATTERIES COMPARTMENT
To replace the batteries, lightly press on the sides of the cover and lift forward. Take out the old batteries, and insert two new batteries (respecting the compartment icons) then close the lid. Remove the batteries from the receiver when not in use for extended periods.
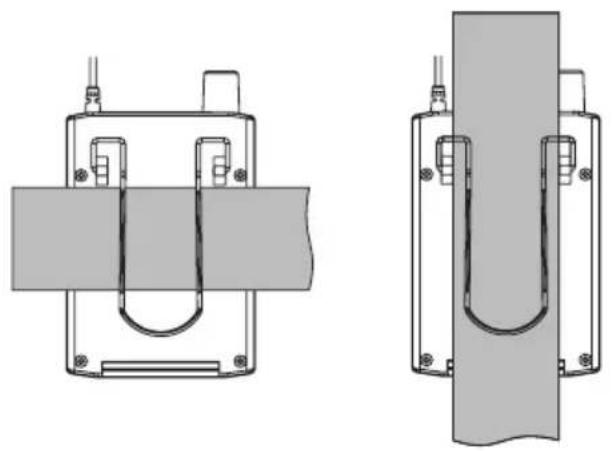
WEARING THE BELTPACK RECEIVER:
Clip the receiver to a belt or to the shoulder strap of your guitar. For better fastening reliability it's preferable to secure it as shown in the figure, then fasten it in a way that the belt is tight from the clip.
3 | TIPS FOR BETTER USE OF THE SYSTEM
- Aim the transmitter to the receiver to achieve a "direct visual contact" between devices, without any interposed obstacle.
-
Avoid placing the receiver near metal objects/surfaces or close to digital equipment (CD players, computers, etc.).
-
Place the receiver in such a way that is far from a wall and that is at least 1 meter (about 3 feet) above the floor.
- Cell phones, two-way radio equipment or similar devices may disturb the radio transmission between the transmitter and the receiver, so they should not be used close to the transmission system.
4 | TROUBLESHOOTING
| PROBLEM LEDs SOLUTION | ||
| No sound or very low sound level. | Receiver ON/OFF LED turned off. | Make sure the unit is properly connected. |
| Power LED turned off. | Make sure the power supply is properly connected to the receiver. | |
| Receiver RF LED turned on. | Raise the volume. Raise gain on transmitter. Check the connections between receiver and amplifier or mixer. | |
| Receiver RF LED turned on. Transmitter LED turned on. | Don't place the receiver close to metallic objects. Check that the transmission space ("visual contact") between transmitter and receiver is free. Approached the transmitter to the receiver. Make sure the transmitter and receiver share the same frequency. | |
| Batteries status LED is red. Replace batteries. | ||
| Distortion or unwanted interferences. | Receiver RF LED turned on. | Remove possible sources of interference such as CD players, computers, digital broadcast sources, etc. |
| Increasing distortions. | Batteries status LED is red. | Replace batteries. |
| Great intensity difference when the same source is via cable, or in case of connection with other guitars or microphones. | Set properly the transmitter gain selector and the receiver volume. | |
5 | TECHNICAL SPECIFICATIONS
| RECEIVER - START 16R | |
| Type Diversity | |
| Modulation FM | |
| Available frequency bands 823-832MHz (B6) / 863-865MHz (B7) | |
| Channels 16 | |
| Antennas x 2, adjustable and fixed on front panel | |
| Frequency response 60Hz - 15.000Hz (±3dB) | |
| Transmission optimisation Pilot tone | |
| THD <1% | |
| Audio outputs Balanced XLR, unbalanced 6,35mm (1/4") jack | |
| Balanced output level + 10dBu | |
| Controls Power, channel up, channel down, ASC, volume | |
| Indicators Channel number, antenna A/B, 5 LEDs level | |
| Dimensions (W x H x D) 212 x 44 x 115 mm (8.34" x 4.52" x 1.73") | |
| Weight 400 g (0.4 oz.) | |
| HANDHELD MICROPHONE-START 16M | |
| Modulation FM | |
| Available frequency bands 823-832MHz (B6) / 863-865MHz (B7) | |
| Channels 16 | |
| Type Dynamic | |
| Polarity | Cardioid |
| Frequency response 60Hz - 15.000Hz (±3dB) | |
| Output power | 5.19mW |
| Controls ON/OFF | |
| Indicators Power and battery status | |
| Power supply | 2 AA 1.5 Volts batteries |
| Operating time | >10h with alkaline batteries |
| Length 254 mm (10") | |
| Max diameter | 52.5 mm (2.06") |
| Weight 250 g (0.25 oz) | |
| BELPACK TRANSMITTER - START 16B |
| Modulation FM |
| Available frequency bands 823-832MHz (B6) / 863-865MHz (B7) |
| Channels 16 |
| Input DC powered Mini-XLR for PH-90 Headset |
| Frequency response 60Hz - 15.000Hz (±3dB) |
| Output power 5.19mW |
| Controls Gain (3 steps), ON / Standby / OFF |
| Indicators Power and battery status |
| Power supply 2 AA 1.5 Volts batteries |
| Operating time >10h with alkaline batteries |
| Dimensions (W x H x D) 64 x 90 x 23 mm (2.51" x 0.91" x 3.54") |
| Weight 80 g (0.08 oz) |
INDICE
4 INGRESSO MINI XLR-M
1 STROMVERSORGUNGSBUCHSE ,DC 12-18V"
ENG The information contained in this manual have been carefully drawn up and checked. However no responsibility will be assumed for any incorrectness. This manual cannot cover all the possible contingencies which may arise during the product installation and use. Should further information be desired, please contact us or our local distributor. A.E.B. Industriale Srl can not be considered responsible for damages which may be caused to people and things when using this product. Specifications and features are subject to change without prior notice.
The batteries supplied with the system can be recycled. Please dispose of them as special waste or return them to your specialist dealer. In order to protect the environment, only dispose of exhausted batteries.