Cocoon 115 - Phone TOPCOM - Free user manual and instructions
Find the device manual for free Cocoon 115 TOPCOM in PDF.

| Technical Features | DECT cordless phone, LCD display, 10 hours talk time, 300 meters outdoor range. |
|---|---|
| Usage | Ideal for home use, easy to set up and use, built-in answering machine features. |
| Maintenance and Repair | Regularly clean with a soft cloth, replace batteries if needed, consult the manual for repairs. |
| Security | Keypad lock function, communication encryption to protect privacy. |
| General Information | Compatible with other DECT devices, 2-year warranty, technical support available. |
Frequently Asked Questions - Cocoon 115 TOPCOM
User questions about Cocoon 115 TOPCOM
0 question about this device. Answer the ones you know or ask your own.
Ask a new question about this device
Download the instructions for your Phone in PDF format for free! Find your manual Cocoon 115 - TOPCOM and take your electronic device back in hand. On this page are published all the documents necessary for the use of your device. Cocoon 115 by TOPCOM.
USER MANUAL Cocoon 115 TOPCOM
natural_image
Black-and-white photo of a Torion 758 mobile phone with a digital display and keypad (no visible text or symbols on the device body)USER GUIDE
HANDLEIDING
MODE D'EMPLOI
BEDIENUNGSANLEITUNG
CE
!! Important !!
To use ‘Caller ID’ (display caller), this service has to be activated on your phone line. Normally you need a separate subscription from your telephone company to activate this function. If you don’t have the Caller ID function on your phone line, the incoming telephone numbers will NOT be shown on the display of your telephone.
!! Belangrijk !!
GB The features described in this manual are published with reservation to modifications.
5.1.2 Call setup with dial preparation 7
5.2 INCOMING CALLS 7
5.3 LAST NUMBER REDIAL 7
5.4 PROGRAMMING MEMORY NUMBERS 7
5.5 CALLING A MEMORY NUMBER 7
5.6 MUTE FUNCTION 8
5.7 SETTING THE VOLUME 8
5.8 PAGING
5.9 KEYPAD LOCK 8
5.10 OUT OF RANGE WARNING 8
5.11 FLASH BUTTON (R) 8
5.11.1 Setting the Flash time 8
5.12 ACTIVATE/DEACTIVATE KEY TONES 9
5.13 SETTING THE RING MELODY 9
5.14 AUTOMATIC ANSWERING 9
5.15 DEFAULT SETTINGS (RESET) 9
5.16 SETTING THE PAUSE LENGTH 9
5.17 15 MINUTES CONVERSATION TIMER 10
5.18 HEADSET CONNECTION 10
6 CALLER-ID FUNCTION (CLIP) 10
6.1 NEW CALLS 10
6.2 CONSULTING THE CALL LIST 10
6.3 CALLING A NUMBER FROM THE CALL LIST 10
6.4 ERASING A NUMBER FROM THE CALL LIST 10
6.5 COPY FROM CALL LIST TO MEMORY 11
7 W WARRANTY 11
8 T ROUBLESHOOTING 11
9 TECHNICAL DATA 12
1 BUTTONS
1 Numerical buttons
2 L i ne button
3 Redial/Pause button /P
4 F lash button R
5 M emory button
6 Paging button (to retrieve the handset)
7 M u t e button
8 Set button
9 O N-hook button
10 Line/New call indication (LED)
11 Charge indicator (LED)
12 Power indicator (LED)
13 Call list button
14 Headset connection

text_image
14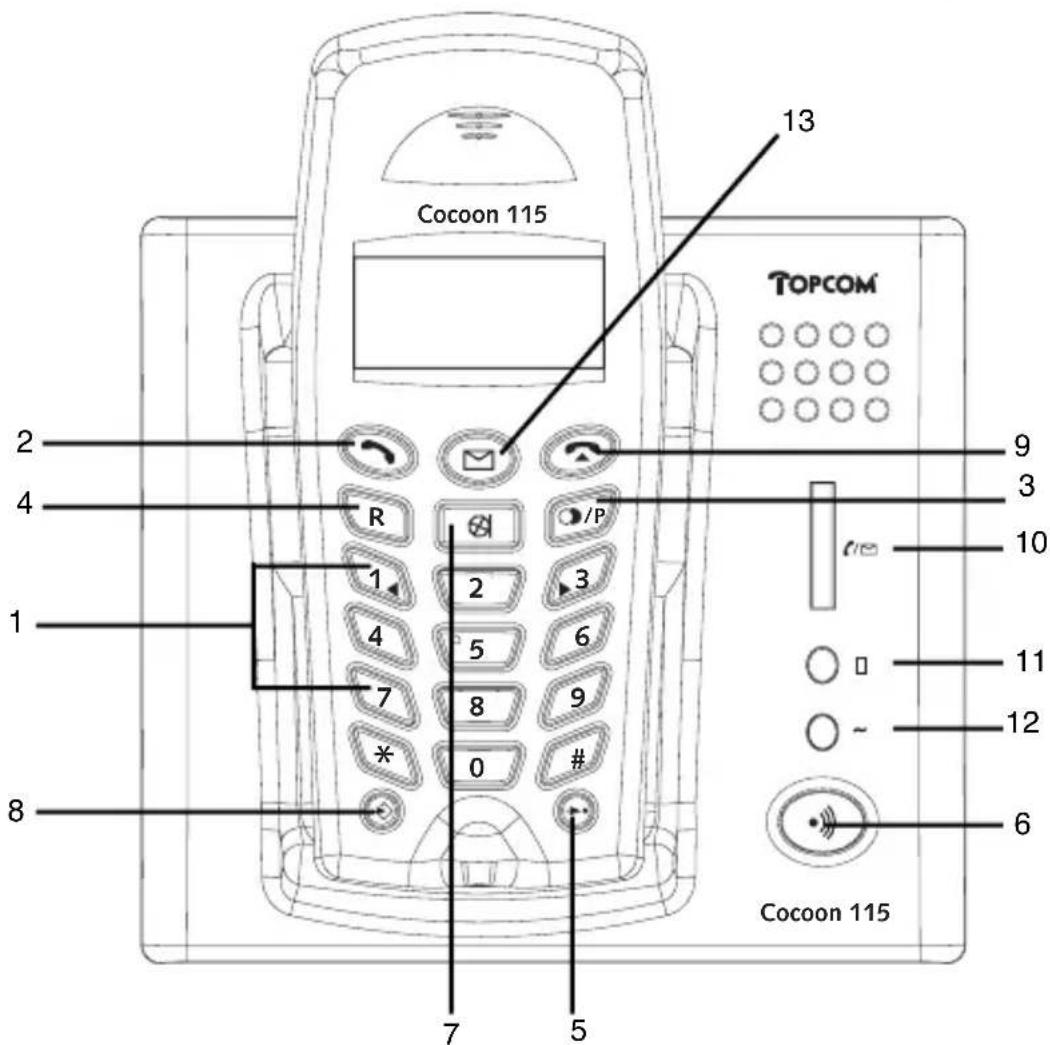
text_image
Cocoon 115 TOPCOM 13 2 4 R /P 1 2 3 4 5 6 7 8 9 * 0 # 8 Cocoon 115 9 3 10 11 12 62 DISPLAY
text_image
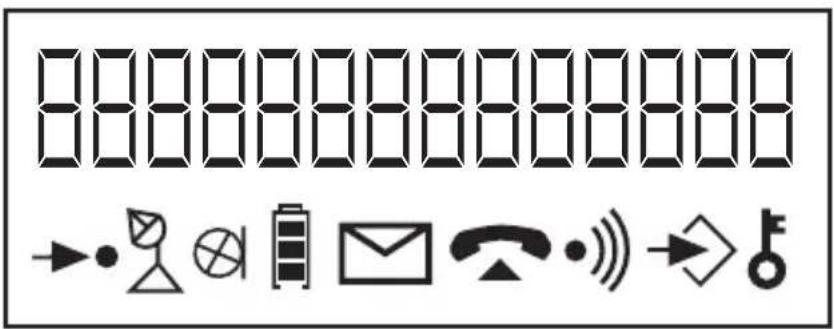
84444444444444 →●○⊗○○○○○○○○○○○○○○○○○○○○○○○○○○○○○○○○○○○○○○○○○○○○○○○○○○○○○○○○○○○○○○○○○○○○○○○○○○○○○○○○○○○○○○○○○○○○○○○○○○○○Memory icon
RF link indicator: When RF link between handset and base is established
⊗ Handset microphone mute indicator
Battery level indicator
Unanswered call indicator
Off-hook indication
On-hook indication
Base paging indication
Program mode indication
Keypad lock indication
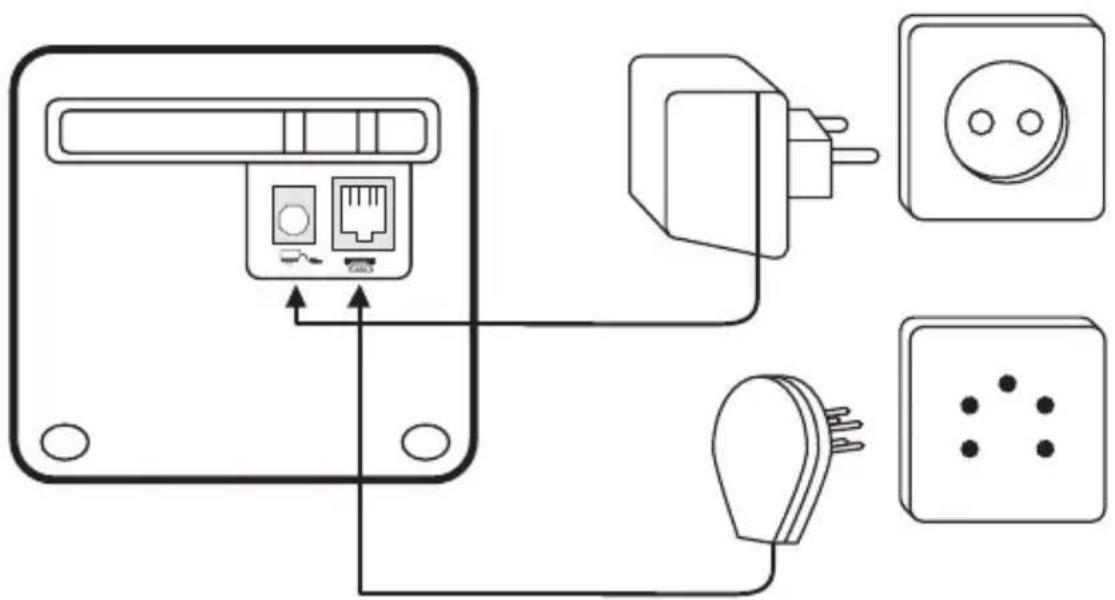
3 INSTALLATION
text_image
Diagram showing connections between a device panel, socket, and plug-in socket with labeled ports and wiring.- P lug one end of the phone cable into the phone unit and the other end into the telephone line wall socket.
- Connect the small plug of the AC adaptor to the phone and the other end of the adapter cable to the electric socket.
- Insert 3 rechargeable batteries (AAA) inside the battery compartment of the handset.
Put the handset on the base unit. The orange Charge LED will burn. Charge the handset for a period of 24 hours before using the handset for the first time. To extend the battery life time, discharge the batteries completely from time to time. As soon as the handset emits a warning tone every 5 seconds and the battery icon blinks on the display, you have to put it back on the base unit.
4 BATTERY EMPTY INDICATION
When the battery is empty, the handset no longer carries out operations. When a battery is completely empty and you have put the handset on the base unit for a short period of time, the Battery symbol will appear to be fully charged but this is actually not the case. The battery capacity will decrease rapidly. We advise you to put the handset on the base unit for the entire night so that it can be recharged thoroughly.
- F ull battery
- Empty battery
When you are in the middle of a conversation and the battery is almost empty, the handset will emit a warning signal ones. Place the handset on the base unit to charge (the keypad upwards).
- Press the Line button. You will hear the dial tone.
- Enter the desired telephone number.
- Press the ON-hook button when you want to terminate the call.
5.1.2 Call setup with dial preparation
- Enter the desired telephone number. An incorrect number can be corrected by means of the Mute button ⓍWhen you haven't pressed a button for 20 seconds, the number you've already entered will disappear and the handset returns to stand-by mode.
- Press the Line button. The number will be dialled automatically.
- Press the ON-hook button when you want to terminate the call.
5.2 Incoming calls
- When a call comes in, only the handset will start to ring. The PHONE symbol blinks on the display and the Line indication (LED) will blink on the base.
- Press the Line button to answer the incoming call.
- When you pick up the handset from the base unit you are immediately connected to the caller. You do not need to press the Line button. This function has to be programmed before it can be used (see 5.14 Automatic answering).
5.3 Last number redial
- Press the Redial button. The last number dialled appears on the display.
- Press the Line button. The number will be dialled automatically.
- Press the On-hook button when you want to terminate the call.
5.4 Programming memory numbers
You can program 10 indirect numbers (of max. 24 digits) in the phone's memory.
- Press the Set button, followed by the Memory button.
- Enter the memory location (0-9).
- Enter the telephone number you wish to save on this memory location.
- Press the Memory button. You will hear a confirmation tone.
Remarks:
- A II memory numbers will be erased when the default settings have been reset (see 5.15 Default settings).
- If you wish to insert a pause, press the Redial button ☐/P on the location where you want a pause (see also '5.16 Setting the pause length').
5.5 Calling a memory number
- Press the Line button
- Press the Memory button, followed by the number of the memory location (0-9).
• T he memory number will be dialled automatically. - Press the On-hook button when you want to terminate the call.
5.6 Mute function
It is possible to deactivate the microphone during a conversation. Now you can speak openly without being heard by your correspondent.
- Press the Mute button during a conversation. The microphone will be deactivated. The MUTE symbol appears on the display.
- Press the Mute button again when you want to continue the conversation.
5.7 Setting the volume
During a conversation you can set the volume by pressing the Line button. The indication 'Loud Hi/Lo' appears on the display.
5.8 Paging
When you press the Paging button on the base unit, the handset emits a ringing signal for 25 seconds. This signal helps you find a lost handset. The symbol links on the base unit. The message "BASE PAGE" appears on the display.
5.9 Keypad lock
When the keypad is locked, the keypad buttons can no longer be pressed, except for the Set button ↗.
- Press the Set button .
- Press numerical button '7'.
- Press:
'1' to lock the keypad and press the Memory button to confirm. The icon and 'unHold=49' are shown on the display.
'2' to unlock the keypad and press the Memory button button to confirm.
Remark: You can temporarily release the keypad lock by pressing '4' and '9'. The keypad lock is automatically active again when the keypad is idle for 10 seconds.
Default setting: no keypad lock.
5.10 Out of range warning
When the handset is out of the working range of the base unit during a conversation, the unit will emit a warning signal every two seconds to warn the user that he has to move closer towards the base unit. If the user is not in the working range of the base unit within 10 seconds, the connection will be broken.
5.11 Flash button (R)
When you press the R button, also called flash or recall, the unit generates a line interruption (of 100 ms). It gives you the possibility to use the special services of your telephone provider and/or to transfer calls when you have a telephone exchange.
5.11.1 Setting the Flash time
- Press the Set button .
- Press '2'
• T he actual flash time is shown on the display. - Press:
$$ ^ {\prime} 1 ^ {\prime} = 1 0 0 \mathrm{ms} $$
$$ ^ {\prime} 2 ^ {\prime} = 1 1 5 \mathrm{ms} $$
$$ ^ {\prime} 3 ^ {\prime} = 2 7 0 \mathrm{ms} $$
$$ ^ \prime 4 ^ {\prime} = 6 0 0 \mathrm{ms} $$
- Press the Memory button to confirm.
5.12 Activate/deactivate key tones
- Press the Set button .
- Press numerical button '4'.
- Press numerical button '1' to activate or '2' to deactivate this function.
- Press the Memory button. The unit emits a confirmation tone.
Default setting: key tones activated.
5.13 Setting the ring melody
- Press the Set button .
- Press numerical button '5'.
- Select the desired ring melody (1-4). Select '5' to turn the ring volume off.
- Press the Memory button. The unit emits a confirmation tone.
Default setting: ring melody 1
5.14 Automatic answering
It is possible to program the unit in such a way that, when you receive a call, you only have to pick up the handset to connect directly to the external caller. It is no longer necessary to press the Line button first to accept the call.
- Press the Set button .
- Press numerical button '0'.
- Press numerical button '1' to activate or '2' deactivate this function.
- Press the Memory button. The unit emits a confirmation tone.
Default setting: off
Note: When a call comes in and the handset is not lying on the base unit, you always have to press the Line button ↗ to accept the call, even when the function 'Automatic answering' is activated.
5.15 Default settings (Reset)
If you want to reset the default settings of the unit, please take the following steps:
- Press the Set button .
- Press numerical button '1'.
- Press numerical button '1' if you want to reset the default settings, or press '2' to cancel
- Press the Memory button. The unit emits a confirmation tone.
Note: When you reset the default settings, all memory-, call list, redial numbers will be erased:
Flash time 100ms
Pause time 3s
Key tones ON
Ring melody 1
15 minute timer OFF
Auto answer OFF
5.16 Setting the pause length
- Press the Set button .
- Press numerical button '3'.
- Press '1' for 3 seconds or '2' for 6 seconds pause time
- Press the Memory button. The unit emits a confirmation tone
5.17 15 Minutes conversation timer
To avoid that you would forget to end a conversation or that you accidentally press the line button without having a conversation, you have the possibility to activate a 15 minutes conversation timer. This warns you after 15 minutes of conversation by means of beeps (last 30 seconds). To continue your conversation and to avoid the connection from being broken automatically, press a numerical button (0-9) as soon as you hear the first beeps.
To activate/deactivate this function:
- Press the Set button
- Press numerical button '9'.
- Press numerical button '1' to activate or '2' deactivate this function.
- Press the Memory button. The unit emits a confirmation tone.
Default setting: off
5.18 Headset connection
You can connect a headset with a 3 pole jack plug of 2,5mm on the right side of the handset. When the headset is connected, you can only hear and talk through the headset. The headset microphone can still be muted by the Mute key.
6 CALLER-ID FUNCTION (CLIP)
The Cocoon 115 displays the telephone numbers of incoming calls. This function is only possible if you are subscribed to a telephone operator that provides this service. Contact your telephone provider for more information. When you receive a call, the numbers are saved in a call list. This list can hold 12 telephone numbers (each of max. 16 digits).
6.1 New calls
When you've received a new unanswered call, the CLIP symbol appears on the display.
6.2 Consulting the Call list
When you consult the Call list, you will notice that the list always starts with the last call received.
- Press the button
• T he number of new calls (ne) and the total number of calls (tot) appear on the display. - Use numerical buttons '1' or '3' to scroll through the list.
- W hen you reach the beginning of the Call list, 'END OF CID' is shown on the display.
- W hen you reach the end of the Call list, 'HEAD OF CID' is shown on the display.
- When the telephone number is longer than the available space on the display, ‘-’ appears at the end of the telephone number. Press button ‘2’ to see the remainder of the number. The CID sequence number will also be shown [x].
- You can leave the Call list by pressing the button
6.3 Calling a number from the Call list
- Scroll through the Call list until the desired number is shown on the display.
- Press the Line button. The number will be dialled automatically.
6.4 Erasing a number from the Call list
(a) Erasing one telephone number
- Scroll through the Call list until the desired number is shown on the display.
- Press the Mute button twice to erase the number.
(b) Erasing the complete Call list
- Enter the Call list.
- Press the Mute button for second. 'Erase All?' appears on the display.
- Press the Mute button once again to erase the complete list.
6.5 Copy from Call list to memory
- Scroll through the Call list until the desired number is shown on the display.
- Press the Memory button and enter the memory location (0-9)
7 WARRANTY
- T his equipment comes with a 24-month warranty. The warranty will be honoured on presentation of the original bill or receipt, provided the date of purchase and the unit type are indicated.
- During the time of the warranty Topcom will repair free of charge any defects caused by material or manufacturing faults. Topcom will at its own discretion fulfil its warranty obligations by either repairing or exchanging the faulty equipment.
- Any warranty claims will be invalidated as a result of intervention by the buyer or unqualified third parties.
- Damage caused by inexpert treatment or operation, and damage resulting from the use of non-original parts or accessories not recommended by Topcom is not covered by the warranty.
- T he warranty does not cover damage caused by outside factors, such as lightning, water and fire, nor does it apply if the unit numbers on the equipment have been changed, removed or rendered illegible.
Note: Please do not forget to enclose your receipt if you return the equipment.
8 T ROUBLESHOOTING
| Problem Possible cause Solution | ||
| No Display Batteries not charged | Check the position of the | batteries |
| Re-charge the batteries | ||
| No dialling tone Telephone cable | not properly connected | Check the connection of the telephone cable |
| Handset does not ring | Volume set to ‘OFF’ | Adjust the volume |
| Communication is disconnected after 15 minutes | 15 minute timer is ON | Switch off the 15 minute times or press any key during the warning beeps |
| Volume of conversation partner too low | Adjust the volume during the conversation by pressing the line button |
9 TECHNICAL DATA
Range: max. 300 m in open space
max. 50 m in buildings
Dialling options: DTMF (tone)
Batteries: 3 x 1.2V, 600 mAh AAA Type NiMh rechargeable
Max. stand-by time: approx. 72 hours
Max. talk time: 5 hours
Ambient temperature: +5 °C to +45 °C
Permitted relative air humidity: 25 to 85 %
Power supply base adapter: 220/230V, 50 Hz
1 TOETSEN
15
2 D ISPLAY
16
3 I N STALLATIE
4 LEGE BATTERIJ-INDICATIE 17
5 WERKING TELEFOON 18
5.1 UITGAANDE GESPREKKEN 18
5.1.1 Telefoneren 18
5.1.2 Blokkiezen 18
5.2 INKOMENDE OPROEPEN 18
5.3 NUMMERHERHALING
5.4 GEHEUGENNUMMERS PROGRAMMEREN 18
5.10 BUITEN BEREIK-WAARSCHUWING 19
5.11 FLASHTOETS (R) 19
text_image
Diagram showing connections between a device panel, socket, and plug-in socket with labeled ports and wiring.text_image
Diagram showing connections between a device panel, socket, and plug-in socket with labeled ports and wiring.text_image
Diagram showing connections between a device panel, socket, and plug-in socket with labeled ports and wiring.DECLARATION OF CONFORMITY
We, Topcom Europe Nv, Grauwmeer 17, 3001 Heverlee, Belgium, declare that our product :
Product name: TOPCOM
Model type: Cocoon 115
is in conformity with the essential requirements of the R&TTE directive 1999/5/EC and carries the CE mark accordingly.
Supplementary information:
The product complies with the requirements of:
- EN 55022
- EN 55024
- ETS 300 235
- EN 301 489-10 V1.1.1
- EN 60950
- TBR 37
- TBR 38
Date: 07/01/2003.
Place: Heverlee, Belgium
Name: Verheyden Geert
Function: Technical Director
Signature:

text_image
nature:European contact: Topcom Europe Nv, R&D department, Research Park, Grauwmeer 17, 3001 Heverlee, Belgium. Tel : +32 16 398920 , Fax : +32 16 398939
TOPCOM®
it's nice t@lking to you
www.topcom.net