HVC150.55R - Vacuum Cleaner AFK - Free user manual and instructions
Find the device manual for free HVC150.55R AFK in PDF.
| Technical Features | Vacuum cleaner with a power of 1500 W, 2.5 L tank capacity, HEPA filter. |
|---|---|
| Usage | Designed for effective cleaning of hard floors and carpets, with several accessories included. |
| Maintenance and Repair | Washable filters, easy-to-empty tank, spare parts available. |
| Safety | Overheat protection, safety power cable, compliant with CE standards. |
| General Information | Device weight: 5 kg, 2-year warranty, noise level of 78 dB. |
Frequently Asked Questions - HVC150.55R AFK
User questions about HVC150.55R AFK
0 question about this device. Answer the ones you know or ask your own.
Ask a new question about this device
Download the instructions for your Vacuum Cleaner in PDF format for free! Find your manual HVC150.55R - AFK and take your electronic device back in hand. On this page are published all the documents necessary for the use of your device. HVC150.55R by AFK.
USER MANUAL HVC150.55R AFK
Thank you for choosing our product. We hope you will enjoy using the appliance.
Symbols in these Instructions for Use
Important information for your safety is specially marked. It is essential to comply with these instructions in order to avoid accidents and prevent damage to the machine:

WARNING:
This warns you of dangers to your health and indicates possible injury risks.

CAUTION:
This refers to possible hazards to the machine or other objects.

NOTE: This highlights tips and information.
General Notes
Read the operating instructions carefully before putting the appliance into operation and keep the instructions including the warranty, the receipt and, if possible, the box with the internal packing. If you give this device to other people, please also pass on the operating instructions.
- The appliance is designed exclusively for private use and for the envisaged purpose. This appliance is not fit for commercial use.
- The mains adaptor is only suitable for use in dry rooms.
- Check if the output current, voltage and the polarity of the mains adaptor match the information on the connected appliance!
- Do not touch the connected mains adapter with wet handsQ
-
If necessary, disconnect the appliance from the power adaptor.
-
Ensure that the cable of the mains adapter does not become kinked, jammed, driven over or come into contact with heat sources.
- Do not use a damaged mains adapter.
- Do not repair the appliance yourself, but visit an authoriYed specialist.
- The device and the mains lead have to be checked regularly for signs of damage. If damage is found the device must not be used.
- Use only original spare parts.
- In order to ensure your children's safety, please keep all packaging (plastic bags, boxes, polystyrene etc.) out of their reach.

WARNING:
Do not allow small children to play with the foil. There is a danger of suffocation!
Special Safety Instructions for this Device
- This appliance can be used by children aged from 8 years and above and persons with reduced physical, sensory or mental capabilities or lack of experience and knowledge if they have been given supervision or instruction concerning use of the appliance in a safe way and understand the hazards involved.
Children shall not play with the appliance. - Cleaning and user maintenance shall not be made by children unless they are older than 8 years and supervised.
- Keep the appliance and its cord out of reach of children less than 8 years.
- The device is intended for use with safety extra-low voltage. Connect only to a power supply according to the specifications on the rating label.
-
If the connection cable of this device has been damaged, it must be replaced with a special connection cable available from the manufacturer or its customer service.
-
Do not suck in combustible substances or liquidsQ
- Avoid vacuuming sharp or pointed objectsQ
- Never vacuum without the filter installed.
Special Safety Information Concerning the Rechargeable Built-in Battery

CAUTION:
- The device contains rechargeable lithium-ion batteries that may not be replaced by the user.
- Risk of explosion in case of improper replacement of the rechargeable battery. Replace only by the same or an equivalent type.
- Do not expose the rechargeable built-in battery to hard impacts or pressure. Do not drop the device!
- Do not expose the device to intense heat such as sunlight. Also keep the device away from heat sources like radiators, stoves, etc.!.
- The battery must be removed from the appliance before it is scrapped.
- The battery is to be disposed of safely.
- The appliance must be disconnected from the supply when removing the battery.

CAUTION:
- The ambient temperature should be between 0^ and max. 45^ .
Heat damages the rechargeable battery. Increasingly lower temperatures reduce the capacity and the life of the rechargeable battery. - Do not charge the rechargeable battery unsupervised.
- Use only the mains adapter "RKGSDC2200500" included in the scope of deliveries.
- Disconnect the power supply unit from the mains when you will not use the device for a longer time.
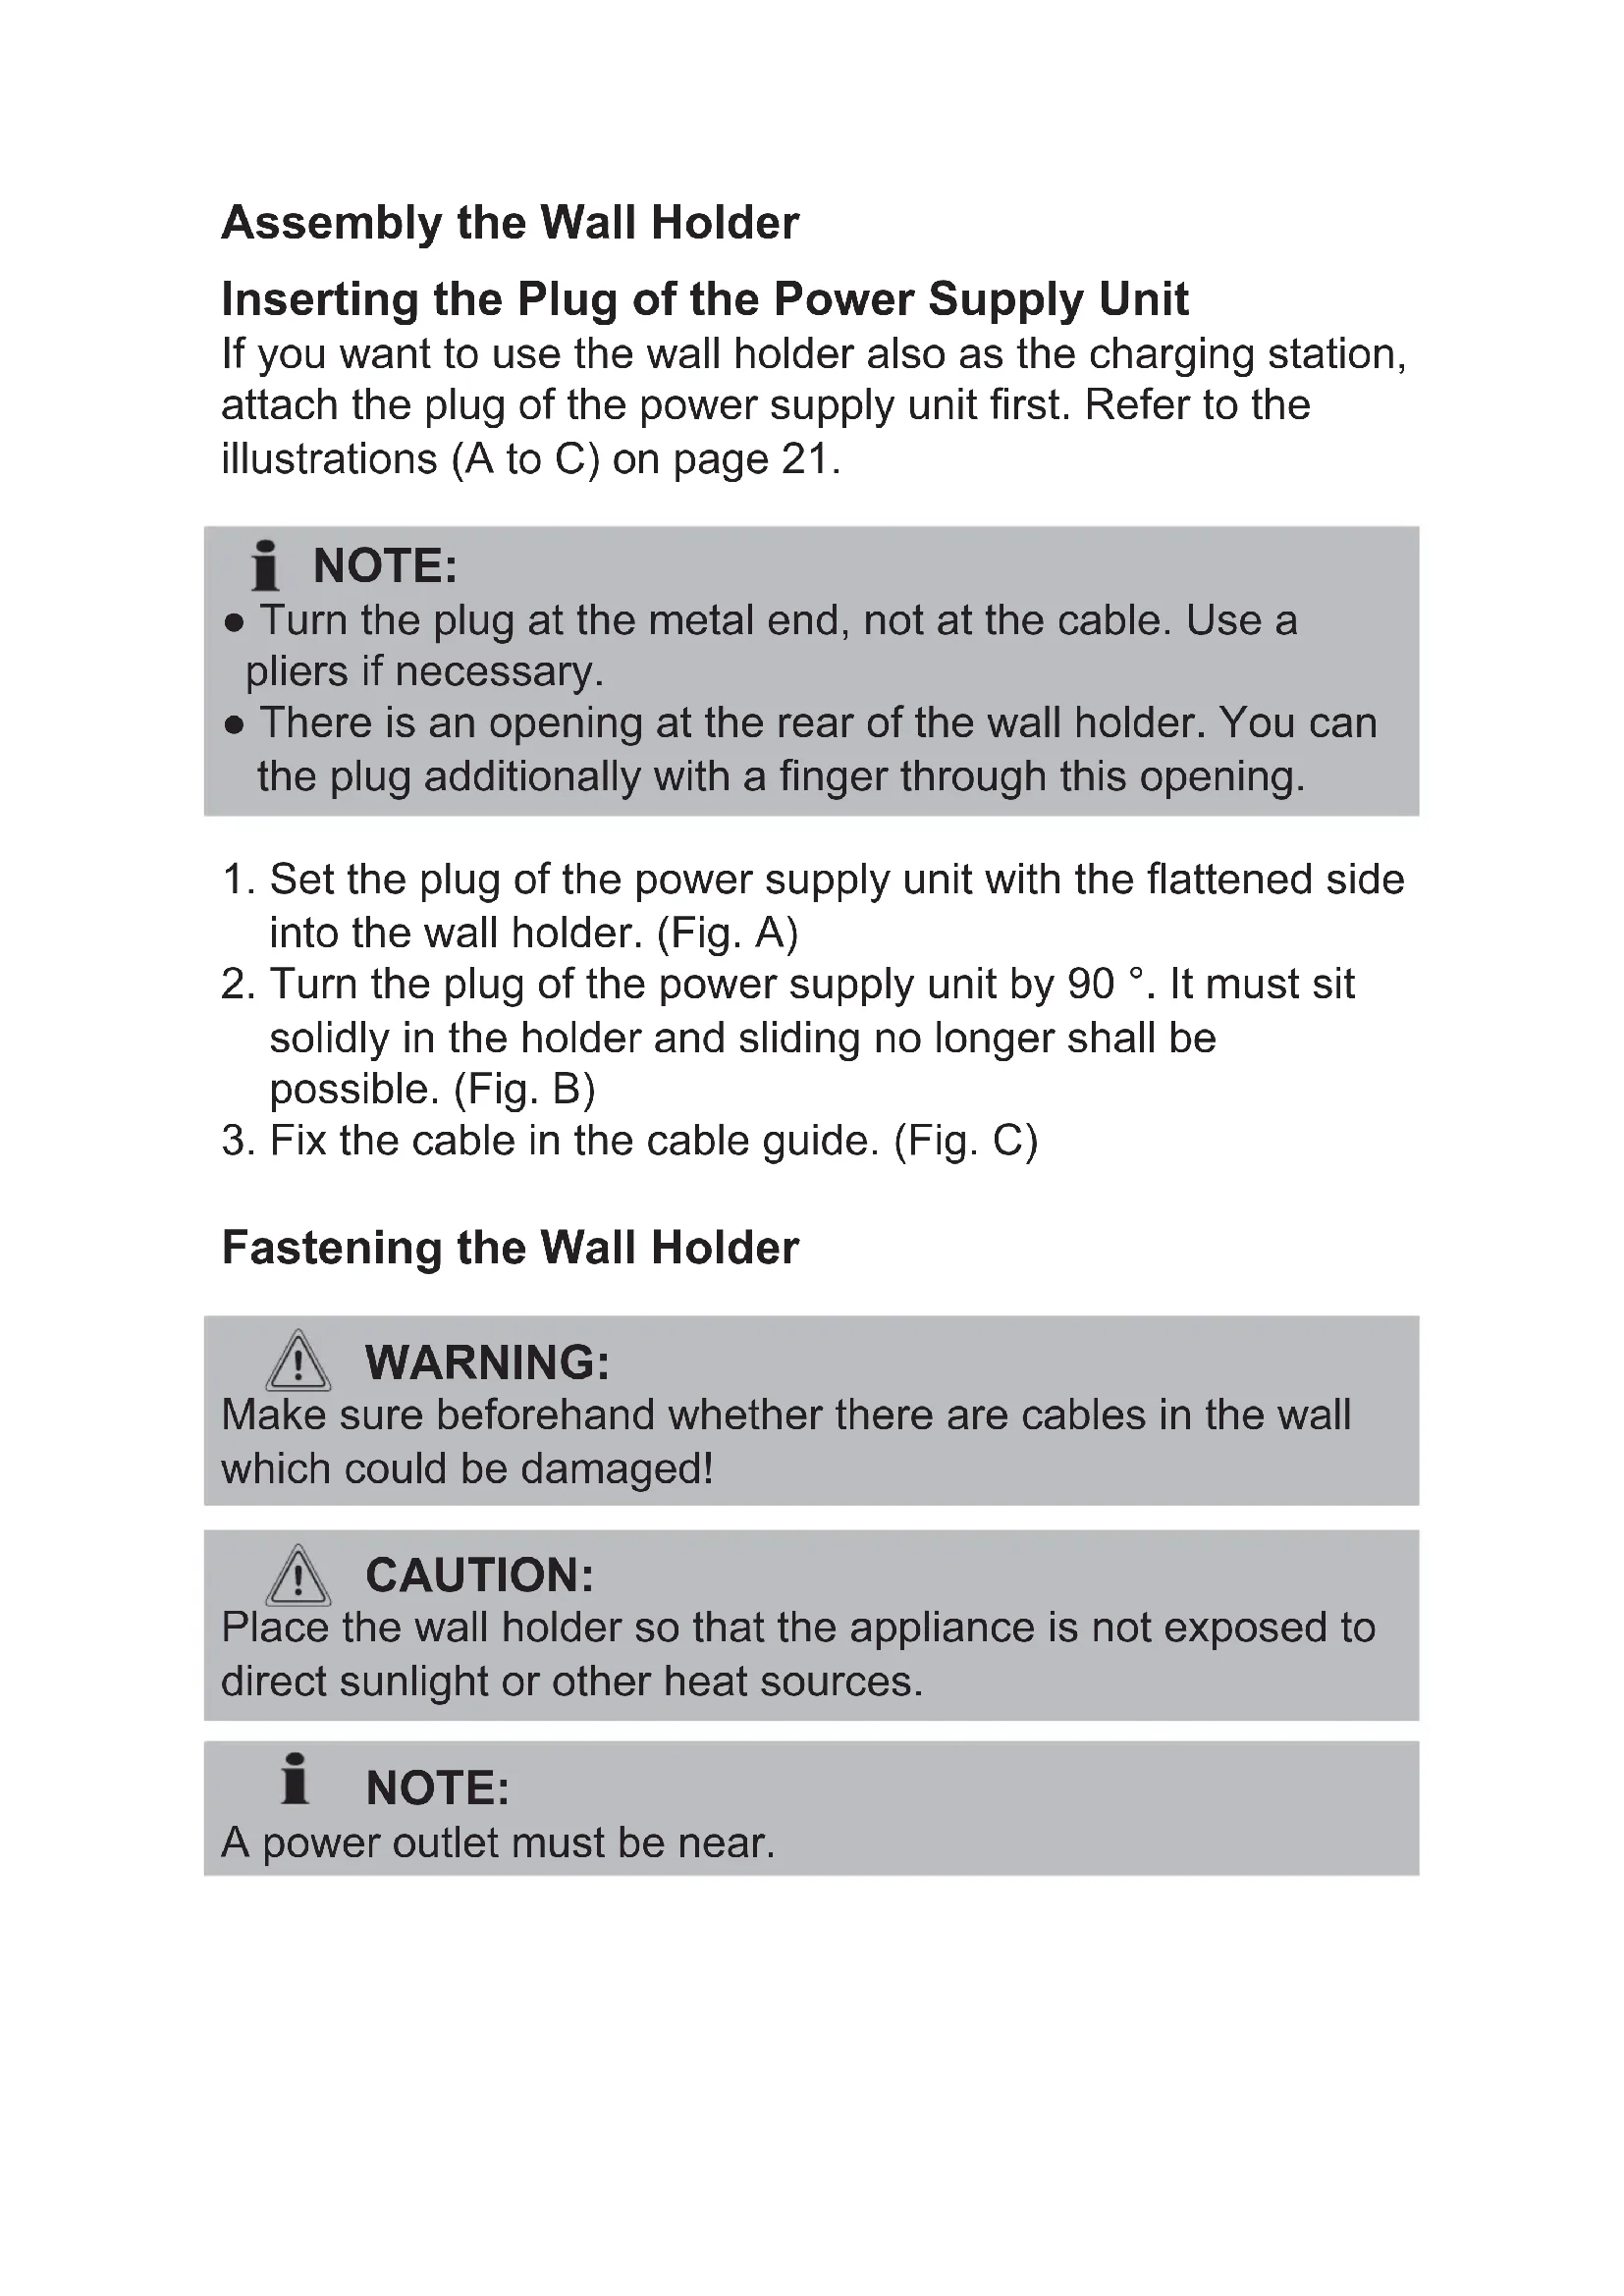
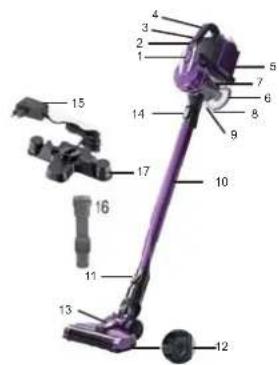
Overview of the Components / Delivery Scope
- Button for unlocking / locking the filter unit
- LED charge indication
- Multifunction button 1 / + / -
- Carrying handle
- Socket for connection of the power supply unit
- Dust collector base plate
- Dust collector with HEPA filter
- Lock of the dust collector
- Opener of the dust collector
- Suction tube
- Unlocking the floor nozzle
- Lock of the brush roller
- Floor nozzle with turbo brush
- Unlocking for suction pipe or nozzle attachment
- Adapter
- Combined crevice / brush nozzle
- Wall holder
Not shown:
1 x Mains adapter
2 x Wall plug
2 x Screw
Unpacking the Device
- Remove the device from its packaging.
- Check the delivery scope for completeness.
- Check the device for any transport damage, in order to prevent hazards.

NOTE:
In case of any transport damage, contact your dealer immediately. Do not use a damaged device!
- Remove the transport lock from the multifunction button.
Notes on Use
- The device is especially suitable for quickly vacuuming small amounts of dry dirt or dust.
- The device is operated via charged battery. Charging is done via the supplied power supply unit.
- Direct power supply via mains adapter is not possible.
Multifunction Button (1 / + / -)
Use the multifunction button to turn the device on and off. Also select a power level with this button.
Press once = Turn on the device, low power level
Press twice = Select high power level
Press three times = Turn off the device
Start-up
Suction Tube
- Insert the suction pipe with the two contact pins into the connection on the hand unit. It must audiably engage.
- To disconnect the suction pipe, press the release (14) and pull out the pipe at the same time.
Floor Nozzle with Turbo Brush
The floor nozzle is suitable for any floor covering. During operation, the LEDs on the floor nozzle light up for better visibility in dark areas.

CAUTION:
You cannot replace the LEDs.
- Slip the lower end of the suction pipe onto the connector on the floor nozzle. Pay attention to the contact pin. The suction pipe must audibly engage.
- To release the suction pipe, push the release (11) away from the suction pipe and pull out the pipe at the same time.
Nozzle Attachments (16)
You can attach nozzle attachments directly to the hand unit or to the already installed suction pipe.
Connection at the Hand Unit
- Insert a nozzle attachment with the marking facing up into the connection at the hand unit. It must audiably engage.
- To disconnect the nozzle attachment, press the release (14) and pull out the attachment at the same time.
Connection to the Suction Pipe
You need the adapter (15) for connection to the suction pipe.
- Insert the adapter with the angular side into the lower end of the suction pipe.
- Now you can slip a nozzle attachment onto the round side of the adapter.
- For removal of the nozzle attachment and the adapter, just pull the parts off.
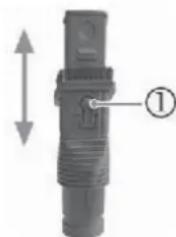
Combined Crevice / Brush Nozzle
With this nozzle, you can selectively vacuum corners and slots. Use the nozzle with locked brush to prevent scratching of the
surface to be cleaned.
- For this, press the button ① and push the brush to the end of the nozzle. It must engage.
- Press the button again to unlock the brush.
Assembly the Wall Holder
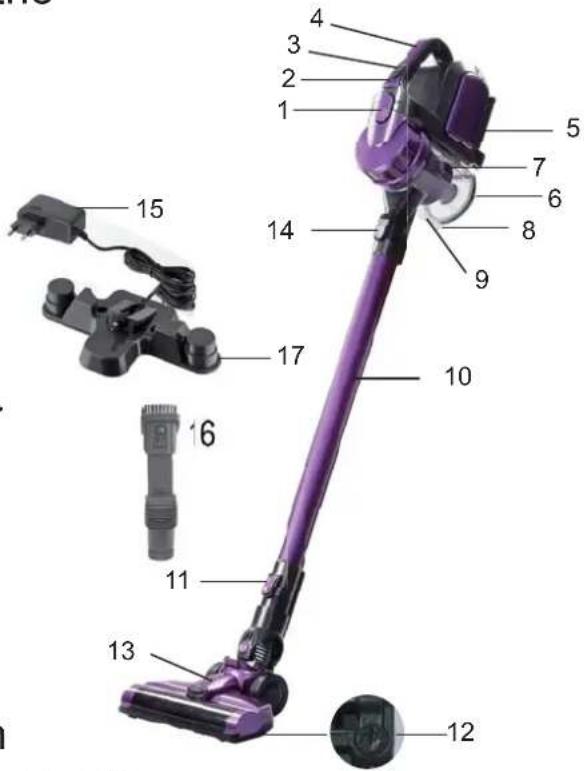
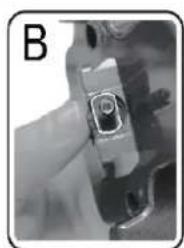
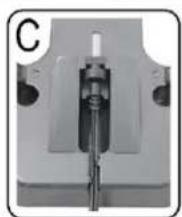
Inserting the Plug of the Power Supply Unit
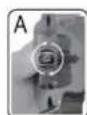
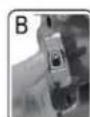
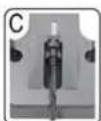
If you want to use the wall holder also as the charging station, attach the plug of the power supply unit first. Refer to the illustrations (A to C) on page 21.
i NOTE:
- Turn the plug at the metal end, not at the cable. Use a pliers if necessary.
-
There is an opening at the rear of the wall holder. You can the plug additionally with a finger through this opening.
-
Set the plug of the power supply unit with the flattened side into the wall holder. (Fig. A)
- Turn the plug of the power supply unit by 90^ . It must sit solidly in the holder and sliding no longer shall be possible. (Fig. B)
- Fix the cable in the cable guide. (Fig. C)
Fastening the Wall Holder

WARNING:
Make sure beforehand whether there are cables in the wall which could be damaged!

CAUTION:
Place the wall holder so that the appliance is not exposed to direct sunlight or other heat sources.

NOTE:
A power outlet must be near.
- Measure the height for the wall holder. Hold the vacuum cleaner against the wall with the suction pipe and the floor nozzle installed.
- Hold the wall holder against the wall as shown on page 21. Mark 2 drill holes.
- Drill the holes and insert the wall plugs into the wall.
- Insert the screws through the holes of the wall holder.
- Tighten the screws with a screwdriver hand-tight.
Charging the Battery
- Turn off the device.
- Connect the power supply unit with the connection socket (5). If you have prepared the wall holder as a charging station, suspend the appliance from the wall holder.
- Connect the mains adapter to a certified wall socket. Charge the device for approx. 5 hours before first-time use.
i NOTE:
- The LED charge indication shows the charging status of the rechargeable battery. (25%, 50%, 100%)
- The appliance has electronic charge control, which prevents overcharging.
- Charging has been completed when all 3 LEDs are lit.
- The LEDs go out after a while.
-
It is normal for the device to heat up during charging.
-
The rechargeable battery must be charged when the LED charge indication shows only 25% of capacity.
- Disconnect the power supply unit from the outlet once the rechargeable battery has been charged completely.
i NOTE:
Even when switched off, the rechargeable battery discharges continuously. If the device is out of use for a longer period of time, charge the rechargeable battery at least once every 6 to 12 weeks.
Using the Device
You can use the appliance as a floor vacuum cleaner or as a handheld and upright vacuum cleaner (basic unit).
- Disconnect the appliance from the mains when changing the accessory.
- Turn on the device.
- Select a power level.
NOTE:
We recommend the higher power level for using the appliance with the floor nozzle.
End of Operation
- Turn off the device.
- If you have already installed the wall holder, hang up the vacuum cleaner. You can attach the crevice and brush nozzle at the left and the right of the vacuum cleaner.
Maintenance
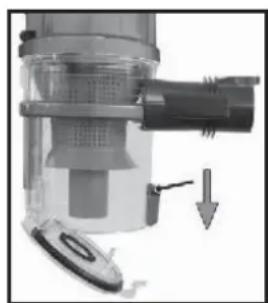
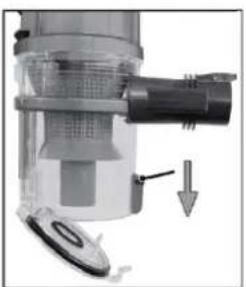
Emptying the Dust Collector
- Disconnect the appliance from the power supply unit.
- If necessary, remove the suction tube or the nozzle attachment from the appliance.
- Hold the appliance with the bottom plate of the dust collector over a dustbin.
- Empty the contents of the dust collector. Slide the opener of the dust collector downwards to open the bottom plate.
- Then close the base plate again. The lock on the dust collector must engage.
The Filter System
Your appliance features 3 filters. The common dust bag system has been replaced by a transparent dust collector.
The higher flow speed of the collector allows for heavy dirt and smallest floating particles to be separated from the "sucked-in air".
It is thus not necessary to buy dust bags.
The filters must be cleaned periodically.

CAUTION:
- Never wash the filter in the washing machine.
- Do not use a hairdryer for drying.
- Only put the appliance back into operation when all filters are completely dry and correctly assembled.
The Filter Unit
The filter unit is composed of:
HEPA filter
- Coarse filter
Proceed as follows to clean the filter unit:
-
Empty the dust container as described above. (Steps 1 - 5)
-
Disassembly of the filter unit
2.1 Press the dotted area of the button (1) to disconnect the dust container from the motor housing.
2.2 Turn the cover of the dust container in the direction
Remove the cover.
2.3 Pull the filter unit from the dust container.
2.4 Turn the HEPA filter to remove it from the coarse filter.
- You can brush out the HEPA filter. In case of heavy staining, clean the filters under running water.
- Let the filters air-dry completely before refitting them!
- Wipe the dust collector with a damp cloth and then wipe it dry.
- Assembly of the filter unit
6.1 The HEPA filter has 3 guide lugs. Set the largest guide lug into the largest recess of the coarse filter.
Tighten the HEPA filter by turning it clockwise. It must audiably engage.
6.2 Set the filter unit into the dust container. The rounded guide lug must sit exactly in the rounded recess.
6.3 Reattach the cover to the dust container. Set the arrow () on the cover just over the arrow at the side of the symbol
6.4 Tighten the cover in the direction ↑. It must audiably engage.
6.5 Reattach the dust container to the motor housing. Set the dust container first at the bottom part to the motor housing, so that the electric contacts are matched. Then engage it to the top. For this, press the smooth area of the button (1).
Outlet Filter
The appliance is also equipped with an outlet filter. It is on the right side of the appliance.

CAUTION:
You cannot remove this filter.
Cleaning

WARNING:
- Always disconnect the appliance from the power supply unit before cleaning!
- Under no circumstances should you immerse the motor housing in water in order to clean it. Otherwise this might result in an electric shock or fire.

CAUTION:
- Do not use a wire brush or any abrasive items.
- Do not use any acidic or abrasive detergents.
-
The single components are not dishwasher-safe.
-
Wipe the casing with a damp cloth.
- You can wipe the mains adapter unit with a dry cloth.
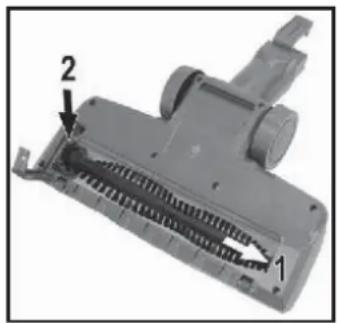
Floor Nozzle
- Disconnect the floor nozzle from the suction pipe.
- Turn the floor nozzle around, so that you see the lower side. Turn the lock of the brush roller on the left side counterclockwise with tool to unlock the brush roller. the lock of the brush roller on the left side.
- Pull out the brush roller.
- Remove threads and hair wound to the brush. Use scissors, if required.
- Assembly:
Refer to the adjacent figure.
5.1 Set the brush roller at position (1). Make sure that the triangular recess on the brush roller is positioned correctly.
5.2 Return the bearing of the brush roller into the housing of the floor nozzle (position 2).
6. Close the lock of the brush roller. It must audibly engage.
Dust Container with Filter Unit
Please read the chapter "Maintenance" for cleaning of these components.
Storage
- Clean the appliance as described and allow it to dry.
- You can use the previously installed wall holder for storage.
- We recommend that you keep the appliance in the original packaging if it will not be used for long periods.
i NOTE concerning the life of the rechargeable battery:
Even when switched off, the rechargeable battery discharges continuously. When the device is out of use for a longer period of time, charge the rechargeable battery at least once every 6 to 12 weeks.
- Always store the appliance out of the reach of children in a dry, well ventilated place.
Troubleshooting
| Possible cause RemedyProblem | ||
| The device does not function. | The rechargeable battery is empty. | Charge the battery |
| The power supply unit is connected. | Disconnect the appliance from the power supply unit. | |
| The rechargeable battery is defect. | Contact our service or your dealer. | |
| Weak suction power. | The battery is nearly discharged. | Charge the battery. |
| The dust container is full. | Empty the dust container | |
| The filters are dirty. | Clean the filters as described under "Maintenance". | |
| Noise during operation. | A foreign body has been sucked into the floor nozzle. | Remove the foreign body. If required, disconnect the floor nozzle from the suction pipe |
| The floor nozzle with turbo brush is not operating. | The brush roller is blocked by dirt. | Clean the floor nozzle as described under "Cleaning" |
| Incorrect assembly of suction pipe and / or floor nozzle. | Check the assembly. | |
| Dust escapes from the dust container. | The dust container is not closed correctly. | Check the installation of the filter unit, the cover, and the base plate. |
| The rechargeable battery does not keep the charge. | The rechargeable battery has reached the end of its life. | Contact our service or your dealer. |
Technical Data Mains Adapter
Input: AC 100-240V ~ 50/60Hz, 0.5 A
Output: DC 26.5 V, 500 mA
Polarity: - +

Battery: 6 × 3.6V , 2200 mAh Li-Ion Operating time: 55 minutes maximum Charging time: approx. 5 hours
The right to make technical and design modifications in the course of continuous product development remains reserved. This device has been tested according to all relevant current CE guidelines, such as electromagnetic compatibility and low voltage directives, and has been constructed in accordance with the latest regulations.
Disposal
Accumulator / Battery Disposal

The unit contains a rechargeable battery. Used batteries / accumulators (rechargeable batte-ries) do not belong in household waste.
The battery must be removed before the product
is recycled. Contact qualified personnel.
Information, where batteries / accumulators are to be disposed of can be obtained from your local or municipal authorities.
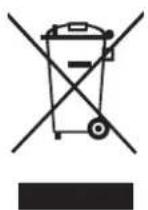
Waste Management
The symbol above and on the product means that the product is classed as Electrical or Electronic equipment and should not be disposed with other household or
commercial waste at the end of its useful life.
The Waste of Electrical and Electronic Equipment (WEEE) Directive (2012/19/EU) has been put in place to recycle products using best available recovery and recycling techniques to minimise the impact on the environment, treat any hazardous substances and avoid the increasing landfill. Contact local authorities for information on the correct disposal of Electrical or Electronic equipment.
Gebruiksaanwijzing
HEPA filter
Grof filter
Les batteries/accumulateurs (batteries
Con这对于 the bocchetta, this is a good idea. It's not that it's a good idea, but rather a bad idea. Conquesta la bocchetta and the spazzola bloccata are the best way to get rid of the messes.
J 8 Jn Jn Jn Jn Jn Jn Jn Jn Jn Jn Jn Jn Jn Jn Jn Jn Jn Jn Jn Jn Jn Jn Jn Jn Jn Jn Jn Jn Jn Jn Jn Jn Jn Jn Jn Jn Jn Jn Jn Jn Jn Jn Jn Jn Jn Jn Jn Jn Jn Jn J n J n J n J n J n J n J n J n J n J n J n J n J n J n J n J n J n J n J n J n J n J n J n J n J n J n J n J n J n J n J n J n J n J n J n J n J n J n
!JgglgljLaxuAylalalglb
!dlo glo plwgljg jglplu
c
Joo 1000000000000000000000000000000000000000000000
4
Jg Jg Jg Jg Jg Jg Jg Jg
. p.s
y. 1u Jx jn aal ldy alal y arl lll
.
!jgjjbawy.0uulclao gI baxal jooaiol oaley aaiiaaiaaiaaiaaa
J 1 J 1
150 150 150
4590 4590
aIbIbIbIbIbIbIbIbIbIbIbIbIbIbIbIbIbIbIbIbIbIbIbIbIbIbIbIbIbIbIbIbIbIbIbIbIbIbIb
.
.
"RKGSDC2200500" aI I Juaa baa
Jgbl jzjll pluxuul pue uic 1yol jll j
角 A^ PB = 90^
x1
x2
paluno x2
jgljllgizoo
.
al051 jouuuljolulil joi jao
jglalgl jai lgl aai gglg qae jao jao jao jao
b1b2 = 0
:
pue yj. gall jie ellg Jaiil jaiil 100 100
1
aalbll jj Ja Jaa 4
puiy
aalglguln aullsall y grrlll jaiy lus
1
aaii gbi/ ciig61 de aole 8,
jull 0.0g Jd / gdd j 1
LEDjw2
-/+/① 3
Jauu Jaa 4
aillgjo0ogjoojua 5
1aillgaoa bua 6
HEPA 7
Jalal 8
jollgao 9
10
a 11
12
yjoljg001 13
14
aasjgdo 15
Lao 16
17
gablaJolal
aillgjooogwla
y 8aall 2g0 0008 5j jaaabaae lai baiell lalb
3.2a#all (C|A)gall
4ab = 10a
13 1
e 1
.
(AJ.)jIJI JJI 1
39 Jalall 1050j j 00.2090 1020 800g 00g 00g 0
(BJSS)
120 < x < 160
(25) jaiil 1saii aiaai iaiai LED
(100.50
aill jann gilg jgsyin iaai pssn aie jally
LED 00000001
LED
aalaae 1
LED%25 jao gao bao lae jaoaill aolal yall jao 4
a3lbj 12
0eey 1aill jll jow jy jy jll jio jao 8o 8o
lola
ab = 10
#
Jgaaa aalssy aaii aai iiaai
jaii 10eay aaiai jaiy jaiai aygb yjai jajoi pia iis jao
12 65 80 100
aai 23y 20 yj j 100 100 100
a
guljagao jn jn jn jn jn jn jn
(-/+①)a#
gssusssssssssssssssssssssssssssssssssssssssssssssssssssssssssssssssssssssss
jlll llo plioooyi ball
jtae 1000000000000000000000000000000000000000000
gaiyadibgsuue 1
j01
#
aogg g oogg g aagg g aagg g aagg g aagg g aagg
aai 100
jai jai 14
.
50j 8o 1
LED
211 100
4
#
LEDU
Jgssll 1
1
1 11
.
(17)g(16)agaiLao
aaii gai jgai iagai jgi aaiiaai aiai aai
1
a2 = 1,b2 = 2
80g 32g 40g 50g 60g 70g 80g 90g 100g
gte 000000000000
j 14) j 1
.
laill yolil yogill
1000000000000000000000000000000000000000000
1
ygal pannal jagai gao jj dsc
aal gaaal aal aal aal aal aal aal aal
jdlal 100g 6
6.1
A
jzuy jydy 10g jdaal a>6.2
aaiiaaae aae aee aee aee aee aee aee aee aee
.1
x^2 + 5x + 6 = 12
jglal jie jilil jie 80ggo gao
x1 = -b - ^2 - 4ac2a,x2 = -b + ^2 - 4ac2a
jglwpl
1000.8,8,8,8,8,8,8,8,8,8,8,8,8,8,8,8,8,8,8
yjyjgoo jie
#
a 3 a 10000000000000000000000000000000000000000000
yag 1
a aalll aall algall gaa
aagaa aal aai
法
y1 = ynx1 + y2 = y1x2 + y_2
jglal jai jai jai jai jai jai
-
-
-
-
-
-
-
-
-
-
-
-
-
-
-
-
-
-
-
-
-
-
-
-
-
-
-
- 1.
-
-
-
-
-
-
-
-
-
-
-
-
-
-
-
-
-
-
-
-
-
-
-
-
-
-
#
:
1a
a 11 11 11 11 11 11 11 11 11
[ \Leftrightarrow \frac{1 + u}{x} - u = \frac{1}{x} + \frac{1}{\left( {1 + u}\right) u} - \frac{1}{\left( {1 + u}\right) u}]
| العربية | الإستعمال | الإستعمال |
| . ميراني بوراني الحرفية | سيلة الحرفية الحرفية | . ميراني الحرفية |
| . ميراني الحرفية الحرفية | . ميراني الحرفية | |
| . ميراني بوراني الحرفية | سيلة الحرفية الحرفية | . ميراني الحرفية |
| . ميراني الحرفية الحرفية | . ميراني الحرفية | |
| . ميراني بوراني الحرفية | سيلة الحرفية الحرفية | . ميراني الحرفية |
| . ميراني الح註冊 | . ميراني الح註冊 | |
| . ميراني بوراني الحرفية | سيلة الح註冊 الحرفية | . ميراني الح註冊 |
| . ميراني الح註冊 | . ميراني الح註冊 | |
| . ميراني بوراني الح註冊 | سيلة الح註冊 الح註冊 | . ميراني الح註冊 |
| . ميراني الح註冊 | . ميراني الح註冊 | |
| . ميراني بوراني الح註冊 | سيلة الح註冊 الح註冊 | . ميراني الح註冊 |
| . ميراني الح註冊 | . ميراني الح註冊 | |
| . ميراني بوراني الح註冊 | سيلة الح註冊 الح註冊 | . ميراني الح註冊 |
| . م TERم蛙 | . ميراني الح註冊 | |
| . ميراني بوراني الح註冊 | سيلة الح註冊 الح註冊 | . ميراني الح註冊 |
| . م TERM蛙 | . ميراني الح註冊 | |
| . ميراني بوراني الح註冊 | سيلة الح註冊 الح註冊 | . ميراني الح註冊 |
| . م TERM蛙 | . ميراني الح註冊 | |
| . ميراني بوراني الح註冊 | سيلة الح註冊 الح註冊 | . ميراني الح註冊 |
| . م TERM蛙 | . ميراني الح註冊 | |
| . ميراني borsai الح註冊 | سيلة الح註冊 الح註冊 | . ميراني الح註冊 |
| . م TERM蛙 | . ميراني الح註冊 | |
| . ميراني borsai الح註冊 | سيلة الح註冊 الح註冊 | . ميراني الح註冊 |
| . م TERM蛙 | . ميراني الح註冊 | |
| . ميراني borsai الح註冊 | سيلة الح註冊 الح註冊 | . ميراني الحarters |
| . م TERM蛙 | . ميراني الح註冊 | |
| . ميراني borsai الح註冊 | سيلة الح註冊 الح註冊 | . ميراني الحarters |
| . م TERM蛙 | . ميراني الح註冊 | |
| . ميراني borsai الح註冊 | سيلة الح註冊 الح註冊 | . ميراني الحarters |
| . م TERM蛙 | . ميراني الحarters | |
| . ميراني borsai الح註冊 | سيلة الح註冊 الح註冊 | . ميراني الحarters |
| . م TERM蛙 | . ميراني الحarters | |
| . ميراني borsai الح註冊 | سILA الح註冊 | . ميراني الحarters |
| . م TERM蛙 | . ميراني الحarters | |
| . ميراني borsai الح註冊 | سILA الح註冊 | . ميراني الحarters |
| . م TERM蛙 | . ميراني الحarters | |
| . ميراني borsai الح註冊 | سILA الح註冊 | . ميراني الحarters |
| . م TERM蛙 | . . . . . . . . . . . . . . . . . . . . . . . . . . . . . . . . . . . . . . . . . . . . . . . . . . . . . . . . . . . . . . . . . . . . . . . . . . . . . . . . . . . . . . . . . . . . . . . . . . . . - . . . . . . . . . . . . . . . . . . . . . . . . . . . . . . . . . . . . . . . . . . . . . . . . . . . . . . . . . . . . . . . . . . . . . . . . . . . . . . . . . . . . . . . . . . . . . . . . . . . - . - - - - - - - - - - - - - - - - - - - - - - - - - - - - - - - - - - - - - - - - - - - - - - - - - - - - - - - - - - - - - - - - - - - - - - - - - - - - - - - - - - - - - - - - - - - - - - - - - - - - - - . . . . . . . . . . . . . . . . . . . . . . . . . . . . . . . . . . . . . . . . . . . . . . . . . . . . . . . . . . . . . . . . . . . . . . . . . . . . . . . . . . . . . . . . . . . . . . . . . . . ? . . . . . . . . . . . . . . . . . . . . . . . . . . . . . . . . . . . . . . . . . . . . . . . . . . . . . . . . . . . . . . . . . . . . . . . . . . . . . . . . . . . . . . . . . . . . . . . . . . . ; . . . . . . . . . . . . . . . . . . . . . . . . . . . . . . . . . . . . . . . . . . . . . . . . . . . . . . . . . . . . . . . . . . . . . . . . . . . . . . . . . . . . . . . . . . . . . . . . . . . = . . . . . . . . . . . . . . . . . . . . . . . . . . . . . . . . . . . . . . . . . . . . . . . . . . . . . . . . . . . . . . . . . . . . . . . . . . . . . . . . . . . . . . . . . . . . . . . . . . . \- . \- \- \- \- \- \- \- \- \- \- \- \- \- \- \- \- \- \- \- \- \- \- \- \- \- \- \- \- \- \- \- \- \- \- \- \- \- \- \- \- \- \- \- \- \- \- \- \- \- \- \ - - - - - - - - - - - - - - - - - - - - - - - - - - - - - - - - - - - - - - - - - - - - - - - - - - - - - - - - - - - - - - - - - - - - - - - - - - - - - - - - - - - - - - - - - - - - - - - - - - - - - - - - - - - - - - - - - - - - - - - - - - - - - - - - - - - - - - - - - - - - - - - - - - - - - - - - - - - - - - - - - - - - - - - - - - - - - - - - - - - - - - - - - - - - - - - - - - - - - - - - - - - - - - - - - - - - - - - - - - - - - - - - - - - - - - - - - - - - - - - - - - - - - - - - - - - - - - - - - - - - - - - - - - - - - - - - - - - - - - - - - - - - - - - - - - - - - - - - - - - - - - - - - - - - - - - - - - - - - - - - - - - - - - - - - - - - - - - - - - - - - - - - - - - - - - - - - - - - - - - - - - - - - - - - - - - - - - - - - - - - - - - - - - - - - - - - - - - - - - - - -- - - - - - - - - - - - - - - - - - - - - - - - - - - - - - - - - - - - - - - - - - - - - - - - - - - - - - - - - - - - - - - - - - - - - - - - - - - - - - - - - - - - - - - - - - - - - - - - - - - - - - - - - - - - - - - - - - - - - - - - - - - - - - - - - - - - - - - - - - - - - - - - - - - - - - - - - - - - - - - - - - - - - - - - - - - - - - - - - - - - - - - - - - - - - - - - - - - - - - - () - - - - - - - - - - - - - - - - - - - - - - - - - - - - - - - - - - - - - - - - - - - - - - - - - - - - - - - - - - - - - - - - - - - - - - - - - - - - - - - - - - - - - - - - - - - - - - - - - - - - - - - - - - - - - - - - - - - - - - - - - - - - - - - - - - - - - - - - - - - - - - - - - - - - - - - - - - - - - - - - - - - - - - - - - - - - - - - - - - - - - - - - - - - - - - - - - - - - - - - = 0 = 1 = 2 = 3 = 4 = 5 = 6 = 7 = 8 = 9 = 10 = 11 = 12 = 13 = 14 = 15 = 16 = 17 = 18 = 19 = 20 = 21 = 22 = 23 = 24 = 25 = 26 = 27 = 28 = 29 = 30 = 31 = 32 = 33 = 34 = 35 = 36 = 37 = 38 = 39 = 40 = 41 = 42 = 43 = 44 = 45 = 46 = 47 = 48 = 49 = 50 = 51 = 52 = 53 = 54 = 55 = 56 = 57 = 58 = 59 = 60 = 61 = 62 = 63 = 64 = 65 = 66 = 67 = 68 = 69 = 70 = 71 = 72 = 73 = 74 = 75 = 76 = 77 = 78 = 79 = 80 = 81 = 82 = 83 = 84 = 85 = 86 = 87 = 88 = 89 = 90 = 91 = 92 = 93 = 94 = 95 = 96 = 97 = 98 = 99 = 100 = 101 = 102 = 103 = 104 = 105 = 106 = 107 = 108 = 109 = 110 = 111 = 112 = 113 = 114 = 115 = 116 = 117 = 118 = 119 = 120 = 121 = 122 = 123 = 124 = 125 = 126 = 127 = 128 = 129 = 130 = 131 = 132 = 133 = 134 = 135 = 136 = 137 = 138 = 139 = 140 = 141 = 142 = 143 = 144 = 145 = 146 = 147 = 148 = 149 = 150 = 151 = 152 = 153 = 154 = 155 = 156 = 157 = 158 = 159 = 160 = 161 = 162 = 163 = 164 = 165 = 166 = 167 = 168 = 169 = 170 = 171 = 172 = 173 = 174 = 175 = 176 = 177 = 178 = 179 = 180 = 181 = 182 = 183 = 184 = 185 = 186 = 187 = 188 = 189 = 190 = 191 = 192 = 193 = 194 = 195 = 196 = 197 = 198 = 199 = 200 = 201 = 202 = 203 = 204 = 205 = 206 = 207 = 208 = 209 = 210 = 211 = 212 = 213 = 214 = 215 = 216 = 217 = 218 = 219 = 220 = 221 = 222 = 223 = 224 = 225 = 226 = 227 = 228 = 229 = 230 = 231 = 232 = 233 = 234 = 235 = 236 = 237 = 238 = 239 = 240 = 241 = 242 = 243 = 244 = 245 = 246 = 247 = 248 = 249 = 250 = 251 = 252 = 253 = 254 = 255 = 256 = 257 = 258 = 259 = 260 = 261 = 262 = 263 = 264 = 265 = 266 = 267 = 268 = 269 = 270 = 271 = 272 = 273 = 274 = 275 = 276 = 277 = 278 = 279 = 280 = 281 = 282 = 283 = 284 = 285 = 286 = 287 = 288 = 289 = 290 = 291 = 292 = 293 = 294 = 295 = 296 = 297 = 298 = 299 = 300 = 301 = 302 = 303 = 304 = 305 = 306 = 307 = 308 = 309 = 310 = 311 = 312 = 313 = 314 = 315 = 316 = 317 = 318 = 319 = 320 = 321 = 322 = 323 = 324 = 325 = 326 = 327 = 328 = 329 = 330 = 331 = 332 = 333 = 334 = 335 = 336 = 337 = 338 = 339 = 340 = 341 = 342 = 343 = 344 = 345 = 346 = 347 = 348 = 349 = 350 = 351 = 352 = 353 = 354 = 355 = 356 = 357 = 358 = 359 = 360 = 361 = 362 = 363 = 364 = 365 = 366 = 367 = 368 = 369 = 370 = 371 = 372 = 373 = 374 = 375 = 376 = 377 = 378 = 379 = 380 = 381 = 382 = 383 = 384 = 385 = 386 = 387 = 388 = 389 = 390 = 391 = 392 = 393 = 394 = 395 = 396 = 397 = 398 = 399 = 400 = 401 = 402 = 403 = 404 = 405 = 406 = 407 = 408 = 409 = 410 = 411 = 412 = 413 = 414 = 415 = 416 = 417 = 418 = 419 = 420 = 421 = 422 = 423 = 424 = 425 = 426 = 427 = 428 = 429 = 430 = 431 = 432 = 433 = 434 = 435 = 436 = 437 = 438 = 439 = 440 = 441 = 442 = 443 = 444 = 445 = 446 = 447 = 448 = 449 = 450 = 451 = 452 = 453 = 454 = 455 = 456 = 457 = 458 = 459 = 460 = 461 = 462 = 463 = 464 = 465 = 466 = 467 = 468 = 469 = 470 = 471 = 472 = 473 = 474 = 475 = 476 = 477 = 478 = 479 = 480 = 481 = 482 = 483 = 484 = 485 = 486 = 487 = 488 = 489 = 490 = 491 = 492 = 493 = 494 = 495 = 496 = 497 = 498 = 499 = 500 = 501 = 502 = 503 = 504 = 505 = 506 = 507 = 508 = 509 = 510 = 511 = 512 = 513 = 514 = 515 = 516 = 517 = 518 = 519 = 520 = 521 = 522 = 523 = 524 = 525 = 526 = 527 = 528 = 529 = 530 = 531 = 532 = 533 = 534 = 535 = 536 = 537 = 538 = 539 = 540 = 541 = 542 = 543 = 544 = 545 = 546 = 547 = 548 = 549 = 550 = 551 = 552 = 553 = 554 = 555 = 556 = 557 = 558 = 559 = 560 = 561 = 562 = 563 = 564 = 565 = 566 = 567 = 568 = 569 = 570 = 571 = 572 = 573 = 574 = 575 = 576 = 577 = 578 = 579 = 580 = 581 = 582 = 583 = 584 = 585 = 586 = 587 = 588 = 589 = 590 = 591 = 592 = 593 = 594 = 595 = 596 = 597 = 598 = 599 = 600 = 601 = 602 = 603 = 604 = 605 = 606 = 607 = 608 = 609 = 610 = 611 = 612 = 613 = 614 = 615 = 616 = 617 = 618 = 619 = 620 = 621 = 622 = 623 = 624 = 625 = 626 = 627 = 628 = 629 = 630 = 631 = 632 = 633 = 634 = 635 = 636 = 637 = 638 = 639 = 640 = 641 = 642 = 643 = 644 = 645 = 646 = 647 = 648 = 649 = 650 = 651 = 652 = 653 = 654 = 655 = 656 = 657 = 658 = 659 = 660 = 661 = 662 = 663 = 664 = 665 = 666 = 667 = 668 = 669 = 670 = 671 = 672 = 673 = 674 = 675 = 676 = 677 = 678 = 679 = 680 = 681 = 682 = 683 = 684 = 685 = 686 = 687 = 688 = 689 = 690 = 691 = 692 = 693 = 694 = 695 = 696 = 697 = 698 = 699 = 700 = 701 = 702 = 703 = 704 = 705 = 706 = 707 = 708 = 709 = 710 = 711 = 712 = 713 = 714 = 715 = 716 = 717 = 718 = 719 = 720 = 721 = 722 = 723 = 724 = 725 = 726 = 727 = 728 = 729 = 730 = 731 = 732 = 733 = 734 = 735 = 736 = 737 = 738 = 739 = 740 = 741 = 742 = 743 = 744 = 745 = 746 = 747 = 748 = 749 = 750 = 751 = 752 = 753 = 754 = 755 = 756 = 757 = 758 = 759 = 760 = 761 = 762 = 763 = 764 = 765 = 766 = 767 = 768 = 769 = 770 = 771 = 772 = 773 = 774 = 775 = 776 = 777 = 778 = 779 = 780 = 781 = 782 = 783 = 784 = 785 = 786 = 787 = 788 = 789 = 790 = 791 = 792 = 793 = 794 = 795 = 796 = 797 = 798 = 799 = 800 = 801 = 802 = 803 = 804 = 805 = 806 = 807 = 808 = 809 = 810 = 811 = 812 = 813 = 814 = 815 = 816 = 817 = 818 = 819 = 820 = 821 = 822 = 823 = 824 = 825 = 826 = 827 = 828 = 829 = 830 = 831 = 832 = 833 = 834 = 835 = 836 = 837 = 838 = 839 = 840 = 841 = 842 = 843 = 844 = 845 = 846 = 847 = 848 = 849 = 850 = 851 = 852 = 853 = 854 = 855 = 856 = 857 = 858 = 859 = 860 = 861 = 862 = 863 = 864 = 865 = 866 = 867 = 868 = 869 = 870 = 871 = 872 = 873 = 874 = 875 = 876 = 877 = 878 = 879 = 880 = 881 = 882 = 883 = 884 = 885 = 886 = 887 = 888 = 889 = 890 = 891 = 892 = 893 = 894 = 895 = 896 = 897 = 898 = 899 = 900 |
a:aiulloglab
g
0.560/50-20240-100
500-26.5
jpaJd2JxJScdeLw 3deLw 100.36x6..
55
设 S = S1 与 S = S2
yaiui jy gial 3 aagai ydi ci 1g qal hiai
aal 1000 CE y jg o
aolllg lgl y 1y 15 aas gaa 15 aiaabla 15 aaii
CE
a#spolis gistelll joljpaacssy
a15 1
glby1 all 3 b5y1 y
a#
10
Jaiw wgi jao aoy 1
(12) jll be bcdol Jdcl 100143j0 SaaS.2a0y1 aagg 151 2
111111111111111111111111111
3
aai 13i jia aie iuiu oai jie ai bai gai alljy p3 .4
5
| x^ | = 1| x| · | r1^2 + r2^2 + r_3^2| ≤ 34| x| ^2
5.1
goa Jou5b.(1)
355>6d 1250
y
5aJyai 52
a. a. 12 a. a. 12
(2g0g)
J 8Lgj1 j
a 1
j03 00g;0gjj1 a, jyll c9g
CioSlo 1aL 1
#
a 5jgl gjjgall jgalll
Jaaal Caiol Jao plucuus
aIgBolalolulusuie yolladoljgllgoggi
jaiy jaiy jaiy aay ay aan yaae yaaa
aaii 1000000000000000000000000000000000000000000
aill jyjll jayb yjdl jyol pluul pueie. jau
12 65 31 40 10
aagglg 100
i
(1)
。
m = 311
1
(c)
m = 311
J 1
1 1 1
aaii
i111 1j

Jgall jag gally Jai Jyj dle!
aIg aIg 10000000000000000000000000000
S BCD = S COD + S_ BDO
y
j 1 1 1 1 1 1 1 1 1 1 1 1 1 1 1 1 1 1 1 1 1 1 1 1 1 1 1
1