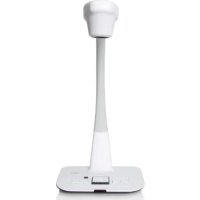
DC554 - Document camera OPTOMA - Free user manual and instructions
Find the device manual for free DC554 OPTOMA in PDF.

| Product Type | Document Camera (visualizer) |
| Brand | Optoma |
| Model | DC554 |
| Power Supply | 5V DC power adapter (100-240V AC) |
| HDMI Output Resolution | 720p, 1080i, 4K (3840x2160) at 30 Hz |
| VGA Output Resolution | XGA (1024x768), UXGA (1600x1200), 720p (1280x720), WXGA (1280x800) |
| Capture Resolution | Up to 13M (still) |
| Zoom | Optical and digital zoom 2X/4X quick |
| Focus | Autofocus (AF) and manual |
| Lighting | Built-in LED lamp, adjustable brightness |
| Storage | SD/SDHC card slot, internal memory |
| Connectivity | HDMI (input/output), VGA (input/output), USB (type B for PC) |
| Video Formats | Recording in AVI |
| Special Functions | Picture-in-Picture (PIP), highlight, hide, anti-glare, rotate 90°/180°, freeze image, slideshow |
| Built-in Microphone | Yes, with speaker |
| Remote Control | Infrared (AAA batteries) |
| OSD Languages | Multilingual (including French) |
| Maintenance | Clean with a soft, dry cloth. Do not use solvents. |
| Safety | Do not look directly at the LED light source. Use with care to avoid shocks. |
| Included Accessories | Power adapter, USB cable, anti-glare sheet, remote control (batteries not included) |
| Dimensions (approx.) | Folded base: approx. 30 x 25 x 10 cm |
| Weight (approx.) | Approximately 1.5 kg |
Frequently Asked Questions - DC554 OPTOMA
User questions about DC554 OPTOMA
0 question about this device. Answer the ones you know or ask your own.
Ask a new question about this device
Download the instructions for your Document camera in PDF format for free! Find your manual DC554 - OPTOMA and take your electronic device back in hand. On this page are published all the documents necessary for the use of your device. DC554 by OPTOMA.
USER MANUAL DC554 OPTOMA
Thanks for purchasing this product. Please read the instructions carefully before using this product.
• FCC Compliance Statement (Class A):
This device complies with Part 15 of the FCC Rules. Operation is subject to the following two conditions: (1) this device may not cause harmful interference, and (2) this device must accept any interference received; including interference that may cause undesired operation.
• Federal Communications Commission (FCC) Statement :
This Equipment has been tested and found to comply with the limits for a Class A digital device, pursuant to Part 15 of the FCC rules.

text_image
FEDERAL COMMUNICATION COMMISSION U.S.A. FCThese limits are designed to provide reasonable protection against harmful interference when the equipment is operated in a commercial environment. This equipment generates, uses and can radiate radio frequency energy and, if not installed and used in accordance with the instructions, may cause harmful interference to radio communications. Operation of this equipment in a residential area is likely to cause harmful interference in which case the user will be required to correct the interference at his own expense.
• European Community Compliance Statement (Class A):
This is a class A product. In a domestic environment this product may cause radio interference in which case the user may be required to take adequate measures.

The symbol of the crossed out wheeled bin indicates this product should not be placed in municipal waste. Instead, you need to dispose of the waste equipment by handing it over to a designated collection point for the recycling of waste electrical and electronic equipment.

natural_image
Symbol of a trash bin crossed with no visible text or labelsWarning
- Do not look directly at the LED light source, which may cause retinal damage.
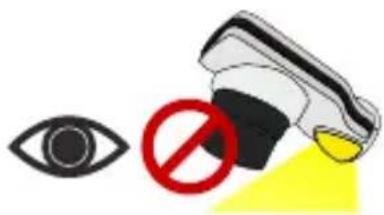
text_image
Safety warning symbol with eye, no sign, and yellow highlight on a device- Carry the product by holding the lower part of the main unit in both hands. Never hold the product by the arm or the camera head only.
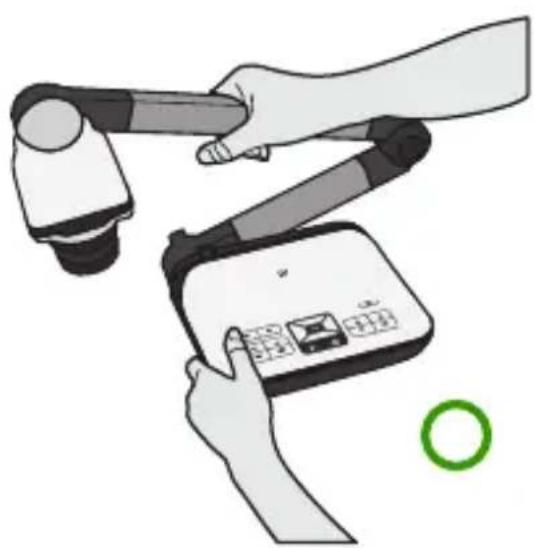
natural_image
Illustration of hands using a robotic arm to interact with a handheld device (no text or symbols visible)
natural_image
Illustration of a hand using a robotic arm to lift a device, with a red X mark indicating cancellation (no text or symbols present)-
The camera can be damaged if it hits a desk surface or any hard object.
-
Never turn the arm in the opposite direction.
Preparing the Document Camera
» Knowing the Document Camera Parts
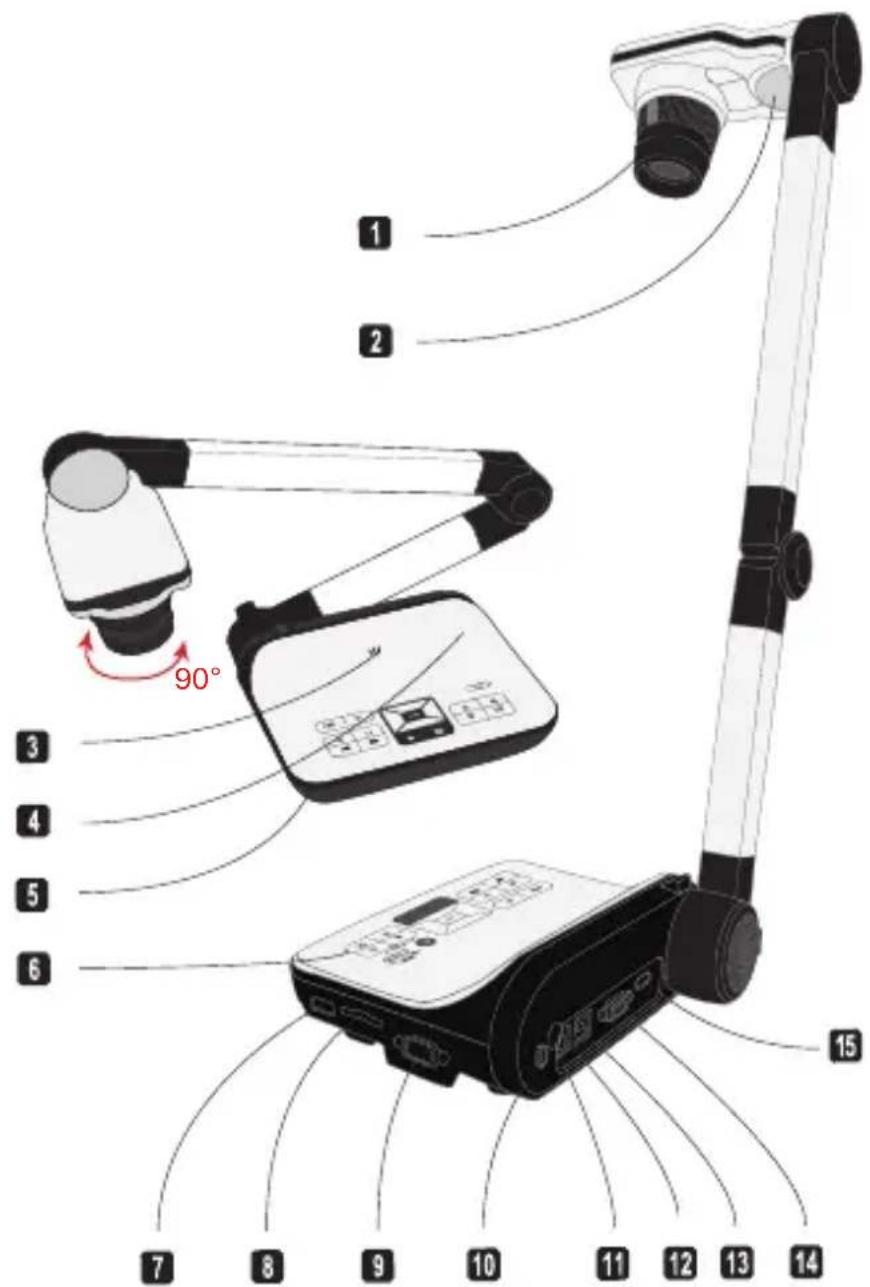
text_image
1 2 3 4 5 6 7 8 9 10 11 12 13 14 15 90°1 Camera Head
2 LED Lamp
3 Speaker
4 Microphone
5 Remote Control Signal Receiver
6 Control Panel
7 HDMI Input Port
SD Card Slot
9 VGA Input Port
10 Anti-theft Slot
11 Remote Control Signal Receiver
12 DC 5V Power Socket
13 USB Port
14 VGA Output Port
15 HDMI Output Port
text_image
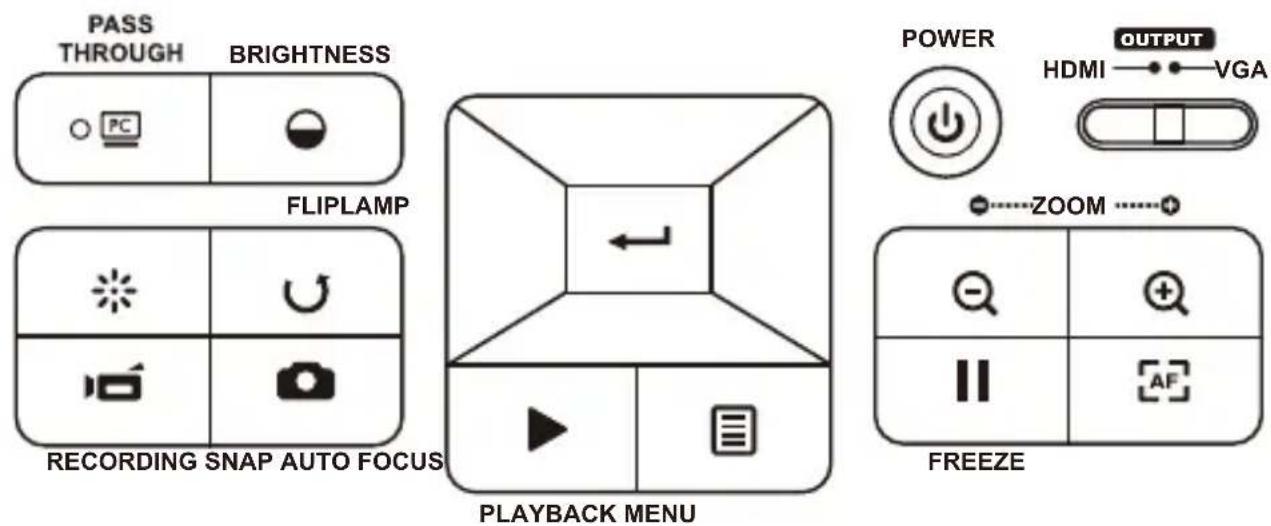
PASS THROUGH BRIGHTNESS FLIPLAMP RECORDING SNAP AUTO FOCUS PLAYBACK MENU POWER HDMI OUTPUT VGA ZOOM FREEZE| Button | Function |
| Power on/off | |
| Invert image 180° | |
| "Freeze" the current image or "Pause" the clip while playing video | |
| Capture a still image | |
| Show or hide Menu | |
| Direction button | |
| Zoom out | |
| Zoom in | |
| One-time auto focus |
| Button | Function |
 | Pass the signal from PC |
 | Show/hide brightness adjustment bar. |
 | Turn on/off the LED lamp and adjust the brightness. |
 | Record a video clip |
 | Enter playback mode to display recorded still images and video clips |
 | Output switch |
 | Brightness hotkey |
 | Power on / off |
| [wezad] | Freeze current image.* Pause the clip while playing videos |
 | Show or hide on-screen icons |
 | To show or hide OSD menu |
| [wezal] | Playback mode to display recorded pictures and video clips |
 | Invert image 180° |
 | Select and adjust |
| [wezal] | Record a video clip |
| [wezal] | Capture a still image |
 | om out / Zoom in |
 | One-shot auto focus |
 | Use the level bar to adjust the focus manually |
 | 2X or 4X digital zoom |
 | Highlight function on / off |
 | Mask function on / off |
 | Macro / Normal switch |
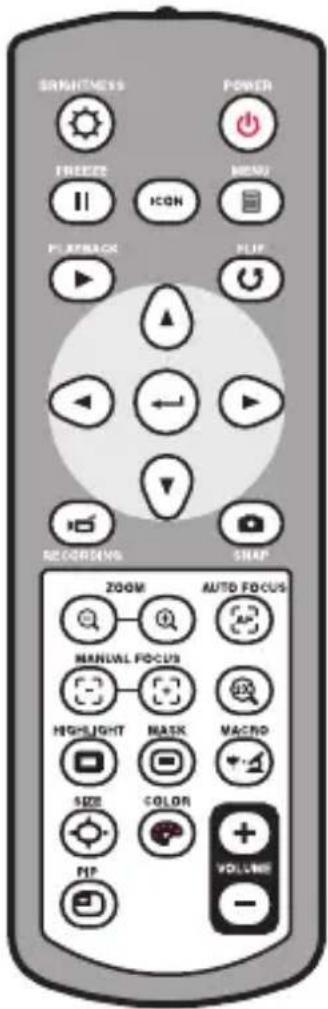
text_image
SMARTNESS POWER FREEZ MENU ICON PLAYBACK PLIP RECORDING SNAP ZOOM AUTO FOCUS MANUAL FOCUS HIGHLIGHT MASK MACRO SIZE COLOR PIP VOLUME -| Button | Function |
 | Adjust highlighted / masked area size |
 | Set color for highlighted / masked area |
 | Increase / decrease the sound volume. |
 | Picture in Picture function on / off *For displaying a still image as an insert while displaying another image. |
Infrared remote control can only be used in proximity to the unit.
Remove the battery cover and load the batteries into the battery compartment correctly according to the “+” and “-” symbols.
① Be sure to use two AAA batteries. Do not use new and old batteries or different battery types together.
text_image
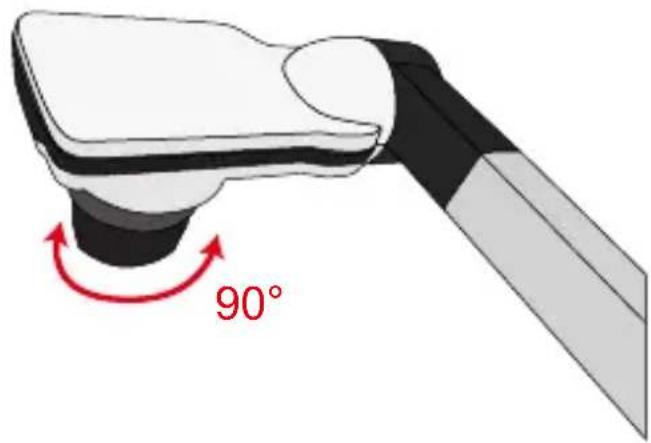
90°- Camera Head
Roll the lens rotator to rotate image 90°.
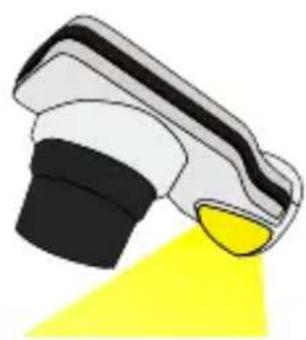
- Illumination Lamp
If you are in a dark environment, please turn the LED lamp on to make better exposure.
- Press the LED lamp button ( Ⓐ ) on the base to turn on/off the LED lamp.
- Adjusting the brightness by pressing the lamp button ( Ⓐ)
natural_image
Illustration of a spray gun with black and white casing emitting yellow light (no text or symbols)
natural_image
Illustration of a medical or laboratory device with a pen and a printed document labeled 'A' (no text or symbols on the devices themselves)- Menu options in Preview Mode
| Name Icon Option Description | |||
| Brightness |  | Use the Right / Left buttons to make the image brighter / darker | |
| Effect |  | Graphic | To improve the tint of color-based subjects such as pictures or figures. |
 | Text | The function is designed especially for text-based documents to which can be enhanced white and black subjects such as characters and lines. | |
 | B&W | To output a black & white camera image.To make the image easier to view,select this when shooting black & white documents etc. | |
 | Negative To output a negative image. | ||
 | Sketch To output a sketch image | ||
| White Balance |  | Auto | There are various modes (Auto, Fluescent, Tungsten and Custom) for user to choose and fit in different surroundings. |
 | Fluorescent | ||
 | Tungsten | ||
 | Custom | ||
| Quick Zoom 2X / 4X Set |  | quick zoom to 2X or 4X. | |
| Marco |  | Normal | Select standard mode for focus distance from 25cm to infinite. |
 | Macro / Microscope | Select Macro/Microscope mode to take close-ups or while connecting to a microscope. | |
| Image Size 0.8M / 2M / |  | 3M | Select the desired still image resolution. |
| Video Mode |  | High Quality | Select the desired video quality. |
 | High Frame Rate | ||
| Setting | |||
| Beep On / Off Enable be |  | ound on / off | |
| Flicker 50Hz / 60Hz |  | Set flicker frequency to 50Hz or 60Hz. The flicker setting is based on the frequency standard of your local power supply. | |
| USB Connection |  | Disk | Select “Disk” to enter Mass storage Mode |
 | PC cam | Select “PC Cam” to enter PC Cam Mode | |
 | Off Disable USB function | ||
| HDMI Out |  | 720p/1080i/4K | Select output resolution |
| VGA Out |  | XGA/UXGA/720p/WXGA | Select output resolution |
| Language - |  | Allows you select the language used for OSD | |
| Clock - Set da |  and time and time | ||
| Format No / Yes |  | Format the storage medium. Note that all files stored in the medium will be gone. | |
| Reset default No / Yes |  | Restore factory defaults. Note that your current settings will disappear. | |
- Menu options in Playback Mode
| Function Icon Option D | Description | ||
| File Info - |  | View the file's title, saved date and time, size and the length of recording. | |
| Slide show On / Off |  | Start a slide show with selected interval time. | |
| Volume |  | - | Use the Right / Left buttons to adjust volume |
| Delete one Yes / No |  | Delete current file. | |
| Delete all |  | Yes / No | Delete all images of the same type stored in the memory. |
• Adjusting the brightness
-
Press BRIGHTNESS button on the control panel (○) or remote control (○).
-
Use (◀ or ▶) buttons to increase or decrease the brightness level.
- Zoom Function
- Use the Zoom button ( + ) to zoom in or zoom out the screen.
- Adjusting the focus
- Automatic focus
Press AF button ( ) to do all one-time auto focus.
This function provides a one-shot auto focus.
- Manual focus
Use the manual focus buttons ( / ) on remote control to finetune the focus.
- Anti-glare
Anti-glare sheet is a transparent plastic that is overlaid on top of shiny object or glossy surface to reduce the glare.
To use, simply place the anti-glare sheet on top of shiny object to glossy surface such as magazine to reduce light reflection.
- Inserting and Ejecting a SD / SDHC card (Not supplied)
- Insert a memory card (SD/SDHC/MMC/MMC 2.0) with the label facing up until it reaches the end of the slot.
- When the card is inserted successfully, the icon (☐) will appear on screen and the internal memory will become inaccessible.
- To remove the card, push the card to release it and then pull it out gently.
When using a new memory card, you are recommended to format the card with the device. Do not turn off the device while formatting the SD card.
Even if your card has been formatted on other devices, you may have to reformat the card with the device.
If no external storage devices are connected, all files will be saved in the built-in memory.
• Recording a video clip / Taking a still picture
- Set the capture or record resolution.
- Choose the focus mode according to distance to object:
⊕ / ⊖ to zoom in or zoom from the screen.
- Press the Recording button ( ) to start recording and press it again to stop recording
- Press the Snap button ( ) to take a still picture.
| Output Switch Resolution Setting Recording resolution | ||
| VGA | XGA 1024 x 768 | |
| UXGA 1024 x 768 | ||
| 720p 1280 x 720 | ||
| WXGA 1280 x 800 | ||
| HDMI | 720P 1280 x 720 | |
| 1080i 1920 x 1080 | ||
| 4K | 1920 x 1080 | |
- Playback
- Press PLAYBACK button (▶)
- The last recorded picture or video clip will play.
- Use Up /Down button to choose files.
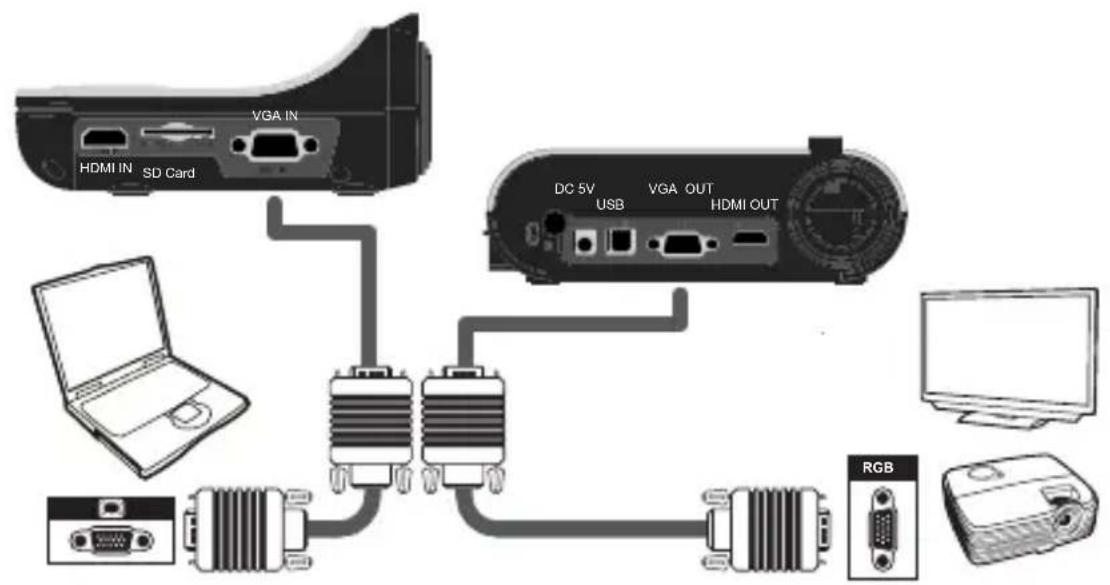
- System Diagram
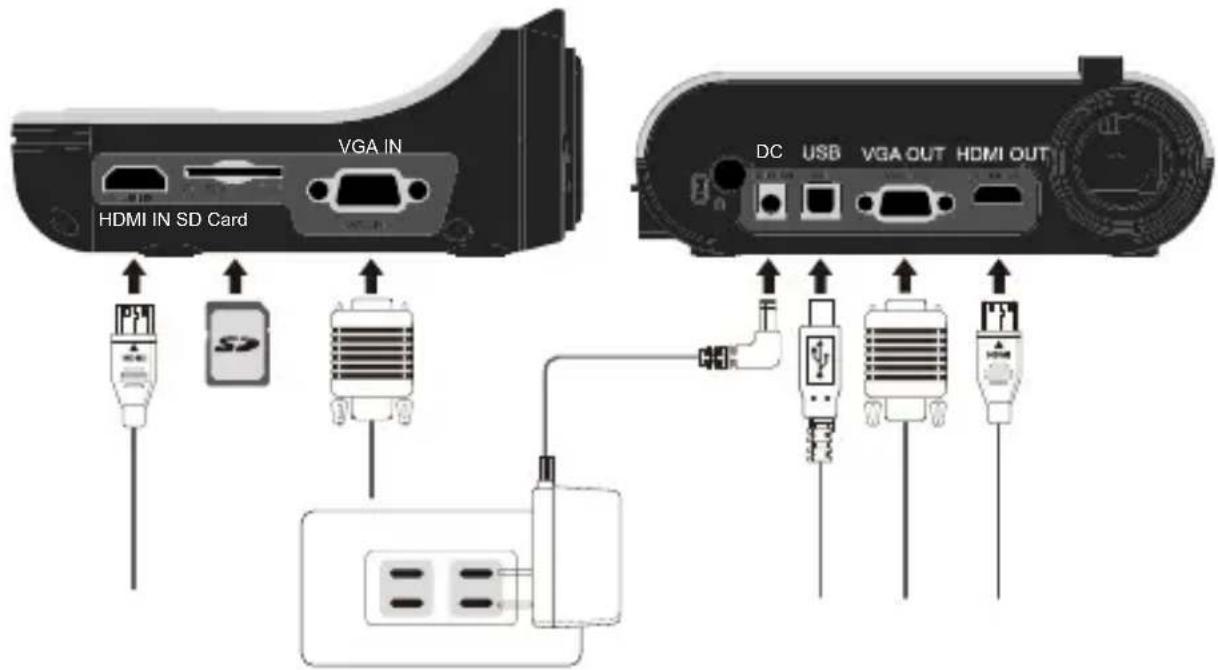
text_image
VGA IN HDMI IN SD Card DC USB VGA OUT HDMI OUTStep 1 / Plugging in the Power Outlet
Use power adapter to connect DC IN connector on the product to a standard 100V\~240V AC power outlet.
The type of power adapter is depending on your countries / regions.
Step 2 / Output Resolution and Aspect Ratio.
Various output resolutions are available depending on the output and aspect ratio setting. Please refer to the table listed below :
| Output Aspect | Ratio Resolution Vertical Frequency | ||
| VGA | 4:3 | 1024 x 768 | 50 / 60 Hz |
| 1600 x 1200 | |||
| 16:9 | 1280 x 720 | 50 / 60 Hz | |
| 1280 x 800 | |||
| HDMI 16:9 | 1280 x 720 | 50 / 60 Hz | |
| 1920 x 1080 | |||
| 4K (3840 x 2160) 30 | Hz | ||
*Document camera will downgrade the output resolution automatically when the connected display device doesn't support highest resolution.Idet vesse ipicta tusa L. Sere con vividi, caesseniu morumus est C. Ediem, Patilin denihice condam intereipes consign onveraes mente patu sentr
Step 3 / Connecting with Components
| Product Port | Cable | Display Device Port | PC Port | |
| VGA |  RGB OUTPUT RGB OUTPUT |  |  RGB INPUT RGB INPUT | |
 RGB INPUT RGB INPUT |  |  RGB OUTPUT RGB OUTPUT | ||
| HDMI |  HDMI OUT HDMI OUT |  |  | |
 HDMI IN HDMI IN |  |  | ||
| USB |  TYPE B Port TYPE B Port |  |  TYPE A Port TYPE A Port |  TYPE A Port TYPE A Port |
- Connect via VGA OUTPUT
To display images, you can use VGA cable to connect to your television's RGB port via the VGA OUT connector.
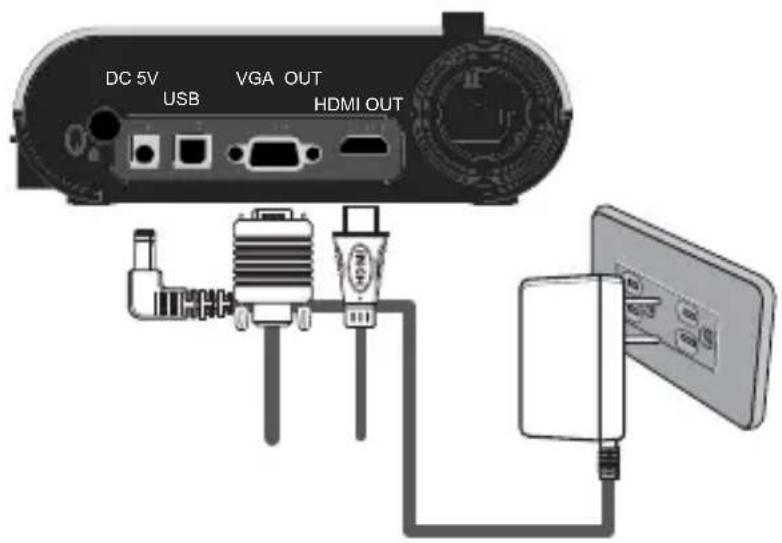
text_image
DC 5V USB VGA OUT HDMI OUT- Connect via USB
Press MENU ( ☐) button → select "USB Connect".
Choose "Disk" to connect mass storage.
Choose "PC Cam" to use as a PC-Cam.
• Copying files to your computer
Please notice that the video clips are recorded in AVI format and are compiled as CLIPxxxx.avi (xxxx are four serial numbers).
Before viewing these videos on your PC, you may need to install some media programs.
- Turn on the document camera.
- Connect the product to your computer with USB cable.
- Press MENU (☐) → select "USB Connect" → choose "Disk". The built-in memory or external memory will be detected.
Then, You can view the image data on a SD card on the PC's viewer software or simply cut/copy and paste the file to your PC.
• Using product as a PC cam
- Connect the product to your computer.
Turn on your computer, then connect the accessory USB cable to the USB port of your computer.
Make sure the connector and the port are aligned correctly.
Switch to PC Cam mode.
Connect the other end of the USB cable to the main unit.
Power on press MENU (☐) → Setting → select USB Connect → select PC Cam (💡) and press OK button to confirm.
- Launch PC Camera
After the product is correctly connected to and detected by your PC, you are ready to use PC Camera function.
• Passthrough Function
To display computer image, press PASSTHROUGH button (PC) on the control panel.
For laptop to output display mode, use the keyboard command (Fn + □) to switch between the display modes. For different command, please refer to your laptop manual.
The signal is only pass through from VGA IN port to VGA OUT port or HDMI In port to HDMI Out port on document camera.
Please connect an output device to display the image on computer.
text_image
VGA IN HDMI IN SD Card DC 5V VGA OUT USB HDMI OUT LCD RGBFor laptop to output display mode, use the keyboard command (Fn + □) to switch between the display modes. For different command, please refer to your laptop manual.
- Highlight function
- Use the Highlight display to draw attention to a particular section of the output image.
- Press the Highlight button ( ☐ on the remote control, and use the
- Mask function
- You can mask a section of the output image.
- Press the Mask button ( □) on the remote control, and use the direction buttons to move the masked area.

natural_image
Close-up of a decorative stone carving with a central emblem, set against a blue background (no visible text or symbols)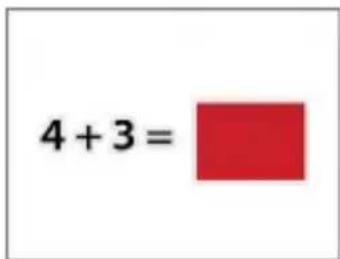
text_image
4 + 3 =- Press the Size button ( ) on the remote control, and use the direction buttons to adjust the highlighted / masked size.
Press the Color button ( ) on the remote control, and use the direction buttons to adjust the color of highlighted / masked area.
- PIP (Picture in Picture) function
- Press the PIP button (9) to display an around quarter-size still image on a live display.
- Use the up / down button to move the still image to the top left and bottom left.
- Use the left or right button to change the shift between still images.

natural_image
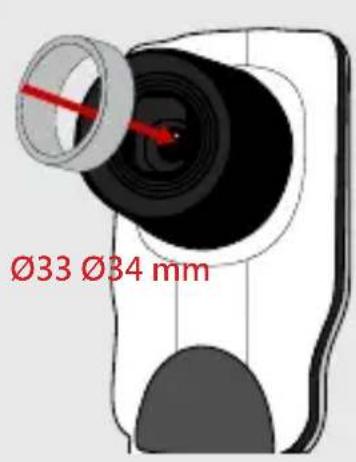
Blue and white porcelain plate with floral patterns, no visible text or symbols- Connect to a microscope
Connect to a microscope enables you to examine microscopic objects on a big screen.
- Adjust the microscope and focus objects.
-
Choose an appropriate microscope adapter.
-
Microscope adapter accessories are applicable to ∅28mm, ∅31mm, ∅33mm, and ∅34mm eyepieces.
For eyepieces of about ∅33mm and ∅34mm, only a microscope adaptor with ∅28 or ∅34mm label should be installed.
For a ∅28mm eyepiece, insert the ∅28mm adapter into the microscope adapter.
For a ∅31mm eyepiece, insert the ∅31mm adapter into the microscope adapter.
text_image
Ø33 Ø34 mm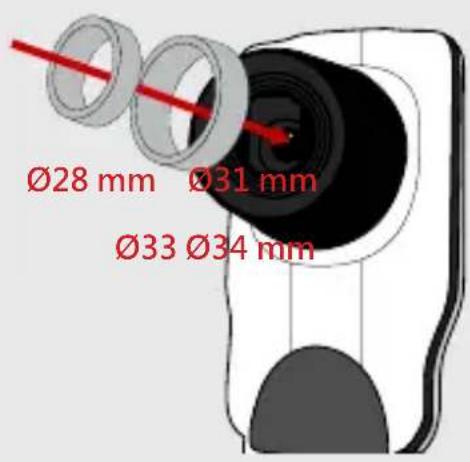
text_image
Ø28 mm Ø31 mm Ø33 Ø34 mm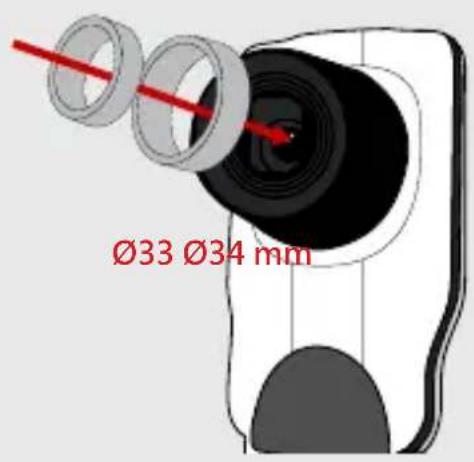
text_image
Ø33 Ø34 mm- Mount the microscope adapter onto the Lens.
- Switch the focus mode to Macro. Press MENU (☐--> select Focus (☐-->select Macro or press Macro button ( )() on remote
controller.

text_image
Focus: Macro- Connect the lens with microscope adapter to the microscope.
If the image is not clear. Please adjust the focus of microscope.
Press the AF button (A) for use the manual focus button on remote control to fine-tune the focus.
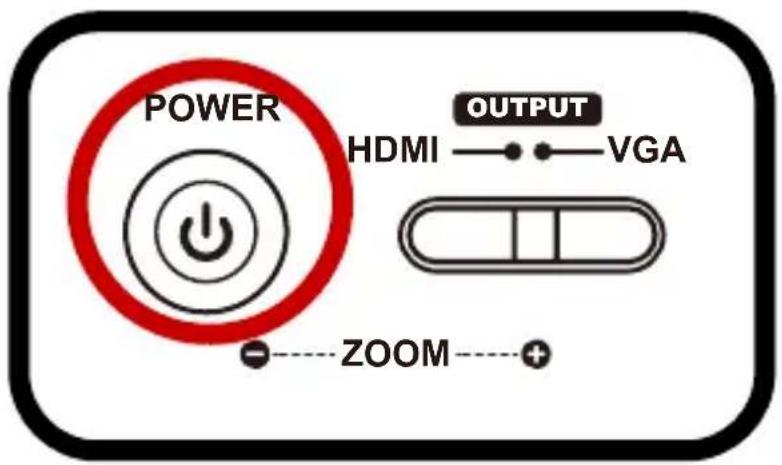
- Power off the product.
text_image
POWER HDMI —— VGA OUTPUT ZOOM —— +-
Unplug the AC adapter from the wall outlet. Disconnect the AC Adapter and all cables.
-
Fold the camera head and arms in the way shown in the figure.

natural_image
Illustration of hands inserting a plug into a wall-mounted power outlet (no text or symbols)
natural_image
Illustration of a handheld electronic device with a screen and keypad (no visible text or symbols)| Problem Cause Solution | ||
| Cannot power on normally. | The AC adapter is not correctly connected to the wall outlet or the document camera. | Re-connect one end of the AC adapter to the document camera and the other end to a wall outlet. |
| Cannot take pictures and video clips. | Out of memory. Free some space from the SD / MMC card or the internal memory. | |
| Using a “protected” SD card. Set the SD card to be written in. | ||
| No image output after connecting. | The document camera is not correctly connected to the external device. | Re-connect all related cables with the external device correctly. |
| Incorrect input type of display output device. | Set up correct input type of display output device. | |
| Incorrect output switch setting for display device. | Switch output switch to correct mode. | |
| PC pass through button indicator is on. | Press [pass through button to turn off the function. | |
| The image is fuzzy. Probably the distance of object is too close to the lens. | Press AF button to auto focus or adjust by Manual Focus. | |
| Select Macro mode if the distance is less 20cm. | ||
| The image is reverse. | The document is not put in the recommend working area. | Press [button to adjust the direction. |
| The image dose not move. | Camera image is set to Freeze []. | Press the [button on the control panel again toun-pause. |
| Remote control cannot work. | No power. Replace the AAA batteries in the remote control. | |
| Object is blocking the remote control signal receiver of the product. | Remove obstruction in front of the product. | |
| The distance of usage is too far. | Stand closer to the product to use the remote control. | |
| The LCD screen displays “MEMORY ERROR” or “CARD ERROR” message or memory card cannot be read. | The format of the memory card is not compatible with the document camera. | Format the card. |
| The memory card is corrupted. | Replace the memory card with a new one. | |
| Cannot delete the pictures and video clips, and also cannot find them in the memory card. | The lost recordings are saved in the internal memory. | The lost recordings are saved in the internal memory. |
| Cannot view the video clips on my computer. | Software is not installed on the computer. | Software is not installed on the computer. |
| TV screen does not display after connecting the product to TV. | The product is not correctly connected to the TV. | Reconnect the product to TV correctly. |
| Noises occur when viewing images on the LCD screen or on the computer. | The flicker setting does not match the standard of the country you are staying. | Adjust the flicker setting .For more information, please refer to the “Flicker Settings” table. |
DC554
natural_image
Illustration showing an eye symbol, a prohibition sign, and a stylized helmet with yellow highlights (no text or labels)natural_image
Illustration of hands interacting with a robotic arm and a handheld device (no text or symbols visible)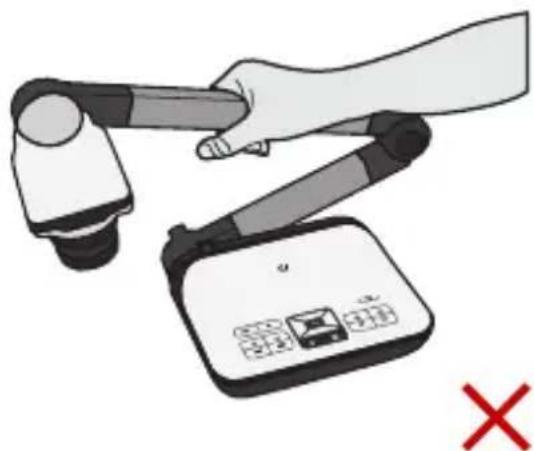
natural_image
Illustration of a robotic arm interacting with a digital device, marked with a red X (no text or symbols present)text_image
Illustration showing a medical or laboratory device and a document with visible text 'A' and colored bars, likely indicating a report or section.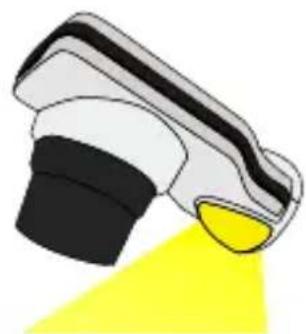
natural_image
Illustration of a stylized object with a yellow highlight, no text or symbols presentnatural_image
Stone carving of a seated figure with a banner, set against a blue background (no readable text or symbols)
text_image
4 + 3 =natural_image
Blue and white porcelain plate with floral patterns and a small circular inset showing a decorative emblem (no text or symbols)text_image
Focus:Macronatural_image
Illustration of hands inserting a black plug into a wall-mounted power outlet (no text or symbols)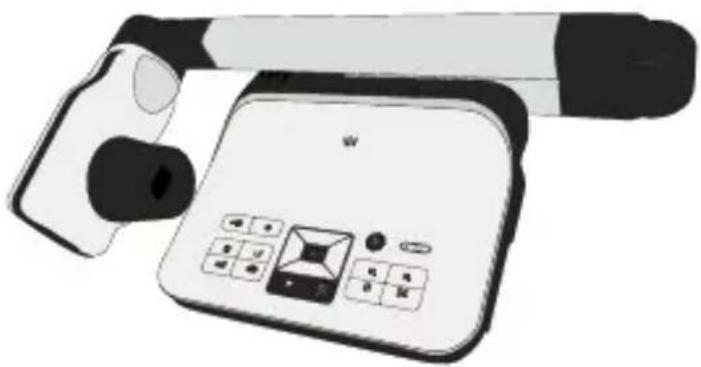
natural_image
Illustration of a handheld electronic device with a keypad and screen (no text or symbols visible)natural_image
Symbol of a trash bin crossed with a diagonal line, no text or numbers presentAvertissement
text_image
Safety warning symbol with eye, no sign, and yellow highlight on a devicenatural_image
Illustration of hands using a robotic arm to interact with a handheld device (no text or symbols visible)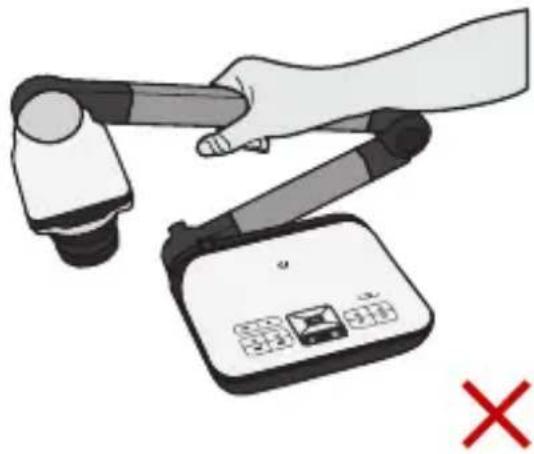
natural_image
Illustration of a hand using a robotic arm to lift a device, with a red X mark indicating cancellation (no text or symbols present)natural_image
Illustration of a spray gun with black and white casing, emitting yellow light (no text or symbols)
text_image
Illustration showing a medical or laboratory device interacting with a printed document labeled 'A', likely for scientific or technical purposes.natural_image
Exterior view of a modern office building (no signage)
text_image
4 + 3 =natural_image
Blue and white porcelain plate with floral patterns, no visible text or symbolstext_image
Focus:Macronatural_image
Illustration of hands inserting a black plug into a wall-mounted socket (no text or symbols)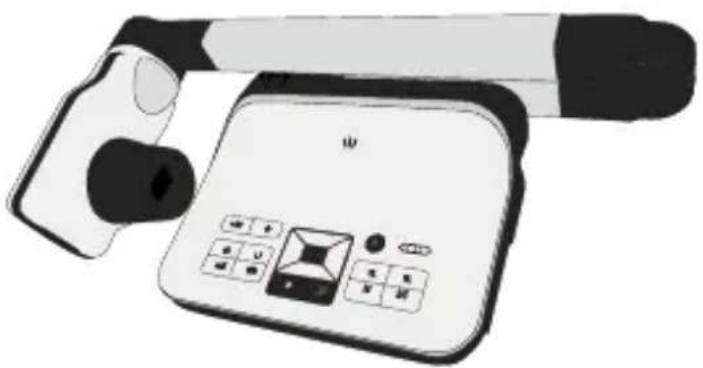
natural_image
Illustration of a handheld electronic device with a keypad and screen (no text or symbols visible)natural_image
Symbol of a trash bin crossed with no text or numbers, representing waste sorting or disposal (no text present)Advertencia
text_image
Safety warning symbol with eye, no sign, and yellow highlight on a devicenatural_image
Illustration of hands using a robotic arm to interact with a handheld device (no text or symbols visible)
natural_image
Illustration of a hand using a robotic arm to lift a device, with a red X mark indicating cancellation (no text or symbols present)natural_image
Illustration of a spray gun with black and white casing, emitting yellow light (no text or symbols)
text_image
Illustration showing a medical or laboratory device interacting with a printed document labeled 'A', likely representing a medical or lab report.natural_image
Close-up of a stone carving with a small figure, set against a blue background (no text or symbols visible)