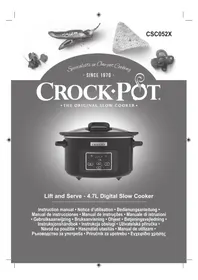
Express CSC051X - Slow cooker CROCK POT - Free user manual and instructions
Find the device manual for free Express CSC051X CROCK POT in PDF.
| Product Type | Slow cooker / multi-function pressure cooker |
| Brand | CROCK POT |
| Model | Express CSC051X |
| Capacity | Approx. 6 liters (estimated) |
| Power | Approx. 1000-1200 W (estimated) |
| Power supply | 220-240 V ~ 50/60 Hz |
| Main functions | Slow cooking (Low/High), pressure cooking, steaming, browning/sautéing, rice/risotto, keep warm, delayed start |
| Display | Digital display with timer and indicators |
| Settings | Time, temperature and pressure adjustment according to program |
| Safety | Float valve, steam release valve, lid locking, automatic shut-off |
| Cooking pot | Removable, non-stick coating, dishwasher-safe (hand washing recommended) |
| Included accessories | Plastic spoon, steaming basket, condensation collector |
| Care and cleaning | Clean after complete cooling; pot and accessories washable by hand (pot dishwasher-safe); seal and valve to be cleaned regularly; do not immerse the base |
| Spare parts and repairability | Replaceable sealing ring (every 1-2 years); contact after-sales service for repairs; do not open or repair yourself |
| Warranty | 2 years from date of purchase |
| General information | Household use only; do not use for frying; always place on stable surface; minimum clearance 15 cm around |
Frequently Asked Questions - Express CSC051X CROCK POT
User questions about Express CSC051X CROCK POT
0 question about this device. Answer the ones you know or ask your own.
Ask a new question about this device
Download the instructions for your Slow cooker in PDF format for free! Find your manual Express CSC051X - CROCK POT and take your electronic device back in hand. On this page are published all the documents necessary for the use of your device. Express CSC051X by CROCK POT.
USER MANUAL Express CSC051X CROCK POT
Specialists in One-pot Cooking - SINCE 1970 -
CROCKPOT
Magyar/Hungarian 150
Româna/Romanian 160
6bIraPcKn/Bulgarian 170
ENGLISH
IMPORTANT SAFEGUARDS
IMPORTANT SAFETY NOTICE:
When releasing pressure from the unit, ensure an oven glove is worn and a kitchen utensil is used to gradually open the valve and release pressure. Beware of escaping steam.
NEVER immerse the heating base, power cord or plug into water or any other liquid.
When using electrical appliances, basic safety precautions should always be followed to reduce the risk of fire, electric shock, and/or injury to persons including the following:
- Read all instructions before using this product.
- This appliance shall not be used by children. Keep the appliance and it's cord out of reach of children. Children shall not play with the appliance. Appliances can be used by persons with reduced physical, sensory or mental capabilities or lack of experience and knowledge if they have been given supervision or instruction concerning use of the appliance in a safe way and understand the hazards involved.
- Do not operate any appliance with a damaged cord or plug or after the appliance malfunctions, or has been damaged in any manner. Return the appliance to the manufacturer (see warranty) for examination, repair or adjustment. Do not attempt to replace or splice a damaged cord. If the supply cord is damaged it must be replaced by a special cord or assembly available from the manufacturer or its service agent.
- Do not use outdoors or for commercial purposes.
- Do not use appliance for other than intended use. Misuse can cause injuries. This appliance is not intended for deep frying foods.
- This appliance cooks under pressure when using pressure cooking functions. Improper use may result in scalding injury. Make certain unit is properly closed before operating. See Operating Instructions.
- This appliance generates heat during use. Do not touch hot surfaces. Use handles or knobs.
-
Do not fill the unit over maximum fill line at 2/3 full. When cooking foods that expand during cooking such as rice or dried vegetables, do not fill the unit beyond the recommended level at 1/2 full. Over filling may cause a risk of clogging the vent pipe and developing excess pressure. Follow all cooking and recipe instructions.
-
Always check the pressure release devices for clogging before use. Clean as necessary.
- Place the Multi-Cooker so that the Steam Release Valve is positioned away from the body.
- Never place any part of the body, including face, hands, and arms over the Steam Release Valve. Steam can result in serious burns.
- Do not operate the Multi-Cooker without food or liquid in the Cooking Pot.
- To prevent risk of injury due to excessive pressure, replace Lid Sealing Gasket only as recommended by the manufacturer. See Care and Cleaning instructions.
- Do not use the Lid to carry the Multi-Cooker.
- Do not move or cover the Multi-Cooker while it is in operation.
- After pressure cooking, do not open the pressure cooker until the unit has cooled and all internal pressure has been released. If the Lid is difficult to remove, this indicates that the cooker is still pressurized - do not force it open. Any pressure in the cooker can be hazardous. See Releasing Pressure Instructions.
- Be careful when lifting and removing Lid after cooking. Always to using oven glove tilt the Lid away from you as steam is hot and can result in serious burns. Never place face over the Multi-Cooker.
- Do not use this pressure cooker for pressure frying with oil.
- To protect against electric shock, do not place or immerse power cord, plugs or heating base in water or other liquid.
- Do not use the Cooking Pot for food storage or place in the freezer.
- To prevent damage to the Multi-Cooker do not use alkaline cleaning agents when cleaning. Use a soft cloth and a mild detergent.
- Always plug Power Cord fully into Multi-Cooker first, then plug cord into the wall outlet.
- Unplug from the outlet when not in use, Always unplug and allow to cool before putting on or taking off parts and before cleaning. To disconnect, ensure that the Multi-Cooker is OFF, then unplug Power Cord from outlet. Do not disconnect by pulling on cord.
- Do not let Power Cord hang over edge of table or counter or come into contact with hot surfaces.
-
Extreme caution must be used when moving an appliance containing hot liquids.
-
Never use any accessory or attachment not recommended by the manufacturer.
- Do not place on or near wet surfaces, or heat sources such as a hot gas or electric burner, or in a heated oven.
- CAUTION: To protect against electrical shock and product damage, do not cook directly in the Heating Base. Cook only in the removable Cooking Pot provided.
- WARNING: Spilled food can cause serious burns. Never drape cord over edge of counter, never use outlet below counter, and never use with an extension cord.
- Do not plug in or turn on the Multi-Cooker without having the Cooking Pot inside the Multi-Cooker.
- Intended for household countertop use only. Keep 6 inches (152 mm) clear from the wall and on all sides. Always use appliance on a dry, stable, level surface.
SAVE THESE INSTRUCTIONS HOUSEHOLD USE ONLY
FITTING A PLUG (UK & IRELAND ONLY)
This appliance must be earthed.
If the plug is not suitable for the socket outlets in your home, it can be removed and replaced by a plug of the correct type.
If the fuse in a moulded plug needs to be changed, the fuse cover must be refitted. The appliance must not be used without the fuse cover fitted.
If the plug is unsuitable, it should be dismantled and removed from the supply cord and an appropriate plug fitted as detailed. If you remove the plug it must not be connected to a 13 amp socket and the plug must be disposed of immediately.
If the terminals in the plug are not marked or if you are unsure about the installation of the plug please contact a qualified electrician.
A short Power Cord is used to reduce the risk resulting from it being grabbed by children, becoming entangled in, or tripping over a longer cord.
Plug should be ASTA approved to BS1363 Fuse should be ASTA approved to BS1362
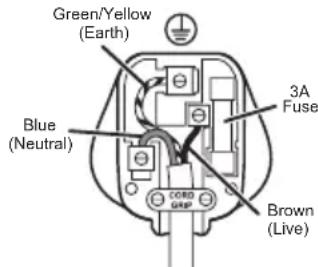
Ensure that the outer sheath of the cable is firmly held by the cord grip
NOTICES:
- Some countertop and table surfaces are not designed to withstand the prolonged heat generated by certain appliances. Do not set the heated Multi-Cooker on a finished wood table. We recommend placing a hot pad or trivet under your Multi-Cooker to prevent possible damage to the surface.
- During initial use of this appliance, some slight smoke and/or odor may be detected. This is normal with many heating appliances and will not recur after a few uses.
- Please use caution when placing your Cooking Pot on a ceramic or smooth glass cook top stove, countertop, table or other surface. It may scratch some surfaces if caution is not used. Always place heat resistant protective padding under the Cooking Pot before setting on a table, countertop or other surface.
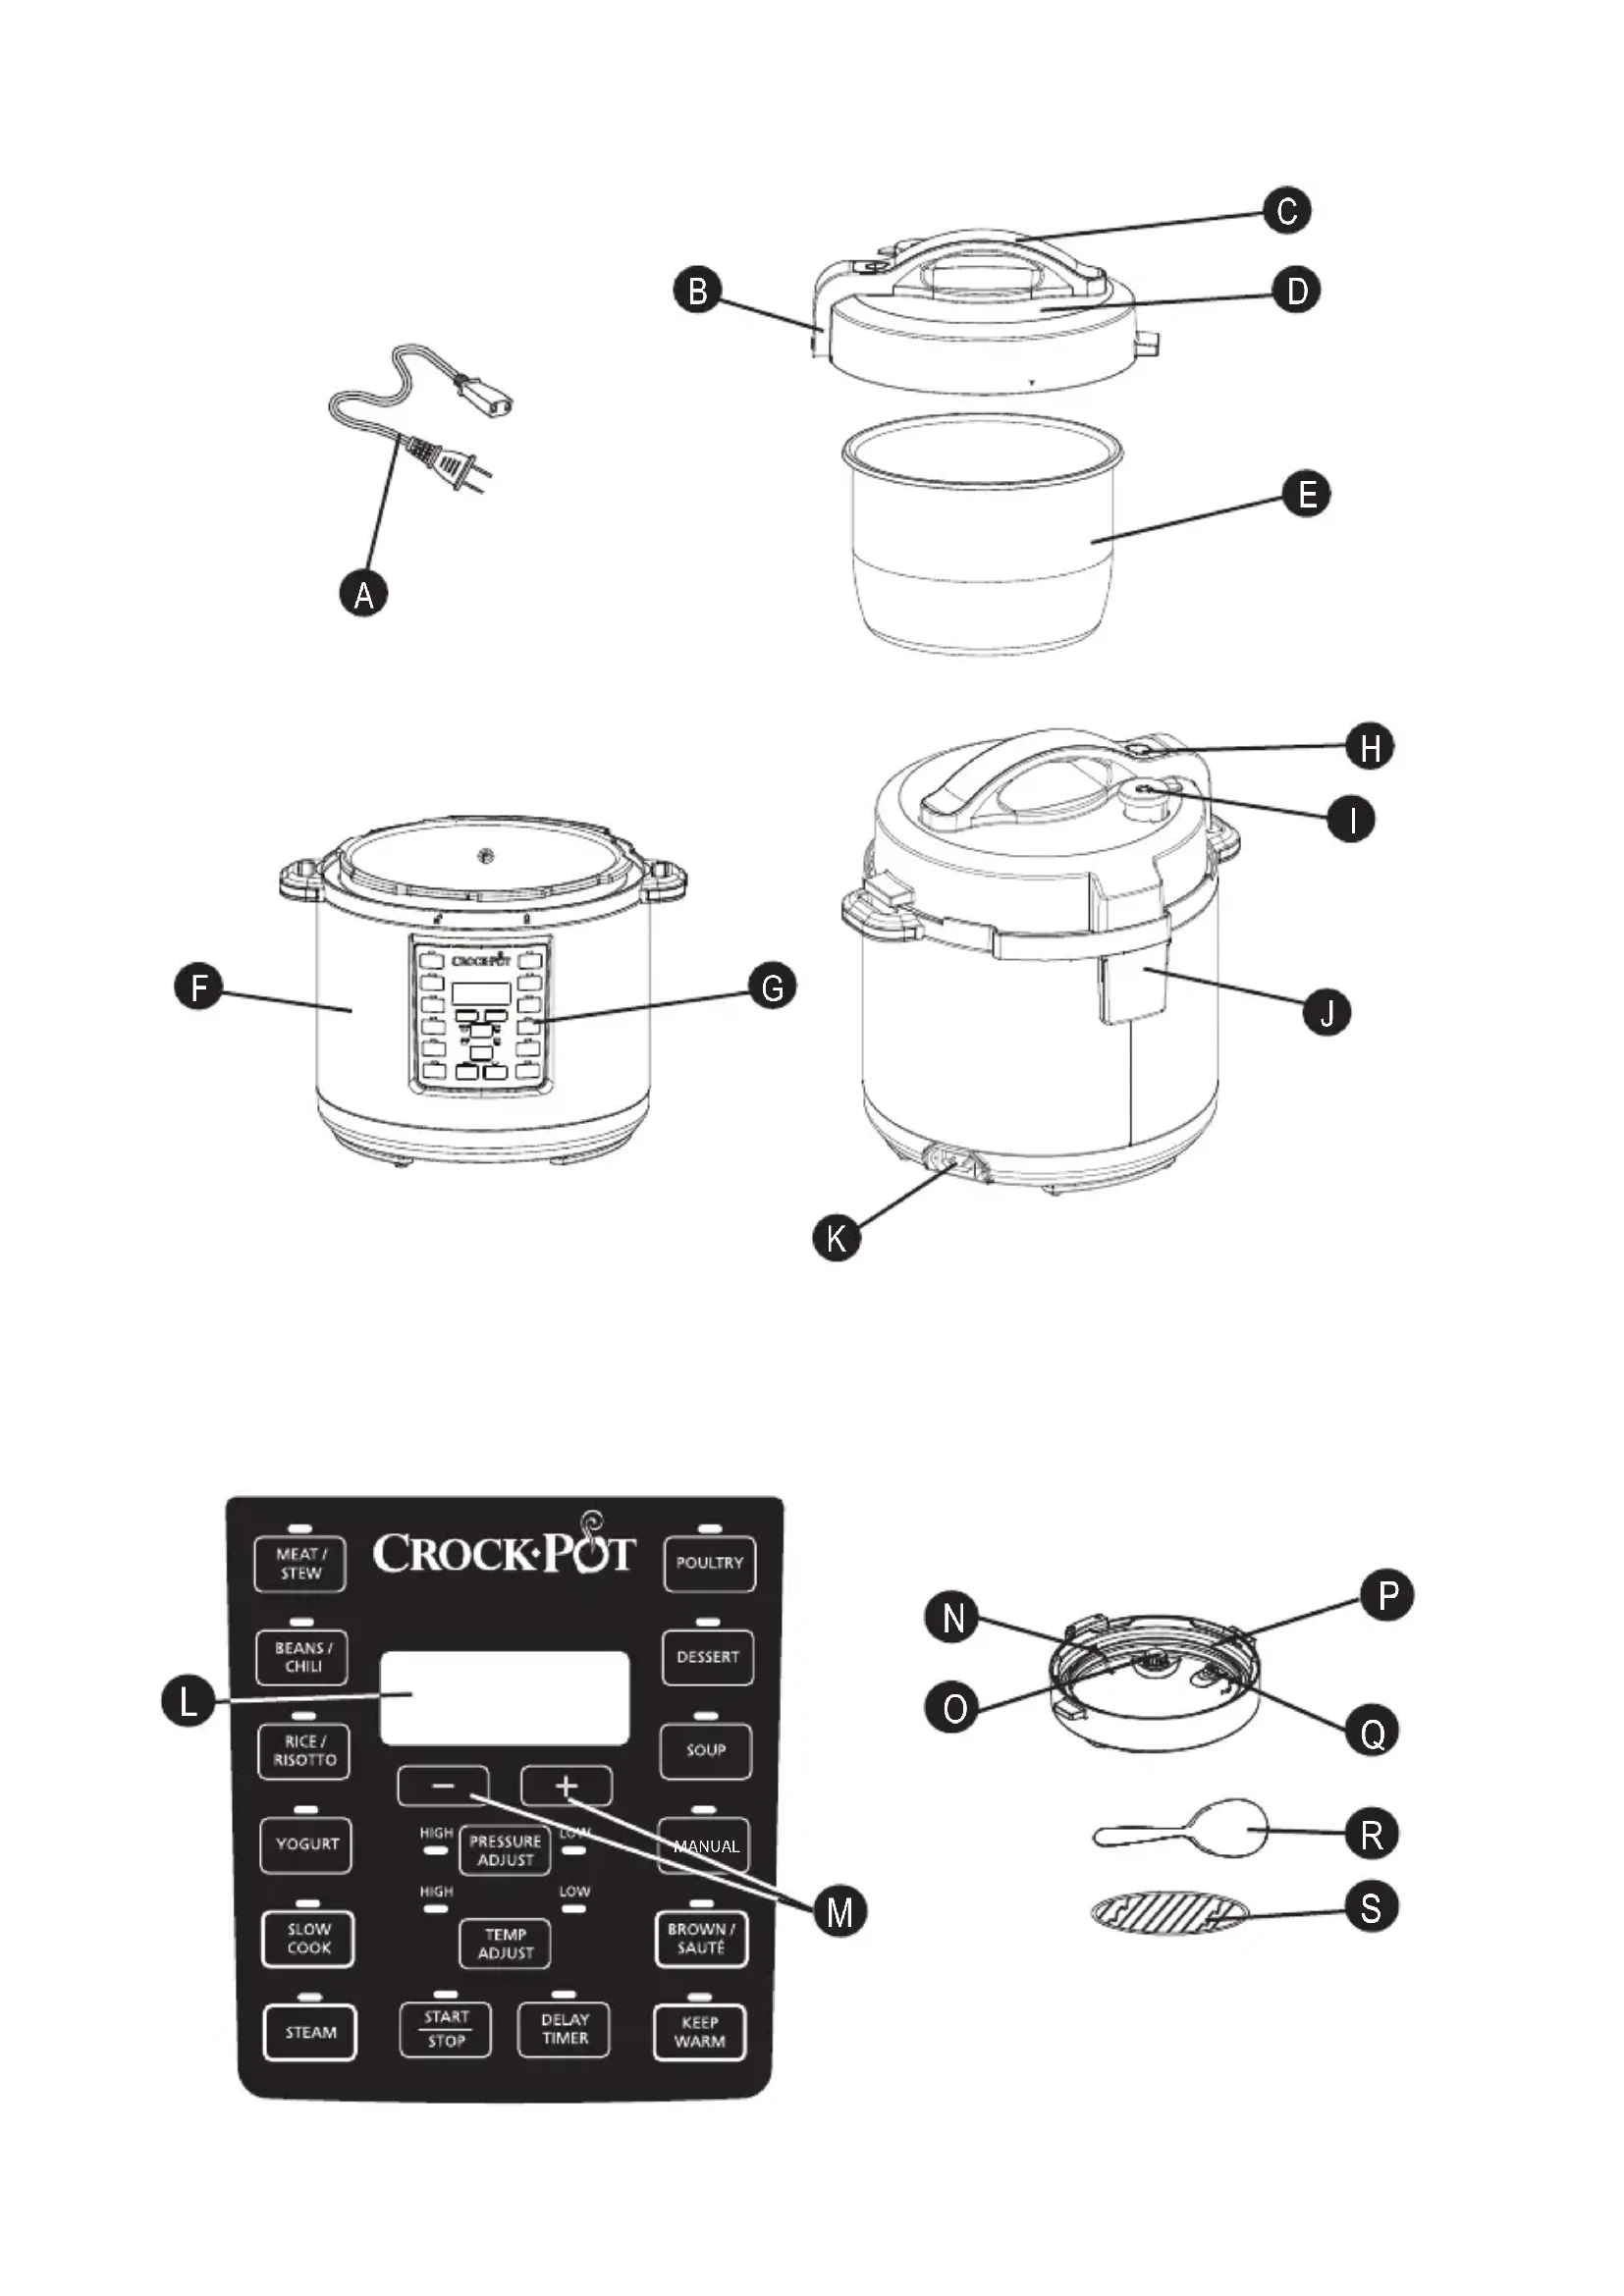
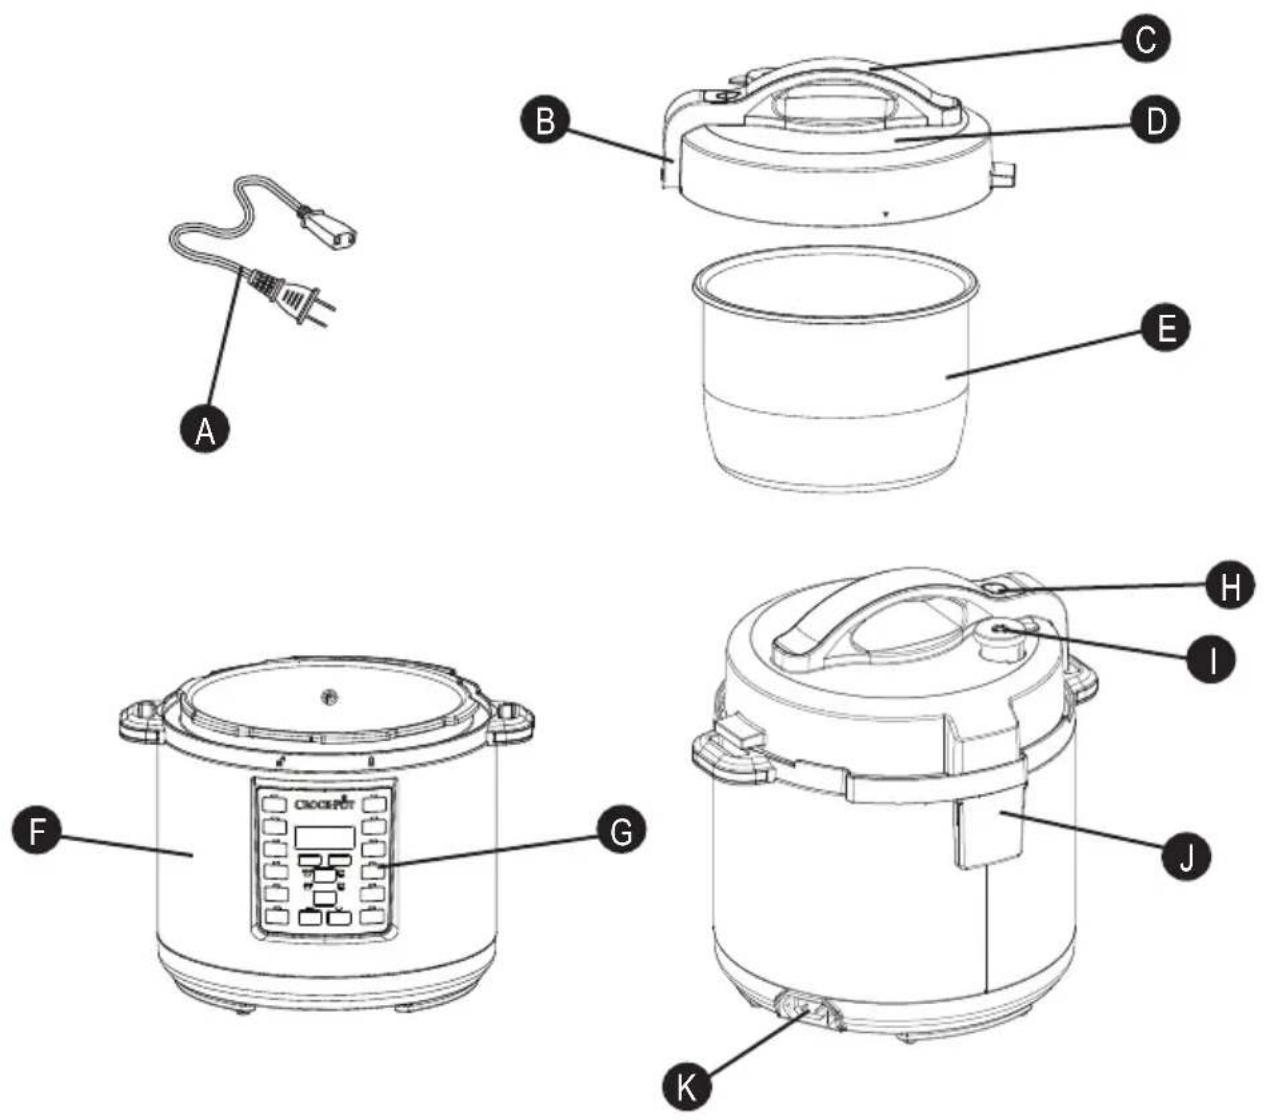
CROCK-POT® EXPRESS MULTI-COOKER COMPONENTS
A Power Cord
B Lid Lock Pin
Lid Handle
D Lid
E Cooking Pot
Heating Base
Control Panel
Bobber Valve
Steam Release Valve
Condensation Collector
Power Cord Port
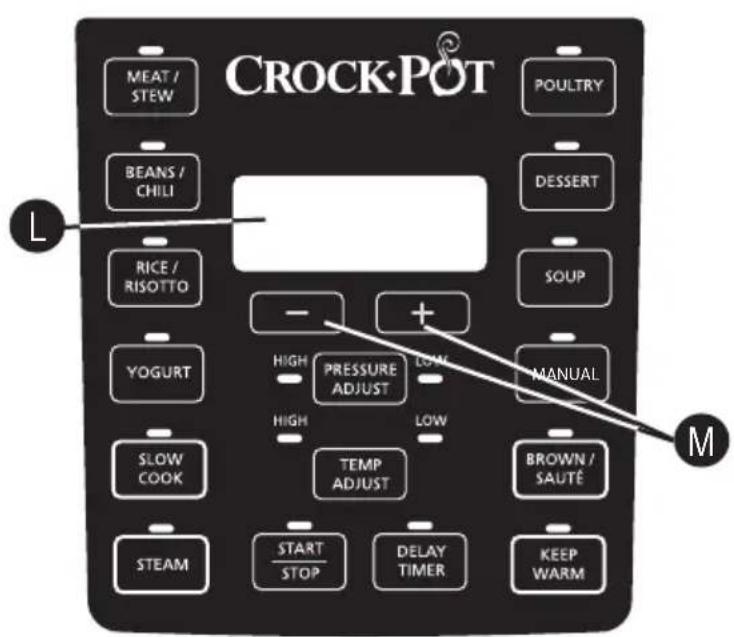
CONTROL PANEL
Display Screen
M Time Selection Buttons
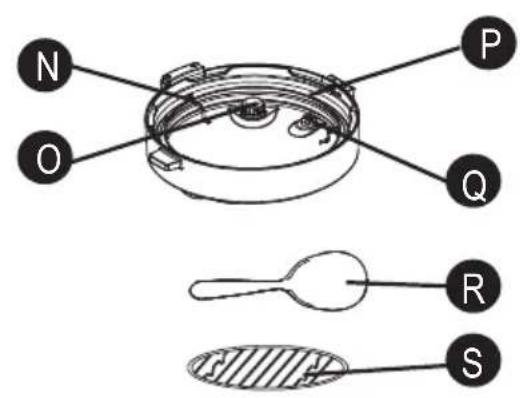
UNDERSIDE OF LID
Gasket Fixing Ring
Steam Release Valve Cover
Sealing Gasket
Bobber Valve
Plastic Spoon
5 Steaming Rack
HOW TO USE YOUR CROCK-POT® EXPRESS MULTI-COOKER
GETTING STARTED:
Remove all packaging, paper, and cardboard (including any located between the Cooking Pot and Heating Base).
Read and save the literature and be sure to read the service and warranty information.
Visit the Crock-Pot® website at www.crockpot.co.uk for additional information, hints, tips and recipes or call 0800 052 3615.
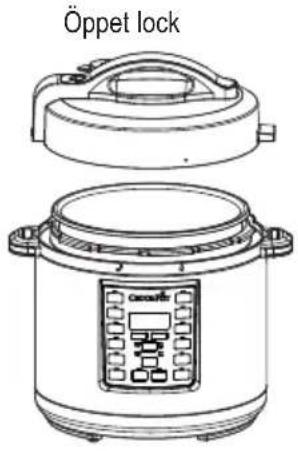
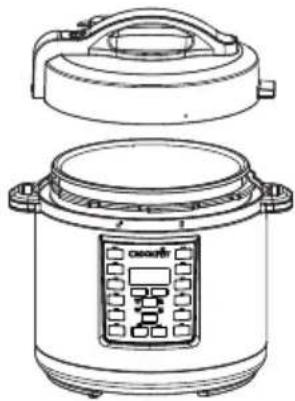
ASSEMBLY:
- Place Cooking Pot into the Heating Base
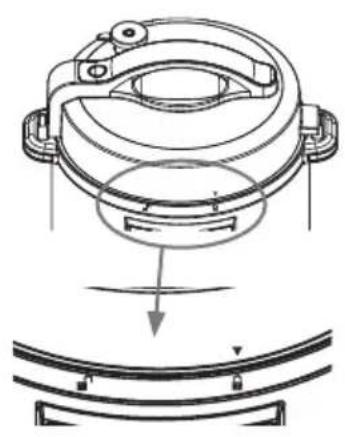
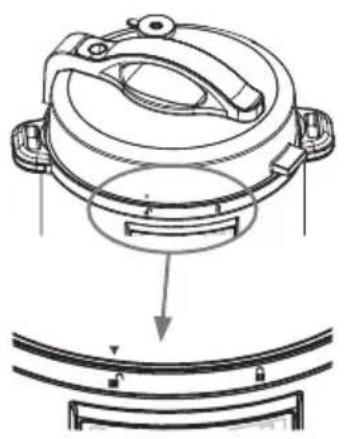
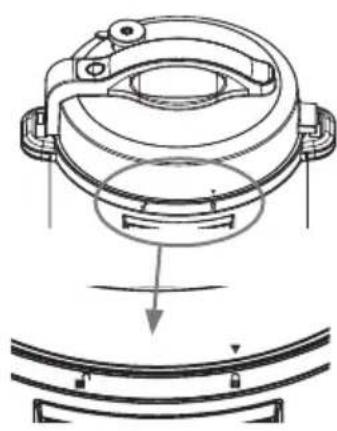
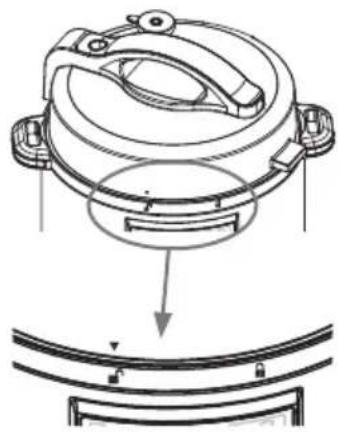
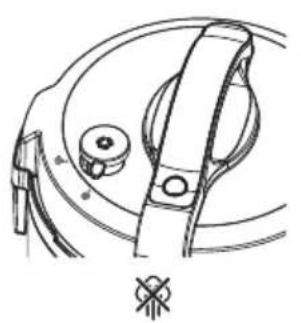
- Place Lid upon Multi-Cooker and align with To lock, twist counterclockwise, aligning with . Tounlock, twist Lid clockwise and align with
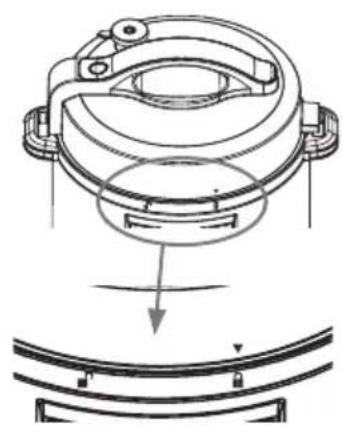
Locked Lid Unlocked Lid
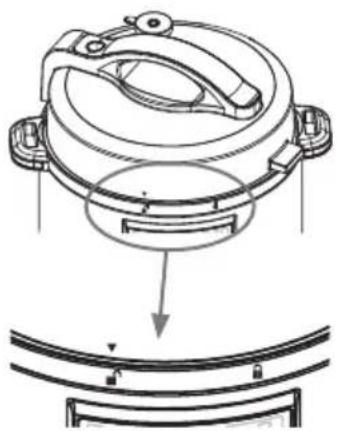
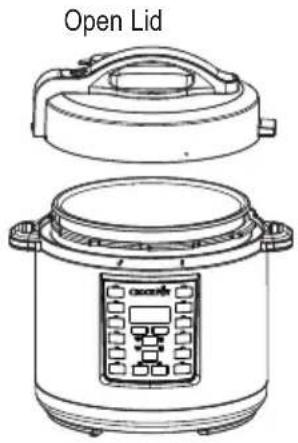
Figure 1
GETTING TO KNOW YOUR CROCK-POT EXPRESS MULTI-COOKER
-
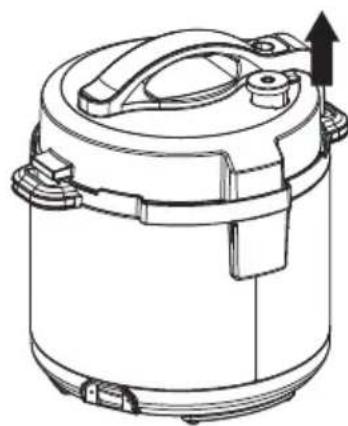
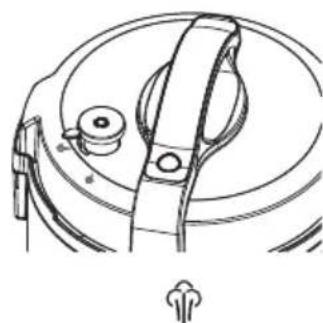
Remove the Lid by turning clockwise to unlock, aligning with . Remove the Sealing Gasket from the Lid and wash the gasket and the Lid in warm soapy water. Dry the Sealing Gasket and Lid thoroughly before reattaching the Sealing Gasket to the Lid. Ensure the Sealing Gasket is smoothly and securely in place in the gasket holder. If the Sealing Gasket is not in the correct position the Lid will not be able to form a seal and will not be able to gain pressure.
-
Remove the Cooking Pot and the Condensation Collector and wash in warm, soapy water. Dry thoroughly before replacing back in the Multi-Cooker.
The Crock-Pot® Express Multi-Cooker has been designed with safety in mind and has various safety measures.
- Pressure will not build if the Lid is not shut correctly and has not sealed.
- Ensure Lid is in the completely locked position and the is aligned with
- Pressure will not build if the Steam Release Valve has not been switched to the Seal " position.
- Over filling may cause a risk of clogging the vent pipe and developing excess pressure.
- The gasket and the valves can be removed for cleaning. (See page 15).
- Once the pressure increases, the Lid cannot be opened. Safety sensors ensure the pressure remains within the set range.
- The Steam Release Valve has an extended finger tab, designed to keep the hand away from the top of the valve. Always use a kitchen utensil when operating this tab. See RELEASING PRESSURE Instructions on page 11.
- The pressure cooking functions require liquid to work. If the inside of the Cooking Pot does not have enough liquid, an error will appear in the Display Screen. See ERROR CODES chart on page 17.
- At the end of cooking, the Lid cannot be unlocked until all the pressure is released. This can be done using the Natural Pressure Release Method or Quick Pressure Release Method, explained on page 11.
- The Time Selection Buttons (+ and -) are used to set the cooking time. To advance slowly, simply press the + or - button and release. To advance quickly, press and hold the + or - button. If you have passed the desired time, simply press the opposite arrow button to return to the desired time.
NOTE: The timer can be selected for all programs and can be changed at any time during cooking by pressing START/ STOP and selecting a new function.
- The PRESSURE ADJUST button is used to select desired cooking pressure (HIGH or LOW). Each pre-set cooking setting automatically selects the optimum pressure for that selection, but it can be manually selected with this button (see the Cooking Guide on page 182 for available adjustments).
- The TEMP ADJUST button is used to select desired temperature (HIGH or LOW). The temperature may only be adjusted on the SLOW COOK, YOGURT, and BROWN/SAUTÉ functions (see the Cooking Guide on page 182 for available adjustments).
- The START/STOP button starts and stops a cooking function. It must be pressed to change from one cooking function to another after cooking has begun.
- The Display Screen shows how much longer the food needs to cook from the selected time in hours and minutes once the Multi-Cooker is preheated. While the Multi-Cooker is preheating, the display screen will show, "HEAt".
GETTING STARTED
(NOTE: The Multi-Cooker beeps as each button is pressed.)
- Add desired ingredients to Cooking Pot. Place Lid on top of Multi-Cooker and align counterclockwise, aligning with
with To lock, twist
- Plug provided Power Cord into the Power Cord Port of the Multi-Cooker.
- Plug other end of the Power Cord into a wall power outlet.
- Select the cooking function you would like to use.
- The START/STOP button and the time on the screen will flash.
- Select the desired cook time by using the + and - buttons. Select the desired temperature using the TEMP ADJUST button (if applicable). Select the desired pressure using the PRESSURE ADJUST button. (Please refer to the Cooking Guide chart on page 182 for time and temperature recommendations.)
- Press the START/STOP button. For pressure cooking functions, the word "HEAt" will appear on the Display Screen during preheating time. Once the Multi-Cooker is preheated, the selected cooking time will appear on Display Screen.
Note: For Pressure Cooking functions, the average pre-heat time can vary depending on the volume and temperature of the food being cooked. This can range from 5-30 minutes.
- This Multi-Cooker allows you to delay the start of your cooking so that cooking finishes when you need it. See page 9 for instructions on the DELAY TIMER function.
- After the set cooking time has elapsed, the Multi-Cooker will beep again and will automatically switch to the KEEP WARM setting. The Display Screen will then change from the cook time to a new timer that will count up to 4:00 (4 hours) or until you press the START/STOP button. After 4 hours in the KEEP WARM setting, the Multi-Cooker will turn off.
- To end a cooking function at any time, press the START/STOP button.
- When finished, unplug the Multi-Cooker and wait for it to cool completely before attempting to clean.
CAUTION: The Cooking Pot and Heating Base will get very hot while using this Multi-Cooker. Do not touch hot surfaces. Always use pot holders or oven-mitts when using this Multi-Cooker. Always lift the Lid by tilting away from you to avoid the steam.
HOW TO USE THE TIME DELAY
This Multi-Cooker allows you to delay the start of your cooking so that cooking finishes when you need it.
Note: The DELAY TIMER function is not available on the BROWN/SAUTÉ, KEEP WARM, or YOGURT settings.
Note: Do not use the DELAY TIMER function when the recipe has perishable ingredients such as meat, fish, eggs, or dairy, as these may spoil.
- Adjust the Multi-Cooker settings using the instructions on pages 10-14.
- After setting the cooking time, press the DELAY TIMER button. The DELAY TIMER and START/STOP buttons will flash, and "0:30" will flash on the Display Screen, to indicate the Multi-Cooker is being programmed on the delay setting.
- Press the + and - buttons until you reach the number of hours and minutes you want the cooking process to be delayed (i.e., set the amount of time you wish to delay the cooking cycle).
- Press START/STOP button to begin the delay feature. The timer and DELAY TIMER button will stop flashing, while the START/STOP button will continue flashing. This will indicate that the Multi-Cooker has been set on the DELAY TIMER setting. The Display Screen will countdown the delay time until 0:00 is reached. When 0:00 is reached, the DELAY TIMER light will turn off and the START/STOP light will stop flashing to show that time delay has finished. The word "HEAt" will appear on the display screen until the Multi-Cooker is fully pressurized. When the selected pressure has been reached, the timer will start counting down.
Example:
It's 4pm and you want to have a soup cooked and ready in 2 hours' time for dinner at 6pm. You want to set the machine now so you are free to do other things.
The pre-set function (if unchanged) will cook for 30 minutes at HIGH pressure. Time to gain pressure varies according to humidity and water temperature, but let's assume it takes 15 minutes to gain pressure. Therefore total time is 45 minutes. To have the stew ready by 6pm, you will need to delay the start of your cooking by approximately 1 hour and 15 minutes.
- Press SOUP
- The Display Screen will flash "0:30"
- Press the DELAY TIMER button and set for "1:15"
- Press START/STOP
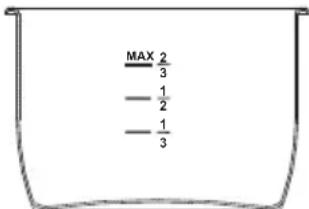
COOKING POT MARKINGS
Inside the removable Cooking Pot are markings to guide the fill level of the Cooking Pot. The word MAX indicates the maximum fill line.
The 1/3, 1/2, and 2/3 markings are handy guides to use in your recipes.
CAUTION: Never load the Cooking Pot above the maximum ingredient level line marked MAX on the inside of the Cooking Pot.
Foods that expand during cooking (e.g. rice) should never go above the 1/2 mark.
Note: The Multi-Cooker cannot pressure cook without liquid. Ensure a minimum of 250ml of liquid is used inside the removable Cooking Pot.
PRESSURE COOKING
Pressure cooking is an ideal way to create quick, flavorful meals. Pressure cooking is a method of cooking food in liquid (water, stock, wine, etc.) in a sealed Cooking Pot. The sealed Multi-Cooker retains steam and builds pressure, raising the temperature of the liquid inside the pot above boiling point. The increased temperature of the liquid and the steam results in reduced cooking times.
HIGH Pressure Setting is 6.5 - 10 PSI (45 - 70 kPa). It is suitable for a wide range of foods.
LOW Pressure Setting is 3.3 - 6.5 PSI (23 - 45 kPa). It is more suited to delicate foods like chicken fillet, fish and some vegetables.
KEEP WARM Setting: When cooking time is completed, the Multi-Cooker automatically switches to the KEEP WARM setting to prevent overcooking and to keep your cooked food warm until serving - perfect for busy families, those on the run and those who need flexible meal times. This setting is not hot enough to cook and should only be used to keep warm, cooked food for serving.
Ideal Meals to Pressure Cook: Soups, stocks, casseroles, sauces (e.g. pasta sauces), meat, rice, firm vegetables (beetroot, potatoes) and desserts (e.g., pudding).
Capacity: Never fill the Cooking Pot above the MAX line. Foods that expand during cooking should never go above the 1/2 mark. The Multi-Cooker cannot pressure cook without liquid. Ensure a minimum of 250ml of liquid is used inside the removable Cooking Pot.
MANUAL FUNCTION
This function allows the user to select their own pressure cooking time ranging from 1 minute to 2 hours, with a temperature selection of Low or High. This is particularly suitable for those users who would like to pressure cook food items not covered by our other cooking functions. This also gives the user greater scope for sourcing recipes from a wide range of sources. Please follow our guidelines for Pressure Cooking on page 9.
USING THE PRESSURE COOKING FUNCTIONS
Place the Multi-Cooker on a flat, level surface.
Place Cooking Pot inside Heating Base. Plug the Multi-Cooker into a wall outlet. The Multi-Cooker will beep, and the Display Screen will illuminate with four dashes (---)
- Place your food and liquid inside the removable Cooking Pot.
- Place the Lid onto the Multi-Cooker and align with To lock, rotate counterclockwise to the LOCKED position.
- Using the finger tab, rotate the Steam Release Valve to the "Seal" position.
- Select the desired cooking function
- Adjust the cooking time and pressure if necessary.
Note: See the Cooking Guide on page 182 to find the possible time and pressure adjustments
- Once you have made the desired adjustments, if any, press START/STOP.
- The Multi-Cooker needs to gain pressure before pressure cooking can begin. When the Multi-Cooker is gaining pressure, "HEAt" will appear on the Display Screen and the time will not count down. The amount of time the Multi-Cooker takes to gain pressure varies according to humidity and water temperature, but average pressurization time is 5-30 minutes. When pressure has been reached, "HEAt" will disappear on the Display Screen, and the time will begin to count down.
- After the set cooking time has elapsed, the Multi-Cooker will beep and will automatically switch to the KEEP WARM setting. The Display Screen will therefore change from the cook time to a new timer that will count up to 4:00 (4 hours) or until you press the START/STOP button. After 4 hours in the KEEP WARM setting, the Multi-Cooker will go into stand-by mode, and the Display Screen will illuminate with four dashes () .
TIP:
- The pressure cooking settings are in the Cooking Guide table on page 182.
-
If the lid is not shut correctly or if the Steam Release Valve is not in the "Seal" position, the Multi-Cooker cannot gain pressure and an ERROR message will appear in the Display Screen. Ensure that the Sealing Gasket is placed evenly in the lid. See the ERROR CODES chart on page 17.
-
It is common for some steam to release through the Bobber Valve during the cooking cycle. This is part of normal operation of the unit.
Note: The Multi-Cooker cannot pressure cook without liquid. Ensure a minimum of 250ml of liquid is used inside the removable Cooking Pot.
Caution: During cooking, steam will build up in the Multi-Cooker, so when lifting the lid use an oven glove to protect your hands.
RELEASING PRESSURE AT THE END OF COOKING
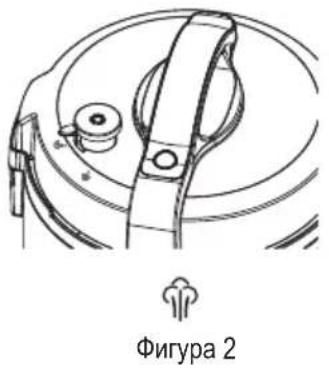
A. Natural Pressure Release Method: After cooking cycle is complete, let Multi-Cooker naturally release pressure through the Bobber Valve. Unit will gradually cool down on its own. Wait at least 10 minutes after cooking has completed. If using a higher volume of food and liquid, this can take up to 20 minutes. And then, using a kitchen utensil, gradually flick the tab on the Steam Release Valve to the "Release" position (see Figure 2). Do not place any part of your hand or body over the steam outlet on top of the valve, as steam is very hot and can scald skin. The pressure has been released when steam is no longer escaping from the valve and the Lid opens freely with minimal force. Only then is it safe to remove the Lid and serve food.
B. Quick Pressure release method should be used with caution: Using a kitchen utensil, gradually flick the tab on the Steam Release Valve to the "Release" setting (see Figure 2). Steam will release rapidly from the Steam Release Valve. Do not place any part of your hand or body over the steam outlet on the top of the valve, as steam is very hot and can scald skin. Use this method with caution when cooking liquid ingredients such as casseroles, soups, stocks, beans and pulses. Never use this method when cooking rice, as rice tends to be very delicate. The pressure has been released when steam is no longer escaping from the valve and the Lid opens freely with minimal force. Only then is it safe to remove the Lid and serve food.
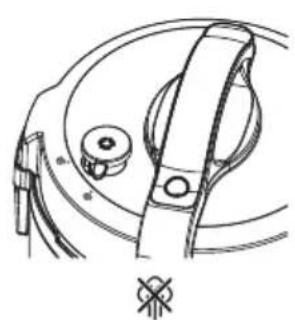
Pressure Release Valve Valve CLOSED ("Seal")
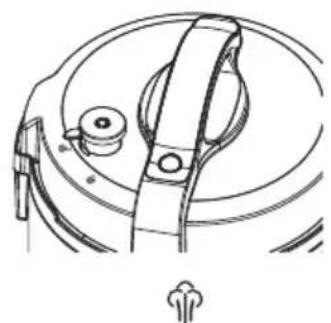
Valve OPEN ("Release")
Valve REMOVE
Figure 2
CAUTION:
- Do not force the Lid to open. If it does not open easily this means that the Multi-Cooker is still under pressure.
- During cooking, steam will build up in the Multi-Cooker, so when lifting the Lid use a kitchen glove or mitt to protect your hand.
SLOW COOKING
LOW Setting: This is suitable for simmering and slow cooking. Recommended cooking times in LOW are from 6 to 8 hours. HIGH Setting: This is for faster cooking. Recommended cooking times in HIGH are from 2 to 4 hours.
KEEP WARM Setting: When cooking time is completed, the Multi-Cooker automatically switches to the KEEP WARM setting to prevent overcooking and to keep your cooked food warm until serving - perfect for busy families, those on the run and those who need flexible meal times. This setting is not hot enough to cook and should only be used to keep hot, cooked food warm for serving.
Note: When slow cooking, the ideal fill level for your ingredients is between the 1/2 and 2/3 marks. Never fill the Cooking Pot above the MAX line.
Due to the multi-functionality of the CSC051X appliance, its slow cooking function works in a slightly different way to regular Crock-Pots. If using a recipe for a similar-sized Crock-Pot, you may need to increase the cooking time for use with the CSC051X.
USING THE SLOW COOK FUNCTION
The SLOW COOK function does not use pressure in the cooking process, but some pressure can build inside the unit during cooking. When using this function, ensure the Steam Release Valve is in the "Release" position. This function will cook similarly to standard slow cookers, using lower temperatures and longer cooking times to achieve tender, flavorful meals.
Place the Multi-Cooker on a flat, level surface.
Place Cooking Pot inside Heating Base. Plug the Multi-Cooker into a wall outlet. The Multi-Cooker will beep, and the Display Screen will illuminate with four dashes (- - - -).
- Place your food and liquid inside the removable Cooking Pot.
- Place the Lid onto the Multi-Cooker and align with To lock, rotate counterclockwise to the LOCKED position.
- Using the finger tab, rotate the Steam Release Valve to the "Release" position.
Note: Although this setting will not use pressure in the cooking process, some pressure can build inside the unit during cooking. This is why it's important to keep the Steam Release Valve in the "Release" position.
- Press the SLOW COOK button and adjust the time and temperature as needed.
Note: See the Cooking Guide on page 182 to find the possible time and temperature adjustments. - Press START/STOP. The time will begin to count down.
- After the set cooking time has elapsed, the Multi-Cooker will beep and will automatically switch to the KEEP WARM setting. The Display Screen will therefore change from the cook time to a new timer that will count up to 4:00 (4 hours) or until you press the START/STOP button. After 4 hours in the KEEP WARM setting, the Multi-Cooker will turn off.
TIP: The SLOW COOK settings are in the Cooking Guide on page 182.
CAUTION: During slow cooking, steam may build up in the Multi-Cooker, so when lifting the Lid use a kitchen glove or mitt to protect your hand.
STEAMING
The STEAM function is perfect for gently steaming fish and vegetables. It is pre-programmed to use the HIGH pressure cooking setting. When steaming, use the Steaming Rack.
Capacity: When the Multi-Cooker is used with the STEAM function, the maximum capacity of liquid should be just under the rack wires, so that the liquid is not touching the food.
Note: The unit cannot pressure cook without liquid. Ensure a minimum of 250ml of liquid is used inside the removable Cooking Pot.
Place the Multi-Cooker on a flat, level surface.
Place Cooking Pot inside Heating Base. Plug the Multi-Cooker into a wall outlet. The Multi-Cooker will beep, and the Display Screen will illuminate with four dashes (- - - - ).
- Add 250ml of water to the bottom of the removable Cooking Pot and insert the cooking rack. Ensure water is just under the wires of the rack so that food is not touching water.
- Place your food on the cooking rack.
- Place the Lid on and lock by rotating counterclockwise to the LOCKED position.
- Using the finger tab, flick the Steam Release Valve to the "Seal" position.
- Press the STEAM button and adjust the time and pressure as needed. Note: See the Cooking Guide on page 182 to find the possible time and pressure adjustments.
- Once you have made the desired adjustments, if any, press START/STOP.
- The Multi-Cooker needs to gain pressure before pressure cooking can begin. When the Multi-Cooker is gaining pressure, "HEAt" will appear on the Display Screen and the time will not count down. When pressure has been reached, "HEAt" will disappear on the Display Screen, and the time will begin to count down.
- After the set cooking time has elapsed, the Multi-Cooker will beep and will automatically switch to the KEEP WARM setting. The Display Screen will therefore change from the cook time to a new timer that will count up to 4:00 (4 hours) or
until you press the START/STOP button. After 4 hours in the KEEP WARM setting, the Multi-Cooker will turn off.
TIP: See the Steaming Chart on page 183.
CAUTION: During cooking, steam will build up in the Multi-Cooker, so when lifting the Lid use a kitchen glove or mitt to protect your hand.
USING THE BROWN/SAUTÉ FUNCTION
This setting does not cook under pressure. It works similarly to standard cooking, requiring dry heat, and therefore does not need the Lid. Do not use the Lid with this function.
Place the Multi-Cooker on a flat, level surface.
Place Cooking Pot inside Heating Base. Plug the Multi-Cooker into a wall outlet. The Multi-Cooker will beep, and the Display Screen will illuminate with four dashes (- - - -).
- Select the BROWN/SAUTÉ function and adjust the time and temperature if necessary, using the + and - buttons.
- Press START/STOP.
- When the Multi-Cooker is pre-heating, "HEAt" will appear on the Display Screen. When the temperature has been reached, the timer will start counting down. Using plastic tongs, carefully add your food to the hot pot.
BROWN/SAUTÉ can be used for each of the following:
A. Brown (sear) meats for casseroles and soups. Browning meat prior to pressure cooking and slow cooking not only gives your food great color, but it also seals in the juices and flavors and keeps the meat tender.
B. Sauté onions or mirepoix (mixture of chopped onion, carrot, and celery), among many other foods, often used in pressure cooker and slow cooker recipes. Sautéing onions allows caramelization which contributes to flavor and color in the end dish.
Capacity: When the Multi-Cooker is used to brown or sauté it may be best to cook in batches to ensure the food is evenly cooked.
RICE COOKING
When cooking rice, use the RICE/RISOTTO function. This is suitable for all types of rice, including white and/or brown rice. The RICE/RISOTTO function cooks under pressure for faster cooking.
Capacity: Since rice expands during cooking, do not fill Cooking Pot above the 1/2 mark when using the RICE/RISOTTO function.
USING THE RICE/RISOTTO FUNCTION
Place the Multi-Cooker on a flat, level surface.
Place Cooking Pot inside Heating Base. Plug the Multi-Cooker into a wall outlet. The Multi-Cooker will beep, and the Display Screen will illuminate with four dashes (- - - - ).
- Measure the desired quantity of rice.
Note: 1 cup uncooked white rice = 2 cups of cooked white rice (approximately). 1 cup uncooked brown rice = 2 cups cooked brown rice (approximately). - Place the measured rice in a strainer and wash rice thoroughly under cold water. Wash until the water runs clear. This removes excess starch which helps to achieve fluffier rice, and prevents rice grains sticking to the Cooking Pot. Rinsing the rice reduces the build-up of starchy water and bubbles that sometimes form around the Valve Cover and Lid, which can cause spitting from the Steam Release Valve.
- Ensure the Cooking Pot is clean and dry before placing it inside the Heating Base.
- Place the washed rice in the Cooking Pot. Add the quantity of water needed for your recipe (Standard ratio -- 1 cup of uncooked rice : 1.5 cups of water). Ensure that a minimum of 250ml of liquid is placed inside the removable Cooking Pot.
- Place the Lid on and lock by rotating counterclockwise to the LOCKED position.
- Using the finger tab, flick the Steam Release Valve to the "Seal" position.
- Press the RICE/RISOTTO button and adjust the time and pressure as needed.
Note: See the Cooking Guide on page 182 to find the possible time and pressure adjustments.
- Once you have made the desired adjustments, if any, press START/STOP.
- The Multi-Cooker needs to gain pressure before pressure cooking can begin. When the Multi-Cooker is gaining pressure, "HEAt" will appear on the Display Screen and the time will not count down. When pressure has been reached, "HEAt" will disappear on the Display Screen, and the time will begin to count down.
- After the set cooking time has elapsed, the Multi-Cooker will beep and will automatically switch to the KEEP WARM setting. The Display Screen will therefore change from the cook time to a new timer that will count up to 4:00 (4 hours) or until you press the START/STOP button. After 4 hours in the KEEP WARM setting, the Multi-Cooker will turn off.
TIPS:
- Do not keep rice in the pot for extended periods of time on the KEEP WARM setting, as the rice will become dry and the quality will deteriorate. Use the supplied plastic spoon to stir and serve the rice. Do not use metal utensils, as these will scratch the non-stick coating.
- As rice grains can be delicate, at the end of cooking wait until the pressure releases naturally. Do not use the Quick Pressure Release Method (see page 11 for instructions on the Natural Pressure Release Method).
- Standard ratio for cooking rice -- 1 cup of uncooked rice : 1.5 cups of water
CAUTION: During cooking, steam will build up in the Multi-Cooker, so when lifting the Lid use a kitchen glove or mitt to protect your hand.
TO CHANGE A SETTING
It's easy to switch functions during cooking.
Press the START/STOP button and then select the new desired cooking function. A new timer will flash on the Display Screen, and the selected function will also flash. Select the desired time, pressure, and/or temperature. Press the START/ STOP button and the new function will begin preheating.
To Change the Cooking Time:
You can change the cooking time before cooking begins by pressing the + and - buttons before pressing START/STOP. Press and release to change slowly. Press and hold to change time quickly. If you pass the desired temperature or time, press the opposite button.
To Change the Pressure:
You can change the pressure on certain pre-set functions before cooking begins by pressing the PRESSURE ADJUST button before pressing START/STOP.
To Change the Temperature:
You can change the temperature on certain functions before cooking begins by pressing the TEMP ADJUST button before pressing START/STOP.
CARE AND CLEANING
Cleaning should only be carried out when the Crock-Pot Express Multi-Cooker is cool and unplugged. Allow the Multi-Cooker to completely cool before cleaning. Do not use the removable Cooking Pot on the stovetop, inside a microwave oven or inside an oven. Use the pot only inside the Crock-Pot Express Multi-Cooker Heating Base. Wash the Sealing Gasket and Lid by hand in warm, soapy water. Dry all parts thoroughly.
Cooking Pot:
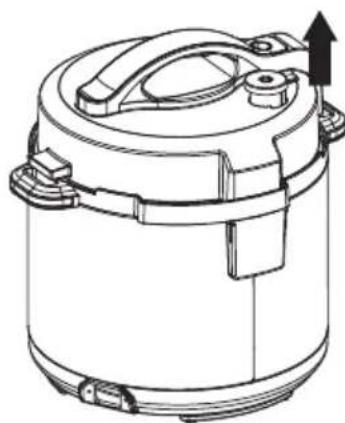
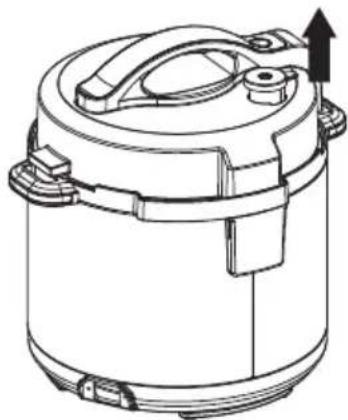
When removing the Cooking Pot from the Heating Base, always use two hands and lift directly upward. Failure to do so may result in scratching the outside of the Cooking Pot (see figure 3).
If food sticks or burns to the surface of the Cooking Pot, then fill it with hot soapy water and let it soak before cleaning. Use a rubber or nylon spatula to remove stubborn residue. If scouring is necessary, use a non-abrasive cleaner and a nylon scouring pad or brush.
Although the Cooking Pot is dishwasher safe, we recommend hand-washing to preserve the non-stick coating.
If white spots form on surface of Cooking Pot, then soak it in a solution of vinegar or lemon juice and warm water for 30 minutes. Rinse and dry.
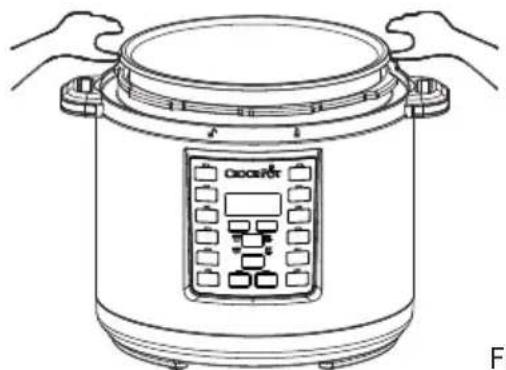
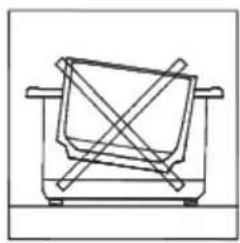
Figure 3
Note: Never use metal utensils or cleaning devices on the Cooking Pot, as this may result in scratching and damaging the non-stick coating.
Exterior
Wipe the exterior of the Heating Base with a damp cloth and polish dry. DO NOT use harsh abrasives, scourers or chemicals, as these will damage the surfaces. To prevent damage to the Multi-Cooker do not use alkaline cleaning agents when cleaning. Only use a soft cloth and mild detergent. Never immerse the heating base, or power cord and plug in water or any other liquid.
Condensation Collector
Empty any collected water from the Condensation Collector after each use. Wash in warm, soapy water.
Lid and Sealing Gasket
Always examine the gasket before each use. The silicon Sealing Gasket on the inside of your Multi-Cooker Lid may deteriorate over time. Remove Sealing Gasket for cleaning as needed. Hand clean using warm, soapy water, dry thoroughly, and replace Sealing Gasket in Lid before use. Leave the Lid upturned for storage, as this will also extend the life of the gasket. Sealing Gasket may need to be replaced every 1-2 years depending on regular use. Contact Crock-Pot customer service to order replacement parts.
Steam Release Valve
Ensure the Steam Release Valve is clear from debris before you begin using the Multi-Cooker. Remove the valve and gently clean. Ensure it is completely dry before replacing.
Steam Release Valve Cover
The Steam Release Valve Cover is on the underside of the Lid. Ensure it is clear from debris before you begin using the Multi-Cooker. To clean, carefully pull the cover off and clean using warm, soapy water. Press the cover back into its place after cleaning is complete.
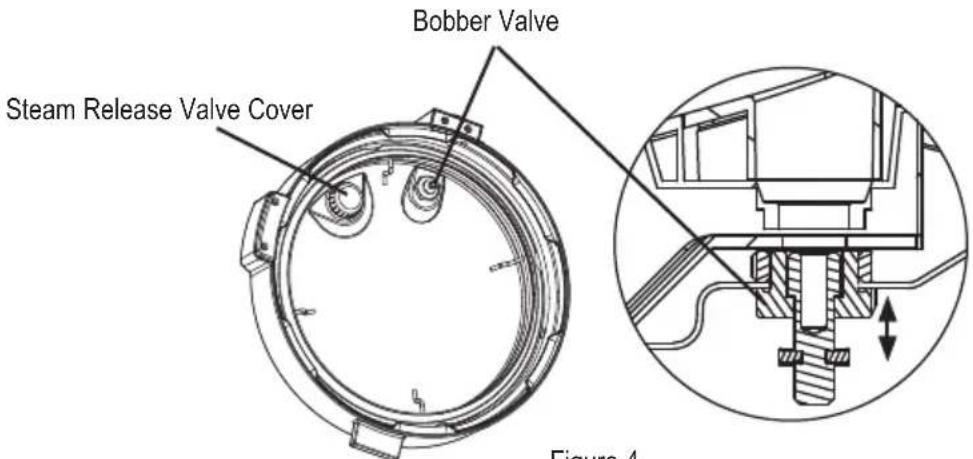
Figure 4
UNDERSIDE OF LID
Bobber Valve
Gently press the valve up and down 2-3 times and ensure it is clear from debris before you begin using the Multi-Cooker.
Lid Lock Pin
Gently press the pin and ensure it is clear from debris before you begin using the Multi-Cooker.
Note:
- Condensation may collect inside the Heating Base under the removable Cooking Pot. This is normal. Allow to cool, and then dry using kitchen cloth.
- Always make sure that each component (pot, valves, gasket, etc.) is completely dry before you put back into the Multi-Cooker.
TROUBLESHOOTING
| Subject Question Solution | ||
| Power My Multi-Cooker will not turn on | Make sure outlet is functioning properly | |
| Check that the Multi-Cooker is plugged in | ||
| Call Customer Service at 0800 052 3615 | ||
| Doneness of food | My food was undercooked | Make sure you selected the proper cooking setting |
| Make sure the Lid is properly placed and locked, and that Steam Release Valve in “Seal” (closed) position. | ||
| Check the recipe to see that the proper pressure, temperature, and time selection were made | ||
| Be sure the power was not interrupted | ||
| Make sure the Cooking Pot has enough liquid to create desired steam and build pressure. Minimum of 250ml of liquid should be used when pressure cooking. Never fill over the “MAX” line. | ||
| My food was overcooked | Make sure the Cooking Pot was at least 1/2 full | |
| Check that the proper pressure, temperature, and time were selected | ||
| Programming | Can I set a time for the Brown/Sauté program? | Because sautéing is a function that generally requires your full attention this may not be necessary. However, if desired a time can be selected. |
| Can I change the cooking function, time or temperature once the food is cooking? | Yes, to change the cooking function, press START/STOP and select a new cooking function. Change the time and temperature as required for the food. Press START/STOP again. The time and temperature can be changed at any time. | |
| Cooking Can the Cooking Pot and Lid be used on top of the stove or in the oven? | The Cooking Pot and Lid are not oven safe. Neither can be used on the stove or in the oven. | |
| I stopped the cooking process and changed pressure settings, and now the Multi-Cooker is preheating again. | If a cooking cycle is stopped and a new one is started, the Multi-Cooker may display “HEAt” until the new pressure is achieved. | |
| Steam Steam is leaking out of the Multi-Cooker | • It is normal for a small amount of steam to come out of the Bobber Valve before the Multi-Cooker is pressurized. • If steam is coming out from the perimeter of the Lid, the Lid has not been closed and locked completely. | |
| Lid I am having trouble removing the Lid. | There is a safety feature to keep Lid from being removed while the Multi-Cooker is under pressure. Please make sure to de-pressurize the unit by rotating the Steam Release Valve into the “Release” (open) position. Refer to Releasing Pressure section for further instructions. | |
ERROR CODES
| Error Solution | |
| “CLOSE LID” blinking light | Ensure that the Lid is closed completely and in the LOCKED position, aligning with . |
| Display “E1” The Multi-Cooker will stop the cooking cycle. Unplug Multi-Cooker and contact service center. | |
| Display “E2” The Multi-Cooker will stop the cooking cycle. Unplug Multi-Cooker and contact service center. | |
| Display “E3” The Multi-Cooker will stop the cooking cycle. Unplug Multi-Cooker, and allow to cool down completely. Once Multi-Cooker has cooled down, check all parts of the Lid (See page 16). Turn Lid to LOCKED position. Ensure Steam Release Valve is in “Seal” (closed) position. If this error code occurs again, unplug Multi-Cooker and contact service center. | |
| Display “E4” The Multi-Cooker will stop the cooking cycle. Unplug Multi-Cooker, and allow to cool down completely. Once Multi-Cooker has cooled down, check Cooking Pot to ensure there is enough liquid inside. Add more liquid if necessary (Minimum 250ml). Ensure no steam is coming out of Cooking Pot before placing Lid back on Multi-Cooker. Turn Lid to LOCKED position. Ensure Steam Release Valve is in “Seal” (closed) position. Select a pressure cooking function, and then press START/STOP. | |
| Display “E5” The Multi-Cooker will stop the cooking cycle. Unplug Multi-Cooker and allow to cool. Once it is cooled down, remove the Lid and check the Cooking Pot. Do not use the Lid when using the BROWN/SAUTÉ function. When using the SLOW COOK function, make sure that the Steam Release Valve is in the “Release” (open) position before starting the cooking cycle. | |
| Display “E6” The Multi-Cooker will stop the cooking cycle. Unplug Multi-Cooker and allow to cool. Once it is cooled down, remove the Lid and check the Cooking Pot. Add liquid as necessary. Ensure a minimum of 250ml of liquid is used inside the removable Cooking Pot. If using a pressure cooking function, ensure that the Steam Release Valve is in the “Seal” (closed) position. | |
HINTS AND TIPS
Hints and Tips to get the best use of your Crock-Pot® Express Multi-Cooker: Go to the Crock-Pot® website at www.crockpot.co.uk for additional recipes, hints, tips and much more.
With your Crock-Pot Express you can create a large variety of delicious meals, snacks and desserts. Various foods take different times to cook perfectly, so sometimes it may take some trial and error to get the cooking times right for you.
- Please refer to your Crock-Pot Express owner's manual when using your Multi-Cooker.
- Never fill the Cooking Pot past the MAX line.
- Do not leave Multi-Cooker plugged in when not in use.
- Make sure Multi-Cooker is kept away from cabinets and walls when in use.
- The Cooking Pot is designed to be used only in this Multi-Cooker. Do not use on stovetop, in microwave, or in oven.
- The provided Steaming Rack is designed to be used in this Multi-Cooker. It should not damage the surface of the Cooking Pot.
- When removing the Lid, use a pot holder to grasp the Lid Handle and lift away from your body to allow steam to escape.
- Always place a trivet or pot holder under the Cooking Pot if it is removed from the Heating Base.
HINTS AND TIPS FOR SLOW COOKING
- If you are slow cooking, you can use the BROWN/SAUTÉ function first, which allows you to sear meats and vegetables at the beginning but also allows you to thicken sauces and make gravies at the end. Browning meat prior to slow cooking not only gives your food great color, but it also seals in the juices and flavors and keeps the meat tender.
- To thicken a casserole at the end of cooking, use the BROWN/SAUTÉ function and stir a small amount of corn flour with water. Allow to simmer, stirring until thickened.
- When using the SLOW COOK function, make sure the Steam Release Valve is in the "Release" (open) position.
- When using the SLOW COOK function, the Multi-Cooker does not recover lost heat quickly, so only lift the Lid if necessary or if instructed to do so in the recipe. It's a good idea to monitor your slow cooking results throughout the cooking cycle by quickly removing the Lid and checking, then quickly replacing the Lid. Different cuts and thickness of meats and vegetables can vary cooking times.
- It is not uncommon for meat to cook faster than root vegetables. It is for this reason that we recommend chopping all vegetables to a similar small size. Meat can be cut into larger chunks because if it is cut too small, it will break up once cooked and tenderized.
- Slow Cooking reduces evaporation, resulting in the flavors and juices being maintained. Keep this in mind when creating your own recipes, as you may not require as much liquid as you would when using other cooking methods.
| Temperature | Temperature Suggestions Recipes Ideas | |
| High Use this setting for recipes that require shorter cooking times, generally 4-6 hours. | Ideal for sauscs, chili, potato dishes, cheese dishes, chicken wings and meatballs in sauce | |
| Low Use this setting for recipes that require longer cook times. This setting is used for recipes that usually require cooking for more than 8 hours. Perfect for less tender cuts of meats. | Ideal for less tender cuts of meat, braised meats, dried beans, soups and stews | |
AFTER SALES SERVICE
These appliances are built to the very highest of standards. There are no user serviceable parts. Follow these steps if the appliance fails to operate:
- Check that the instructions have been followed correctly.
- Check that the fuse has not blown.
- Check that the mains supply is functional.
If the appliance will still not operate, return it to the place it was purchased for a replacement. To return the appliance to the Customer Service Department, follow the steps below:
- Pack it carefully (preferably in the original carton). Ensure the appliance is clean.
- Enclose your name and address and quote the model number on all correspondence.
- Give the reason why you are returning it.
- If within the guarantee period, state when and where it was purchased and include proof of purchase (e.g. till receipt).
- Send it to our Customer Service Department at the address below:
Customer Service Department
Jarden Consumer Solutions (Europe) Limited
Middleton Road, Royton, Oldham
OL2 5LN, UK
Telephone:
0800 525089 (free from UK landlines)
0161 621 6900 (standard rates apply)
Fax: 0161 626 0391
e-mail: enquiriesEurope@jardencs.com
GUARANTEE
Please keep your receipt as this will be required for any claims under this guarantee.
This appliance is guaranteed for 2 years after your purchase as described in this document.
During this guaranteed period, if in the unlikely event the appliance no longer functions due to a design or manufacturing fault, please take it back to the place of purchase, with your till receipt and a copy of this guarantee.
The rights and benefits under this guarantee are additional to your statutory rights, which are not affected by this guarantee.
Only Jarden Consumer Solutions (Europe) Limited ("JCS (Europe)" has the right to change these terms.
JCS (Europe) undertakes within the guarantee period to repair or replace the appliance, or any part of appliance found to be not working properly free of charge provided that:
- you promptly notify the place of purchase or JCS (Europe) of the problem; and
the appliance has not been altered in any way or subjected to damage, misuse, abuse, repair or alteration by a person other than a person authorised by JCS (Europe).
Faults that occur through, improper use, damage, abuse, use with incorrect voltage, acts of nature, events beyond the control of JCS (Europe), repair or alteration by a person other than a person authorised by JCS (Europe) or failure to follow instructions for use are not covered by this guarantee. Additionally, normal wear and tear, including, but not limited to, minor discoloration and scratches are not covered by this guarantee.
The rights under this guarantee shall only apply to the original purchaser and shall not extend to commercial or communal use.
If your appliance includes a country-specific guarantee or warranty insert please refer to the terms and conditions of such guarantee or warranty in place of this guarantee or contact your local authorized dealer for more information.
Waste electrical products should not be disposed of with household waste. Please recycle where facilities exist. E-mail us at enquiriesEurope@jardencs.com for further recycling and WEEE information.
Jarden Consumer Solutions (Europe) Limited
5400 Lakeside
Cheadle Royal Business Park
Cheadle
SK83GQ
UK

FRANÇAIS
CONSIGNES DE SECURITE IMPORTANTES
CONSIGNE DE SECURITE IMPORTANTE :
Soupape OUVERTE (evacuation)
Figure 2
Soupape ENLEVEE
ATTENTION:
Jarden Consumer Solutions (Europe) Limited
5400 Lakeside
Cheadle Royal Business Park
Cheadle
SK83GQ
United Kingdom

DEUTSCH
Jarden Consumer Solutions (Europe) Limited
5400 Lakeside
Cheadle Royal Business Park
Cheadle
SK8 3GQ
United Kingdom

ESPNOL
MEDIDAS DE PROTECCION IMPORTANTES
Jarden Consumer Solutions (Europe) Limited
Edif. Vázquez Krasnow
Jarden Consumer Solutions (Europe) Limited
Edif. Vázquez Krasnow
Jarden Consumer Solutions (Europe) Limited
5400 Lakeside
Cheadle Royal Business Park
Cheadle
SK83GQ
United Kingdom

NEDERLANDS
BELANGRIJKE VEILIGHEIDSMAATREGELEN
BELANGRIJKE VEILIGHEIDSINFORMATIE:
Jarden Consumer Solutions (Europe) Limited
5400 Lakeside
Cheadle Royal Business Park
Cheadle
SK83GQ
United Kingdom

SVENSKA
VIKTIGA SÄKERHETSFÖRESKRIFTER
VIKTIGT SÄKERHETSMEDDELANDE:
Last lock Uplast lock
Figur 1
KOMMA IGÁNG
(Obs! Multikokaren piper nar du trycker pa en knapp.)
Jarden Consumer Solutions (Europe) Limited
5400 Lakeside
Cheadle Royal Business Park
Cheadle
SK8 3GQ
United Kingdom

DANSK
VIGTIGE SIKKERHEDSFORANSTALTNINGER
VIGTIG SIKKERHEDSMEDDEELSE:
Jarden Consumer Solutions (Europe) Limited
5400 Lakeside
Cheadle Royal Business Park
Cheadle
SK83GQ
United Kingdom

NORSK
VIKTIGE FORHOLDSREGLER
VIKTIG SIKKERHETSMERKNAD:
VEDLIKEHOLD OG RENGJØRING
Rengjoring bor kun utfores nar Crock-Pot Express er avkjolt og koblet fra. La multikokeren avkjoles helt ffor renjoring.
Vask forseglingspakningen og lokket for hand i varmt sapevann. Tork alle deler grundig.
Sylv om tilberedningsgryten kan vaskes i oppvaskmaskin, anbefaler vi handvask for a bevare det klebefrie belegget. Hvis det dannes hvite flekker pa tilberedningsgrytens overflate, legg den i blot i en lösning av eddk eller sitronsaft og varmt vann i 30 minutter. Skyll og tork.
Jarden Consumer Solutions (Europe) Limited
5400 Lakeside
Cheadle Royal Business Park
Cheadle
SK8 3GQ
United Kingdom

POLSKI
WAZNE OSTRZEZENIA
WAZNA INFORMACJA DOTYCZACA BEZPIECZENSTWA:
Jarden Consumer Solutions (Europe) Limited 5400 Lakeside
Cheadle Royal Business Park
Cheadle
SK8 3GQ
United Kingdom

CESKY
DULEZITA BEZPECNOSTNI OPATRENI
DULEZITE UPOZORNENI:
Jarden Consumer Solutions (Europe) Limited
5400 Lakeside
Cheadle Royal Business Park
Cheadle
SK83GQ
United Kingdom

SLOVENCINA
DOLEZITÉ BEZPECNOSTNÉ POKNY
DOLEZITÉ BEZPECNOSTNÉ OZNÁMENIE:
Jarden Consumer Solutions (Europe) Limited
5400 Lakeside
Cheadle Royal Business Park
Cheadle
SK83GQ
United Kingdom

MAGYAR
FONTOS BIZTONSÁGIFIGYELMEZTETÉSEK
FONTOS BIZTONSAGI FIGYELMEZTETÉS:
Jarden Consumer Solutions (Europe) Limited
5400 Lakeside
Cheadle Royal Business Park
Cheadle
SK83GQ
United Kingdom

ROMÁNA
MÁSURI IMPORTANTE DE PROTECTIE
NOTIFICARE IMPORTANTA PRIVIND SIGURANTA:
Jarden Consumer Solutions (Europe) Limited
5400 Lakeside
Cheadle Royal Business Park
Cheadle
SK83GQ
United Kingdom

ББЛΓAPСКИ
BAKHN PEPDA3HN MEPKN
BAJHO IPREyIPEXJEHNE 3A BE3OJACHOCT:
Korato n3nyckaTe HaJraHe OT ypeDa, ce yBepete, ye Hocnte KyxHcKa pBkaNuca u Ye n3noJ3BaTe KyxHcKn np6Op, c KOITo NOCTeNEHNO da OTbOpIte KlaNaHa N Da n3nycHete HaJraHeto. Pa3eTe ce ot n3n3aUata npa.
HNKORA He notanayte harpeBaTeHaTa OCHOBa, 3axpaHBaunKa6eI nn IenCeNa BbB BODa IIN Dpyra TeuHOCT.
Korato n3noJ3BaTe eJeKtpnueckn ypeNi, Tp6Ba BnHaRn Da cna3BaTe OCHOBHNTe npedna3Hm MepKn 3a 6e3OnacHocT, 3a Da HamaJIte pNcKa OT NOxap, TOKOB ydap n/nnn HapaHЯBaHe Ha Xopa, BKJIHOHTeJHo CJIeHOTO:
- Прочете BCNUKинсчкци,празда n3noJ3BaTe To3n npoJyKT.
- YpeIbT He Tp8Ba Da ce n3noJ3Ba OT Deca. Pa3eTe ypeDa n 3axpaHbAsnKa6en DaJeU OT DocTbN Ha Deca. DecaTa He Tp8Ba Da cN IrgpaT Cypeda. YpeIte MoRat Da ce n3noJ3BaT OT Nua C HamaJIeHn fN3nueckn, CeTHBn NII MeHTaJIH N Bb3MOXHOCTn, KaKTo N 6e3 ONIT NII N03HaHnA, Ako Ca NOd Ha6JIIOHeHne NII Ca 6NI INHCTpyKTnpAHN 3a 6e3OnaChy yNoTppeBa Ha ypeDa n pa3bupat OnaCHocTnte, CBbp3aHn C HerOBaTa EKcNlOaTaun.
- He n3no13BaIte KoITo I da 6nlo ypei, chIto Ka6eI nn uenceI e NOBpeIeH, IIN B cIyauHa HEN3npaBnOCTn B ypeIa, IIN aKO e 6II NOBpeIeH IO KaKbBTO I da 6nlo NaunH. He ce ONITBaIte Da 3amEnIte IIN da CbeHNITE NOBpeIeH Ka6eI. BbPheTe ypeHa Na pON3BOJNTeJIa (BVXTE rapaHcIraTa) 3a npereIed, pemont IIN HaCTpOJa. Ako 3axpaHbAunr Ka6eI e NOBpeIeH, Tp86Ba Ida 6bDe IODMeHcBc CneuJAEH Ka6eI IIN KOMNJIeKT, npEOCTaBeHn OT pON3BOJNTeJIa IIN OT HerOB cepBN3eH TexHnK.
- He n3noJ3BaIte Ha OTKpIto nIIN 3a TbproBcN ueJI.
- He n3noJ3BaIte ypeJa 3a ueJI, pa3nUHn OT npedHa3NaueHneTo My. HenpaBnHoto n3noJ3BaHe MoKe Ja npuHHn HapAHBaHn. To3n ypeJ He e npedHa3NaueH 3a nbpXeHe Ha XpaHn.
- YpeiBToT roTBn IOD HaJIraHe npn n3noJ3BaHe Ha 0yHKcInTe 3a roTBeHe IOD HaJIraHe. HenpaBnJHaTa yNoTppe6a MoKe Da DoBeDe Do HapaHbAHe OT OnapBaHe. YBepTe ce, Ye ypeIbTe npaBnJHo 3aTBopeH npeDi pa6Ota. BIXTe INHCTpyKcInTe 3a pa6Ota.
-
To3n ypei reheepnpa TOpIIHa no BpeMe Ha pa6ota. He DokocbaIte ropeu nIOBbpxHocTn. N3noJ3BaITe dpbXknte nJI KOnyeTaTata.
-
He nbHHeTe ypeDa haI nnHra Ta 3a MaKcImaJIHo nbHHeHe Ha 2/3 ot ueiHa o6em. Korato npnroTBaTe XpaHn, KOnto ce pa3wnpRaT npn roTBHe, KaTo HApnpMep opn3 nIu cySeHn 3eJeHcyu, He npenbJaTe ypeDa haI npenopbYHTeJHOTO HnBO Ha 1/2 ot ueiHa o6em. PpenbJaBaHeto MoKe Da IOBeDe Do OnaCHOCT OT 3anyBaHe Ha BeHTnlaOnHHaTa Tpb6a I NOBA Ha CBpbXHaJrAhe. CJeDbaiTe BCnUKN HnCTpyKcN 3a roTBHe N peCNTN.
- Binhari npOBepaBaiTe ycTpoiCTBaTa 3a n3nyckaHe Ha HnIraHeTo 3a 3anyuBaHepneDn ynoTpe6a. NocTe cnopeD Heo6xOdmocTta.
- NocTaBeTe MyIITnΦyHKUHOHaJIHnY ypeI 3a rotBeHe Taka, Ye KlaNaHbT 3a H3nyckaHe Ha napaTa Da e No3uOHHpaH HadaJeY OT TAnOTO.
- HnKora He nocTaBryTe KOrTo I da 6nIoo yact OT TAnOTO, BkIouHrTeJHo IIncTeO, dJaHnTe I pBeTe, Na KlaNaHa 3a n3nyckaHe Ha napata. Iapata MoKe Da npuHHn TeXKn n3rapHn.
- He n3noJ3BaIe myItnoHkuNoHaJIHHy ypeI 3a roTBeHe 6e3 xpaHa nn TeuHOCT B Cbda 3a roTBeHe.
- 3a Да педOTВразITE onachocT OT hapaHЯBaHe nopaДи CBрхналяraHe, 3aMeHete yПьТНITEЯ Ha kanaka camo KaKTo e npeHopbuaHo OT npOn3BODHTeY. BIXTe INHCTpykCInTE 3a NOdprBXka I NOuNcTBAHe.
- He u3noJ3BaIte kaNaka, 3a da HocHTe MyIITnФyHKUHOHaJIHHa ypeI 3a rotBeHe.
- He mectete u He nokpnaTe MyTnOyHKcnoHaHn ype3a rotBeHe, DOKaTo e B eKcnpoatauia.
- След roтbeamе пон hailerahe He OTbaprTe ypeda 3a rotbehe noi HaileraHe,dokaTo ypeBt He e n3ctnHaI N BbTpeshOTo HaJraHe He e n3nychato.Ako cpeaTe TpydHocT npn npemaxBaHeto Ha KaNaka, TOBa yKa3Ba,Ye CbDbT BCE OSe e IOD HaJraHe - He rO OTbaprTe npinHydtelHo.HaIIuNeTo Ha HailraHeto B cbDa MoKe da 6bDe onacHo.BixTe mHctpyKcInTe 3a n3nyckaHe Ha HailraHeto.
- BhimabaTe, KOrato BdInrTe n IpemaxBate Kanaka cIeD rotBeHe. BnHarn hakJaHnTe kanaka HadaJeU OT Bac, Tb' KaTo napata e ropeua N MoKe Da npuHH TeKKn n3rapaHna. Hnkora He n3NaRaIte InuTe O Cu Na MuyTnФyHKcNoHaJHnY ypeD 3a rotBeHe.
- He u3noJ3BaIe ypeDa 3a roTBeHe noJ haJIraHe 3a IIbPKeHe noJ HaJIraHe c OJNo.
- 3a 3aunTa OT TOKOB yap He noctabYte n He notanYte KaBeNa, 7eNcEInTe nn ypeDa BbB BODa nn Dpyra TeuHocT.
- He n3noJ3BaIte cBda 3a roTBeHe 3a cbXpaHHe Ha XpaHa n He ro noCTaBnTe BbB @pn3epa.
- 3a npedotbpaTBAHe Ha nobpeHa Ma mytNphiYHKcnoHaHnHa ype
3a roTBeHe He n3noJ3BaIe aIkaJIHn noUcTbaU npenapaTH npn oOuNCTBaHe. N3noJ3BaIe MeKa KbPna I Mek NoUcTbaU npenapaT.
- Binhari BkapBaIte 3axpaHbAunKa6eI NpBBO B MyItnΦyHKcNoHaJIHnYypeD 3a rotBeHe, a nocIe rO BKJIIOUByAitE B CTeHHN KoHTaKT.
- ИЗва对接е сения OT контака, Когато He ro Изпольвate, пedingда постовке и ИЗва对接е части и пeding поочьаг. Остовete за ce oxлади, пedingда постовке и ИЗва对接е части и пeding поочьаг. 3a за ИЗковITE, ce уberpeTe, che мультункцюнгий туpeд заrotbehе e ИЗковЕH, сед_TOВа ИЗва对接е зхранвашия кабел OT kohtakta. He дырайтесамен, за до ГИЗковITE.
- He octabraye 3axpaHbau nja Ka6en da BnCn ot p6a Ha macata nn IIOTa, HNTO Da BIn3a B KOHTaKT C RopeuN NOBbpxHOCTN.
- Пп пемecтвае на урд, сьдьрkaш рорец Teuhoctи, Тразва да ce npиложи n3КЛЮчNTeHNo BHMmaHne.
- Използваши.To на пинадлесхости 3a akcecoapn, конто He ce npenopbчbat ot пpon3BODHTeЯ Ha ypeda, може д пичнин НараняВаня.
- He noctabraTe Bbpxu nnB 6n30cT do MOKpn NOBbpxHOCTn nn H3TOUHnHa ToPnHa, KaTo HAnpUmep HaPrt ra3 nn eJekTpnuCeKa ropeIka, nn B 3aqrTa ypHa.
- BHIMAHHE: 3a 3aunTa OT TOKOB ydap n nobpeHa Ha npodykTa He rotBeTe dIpeKTHO B HarpeBaTeJHaTa OCHOBA. RotBeTe camo B OcHrypeHn IODBHXeH CbD 3a rotBeHe.
- ПЕДУПЕЖDEHNE: Pa3neTte xpaHn MOra T da npuHnT TeKKn n3rapHn. ДржTe ypeDa n Ka6eNa HadaJeU OT deua. Hnkora He npOBecBaIte Ka6eNa ppe3 pb6a Ha nILOTa, Hnkora He n3NoJ3BaIte KOHTaKT NOIPOTa n Hnkora He n3NoJ3BaIte C ydJIxNtJen H Ka6eN.
- He BkIIOUBAite B KOHTaTaN He BkIOUBAite Camna MyNTuHkuNoHaJeH ype3 a rotBeHe, 6e3 da cTe nocTabnN Cbda 3a rotBeHe B MyNTuOyHKcuNoHaJnH ype3 a rotBeHe.
- ПреднаЗнayен 3а n3ползВане само Вьрху Кухнскя плOT. ДрьжтЕ ha pa3стони 152 mm (6 Ичa) ot CTehata n OT BCnчк n CTpaHn. BnHaRn n3пол3ВаITE Вьрху cyxa, CTa6Инha, paBHa NOBьрхHOCT.
3A7A3ETE TE3N INHCTPYKUIN CAMO 3A DOMAUHA YNOTPEBA
KOMNOHETN HA EKCINPECHNMyJNTNФYHKUHOHAJEH YPEd 3A TOTBEHE CROCK-POT
A 3axpaHbau Ka6eJ
B Knoukanka 3a kanaka
G DpbkKa Ha KaNaKa
Kanak
E CbД 3a roTBeHe
HarpeBaTeHa ochoba
KOHTPOJENIHAHEJI
EkpaH
M ByToHn 3a n36Op Ha BpeMe
6 KOHTpOneH naHeN
Knahan 3a napata
KlanaH 3a n3nyckaHe Ha napata
KoHdEHHaUHOHeN KOJIeKTop
K IopT 3a 3axpaHbuaJnKa6eJn
ДОЛHAЧАТ HA KANAKA
N ΦИКсираш npbCTeH Ha ynIbTHnITeJIa
Kanayka Ha Knanaha 3a n3nyckaHe Ha napata
P YnIbTHHTeI
KlanaH 3a napata
R PnactMaCoBa JbXnUka
S Ipnctabka 3a roTbeHe Ha napa
KAK DA N3PON3BATE BAUNA EKCNPCEH MYNTNФУнкцИОHAJIEN YPEД 3A FOTBEHE CROCK-POT
TbPBNCTbnKn:
IpemaxheTe BCnKo ONAKOBKn, XapTnn n KAPTOHn (BKNIOHTeJIHO TAKNBA, HAMnpaun Ce MeJy CbJa 3a rotBeHe n HargBaTeJIHaTa OCHOBA). Ipooyete n 3ana3e Te JInTepaTypaTa n ce yBepTe, ye cTe npOeyn INHOpMaunrTa 3a obCnyXbaHe n rapAnu.
CTIO6BAHE:
- NocTabete Cbda 3a rotBeHe B HArpeBaTeJIHata OCHOBA
IocTaBeTe KaNaka Ha MyNTnOyHKUHOHaHnHyape3a roTBHe Hn3paBHeTe c 3a Da 3akNoHTe, 3abbptTe B Nocoka, o6paTHa Ha YacOBHnKOBaTc TpeNka, KATO n3paBHnTe C. 3a Da OTKnIOHTe, 3abbptTe KaNaka B NoCOKa Ha YacOBHnKOBaTc TpeNka Hn3paBHeTe
3akJIOueHkanAKOTKIOUeHkanAK
Φnγρa 1
OTBopeHkanak
PbPbNCTbPKN
(3A6ELEKKA: MyItnuynkuHoaHnrt ypeI 3a roTbeHe n3daBa 3BykoB cHraJI npN BcKaHO HaTaNCKaHe Ha 6yToH.)
- 106abete JeklanHte CbctabKn KbM Cbda 3a rotBeHe. NocTabete Kanaka Ha MyJITnФyHKUHOHaHNr ypeI 3a rotBeHne Hn3paBHeTe c. 3a da 3akNIOHTe, 3aBbPTeTe B NOcOKa, o6paTHa Ha YacOBHnKOBaTa CTpeJIka, KaTO n3paBHnTe
- BkapaTe npedocTabeHn 3axpaHbau Ka6eB n nopTa 3a Hero Ha MyNTuHyKluHOHaHnHa ypeD 3a rotBeHe.
- BkIIOUeTe Ipyrna KpaI Ha 3axpaHbauJn Ka6eN B CteHEN KOHTaKT.
- N36epete cyHKunraTa 3a rotBeHe, KOrTo JKeJaTe Da n3nOJI3BaTe.
- ByToHbT START/STOP n BpeMeTo Bbpxy ekpaHa ige 3anoHAT da Mmrt.
- ɪЗбөрete ќеланото врeme 3a rotbehe, каTOинглэВATE 6утонite +и-. ɪЗбөрete ќеланота temпepатура, kaTo ИзнглэВATE 6утona TEMP ADJUST (akO e npiloxmo).Избөрete ќеланOTO Hanrahe, kato ИзнглэВATE 6утona PRESSURE ADJUST. (HanpaBete срвькс cДиарpaMaTа OT pБКOBODCTBOTO 3a rotbeHe Ha CTp. 182 3a npenopbUHTeJIHOTo Врeme I TemnepaTypa.)
- Hatnche 6ytoHa START/STOP. PnФyHKuHte 3a rotBeHe noJ haJIraHe dymUkata ,HEAt" ue ce noBn Ha ekpaHa nO BpeMe Ha npEdBapnteJHTo 3aIrpBaHe. UOM MyIITnФyHKUHOHaJIHnT ypeJ 3a rotBeHe 6bJe 3aIprpT npEdBapnteJHNo, n36paHTo BpeMe 3a rotBeHe ue Ce noBn Ha ekpaHa.
3a6eJekka: PnФyHKmnte 3a rotBeHe nOd HAnraHe Pn6Hn3HTeHOTo CpeHNO BpeMe 3a PpeBapnteH0 3aRpaBaHe e 13-14 MInHyTu. Ako XpaHaTa e C no-tolam OeM mIe MHO TcYdeHa, BpeMeTo 3a PpeBapnteH0 3aRpaBaHe MoKe Da 6bJe MaNk ONo-PrOdBnKNTeHIO.
- To3n MyItnHcyHKUHOHaEN ypeI 3a rotBeHe BN daBa Bb3MOxHocT 3a OTIOKe H CTapT Ha rotBeHe, Taka Ye npOceBt Ha rotBeHe Da 3aBbPun, Korato e Heo6xoDmO. BnKTe cTp. 174 3a HnCTpyKuMn 3a cyHKUraTa DELAY TIMER.
- CnEiN3TNUaHe Ha 3aIaDeHTo BpeMe 3a roTBeHe MyNTuФyHKUHOHaJIHnIypeD 3a roTBeHe Ie N3aIae OTHOB 3ByKOB cnHaI n ABTOMaTuHNo Ie npBKnOChn Ha HAcTppoKaTa KEEP WARM. EkpaHbT cIeD ToBa Iue ce npomEno OT BpeMeTo 3a roTBeHe Ha HO TaIMep, KoITo GETTING STARTED Ie ot6pon Do 4:00 (4 yaca) nIIN doKato He HATNCheTe bYtoHa START/STOP. CnE 4 Yaca paBoTa c HacTppoKaTa KEEP WARM MyNTuФyHKUHOHaJIHnIypeD 3a roTBeHe Ie Ce N3KJIIOHn.
- 3a da npekpatnte yHKnraTa 3a rotbeHe no BcKO BpeMe, HATncHe 6yToHa START/STOP.
- Korato CBbpHnTE, n3KnIOyTe MyNTNΦyHKUHOHaHNy ypeI 3a roTBeHe OT KOHTAKTa N u3uKaAte Da ce oxlaHn Hnlo, npEi Da 3anoHETe da rO noHCTBaTe.
BHIMAHHE: CbIbT 3a roTBHe H HarpeBaTeHnHaTa OCHOBa 5e cTaHaT MHOro ropeu np np pa6oTa C To3n MytNpyHKUHOHaJe H yPeJ 3a roTBHe. He DOKOCBAIte ropeu NOBpXHocTn. BnHar n3No13BaIte DbpxaHn 3a CbJa nn pKabuN 3a FyPHa npn n3No13BaHe Ha TOn3n MytNpyHKUHOHaJe H yPeJ 3a roTBHe. BnHar nBnraTe Kanaka, KaTo rO HAKIOHInTe HadaJIeY OT Bac, 3a Da ce PpeIpa3nte OT napata.
KAK CE N3ПОЛ3BA BPEMETO 3A 3AБАВЯHE
To3n MyItnfpyHKUHOJAHyepd 3a rotBeHe BN daBa Bb3MOXHOCT 3a OTNOKeH CTapT Ha rotBeHe, Taka Ye npOceBt Ha rotBeHe Da 3abpHNI, KORATO e Heo6xOIMO.
3a6eJekka: FyHKuaTATELAY TIMER He e HauHnHa npn HacToPouKeBROWN/SAUTE, KEEPE WARM nnYOGURT.
3a6eJexka: He n3noJI3BaIte fynKcIyra DELAY TIMER, KoraTo B peCenTaT aMa HETpaHn cbCTaBKn, KaTo HApNIMep MECO, MaIa NII MJIeUH NPOdYKTN, TbN KATo MoKe Da ce pa3BaJIaT.
- CnE 3aabehe Ha BpeMeTo 3a roTbeHe HATncHete 6yToHa DELAY TIMER. ByToHnte DELAY TIMER n START/ STOP 3e 3anOHTA da Mrrat, a Ha ekpaHa 3ane 3anoHe da Mrra ,0:30" Koeto yka3Ba, ye MyIITnФyHKUHOHaJIHHaT ypei 3a roTbeHe e nporpamipar c hactpoKaTa 3a 3abABHe.
- Hatnche 6ytoHt + n-, DOKaTO ce NOKaKAT YacOBete u MNHyTnTe, 3a KOnTO NCKaTe npOueCbT Ha rotBeHe da 6bJe 3abAH (T.e. 3aDaBaTe BpeMeTo, 3a KoETo NCKaTe Da OTIOKHTe LkBla Ha rotBeHe).
- Hatnche 6ytoha START/STOP, 3a da cnapura fynkuiyra 3a 3abayhe. TaimepbT n 6ytoht DELAY TIMER upe cnpaT da mrtat,doKATO 6ytoht START/STOP ue npobnna da mra. Toba ue ykaxe, ye myntnykuohannrtypei 3a rotbehe e 3adaneH ha hactpoikata DELAY TIMER. Ekpaht ue otbpon BpemTo ha 3abayhe,doKATO ce doctnrhe 0:00. Korato ce doctnrhe 0:00,cbetniHata ha DELAY TIMER ue ce n3knou, a cbetniHata ha START/ STOP ue cnpe da mra, 3a da ce bnu,ye BpemTo 3a 3abayhe e cbbpHno. Dymnkata HEAt" ue ce noBnHa ekpaha,doKATO myntnykuohannrty pei 3a rotbehe 6bde n3uNo noHahrahe. Korato 6bde doctnrhato n3bpaHoto hlanrahe, TaimepbT ue 3anoHe da ot6porba BpemTo.
H3PON3BAHE HA FyHKUNTE 3A TOTBEHE NOHJIYRAHE
IocTabete MyIITnФyHKUHOHaHnY ype3a rotBeHe Bbpy paBHa, XOpN3OHTaHn NOBbpxHocT. IocTabete Cbda 3a rotBeHe BHarpeBaTeJIHata OCHOB.BKnIOte MyIITnФyHKUHOHaHnY ype3a rotBeHe BcTeHEN KOHTaKT. MyIITnФyHKUHOHaHnYrT ype3a rotBeHe ige n3daTe 3ByKOB cInHaI, a Ha ekpaHa ige CBETHa YcETnP TIpTa (- - - - ).
- NocTabete XpaHata n TeuHocTtA BbTpE B NOBnKnHc 3d 3a rotBeHe.
- Nocabete kaaka ha MyIHTuHkUHOHaJIHHa ype3a rotBeHe n 3paBHeT noCoka, o6pTaHa Ha YacOBHnKOBaTa CTpeNka, do no3nZn LOCKED
c 3a da 3aknOHTe,3aBbPTeTE B - KaTo cn Cnyknte C HanpbcTHnka, 3aBbptete KnaHana 3a n3nycKaHe Ha npa do no3nT Ta „Seal".
4.Изберете келана淘汰нкьяза roTBeHe - PerynipaTe BpemTo 3a rotBeHe n HnlaIraHeTo, aKe e Heo6xoDIMO.
3a6eKka: BxTe pkoBcTO 3a roTbeHe Ha cTp. 182, 3a da HamePte Bb3MOXHnTe peyIpaHnHa BpeMeTo HnraHTo
- CneI KaTo ce 3aJaII JKeJIaHInTe peryIINpaHnI, aKo IMa TaKnBa, HATncHe TcART/STOP.
- Heo6xOIMO e MyTTNphiYHKUHOHaHnIype3a TOTBeHe da HaHTeHaHaIraHe, nped Da 3aONue He TOTBeHTo IOd HnIraHe. Korato MyTTNphiYHKUHOHaHnIype3a TOTBeHe HaHTeBA HaIraHe, Ha ekpaHa Ze Ce IOnBn, HEAt" n BpemTo Hma Da ce OTbPOBa. BpemTo, Heo6xOIMO Ha MyTTNphiYHKUHOHaHnIype3a TOTBeHe Da HaHTeHa HaIraHe, Bapnpa B 3aBNCIMOCT OT BnAxxHocCTTA and TemnepaTypaHa BOdaTa, Ho cpeHTo Bpeme 3a DoCTHRe Ha HnIraHe e 13 - 15 MInHyTu. Korato 6bDe docturHato HnIraHaTeo, HEAt" ue n3ue3He ot ekpaHa, a BpemTo ze 3aONue He da ce OTbPOBa.
- CnEiN3TNUaHe Ha 3aJaDeHTo BpeMe 3a roTBeHe MyIuФyHKUHOHaHnHrT ypeD 3a roTBeHe Ie N3JaTe 3ByKOB cnHaJI n ABTomAtuHo Ie npEKnIOuHa HacTroKaTa KEEP WARM. CnEOBaTeIHO ekpaHbT Ie ce npOMEHIOT BpeMeTO 3a roTBeHe Ha HOB TaMep, KOIT Oe OTbPOn Do 4:00 (4 Yaca) INI DOKATO He HATNCHTe 6yToHa START/ STOP. CnEi 4 YACA B pexIM KEEP WARM MyIuФyHKUHOHaHnHrT ypeD 3a roTBeHe Ie npEMHe B peXIM Ha rotOBHOCT, a Ha ekpAna Ue CBETHa TcTnpTu TpTeA (----).
3a6eKka: MyItnHcyHKcnoHaHnnrT ype3 3a rotBeHe He MoKe da rotBn noD haHrahe 6e3 TeuHOCT. YBepTe ce, Ye B IOdBnKHNcBd 3a rotBeHe ce n3No3Ba Hau-MaIKo 236,6 ml (8 oz) TeuHOCT.
BHUMAHNE: No Bpeme Ha rotBeHe B MyIINyHKUHOHaJIHnY ypeI 3a rotBeHe Ie ce o6pa3yBa napa, Taka ye KOraTO BdIraTe KaNaka, N3NoJ3BaIe Ke KyXHeHcKa pKbAUNa UNI pKbAUNa 3a cyPHa 3a aunTa Ha pbKaTata.
OCBOOJDABAHE HA HANRAHETO B KPAR HA IPOUCECA HA TOTBEHE
A. EcTeCTBeH MeToD 3a N3nyckaHe Ha HnIraHaTe: Cnei KaTo npKKnOCh uKbIbT Ha rotBeHe, OCTabeTe MyIITNFOHKUHOHaHnIy TyeD 3a RotBeHe NO eCTeBHe NbT Da I3NyCHe HnIraHaTe Ype3 KlanHa 3a Napata. YpeBt NoCTeNeHNo ige Ce OXnAdn OT cMo ce6e cn. N3uKaAte Ha-MAkIO 10 MInHyTcNe i npKKnOcbHe Ha RotBeHeTo n C NOMoTa Ha KxHEnCKn Pnp6op, UyKHeTe JocTuE To Ha KlanHa 3a I3NyCKeHa He napata Do IoozurTa "Release" (BnxTe fHypTa 2). He n3JaarTe KOrTO n Da 6nlo Yact OT dNaHTa nn TAnTO Cn Ha n3XoDa 3a npa Bbpxy rOpHata Yact Ha KlanHa, Tb' Kato napata e MHoro ropeua m Moxe da Onapn KoxTa BN. HnIraHaTe e I3nychaTo, Korato NoBee He n3n3a npa OT KlanHa, a KanakTc ot TBapr Cbo6oJHO C MNHMaIIHO ycInne. EDb a Toraba Moke 6e3onacHo da npemaxheTe Kanaka n da cepBnPate xpaHata.
B.БbP3 MeTOd 3a n3nyckaHe Ha HnIraHeTo: C nomOuTa Ha KxHcHckn npI6Op, yKHeTe JocTHeTo BbPxy KnaHa 3a n3nyckaHe Ha napata do hactpoiKaTa ,Release" (BIXkTe fIngpya 2). Napata 6bp30 ue Ce n3nycHe ot KnaHa 3a n3nyckaHe Ha napata. He n3naraiTe KOrTo I da 6Ino Yact OT dAnHTa INN TReIOTo CN Ha n3XoDa 3a npa BbPxy rohata qacT Ha KnaHa, Tb' KaTo npata e MHOro ropeua mOKe Da onapn KoKata BN. HnKora He n3noJ3BaIte TO3n MeOD, KOrato RotBNTe C TeUHN CbCTABKN, KaTo HnPImep AICTB KacepO1, 6yIbOHn cyn. HnKora He n3noJ3BaIte To3n MeOD, Korato RotBNTe Opi3, Tb' KaTo opn3bT e MHOro DeJIkaTeH. HnIraHeTo e n3nychaTo, KOrato NoBeue He n3NI3a npa OT KnaHa, a KanakBT ce OTbApC CBO6OHD C MNHmAlNo yCInne. EDbA Toraba MoKe 6e3OnacHo da npemaxheTe Kanaka I da cepBupate xpaHata.
Knanah 3a n3nyckaHe Ha napata 3ATBOPEH knanan(Seal
OTBOPEH knanan (Release)
ПЕМAXHAT Кларан
BHIMAHHE:
- He OTbaprTe Kanaka Cbc Cnla. Ako KanakbT He ce OTbapr NecHO, TOBa O3Haaba, Ye MyIITNpHkUHOHaHHaYpeD 3a rotBeHe BCE OSe e NOHaHaRaHe.
- IIO Bpeme Ha rotBeHe B MyIITnOyHKUHOHaHnYpeI 3a rotBeHe ige Ce o6pa3yBa npa, Taka ye KOrato Bmrgate Kanaka, n3no3BaIte KxHHeNcKa pbkAbuca nIIN pbkAbuca 3a OpyHa 3a 3aunTa Ha pbkata.
BABHO TOTBEHE
HacpoKa LOW: Pooja e 3a 6abHO BapeHe n roTBHe Ha cna6 orbH. IpeOpBHTeJIHITe BpemeHa 3a roTBHe npI LOW ca ot 6 do 8 yaca.
Hacpoika HIGH: T e 3a no-6bp3o rotBeHe. PpenopbHTeJIHnTe BpeMeHa 3a rotBeHe npH HIGH ca ot 2 do 4 yaca.
HacpoKa KEEP WARM: Korato BpeMeTo 3a rotBeHe CbpyM, MyTnФyHKUHOHaHnT ypeD 3a rotBeHe ABTOMaTHNO npBKnOuBa Ha pexm KEEP WARM, 3a da npedotBpaTn npekomepHo croTBaHe N da NoDlbPka BaWata XpaHa TOnNa do cepBnpaHTo n.
HnKora He notanrte HarpBeaTeJIHaTa OCHOBA BbB BOa nn KaBaTo n da 6nNo dpyra TeuHOCT.
KoHdEHNaUNoH eKToP
I3npa3BaIe c6paJa ce BOda OT KOHdEHaauHOHHa KOJIeKTop cneD BCraKa yIOtpe6a. I3MnBaIe C TOnJa, canyHeHa BOda.
Kanak ynIbTHHTen
IOnCTBaIte Ha pKa C ToIIa, canyHeHa BOda, IocCywaBaIte Do6pe H NoCTabIte o6paTHo yNtBHTeTb B KAnaka npEi yNoTpe6a. MoKe Da e Heo6xoJIMo yNtBHTeJIr Ta Ce 3aMeHn Ha BCEk 1-2 rOdnn B 3aBNCMOcT OT peDOBHata yNoTpe6a.
KlanaH 3a n3nyckaHe Ha npapa
Ybepete ce, ye Knaanb3a n3nyckaHe Ha napata e nouchTeH OT 3ambpcaBaHn, Ppei Da 3anoHte Da n3non3BaTe MyntyHKuOHaHHn ypei 3a rotBeHe. Ipeaxhe Knaana H nouchTe BHMateJIHo. Ybepete ce, ye e HAnbIHO NOcSyWeH Ppei NobTOpHO NoCTaBHe.
KanaKaHa KJanaHa 3a N3nyCaHe Ha npaTa
BHHMaTeJIHO npEmaxHeTe KaNaUkata N NoUcTeTe C TOnla, canyHeHa BOda. IocTabeTe KaNaUkata Ha MrcToTo N, cneI Kato NouHCTBaHToE npNKIIouHNo.
KODOBE 3A TPEWKA
| Г的整体化 | HINH |
| Показв ac ,E1"ил ,E2" | Изклоче муltпфункцюнгий урет 3a rotbehe ot контakta и с CBьржete сбс сервизницentы. |
| Показв ac ,E3"и3 | К�оче муltпфункцюнгий урет 3a rotbehe ot kontakta и ro octabete da ce oxлади habлно. След като муltпфункцюнгий урет 3a rotbehe ce oxлади habлно, поberpeite BCчкни чastи на kanaka. 3abbyptetekanaka до поция LOCKED .Уberete ce, чу каланьтза Изneyckeп. �лара на пapота e на поция „Seal“ (3atbopeho). Ако тоз кд 3a rpeшka ce noявпOTHOBO, Излоче муltпфункцюнгий урет 3a rotbehe ot kontakta и с CBьржete сьс сервизницentы. |
| Показв ac ,E4"и3 | К�оче муltпфункцюнгий урет 3a rotbehe ot kontakta и ro octabete da ce oxлади habлно. След като муltпфункцюнгий урет 3e oxлади habлно, поberpeite sbda 3a rotbehe, за ду вороге, чу Вороге оше teчост. Добавete оше teчost, поюхомо (Minimum 340 ml).Уberete ce, чу осыдza 3a rotbehe He Изliningа пара, поюхаму obbatno калaka на муltпфункцюнгий урет 3a rotbehe. 3abbyptete калaka до поция LOCKED .Уberete ce, чу Каланьтза Изneyckeп. �лара на пapота e на поция „Seal“ (3atbopeho). Изberpeite Функцяя 3a rotbehe по habлагае и след тoba на ratichete START/STOP. |
| Показв ac ,E5"Муltпфункцюнгий урет 3a rotbehe щр. муltпфункцюнгий урет 3a rotbehe OT контakta и ro octabete DA ce oxлади. След като схлди habлно, поbergesе Kanaka и поbergesе sbda 3a rotbehe. He Изponзайte Kanaka, korato paobotITE c ФункцяяТВROWN/SAUTÉ. Korato Изponзайte ФункцяяТСLOW COOK, суberpete, чу Каланьтза Изneyckeп. �лара на пapота e на поция „Release“ (OTbopeho), поюда започецу NaKblа на rotbehe. | |
| Показв ac ,E6"и3 | К�оче муltпфункцюнгий урет 3a rotbehe OT кontakta и ro octabete DA ce oxлади. След като схлди habлно, поbergesе Kanaka и поbergesе sbda 3a rotbehe. Добавete Teчост соред НебхимocstTa.Уberete ce, чу РобVINCHЯ сбд 3a rotbehe с ИзponзBA. най-mалко 340 ml teknoct. Ако ИзponзВate Функцяя 3a rotbehe по habлагае, суberpete, чу Каланьтза Изneyckeп. �лара на пapота e на поция „Seal“ (3atbopeho). |
TAPAHUN
MOnI, na3eTe Kacobata 6eJekKa, Tb' KaTo 1e Bn 6bJe Heo6xOIMa 3a KaKBInTO n da e peKlAmauu Nn HactoTa rapaHcN.
To3n ypea nma rapaanu oT 2 roDInH, cIe KaTO ro 3akynnte, KaKTo e OINcaHO B HactoJua NOKyMeHT.
IbpeHaTo3n rapaHcHHe cpoK, aKO B MaNKo BepoTHn CnyaH ypeT Cnpe Da cyHKIOHnpa npaHn3npaBHOCT B KOHcTpyKUra TnB N3pa6OTkata, MoJI, BbpHeTe FO 6paTHO Ha MAcTO, OTKbTeTO CTe FO 3aKyuNIM,C BaWata KacOBA bEnEka H Konne Ha HactoAata rapaHcH.
IpaBata n non3nTe no HactoAata rapaHcna Ca B doTbHeHne KbM BaHTe yCTaHOBeH cbc 3aKOH npaba, KOtO He ca 3aceHaTH oT hactoAata rapaHcna. EInHCTBeHo Jarden Consumer Solutions (Europe) Ltd. ("JCS (Europe)" ) mma npaboto da npomeHra Te3n ycNoBn.
JCS (Europe) noema 3aIbJIxKeHneTo B pAMKIne Ha rapaHcIOHnIg cPok Da peMOHTnpa 6e3IIaTHo IIN da 3aMeHn UpeDa, IIN KAKBOTO N da e YacT OT UpeDa, aKO CE yCTaHOBu, Ye He paBOTn npabUNHO, pnYcIOBNeYe:
- NaДл\'eхно увeДOMITE мяСТОTO Ha 3aКуNYBaHе ИИ JCS (EuropE) 3a npo6JIeMa; n
yeBt He e 6nMOnuHn No KaKbTO n Da e HauHn He e 6nI npEmT Ha HenpaBnHa ynoTe6a, 3noynoTe6a, pemOHn HmN mHeHne OT nue, KoTo He e oTopn3npaHTo OT JCS (Europe).
Hn3npaBnoCTn, noBnIe CBe pe3yIITat OT He npabunHa yNoTpe6a, nobpea, 3IOyNtpe6a, n3non3BaHe C HnnpaBnHO nApexEne, nproDn bEdCTBna, c6bntna n3BbH KOHTPOna Ha JCS (Europe), pemont nn MoDnphiKaunr O T Nuce, pa3nUHO OT OToPi3npanHO To JCS (Europe) nue, nn B pe3yIITat OT HeCnA3BaHe Na HnCTpyKuNTte 3a yNoTpe6a, He ce NOKpNBAT OT HactoAeta rapaHcun. OcbEN TOBA HopMaJIHOTo n3HOCBaHE Ha ypeDa, BKJIOHTeJIHO, HO He caMO, JeKO obe3cBETBaHe n DpaACKOTHH, He ce NOKpNBAT OT HactoAeta rapaHcun.
IpaBaTa IIO HactoiaTAt rapaHuaCe npnlarat cmo 3a IIpBoHaayanHna KyuBaU He IpOdbJxBaT DeiCTBneTo I BaIIndHocTtCa n pR TbProBcA uNn O67a yNtpe6a.
Ako Baunr T ypeB BKIOUBA npTpyka CbC CneuΦnHa 3a cTpaHata rapaHua, MoJ, BIXTe cPOKOBeI uYcNoBnTa Ha Ta3n rapaHua BMeCTO HAcToaTa rapaHua, IIN Ce ObbpHeTe KbM BaUNa MeCTeH OTOpN3nPaH dNtbp 3a NObeue INOpMaun.
OTnadbnte OT eJektpnueckn npodkTn He Tp8Ba Da ce N3XbPjT B KOHTeHepnTe 3a OTnadbCtO DOMAKHCTBaTa. Mon, peuKnpaiTe TaKNaBc OtnadbCn, KDeTo CbIeCTByBat CbOpBXeHn 3a ToBa. N3npaTeTe Hn IMeIn Ha: enquiriesEurope@jardencs.com 3a INHΦopMaun OTHOCHO No-HaTaTbUHO peuKJIpaHe I OTHOCHO WEEE (DnpeKTNbata 3a OTnadbnte OT eJektpnueckn n eJektpoHNo obOpyDaHe (OEEO)).
Jarden Consumer Solutions (Europe) Limited
5400 Lakeside
Cheadle Royal Business Park
Cheadle
SK8 3GQ
United Kingdom

COOKING GUIDE
| Cooking Function | Default Setting | Pressure Adjustments | Temperature Adjustments | Cook Time Range |
| SLOW COOK Hig h temp / 4 hours N/A Low-High | 30 minutes – 20 hours | |||
| STEAM Hig pressure / 10 minutes Low-High | N/A 1 minute - 1 hour | |||
| BROWN/ SAUTÉHigh temp / 30 minutes N/A | Low-High 3 minutes | - 30 minutes | ||
| KEEP WARM W a m temp / 4 hours N/A Warm 30 | minutes – 4 hours | |||
| MEAT/STEWHigh pressure / 35 minutes | Low-High | N/A | 5 minutes - 2 hours | |
| BEANS/CHILIHigh pressure / 20 minutes | Low-High | N/A | 5 minutes - 2 hours | |
| RICE/RISOTTOLow pressure / 12 minutes | Low-High | N/A | 4 minutes - 30 minutes | |
| YOGURTLow temp / 8 hours | N/A | Low-High | Low: 6 hours - 12 hours High: N/A | |
| POULTRYHigh pressure / 15 minutes | Low-High | N/A | 15 minutes – 2 hours | |
| DESSERTLow pressure / 10 minutes | Low-High | N/A | 5 minutes – 2 hours | |
| SOUPHigh pressure / 30 minutes | Low-High | N/A | 5 minutes – 2 hours | |
| MANUALHigh pressure / 5 minutes | Low-High | N/A | 1 minute - 2 hours |
STEAMING CHART
| Food Amount A | Amount of | water | Pre-prep Cooking | Time, minutes |
| Asparagus 250g 400ml trim woody ends 2 | ||||
| Broccoli 300g 400ml trim stalks 2 | ||||
| Brussel Sprouts 400g 400ml peel outer leaves, leave whole 4 | ||||
| Butternut Squash 1 whole, 900g-1kg 400ml cut in half, remove seeds, slice into 6 7 | ||||
| Carrots 500g 400ml sliced into 1 cm rounds 5 | ||||
| Carrots and Swede | 600g | 400ml | peel and cut into similar sized pieces | 6 |
| Cauliflower | 500g | 400ml | cut into 5cm florets | 3 |
| Corn on the Cob | 2 | 400ml | remove any outer leaves | 3 |
| Frozen Chunky Vegetables | 500g 400ml cook from frozen | 3 | ||
| Green cabbage | 1 whole | 400ml | cut into quarters | 4 |
| Leeks | 500g 400ml trim ends and cut | into 2 cm rounds | 4 | |
| New Potatoes | 750g 400ml leave whole | 8 | ||
| Sweet Potatoes | 900g - 1kg | 400ml | peel and cut into large chunks | 5 |
| White potatoes, ideal for mash | 900g - 1kg | 400ml peel | and cut into large chunks | 9 |
| Basmati Rice | 400g (2 cups) 600ml rinse rice before use | 6 | ||
| Brown Rice 400g (2 cups) | 400ml rinse rice before use | 22 | ||
| Eggs | 6 | 400ml whole | in shell | 7 |
| Chicken fillet | 2-4 fillets | 400ml | season before cooking | 8 |
| Asparagus | 2-4 fillets | 400ml | season before cooking | 3 |


CROCKPOT
For Customer Service details, please see the website.
© 2018 Jarden Consumer Solutions (Europe) Limited.
All rights reserved. Imported and distributed by Jarden Consumer Solutions (Europe) Limited,
5400 Lakeside, Cheadle Royal Business Park, Cheadle, SK8 3GQ, United Kingdom. Two year limited warranty - see inside for details.
Jarden Consumer Solutions (Europe) Limited is a subsidiary of Newell Brands Inc. (NYSE: NWL).
The product supplied may differ slightly from the one illustrated due to continuing product development.
Printed In China
5400 Lakeside, Cheadle Royal Business Park, Cheadle, SK8 3GQ, United Kingdom.