DMX110BT - Car stereo KENWOOD - Free user manual and instructions
Find the device manual for free DMX110BT KENWOOD in PDF.
| Technical specifications | Bluetooth car stereo with 6.8-inch touchscreen |
|---|---|
| Connectivity | Bluetooth, USB, AUX, compatible with Android Auto and Apple CarPlay |
| Output power | 4 x 50 Watts |
| Supported audio formats | MP3, WMA, WAV, FLAC |
| Additional features | Voice control, 13-band equalizer, FM/AM radio |
| Installation | Standard 1 DIN installation |
| Maintenance | Regular cleaning of the screen and connections, firmware update |
| Safety | Overload protection, screen lock |
| General information | 2-year warranty, technical support available |
Frequently Asked Questions - DMX110BT KENWOOD
User questions about DMX110BT KENWOOD
0 question about this device. Answer the ones you know or ask your own.
Ask a new question about this device
Download the instructions for your Car stereo in PDF format for free! Find your manual DMX110BT - KENWOOD and take your electronic device back in hand. On this page are published all the documents necessary for the use of your device. DMX110BT by KENWOOD.
USER MANUAL DMX110BT KENWOOD
ÉCRAN AVEC RÉCEPTEUR
MODE D'EMPLOI
MONITOR CON RECEPTOR
MANUAL DE INSTRUÇÕES
JVCKENWOOD Corporation
- Updated information (the latest Instruction Manual, etc.) is available from http://www.kenwood.com/cs/ce/.
- Des informations actualisées (le dernier mode d'emploi, etc.) sont disponibles sur le site http://www.kenwood.com/cs/ce/.
- La información actualizada (el Manual de instrucciones más actualizado, etc.) está disponible desde http://www.kenwood.com/cs/ce/.
- Estão disponíveis informações atualizadas (o Manual de Instruções mais recente, etc.) em http://www.kenwood.com/cs/ce/.
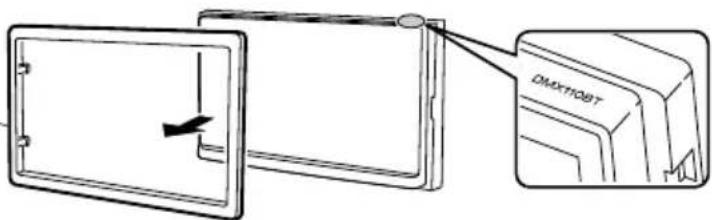
Model name indication position
See "Removing the trim plate" (P.21)
Plaque de garniturea
Marco
Moldura
text_image
DMXTOBTMade for

iPod

iPhone

Designed for
Windows Media ^™


Bluetooth®
Contents
Before use....2
How to read this manual....2
Precautions....2
Getting Started....3
Clock settings....4
Touch panel adjustment....4
Basics 5
Functions of the Buttons on the Front Panel....5
Common operations....5
HOME screen descriptions 6
Source control screen descriptions....6
List screen....6
USB 7
Preparation....7
Playback operations....7
iPod/iPhone 9
Preparation....9
Playback operations....9
Radio....11
Radio Basic Operation....11
Presetting stations....11
FM RDS features....11
Radio Setup....12
External Components....13
Using external audio/video players.... 13
Rear view camera....13
Bluetooth smartphone (DMX110BT) 14
Register your smartphone to the unit 14
Receive a phone call....14
Make a phone call.... 15
Playing Bluetooth Audio Device....16
Delete the registered Bluetooth device 16
Controlling Audio 17
Controlling General Audio....17
Equalizer Control....17
Subwoofer settings....17
Remote control....18
Functions of the Remote control Buttons.... 18
Installation....19
Before Installation....19
Installing the unit....20
About this Unit....24
More information....24
Troubleshooting....24
Copyrights 25
Specifications 26
How to read this manual
- The panels shown in this guide are examples used to provide clear explanations of the operations. For this reason, they may be different from the actual panels.
- In operation procedures, bracket shape indicates the key or button you should control.
<>: indicates the name of panel buttons.
[ ]: indicates the name of touch keys
Before use
Precautions
▲WARNING
■ To prevent injury or fire, take the following precautions:
- To prevent a short circuit, never put or leave any metallic objects (such as coins or metal tools) inside the unit.
- Do not watch or fix your eyes on the unit's display when you are driving for any extended period.
- If you experience problems during installation, consult your KENWOOD dealer.
☐ Precautions on using this unit
- When you purchase optional accessories, check with your KENWOOD dealer to make sure that they work with your model and in your area.
- The Radio Data System or Radio Broadcast Data System feature won't work where the service is not supported by any broadcasting station.
Protecting the monitor
- To protect the monitor from damage, do not operate the monitor using a ballpoint pen or similar tool with the sharp tip.
Cleaning the Unit
If the front panel of this unit is stained, wipe it with a dry soft cloth such as a silicon cloth. If the front panel is stained badly, wipe the stain off with a cloth moistened with neutral cleaner, then wipe it again with a clean soft dry cloth.
CAUTION
- Applying spray cleaner directly to the unit may affect its mechanical parts. Wiping the front panel with a hard cloth or using a volatile liquid such as thinner or alcohol may scratch the surface or erase screened print.
How to reset your unit
If the unit or the connected unit fails to operate properly, reset the unit.

text_image
MUTE OFF KENWOODReset button
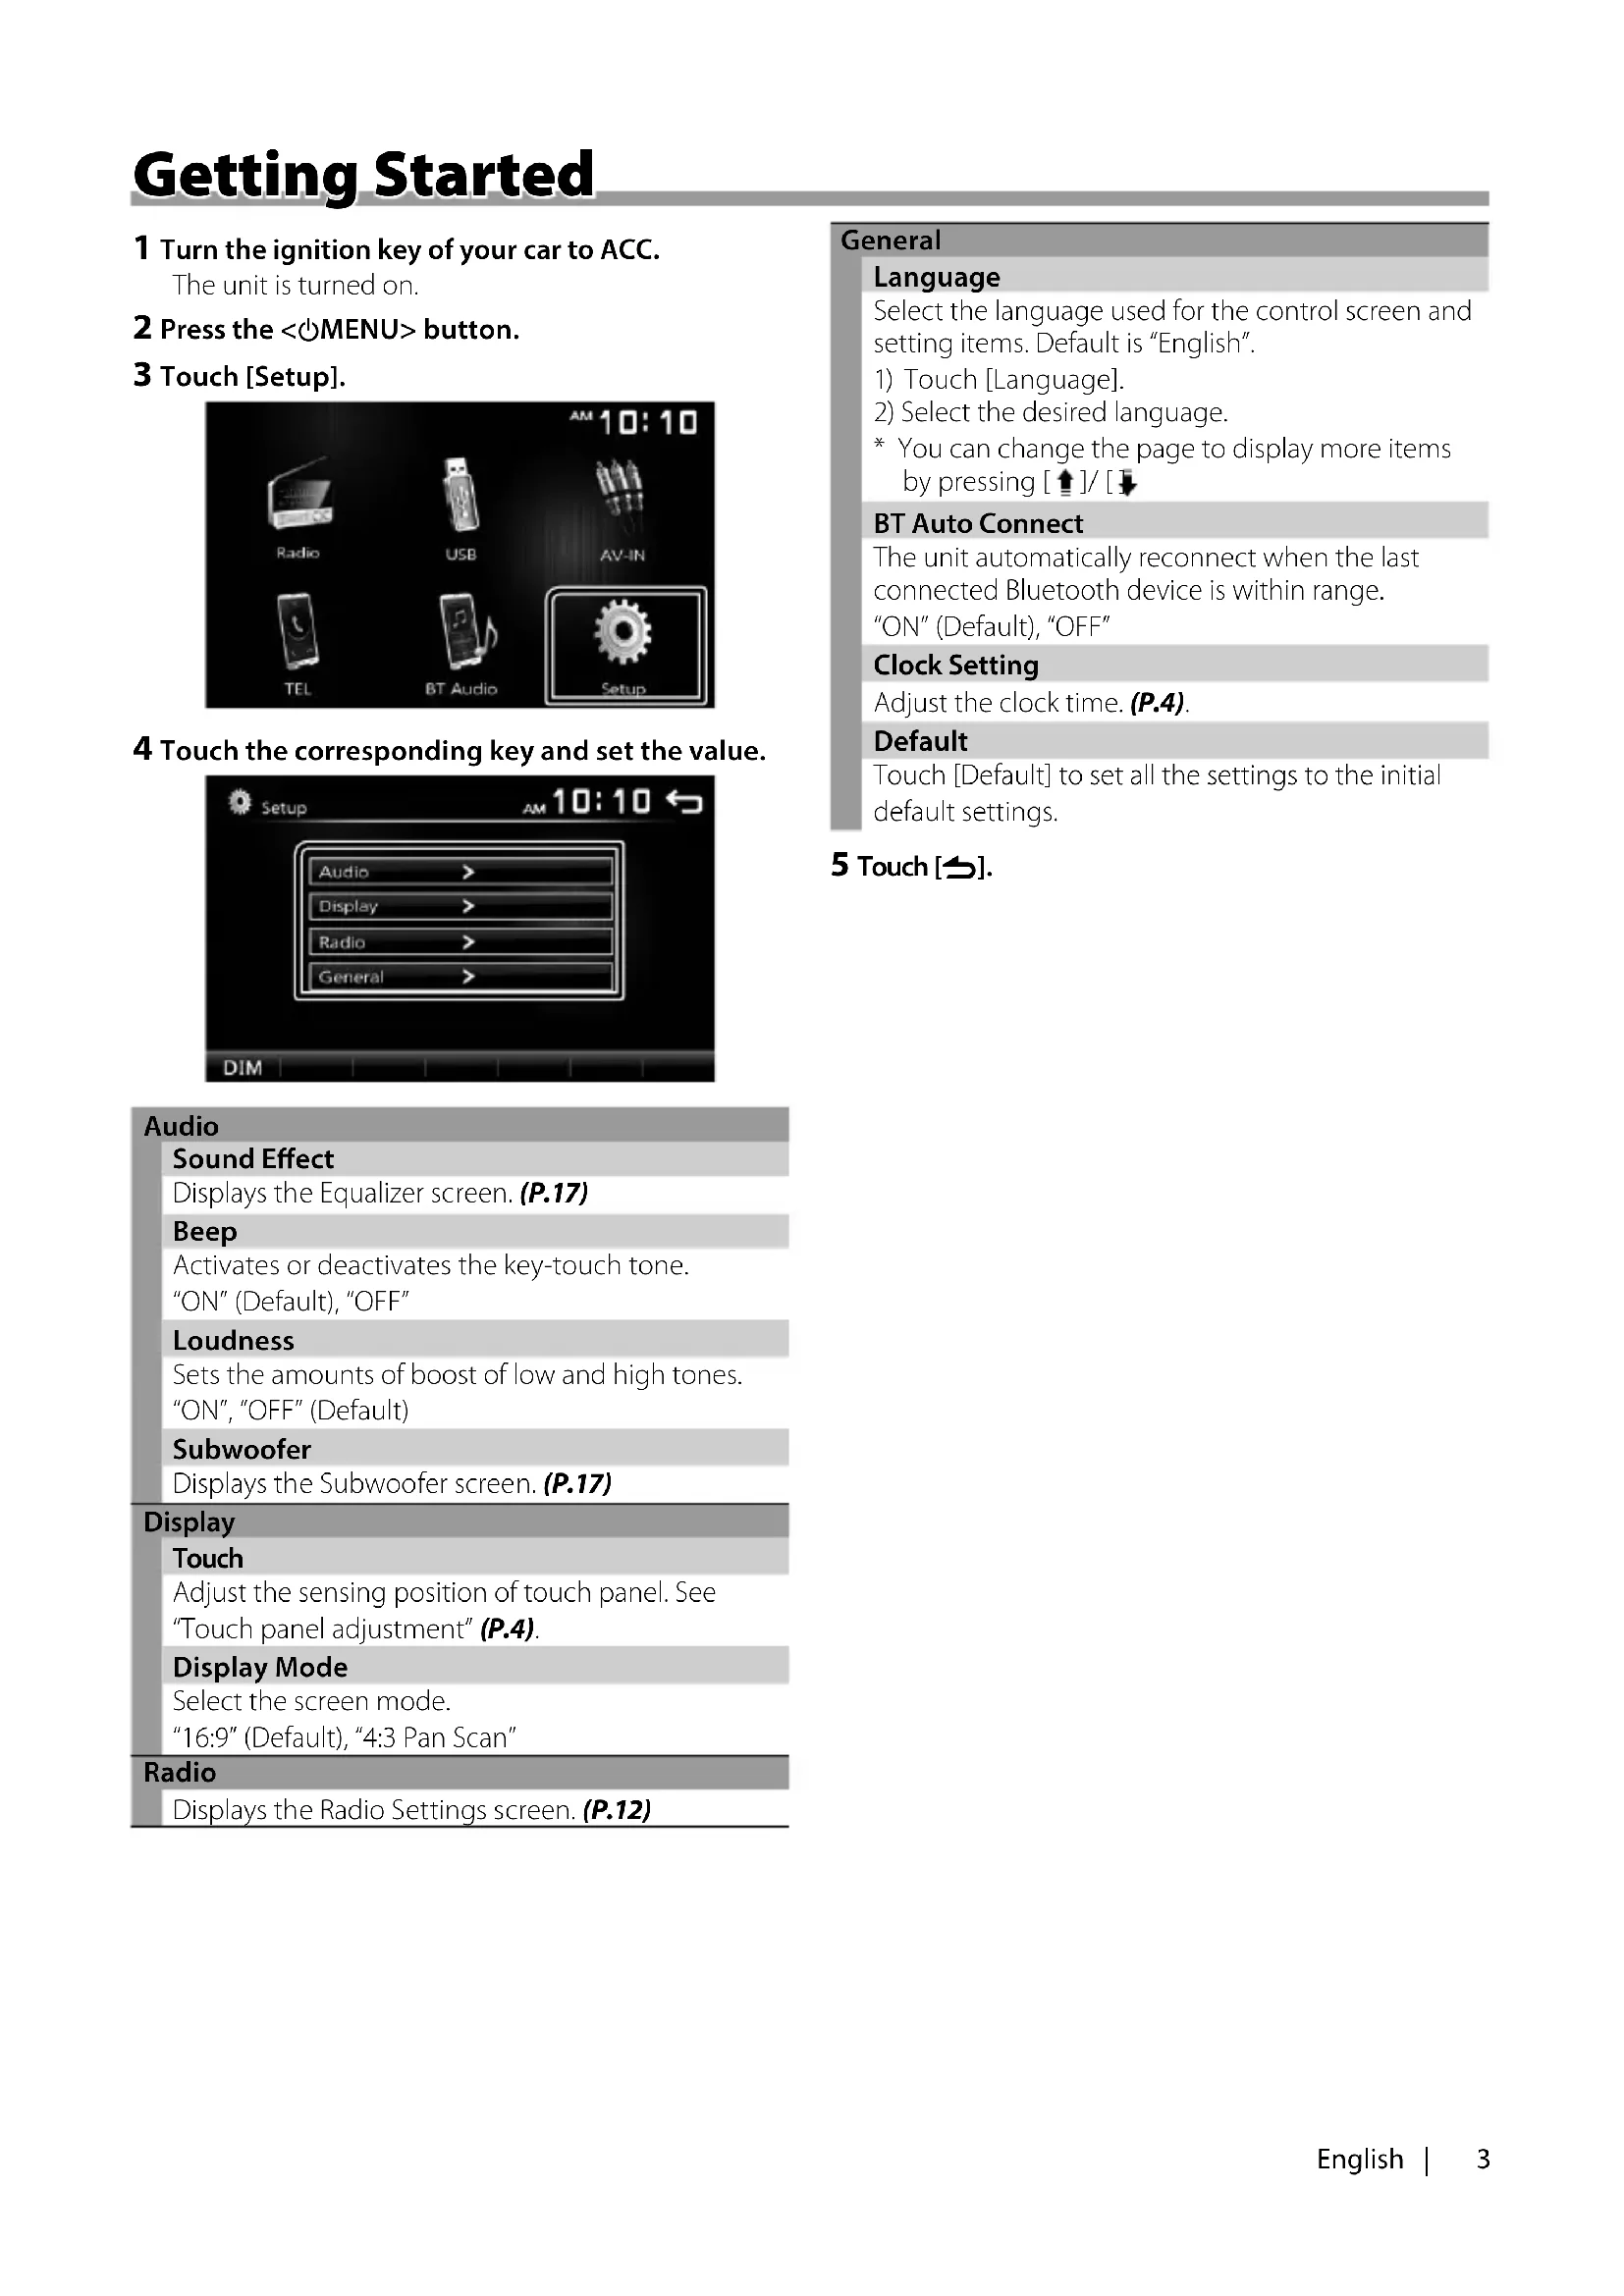
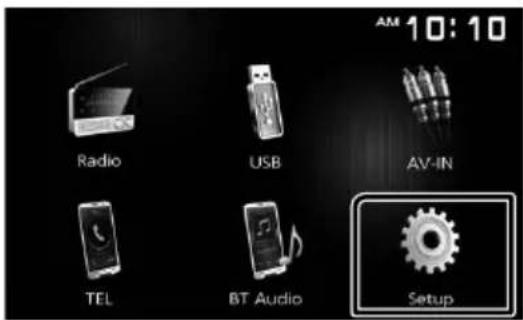
Getting Started
1 Turn the ignition key of your car to ACC.
The unit is turned on.
2 Press the <@MENU> button.
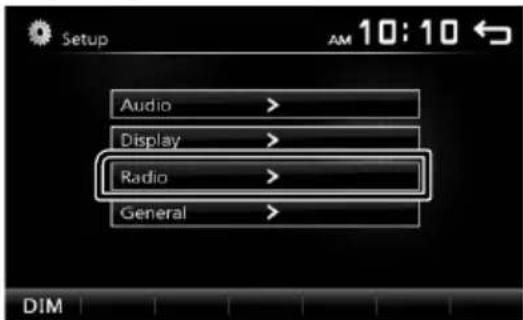
3 Touch [Setup].
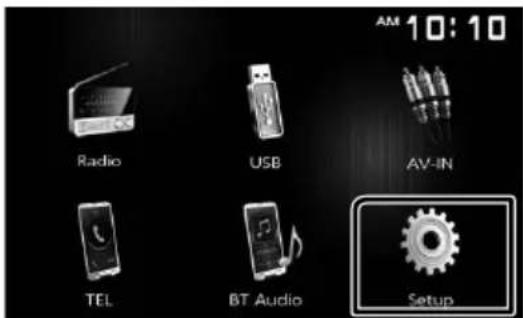
text_image
AM 10:10 Radio USB AV-IN TEL BT Audio Setup4 Touch the corresponding key and set the value.
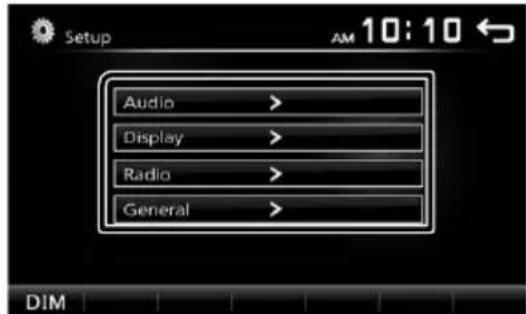
text_image
Setup Audio > Display > Radio > General >Audio
Sound Effect
Displays the Equalizer screen. (P.17)
Beep
Activates or deactivates the key-touch tone.
"ON" (Default), "OFF"
Loudness
Sets the amounts of boost of low and high tones.
"ON", "OFF" (Default)
Subwoofer
Displays the Subwoofer screen. (P.17)
Display
Touch
Adjust the sensing position of touch panel. See
"Touch panel adjustment" (P.4).
Display Mode
Select the screen mode.
"16:9" (Default), "4:3 Pan Scan"
Radio
Displays the Radio Settings screen. (P.12)
General
Language
Select the language used for the control screen and setting items. Default is "English".
1) Touch [Language].
2) Select the desired language.
* You can change the page to display more items by pressing [↑]/[↓]
BT Auto Connect
The unit automatically reconnect when the last connected Bluetooth device is within range.
"ON" (Default), "OFF"
Clock Setting
Adjust the clock time. (P.4).
Default
Touch [Default] to set all the settings to the initial default settings.
5 Touch [→].
Clock settings
■ Synchronizing the clock time with FM RDS
Activate [RDS Clock Sync]. See "Radio Setup" (P.12).
Adjusting the clock manually
NOTE
- Deactivate [RDS Clock Sync] before adjusting the clock. See "Radio Setup" (P.12).
1 Press the <@MENU> button.
2 Touch [Setup].
3 Touch [General].
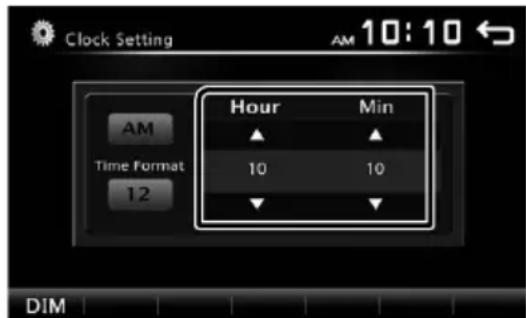
4 Touch [Clock Setting].
Clock screen appears.
5 Selects time format.
[12] (Default: North America, South America sales area only)
[24] (Default: Europe, CIS sales area only)
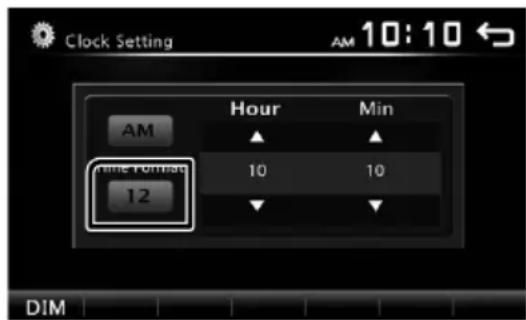
text_image
Clock Setting AM 10:10 ← AM Hour Min time format 10 10 12 DIM6 Touch [▲] or [▼] to set the clock time.
text_image
Clock Setting AM 10:10 ← AM Time Format 12 Hour Min 10 10 ↓ ↓ DIM- If you have selected [12] as the time format, touch [AM] or [PM] before setting the clock time.
7 Touch [→].
Touch panel adjustment
Press the
- To cancel the touch panel adjustment, touch [Cancel].
- If the touch position is deviated, [OK] is not displayed. Retry from the beginning.
6 Touch [OK].
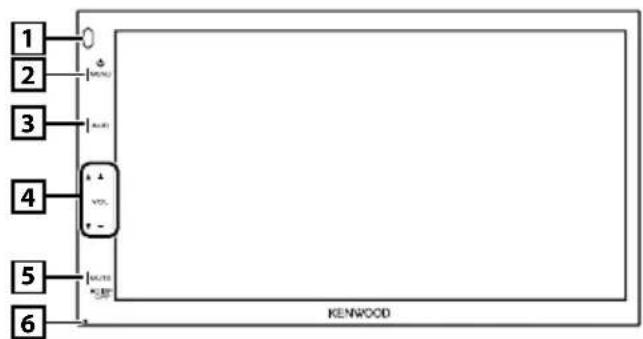
Functions of the Buttons on the Front Panel
text_image
1 2 3 4 5 6 KENWOOD1 Remote Sensor
- Receives the remote control signal.
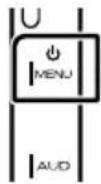
2 ⏻MENU
• Displays the HOME screen. (P.6)
- Pressing for 1 second turns the power off.
- When the power off, turns the power on.
3 AUD
• Displays the Equalizer screen.* (P.17)
* During video file playback, you can set only the preset equalizer curve.
* The Equalizer screen is not displayed during picture file playback or on the list screen or SETUP screen etc,
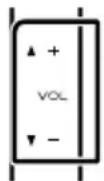
4 + , - (Volume)
- Adjusts volume. The volume will go up until 20 when you keep pressing [ + ].
5 MUTE/ DISP OFF (Display off)
- Mutes/restores the sound.
- Pressing for 1 second turns the screen off. When the screen is off, touch the display to turn on the screen.
6 Reset
- If the unit or the connected unit fails to operate properly, the unit returns to factory settings when this button is pressed.
Common operations
Turning on the power
1 Press the <○MENU> button.

NOTE
- If the gear is in the reverse (R) position, the power cannot be turned on or off.
Turning off the power
1 Press and hold the <○MENU> button.
Adjusting the volume
1 Press the <+> or <-> button.
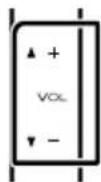
NOTE
- The volume will go up until 20 when you keep pressing [ + ].
Mutes the sound
1 Press the button.
text_image
MUTE ■ DISP OFF KENWOOD- To restore the sound, touch the button again, or adjust the volume.
Turn off the screen
1 Press and hold the button.
text_image
MUTE ■ DISP OFF KENWOOD• To turn on the screen, touch the display.
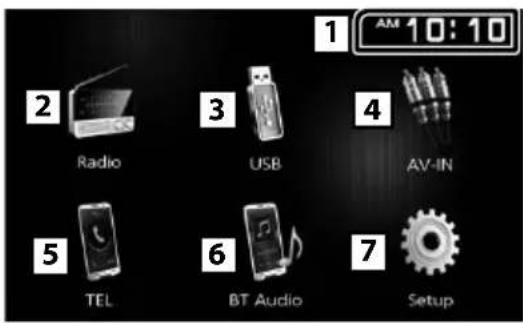
HOME screen descriptions
1 Press the <@MENU> button.

HOME screen appears.
text_image
1 AM 10:10 2 Radio 3 USB 4 AV-IN 5 TEL 6 BT Audio 7 Setup1 Clock display
Touch to displays the Clock screen.
2 Switches to the radio broadcast. (P.11)
3 [USB]
Plays files on a USB device. (P.7)
[iPod]

Plays an iPod/iPhone. (P.9)
- When iPod/iPhone is connected.
4 Switches to an external component connected to the AV-IN input terminal. (P.13)
5 Displays the Hands Free screen. (P.15) (DMX110BT only)
6 Plays a Bluetooth audio player. (P.16) (DMX110BT only)
7 Displays the SETUP screen. (P.3)
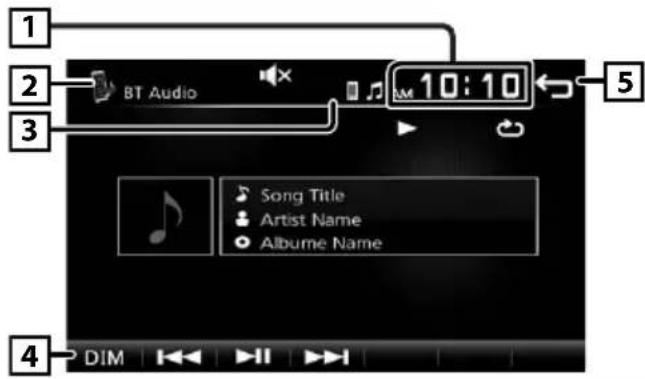
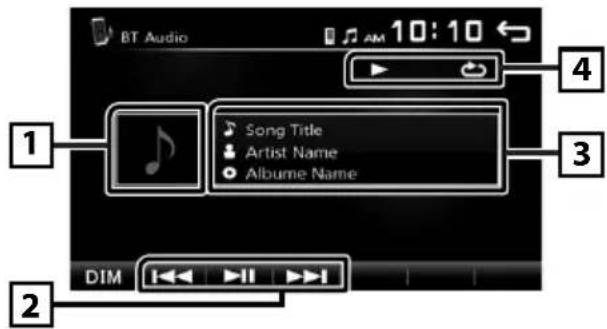
Source control screen descriptions
You can perform source playback operations on the source control screen.
text_image
1 2 BT Audio 10:10 3 5 Song Title Artist Name Albume Name 4 DIM1 Clock display
Touch to displays the Clock screen.
2 Source name
- appears when the Bluetooth smartphone is connected.*
• 🎶 appears when the Bluetooth audio player is connected. *
• 📁✗ appears when the mute function is active.
(P.5)
* DMX110BT only
4 [DIM]
Select dimmer mode. Dim 1, Dim 2, Not dim
5 Returns to previous screen.
List screen
There are some common function keys in the list screens of most sources.
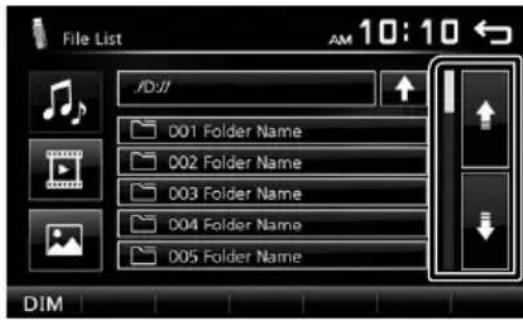
text_image
File List AM 10:10 JD:01 001 Folder Name 002 Folder Name 003 Folder Name 004 Folder Name 005 Folder Name DIM1 You can change the page to display more items by pressing [↑[]. ↓
Preparation
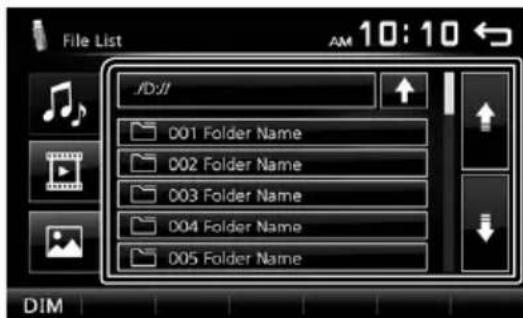
Connecting a USB device
1 Remove the cap of the USB terminal.
2 Connect the USB device with the USB cable.
natural_image
Diagram of two connected electronic devices, one with a port and the other with a cable (no text or symbols)The unit reads the device and playback starts.
To disconnect the USB device:
1 Press the <@MENU> button.
2 Touch a source other than [USB].
3 Detach the USB device.
Usable USB device
This unit can play MPEG1/ MPEG2/ MPEG4/ MP3/ WMA/ AAC/ JPEG/ BMP files stored in a USB mass storage class device. (P.24)
- File system: FAT16/ FAT32
-
This unit can recognize a total of 9 999 files and 320 folders (a maximum of 9 999 files per folder).
• The maximum number of characters: -
Folder names : 24 characters
- File names: 24 characters
- Tag : 30 characters
NOTE
- When the USB device is connected to this unit, it can be charged through the USB cable.
• Install the USB device in the place where it will not affect safe driving. - You cannot connect a USB device via a USB hub and Multi Card Reader.
• Take backups of the audio files used with this unit. The files may be erased depending on the operating conditions of the USB device.
We shall have no compensation for any damage arising from any erased data.
- No USB device comes with this unit. You need to purchase a commercially available USB device.
- Cap the USB terminal whenever not using.
Playback operations
Control the music you are listening to on the source control screen.

text_image
USB 10:10 6 Song Title Artist Name Albume Name 5 4 2 03:45 05:38 DIMThe jacket of the currently playing file is displayed.
2 ##:##:## : Song time
Play time bar : For confirmation of current playing position
3 [▶II]: Plays or pauses.
[◀◀] [▶▶] : Searches the previous/next content. Touch and hold to fast forward or fast backward. Touch [▶▶] to resumes normal play.
[💡]: Selects Repeat playback mode.
Lights off (Default): Repeats all files in the USB device.
: Repeats the current file.
FO 📋: Repeats all files in the current folder.
[×]: Selects Random playback mode.
✗: Randomly plays all files.
Lights off (Default): Normal playback.
4 Displays the information of the current file. Only a file name is displayed if there is no tag information.
5 Searches file. (P.8)
6 ▶, etc.: Playback status
: Repeat playback mode indicator
x: Random playback mode indicator
For Video playback
1 When the operation buttons are not displayed on the screen, touch the display.

text_image
1 03:45 05:38 2 DIM 2 DIM 3 5 4 2Play time bar : For confirmation of current playing position
2 To switch the operation buttons.
3 [☐]: You can adjust image quality in video screen.
[Brightness]: Adjusts the brightness. (00 to 08)
[Contrast]: Adjusts the contrast. (00 to 08)
[Tint]: Adjusts the tint. (00 to 08)
[Color]: Adjusts the color. (00 to 08)
[Reset]: To clear the adjustment.
[+] : Select the zoom ratio.
"Off", "x2", "x3", "x4", "x5", "1/2", "1/3", "1/4"
[∧][∨][<][>]: Scrolls the screen.
4 The operation buttons disappear when 4 is touched or when no operation is done for about 10 seconds.
5 Displays the File List screen.* (P.8)
* The video file stops.
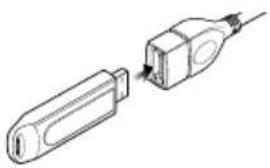
■ Selecting a track in a list (Searches file)
1 Touch [ ]
2 Select whether you search by audio files [video files [ ] or picture files [ ].
text_image
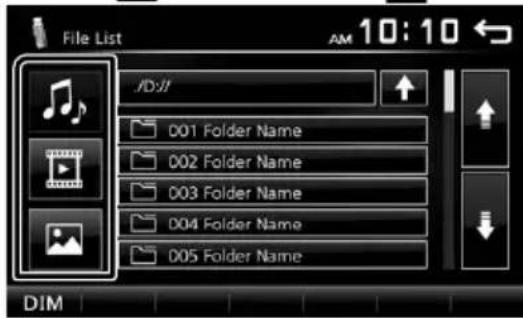
File List 10:10 JD:01 001 Folder Name 002 Folder Name 003 Folder Name 004 Folder Name 005 Folder Name DIM3 Touch [↑] to moves to the upper hierarchy.
4 Touch the desired folder.
text_image
File List JD:01 001 Folder Name 002 Folder Name 003 Folder Name 004 Folder Name 005 Folder Name DIMWhen you touch a folder its contents are displayed.
5 Touch desired item from the content list.
Playback starts.
NOTE
- When file types are switched, the Random/Repeat playback setting is cancelled.
Preparation
Connecting iPod/iPhone
- For Lightning connector models: Use USB Audio cable for iPod/iPhone—KCA-iP103 (optional accessory).
- For details about connecting iPod/iPhone, see page 23.
1 Remove the cap of the USB terminal.
2 Connect the iPod/iPhone.
The unit reads the device and playback starts.
To disconnect the iPod/iPhone
1 Press the <@MENU> button.
2 Touch a source other than [iPod].
3 Detach the iPod/iPhone.
Connectable iPod/iPhone
The following models can be connected to this unit.
Made for
- iPhone 7 Plus
- iPhone 7
- iPhone SE
- iPhone 6s Plus
- iPhone 6s
- iPhone 6 Plus
- iPhone 6
- iPhone 5s
- iPhone 5c
- iPhone 5
- iPod touch (6th generation)
- iPod touch (5th generation)
NOTE
- If you start playback after connecting the iPod, the music that has been played by the iPod is played first.
- Cap the USB terminal whenever not using.
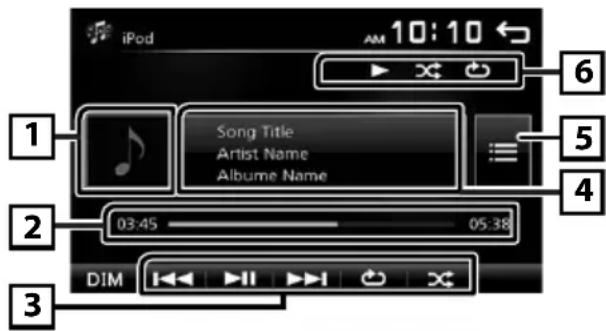
Playback operations
■ Control the music you are listening to on the source control screen.
text_image
iPod 10:10 6 Song Title Artist Name Albume Name 5 4 2 03:45 05:38 DIM1 Artwork (Shown if the track contains artwork)
2 ##:##:## : Song time
Play time bar : For confirmation of current playing position
3 [▶II]: Plays or pauses.
[◀◀] [▶▶▶]: Searches the previous/next content. Touch and hold to fast forward or fast backward.
[💡]: Selects Repeat playback mode.
Lights off: Repeat off
: Functions the same as Repeat All.
1 : Functions the same as Repeat One.
[×]: Selects Random playback mode.
✗ : Functions the same as Shuffle Songs.
Lights off: Random off
4 Displays the information of the current file.
5 Searches content. (P.10)
6 ▶, etc.: Playback status
: Repeat playback mode indicator
x: Random playback mode indicator
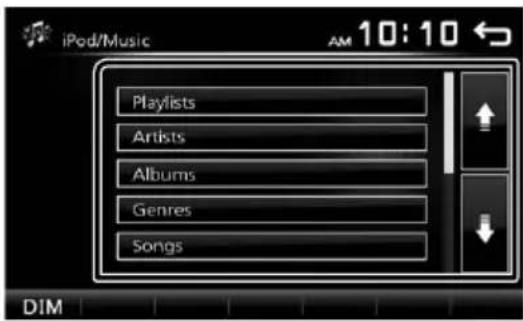
Selecting a content in a list
1 Touch [

2 Touch desired item.
text_image
iPod/Music AM 10:10 Playlists Artists Albums Genres Songs DIMWhen you touch a category its contents are displayed.
3 Touch desired item from the content list.
Playback starts.
- Touch [→] to moves to the upper hierarchy.

NOTE
- The source control screen appears when you touch [→] at the top hierarchy.
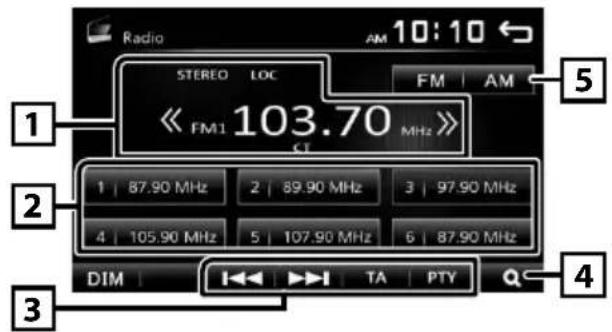
Radio Basic Operation
1 Press the <@MENU> button.
2 Touch [Radio].
Source control screen
text_image
Radio AM 10:10 ← STEREO LOC FM | AM << FM1 103.70 MHz >> 1 | 87.90 MHz | 2 | 89.90 MHz | 3 | 97.90 MHz | 4 | 105.90 MHz | 5 | 107.90 MHz | 6 | 87.90 MHz | DIM | TA | PTY 41 Displays the information of the current station: PS name, Frequency, PTY Genre, Indicator Items [<<] [>>]: Touch to the next frequency manually.
2 Recalls the memorized station.
When touched for 2 seconds, stores the current receiving station in memory.
3 [I◄◄◄] [►►►I]: Tunes in a station with good reception automatically. *¹
[TA]: Traffic information mode is set. * 2*3 (P.11)
[PTY]: Select the available Program Type. * 2*3 (P.11)
*1 If "AF" is set to ON on the Tuner screen, only RDS stations are received. (P.12)
*2 FM only
*3 Europe, CIS sales area only
4 [Q]: Presets stations automatically. (P.11)
5 [FM]: Switches the FM band. "FM1", "FM2", "FM3"
[AM]: Switches the AM band. "AM1", "AM2"
Presetting stations
Auto memory
You can preset 18 stations for FM and 12 stations for AM.
1 Touch [FM] or [AM] to select the band.
2 Touch [Q].
The local stations with the strongest signals are found and stored automatically.
- If "AF" is set to "ON" on the Tuner screen, only RDS stations are stored in the memory. (P.12)
Manual memory
You can store the current receiving station in memory.
1 Tune in to a station you want to preset.
2 Touch and hold [#] (#:1-6) in which you want to store the station.
☐ Recalling the preset station
1 Touch [#] (#:1-6).
NOTE
- Only frequencies are registered as preset stations. Information about RDS stations is not registered.
FM RDS features
(Europe, CIS sales area only)
Search by program type
1 Touch [PT Y].
2 Select a program type from the list.

text_image
PTY List AM 10:10 Pop Music Rock Music Easy Listening Light Classics M Serious ClassicsPTY Search starts.
Traffic Information
1 Touch [TA].
Switches to the traffic information automatically when the traffic bulletin starts. (TA indicator lights up.)
"ON", "OFF" (Default)
- If "AF" is set to "ON" on the Tuner screen, the station is switched to the RDS station. (P.12)
When the traffic bulletin starts
The Traffic Information screen appears automatically.
Radio Setup
Function menu
1 Press the <@MENU> button.
2 Touch [Setup].
text_image
AM 10:10 Radio USB AV-IN TEL BT Audio Setup3 Touch [Radio].
text_image
Setup Audio > Display > Radio > General > DIM AM 10:104 Set each item as follows.
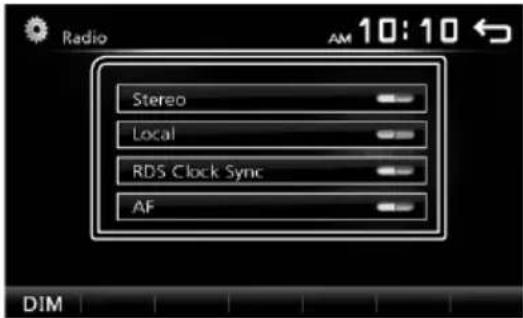
text_image
Radio Stereo Local RDS Clock Sync AF DIM AM 10:10Area \*1
North America (Default): For North/Central/South America, AM/FM intervals: 10 kHz/200 kHz.
South America: For some South American countries, AM/FM intervals: 10 kHz/50 kHz.
Europe: For Europe, AM/FM intervals: 9 kHz/50 kHz.
Stereo
Determines whether to receive stereo broadcasts in the stereo mode or monaural mode (the MONO indicator lights up). "ON" (Default), "OFF"
Local
Tunes in only to the stations with sufficient signal strength. (LOC indicator lights up.) "ON", "OFF" (Default)
RDS Clock Sync
Synchronizing the Radio Data System station time data and this unit's clock. "ON" (Default), "OFF"
AF\*2
When station reception is poor, automatically switches to the station that is broadcasting the same program over the same Radio Data System network. "ON" (Default), "OFF"
*1 North America, South America sales area only
*2 Europe, CIS sales area only
5 Touch [→].
External Components
Using external audio/video players
Starting playback
1 Connect an external component to the AV-IN input terminal. (P.22)
2 Press the <@MENU> button.
3 Touch [AV-IN].
4 Turn on the connected component and start playing the source.
For Video playback
1 When the operation buttons are not displayed on the screen, touch the display.
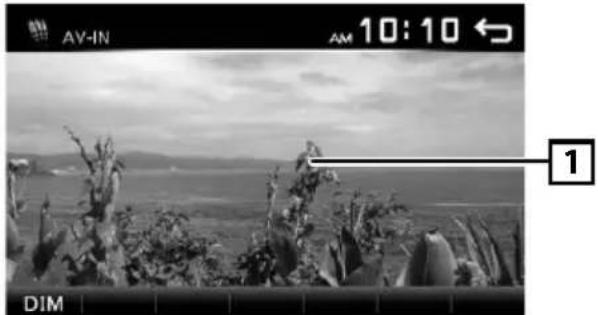
natural_image
Black-and-white landscape photo showing cacti and distant hills under cloudy sky, no visible text or symbolsThe operation buttons disappear when 1 is touched or when no operation is done for about 5 seconds.
NOTE
- When the picture from the rear view camera is displayed on the AV-IN screen, the picture output from the Visual Output terminal disappears.
Rear view camera
To use a rear view camera, the REVERSE lead connection is required. For connecting a rear view camera. (P.22)
■ Displaying the picture from the rear view camera
The rear view screen is displayed when you shift the gear to the reverse (R) position.

text_image
Check Surroundings Before Backing Up• To erase the caution message, touch the screen.
Bluetooth smartphone (DMX110BT)
■ About the Bluetooth smartphone and Bluetooth audio player
This unit conforms to the following Bluetooth specifications:
Version
Bluetooth Ver.2.1 + EDR
Profile
Smartphone/ Cell-phone:
HFP (V1.6) (Hands Free Profile)
PBAP (V1.1.1) (Phonebook Access Profile)
Audio player:
A2DP (V1.2) (Advanced Audio Distribution Profile)
AVRCP (V1.3) (Audio/Video Remote Control Profile)
Sound codec
SBC
■ About mobile phones compatible with Phone book Access Profile (PBAP)
If your mobile phone supports PBAP, you can display the following items on the touch panel screen when the mobile phone is connected.
• Phone book (up to 1000 entries)
- Dialed calls, received calls, and missed calls (up to 20 entries in total)
Register your smartphone to the unit
You can use your Bluetooth smartphone when paired to this unit.
You can register up to 5 Bluetooth devices.
- You can pair the device and the unit using SSP (Secure Simple Pairing) which only requires confirmation.
• One device can be connected at a time. - When you register a new Bluetooth device, disconnect the Bluetooth device currently connected and then register the new device.
- A new device cannot be registered if there are 5 registered Bluetooth units. Delete unnecessary registration. (P.16)
1 Turn on the Bluetooth function on your smartphone/cell-phone.
2 Search the unit ("DMX110BT") from your smartphone/cell-phone.
If a PIN code is required, enter the PIN code ("0000").
- appears when the Bluetooth smartphone is connected.
• 🎶 appears when the Bluetooth audio player is connected.
■ Disconnecting the device
- Turn off the Bluetooth function from your smartphone/cell-phone.
- Turn off the ignition switch.
Receive a phone call
1 Touch [L].
![KENWOOD DMX110BT - Touch [L]. - 1](/content/2026/03/437590/images/5628f0bdd85f844918340b66ef5adc8c9f73ca8d2ca881b9e874aa8a6b8b01e1.jpg)
text_image
TEL Unknown 012456789 DIM• [💡]: Reject an incoming call.
Operations during a call
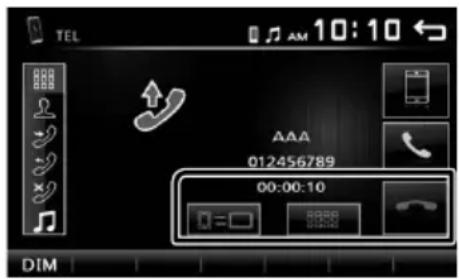
text_image
TEL 012456789 00:00:10 DIM
Ending a call

You can send tones by touching desired keys on the screen.
- Touch [ ] to close the window.

Switches the speaking voice output between cell-phone and speaker.
- Adjust the receiver volume
Press the <+> or <-> button.
Make a phone call
1 Press the <@MENU> button.
2 Touch [TEL].
3 See the table below for each operation method.
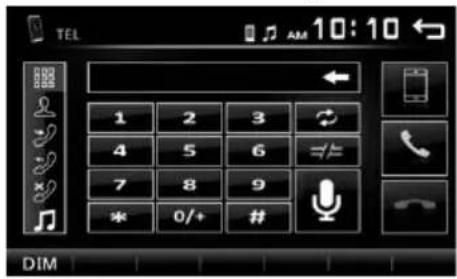
text_image
TEL 1 2 3 4 5 6 7 8 9 * 0/+ # DIM- [ ] disconnects the Bluetooth smartphone.
• [ ] : Closes the screen for sending tones while talking.
• [ ] : Displays the screen for deleting the previously registered Bluetooth devices. (P.16)
Call by entering a phone number
1) Touch [ ]
2) Enter a phone number with number keys.
3) Touch [☐]. Make a call
- Touch [←] to delete the last entry.
Call using call records
1) Touch [?] (Incoming Calls), [Outgoing Calls), [?] (Missed Calls).
2) Select the phone number from the list.
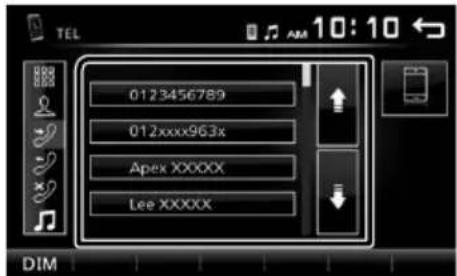
text_image
0123456789 012xxxx963x Apex XXXXX Lee XXXXX DIMMake a call
Call using the phonebook
1) Touch [ ] .
2) Select the name from the list.

text_image
TEL AAA/0123456789 AAA/012xxxx96.3x Apex XXXXXX/0123 Lee XXXXXX/01234 XXXXX/012398765 DIMMake a call
- [ ]: Updates the phonebook. Touch this button after you have made a change to the phonebook of your cell-phone.
Call by voice
You can make a voice call using the voice recognition function of the Bluetooth smartphone.
1) Touch [ ]
2) Touch [ ]
3) Say the name registered in the Bluetooth smartphone.
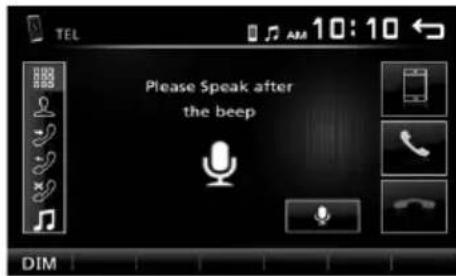
text_image
Please Speak after the beep- Touch [to cancel voice dialing.
Playing Bluetooth Audio Device
1 Press the <@MENU> button.
2 Touch [BT Audio].

Source control screen
text_image
BT Audio 10:10 4 1 Song Title Artist Name Albume Name 3 DIM1 The jacket of the currently playing file is displayed.
2 [▶III]: Plays or pauses.
[◀◀◀] [▶▶▶▶] : Searches the previous/next content.
3 Displays the information of the current file.
Only a file name and a folder name are displayed if there is no tag information.
4▶, etc.: Playback status
: Repeat playback mode indicator *
✗: Random playback mode indicator *
* The settings on the Bluetooth audio device are displayed.

NOTE
• Operations and display indications may differ according to their availability on the connected device.
Delete the registered Bluetooth device
1 Press the <@MENU> button.
2 Touch [TEL].
3 Touch [
4 Touch the device name.
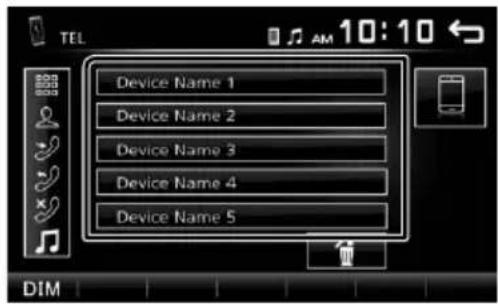
text_image
Device Name 1 Device Name 2 Device Name 3 Device Name 4 Device Name 5 DIM5 Touch

Controlling Audio
Controlling General Audio
1 Press the <@MENU> button.
2 Touch [Setup].
3 Touch [Audio].
4 Touch [Sound Effect].
5 Touch [
6 Set each item as follows.
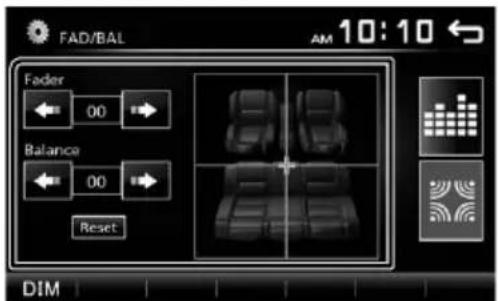
text_image
FAD/BAL AM 10:10 Fader Balance Reset DIMFader Adjust the front and rear volume balance. [←→] [→] 12 (front) to -12 (rear)
Balance Adjust the left and right volume balance. [←] [→] 12 (right) to -12 (left)
[Reset] To clear the adjustment.
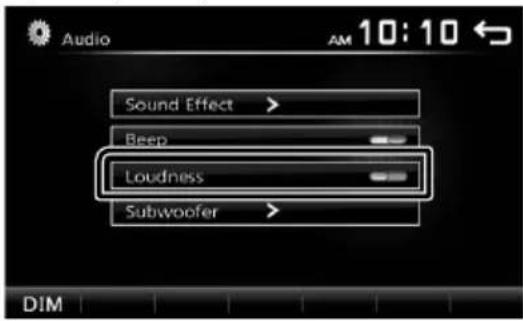
Loudness
1 Press the <○MENU> button.
2 Touch [Setup].
3 Touch [Audio].
4 Touch [Loudness].
Sets the amounts of boost of low and high tones. "ON", "OFF" (Default)
text_image
Audio Sound Effect > Beep Loudness Subwoofer DIM AM 10:10 ←Equalizer Control
1 Press the <○MENU> button.
2 Touch [Setup].
3 Touch [Audio].
4 Touch [Sound Effect].
5 Set each item as follows.
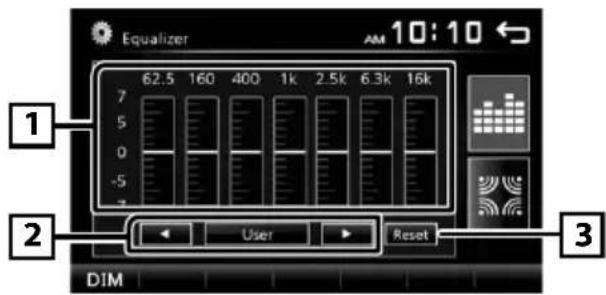
text_image
Equalizer 62.5 160 400 1k 2.5k 6.3k 16k 7 5 0 -5 - 2 User Reset DIM1 You can select frequency bar and adjust its level. (-7 to +7)
- The adjustments are stored and "User" is activated.
2 To recall the preset equalizer curve.
3 The "User" preset and the current EQ curve returns to flat.
Subwoofer settings
1 Press the <@MENU> button.
2 Touch [Setup].
3 Touch [Audio].
4 Touch [Subwoofer].
5 Set each item as follows.
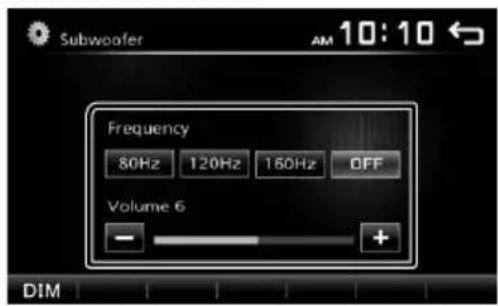
text_image
Subwoofer 10:10 Frequency 80Hz 120Hz 160Hz OFF Volume 6 - + DIM| Frequency[80Hz], [120Hz],[160Hz], [OFF] | Low Pass Filter adjustment. /[OFF]: Turns off the subwoofer output. (Default OFF) |
| Volume[-], [+] | Adjusts the subwoofer level. 0 to 12(Default 6) |
Remote control
This unit can be operated using the remote control KNA-RCDV331 (optional accessory).

CAUTION
- Put the remote control in a place where it will not move during braking or other operations. A dangerous situation could result, if the remote control falls down and gets wedged under the pedals while driving.
- Do not leave the battery near fire or under direct sunlight. A fire, explosion or excessive heat generation may result.
- Do not recharge, short, break up or heat the battery or place it in an open fire. Such actions may cause the battery to leak fluid. If spilled fluid comes in contact with your eyes or on clothing, immediately rinse with water and consult a physician.
- Place the battery out of reach of children. In the unlikely event that a child swallows the battery, immediately consult a physician.

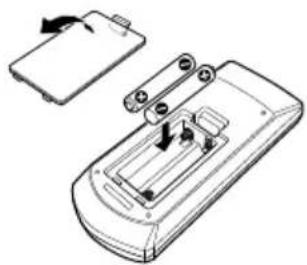
Battery Installation
If the remote control operates only over shorter distances or does not operate at all, it is possible that the batteries are depleted.
In such instances, replace the both batteries with new ones.
1 Insert two "AAA"/"R03"-size batteries with the ⊕ and ⊖ poles aligned properly, following the illustration inside the case.
natural_image
Technical line drawing of a remote control device with battery and switch components (no text or symbols)
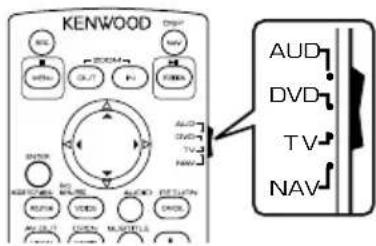
Switch the operation mode
Turn its operation mode switch to "DVD."
text_image
KENWOOD DNDP NAV REL AVES OUT F1 F2 F3 AVCD AVCD TV NAV AVCD AVCD AVCD AVCD AVCD AVCD AVCD AVCD AVCD AVCD AVCD AVCD AVCD AVCD AVCD AVCD AVCD AVCD AVCD AVCD AVCD AVCD AVCD AVCD AVCD AVCD AVCD AVCD AVCD AVCD AVCD AVCD AVCD AVCDFunctions of the Remote control Buttons
- Aim the remote control directly at the remote sensor on the faceplate.
- DO NOT expose the remote sensor to bright light (direct sunlight or artificial lighting).
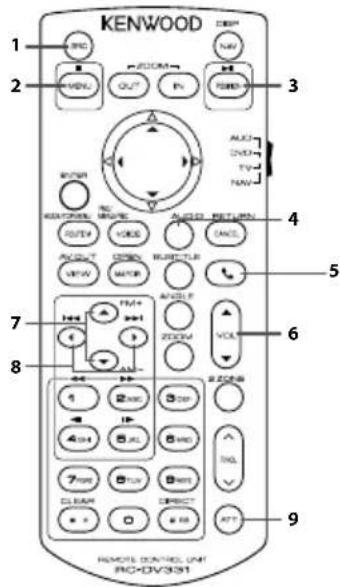
text_image
KENWOOD 1 2 3 4 5 6 7 8 9 REMOTE CONTROL UNIT INC+DV/30S1| 1 SRC | Switches to the source to be played. | |
| 2 | ■ | Stop playback. |
| 3 | ▶II | Plays or pauses. |
| 4 AUDIO | Displays the Equalizer screen. (P.17) | |
| 5 | ◀ | When a call comes in, answers the call. |
| 6 VOL ▲ ▼ | Adjusts the volume. | |
| 7 FM+AM- | Selects the folder to be played.During tuner source, select FM/ AM band to be received. | |
| 8 | |◀◀ | Selects the track or file to be played.During tuner source, switches to broadcast stations received by the unit. |
| ▶▶| | ||
| 9 ATT | Mutes/restores the sound | |
| - Other | Not used. | |
Before Installation
Before installation of this unit, please note the following precautions.
▲WARNINGS
- If you connect the ignition wire (red) and the battery wire (yellow) to the car chassis (ground), you may cause a short circuit, that in turn may start a fire. Always connect those wires to the power source running through the fuse box.
- Do not cut out the fuse from the ignition wire (red) and the battery wire (yellow). The power supply must be connected to the wires via the fuse.
▲CAUTION
• Install this unit in the console of your vehicle. Do not touch the metal part of this unit during and shortly after the use of the unit. Metal part such as the heat sink and enclosure become hot.

NOTE
- Mounting and wiring this product requires skills and experience. For best safety, leave the mounting and wiring work to professionals.
- Make sure to ground the unit to a negative 12V DC power supply.
- Do not install the unit in a spot exposed to direct sunlight or excessive heat or humidity. Also avoid places with too much dust or the possibility of water splashing.
- Do not use your own screws. Use only the screws provided. If you use the wrong screws, you could damage the unit.
- If the power is not turned ON ("There is an error in the speaker wiring. Please check the connections." is displayed), the speaker wire may have a short-circuit or touched the chassis of the vehicle and the protection function may have been activated. Therefore, the speaker wire should be checked.
- If your car's ignition does not have an ACC position, connect the ignition wires to a power source that can be turned on and off with the ignition key. If you connect the ignition wire to a power source with a constant voltage supply, such as with battery wires, the battery may be drained.
- If the console has a lid, make sure to install the unit so that the front panel will not hit the lid when closing and opening.
- If the fuse blows, first make sure the wires aren't touching to cause a short circuit, then replace the old fuse with one with the same rating.
- Insulate unconnected wires with vinyl tape or other similar material. To prevent a short circuit, do not remove the caps on the ends of the unconnected wires or the terminals.
- Secure the wires with cable clamps and wrap vinyl tape around the wires that comes into contact with metal parts to protect the wires and to prevent short circuit.
- Connect the speaker wires correctly to the terminals to which they correspond. The unit may be damaged or fail to work if you share the wires or ground them to any metal part in the car.
- When only two speakers are being connected to the system, connect the connectors either to both the front output terminals or to both the rear output terminals (do not mix front and rear). For example, if you connect the connector of the left speaker to a front output terminal, do not connect the connector to a rear output terminal.
• After the unit is installed, check whether the brake lamps, blinkers, wipers, etc. on the car are working properly.
- Mount the unit so that the mounting angle is 30^ or less.
- Do not press hard on the panel surface when installing the unit to the vehicle. Otherwise scars, damage, or failure may result.
- Reception may drop if there are metal objects near the Bluetooth antenna.

natural_image
Pure electrical circuit lines without any symbolsBluetooth antenna unit

Supplied accessories for installation
1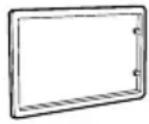 x1 x1 | 2 x2 x2 |
3 x1 x1 | 4[2]ZCTA |
5[1] x1 x1 | 6[1] x1 x1 |
7[1 (M5 × 6 mm) x4 (M5 × 6 mm) x4 | 8[1] (M5 × 7 mm) x4 (M5 × 7 mm) x4 |
9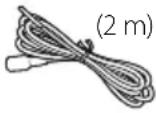 x1 x1 |
[1] North America, South America sales area only
[2] DMX110BT only
Installation procedure
1) To prevent a short circuit, remove the key from the ignition and disconnect the terminal of the battery.
2) Make the proper input and output wire connections for each unit.
3) Connect the wire on the wiring harness.
4) Take Connector B on the wiring harness and connect it to the speaker connector in your vehicle.
5) Take Connector A on the wiring harness and connect it to the external power connector on your vehicle.
6) Connect the wiring harness connector to the unit.
7) Install the unit in your car.
8) Reconnect the ⊖ terminal of the battery.
9) Press the reset button.
Installing the unit
Non-Japanese cars
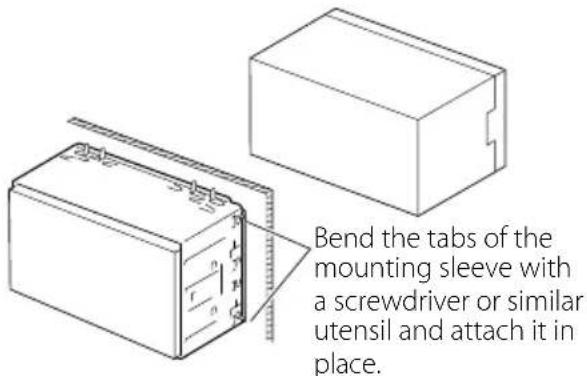
text_image
Bend the tabs of the mounting sleeve with a screwdriver or similar utensil and attach it in place.
NOTE
- Make sure that the unit is installed securely in place. If the unit is unstable, it may malfunction (eg, the sound may skip).
■ Japanese cars (North America, South America sales area only)
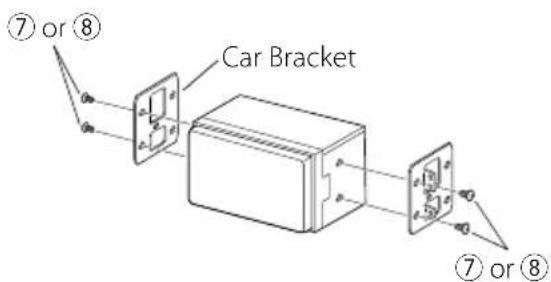
text_image
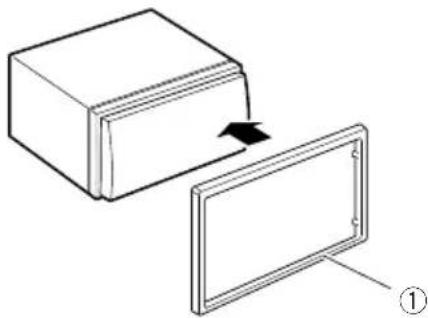
⑦ or ⑧ Car Bracket ⑦ or ⑧Trim plate
1) Attach accessory ① to the unit.
natural_image
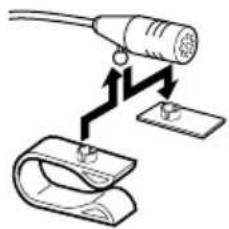
Diagram showing a rectangular block being placed on a flat panel, with an arrow indicating rotation (no text or symbols present)Microphone unit (DMX110BT)
1) Check the installation position of the microphone (accessory ④).
2) Clean the installation surface.
3) Remove the separator of the microphone (accessory ④), and stick the microphone to the place shown below.
4) Wire the microphone cable up to the unit with it secured at several positions using tape or other desired method.
5) Adjust the direction of the microphone (accessory ④) to the driver.

text_image
Diagram illustrating cable installation steps with labeled components and directional arrows indicating motionFix a cable with a commercial item of tape.
NOTE
- Swap the clips if necessary.
natural_image
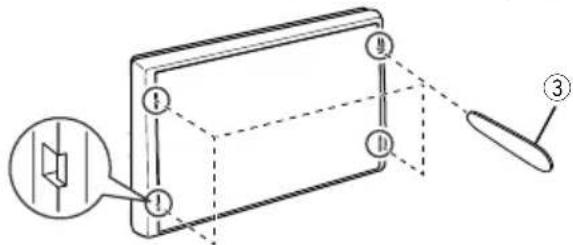
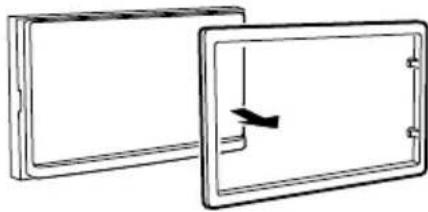
Diagram showing a connector with a probe inserted into a clip, no text or symbols presentRemoving the trim plate
1) Use the extraction key (accessory ③) to lever out the four tabs (two on the left part, two on the right part).
text_image
Diagram of a device with numbered components and an inset showing a speaker icon, likely illustrating a physical or technical concept.2) Pull the trim plate forward.
natural_image
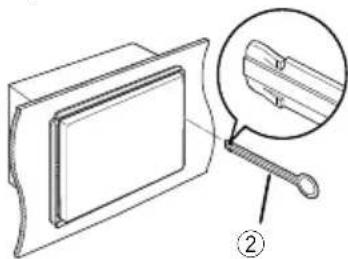
Two rectangular panels with a vertical arrow indicating direction, no text or symbols presentRemoving the unit
1) Remove the trim plate by referring to step 1 in "Removing the trim plate".
2) Insert the extraction key (accessory ②) deeply into the slot as shown. (The protrusion at the tip of the extraction key must face toward the unit.)
natural_image
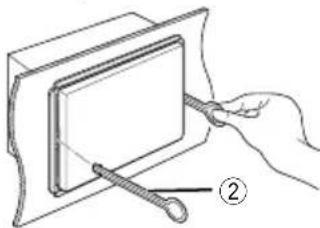
Technical line drawing of a mechanical component with an inset magnified detail (no text or symbols)3) With the inserted extraction key secured, insert the other extraction key into the slot.
natural_image
Illustration of a hand using a tool to adjust or install a rectangular component, labeled with number ② (no text or symbols on the diagram itself)4) Pull out the unit halfway.
natural_image
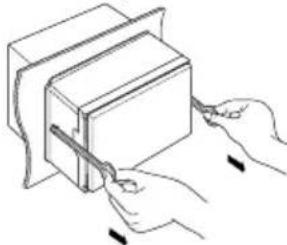
Line drawing of hands using a tool to cut or adjust a rectangular object (no text or symbols)NOTE
- Be careful to avoid injury from the catch pins on the extraction key.
5) Pull the unit all the way out with your hands, being careful not to drop it.

natural_image
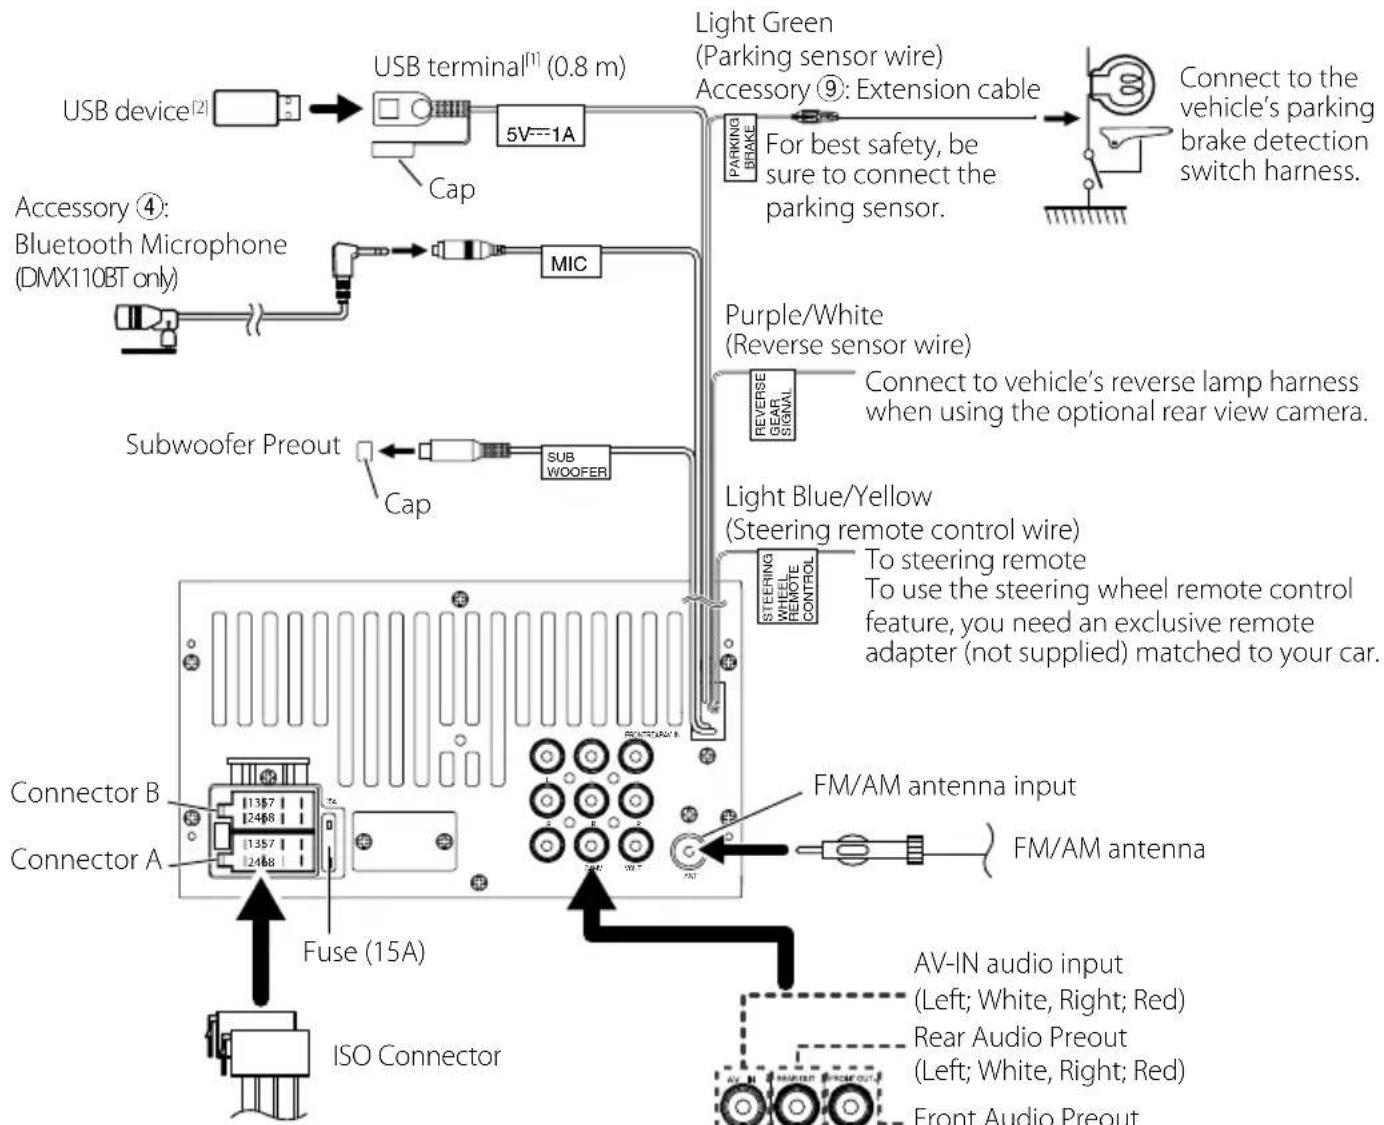
Line drawing of a hand holding a clamped object (no text or symbols)Connecting wires to terminals
text_image
USB device[2] --> USB terminal[1] (0.8 m) 5V=1A Cap Light Green (Parking sensor wire) Accessory ⑨: Extension cable For best safety, be sure to connect the parking sensor. Connect to the vehicle's parking brake detection switch harness. Accessory ④: Bluetooth Microphone (DMX110BT only) MIC Purple/White (Reverse sensor wire) REVERSE GEAR SIGNAL Connect to vehicle's reverse lamp harness when using the optional rear view camera. Subwoofer Preout Cap SUB WOOFER Light Blue/Yellow (Steering remote control wire) STEERING WHEEL REMOTE CONTROL To steering remote To use the steering wheel remote control feature, you need an exclusive remote adapter (not supplied) matched to your car. Connector B Connector A 1357 12468 1357 2468 Fuse (15A) ISO Connector FM/AM antenna input AV-IN audio input (Left; White, Right; Red) Rear Audio Preout (Left; White, Right; Red) Front Audio PreoutWiring harness connector function guide
| Pin Color and function | ||
| A-4 Yellow Battery | ||
| A-5 Blue/White [3] | Power Control | |
| A-7 Red | Ignition (ACC) | |
| A-8 Black Earth (Ground) Connection | ||
| B-1/ B-2 | Purple (+) / Purple/Black (-) | Rear Right |
| B-3/ B-4 | Gray (+) / Gray/Black (-) | Front Right |
| B-5/ B-6 | White (+) / White/Black (-) | Front Left |
| B-7/ B-8 | Green (+) / Green/Black (-) | Rear Left |
• Speaker Impedance: 4-8 Ω
CAUTION
Before you connect the commercially available ISO connectors to the unit, check the following condition:
• Make sure that the pin assignment of the connector matches with the KENWOOD unit.
• Take extra notice of the power wire.
• In case battery wire and ignition wire are not corresponding then change them accordingly.
- In case the car does not have an ignition wire, use a commercially available interface.
[1] USB maximum power supply current: DC 5 V = 1 A
[2] Sold separately
[3] Max. 300mA, 12V
• North America, South America sales area only
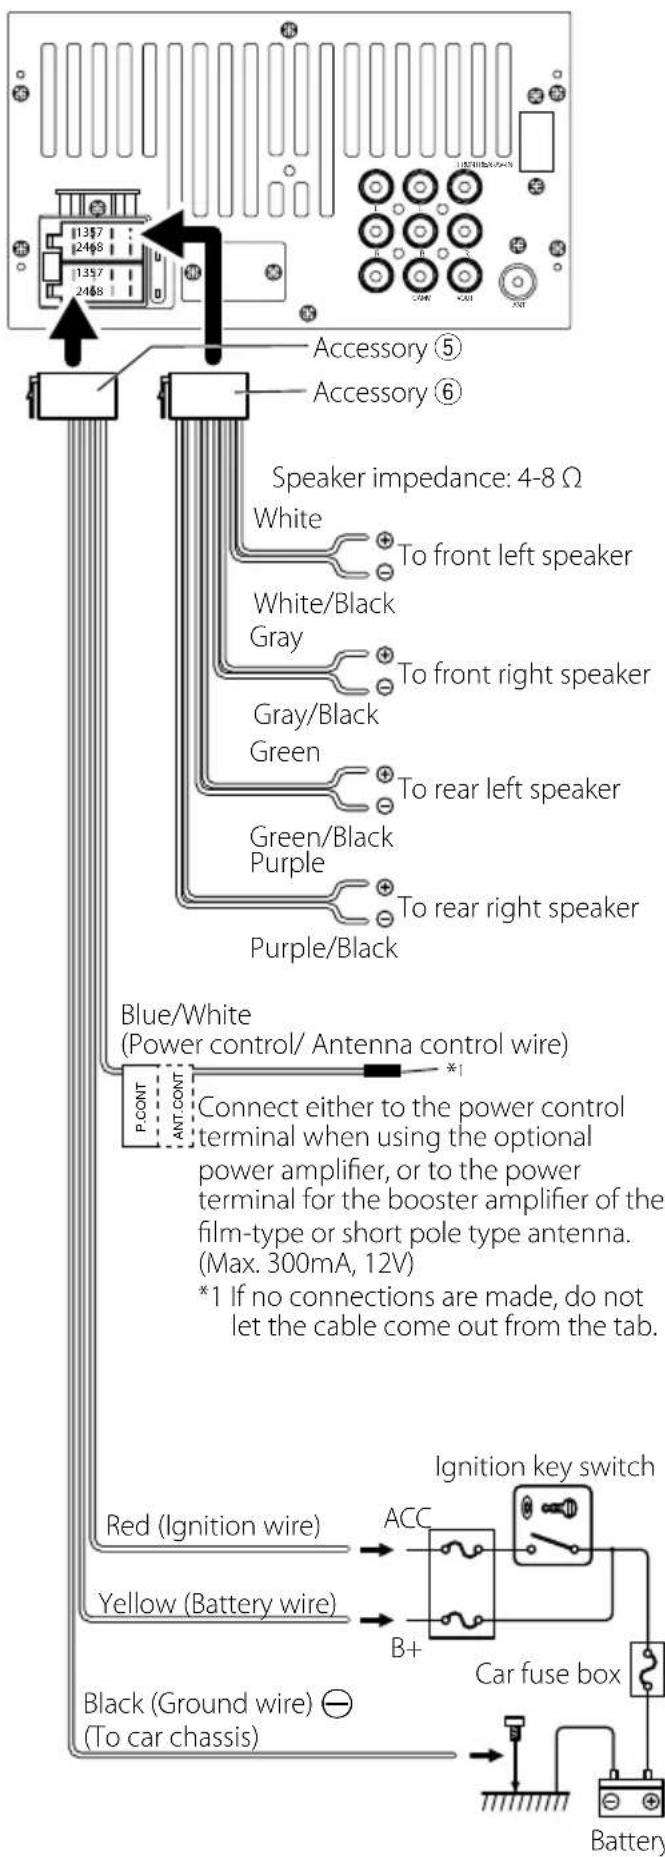
text_image
1357 2468 1357 2468 Accessory ⑤ Accessory ⑥ Speaker impedance: 4-8 Ω White To front left speaker White/Black Gray To front right speaker Gray/Black Green To rear left speaker Green/Black Purple To rear right speaker Purple/Black Blue/White (Power control/ Antenna control wire) P.CONT *1 Connect either to the power control terminal when using the optional power amplifier, or to the power terminal for the booster amplifier of the film-type or short pole type antenna. (Max. 300mA, 12V) *1 If no connections are made, do not let the cable come out from the tab. Red (Ignition wire) Yellow (Battery wire) Black (Ground wire) (To car chassis) Ignition key switch ACC B+ Car fuse box BatteryConnecting an iPod/iPhone
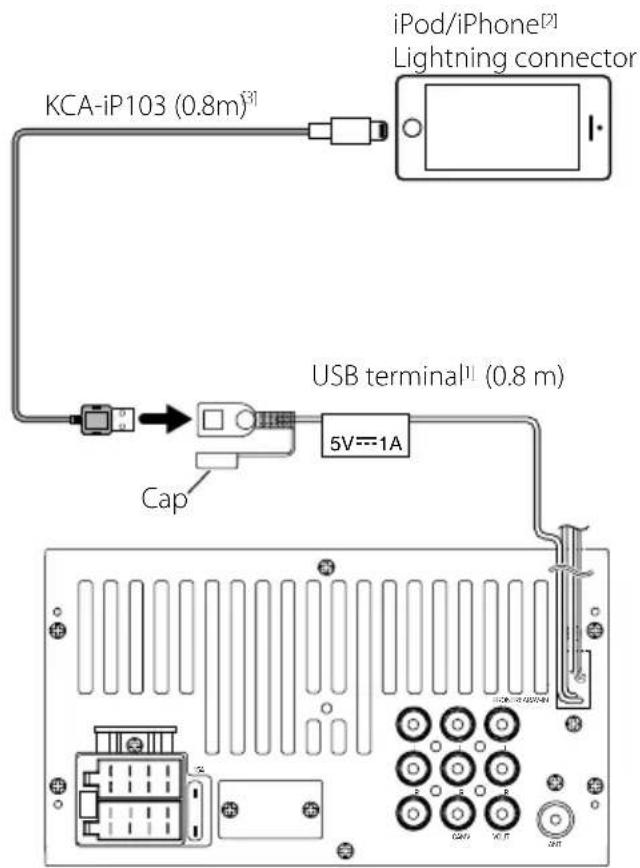
text_image
KCA-iP103 (0.8m) [3] iPod/iPhone [2] Lightning connector USB terminal [1] (0.8 m) Cap 5V=1A[1] iPod/iPhone maximum power supply current: DC 5 V = 1 A
[2] Sold separately
[3] Optional accessory
More information
■ Playable Audio files
| Audio format | Bit rate Sampling frequency |
| MP3 (.mp3) 16 | 320kbps, VBR |
| WMA (.wma) 16 | 320kbps 16 - 48 kHz |
| AAC-LC (.m4a) | 16 - 320kbps 16 - 48 kHz |
- This unit can show ID3 Tag Version 1.0/1.1/2.2/2.3/2.4 (for MP3).
• The maximum number of characters:
- Tag : 30 characters
NOTE
- WMA and AAC of which is covered with DRM cannot be played.
- Although the audio files are complied with the standards listed above, the play may be impossible depending on the types or conditions of media or device.
Acceptable Video files
| Video format | Video codec Audio codec | |
| MPEG-1 (.mpg, .mpeg) | MPEG-1 | MPEG Audio Layer 2 |
| MPEG-2 (.mpg, .mpeg) | MPEG-2 | MPEG Audio Layer 2 |
| MPEG-4 (.mp4, .avi) | MPEG-4 | MP3, AAC-LC (2ch) |
Acceptable Picture files
- JPEG (.jpg)
32 x 32 to 8,192 x 7,680 resolution
– It may take time to display the file.
- Progressive JPEG files or lossless JPEG files cannot be played.
- BMP (.bmp)
32 x 32 to 8,192 x 7,680 resolution
- It may take time to display the file.
Troubleshooting
What appears to be trouble is not always serious. Check the following points before calling a service center.
- For operations with the external components, refer also to the instructions supplied with the adapters used for the connections (as well as the instructions supplied with the external components).
General
No sound comes out of the speakers.
- Adjust the volume to the optimum level.
- Check the cords and connections.
The unit does not work at all.
- Reset the unit. (P.2)
The remote controller does not work.
- Replace the battery.
USB
While playing a track, sound is sometimes interrupted.
- The tracks are not properly copied into the USB device. Copy the tracks again, and try again.
iPod/iPhone
No sound comes out of the speakers.
- Disconnect the iPod/iPhone, then connect it again.
- Select another source, then reselect "iPod".
The iPod/iPhone does not turn on or does not work.
- Check the connecting cable and its connection.
- Update the firmware version of iPod/iPhone.
- Charge the battery of iPod/iPhone.
- Reset the iPod/iPhone.
Sound is distorted.
- Deactivate the equalizer either on this unit or the iPod/iPhone.
A lot of noise is generated.
- Turn off (unchecked) "VoiceOver" on the iPod/iPhone. For details, visit http://www.apple.com.
Radio
Automatic presetting does not work.
- Store stations manually. (P.11)
Static noise while listening to the radio.
- Connect the antenna firmly.

AV-IN
No picture appears on the screen.
- Turn on the video component if it is not on.
- Connect the video component correctly.

Bluetooth
Phone sound quality is poor.
- Reduce the distance between the unit and the Bluetooth mobile phone.
- Move the car to a place where you can get a better signal reception.
The sound is interrupted or skipped while using a Bluetooth audio player.
- Reduce the distance between the unit and the Bluetooth audio player.
- Turn off, then turn on the unit. (When the sound is not yet restored) connect the player again.
The connected audio player cannot be controlled.
- Check whether the connected audio player supports AVRCP (Audio/Video Remote Control Profile).
The Bluetooth device does not detect the unit.
- Search from the Bluetooth device again.
The unit does not pair with the Bluetooth device.
- Turn off, then turn on the Bluetooth device.
- Disconnect the Bluetooth device currently connected and then register the new device. (P.14)

Remote control
KNA-RCDV331 (optional accessory) cannot control the unit.
- Turn its operation mode switch to "DVD."
Copyrights
- The Bluetooth word mark and logos are registered trademarks owned by the Bluetooth SIG, Inc. and any use of such marks by JVC KENWOOD Corporation is under license. Other trademarks and trade names are those of their respective owners.
- "Made for iPod" and "Made for iPhone" mean that an electronic accessory has been designed to connect specifically to iPod, or iPhone, respectively, and has been certified by the developer to meet Apple performance standards.
Apple is not responsible for the operation of this device or its compliance with safety and regulatory standards. Please note that the use of this accessory with iPod, or iPhone may affect wireless performance. - iPhone, iPod, iPod classic, iPod nano, and iPod touch are trademarks of Apple Inc., registered in the U.S. and other countries. Lightning is a trademark of Apple Inc.
- The "AAC" logo is a trademark of Dolby Laboratories.
- Microsoft and Windows Media are either registered trademarks or trademarks of Microsoft Corporation in the United States and/or other countries.
- THIS PRODUCT IS LICENSED UNDER THE MPEG-4 VISUAL PATENT PORTFOLIO LICENSE FOR THE PERSONAL AND NON-COMMERCIAL USE OF A CONSUMER FOR (i) ENCODING VIDEO IN COMPLIANCE WITH THE MPEG-4 VISUAL STANDARD ("MPEG-4 VIDEO") AND/OR (ii) DECODING MPEG-4 VIDEO THAT WAS ENCODED BY A CONSUMER ENGAGED IN A PERSONAL AND NON-COMMERCIAL ACTIVITY AND/OR WAS OBTAINED FROM A VIDEO PROVIDER LICENSED BY MPEG LA TO PROVIDE MPEG-4 VIDEO. NO LICENSE IS GRANTED OR SHALL BE IMPLIED FOR ANY OTHER USE. ADDITIONAL INFORMATION INCLUDING THAT RELATING TO PROMOTIONAL, INTERNAL AND COMMERCIAL USES AND LICENSING MAY BE OBTAINED FROM MPEG LA, LLC. SEE HTTP://WWW.MPEGLA.COM.
Specifications
Monitor section
Picture Size
: 6.75 inches (diagonal) wide
: 151.8 mm (W) × 79.7 mm (H)
Display System
: Transparent TN LCD panel
Drive System
: TFT active matrix system
Number of Pixels
: 1,152,000 (800H x 480V x RGB)
Effective Pixels
: 99.99 %
Pixel Arrangement
: RGB striped arrangement
Back Lighting
: LED
USB interface section
USB Standard
: USB 2.0
File System
: FAT 16/32
Maximum Power Supply Current
: DC 5 V = 1 A
D/A Converter
: 24 Bit
Audio Decoder
: MP3/ WMA/ AAC (.aac/.m4a)
Video Decoder
- Although the effective pixels for the liquid crystal panel is given as 99.99% or more, 0.01% of pixels may not light or may light incorrectly.
- Specifications subject to change without notice.
Bluetooth section
Technology
: Bluetooth Ver.2.1 + EDR
Frequency
: 2.402 - 2.480 GHz
Output Power
:+4 dBm (MAX), Power Class2
Maximum Communication range
: Line of sight approx. 10m (32.8 ft)
Audio Codec
: SBC
Profile (Multi Profile support)
• HFP (V1.6) (Hands Free Profile)
• A2DP (V1.2) (Advanced Audio Distribution Profile)
• AVRCP (V1.3) (Audio/Video Remote Control Profile)
• PBAP (V1.1.1) (Phonebook Access Profile)
FM tuner section
Frequency Range (step)
: 87.5 MHz - 108.0 MHz (50 kHz)
(Europe, CIS sales area)
: 87.9 MHz - 107.9 MHz (200 kHz)
(North America, South America sales area)
Usable Sensitivity
: 12.2 dBf
: 1.1 μV/75 Ω
(For North America, South America sales area, S/N : 30 dB)
(For Europe, CIS sales area, S/N : 26 dB)
Quieting Sensitivity
: 19.2 dBf
: 2.5 μV/75 Ω
(For North America, South America sales area, S/N : 50 dB)
(For Europe, CIS sales area, S/N : 46 dB)
Frequency Response
: 30 Hz - 14 kHz
S/N Ratio (dB)
: 55 dB (MONO)
Selectivity (± 400 kHz)
: Over 70 dB
Stereo Separation
: 37 dB (1 kHz)
AM tuner section
Frequency Range (step)
: 531 - 1611 kHz (9 kHz) (Europe, CIS sales area)
: 530 - 1700 kHz (10 kHz)
(North America, South America sales area)
Usable Sensitivity
: 29 μV
Video section
Color System of External Video Input : NTSC/PAL
External Video Input Level (RCA jacks) : 1.0 Vp-p/75 Ω
External Audio Max Input Level (RCA jacks) : 1.8 V/ 10 kΩ
Video Output Level (RCA jacks) : 1.0 Vp-p/75 Ω
Audio section
Maximum Power (Front & Rear) : 50 W × 4
Full Bandwidth Power (Front & Rear) Full Bandwidth Power (at less than 1% THD) : 21 W × 4
Preout Level (V) : 2 V/10 kΩ
Preout Impedance : ≤ 600 Ω
Speaker Impedance : 4 - 8 Ω
Equalizer : 7 Band
Band Frequency: 62.5/160/400/1k/2.5k/6.3k/16kHz Level: -7 – +7 (-7 dB – +7 dB)
LPF Frequency: 80/120/160 Hz
General
Operating Voltage : 14.4 V (10.5 – 16 V allowable)
Maximum Current Consumption : 10 A
Installation Dimensions (W × H × D) : 182 × 112 × 74.5 mm 7-3/8 × 4-3/8 × 2-15/16 inch
Main Unit Installation size (W × H × D) : 178 × 100 × 79 mm (w/o sleeve)
Operational Temperature Range : -10 °C - +60 °C
Weight : 0.9 kg (2.0 lbs)
Information on Disposal of Old Electrical and Electronic Equipment and Batteries (applicable for EU countries that have adopted separate waste collection systems)
Products and batteries with the symbol (crossed-out wheeled bin) cannot be disposed as household waste.
Old electrical and electronic equipment and batteries should be recycled at a facility capable of handling these items and their waste byproducts.
Contact your local authority for details in locating a recycle facility nearest to you.
Proper recycling and waste disposal will help conserve resources whilst preventing detrimental effects on our health and the environment.
Notice: The sign "Pb" below the symbol for batteries indicates that this battery contains lead.

text_image
PbFor Israel
תְרָה
This equipment may generate or use radio frequency energy. Changes or modifications to this equipment may cause harmful interference unless the modifications are expressly approved in the instruction manual. The user could lose the authority to operate this equipment if an unauthorized change or modification is made.
NOTE
- This equipment has been tested and found to comply with the limits for a Class B digital device, pursuant to Part 15 of the FCC Rules. These limits are designed to provide reasonable protection against harmful interference in a residential installation.
- This equipment may cause harmful interference to radio communications, if it is not installed and used in accordance with the instructions. However, there is no guarantee that interference will not occur in a particular installation. If this equipment does cause harmful interference to radio or television reception, which can be determined by turning the equipment off and on, the user is encouraged to try to correct the interference by one or more of the following measures:
- Reorient or relocate the receiving antenna.
- Increase the separation between the equipment and receiver.
- Connect the equipment into an outlet on a circuit different from that to which the receiver is connected.
- Consult the dealer or an experienced radio/TV technician for help.
CAUTION
Use of controls or adjustments or performance of procedures other than those specified herein may result in hazardous radiation exposure. In compliance with Federal Regulations, following are reproductions of labels on, or inside the product relating to laser product safety.
JVC KENWOOD Corporation
2967-3, ISHIKAWA-MACHI,
THIS PRODUCT COMPLIES WITH DHHS RULES 21 CFR SUBCHAPTER J IN EFFECT AT DATE OF MANUFACTURE.
Location: Bottom plate
This transmitter must not be co-located or operated in conjunction with any other antenna or transmitter.
For Canada
IC (Industry Canada) Notice
This device complies with Industry Canada licence-exempt RSS standard(s).
Operation is subject to the following two conditions:
(1) This device may not cause interference, and
(2) this device must accept any interference, including interference that may cause undesired operation of the device.
CAUTION
This equipment complies with FCC/IC radiation exposure limits set forth for an uncontrolled environment and meets the FCC radio frequency (RF) Exposure Guidelines and RSS-102 of the IC radio frequency (RF) Exposure rules. This equipment has very low levels of RF energy that is deemed to comply without maximum permissive exposure evaluation (MPE). But it is desirable that it should be installed and operated keeping the radiator at least 20 cm or more away from person's body.
CALIFORNIA, USA
This product contains a CR Coin Cell Lithium Battery which contains Perchlorate Material – special handling may apply.
See www.dtsc.ca.gov/hazardouswaste/perchlorate
For Argentina
Configuration radio....40
Composants Externes....41
Smartphone Bluetooth (DMX110BT) 42
text_image
MUTE Diff OFF KENWOODtext_image
MUTE DEP OFF KENWOODtext_image
MUTE DISP OFF KENWOODnatural_image
Diagram of two connected electronic devices, one with a port and the other with a cable (no text or symbols)La lecture commence.
REMARQUE
text_image
iPod/Music AM 10:10 Playlists Artists Albums Genres Songs DIMLa lecture commence.
text_image
TEL 012456789 00:00:10 DIM
Raccrocher

natural_image
Technical line drawing of a handheld device with battery and internal components (no text or symbols)text_image
KENWOOD AUD DVD TV NAVnatural_image
Diagram showing a rectangular box being placed on a flat panel, with an arrow indicating the direction of movement (no text or symbols present)Microphone (DMX110BT)
text_image
Diagram illustrating car fuel plug installation steps with labeled components and directional arrowsnatural_image
Diagram showing a connector with a probe inserted into a clamp, no text or symbols presenttext_image
Diagram of a device with labeled components and an inset showing a speaker icon, likely illustrating a physical or engineering concept.natural_image
Simple line drawing of two rectangular panels with a vertical arrow indicating direction (no text or symbols)natural_image
Technical line drawing of a mechanical component with an inset close-up view (no text or symbols)natural_image
Line drawing of a hand using a tool to cut or mark a rectangular object, with no visible text or symbols.natural_image
Illustration of hands using scissors to cut a rectangular object (no text or symbols)REMARQUE
natural_image
Line drawing of a hand gripping a rectangular object with a curved handle (no text or symbols)Apple is not responsible for the operation of this device or its compliance with safety and regulatory standards. Please note that the use of this accessory with iPod, or iPhone may affect wireless performance.
- iPhone, iPod, iPod classic, iPod nano, and iPod touch are trademarks of Apple Inc., registered in the U.S. and other countries.
Lightning is a trademark of Apple Inc.
- The "AAC" logo is a trademark of Dolby Laboratories.
- Microsoft and Windows Media are either registered trademarks or trademarks of Microsoft Corporation in the United States and/or other countries.
- THIS PRODUCT IS LICENSED UNDER THE MPEG-4 VISUAL PATENT PORTFOLIO LICENSE FOR THE PERSONAL AND NON-COMMERCIAL USE OF A CONSUMER FOR (i) ENCODING VIDEO IN COMPLIANCE WITH THE MPEG-4 VISUAL STANDARD ("MPEG-4 VIDEO") AND/OR (ii) DECODING MPEG-4 VIDEO THAT WAS ENCODED BY A CONSUMER ENGAGED IN A PERSONAL AND NON-COMMERCIAL ACTIVITY AND/OR WAS OBTAINED FROM A VIDEO PROVIDER LICENSED BY MPEG LA TO PROVIDE MPEG-4 VIDEO. NO LICENSE IS GRANTED OR SHALL BE IMPLIED FOR ANY OTHER USE. ADDITIONAL INFORMATION INCLUDING THAT RELATING TO PROMOTIONAL, INTERNAL AND COMMERCIAL USES AND LICENSING MAY BE OBTAINED FROM MPEG LA, LLC. SEE HTTP://WWW.MPEGLA.COM.
Spécifications
Section moniteur
Taille de l'image
: 6,75 pouces de large (diagonale)
: 151,8 mm (L) × 79,7 mm (H)
Système d'affichage
: Panneau LCD TN transparent
Système de lecture
Section interface USB
Norme USB
: USB 2.0
Système de fichiers
: FAT 16/32
text_image
MUTE Diff KENWOODBotón Restablecer
Inicio
text_image
MUTE DEP OFF KENWOODtext_image
| MUTE ■ DISP OFF | KENWOODnatural_image
Line drawing of a connector with a cable inserted into a device (no text or symbols)text_image
iPod/Music AM 10:10 Playlists Artists Albums Genres Songs DIMtext_image
TEL 012456789 00:00:10 DIM
text_image
Please Speak after the beepnatural_image
Technical line drawing of a handheld device with battery and internal components (no text or symbols)
text_image
KENWOOD AUD DVD TV NAVnatural_image
Pure electrical circuit lines without any symbolsnatural_image
Diagram showing a rectangular box being placed on a flat panel, with an arrow indicating rotation (no text or symbols present)text_image
Diagram illustrating car power plug installation steps with labeled components and directional arrowsnatural_image
Diagram showing a cable connector with a probe inserted, and a separate clamp or clip attached (no text or symbols present)Retirada del marco
text_image
Diagram of a device with labeled components and an inset showing a speaker icon, likely illustrating a physical or educational concept.natural_image
Two rectangular panels with a vertical arrow indicating direction, no text or symbols presentnatural_image
Technical line drawing of a mechanical component with an inset showing a magnified detail (no text or symbols)natural_image
Hand holding a tool interacting with a rectangular object, labeled with number ② (no text or symbols on the object itself)natural_image
Illustration of hands using a tool to cut or adjust a rectangular object (no text or symbols visible)NOTA
natural_image
Line drawing of a hand holding a clamped object (no text or symbols)- La marca denominativa y los logos de Bluetooth son marcas registradas propiedad de Bluetooth SIG, Inc. y cualquier uso de dichas marcas por JVC KENWOOD Corporation está sujeto a los términos de licencia. El resto de marcas comerciales y nombres comerciales corresponden a sus respectivos propietarios.
- "Made for iPod" and "Made for iPhone" mean that an electronic accessory has been designed to connect specifically to iPod, or iPhone, respectively, and has been certified by the developer to meet Apple performance standards.
Apple is not responsible for the operation of this device or its compliance with safety and regulatory standards. Please note that the use of this accessory with iPod, or iPhone may affect wireless performance. - iPhone, iPod, iPod classic, iPod nano, and iPod touch are trademarks of Apple Inc., registered in the U.S. and other countries. Lightning is a trademark of Apple Inc.
- The "AAC" logo is a trademark of Dolby Laboratories.
- Microsoft and Windows Media are either registered trademarks or trademarks of Microsoft Corporation in the United States and/or other countries.
- THIS PRODUCT IS LICENSED UNDER THE MPEG-4 VISUAL PATENT PORTFOLIO LICENSE FOR THE PERSONAL AND NON-COMMERCIAL USE OF A CONSUMER FOR (i) ENCODING VIDEO IN COMPLIANCE WITH THE MPEG-4 VISUAL STANDARD ("MPEG-4 VIDEO") AND/OR (ii) DECODING MPEG-4 VIDEO THAT WAS ENCODED BY A CONSUMER ENGAGED IN A PERSONAL AND NON-COMMERCIAL ACTIVITY AND/OR WAS OBTAINED FROM A VIDEO PROVIDER LICENSED BY MPEG LA TO PROVIDE MPEG-4 VIDEO. NO LICENSE IS GRANTED OR SHALL BE IMPLIED FOR ANY OTHER USE. ADDITIONAL INFORMATION INCLUDING THAT RELATING TO PROMOTIONAL, INTERNAL AND COMMERCIAL USES AND LICENSING MAY BE OBTAINED FROM MPEG LA, LLC. SEE HTTP://WWW.MPEGLA.COM.
Especificaciones
Sección del monitor
Tamaño de imagen
Smartphone com bluetooth (DMX110BT)....96
text_image
MUTE ■OFF KENWOODBotão de reposição
Primeiros Passos
text_image
MUTE ■ DISP OFF KENWOODtext_image
MUTE ●DSP OFF KENWOOD- Para ligar o ecrã, toque no visor.
natural_image
Diagram of two connected electronic devices, one with a port and the other with a cable (no text or symbols)Conectar a iPod/iPhone
text_image
iPod/Music AM 10:10 Playlists Artists Albums Genres Songs DIMtext_image
TEL 012456789 00:00:10 DIM
natural_image
Line drawing of a remote control device with battery and switch components (no text or symbols)text_image
① x1 ② x2 ③ x1 ④ [2] (3 m) x1 ⑤ [1] x1 ⑥ [1] x1 ⑦ [1] (M5 × 6 mm) x4 ⑧ [1] (M5 × 7 mm) x4 ⑨ (2 m) x1natural_image
Diagram showing a rectangular block being placed on a flat panel, with an arrow indicating rotation (no text or symbols present)text_image
Diagram illustrating cable installation steps with labeled components and directional arrows indicating motionnatural_image
Diagram showing a cable being inserted into a clip, with no text or symbols present.Retirar a moldura
text_image
Technical diagram of a device with labeled components and an inset view showing a component with a magnified view.natural_image
Two rectangular panels with internal frame and a directional arrow, no text or symbols presentRetirar a unidade
natural_image
Technical line drawing of a mechanical component with an inset showing a magnified detail (no text or symbols)natural_image
Illustration of a hand using a tool to cut or mark a rectangular object, no text or symbols presentnatural_image
Line drawing of hands using a tool to cut or adjust a rectangular object (no text or symbols present)NOTA
natural_image
Line drawing of a hand gripping a rectangular object with a curved handle (no text or symbols)- A marca da palavra e os logótipos Bluetooth são marcas comerciais registadas propriedade da Bluetooth SIG, Inc. e qualquer utilização de tais marcas pela JVC KENWOOD Corporation está licenciada.
Outras marcas registadas e nomes de marcas são dos respetivos proprietários. - "Made for iPod" and "Made for iPhone" mean that an electronic accessory has been designed to connect specifically to iPod, or iPhone, respectively, and has been certified by the developer to meet Apple performance standards.
Apple is not responsible for the operation of this device or its compliance with safety and regulatory standards. Please note that the use of this accessory with iPod, or iPhone may affect wireless performance. - iPhone, iPod, iPod classic, iPod nano, and iPod touch are trademarks of Apple Inc., registered in the U.S. and other countries.
Lightning is a trademark of Apple Inc. - The "AAC" logo is a trademark of Dolby Laboratories.
- Microsoft and Windows Media are either registered trademarks or trademarks of Microsoft Corporation in the United States and/or other countries.
- THIS PRODUCT IS LICENSED UNDER THE MPEG-4 VISUAL PATENT PORTFOLIO LICENSE FOR THE PERSONAL AND NON-COMMERCIAL USE OF A CONSUMER FOR (i) ENCODING VIDEO IN COMPLIANCE WITH THE MPEG-4 VISUAL STANDARD ("MPEG-4 VIDEO") AND/OR (ii) DECODING MPEG-4 VIDEO THAT WAS ENCODED BY A CONSUMER ENGAGED IN A PERSONAL AND NON-COMMERCIAL ACTIVITY AND/OR WAS OBTAINED FROM A VIDEO PROVIDER LICENSED BY MPEG LA TO PROVIDE MPEG-4 VIDEO. NO LICENSE IS GRANTED OR SHALL BE IMPLIED FOR ANY OTHER USE. ADDITIONAL INFORMATION INCLUDING THAT RELATING TO PROMOTIONAL, INTERNAL AND COMMERCIAL USES AND LICENSING MAY BE OBTAINED FROM MPEG LA, LLC. SEE HTTP://WWW.MPEGLA.COM.
Especificações
Secção Monitor
Tamanho da imagem
: 6,75 polegadas (diagonal) largura
Peso : 0,9 kg (2,0 lbs)
For Europe sales area

Declaration of Conformity with regard to the RE Directive 2014/53/EU Declaration of Conformity with regard to the RoHS Directive 2011/65/EU Manufacturer:
JVC KENWOOD Corporation
3-12, Moriyacho, Kanagawa-ku, Yokohama-shi, Kanagawa 221-0022, JAPAN
EU Representative:
JVCKENWOOD Europe B.V.
Amsterdamseweg 37, 1422 AC UITHOORN, THE NETHERLANDS
Hereby, JVC KENWOOD declares that the radio equipment DMX110BT is in compliance with Directive 2014/53/EU. The full text of the EU declaration of conformity is available at the following internet address: