
Relax SO810 - Radio SONORO - Free user manual and instructions
Find the device manual for free Relax SO810 SONORO in PDF.
| Product type | Multiformat connected radio |
| Brand | Sonoro |
| Model | Relax SO810 |
| Dimensions (L x W x H) | Approx. 183 x 223 x 115 mm |
| Weight | Approx. 2 kg |
| Power supply | AC adapter 15 V / 2.4 A |
| Power consumption standby | Less than 1 W |
| Network standby power consumption | Less than 2 W |
| Display | 2.4" TFT color screen |
| Radio bands | FM (87.5–108 MHz), DAB+ (Band III), Internet (25,000+ stations) |
| Streaming | Bluetooth 4.1, Spotify Connect, DLNA/UPnP |
| Network connectivity | Wi-Fi 2.4/5 GHz, Ethernet RJ45 |
| Auxiliary input | 3.5 mm jack |
| Headphone output | 3.5 mm jack |
| USB port | 5 V / 2.1 A for charging and playback (FAT16/32) |
| Preset memory | 40 stations per band (FM/DAB/Internet), 10 for Spotify |
| Alarms | 2 alarms with snooze and source selection |
| Sleep timer | From 5 to 120 minutes |
| Multi-room function | Up to 5 compatible speakers |
| Package contents | Remote control (CR2032 battery included), AC adapter, FM/DAB antennas, quick start guide |
| Care | Clean with a soft, dry cloth; do not use solvents |
| Safety | Read the manual, do not expose to moisture, use the supplied adapter |
| Spare parts and repairability | Contact Sonoro customer service (support@sonoro.de) |
| Warranty | 2 years (1 year North America and Australia) |
Frequently Asked Questions - Relax SO810 SONORO
User questions about Relax SO810 SONORO
0 question about this device. Answer the ones you know or ask your own.
Ask a new question about this device
Download the instructions for your Radio in PDF format for free! Find your manual Relax SO810 - SONORO and take your electronic device back in hand. On this page are published all the documents necessary for the use of your device. Relax SO810 by SONORO.
USER MANUAL Relax SO810 SONORO
www.spo fy.com/connect/third-party-licenses
[DAB Radio]
[FM Radio]
- [Nature sound]
- [Programm]
- [NetRemote PIN-Setup]
FM/DAB+/IR music system
Opera ng manual
Table of contents
1 Introduc on 70
1.1 Contact data 70
1.2 Intended use 71
2 Ge ng to know your RELAX 71
2.1 Scope of delivery 71
2.2 Controls and ports 72
2.3 Technical data 77
2.4 Marks of approval 78
3 Ge ng started 79
3.1 Unpacking RELAX. 79
3.2 Connec ng the power supply 79
3.3 Inser ng the ba ery in the remote control 80
3.4 Using the antennas 80
3.5 Performing ini al setup 82
4 Basic opera on 84
5 Using the menus 85
6 Display icons 86
7 FM Radio mode 87
7.1 Opera on 87
7.2 Setup menu 88
8 DAB Radio mode 89
8.1 Opera on 89
8.2 Setup menu 90
9 Internet Radio mode 92
9.1 Opera on 92
9.2 Setup menu 93
9.3 Sta on list 93
9.4 Using the web portal 95
10 Spo fy mode. 96
10.1 Opera on 96
10.2 Setup menu 97
11 My Music mode 98
11.1 Opera on 98
11.2 Setup menu 99
12 AUX In mode 101
12.1 Opera on 101
12.2 Setup menu 101
13 Bluetooth mode 102
13.1 Pairing 102
13.2 Opera on 102
13.3 Setup menu 103
14 Nature Sound mode 104
14.1 Opera on 104
14.2 Setup menu 104
15 Medita on Music mode. 105
15.1 Opera on 105
15.2 Setup menu 105
16 Guided Meditation mode 106
16.1 Opera on 106
16.2 Setup menu 106
17 Demo music mode 107
17.1 Opera on 107
18 Alarms 108
18.1 Se ng alarms 108
18.2 Turning the alarms on or o 109
18.3 Deac va ng a sounding alarm 109
18.4 Snooze 109
19 Sleep mer. 110
20 System Se ngs 111
20.1 Accessing the system se ngs 111
20.2 Equalizer 111
20.3 Network 111
20.4 Time/date 112
20.5 Inac ve Standby 112
20.6Backlight 112
20.7 Language 113
20.8 Factory Reset 113
20.9 So ware update 113
20.10 Setup Wizard 113
20.11 Info 113
20.12 Mul -Room 114
21 Using UNDOK™ app to control RELAX 115
22 Troubleshoo ng. 117
23 Cleaning 119
24 Warranty. 120
1 Introduc on
Thank you for purchasing RELAX. This opera ng manual and safety manual provide all the informa on required for trouble-free and safe opera on of RELAX.
- Read the operatings manual and the safety manual in their en rety before using RELAX.
- Keep the operatings manual for future reference.
If you pass RELAX on to a third party, please provide them with the oper-ang manual and safety manual as well. - Failure to follow the operatings manual and safety manual can result in serious injury or damage to RELAX.
- We assume no liability for damage resulting from failure to observe the instruc ons in this oper ing manual and safety manual.
The images in this operang manual are intended to illustrate the ac ons necessary to operate RELAX.
Enjoy your RELAX!
1.1 Contact data
| Address | sonoro audio GmbH, Nordkanalallee 94, 41464 Neuss, Germany |
| Phone | +49 2131 8834-141 |
| Fax | +49 2131 7517-599 |
| support@sonoro.de | |
| Internet | www.sonoro.de |
1.2 Intended use
RELAX is intended for personal use only. It is not intended for commercial use. RELAX is solely intended for the following tasks:
- Playback of FM/DAB+/Internet radio and Spo fy streaming service.
Audio playback from external devices connected via AUX In or USB port.
Audio playback from Bluetooth-enabled devices (e.g. mobile phones). - Charging of external devices that are connected via the USB port.
- Playback of nature sound, media on music and guided medita on.
Any other use is considered improper use and is prohibited. We assume no liability for damages resulting from improper use.
2 Ge ng to know your RELAX
2.1 Scope of delivery
In addi onto RELAXitself, the following accessories are also included in the scope of delivery:
Remote control
One bu on cell (CR2032, 3 V)
- AC adapter with universal adapter (VDE and UK)
FM/DAB cable antenna
FM/DAB telescopic antenna
- Quick start guide
- Operang manual
Safety manual
Gree ng card
- sonoro audio collec on yer
Spo fy yer
Wellness guide
Service address sheet
Gloves
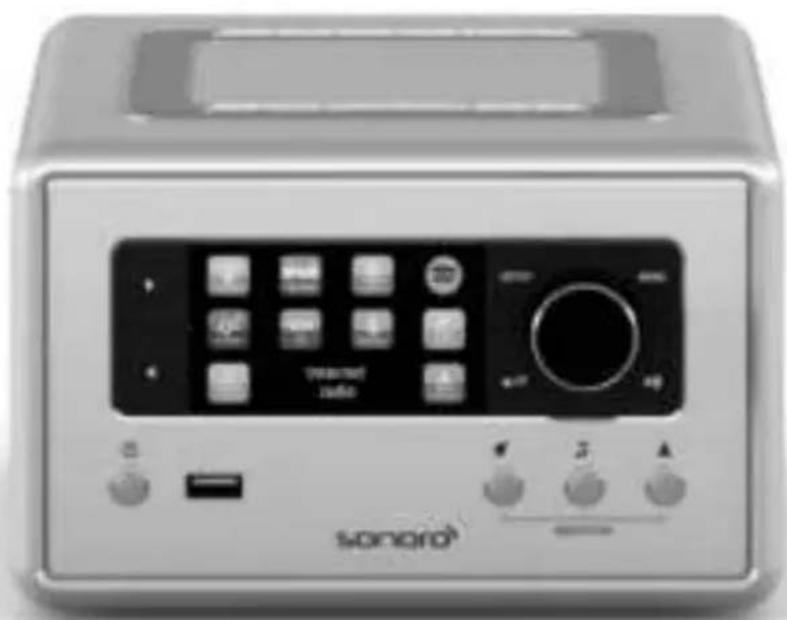
2.2 Controls and ports
Front view
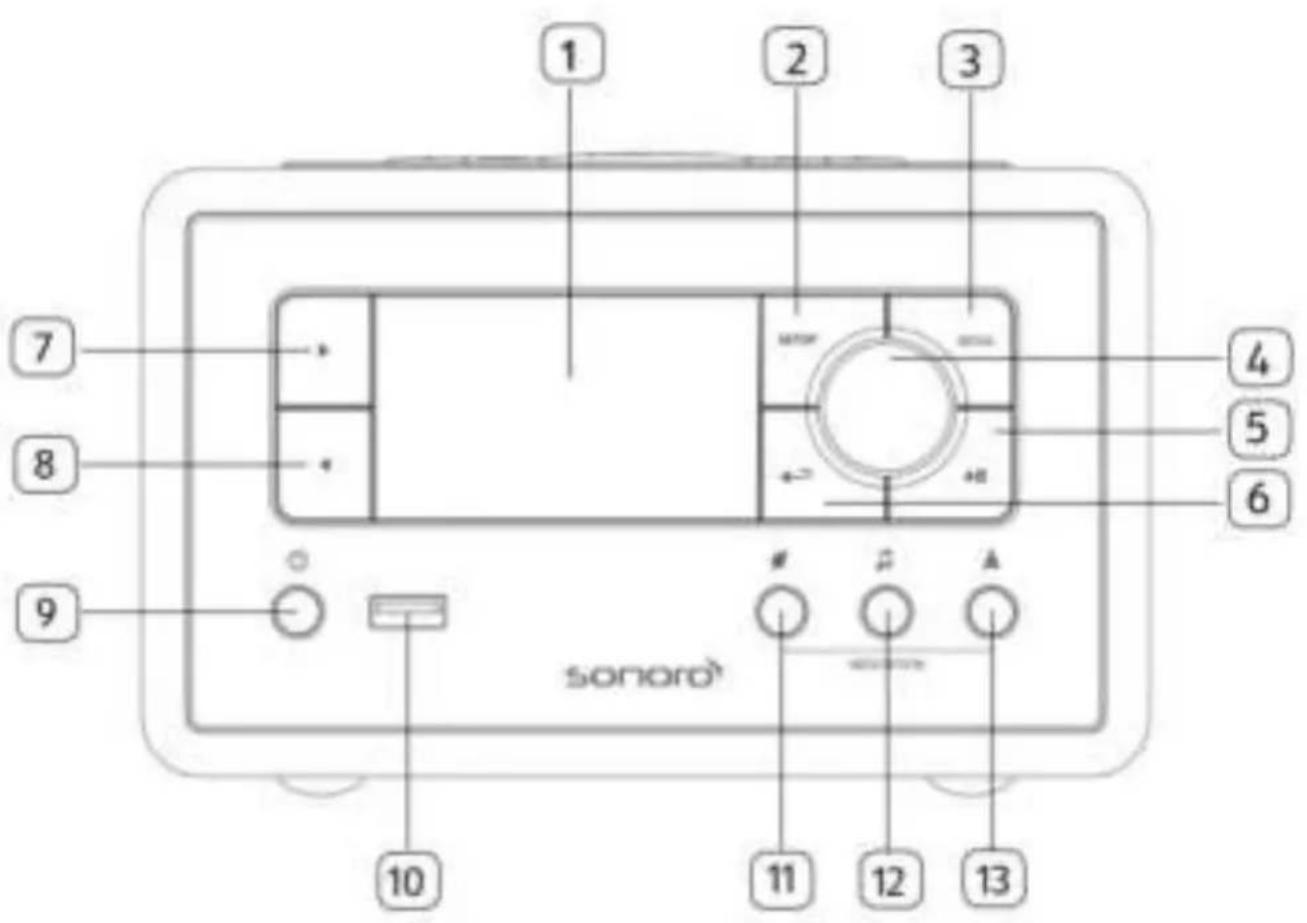
- Display 7. Right bu on ( )
- Setup bu on (SETUP) 8. Le bu on( )
- Menu bu on (MENU) 9. Standby bu on ()
- Volume knob, naviga on knob, 10. USB port OK bu on (press the knob) 11. Nature sound ()
- Play/pause bu on ( 12. Medita on music ()
- Back bu on ( 13. Guided medita on (
Top view

- Preset sta on bu ons (1-6)
- Bluetooth ( )
- Sleep mer (SLEEP)
- Snooze & Mute bu on (SNOOZE MUTE)
- Alarm 2 bu on ( )
- Alarm 1 bu on ( )
Rear view
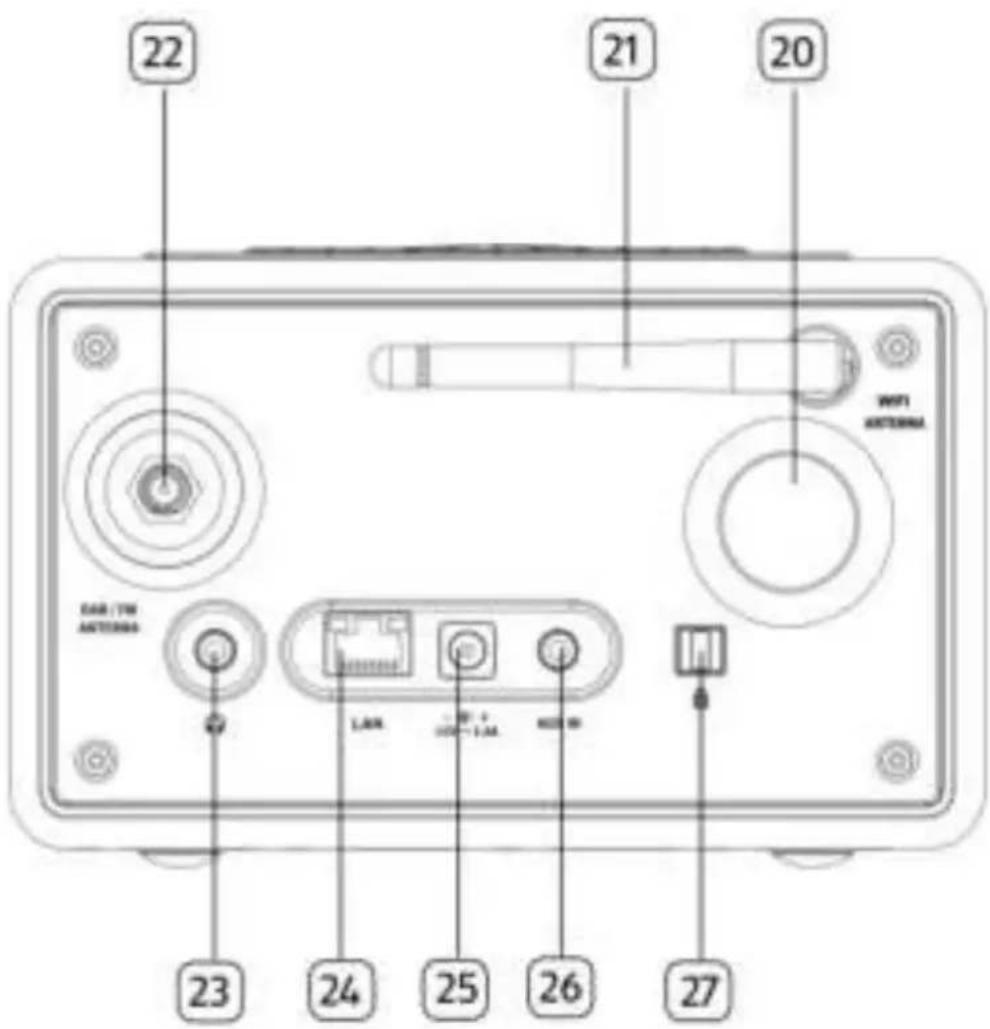
-
Bass re ex opening
-
LAN RJ-45 jack
-
Wi-Fi antenna
-
DC power input jack
-
FM/DAB antenna jack
-
Auxiliary input jack (3.5mm)
-
Headphone jack (D) 27. Keylock, an -the port
Remote control
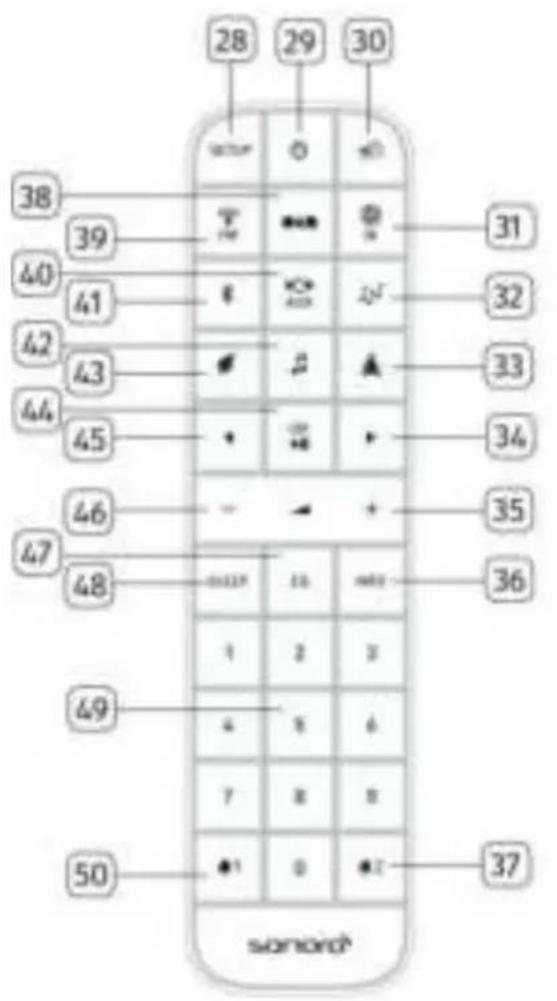
-
Setup bu on (SETUP)
-
Informa on bu on ( IN)O
-
Standby bu on ( ) 37. Alarm 2 bu on ( )
-
Mute/Snoopze bu on(
-
DAB Radio mode (
-
Internet Radio mode ( ) 39. FM Radio mode ( )
-
My Music mode (
-
AUX In mode (
-
Guided media on mode (
-
Bluetooth mode ( )
-
Right bu on (▶)
-
Medita on music mode (
-
Volume up bu on (+) * 43. Nature music mode ( )
-
Play/pause bu on ( OK bu on
- Le bu on (
- Volume down bu on (—)^*
- Equalizer se ng bu on ( )
- Sleep mer se ng bu on (
- Preset sta on bu ons (1-9)
- Alarm 1 bu on (
- Infra-red transmi er
- Ba ery compartment
*Naviga on bu ons (+, -)
2.3 Technical data
| Speci ca on | Value |
| Dimensions (W×D×H) | approx. 183 x 223 x 115 mm |
| Weight | approx. 2 kg |
| Display | 2.4" TFT colour display |
| Frequency range, FM | 87.50 MHz-108.00 MHz |
| DAB/DAB+ | Band III, 174.928 MHz-239.200 MHz |
| Internet radio | More than 25,000 sta ons worldwide |
| Sta on presets | 40 for each FM | DAB + | Internet Radio, 10 for Spo fy |
| Music player support media formats | AAC, AAC+, MP3, WAV, WMA, FLAC Max. 16 bits, 2 channels, sample rate 48KHz |
| USB charging | Output: DC 5V === 2.1A |
| USB playback | Compa bility system: FAT 16, FAT 32 (not compa ble with NTFS or other systems) |
| AUX-IN | Port: 3.5mm jack Sensi vity: 300 mV |
| Streaming | Bluetooth | Spo fy | DLNA | UPnP |
| Network supported | IEEE 802.11 a/b/g/n, 2.4G & 5GHz, 10/100 Ethernet 2.412GHz-2.472GHz / 5.18GHz - 5.32GHz / 5.50GHz-5.70GHz |
| Max. transmi ed | < 20dBm |
| Encrypted key | WEP, WPA, WPA2 (PSK), WPS |
| Mul -room func on | Maximum of 5 speakers in a group (4 client and 1 server) |
| Bluetooth | Version 4.1 Pro le : AVRCP 1.5, A2DP 1.2 2.402GHz-2.480 GHz |
| Max. transmi ed | < 4dBm |
| AC adapter, power | Kingwall Electronics Ltd. Model: AS360-150-AD240 Input: 100-240V ~ 50/60Hz 1.2A Output: 15.0V === 2.4A |
| Ba ery | CR2032 (remote control) |
| Standby Power | < 1.0W |
| Network Standby | < 2.0W |
2.4 Marks of approval

Bluetooth
The Bluetooth® word mark and logos are registered trademarks owned by the Bluetooth SIG, Inc. and any use of such marks by sonoro audio GmbH is under license. Other trademarks and trade names are those of their respec ve owners.

This product incorporates Spo fy so ware which is subject to 3rd party licences found here: www.spo fy.com/connect/third-party-licenses
UPnP™ is a trademark of the UPnP™ Forum.
3 Ge ng started
3.1 Unpacking RELAX
- Take RELAX out of the packaging and check whether RELAX or the individual parts exhibit damages. If this is the case, do not use RELAX. Should you detect any damage, contact your dealer or sonoro audio GmbH customer support immediately.
- Check to make sure that the delivery is complete (see chapter "Scope of delivery").
- Place RELAX at a suitable loca on.
- Remove the protec ve lm from the display.
3.2 Connec ng the power supply
- Insert the top end of the adapter into the upper slot of the power supply.
- Click the bo om end of the adapter in to lock it into place.
- To remove, rst pull back the tab on the power supply.
- Pull the adapter upwards to remove it.
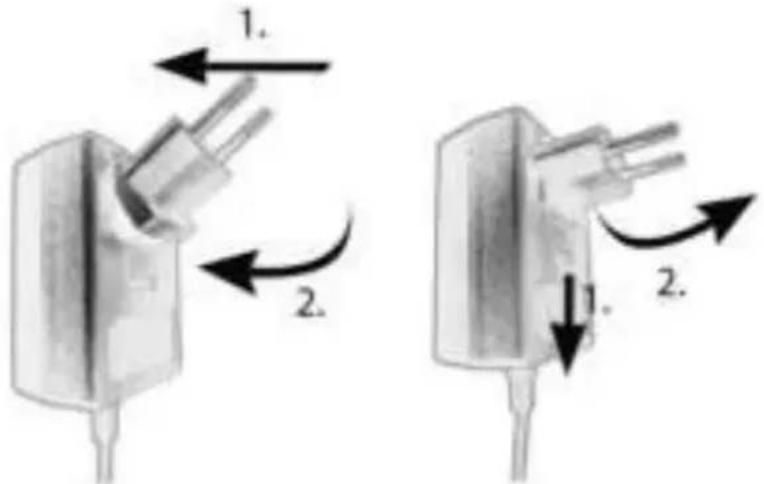
- Insert the connector of the power adapter into the DC power input jack on the back of RELAX.
- Insert the power plug into a wall socket. RELAX is turned on.
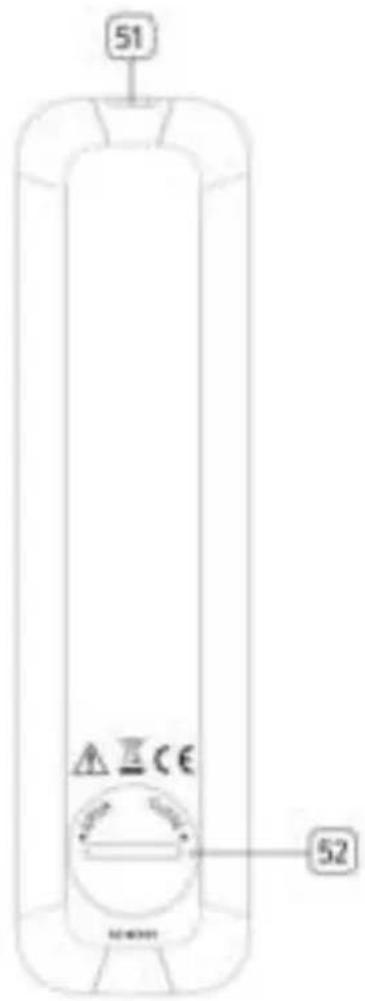
3.3 Inser ng the ba ery in the remote control
- Open the ba ery compartment cover on the back of the remote control by turning it an clockwise using a small coin.
- Insert the supplied baeries (CR2032, 3 V) with the label (+) side up.
- Replace and close the ba ery compartment cover by turning the cover clockwise using a small coin.

i
Do not block the infra-red sensor on RELAX and the infra-red transmi er on the remote control during use.
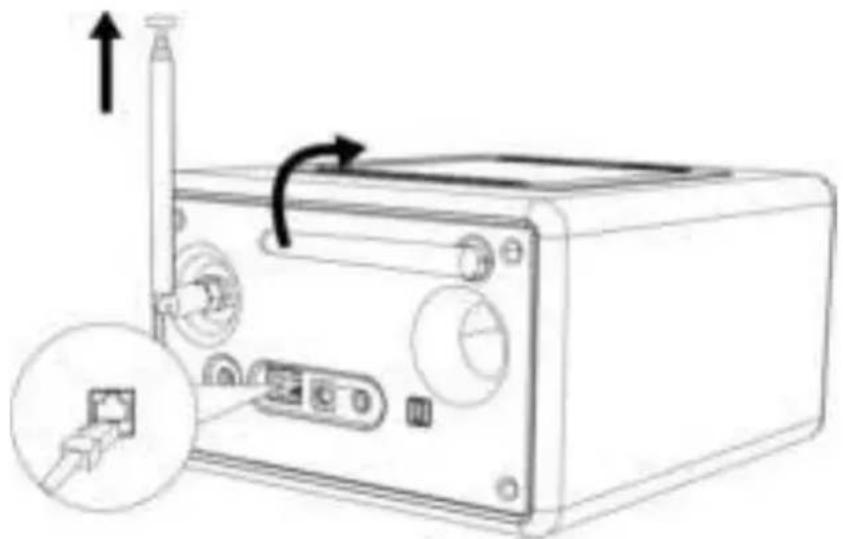
3.4 Using the antennas
- The scope of supply contains a cable antenna and a rod antenna. For op mum radio recep on, one of the two antennae must be used.
- Screw the desired antenna located on the back of RELAX to the FM/DAB antenna connector.
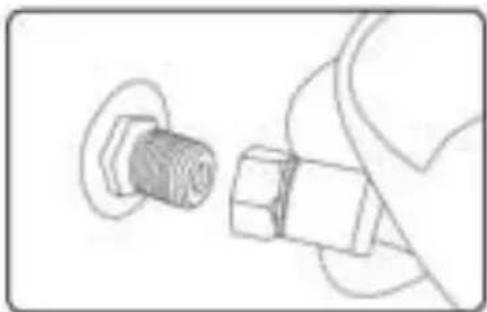
- If you are using the cable antenna, unfold the cable and align the antenna so that you have the bespossible recep on.

i
For good FM/DAB radio recep on, the two ends of the cable antenna should form a 'T' (dipole) with the connec on cable.
A:Recommended alignment for FM
B:Recommended alignment for DAB
Foreven be errecep on, a ach the cable to a suitable house antenna.
-
If you are using the rod antenna, pull the arms of the rod antenna apart and align the antenna so that you have the best possible reception on.
-
Li Wi-Fi antenna upwards.
-
If you want to connect RELAX to your network using an Ethernet cable, connect an Ethernet cable from LAN port on the back of RELAX to your router.
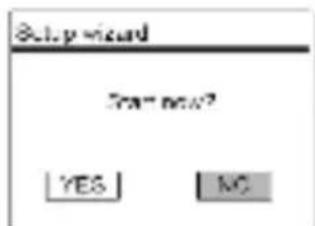
When RELAX is powered on for the rst time, the "Setup Wizard" appears on the display. Follow the instruc ons below to con gure some basic se ngs.
- When the "Setup Wizard" is displayed, press + or - on the remote control (or rotate the navigation knob) to select "YES" and then press OK to start the setup.
- You are then prompted to select:
Language (to be used in the display)
Time format (12 or 24-hour)
Source of auto update (Update from radio, Internet or no update).
Depending on the selec on you have made, follow the instruc ons on the display to further set up date and me, me zone, daylight saving or wireless network. Rotate the naviga on knob on RELAX or press the naviga on bu ons on the remote control to make selec ons and then press OK to con rm (see chapter "Using the menus").
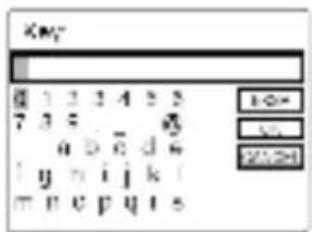
When Update from Internet is selected, Wi-Fi connec on must be rst established. When entering the key of your wireless network, rotate the naviga on knob on RELAX or press the naviga on bu ons on the remote control to select a character and then press OK to con rm. To delete the last entry, select [BKSP]. To cancel entering the key, select [CANCEL]. To con rm the entered key, select [OK].
- When "Setup wizard completed" appears, press OK to exit the se ng.

- Alterna vely, use the Ethernet (LAN) connec on to your router (with automac con gura on) and select the [Wired] menu item in the available network.
i
To run the setup wizard again, go to [System Settings] and then select [Setup Wizard] (See chapter "System Settings").
4 Basic opera on
| To turn on, | PressRelax starts opera on from the last selected playback mode. |
| To turn o (standby mode), | PressThe me and date (if set) are displayed.Relax will automa cally turn o without playback and opera on a er 15 minutes. |
| To select a playback mode, | Press MENU once, then < or > (or rotate the naviga on knob) to select a playback mode and then press OK to con rm.Mode sequence: FM Radio > DAB Radio > Internet Radio > Spo fy > My Music > AUX In > Bluetooth audio > Nature Sound > Medita on Music > Guided Medita on |
| To directly select a playback mode, | Press the direct opera on mode key on the remote control or the front panel for directly switching from one opera on mode to the other. |
| To control the volume, | Press + or - on the remote control or rotate the volume knob on Relax. |
5 Using the menus
There are three types of menus in RELAX.
- Setup menu (For speci c se ngs in a playback mode, e.g. [Recall from Preset] in FM mode)
System Se ngs (For general se ngs, e.g. me/date, language etc.) - Main menu (For accessing the playback modes, sleep mer and alarms)
| To access the menus, | Press SETUP. Contents of the menus may di er in di erent playback modes. |
| To select an op on in the menus, | Rotate the naviga on knob on RELAX or press + or – on the remote control. |
| To con rm a selec on in the menus, | Press OK. (On RELAX, press the naviga on knob) |
| To go back one level in the menu, | Press ↦. |
6 Display icons
Refer to the table below for the meanings of the display icons when they show on the display.
| Wi-Fi connec on is established (with signal strength). | |
| Wi-Fi connec on is disconnected. | |
| LAN connec on is established. | |
| LAN connec on is unplugged. | |
| A Bluetooth device is connected. | |
| Alarm 1 is ac vated. | |
| Alarm 2 is ac vated. | |
| The radio sta on is in the preset list. | |
| FM RDS informa on is received. | |
| Radio signal is being received (with signal strength). | |
| Repeat all playback mode is ac ve. | |
| Repeat one playback mode is ac ve | |
| Shu e playback mode is ac ve. | |
| Repeat all and shu e playback mode is ac ve. | |
| Sleep mer is ac ve. | |
| Stereo sound broadcast is available. | |
| Sound output is muted. | |
| A USB device is connected. | |
| Playback is paused. |
7 FM Radio mode
7.1 Opera on
| To access the FM Radio mode, | Press the FM key on the remote control. Or, press MENU once, then ←or (or rotate the naviga on knob) to select the FM Radio mode and then press OK to con rm. |
| To manually tune the frequency, | Press ←or>. |
| To automa cally tune to the next available sta on, | Press and hold ←or>. Or, press the naviga on knob to start the automa c tuning. |
| To store a radio sta on in the preset list, | A maximum of 40 radio sta ons can be stored. 1. Press SETUP un I the save to preset is shown then press OK to con rm. 2. Press + or - (or rotate the naviga on knob) to select a preset sta on number and then press OK to con rm. |
| To directly store a radio sta on in the preset list (1-9), | Tune to a sta on and then press and hold a preset sta on bu on (1-9) to directly store it in the preset list. |
| To recall a radio sta on in the preset list, | 1. Press SETUP un I the recall from preset is shown then press OK to con rm. 2. Press + or - (or rotate the naviga on knob) to select a radio sta on in the preset list and then press OK to con rm. Or, press preset sta on bu ons (0-9) to access a stored preset sta on (1-40). |
| To browse the radio sta on informa on (if available), | Press INFO repeatedly. |
| To mute or restore the sound output, | Press or SNOOZE MUTE bu on. |
7.2 Setup menu
Press SETUP in the FM mode to access the setup menu (see chapter "Using the menus"). The following op ons are available and the current se ngs (if applicable) are marked with an asterisk (^*)
- [Recall from Preset] To recall a radio sta on in the preset list.
- [Save to Preset]
To store a radio sta on in the preset list. - [FM Auto Search]
To auto store all available radio sta ons in the preset list.* - All exits ng preset sta ons will be erased.
- [FM Scan Se ng] To decide if only sta ons with strong signals are scanned when performing automa c tuning.
- [FM Recep on Se ng] To listen radio in stereo or mono sound output.
System Settings. See chapter "System Settings". - [Main menu]
To access other playback modes, sleep mer or alarms.
8 DAB Radio mode
8.1 Opera on
| To access the DAB Radio mode, | Press the key on the remote control. Or, press MENU once, then or (or rotate the naviga on knob) select the DAB Radio mode and then press OK to con rm. |
| To search for DAB radio sta ons, | The rst me you select the DAB mode, or if the sta on list is empty, RELAX will automa cally perform a full scan and store all available sta ons in the sta on list. |
| To tune to a sta on, | Press or. |
| To store a radio sta on in the preset list, | A maximum of 40 radio sta ons can be stored. 1. Press SETUP un I the save to preset is shown then press OK to con rm. 2. Press + or - (or rotate the naviga on knob) to select a preset sta on number and then press OK to con rm. |
| To directly store a radio sta on in the preset list (1-9), | Tune to a sta on and then press and hold a preset sta on bu on (1-9) to directly store it in the preset list. |
| To recall a radio sta on in the preset list, | 1. Press SETUP un I the recall from preset is shown then press OK to con rm. 2. Press + or - (or rotate the naviga on knob) to select a radio sta on in the preset list and then press OK to con rm. Or, press preset sta on bu ons (0-9) to access a stored preset sta on (1-40). |
| To browse the radio sta on informa on* (if available), | Press INFO repeatedly. |
| To mute or restore the sound output, | Press or SNOOZE MUTE bu on. |
*DAB informa on (if available) includes: Sta on name, Dynamic Label Segment (DLS), Signal strength, Program type (PTY), Ensemble Name, Frequency, Signal error rate, Bit rate and audio status, Codec, and Time and date.
8.2 Setup menu
Press SETUP in the DAB mode to access the setup menu (see chapter "Using the menus"). The following op ons are available and the current se ngs (if applicable) are marked with an asterisk (^*)
- [Recall from Preset]
To recall a radio sta on in the preset list.
[Save to Preset]
To store a radio sta on in the preset list.
[Sta on List]
To display all available sta ons.
[Scan]
To scan and store all available sta ons.
[Manual Tune]
To manually tune the frequency. The list of available digital radio ensembles is shown.
[Prune invalid Sta ons]
To remove all invalid sta ons from the sta on list.
- [DRC]
Some DAB broadcasts or er dynamic range compression (DRC).
Compressing the dynamic range of a radio signal can increase the volume of quiet sounds and reduce the volume of loud sounds. You can select high, low or o level. High level is recommended for noisy environment.
[Sta on Order]
To de ne how the sta ons are listed when browsing the sta on list. Op ons are:
-
[Alphanumeric]: Arrange the sta ons in alphabet cal order,
-
[Ensemble]: List groups of sta ons that are broadcast together on the same ensemble, and
-
[Valid]: List valid sta ons rst, then o -air sta ons.
-
[System Se ngs] See chapter "System Settings".
- [Main menu]
- To access other playback modes, sleep mer or alarms.
9 Internet Radio mode
9.1 Opera on
Wi-Fi Ethernet Internet connec on must be established rst to use the Internet Radio (see chapters "Performing ini al setup" and "Network").
| To access the Internet Radio mode, | Press remote control IR key. Or, press MENU once, then ←or▷ (or rotate the naviga on knob) to select the Internet Radio mode and then press OK to con rm. RELAX starts connec ng to the previously connected network and then the last listened sta on. |
| To tune to a radio sta on or podcast, | See chapter “Station list”. |
| To store a radio sta on in the preset list, | A maximum of 40 radio sta ons can be stored. 1. Press SETUP un Ithe “Save to preset” is shown then press OK to con rm. 2. Press + or - (or rotate the naviga on knob) to select a preset sta on number and then press OK to con rm. |
| To directly store a radio sta on in the preset list (1-9), | Tune to a sta on and then press and hold a preset sta on bu on (1-9) to directly store it in the preset list. |
| To recall a radio sta on in the preset list, | 1. Press SETUP un I the recall from preset is shown then press OK to con rm. 2. Press + or - (or rotate the naviga on knob) to select a radio sta on in the preset list and then press OK to con rm. Or, press preset sta on bu ons (0-9) to access a stored preset sta on (1-40). |
| To browse the sta on informa on* (if available), | Press INFO repeatedly. |
| To mute or restore the sound output, | Press or SNOOZE MUTE bu on. |
*Sta on informa on (if available) includes: Ar st and track name, Sta on descrip on, Sta on genre and loca on, Signal reliability, Codec and sampling rate, Playback bu er, and Date.
9.2 Setup menu
Press SETUP in the Internet Radio mode to access the setup menu (see chapter "Using the menus"). The following op ons are available and the current se ngs (if applicable) are marked with an asterisk (^*)
[Recall from Preset]
To recall a radio sta on in the preset list.
[Save to Preset]
To store a radio sta on in the preset list.
- [Last listened]
To tune to your last listened radio sta ons.
[Sta on List]
To tune to any available Internet radio sta ons (See chapter "Station list").
System Se ngs
See chapter "System Settings".
[Main menu]
To access other playback modes, sleep mer or alarms.
9.3 Sta on list
The following menus and sub-menus are available in the [Sta on List]:
[My Favourites]
To browse and tune to the Internet radio sta ons that you have added to "My favourites" on the web portal (See chapter "Using the web portal").
[Local (name of your loca on)]
To browse and tune to any radio sta ons available in your area. The sta ons are grouped into several categories.
[Sta ons]
[Loca on]: To browse and tune to radio stations by loca on.
- [Genre]: To browse and tune to radio stations by genre.
- [Search sta ons]: To search for any available radio sta ons by entering keywords.
- [Popular sta ons]: To browse and tune to the most popular Internet radio sta ons.
- [New sta ons]: To browse and tune to the latest Internet radio sta ons.
[Podcasts]
- [Loca on]: To browse and tune to podcasts by location.
- [Genre]: To browse and tune to podcasts by genre.
- [Search podcasts]: To search for any available podcasts by entering keywords.
[My Added Sta ons]
To browse and tune to the radio stations that you have added to "My added stations" on the web portal (See chapter "Using the web portal").
[Help]
- [Get access code]: To get the access code of RELAX.
[FAQ]: To get help when the Internet radio does not work properly.
9.4 Using the web portal
The Fron er Silicon Internet Radio portal website allows you to organise your "My favourites" and add new Internet radio sta ons on a computer. To do so, you need to rst register at the web portal.
-
In the Internet Radio mode, press SETUP and then go to [Sta on list] > [Help] > [Get access code]. Write down the access code.
-
Go to www.wi radio-fron er.com on the web browser of your computer.
-
Register a new account with the access code.
-
Following the instruc ons in the web portal, use the "My favourites" and "My added stations" features to add radio stations.
The added sta ons in "My favourites" can be accessed through [My favourites] in the Internet Radio mode of RELAX.
The added sta ons in "My added stations" can be accessed through [My added sta ons] in the Internet Radio mode of RELAX.
10 Spo fy mode
i
To play back music available from "Spotify", you need to install the "Spotify" applica on onto your mobile phone, set up an account and purchase the premium version (fee-charging). Also your mobile phone must be registered in the same Wi-Fi network as this RELAX.
For the most up-to-date instruc ons on how to setup Spo fy: www.spo fy.com/connect
10.1 Opera on
Your mobile phone with Spo fy must be registered in the same Wi-Fi network as RELAX.
| To access the Spo fy mode, | Press MENU once, then \( \blacktriangleleft \) or \( \blacktriangleright \) (or rotate the naviga on knob) to select the Spo fy mode and then press OK to con rm. |
| To select an item (song, album etc.) and start playback in Spo fy, | Use the Spo fy applica on on your mobile phone to browse and select a playback item. |
| To play back Spo fy through RELAX, | Play a song on Spo fy and hit ' DEVICES AVAILABLE'. Choose "RELAX" from the list of available devices and music will start playing out loud. |
| To pause or resume playback, | Press II. |
| To skip to the previous or next playback item, | Press \( \blacktriangleleft \) or \( \blacktriangleright \) . |
| To store a playback item in the preset list, | A maximum of 10 playback items can be stored. 1. Press SETUP un I the save to preset is shown then press OK to con rm. 2. Press + or - (or rotate the naviga on knob) to select a preset item number and then press OK to con rm. |
| To directly store a playback item in the preset list (1-9), | Select a playback item and then press and hold a preset sta on bu on (1-9) to directly store it in the preset list. |
| To recall a playback item in the preset list, | 1. Press SETUP un I the recall from preset is shown then press OK to con rm. 2. Press + or - (or rotate the naviga on knob) to select a playback item in the preset list and then press OK to con rm. Or, press preset sta on bu on (0-9) to directly access a preset playback item (1-10). |
| To browse the informa on (if available) of the playback item, | Press INFO repeatedly. |
10.2 Setup menu
Press SETUP in the Spo fy mode to access the setup menu (see chapter "Using the menus"). The following op ons are available and the current se ngs (if applicable) are marked with an asterisk (^*)
- [Recall from Preset]
To recall a playlist in the preset list.
- [Save to Preset]
To store a playlist in the preset list.
System Se ngs
See chapter "System Settings".
[Main menu]
To access other playback modes, sleep mer or alarms.
11 My Music mode

NOTICE!
Risk of damage!
Improper handling of RELAX may cause damage.
Do not connect Relax directly to the USB port of a computer or other external storage media such as external hard disk.
i
My Music mode can play back audio les stored on a connected USB memory s ck or from a media server (UPnP) sharing the same Wi-Fi network with RELAX.
11.1 Opera on
| To access the My Music mode, | Press the key on the remote control. Or, press MENU once, then or (or rotate the naviga on knob) to select the My Music mode and then press OK to con rm. |
| To play back audio les stored on a USB memory s ck, | Connect the USB memory s ck to the USB port of RELAX. Then press SETUP and select [USB Playback] from the setup menu (see chapter “Setup menu” on next page). |
| To pause or resume playback, | Press |
| To skip to the previous or next audio le, | Press or . |
| To quickly search backward or forward within an audio le, | During playback, press and hold or . |
| To add an audio le to “My Playlist”, | Press and hold ➔dr the naviga on knob when the le is highlighted in the selec on menu. |
| To select a playback mode, | Press repeatedly. • = Repeat all • = Repeat one • = Shu e • = Repeat all and shu e |
| To browse the informa on (if available) of the audio le, | Press INFO repeatedly. |
11.2 Setup menu
Press SETUP in the music player mode to access the setup menu (see chapter "Using the menus"). The following op ons are available and the current se ngs (if applicable) are marked with an asterisk (^*)
[Shared Media]
To search for audio les on the Wi-Fi or Ethernet network.
Once a media server has been found, a selec on menu will show for selec on of audio les for playback from RELAX.
[USB Playback]
To search for audio les on the connected USB memory s ck.
Once a USB memory s ck has been found, a selec on menu will show for selec on of audio les for playback from RELAX.
[My Playlist]
To browse and play back audio files stored in "My playlist".
- [Repeat]
To turn on or o the repeat playback mode of the current folder/ playlist.
[Shu e]
To turn on or off the shu e playback mode of the current folder/ playlist.
[Clear my Playlist]
To clear entries from "My Playlist".
[Prune Servers]
If this se ng is set to "YES", inac ve media servers will be displayed. You can then select a media server and "wake it up" (WOL "wake on LAN" func on) in order to play back audio les from RELAX.
System Se ngs]
See chapter "System Settings".
[Main menu]
To access other playback modes, sleep mer or alarms.
12 AUX In mode
12.1 Opera on
Your external player (e.g. mp3 player) must be connected to the auxiliary input jack of RELAX with an audio cable (with 3.5mm connector, not supplied).
| To access the AUX In mode, | Press remote control key. Or, press MENU once, then <or> (or rotate the naviga on knob) to select the AUX In mode and then press OK to con rm. |
| To start and control playback, | Perform all playback opera ons on the external player. |
| To mute or restore the sound output, | Press or SNOOZE MUTE bu on. |
12.2 Setup menu
Press SETUP in the AUX In mode to access the setup menu (see chapter "Using the menus"). The following op ons are available and the current se ngs(if applicable) are marked with an asterisk (^*)
- [System Se ngs]
See chapter "System Settings".
[Main menu]
To access other playback modes, sleep mer or alarms.
13 Bluetooth mode
RELAX can connect to Bluetooth-enabled players (e.g. mobile phone) within a range of approximately 10 meters (30 feet).
13.1 Pairing
- Press key on RELAX or remote control. Or, press MENU once, then + or - (or rotate the naviga on knob) to select the Bluetooth mode and then press OK to con rm.
The small Bluetooth icon is blinking, indicating that RELAX is ready for pairing.
-
On your Bluetooth-enabled player, turn on the Bluetooth func on and search for available Bluetooth devices.
-
Select "RELAX" in the list of available Bluetooth devices to start pairing.
The Bluetooth icon stops blinking when pairing is complete.
13.2 Opera on
| To access theBluetooth mode, | Press the key on RELAX or remote control. Or, press MENU once, then or (or rotate the naviga on knob) to select the Bluetooth mode and then press OK to con rm. |
| To start playback, | Select an audio le from your Bluetooth-enabled player and start playback. |
| To pause or resume playback, | Press II. |
| To skip to the previous or next audio le, | Press or . |
| To quickly search backward or forward within an audio le, | During playback, press and hold or . |
| To disconnect the Bluetooth connec on, | Switch to another playback mode, or Select [BT disconnect] from the setup menu (see below), or Press and hold. |
| To browse the informa on (if available) of the audio le, | Press INFO repeatedly. |
13.3 Setup menu
Press SETUP in the Bluetooth mode to access the setup menu (see chapter "Using the menus"). The following op ons are available and the current se ngs(if applicable) are marked with an asterisk (^*)
- [Bluetooth disconnect]
To disconnect the Bluetooth connec on.
[View Details]
- [Bluetooth Info]: To get the exis ng Bluetooth connec on status.
- [Connected Device]: To get the axis ng connected Bluetooth device name.
[Paired Device list]: To list out paired Bluetooth devices' names.
System Se ngs]
See chapter "System Settings".
[Main menu]
To access other playback modes, sleep mer or alarms.
14 Nature sound mode
14.1 Opera on
A range of nature sounds integrated in your RELAX will help you relieve of stress.
| To access the Nature Sound mode, | Press the key on RELAX or remote control. Or, press MENU once, then or (or rotate the naviga on knob) to select the Nature Sound mode and then press OK to con rm. |
| To start and control playback, | Select a track from preset sta on bu on (1-6)* to directly access the nature sound music. |
| To pause or resume playback, | Press |
| Nature sound contents, | * For the nature sound contents, please refer to the wellness guide. |
| To skip to the previous or next nature sound music, | Press |
| To mute or restore the sound output, | Press or SNOOZE MUTE bu on. |
14.2 Setup menu
Press SETUP in the nature sound mode to access the setup menu (see chapter "Using the menus"). The following op ons are available and the current se ngs(if applicable) are marked with an asterisk (^*)
- [Content Language]
To select music contents countries (Deutsch, English, Francais).
System Se ngs
See chapter "System Settings".
[Main menu]
To access other playback modes, sleep mer or alarms.
15 Medita on music mode
15.1 Opera on
The medita on music on your RELAX helps you to truly let go of any stressful thoughts.
| To access the Medita on Music mode, | Press the key on RELAX or remote control. Or, press MENU once, then or (or rotate the naviga on knob) to select the Medita on Music mode and then press OK to con rm. |
| To start and control playback, | Select a tracks from preset sta on bu on (1-6)* to directly access the medita on music. |
| To pause or resume playback, | PressII. |
| Medita on content language*, | * For the medita on content language, please refer to the wellness guide. |
| To skip to the previous or next medita on music, | Pressor. |
| To mute or restore the sound output, | Pressor SNOOZE MUTE bu on. |
15.2 Setup menu
Press SETUP in the medita on music mode to access the setup menu (see chapter "Using the menus"). The following op ons are available and the current §§ (if applicable) are marked with an asterisk (^*) .
Content Language
To select music contents countries (Deutsch, English, Francais).
System Se ngs
See chapter "System Settings".
[Main menu]
To access other playback modes, sleep mer or alarms.
16 Guided Medita on mode
16.1 Opera on
The guided medita on music on your RELAX helps you enter true relaxa on and release stress or tension you may feel.
| To access the Guided Medita on mode, | Press the key on RELAX or remote control. Or, press MENU once, then or (or rotate the naviga on knob) to select the Guided Medita on mode and then press OK to con rm. |
| To start and control playback, | Select an album from preset sta on bu on (1-6)* to directly access the guided medita on. |
| To pause or resume playback, | Press ▶. |
| Guided medita on content language*, | * For the guided medita on content language, please refer to the wellness guide. |
| To skip to the previous or next guided medita on, | Press ▶or ▶. |
| To mute or restore the sound output, | Press ▶or SNOOZE MUTE bu on. |
16.2 Setup menu
Press SETUP in the guided medita on mode to access the setup menu (see chapter "Using the menus"). The following op ons are available and the current §§ (if applicable) are marked with an asterisk (*).
- [Contents Language]
To select music contents countries (Deutsch, English, Français).
System Segns
See chapter "System Settings".
[Main menu]
To access other playback modes, sleep mer or alarms.
17 Demo music mode
17.1 Opera on
Demo music can be played in standby mode to demonstrate RELAX in a shop, for example.
| To access the demo music mode, | RELAX is in standby mode. Press and hold naviga on knob for 3sec. |
| To start and control playback, | Select a music song from preset sta on bu on (1-6). |
| To pause or resume playback, | Press▶II. |
| To skip to the previous or next music track, | Press<or>. |
| To mute or restore the sound output, | Pressor SNOOZE MUTE bu on. |
| To exit the demo music mode, | Press◎ |
18 Alarms
18.1 Se ng alarms
You can set up two alarms.
- Press and hold 1 or 2 access the alarm se ng mode.
Alternavely, press SETUP in any playback mode and then select [Main menu] and then [Alarm].
You may also access the alarm setting mode when RELAX is in the standby (o) mode. To do so, press and hold 1 or 2 on.
-
Select the alarm you want to set (Alarm 1 or 2) and then press OK.
-
The following op ons show how to set the alarm. Rotate the naviga on knob or press the naviga on bu ons to perform these sings (see chapter "Using the menus").
-
[Enable]
To turn on or o and set frequency of the alarm. The following op ons are available:
[O]: To deac vate the alarm.
[Daily]: The alarm ac vates everyday.
[Once]: The alarm ac vates once only.
[Weekends]: The alarm ac vates on Saturdays and Sundays.
[Weekdays]: The alarm ac vates from Monday to Friday.
[Time]
To set the alarm me.
- [Mode]
To select the alarm sound source. The following op ons are available:
[Ringtone]
[Internet Radio]
[DAB Radio]
[FM Radio]
[Nature Sound]
[Preset]
To select the last listened sta on or a preset sta on as the alarm sound source. This only shows when Internet Radio, DAB or FM is selected in [Mode].
To select the wake up ringone track including [Beep], [Awakening], [Bird], [Guitar], [Piano], [Xylophone]. This only shows when Ringtone is selected in [Mode].
To select the wake up nature sound track including [Birds], [Rain], [Ocean Surf], [Whales], [Wind Chimes], [Fireplace]. This only shows when Nature sound is selected in [Mode].
Volume]
To set the volume of the alarm sound.
[Save]
To save the current se ngs.
Once [Save] is selected, the alarm se ngs will be stored. If an alarm is ac vated, the corresponding alarm icon 0 / 0 will show.
18.2 Turning the alarms on or o
-
When RELAX is in opera on mode or in the standby (o) mode, press 1or 2 repeatedly to switch on or o the corresponding alarm.
-
When an alarm is turned on, the corresponding alarm icon( 0/0) will show.
18.3 Deac va ng a sounding alarm
- Press , Ⓞ1, Ⓞ2 or press down the volume knob to stop a sounding alarms.
18.4 Snooze
-
To temporarily silence (default: 10 min) a sounding alarm, press Snooze MUTE orbu ons.
-
Press + or - (or rotate the naviga on knob) to change the snooze period (5, 10, 15 or 30 min).
-
During the snooze period, the alarm icon will blink and the remaining snooze me will show.
To cancel the snooze func on, press or 1 or 2
19 Sleep mer
The sleep mer sets the dura on of me before RELAX turns o automa cally.
- Press SETUP in any playback mode and then select [Main menu] and then [Sleep].
Or, direct press SLEEP bu on on remote control to turn the sleepmer on or o . - Press + or - (or rotate the naviga on knob) to select a sleep mer (5, 10, 15, 20, 25, 30, 35, 40, 45, 50, 55, 60, 65, 70, 75, 80, 85, 90, 95, 100, 105, 110, 115 or 120 min).
- Press OK to confirm the selec on.
When the sleep mer is ac ve, the sleep mer icon ( ) and the remaining me will be shown. To cancel the sleep mer, select [Sleep OFF].
20 System Se ngs
20.1 Accessing the system se ngs
- Press SETUP in any playback mode and then select [System Se ngs]
Refer to the chapters below for details of each se ng op on. The current s ngs (if applicable) are marked with an asterisk (^*)
See chapter "Using the menus" for browsing and making selec ons in the system se ngs.
20.2 Equalizer
- Select one of the sound equalizer op ons including: [Loudness], [Jazz], [Rock], [Movie], [Classic], [Pop], [News], [My EQ] and [My EQ pro les setup].
- [My EQ Pro le Setup] allows you to set your own bass and treble levels.
20.3 Network
- [Network Wizard]
To establish network connec on.
WPS WLAN Setup]
Select this op on if your wireless router supports both WPS and PBC setup methods.
[View Se ngs]
To view the current network informa on.
[Wlan Region]
To select a WLAN region.
- [Manual Se ngs]
Under the [Wireless] op on, select [DHCP enable] to allocate IP address automa cally or [DHCP disable] to do it manually.
- [NetRemote PIN Setup]
To set up a NetRemote PIN.
- [Network Pro le]
To display a list of networks saved by RELAX.
[Clear Network Se ngs]
To clear all network se ngs.
- [Keep Network Connected]
To keep the network connected. This allows you to wake RELAX from standby using a remote app.
20.4 Time/date
[Set Time/Date]
To set me and date.
- [Auto update]
To select a source (Radio, Internet network or no update) for automata c me update.
If you are upda ng me from a source (Radio - FM/DAB), the daylight saving se ng has no e ect.
If you are upda ng me from the Internet network, set your me zone.
- [Set format]
To set 12 or 24-hour me format.
- [Set mezone]
To set a me zone.
- [Daylight savings]
To enable or disable daylight saving me.
20.5 Inac ve Standby
- This op on sets the dura on of me before RELAX turns o automa cally. Op ons include: O , 2, 4, 5 and 6 hours.
20.6 Backlight
To select the brightness level of the display. The display is switching to bright or dark. The brightness level is automa cally adjusted according to the ambient light sensor at the front of RELAX.
[High Ambience]
Level 8 to 15
[Dark Ambience]
Level 1 to 8
20.7 Language
- This op on sets the menu language. Op ons include: English, German, Danish, Spanish, French, Italian, Dutch, Norwegian, Polish, Portuguese, Finnish, Swedish and Turkish.
20.8 Factory Reset
- This op on clears all user-de ned se ngs and replaces them with the original default se ngs.
20.9 So ware update
- [Auto Check]
To set to periodically check for update.
- [Check now]
To check for update immediately.
If a new so ware is available, RELAX will ask if you want to proceed with an update.
Before so ware upgrade, make sure that RELAX is connected to a stable power connec on. Disconnec ng power during a so ware update may damage RELAX.
20.10 Setup Wizard
- To performini alsetup (see chapter "Performing ini al setup").
20.11 Info
This shows the current so ware version, spo fy version, radio ID and friendly name.
20.12 Mul -Room
Your RELAX can be used with other compatible products as part of a mul -room system. Products under the same Wi-Fi network and synchronised in the same mul -room group can play the same content around your home. You may also create mul ple groups for di erent areas of the home or for di erent users.
You can con gure the mul -room groups in the system se ngs with the following op ons:
- [View Details]
To view your current mul -room status:
- [Ungrouped]: RELAX is not part of a group.
- [Server]: RELAX sends audio content to other group members.
-
[Client]: RELAX receives audio content from another product in the group.
-
[Create New Group]
To create a new mul -room group.
[Add to Group]
To add other compatible products to a current mul -room group.
- [List Current Clients]
To view the list of compatible products receiving audio contents from RELAX.
- [Leave Group]
To remove compatible products from a mul -room group.
- [Dissolve Group]
To dissolve a mul -room group. Each product in the group will then be operated individually.
21 Using UNDOK ™ app to control RELAX
RELAX is comparable with the Froner Silicon's UNDOK™ app. The app offers comprehensive remote control func onality for FS based audio modules with an iOS or Android smart device.
To install and use the UNDOK™ app:
- Download the UNDOK™ app from "App Store" or "Google play" and install it on your iOS or Android smart device.

-
Connect your smart device to the same Wi-Fi network as RELAX.
-
Launch the UNDOK™ app on your smart device. The app will search for compatible audio systems. You may also tap on "Set up audio system" to start searching for audio systems.
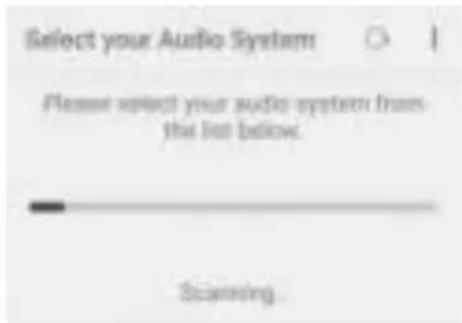
- Select "RELAX" from the list of available audio systems.

- Control RELAX through the UNDOK™ app.
Your RELAX can be used with other compatible products as part of a mul -room system. You can use the UNDOK™ app to manage the mul -room groups. To do so:
- Tap on the edit group icon ( ) in the list of available audio system.

- Add or remove RELAX to or from mul -room groups, change a group name or delete a group as required.
22 Troubleshoo ng
Malfunc ons can occur with any electrical equipment. This is not necessarily due to a defect. As such, you should check the following table to see if you can eliminate the problem yourself.
| Malfunc on | Possible cause | Solu on |
| No power | Power cable is not properly connected. | Connect the power cable properly. |
| No response from RELAX | There is an error in the RELAX. | Disconnect and reconnect the power plug. Then turn RELAX on again. |
| Remote control does not work, or only works sporadically | Distance to RELAX is too large. | Reduce the distance between the remote control and RELAX. |
| Ba ery is empty. | Replace the ba ery. | |
| No sound or poor sound | Sound is turned o . | Adjust the volume. |
| Headset is plugged in. | Pull the headset out of the jack. | |
| RELAX is not set to the correct playback mode. | Select another playback mode. | |
| FM/DAB or Internet recep on is poor. | Extend/adjust the FM/DAB antenna or check the Wi-Fi connec on. | |
| There is radio interference. | Keep RELAX away from other electronic devices. | |
| Alarm does not work. | Alarm is not ac vated. | Ac vate the alarm. |
| Alarm volume is set too low. | Increase the alarm volume. | |
| InsuCNT Wi-Fi signal strength | The router is too far or blocked. | Place RELAX closer to the router or adjust the posi on of the Wi-Fi antenna. |
| Cannot connect to your Wi-Fi network | Router is not switched on or working properly. | Switch on your router or check the router condi ons. |
| Setup method is incorrect. | Check if your router supports WPS and uses the correct setup method (PBC or PIN). | |
| Con gure the Wi-Fi se ngs again. | ||
| Internet radio sta on does not work some mes. | Some sta ons only support a limited number of listeners. | Try again later. |
| Sta on is not broadcas ng. | Try again later. | |
| Some Internet radio sta ons disappear from the sta on list. | The sta on is removed from the list when it stops broadcas ng. | Check again later. If the sta on broadcasts again, it will be brought back to the list. |
| USB device does not work. | USB playback is not support. | Check the les and le system on the USB device. |
| USB device is not charging. | Check the USB cable. |
23 Cleaning

NOTICE!
Material damage due to improper cleaning!
Improper cleaning can result in damage to RELAX or cause certain functions to stop working.
- Never use abrasive or solvent-based cleaning agents, as these may damage the surface of RELAX.
- Never use hot or compressed air to dry RELAX.
- The edges and corners of RELAX are vulnerable to pressure. Protect these areas to prevent them from being subjected to excessive pressure.
Cleaning o ngerprints and light soiling
Clean RELAX only from the outside with a so, dry cloth.
Cleaning o heavy soiling
- Clean RELAX only from the outside with a slightly damp cloth and then dry RELAX with a so, dry cloth.
24 Warranty
When submi ng warranty claims, the following applies without restric ng your legal rights:
- Warranty claims can only be asserted within a period of max. 2 years (1 year in North America and Australia), calculated from the date of purchase.
- sonoro audio GmbH shall, at its own discretion, repair or replace RELAX free of charge any defects caused by material or manufacturing defects within the warranty period.
In case of a complaint, please contact our customer service department. You can nd contact details under "Contact data" or at www.sonoro.de. - No new warranty period begins following repair or replacement of RELAX. The warranty period of 2 years (1 year in North America and Australia) from date of purchase remains applicable.
- Excluded from the warranty are ba eries, damage caused by improper use, normal wear and tear, as well as defects which only minimally a ect the value or usability of RELAX. The warranty also expires in case of any modi ca ons not made by our authorised service centre.
sonoro.de
sonoro audio GmbH
Nordkanalallee 94
41464 Neuss
Allemagne
Telephone: +49 2131 8834-141
Fax: +49 2131 7517-599
E-mail: support@sonoro.de
www.spo fy.com/connect/third-party-licenses

- [Con gura on PIN NetRemote]
[WPS WLAN-installingen]
- [NetRemote PIN set-up]
- [Recall from Preset]
Hent en radiosta on i den forinds Ilede liste.
[Save to Preset]
Gem en radiosta on i den forinds Ilede liste.
[FM Auto Search]
For automa sk at gemme alle lgengelige radiosta oner i den forinds llede liste.*
- Alle eksisterende forinds llede sta oner sle es.
[FM Scan Se ng]
- [Recall from Preset]
- [Local (name of your loca on)]
- [Recall from Preset]
Hent en afspilningsliste i den forinds Ilidee liste.
[Save to Preset]
Gemmer en afspilningsliste i den forinds Ilidee liste.
- [System Se ngs]
Se kapitlet "Systemindstillinger".
[Main menu]
Giver adgang I andre afspilnings Istande, sleep meren ellarmer.
11 Min musik

ADVARSEL!
Risiko for skader!
- [NetRemote PIN setup]
Opret en NetRemote PIN.
- [Network Pro le]
- [Keep Network Connected]
- [List Current Clients]