
CL7100 - Headphones GEEMARC - Free user manual and instructions
Find the device manual for free CL7100 GEEMARC in PDF.
| Product type | Infrared TV headset |
| Brand | Geemarc |
| Model | CL7100 |
| Headset weight | Approximately 58 to 60 g |
| Battery | Rechargeable lithium polymer, 3.7 V / 200 mAh |
| Battery life | Approximately 10 hours |
| Charging time | Approximately 2 hours for the first charge |
| Transmission frequency | 2.3 MHz (infrared) |
| Range | Approximately 55 m² |
| Frequency response | 100 - 16,000 Hz |
| Total harmonic distortion | < 1% |
| Signal-to-noise ratio | 70 dB |
| Maximum sound pressure level | 120 dB |
| Base power supply | AC/DC adapter 100-240 V ~ 50/60 Hz, output 12 V DC |
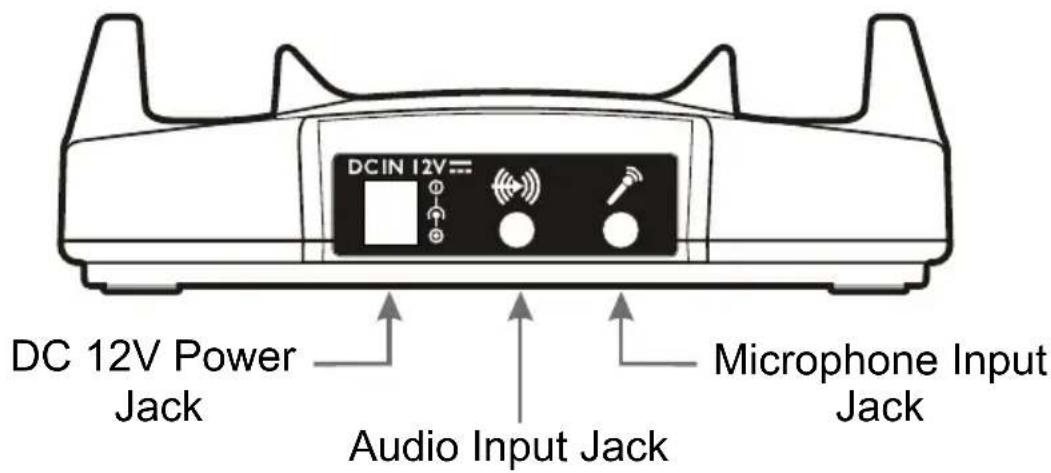
| Connectivity | RCA audio input (red/white), SCART socket (optional), 3.5 mm microphone/headphone input |
| Main features | Infrared transmission, tone adjustment, balance adjustment, auto standby, charging on base |
| Box contents | 1 or 2 headsets, transmitter base, power adapter, RCA to 3.5 mm audio cable, spare ear tips |
| Care and cleaning | Clean the headset with a damp cloth; ear tips with warm water and mild detergent |
| Safety | Do not expose to water, do not open, do not incinerate, keep out of reach of children |
| Warranty | 1 year parts and labor (France) |
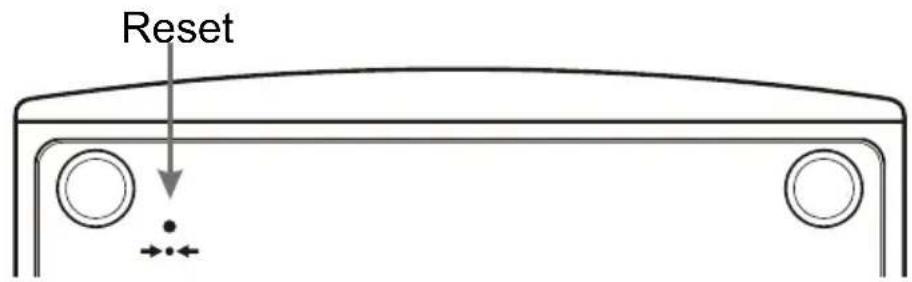
| Repairability | Repairs by Geemarc-certified technician; reset button at the back of the base |
| Recycling | Do not dispose of with household waste; take to a collection point for electrical and electronic equipment |
| Customer service | Tel. 03 28 58 75 99, website www.geemarc.com |
Frequently Asked Questions - CL7100 GEEMARC
User questions about CL7100 GEEMARC
0 question about this device. Answer the ones you know or ask your own.
Ask a new question about this device
Download the instructions for your Headphones in PDF format for free! Find your manual CL7100 - GEEMARC and take your electronic device back in hand. On this page are published all the documents necessary for the use of your device. CL7100 by GEEMARC.
USER MANUAL CL7100 GEEMARC
natural_image
Black 3.3MHz desktop computer with earbuds and antenna, no visible text or symbols on device bodyINTRODUCTION
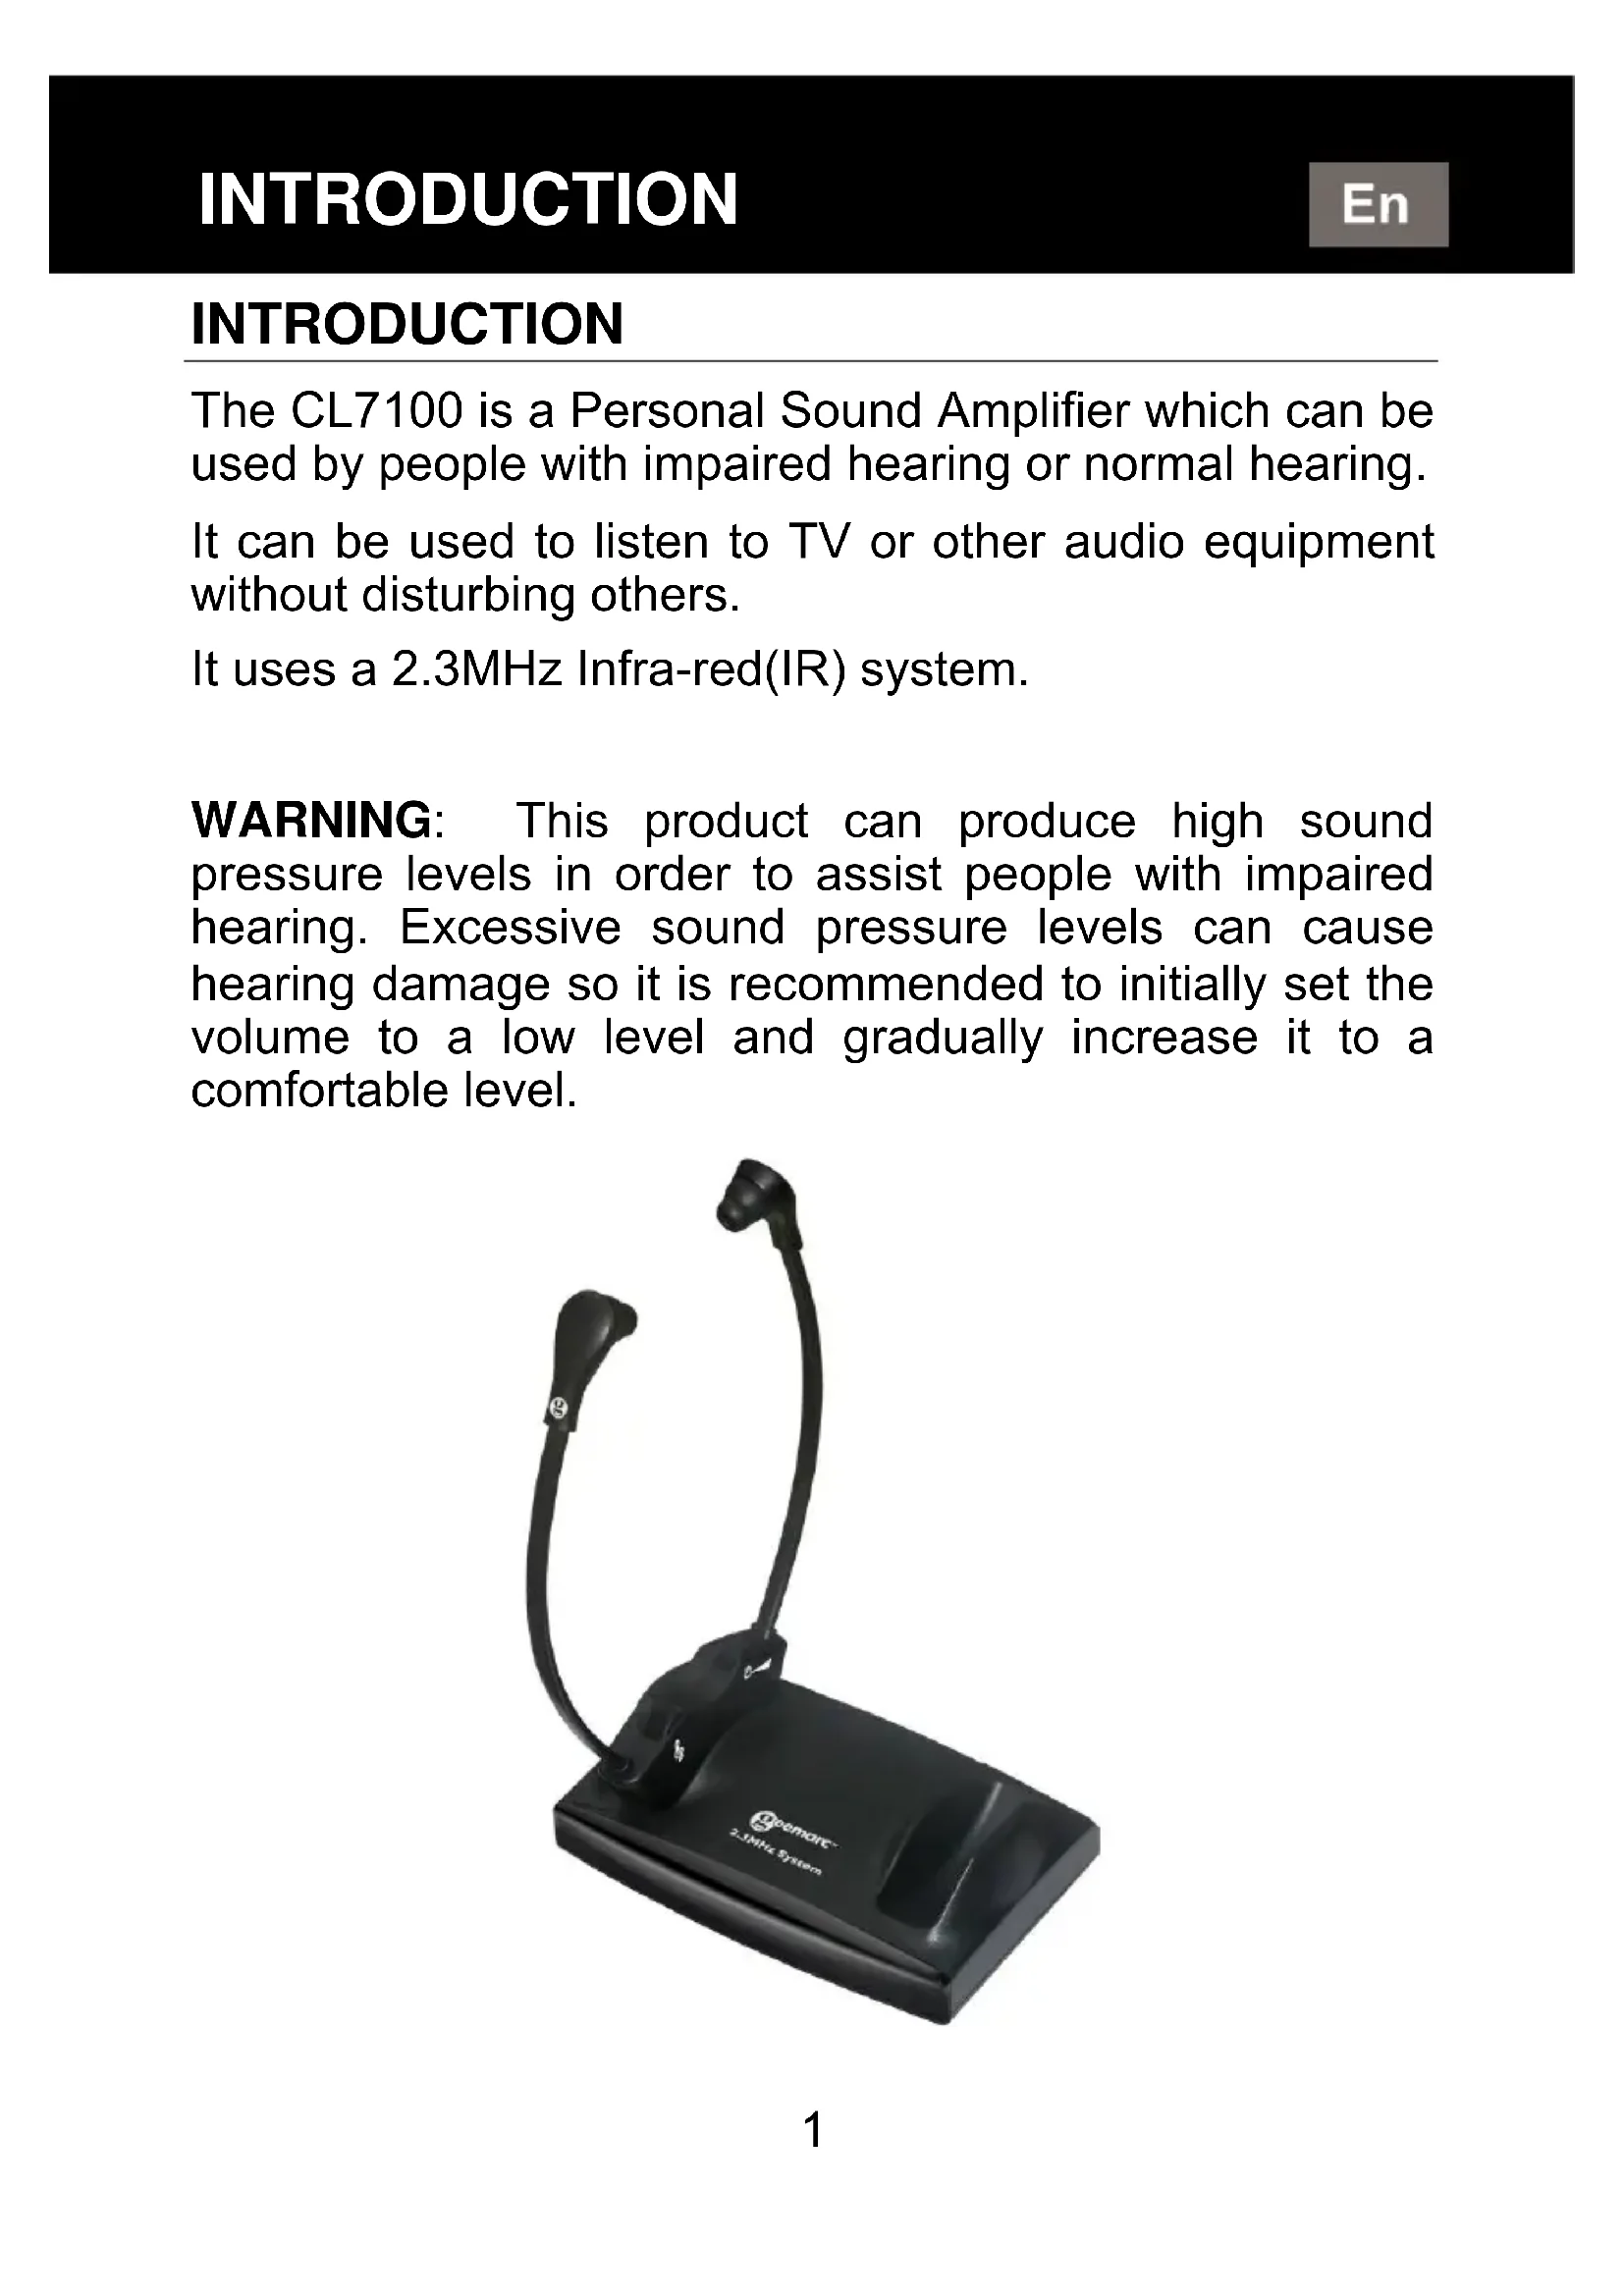
The CL7100 is a Personal Sound Amplifier which can be used by people with impaired hearing or normal hearing.
It can be used to listen to TV or other audio equipment without disturbing others.
It uses a 2.3MHz Infra-red(IR) system.
WARNING: This product can produce high sound pressure levels in order to assist people with impaired hearing. Excessive sound pressure levels can cause hearing damage so it is recommended to initially set the volume to a low level and gradually increase it to a comfortable level.
natural_image
Black remote computer system device with curved cable and ear connector (no visible text or symbols)PRODUCT CONTENTS
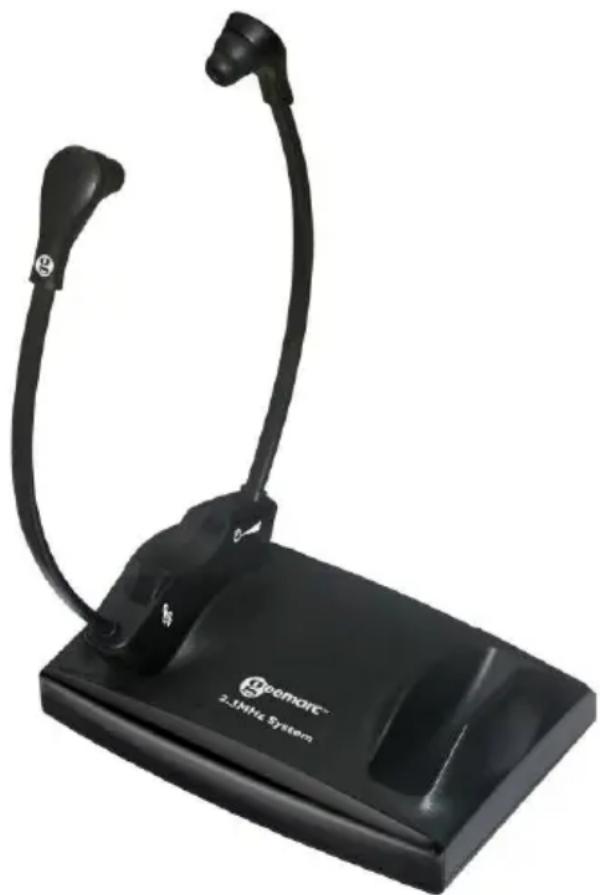
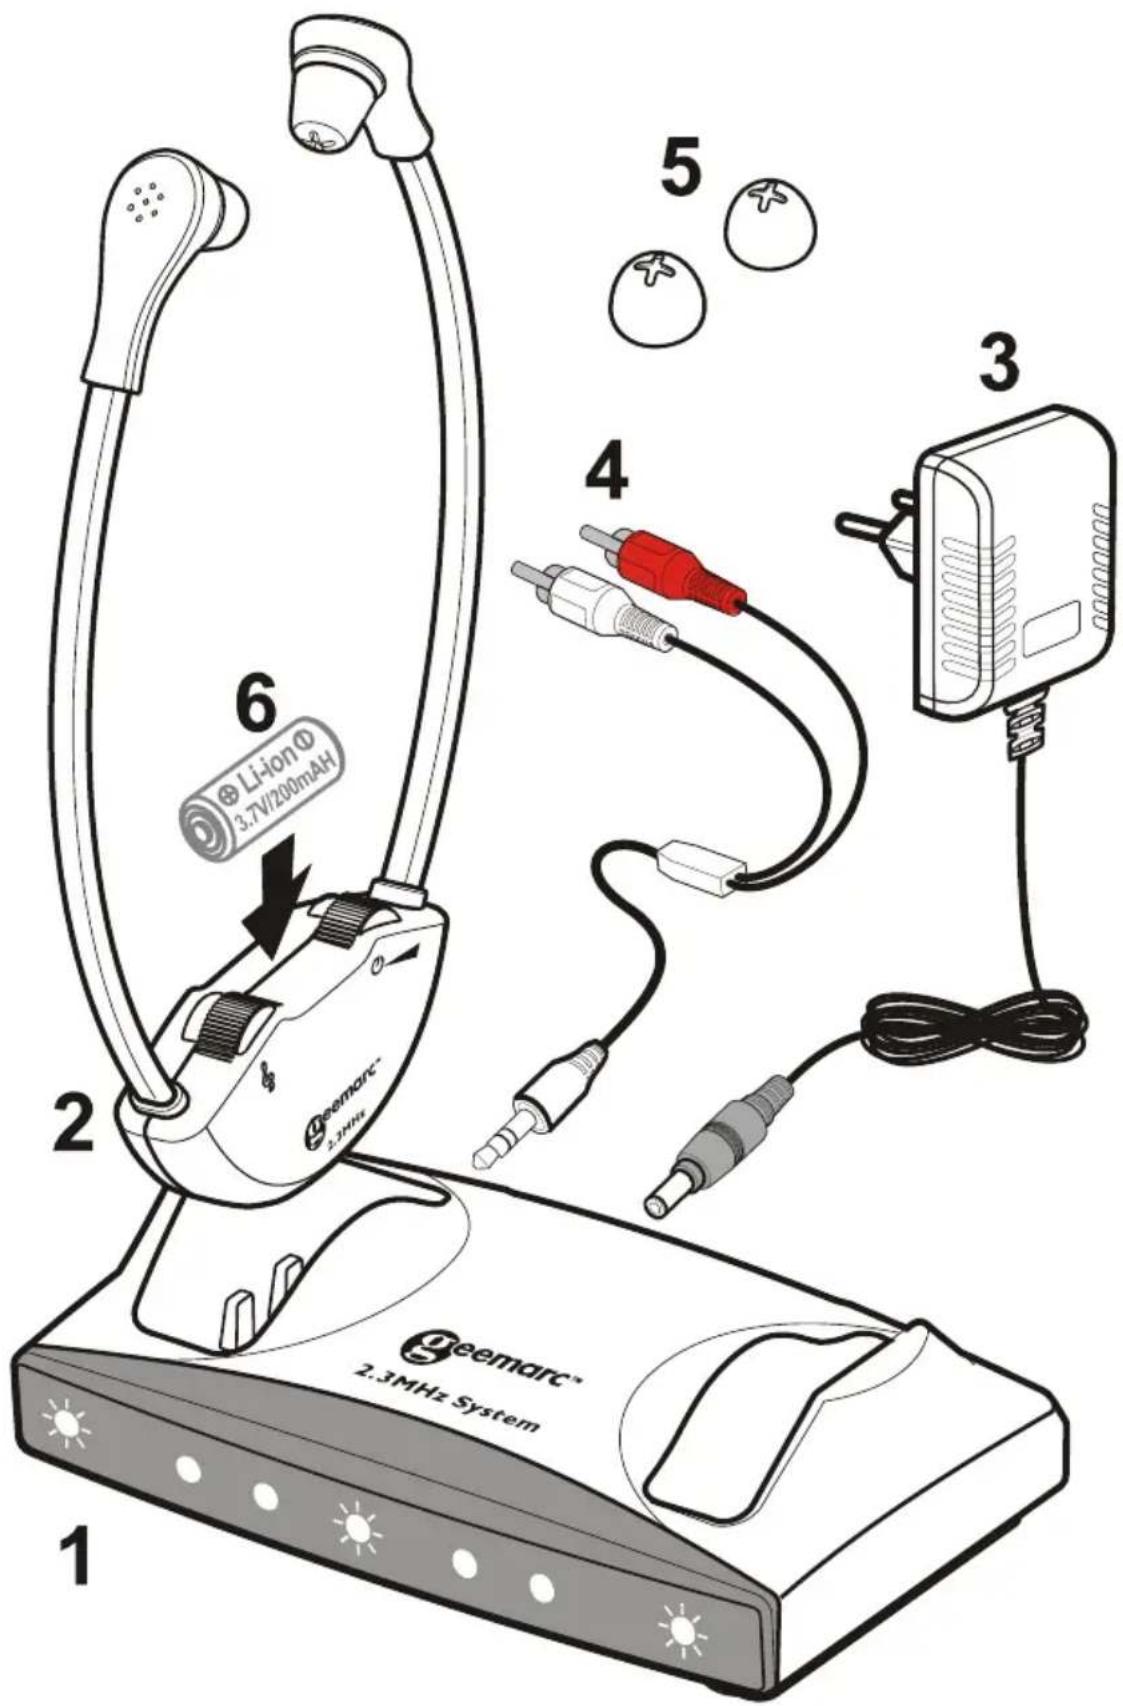
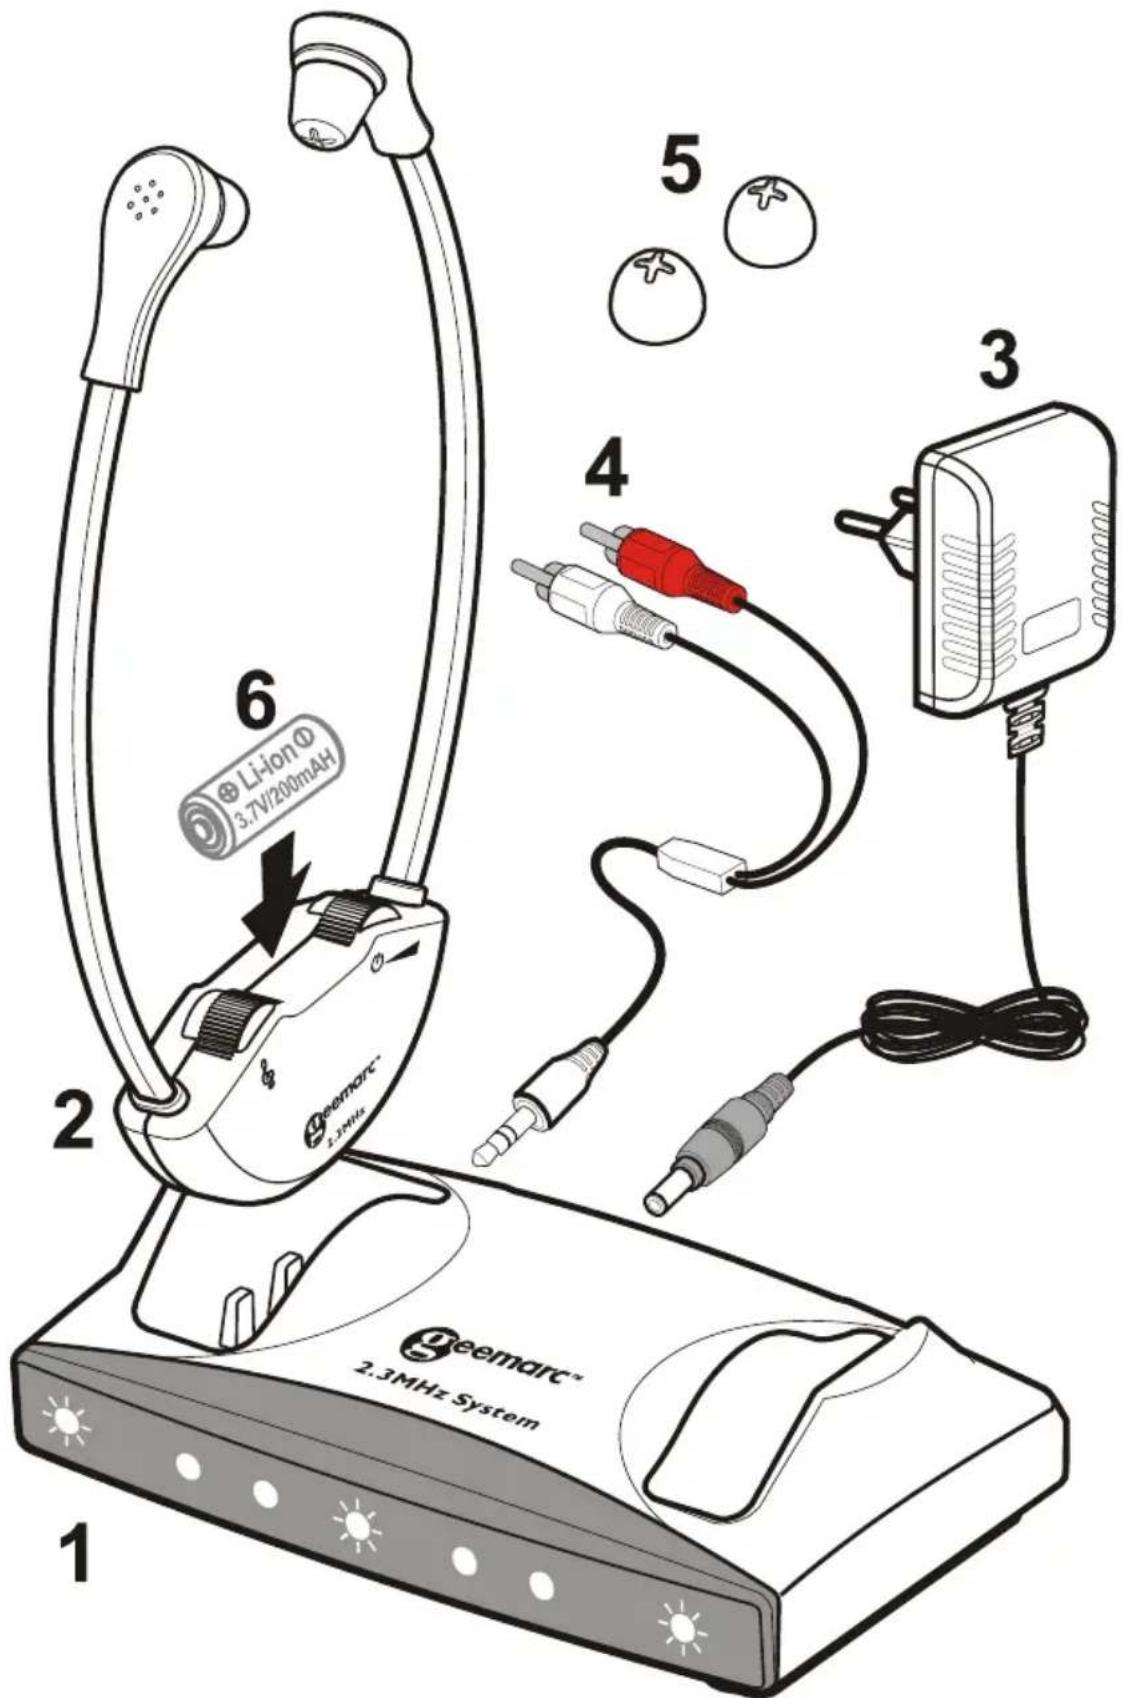
(1) Transmitter / Charger
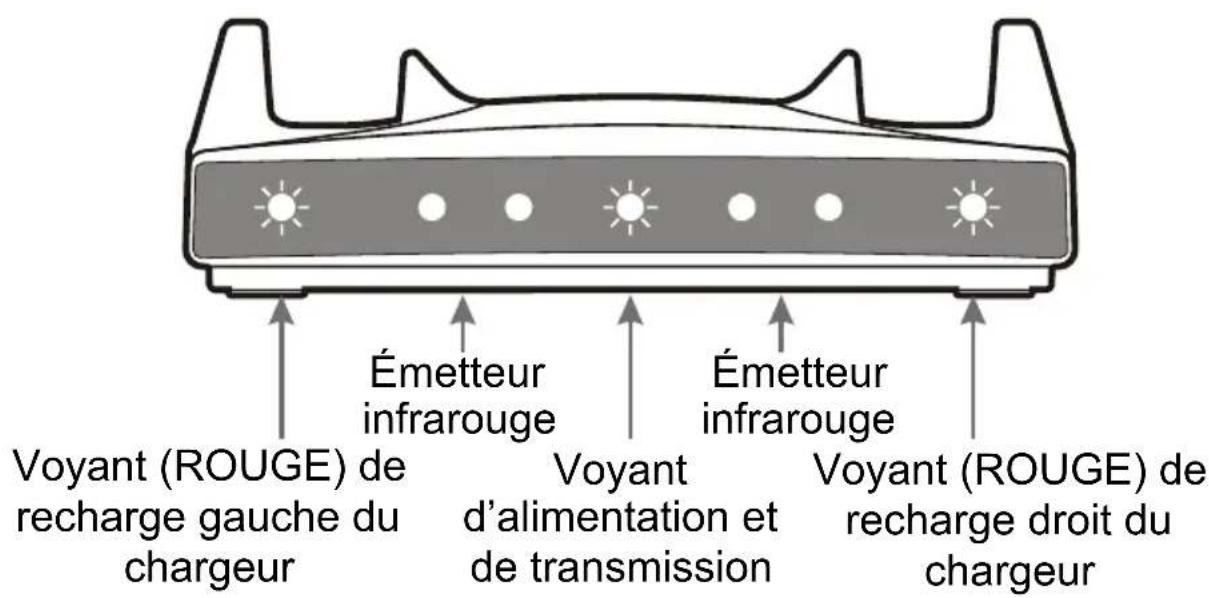
Front View
Back View
Bottom View
NOTE: The transmitter/charger can charge one or two headsets.
(2) Headset

NOTE: Depending on the model purchased there may be either one or two headsets in the box.
(3) Power Supply (AC - DC Adapter, 100 - 240V)
(4) RCA(red/white) to 3.5mm audio cable
(5) Spare ear tips. There are 2 styles of ear tip.
(6) Lithium Polymer Rechargeable battery (Sealed inside the headset) 3.7V/200mAh
NOTE:
- This type of battery should last for many years and normally should not need replacing.
- We recommend that the battery be charged for about 2 hours before the system is used for the first time.
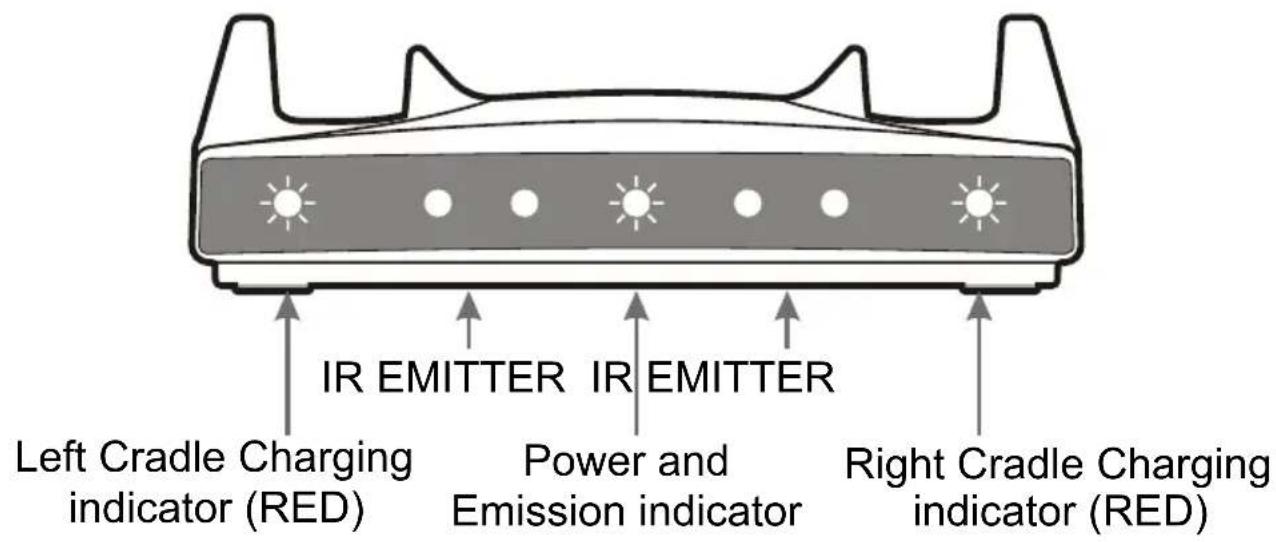
- Place the headset in the charging cradle. Verify that the LED charging indicator (RED) is lit. The LED turns off when the battery is fully charged.
Left cradle charging indicator

natural_image
Simple diagram with two circular symbols inside a rectangular frame, no text or labels presentRight cradle charging indicator
- It is not possible to overcharge the battery. We recommend that the headset be placed in the charging cradle when not in use.

BATTERY WARNINGS
- Do not attempt to change or remove the battery
- Do not dispose in fire
- Keep away from children
- Do not short circuit the charging terminals in the bottom of the headset.

natural_image
Prohibition sign showing a circular absence of flames crossed out by a diagonal line, no text present.Note: This series of CL7100 products comes in 2 model variations and spare headsets as below. This Instruction Manual covers all of them.
1) CL7100 Wireless Single Headset System
2) Extra Wireless Headset
INSTALLATION
flowchart
graph TD
    A["DC 12V port"] --> B["Single end of the cable to be plugged into the (**) port"]
    B --> C["Power supply DC 12V (AC/DC ADAPTOR, 100-240V)"]
    C --> D["100-240V~50/60Hz"]
    D --> E["DC 12V"]
    E --> F["Microphone cable to be plugged into the 3 port"]
    F --> G["TV/Cable /Satellite /DVD/VCR Audio Out"]
    G --> H["DVD/VCR"]
    H --> I["TV"]
    I --> J["DAC BOX"]
    J --> K["TV With SCART OUTPUT"]
    K --> L["DC 12V"]
    L --> M["Right"]
    M --> N["Left"]
    N --> O["Right"]
    O --> P["DAC BOX Audio Out"]
    P --> Q["DC 12V"]
    Q --> R["Right"]
    R --> S["Left"]
    S --> T["Right"]
    T --> U["DC 12V"]
    U --> V["Not Included"]
    V --> W["(*) MP3/Mobile Phone"]
    W --> X["(*) SCART"]
    X --> Y["Use Audio out Red/White plugs"]
    Y --> Z["(*) NOT INCLUDED"]
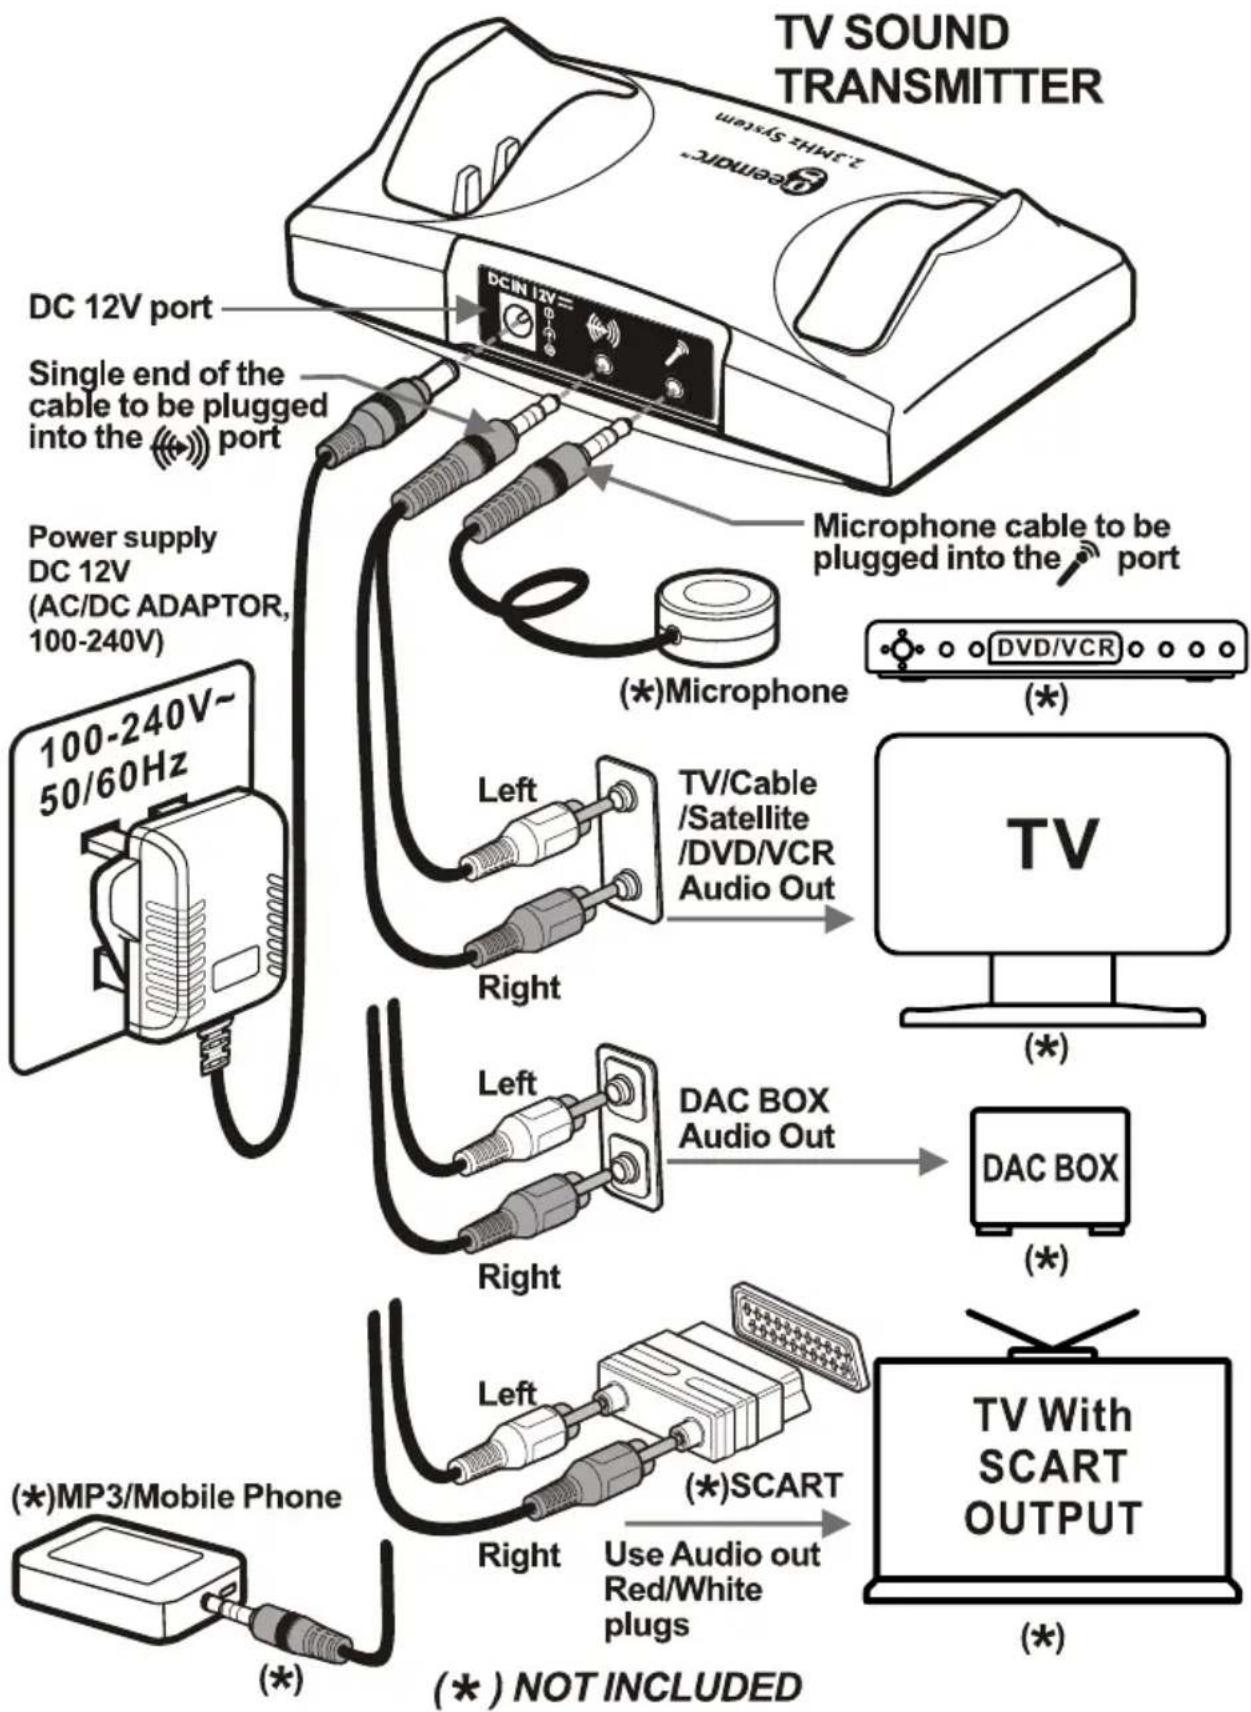
(1) Connect the power supply as shown in the diagram
(2) The transmitter/charger must be connected to the audio OUTPUT sockets of the TV, audio equipment, cable or satellite box, DVD or VCR player, etc. When an RCA type cable is used the outputs jacks are red and white. Refer to the diagram
A Scart adapter(not included) may also be used. Use only the red and white terminals.
NOTE: If the system is connected to a cable or satellite box and to a DVD or VCR player it is necessary to turn off the device which is not in use at the time. When using the DVD or VCR player turn off the cable or satellite box. When watching TV turn off the DVD and VCR player.
(3) Connecting to a digital converter box(DAC)
Connect the digital audio output from the TV or audio device to the DAC using an appropriate cable (optical or coaxial cable). Then use the supplied RCA type cable to connect from the red and white output terminals of the DAC to the audio input socket of the transmitter/charger.
NOTE: If you wish to use the system to listen to TV while the CL7100 is muted so as not to disturb others, the TV audio output must be set to FIXED. Refer to the user manual of your TV for instructions as to how to set to FIXED.
POSITIONING
The infra-red(IR) signals need a direct line-of-sight connection between the transmitter and the headset. Position the transmitter such that there is a direct line-of-sight connection with the headset when in use. The IR signals may be blocked by objects such as walls, doors, furniture, newspapers, books, etc. The IR diodes are lit during use.
NOTE: When there is no audio input to the transmitter/charge, transmission is turned off automatically and the blue LED goes off. This is resumed automatically when audio signal is restored.
OPERATION
- Make sure that the transmitter/charger is correctly connected to the mains supply using the adapter supplied.
- Put on the headset such that the front(silkscreened) part of the headset is facing the transmitter.
- Turn on the headset using the ON/ OFF/ VOLUME control and adjust the volume.
- Use the tone control wheel to adjust the tone frequency to suit your needs.
- Use the included balance 🙏 control tool to adjust the volume balance between the left and right ears. This control is on the headset.
- If needed, insert a condenser (electret) microphone jack into the Mic/Line In socket 📋/+/ meaning on the headset or connect the audio output of a cell phone into the same socket using a cable with a 3.5mm jack.
- When you are finished using the system carefully place the headset in the charging cradle making sure that it fits snugly. Check that the charging light turns on.
SAFETY, CARE AND MAINTENANCE
- The system is designed to operate from a 100-240V AC supply and does not have an integral on/off switch. To disconnect the power switch the mains power point switch to OFF or unplug the power supply (AC-DC adapter);
- Clean the headset and ear tips regularly ---- use a damp cloth for the headset and warm water and a mild detergent for the ear tips(after removal from the headset);
- Keep away from heat sources such as hot-plates, and heat generating appliances;
- Keep away from water and other fluids;
- Repairs must be carried out by qualified personnel;
- We suggest that a power surge protector is connected between the mains supply power point and the AC-DC adapter.
PROBLEMS AND SOLUTIONS
The sound is not clear (static/interference)
- Check the line-of-sight connection.
- Make sure that the Blue LEDs is lit.
- Check the transmitter location (height above the floor).
- Keep away from any windows or interfering device.
- Check if the audio cable is connected to an analogue (RCA) audio-OUT jack on TV, cable or satellite decoder /receiver.
- Check that the audio cable is NOT connected to a digital audio-out jack.
- The power outlet may already be in use with another device.
- Audio cable is connected to the transmitter's audio jack.
The transmitter's LED lights are not on.
- Check the connection to the wall socket or power outlet.
- Check the connection to the CL7100 12V jack.
The charging lights do not come on when the earphone set is in the cradle.
- Realign earphone set; if necessary, move around in the cradle.
- Ensure that the charging cradle is connected to mains power.
PRODUCT SPECIFICATIONS
General data :
Frequency: 2.3MHz
Modulation: Infrared, mono
Approx. range: 55 sq.m (approx. 600 sq. ft.)
Audio frequency response: 100-16,000 Hz
Total harmonic distortion: < 1%
Signal to noise Ratio: 70 dB
Auto ON/OFF
Headset :
Max. sound pressure level (SPL): 120 dB
Battery requirement: Lithium Polymer Rechargeable
battery, 3.7V / 200mAh
Operating time: Max.10 hrs.
Weight: approx. 58 – 60 g
Transmitter :
Audio connection: Mini headphone/RCA cable.
Power Supply: DC Power Supply 12V, 500mA
Weight: Approx. 171 g
Dimensions (H x W x D): 4.8 x 10.5 x 15.4 cm
RESET SWITCH: Sometimes computers malfunction due to electrostatic discharge or other electrical disturbances, or when DC Jack is plugged. If this happens push a thin rod into the RESET hole →●← in the base of transmitter unit and press down for about one second. This Resets the transmitter unit, clears its memory and returns it to normal operation.
General information
Guarantee
From the moment your Geemarc product is purchased, Geemarc guarantee it for the period of one year. During this time, all repairs or replacements (at our discretion) are free of charge. Should you experience a problem then contact our Helpline or visit our website at www.geemarc.com.
The guarantee does not cover accidents, negligence or breakage to any parts.
The product must not be tampered with or taken apart by anyone who is not an authorised Geemarc representative.
The Geemarc guarantee in no way limits your legal rights.
Important: YOUR RECEIPT IS PART OF YOUR GUARANTEE AND MUST BE RETAINED AND PRODUCED IN THE EVENT OF A WARRANTY CLAIM.
Please note: The guarantee applies to the United Kingdom only.
EEC Declaration
Geemarc Telecom SA hereby declares that this product is in compliance with the essential requirements and other relevant provisions of the Radio and Telecommunications Terminal Equipment Directive 1999/5 EEC.
The declaration of conformity may be consulted at www.geemarc.com

Disposal information
Disposal of old electrical & electronic equipment (applicable in the European Union and other European countries with separate collection systems)
The symbol on the product or its packaging indicates that this product may not be treated as household waste. Instead it should be handed over to the applicable collection point for the recycling of electrical and electronic equipment.
By ensuring this product is disposed of correctly, you will help prevent potential negative consequences for the environment and human health, which could otherwise be caused by inappropriate waste handling of this product.
For more detailed information about recycling this product, please contact your local council office, your household waste disposal service or the shop where the product was purchased.

Customer support
For product support and help, visit our website at
www.geemarc.com
For our Customer Helpline
Telephone:
01707 384438
Fax: 01707 832529
INTRODUCTION
natural_image
Black Z-JIMUS System device with curved cable and connector (no visible text or symbols on body)CONTENU DE L'EMBALLAGE
(1) Base
natural_image
Simple diagram with two circular symbols inside a rectangular border, no text or labels presentVoyant de recharge
natural_image
Prohibition sign showing a flame with no accompanying text or symbolsAlimentation: 12V CC, 500 mA
Poids: 171g environ
Dimensions (HxLxP): 4,8x10,5x 15,4 cm
natural_image
Black Z-PTT5 system device with curved cable and connector (no visible text or symbols on body)VERPACKUNGSINHALT
natural_image
Symbol of a trash bin with no text or numbers presentKundenbetreuung
UGCL7100_EnFrGeNLSplt_v1.2

eemarc™
Telecom SA
United Kingdom
5 Swallow Court Swallowfields
Welwyn Garden City
Hertfordshire, AL7 1SB
For product support:
01707 384438
www.geemarc.com

eemarc™
Telecom SA
FRANCE
Parc de l'Etoile

- INTRODUCTION
- PRODUCT CONTENTS
- Transmitter / Charger
- Lithium Polymer Rechargeable battery (Sealed inside the headset) 3.7V/200mAh
- NOTE:
- BATTERY WARNINGS
- INSTALLATION
- POSITIONING
- OPERATION
- SAFETY, CARE AND MAINTENANCE
- PROBLEMS AND SOLUTIONS
- The sound is not clear (static/interference)
- The transmitter's LED lights are not on.
- The charging lights do not come on when the earphone set is in the cradle.
- PRODUCT SPECIFICATIONS
- General data :
- Headset :
- Transmitter :
- General information
- Guarantee
- EEC Declaration
- Disposal information
- Disposal of old electrical & electronic equipment (applicable in the European Union and other European countries with separate collection systems)
- Customer support
- CONTENU DE L'EMBALLAGE
- VERPACKUNGSINHALT
- Kundenbetreuung
Brand : GEEMARC
Model : CL7100
Category : Headphones