
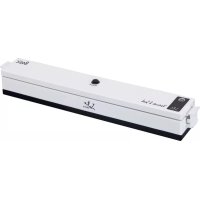
EV105 - Vacuum packaging machines JATA - Free user manual and instructions
Find the device manual for free EV105 JATA in PDF.
| Brand | JATA |
| Model | EV105 |
| Device type | Vacuum packaging machine |
| Power supply | 230 V, 50 Hz |
| Power | 120 W (estimate) |
| Main functions | Automatic vacuum sealing, manual sealing, vacuum for bowls and wine stoppers |
| Vacuum pressure | Normal (regular products) / Gentle (fragile products) |
| Sealing temperature | Selectable: Dry (short time) / Sauces (long time) |
| Power cord | Length not specified (estimate 80 cm) |
| Housing material | Plastic (estimate) |
| Sealing bar | Teflon coating |
| Gaskets | Upper and lower removable gaskets, keep clean |
| Included accessories | Plastic tube for bowl, user manual |
| Usage | Domestic only |
| Safety | Do not immerse, do not touch hot bar, do not leave unattended, use out of reach of children |
| Maintenance | Clean with a slightly damp cloth, no abrasive products |
| Repairability | Authorized technical service for replacement of cable or other parts |
| Available spare parts | Gaskets, sealing bar, tube (estimate) |
| Dimensions (L x W x H) | Approximately 40 x 20 x 10 cm (estimate) |
| Weight | Approximately 2.5 kg (estimate) |
Frequently Asked Questions - EV105 JATA
User questions about EV105 JATA
0 question about this device. Answer the ones you know or ask your own.
Ask a new question about this device
Download the instructions for your Vacuum packaging machines in PDF format for free! Find your manual EV105 - JATA and take your electronic device back in hand. On this page are published all the documents necessary for the use of your device. EV105 by JATA.
USER MANUAL EV105 JATA
MAIN COMPONENTS AND FUNCTIONS
1. Vacuum + sealing / Cancel:
This pusher button has 2 options depending on the condition of the appliance:
- Pushing it begins the vacuum operation and it seals automatically when this is completed.
- When running (vacuum operation or sealing), it stops the machine running.
2.Food: It is used to select the suitable time for the sealing the bag
- Dry: for liquid free bags and products, for shorting sealing time.
- Sauces: for bags, wet products or foods in sauce. Extends sealing time.
- By default, the sealing time is for "dry" foods.
3. Suction: Pressure selection for vacuum:
- Normal: for stored regular products with normal sealing pressure.
- Gentle (suave): for fragile or breakable products where lesser sealing pressure is desired.
The default vacuum time is in "normal".
4. Sealing: This button offers 2 functions:
- Manual sealing of the bag with no suction or vacuum. This is used to make a bag with the plastic roll.
- When sealing and vacuuming is carried out automatically this button stops the pump and immediately starts to seal, allowing the pressure to be controlled manually to avoid breaking delicate products
- Bowl switch: For sealing bowls, containers, wine stoppers or other accessories, by means of the plastic tube.
- Opening button: Press the 2 buttons placed on both sides of the appliance, eliminating the vacuum pressure within the machine.
- Air inlet: This connects the vacuum chamber with the pump. Place the plastic tube in this outlet for vacuuming bowl, containers, wine stoppers, etc.
- Sealing strip: Places the bag to be sealed on this strip.
- Sealing chamber: Positions the bag opening inside the chamber. It attracts the air and collects any liquid that could leak from the bag.
- Lower gasket: It maintains the air outside forming an air chamber with the top seal. Keep it clean and dry and replace it if any damages or distortions appear.
- Upper gasket: Keeps the air out forming an air chamber with the lower seal. Keep it clean and dry and replace it if it presents any damages or distortions.
- Sealing element: Hot resistance with Teflon covering for sealing the bag.
- Hook: To close the cover with the base.
- Hose storage: The plastic tube provided can be kept here.
ATTENTION
- Carefully read these instructions before using your appliance for the first time and keep it for future enquires.
- This appliance is not intended for use by persons (including children) with reduced physical, sensory or mental capabilities, or lack of experience and knowledge, unless they have been given supervision or instruction concerning use of the appliances by a person responsible for their safety.
- Keep all plastic bags and packaging components out of the reach of children. They are potentially dangerous.
- Do not connect to the mains without checking that the voltage on the rating plate and that of your household are the same.
- Do not leave unattended while in use.
- Take care the cable does not touch any hot parts.
- Don't allow children play with the appliance. Keep the appliance out of the reach of children.
- Keep out of curtains or other flammable materials.
- Avoid any contact with the sealing strip. It is hot and can burn.
- Keep away from hot surfaces.
- This appliance has been designed for domestic use only.
- VERY IMPORTANT: Do not immerse the appliance in water or any other liquid.
- To unplug, pull from the plug, never from the cable.
It must not be used outdoors. - If the cable were to deteriorate it must be changed by an Authorised Service Centre.

INSTRUCTIONS OF USE
- Always use original spare parts.

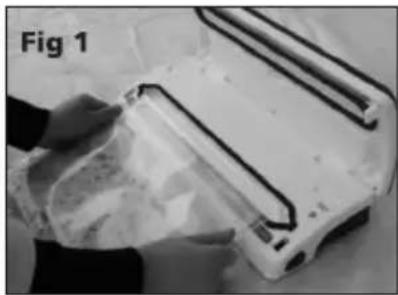
I. Making a bag with a plastic roll
- Connect the appliance to the mains.
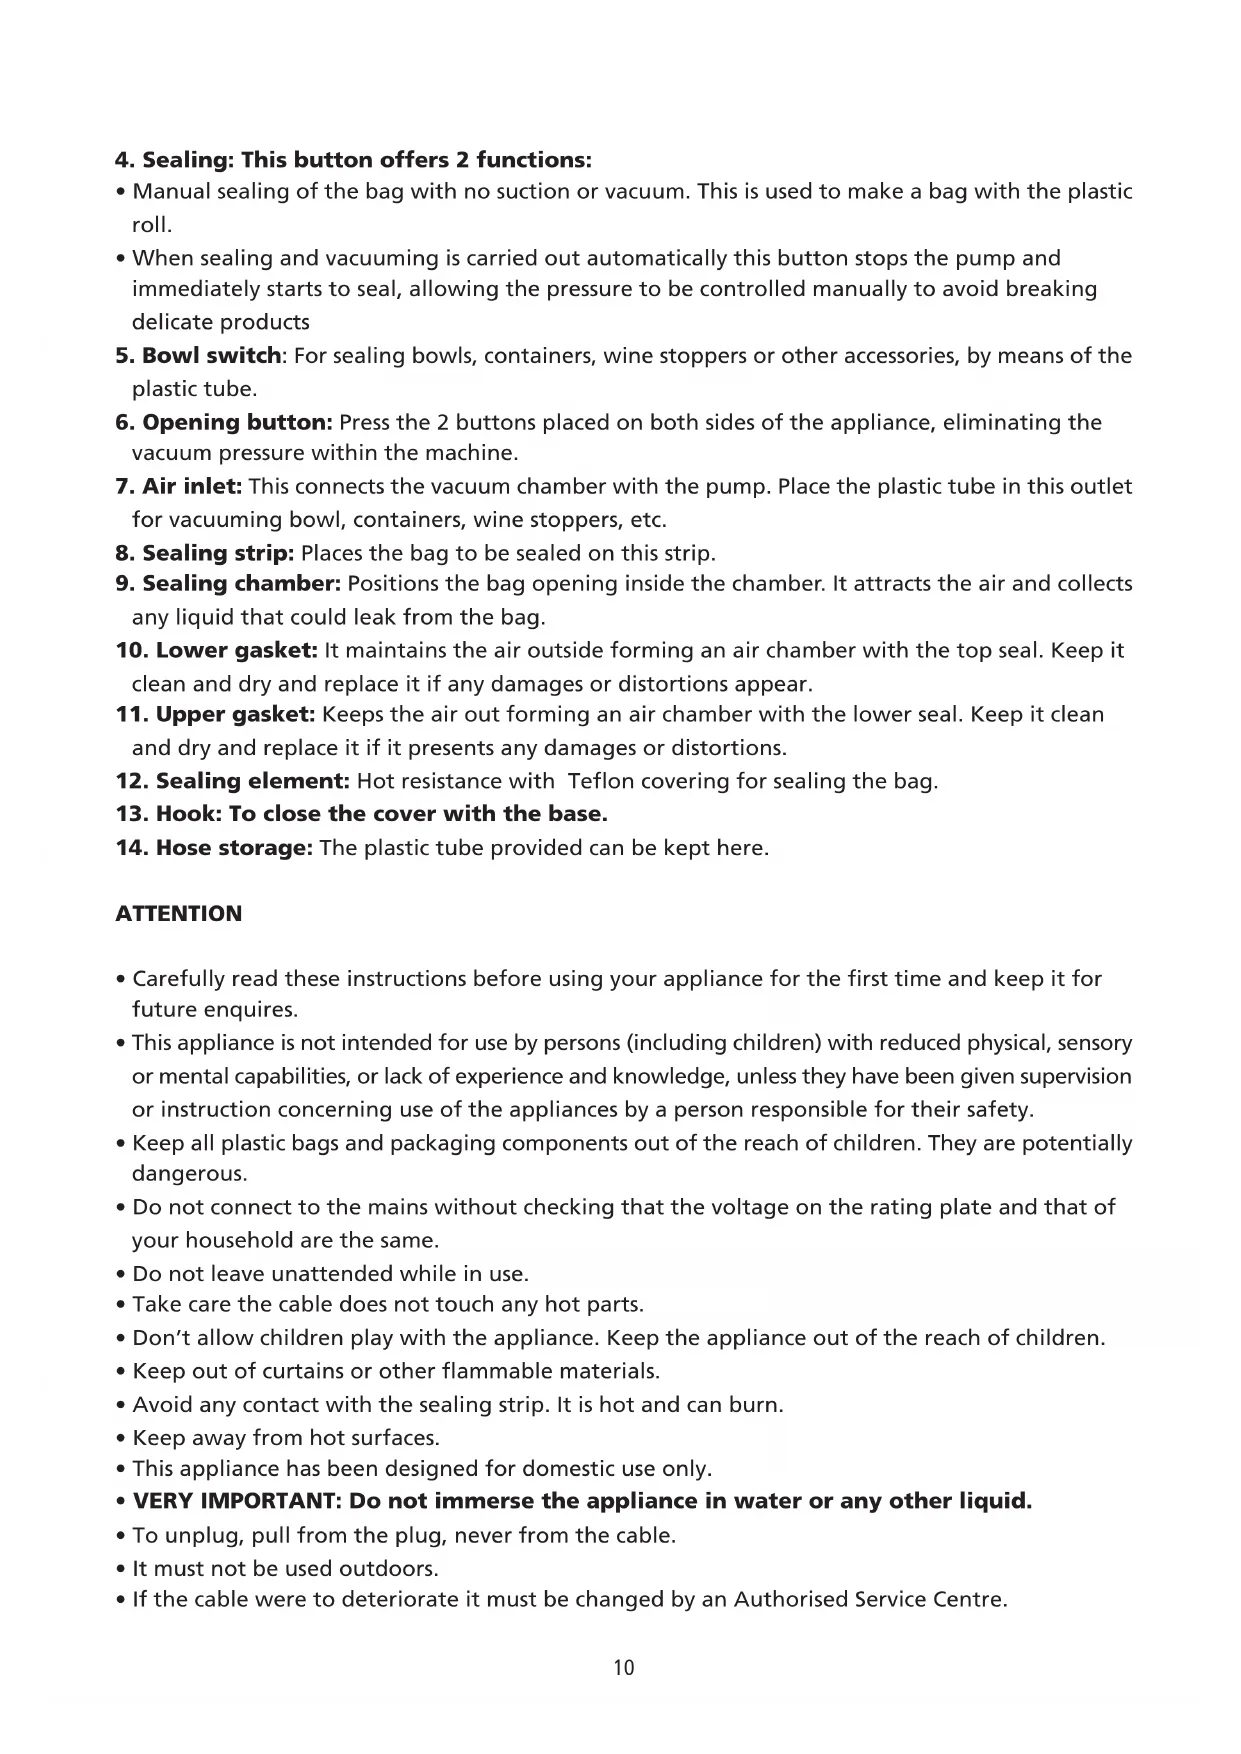
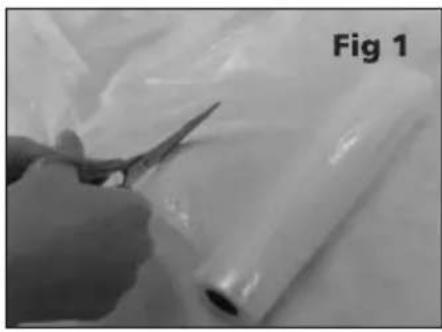
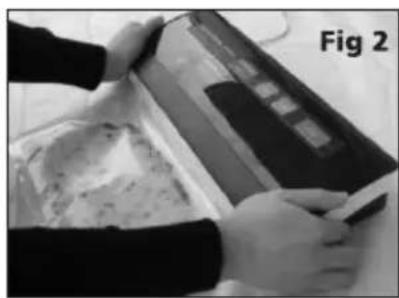
2.Use the scissors to cut a bag, to the desired length, from the plastic roll - Fig.1 - Place the end of the bag on the sealing strip, without going into the vacuum chamber. Fig.2
- Close the top cover and press tightly until you hear a click on both sides. Fig.3
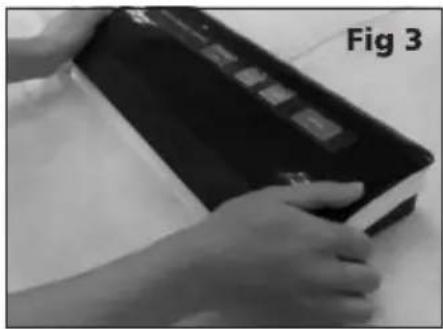
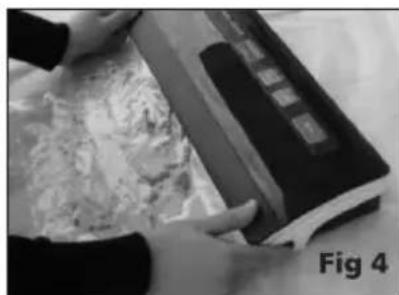
- Presses the "sealing" "sellado" button to start sealing the bag. Fig.4
- Press the open buttons to open the cover and remove the bag. The bag will then be ready for vacuuming and sealing. Fig.5
II. Vacuum packaging with bag
- Place the items inside the bag. Use only the special bags supplied with vacuum channels.
- Clean and stretch the opening of the bag, ensure that there is no dust, waves or wrinkles and have in mind that the sealing area is totally dry.
- Place the opening of the bag inside the vacuum chamber. Ensure that the air intake is not covered by the bag.
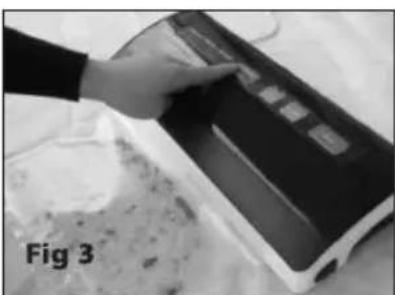
Fig 1
g a click on both sides of the appliance.
- Check the state of the indicator light of the "Food" and "Suction" button to confirm the sealing time depending on the product to be sealed (saues or dry food) and the desired sealing pressure (Normal/Smooth) according to the type of food.
- Press the Vacuum + Sealing button, the appliance will begin vacuuming and sealing the bag automatically. Fig 3
NOTE. This product provides very high vacuuming pressure, therefore to avoid breakages on very delicate foods check the product during the vacuum period and immediately press the "Sealing" button once the suitable pressure has been obtained. The machine will stop the pump and will seal the bag.
- Vacuum packing has finished. Press the side buttons simultaneously to open the cover and remove the bag. Fig 4
NOTE
- For an improved sealing effect, leave the machine to cool for a minute before using it again. Eliminate any remaining liquid or food from the vacuum chamber before further packing.
- Do not carry out the sealing function continuously to avoid overheating the heating element. The machine will reject the function if the "sealing" button is activated 15 seconds from the last time.
- The machine is designed to be used with suitable bags. Do not use another type of bag that is not suitable for vacuum packing.
Cut the bag with scissors to open the sealing area
III. Vacuuming the bowl
- Clean the cover, the base of the bowl and ensure that it is clean and dry.
- Place the foods in the bowl and leave at least 2 centimetres between the food and the edge of the cover.
- Open the cover of the appliance and enter the end of the tube into the air intake (7) inside the vacuuming chamber and the other end in the centre of the hole of the bowl cover.
- Press the bowl switch (5) (just above the air intake) to begin vacuuming. To assure that no air escapes between the cover and bowl, press down with your hand at the beginning of vacuuming. The machine will stop automatically when it has obtained sufficient vacuuming pressure with the red button remaining slighted inserted.
NOTE: First remove the end of the tube from the bowl. If you remove first the end of the tube from the air inlet, the vacuum will be lost because the air will go again into the bowl.
- In order to use the wine stopper, follow the same steps as indicated for the bowl. To remove it just pull it.
Opening the bowl after vacuuming
To open the bowl, the air needs to be released pushing the blue button.
MAINTENANCE AND CLEANING
- Before you proceed to cleaning, make sure the appliance is unplugged from the mains.
- Clean with a slightly dampened cloth.
- Do not use abrasive or chemical products, metallic scourers, and such may deteriorate the protection.
ENVIRONMENT PROTECTION
- Dispose the appliance according to the local garbage regulations.
- Never throw it away to the rubbish. So you will help to the improvement of the environment.
COMPOSANTS PRINCIPAUX ET FONCTIONS
1.Vide + soudure / Annuler:
GARANTIA GERAL (2 ANOS) - GARANTIA TOTAL
In the rest of countries, the holder of the guarantee will enjoy all the rights that his legislation in force concedes.
FRANÇAIS:
- MAIN COMPONENTS AND FUNCTIONS
- Vacuum + sealing / Cancel:
- Suction: Pressure selection for vacuum:
- Sealing: This button offers 2 functions:
- ATTENTION
- INSTRUCTIONS OF USE
- Making a bag with a plastic roll
- Vacuum packaging with bag
- NOTE
- Vacuuming the bowl
- Opening the bowl after vacuuming
- MAINTENANCE AND CLEANING
- ENVIRONMENT PROTECTION
- COMPOSANTS PRINCIPAUX ET FONCTIONS
- 1.Vide + soudure / Annuler:
- GARANTIA GERAL (2 ANOS) - GARANTIA TOTAL
- FRANÇAIS:
Brand : JATA
Model : EV105
Category : Vacuum packaging machines