MPC176SS - Saucepan MIDEA - Free user manual and instructions
Find the device manual for free MPC176SS MIDEA in PDF.

| Product Type | Electric Pressure Cooker |
| Brand | Midea |
| Model | MPC176SS |
| Power Supply | 120 V ~ 60 Hz |
| Power | 1000 W |
| Inner Pot Capacity | 6 liters |
| Inner Pot Diameter | 22 cm |
| Operating Pressure | 70 kPa |
| Heating Temperature | 60 °C to 80 °C |
| Included Accessories | Wooden spatula, tablespoon, measuring cup, user guide |
| Cooking Functions | Rice, Soup/Stew, Slow Cook, Browning/Sauté, Chicken, Meat, Fish, Pasta, Steam, Yogurt, Chili/Beans |
| Additional Programs | Timer (preset up to 24h), Keep Warm, Cancel |
| Pot Material | Stainless steel (removable pot) |
| Cleaning | Inner pot, sealing ring, valve and anti-block shield are dishwasher safe. Body and lid should be hand washed with a damp cloth. Do not immerse the body. |
| Safety | Pressure indicator valve, pressure release valve, safety lock, overheat protection |
| Replacement Parts | Sealing ring, anti-block shield, inner pot (sold separately) |
| Dimensions (approx.) | Height ~30 cm, diameter ~25 cm (without handles) |
| Weight (approx.) | Approximately 4.5 kg (with pot and lid) |
Frequently Asked Questions - MPC176SS MIDEA
User questions about MPC176SS MIDEA
0 question about this device. Answer the ones you know or ask your own.
Ask a new question about this device
Download the instructions for your Saucepan in PDF format for free! Find your manual MPC176SS - MIDEA and take your electronic device back in hand. On this page are published all the documents necessary for the use of your device. MPC176SS by MIDEA.
USER MANUAL MPC176SS MIDEA
natural_image
Line drawing of a rice cooker with digital display and control panel (no text or symbols)(Pictures in the text are for reference only, please refer to the actual product)
Thank you for purchasing Midea electric pressure cooker. Please read the User Manual carefully before use and keep it in a convenient place for future reference.
TABLE OF CONTENTS
Important Safeguards....2
Specifications ....4
Product Structure ....4
Controls and State of the Cooker....5
Control Panel....5
State of the Cooker....5
Operation Keys....5
Function Keys....6
Before the First Use ....6
Remove and Install the Anti-Block Shield....6
Remove and Install the Sealing Ring 6
Safe Lid Opening....7
Cooking Preparation....7
Cooking with Your Cooker....8
Pressure Cooking....8
Preset Cooking....10
Browning/Sauté 11
Care and Maintenance ....12
Cleaning 13
Electrical Circuit Diagram 13
Troubleshooting....14
When using electrical appliances, basic safety precautions should always be followed including the following, please read all instructions.
- This product is for household use only. Do not use outdoors.
- Do not use pressure cooker for other than intended use.
- Do not place the unit on or near a hot gas or electric burner, or in a heated oven.
- Do not use it in a place which is near splash water or fire. Do not use it in a place exposed to directly to sunshine or oil splash. Put it in a place out of the reach of children.
- Do not place the unit on an unstable location. It is strictly prohibited to use it on a newspaper, foam or other object that may easily block the vent hole at the bottom.
- Close supervision is necessary when the pressure cooker is used by or near children. The adult should supervise the children in order to make sure the children cannot play with the appliance.
- This appliance is not intended for use by persons (including children) with reduced physical, sensory or mental capabilities, or lack of experience and knowledge, unless they are accompanied by a person responsible for their safety.
- To protect against electrical shock, do not immerse cord, plugs, or appliance in water or other liquid.
- Be sure that handles are assembled and fastened properly before each use. Cracked, broken or charred handles should be replaced.
- Do not operate any appliance with a damaged cord or plug or after the appliance malfunctions or has been damaged in any manner. Return appliance to the Service Center for examination, repair, or adjustment.
- Do not make unauthorized replacement of any spare part inside the pressure cooker, as this may cause electric shock, fire or injury.
- The use of accessory attachment not recommended by the appliance manufacturer may cause injuries.
- Do not let cord hang over edge of table or counter, or touch hot surfaces.
- Caution: to reduce the risk of electric shock, cook only in the provided removable container (cooking pot).
- Before use each time, be sure to check the anti-block shield, float valve and exhaust valve for obstruction, wipe the surface of the inner pot and the heating plate to confirm they are free of any foreign object, make sure the exhaust valve
is in sealing location.
-
Always check the pressure release devices for clogging before use. Do not cover the pressure valves.
-
Please soak the dry foods before cooking them in the product.
-
Be aware that certain food, such as applesauce, cranberries, pearl barley, oatmeal or other cereals, split peas, noodles, macaroni, rhubarb, or spaghetti can foam, froth, and sputter, and clog the pressure release device. These foods should only be cooked in a pressure cooker with caution with the inner pot never more than 1/2 full and using natural release.
-
Do not fill the unit over MAX level (2/3 full). When cooking foods that expand during cooking such as rice or dried vegetables, do not fill the unit over 1/2 full. Over filling may cause a risk of clogging the vent pipe and developing excess pressure. Please see "Cooking Preparation".
-
This appliance cooks under pressure. Improper use may result in scalding injury. Make certain unit is properly closed before operating. Please see "Cooking Preparation".
-
Never deep fry or pressure fry in the unit with oil. It is dangerous and may cause a fire or serious damage.
-
Do not move this product or force to remove the lid when the unit is in operation.
-
Extreme caution must be used when moving the unit containing hot oil or other hot liquids.
-
Do not touch hot surfaces. Use handles or knobs. Do not place your hands or face over the exhaust valve or float valve to avoid scald when the unit is in operation.
-
After cooking, use extreme caution when removing the lid. Serious burns can result from stream inside the unit.
-
When opening the lid after cooking, do not touch the inner pot and cover inside with hands directly to avoid scald.
-
Do not open the pressure cooker until the unit has cooled and all internal pressure has been released. If the handles are difficult to push apart, this indicates that the cooker is still pressurized-do not force it open. Any pressure in the cooker can be hazardous. Please see “Cooking Preparation”.
-
To disconnect, turn any control to "off" then remove plug from wall outlet.
-
Always unplug from outlet when not in use, before removing parts and cleaning. Allow to cool before putting on or taking off parts, and before cleaning.
1) Intended for countertop use only.
2) WARNING: Spilled food can cause serious burns. Keep appliance and cord away from children. Never drape cord over edge of counter, never use outlet below counter, and never use with an extension cord.
A short power-supply cord is used to reduce the risk resulting from it being grab bed by children, becoming entangled in, or tripping over a longer cord
- This appliance has a polarized plug (one blade is wider than the other). To reduce the risk of electric shock, this plug is intended to fit into a polarized outlet only one way. If the plug does not fit fully into the outlet, reverse the plug. If it still does not fit, contact a qualified electrician. Do not attempt to modify the plug in any way.
PLEASE SAVE THESE INSTRUCTIONS
SPECIFICATIONS
| Voltage/Frequency | 120V~60HZ | Power | 1000W |
| Inner Pot Caliber | 22cm | Inner Pot Volume | 6L |
| Working Pressure | 70kPa | Warm Temperature | 60°C~80°C |
| Accessories | Rice paddle, soup spoon, measuring cup, user manual. | ||
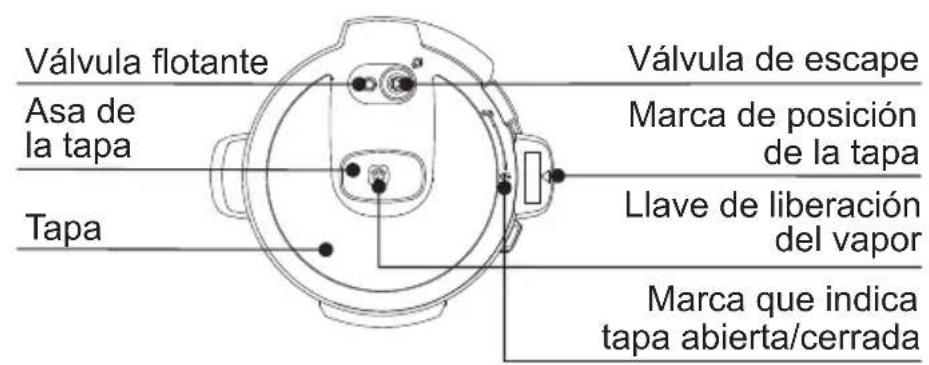
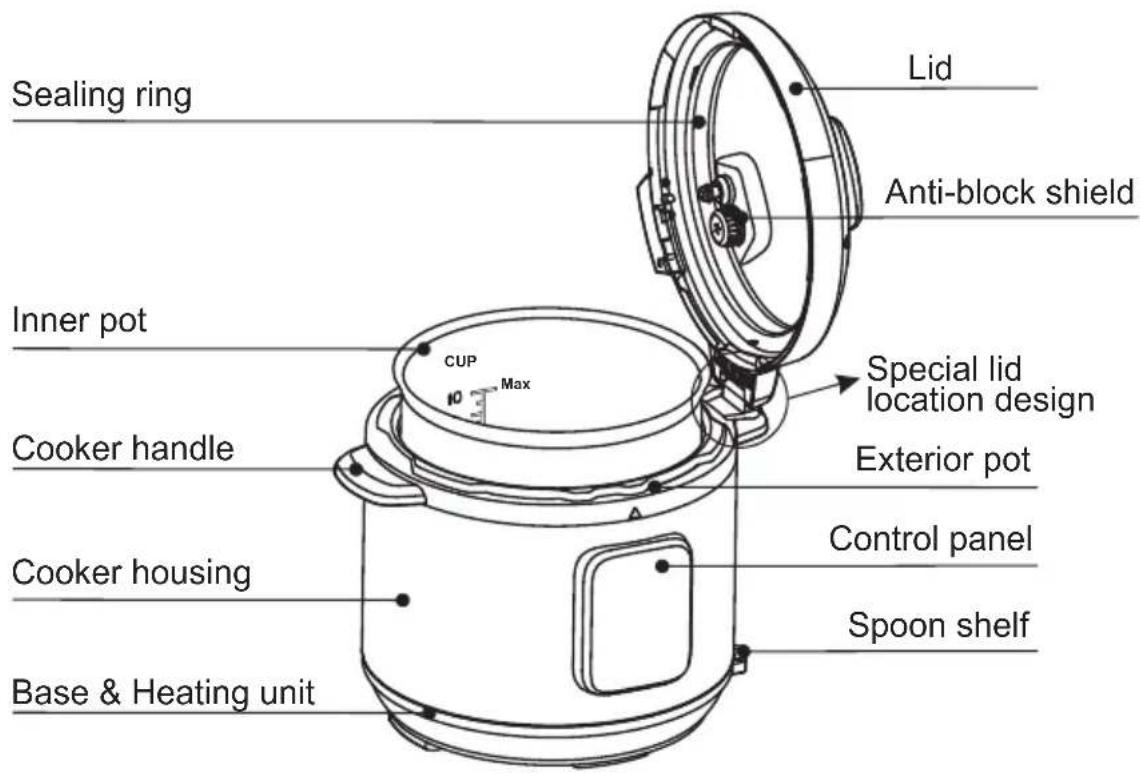
PRODUCT STRUCTURE
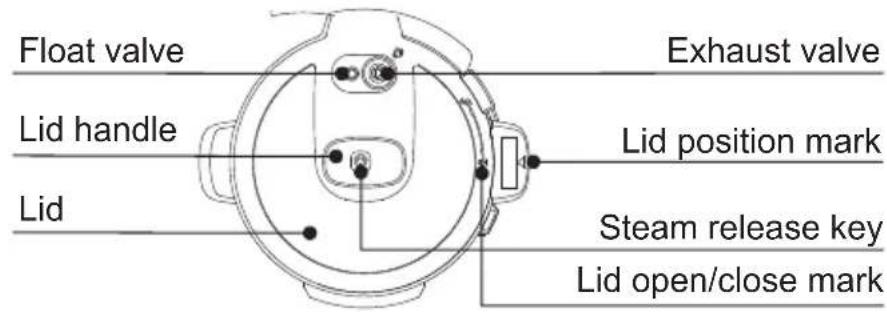
Control Panel
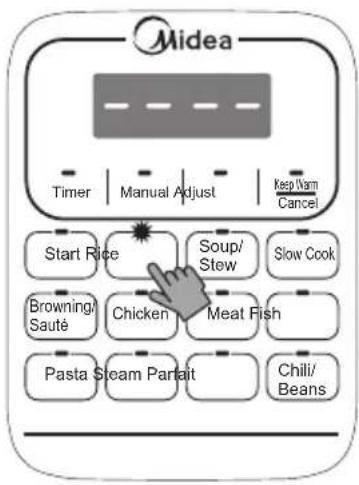
The control panel of your electric pressure cooker consists of an LED display, 3 operation keys and 11 function keys. Each function key has a function indicator light.
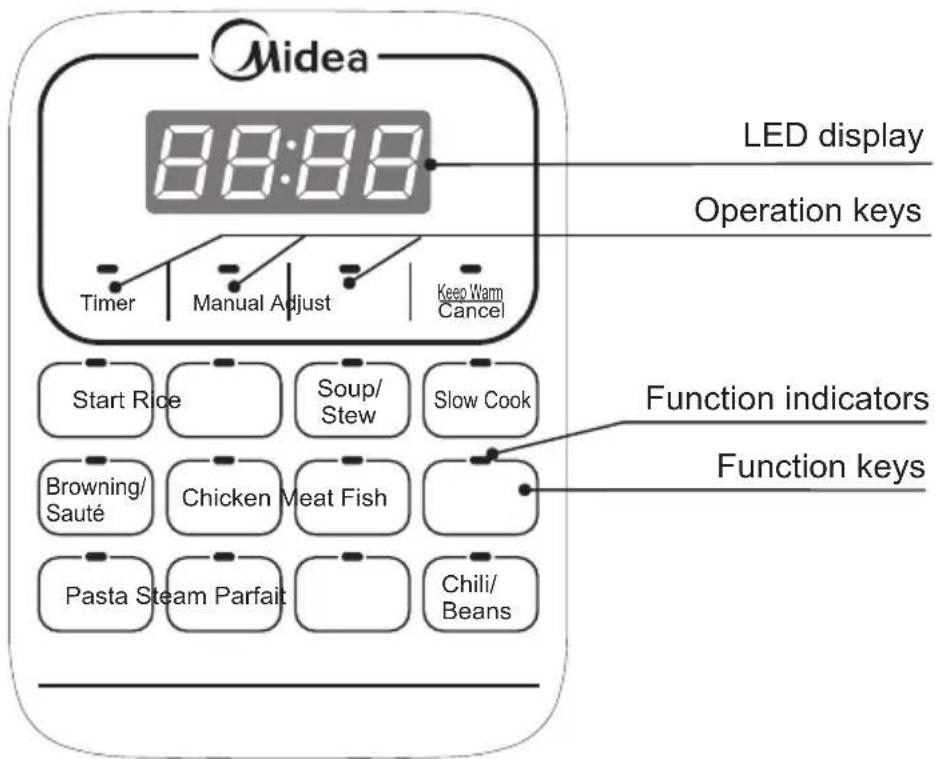
States of the Cooker
Your electric pressure cooker has 4 states which are shown on the LED display and function indicators.
- Standby state: the LED display shows “----”.
- Preset state: the LED display shows "preset" time and the time counts down, and the activated function indicator lights up.
- Program operating state: the LED display shows “[☐]” and the activated function indicator lights up.
- Keep-Warm state: the LED display shows “OH” and the time counts up, and the “Keep Warm” function indicator lights up.
Operation Keys
There are three function buttons including Timer, Manual and Adjust. Button Timer is for presetting, button Manual is for adjusting the pressure maintaining time, and button Adjust is for adjusting the time.
Function Keys
The most important key is “Keep Warm/Cancel”. When the cooker is being programmed or any program is in effect, press this key will cancel the program and take the cooker to standby state. When the cooker is in standby state, pressing this key activates the keep-warm program.
The other function keys include “Rice”, “Soup/Stew”, “Slow Cook”, “Browning/Sauté”, “Chicken”, “Meat”, “Fish”, “Pasta”, “Steam”, “Parfait”, “Chili/Beans”, “Start” keys.
BEFORE THE FIRST USE
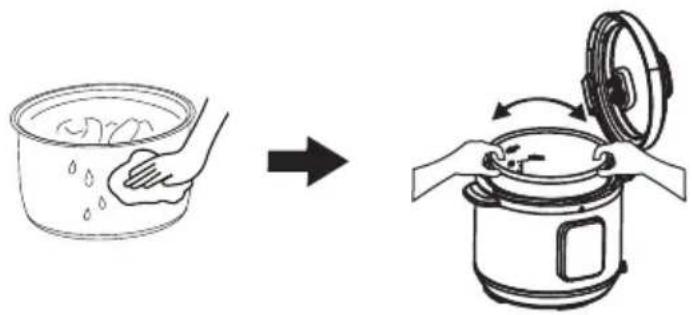
Before the first use, please take out all accessories from the package and read this manual carefully. Please pay particular attention to operational instructions and cautions to avoid any injury or property damage. Please wash the inside of the lid and the inner pot with warm soapy water, rinse and dry thoroughly. Wipe the outer housing with a clean damp cloth. Never immerse the cooker housing in water or any other liquid. The inner pot, sealing ring and exhaust valve and all accessories are dishwasher safe. But never clean the lid and housing in a dishwasher.
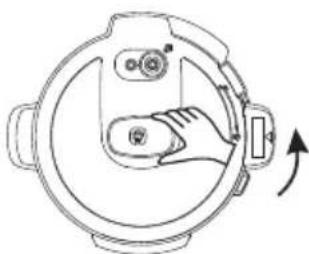
Remove and Install the Anti-Block Shield
The anti-block shield can be removed by pushing it on the side to lift it up. To install the anti-block shield, position it in place and press it down.
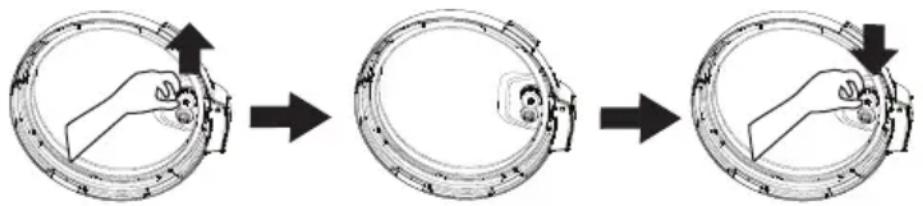
flowchart
graph TD
    A["Hand pressing part"] --> B["Outer ring with handle"]
    B --> C["Arrow pointing to the inner ring"]
Remove and Install the Sealing Ring
The sealing ring can be removed by pulling upwards from the sealing ring rack in sections. To install the sealing ring, pressing it down into the rack section by section. The sealing ring can be installed on either side facing up.
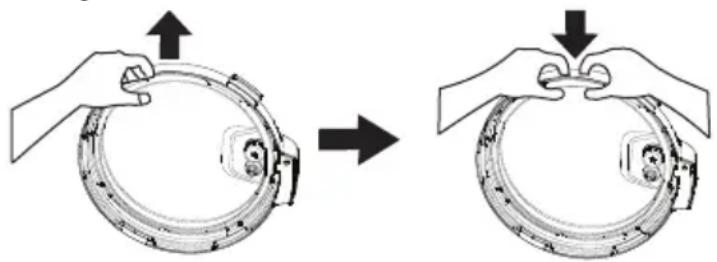
natural_image
Illustration of hands performing a circular mechanical device before and after press, showing motion changes (no text or symbols)Please note the following:
- Prior to each use, inspect to make sure the sealing ring is well seated in the sealing ring rack and the anti-block shield is mounted properly on the steam release pipe.
-
After use, remove any foreign objects from the sealing ring and anti-block shield.
-
Keep the sealing ring clean to avoid odor. Washing the sealing ring in warm soapy water or dishwater can remove odor. However, it is normal for the sealing ring to absorb the smell of certain acidic foods. That is why it is always a good idea to have more than one sealing ring on hand.
- Never pull the sealing ring by force, as the pulling may cause deformation and affect its function in sealing the pressure.
- A sealing ring with cracks, cuts or other damages should not be used. A new sealing ring replacement should be used.
Safe Lid Opening
- Make sure the pressure cooking program has completed or press "Keep Warm/Cancel" key to terminate the program.
- Releasing pressure in one of the following approaches.
Quick Release:
- Press the “Steam Release 🎨” key on the lid handle to let out steam until the float valve drops down.
Caution:
- Please keep hands and face away from the hole on the top of the exhaust valve when using Quick Release. The escaping steam is very hot and can cause scalding.
- Never pull out the exhaust valve when it is letting out steam.
- Please be aware that Quick Release is not suitable for food in large liquid volume or with high starch content (e.g. porridge, congee, sticky liquids, soup, etc.). Food content may splatter out with steam. Use Nature Release instead.
Nature Release:
- Allow the cooker to cool down naturally until the float valve drops down. This may take 10 to 15 minutes after cooking is finished and the cooker is in Keep-Warm mode.
- Putting a wet towel on the lid can speed up cooling.
- Open the lid: Hold the lid handle, turn the lid counterclockwise to the open position, and lift the lid up to open.
- Caution: Do not open the lid until pressure inside the pot is completely released. As a safety feature, until the float valve drops down, the lid is locked and cannot be opened.
- If the float valve is stuck due to food debris or stickiness, you can push it down with a pen or chopsticks when you are certain the pressure has been released by pressing the "Steam Release 🔍" key on the lid handle.
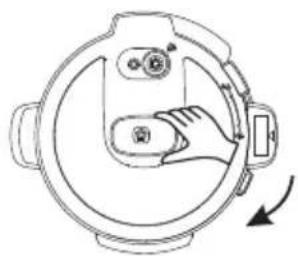
1. Open the lid
Holding the lid handle with your hand, rotate approximately 30 degrees clockwise until the “💡” mark on the lid is aligned with the “▲” mark on the cooker housing rim.
2. Check whether all parts on the lid are assembled properly
Check the float valve and exhaust valve for obstructions. Make sure that the sealing ring is well seated inside its holding rack, the anti-block shield is installed properly and the float valve can move up and down easily.
3. Take out inner pot, and put in food and liquid
The total amount of food and water should NEVER exceed the maximum level marking of the inner pot. It is recommended that you do not fill the unit over 2/3 full. When cooking foods that expand during cooking such as rice, beans or dried vegetables, do not fill the unit over 1/2 full. Over filling may risk clogging the vent pipes and developing excess pressure. This could also cause spillage and may damage to the unit.
natural_image
Diagram of a mechanical device with a hand interacting with a circular component, showing no text or symbols.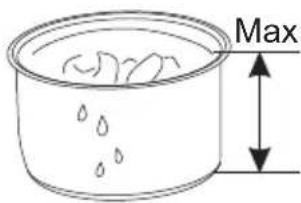
4. Place the inner pot inside the cooker housing
Before that, be sure to remove foreign objects and wipe dry the outside of the inner pot and the heating element inside of the cooker.
After putting the inner pot inside the housing, rotate the inner pot slightly to ensure good contact between the inner pot and the heating element.
natural_image
Illustration showing a hand washing a bowl and then boiling into a rice cooker (no text or symbols)5. Close the lid completely
Hold the lid handle and put the lid on the cooker, with the “☐” mark on the lid and “▲” mark on the housing rim are aligned. Rotate the lid counterclockwise approximately 30 degrees until the “☐” mark on the lid is aligned with the “▲” mark on the housing rim.
natural_image
Technical line drawing of a mechanical component with a hand operating a lever (no text or symbols)Pressure Cooking
This following procedure is "Rice", "Soup/Stew", "Chicken", "Meat", "Fish", "Pasta", "Steam", "Chili/Beans" functions.
- Follow steps in the "Cooking Preparation" section of this manual.
- Contact power cord. The LED display shows “----” indicating that it is in standby state.
-
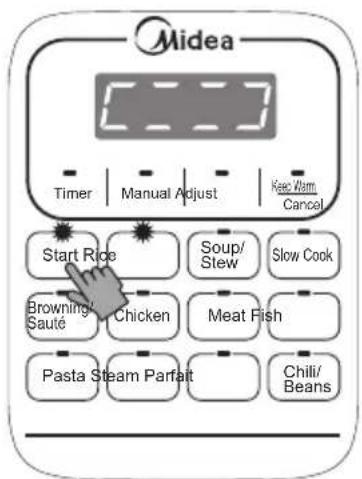
Select a cooking function button, e. g. Rice. Once a function button is pressed, its indicator light will flash, as well as the light of button Start.
-
Press Start to turn on the cooking mode Rice. Button Rice and Start stays lighted.
-
The LED display shows "☐☐☐" indicating that the pre-heating state is in progress.
-
As the pressure increase inside the cooker, it is perfectly normal for traces of steam to escape from the float valve until the float valve pops up.
-
At any time, you can cancel the cooking program in progress and return to standby mode by pressing the "Keep Warm/Cancel" key.
-
When the cooking program finishes, the cooker beeps and automatically goes into the "Keep Warm" cycle, The LED display shows "OH".
- It is not recommended to leave cooked rice in "Keep Warm" state for too long as it may affect the texture or the taste of the food.
- To serve the food, press "Keep Warm/Cancel" key to stop the keep-warm cycle and open the lid according to the "Safe Lid Opening" section of this manual.
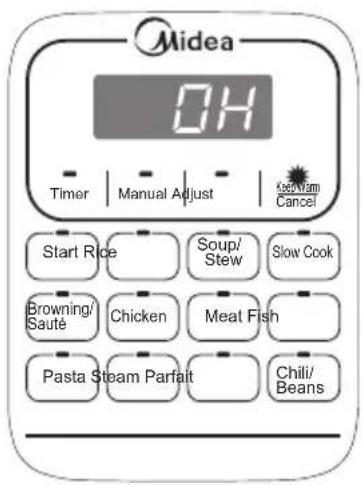
- When opening the lid, the inner pot may appear to be stuck on the lid by vacuum. This is caused by contraction of air due to cooling. Please press the "Steam Release 🔊" key on the lid handle to let in air to release the vacuum.
Preset Cooking
Your pressure cooker has the preset function, can be the end of the cooking time setting with 24 hours to 2 hours clock between. The preset function does not apply to the “Keep Warm/Cancel”, “Slow Cook”, “Browning/Sauté” and “Parfait” functions. The following shows how to program for preset cooking.
- Follow steps in the previous "Pressure Cooking" section to set a cooking program.
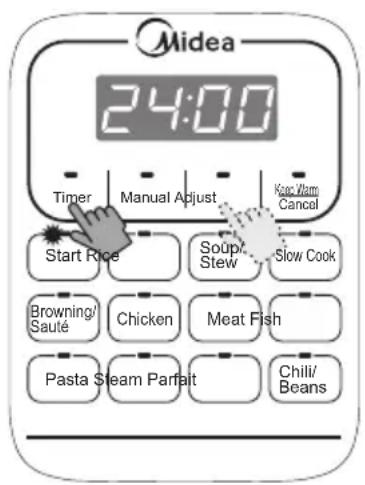
- Press button Timer to enter the presetting mode. At this time, the button Timer blinks, then press Adjust to adjust the presetting time.
- Finally press button Start to conduct Timer function. Then the time which is shown on the LED screen will be counted down and the button Timer lights on.
- To cancel the Timer operation, press the "Keep Warm/Cancel" key at any time.
- Your cooker finishes cooking when the preset time counts down to 0, then the cooker beeps and automatically goes into the Auto "Keep Warm" cycle for hours. Please Note:
- We highly discourage using the preset function for perishable foods, such as meat and fish, which may go bad when left at room temperature for hours. Cooked rice may yield overly soft texture due to long soaking time. It may also cause a layer of burned rice at the bottom of the cooker if it is left in Keep-Warm mode for too long.
- Care should be taken when using Preset function for porridge, oatmeal or other foamy and sticky foods. Because of the possibility of these foods gumming up the float valve, if your cooker is overfilled, causing it to never seal and leading to overflowing food content, it is highly recommended that your cooker not be filled more than 1/2 full and ideally not be left unattended during the preheat cycle.
Browning/Sauté
- Follow steps in the "Cooking Preparation" section of this manual. Keep the lid open to avoid pressure from building up inside the cooker.
- Contact power cord. The LED display shows “----” indicating that it is in standby state.
- Press button Browning/Sauté. For safety reason, the maximum cooking time for a Browning/Sauté process is 30 minutes.
- It will heat up automatically after pressing button Start. It is heating up as the LED screen shows 0:30.
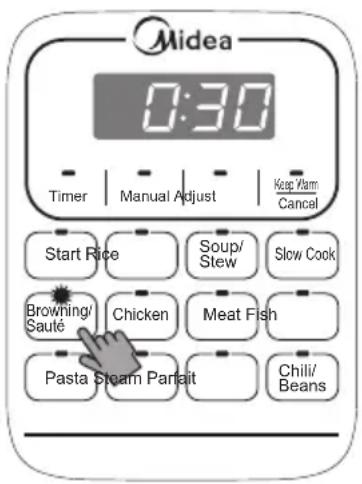
- To avoid pressure building up, the lid cannot be closed. Or else this can be hazardous.
-
The “Browning/Sauté” program can be cancelled by pressing the “Keep Warm/Cancel” key at any time.
-
When cooking finishes, the cooker beeps and automatically goes into standby state.
Parfait
- Follow steps in the "Cooking Preparation" section of this manual.
- The temperature of cooled fresh milk and yogurt are about 20°C. Stir them in proportion of 10:1, then put the mixture in the inner pot.
- Contact power cord. The LED display shows “----” indicating that it is in standby state.
- After pressing button Parfait, the LED screen will show 4:00, then press Start, it will heat up automatically. Once the time shown on LED screen starts countdown, the key Parfait and Start lights.
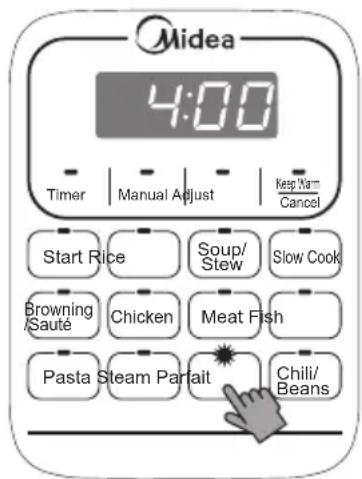
- The “Parfait” program can be cancelled by pressing the “Keep Warm/Cancel” key at any time.
- When cooking finishes, the cooker beeps and automatically goes into standby state.
Slow Cook
- Follow steps in the "Cooking Preparation" section of this manual.
- Contact power cord. The LED display shows “----” indicating that it is in standby state.
- Press key Slow Cook. The maximum cooking time for a Slow Cook process is 6 hours.
- It will heat up automatically after pressing button Start. It is preheating as the LED screen shows 6:00.
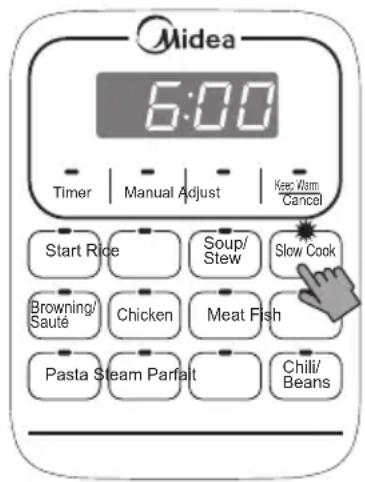
- The “Slow Cook” program can be cancelled by pressing the “Keep Warm/Cancel” key at any time.
- After cooking is over, the Slow Cook mode will be ended and it will turn into warm-keeping mode.
Warming
Pressing the “Keep Warm/Cancel” key in standby state activates the “Keep Warm” function. When “Keep Warm” function starts, the keep warm indicator is bright, and “OH” is shown on the screen, counting time in hours, does not display the holding time after time more than 24 hours, display “----”. The “Keep Warm” function can be used with or without the lid closed.
Regular care or maintenance is essential in ensuring that this product is safe for use. If any of the following circumstances take place, please stop using the appliance immediately and contact authorized service representative.
● Power cord and plug suffer from expansion, deformation, discoloration, damages, etc.
- A portion of the power cord or the plug gets hotter than usual.
- Electric pressure cooker heats abnormally, emitting a burnt smell.
- When power on, there are unusual sounds or vibrations.
If there is dust or dirt on the plug or socket, please remove dust or dirt with a dry brush.
Cleaning
Caution: please make sure the appliance has cooled down and is unplugged before cleaning.
- Clean the product after each use. Wipe the black inner housing rim and slot dry with cloth to prevent rusting on the exterior pot rim.
- Remove the lid and take out the inner pot, wash them with detergent, rinse with clear water and then wipe dry with a soft cloth.
- Use water to clean the lid, including the sealing ring (which can be removed), exhaust valve, anti-block shield, and wipe them clean with dry soft cloth. Do not take apart the steam release pipe assembly.
- Clean the cooker body with clean damp cloth. Do not immerse the cooker into water. Do not use a wet cloth to clean the pot while the power cord is plugged into the power outlet.
Electrical Circuit Diagram
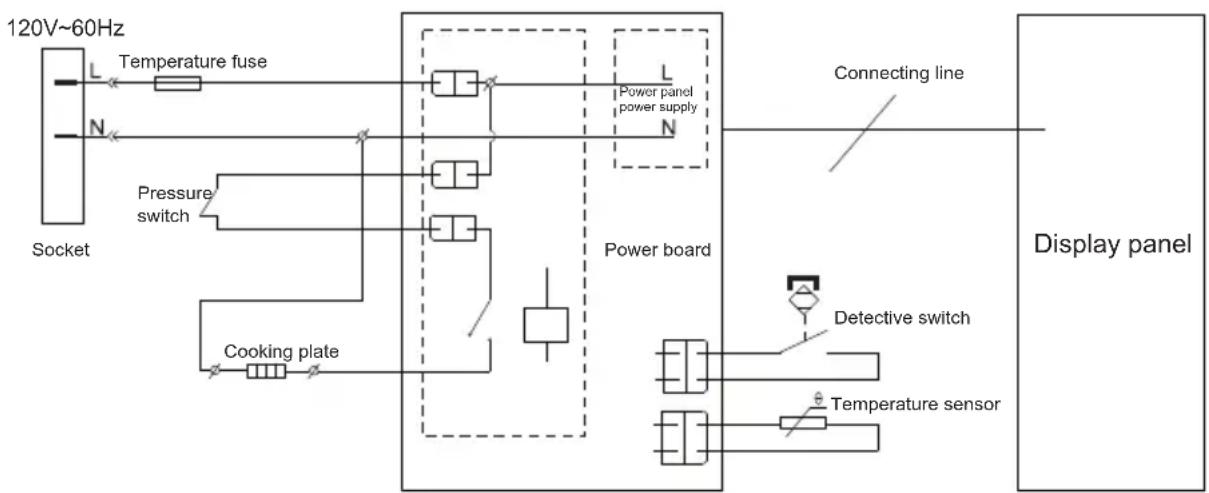
flowchart
graph TD
    A["120V~60Hz Socket"] --> B["Temperature fuse"]
    A --> C["Pressure switch"]
    A --> D["Cooking plate"]
    B --> E["Power board"]
    C --> E
    D --> E
    E --> F["Display panel"]
    G["Power panel power supply"] --> H["Connecting line"]
    I["Detective switch"] --> J["Temperature sensor"]
    K["Power board"] --> L["Power board"]
The cases in the following tables do not always indicate a faulty cooker. Please examine the cooker carefully before contacting the support for repair.
| Problem | Possible Reason Solution | |||
| 1 | Difficult to close the lid | Sealing ring not installed properly | Position the sealing ring well | |
| Float valve in the popped-up position | Press the float valve lightly downwards | |||
| 2 | Difficult to open the lid | Pressure exists inside the cooker | Use the steam release handle to reduce the internal pressure. Open the lid after the pressure is completely released. | |
| Float valve stuck at the popped-up position | Press the float valve lightly with a pen or chopstick. | |||
| 3 | Steam leaks from the side of the lid | No sealing ring | Install the sealing ring | |
| Sealing ring damaged | Replace the sealing ring | |||
| Food debris attached to the sealing ring | Clean the sealing ring | |||
| Lid not closed properly | Open then close the lid again | |||
| 4 | Steam leaks from float valve for over 2 minutes | Food debris on the float valve silicone seal | Clean the float valve silicone seal | |
| Float valve silicone ring worn-out | Replace the float valve silicone seal | |||
| 5 | Float valve unable to rise | Too little food or water in inner pot | Add water according to the recipe | |
| Float valve obstructed by the lid locking pin | Close the lid completely | |||
| 6 | Steam comes out from exhaust valve non-stop | Steam release handle not in sealing position | Turn the release handle to the sealing position | |
| Pressure control fails | Contact support online | |||
| 7 | Display remains blank after connecting the power cord | Bad power connection or no power | Inspect the power cord to ensure a good connection, check the power outlet is active. | |
| Cooker's electrical fuse was blown | Contact support online | |||
| 8 | Display | E1 code | Open circuit of bottom sensor | Please return the appliance to service center for repairing |
| E2 code | Short circuit of bottom sensor | |||
| E8 code | Pressure switches break down | |||
| C1 code | Over temperature protection | Please check whether there is water or food in the pot; after adjustment, the appliance can be normally used after beep stops; otherwise, send it to service center. | ||
| 9 | Rice half cooked or too hard | Too litter water | Adjust dry-rice and water ratio according to recipe | |
| Cover opened prematurely | After cooking cycle completes, leave the cover on for 5 more minutes. | |||
| 10 | Rice too soft | Too much water | Adjust dry-rice and water ratio according to recipe | |
For any technical improvement or change in appearance or name plate, changes shall be placed in the revised manual without further notice. In case of changes in appearance and color, please refer to the actual product for detailed information.
Mode d'emploi
natural_image
Line drawing of a rice cooker with digital display and control panel (no text or symbols)STRUCTURE DU PRODUIT
natural_image
Three-step diagram showing a hand holding a circular device, moving from top-left to bottom-right (no text or symbols)natural_image
Diagram of a mechanical device with a hand interacting with a circular component, showing no text or symbols.natural_image
Technical line drawing of a mechanical component with a hand operating a lever (no text or symbols)natural_image
Line drawing of a rice cooker with digital display and control panel (no text or symbols)ESTRUCTURA DEL PRODUCTO