
Appleberry 10022726 - Food Dehydrator Klarstein - Free user manual and instructions
Find the device manual for free Appleberry 10022726 Klarstein in PDF.

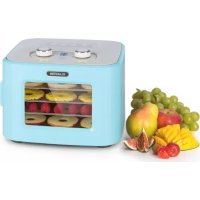
| Product type | Food dehydrator |
| Brand | Klarstein |
| Model | Appleberry 10022726 |
| Power supply | 220-240 V, 50/60 Hz |
| Adjustable temperatures | 48 °C and 68 °C (selection via High/Low button) |
| Timer | Up to 1 hour |
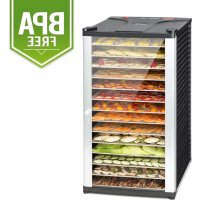
| Number of tiers | Multiple height-adjustable tiers (25.5 - 36 mm) |
| Capacity | Not specified |
| Materials | Plastic and metal |
| Cleaning | With a damp cloth and a little soap; do not immerse |
| Safety | Do not use in rain, do not repair yourself, keep out of reach of children |
| Weight | Not specified |
| Dimensions (approx.) | Not specified |
| Included accessories | Multiple tiers, lid, handle |
| Use | For fruits, vegetables, herbs, spices, meat |
| Warranty | Not specified |
| Certifications | CE (EMC 2014/30/EU, LVD 2014/35/EU, RoHS 2011/65/EU) |
| Manufacturer | Chal-Tec GmbH, Wallstraße 16, 10179 Berlin, Germany |
| Storage | In a clean place, away from light, between 5 and 20 °C |
| Noise level | Not specified |
Frequently Asked Questions - Appleberry 10022726 Klarstein
User questions about Appleberry 10022726 Klarstein
0 question about this device. Answer the ones you know or ask your own.
Ask a new question about this device
Download the instructions for your Food Dehydrator in PDF format for free! Find your manual Appleberry 10022726 - Klarstein and take your electronic device back in hand. On this page are published all the documents necessary for the use of your device. Appleberry 10022726 by Klarstein.
USER MANUAL Appleberry 10022726 Klarstein
natural_image
Row of white icons representing kitchen appliances including blender, kettle, refrigerator, air conditioner, fan, washing machine, and microwave (no text or symbols)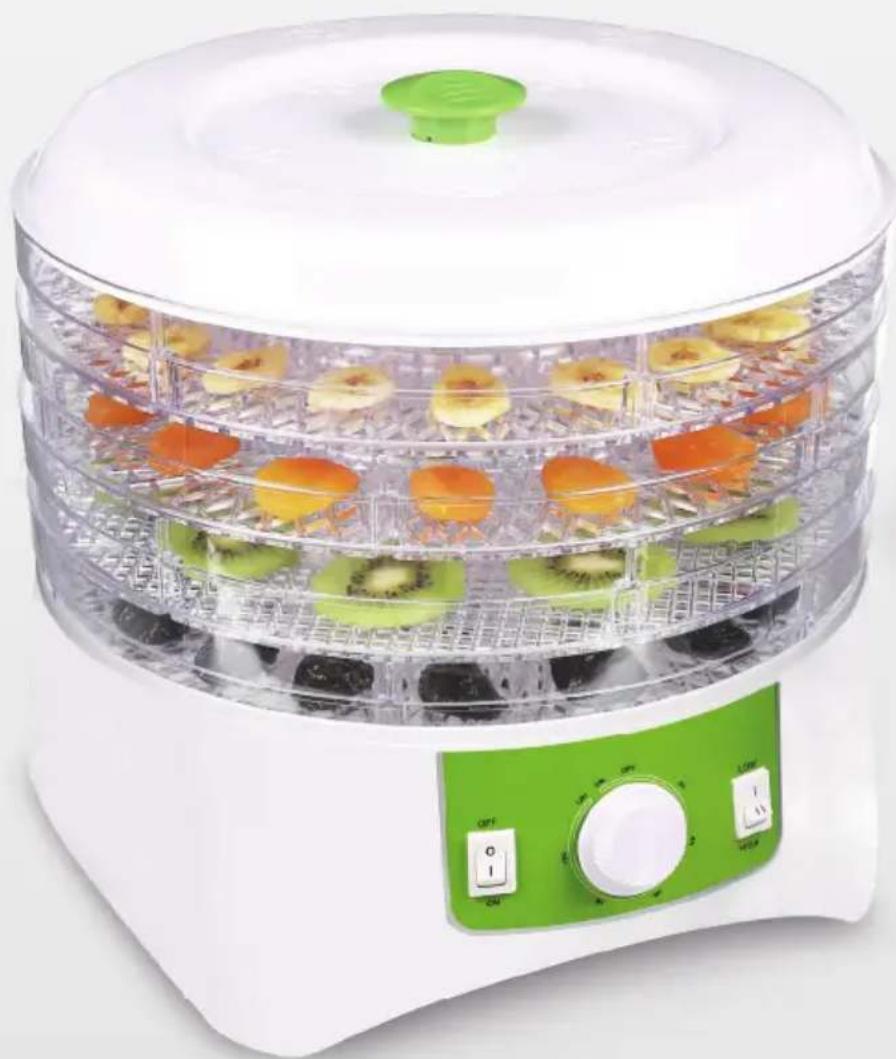
natural_image
White digital kitchen appliance with multi-tiered drying rack filled with kiwifruits and dried fruits, featuring a green control panel (no text or symbols visible)natural_image
Symbol of a trash bin crossed with a diagonal line, no text or numbers presentCongratulations on purchasing this equipment. Please read this manual carefully and take care of the following hints to avoid damages. Any failure caused by ignoring the mentioned items and cautions mentioned in the instruction manual are not covered by our warranty and any liability.
Safety Instructions
To reduce the risk of fire, electric shock and damage:
- Do not expose this device to rain.
- Do not playe objects on the unit filled with liquids, such as vases.
- Use recommended accessories only.
- Do not repair this device yourself. Refer repairs to qualified service personnel.
- Do not drop any metal objects into this unit.
- Do not place heavy objects on top of this unit.
Power cord / power supply
- Make sure that the power supply voltage corresponds to the specifications on this unit.
- Plug the power cord into the outlet securely.
- Do not pull the cable, do not bend it and do not place heavy objects on it.
- Do not handle the plug with wet hands.
- Grasp the plug when pulling out of the electrical outlet.
- Do not use a damaged power plug or a damaged electrical outlet.
- Install this unit so that the power cord can be unplugged immediately when a problem occurs.
Small objects / Packaging Parts
Store small objects (eg screws and other mounting hardware, memory cards) and packaging parts out of the reach of children. Do not let you play with the film. Risk of suffocation!
Location
- Set the appliance on a dry, flat, waterproof and heat-resistant surface.
- The socket must be readily accessible to disconnect the unit quickly in an emergency from the electrical circuit.
- Do not install or position this unit in a bookcase, built-in wardrobe or any other confined space. Ensure good ventilation of the unit.
- Do not place near to an amplifier or other equipment that may be hot. The heat can damage the unit.
- Do not expose this unit to direct sunlight, high temperatures, excessive moisture and excessive vibration.
AC Adapter
- The power adapter can operate on AC 220-240 V only. Use a suitable plug adapter if the plug does not fit into the power outlet.
Intended Use
- This device is used for draing food. It is exclusively meant for this purpose and must only be used for this purpose. It may only be used in the manner as described in this manual.
- This product is not designed for use by persons (including children) who have reduced physical, sensory or mental capacities or persons with no experience or knowledge, unless they are instructed and supervised in the use of the appliance by a person responsible for their safety.
Transport
- Please keep the original packaging. To an adequate protection during transport of the device, pack the unit in its original packaging.
Cleaning
Do not use volatile liquids, such as insecticide spray. Dont clean the surface with strong pressure otherwise it could get damaged. Rubber or plastic should not be in contact with the devive over a longer period. Clean the appliance and the floor using a soft cloth and warm water, if necessary, a soap solution. Never submerge the base in water or any other liquid.
Repairs
- Repairs to the appliance should only be carried out by an authorized service center.
- A remodeling or modification of the affected product safety. Risk of injury!
- Open the product never arbitrarily and perform repairs never yourself!
- Incorrect reassembly may result in malfunction or total failure.
- Open in no case the unit. We assume no liability for consequential damages. The warranty expires at foreign interference with the device.
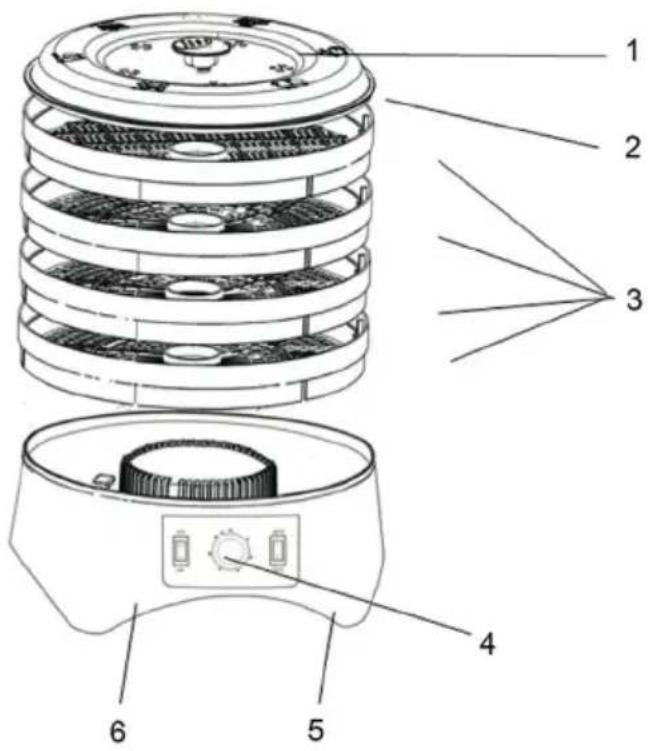
Product Description
1 Handle
2 Cover
3 Trays
4 Control Panel
5 Base
6 Wind outlet
Use and Operation
Caution: Clean the appliance before first use.
Operation
- Put food on trays with fittable gap, so that the cycling hot wind can flow freely between each tray. Therefore, we suggest not to pile food one on another one.
- Put the trays into food dehydrator. Tips: put the tray with food on food dehydrator. All the trays must be put onto food dehydrator when food dehydrator is working even some trays are empty. And please put the tray with food onto food dehydrator firstly and then put the empty trays in the next.
- Starting food dehydrator by turning on food dehydrator by press the "ON" button.
• After food is dry, press "OFF" to turn off machine. Put food into the sealed container after food cools. - Unplug it.
- All the trays must be put onto food dehydrator when food dehydrator is working even some trays are empty.
HIGH/LOW button
The „HIGH/LOW“ button on the control panel is for the two different temperature settings: 48 °C/68 °C. At 68 °C, the food is parched faster than at 48 °C.

Tray Adjustable
Trays are adjustable for different food. For drying thick food, you can adjust trays to 36 mm height of each tray. For drying thin food, you can adjust trays to 25.5 mm height of each tray. And you can save a lot space to storage after you adjust the tray to 25.5 mm of each tray. For the details refer to the following picture:
| When storage When using |
The Do's and Don'ts
- Please dry food in food dehydrator after cleaning and drying food. Please don't put the food with water into food dehydrator.
- Attention! Please don't dry food with flow of liquid.in food dehydrator!
- If the food is with soft and rotten part, please clean it out firstly. And put food with fittable size onto food dehydrator. The size of food will influence the time needed to dry food.
- During the process of drying, please adjust the trays position up and down if you found any food is dried uneven. You can move the top tray to the bottom and move the bottom one to the top position. Some food is with skin to prevent the loss of water, which is one of the reasons why it need more time to dry. The best way to solve the problem is to boil food for 1 to 2 minutes and then cool them into cool water. And then put them onto food dehydrator after draining water.
- Drying time is influenced by room temperature, air humidity, food type, food size and quantity etc.
- Drying note: time for drying in instruction manual is only for your information.
Operating Instructions
Dry Food
- Clean food
- Clean out the soft and rotten part of food, also clean out seed.
- Chop food to fittable size and put food onto trays.
- It's suggested to add lemon juice to keep the color of fruit.
Dry Vegetable
- Clean vegetable
- Clean out the soft and rotten part of food, also clean out seed.
- Chop food to fittable size and put food onto trays.
- It is best way to to boil vegetable for 1 to 2 minutes and then cool them into cool water. And then put them onto food dehydrator after draining water.
Dry Herb
- It's suggested to dry with the fresh leaves of herb.
• After drying herb, store them into paper bag or glass of bottle. And keep them out of sunlight.
Food Storage
- The storage container must be clean and dry.
- It's suggested to storage food with glass of bottle covered by metal lid. And keep them in the place with 5-20· temperature and avoid sunlight.
- Please check the dried food if they are 100% dried during the first week. If any undried food found, please put them into food dehydrator to dry again.
- Attention! The dried food must be 100% cooled down before you store them in sealed container.
Tips for drying Vegetables
It is recommended to boil vegetables briefly before drying, then cool before using for drying.
| Name Preparation | Effect Time (hours) | ||
| Artichoke Cut into | stripes für 3-4 mm, 3-4 cups of water mixed with one spoon of lemon juice, and then boil it for 5-8 minutes. | crisp 5-13 | |
| Eggplant Cut out the | stem, clean, slice 6-12 mm, put into trays and then boil them. | crisp 6-18 | |
| Broccoli Cut, clean and | boil for 3-5 minutes. crisp 6-20 | ||
| Mushroom To clean | the durst with the brush or wet clothing. Chop or cut into pieces. You can also dry the whole mushroom. | tough 6-14 | |
| Bean Cut and boil | them till it looks translucent, please turn over the bean during you dry the beans to have evenly. | crisp | 8-26 |
| Pumpkin Clean and | slice (6 mm). crisp 6-18 | ||
| Cabbage Cut the stem | cut into strip, cut the cabbage 4 parts, and then dry on trays. | tough 6-14 | |
| Brussel sprouts | Cut the whole sprout into 2 parts. | crisp | 8-30 |
| Cauliflower | Dip cauliflower into 1 liter of water mixed with 3 spoons of salt for 2 minutes. And then boil them. | tough 6-16 | |
| Potato | You can choose to cut peel, keep peel, slice, shred, cut into cubic, boil for 8-10 minutes. | crisp | 8-30 |
| Name Preparation Effect Time (hours) | |||
| Onion Slice, cut oder chop. Please turn over when drying. crisp 8-14 | |||
| Carrot Choose tender carrots. Slice or cut into strip oder cubic, chop or shred. And then boil them. | crisp 8-14 | ||
| Cucumber Slice (12 mm), cool and dry on trays. tough 6-18 | |||
| Green pepper | Cut into strips or around (6 mm), clean the seed out, clean and drain. | crisp 4-14 | |
| Hot pepper | Clean, drain, no need to cut. Please wear gloves to protect your hands. | tough 8-14 | |
| Parsley Tear, dry by air first, or to chop into smaller sizes. crisp 2-10 | |||
| Tomato | Clean out the base, boil to makethe skin soft, cut into 2 parts or chop. | tough 8-24 | |
| Rhubarb Choose tender stem, clean and slice (3 mm). moist 8-38 | |||
| Beet | Cut the leaves of stem, clean, boil, cool, cut the base, peel, cut or slice. | crisp | 8-26 |
| Celery | Seperate leaves and stems, clean, cut stem. You can take out leaves at first, as it will dry faster than the stem, cut leaves into small size which could be used to cook soup. | crisp 6-14 | |
| Green onion | Chop before drying. | crisp 6-10 | |
| Aspargus Slice (2.5 mm). crisp 6-14 | |||
| Garlic | Peel and cut before dry. | crisp 6-16 | |
| Spinach | Boil until the color changes. | crisp 6-16 | |
Meat drying
To avoid the fat meat, the best way is to cure meat first before drying, which can keep the natural taste of meat and make it looks softer after drying.
Tips for drying Fruits
| Name Preparation | Effect Time (hours) | ||
| Apricot | Cut and clean out the seeds. Cut into 2 or 4 pieces, face up on trays. | soft | 13-28 |
| Tangerine peel | Peel into strip. | crisp 8-16 | |
| Fresh pineapple | Peel and clean out the middle part, slice or cut into bulk. | tough | 6-36 |
| Canned pineapple | Drain canned pineapple, and then dry them on trays. | soft | 6-36 |
| Banana | Peel and cut into round with 3-4 cm thickness. | crisp 8-38 | |
| Grape | Clean and destem. It's better to boil it first before dry. | soft | 8-38 |
| Cherry | Destem befor dry, no need to take the seeds out, you can choose to take seeds out when it is half dried. | tough 8-26 | |
| Name Preparation Effect Time (hours) | |||
| Pear | Peel and cut out the middle part, cut into bulk, 2 pieces, 4 pieces or 8 pieces. | soft 8-30 | |
| Fig Cut before dry. tough 6-26 | |||
| Bilberry Clean and slice before dry. Or dry with whole bilberry. soft 6-26 | |||
| Peach | Peel first, clean out the seed when it is half dried. And then cut into 2 pieces or 4 pieces. | soft 10-34 | |
| Date Clean out seeds and slice. tough 6-26 | |||
| Apple | Peel and clean out seeds, slice or cut into round or bulk size. Dip for 2 minutes in water, and then put it on trays after draining | soft 5-7 | |
Time for drying and preparing food in above table is just for your reference.
Hints on Disposal
natural_image
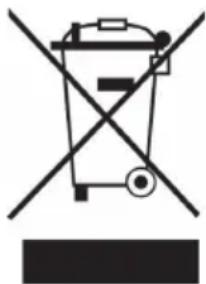
Symbol of a trash bin crossed with a diagonal line, no text or numbers presentAccording to the European waste regulation 2002/96/EC this symbol on the product or on its packaging indicates that this product may not be treated as household waste. Instead it should be taken to the appropriate collection point for the recycling of electrical and electronic equipment. By ensuring this product is disposed of correctly, you will help prevent potential negative consequences for the environment and human health, which could otherwise be caused by inappropriate waste handling of this product. For more detailed information about recycling of this product, please contact your local council or your household waste disposal service.
Declaration of Conformity
Producer: Chal-Tec GmbH, Wallstraße 16, 10179 Berlin, Germany.
CE
This product is conform to the following European Directives:
2014/30/EU (EMC)
2014/35/EU (LVD)
2011/65/EU (RoHS)
Chère cliente, cher client,
natural_image
Symbol of a trash bin crossed with a diagonal line, no text or labels presentnatural_image
Symbol of a trash bin crossed with a diagonal line, no text or numbers presentnatural_image
Symbol of a trash bin crossed with a diagonal line, no text or numbers present

- Safety Instructions
- Power cord / power supply
- Small objects / Packaging Parts
- Location
- AC Adapter
- Intended Use
- Transport
- Cleaning
- Repairs
- Product Description
- Use and Operation
- Operation
- HIGH/LOW button
- Tray Adjustable
- The Do's and Don'ts
- Operating Instructions
- Dry Food
- Dry Vegetable
- Dry Herb
- Food Storage
- Tips for drying Vegetables
- Meat drying
- Hints on Disposal
- Declaration of Conformity
Brand : Klarstein
Model : Appleberry 10022726
Category : Food Dehydrator