
Aquapro 5 - Diving regulator CRESSI - Free user manual and instructions
Find the device manual for free Aquapro 5 CRESSI in PDF.
| Product type | Buoyancy compensator (BCD / Stab Jacket) |
| Brand | Cressi |
| Model | Aquapro 5 |
| Maximum certified depth | 50 meters |
| Materials | Cordura 1000, high-frequency welding, reinforced nylon stitching |
| Inflation system | Flight Control System with Fenstop (inflation button and deflation push button) |
| Operating pressure | 6 to 12 bars |
| Quick fitting | Yes, for low pressure hose |
| Overpressure valves | Two, at upper and lower right, manually operated by cable |
| Manual purge | By sliding the deflation push button on the Fenstop |
| Backpack | Height-adjustable lumbar support, carrying handle, cylinder attachment with two positions |
| Weight system | Side weight pockets with quick release (gravity or C-Trim System) |
| Accessory pockets | Yes, for instruments (octopus, pressure gauge, etc.) |
| Main closure | Velcro abdominal belt with Freematic elastic system |
| Chest adjustment | Strap with quick-release buckle |
| Oral inflation | Yes, via specific hose in right pocket |
| Maintenance | Rinse with freshwater, dry with valves open, store slightly inflated |
| Lubrication | Silicone grease on fitting and hose collar |
| Certifications | CE, EN 250, EN 1809 (notified body 0474) |
| Caution | This is not a life jacket - does not guarantee keeping the head above water |
| Annual inspections | Inflator and purges must be serviced by a Cressi authorized dealer |
Frequently Asked Questions - Aquapro 5 CRESSI
User questions about Aquapro 5 CRESSI
0 question about this device. Answer the ones you know or ask your own.
Ask a new question about this device
Download the instructions for your Diving regulator in PDF format for free! Find your manual Aquapro 5 - CRESSI and take your electronic device back in hand. On this page are published all the documents necessary for the use of your device. Aquapro 5 by CRESSI.
USER MANUAL Aquapro 5 CRESSI
natural_image
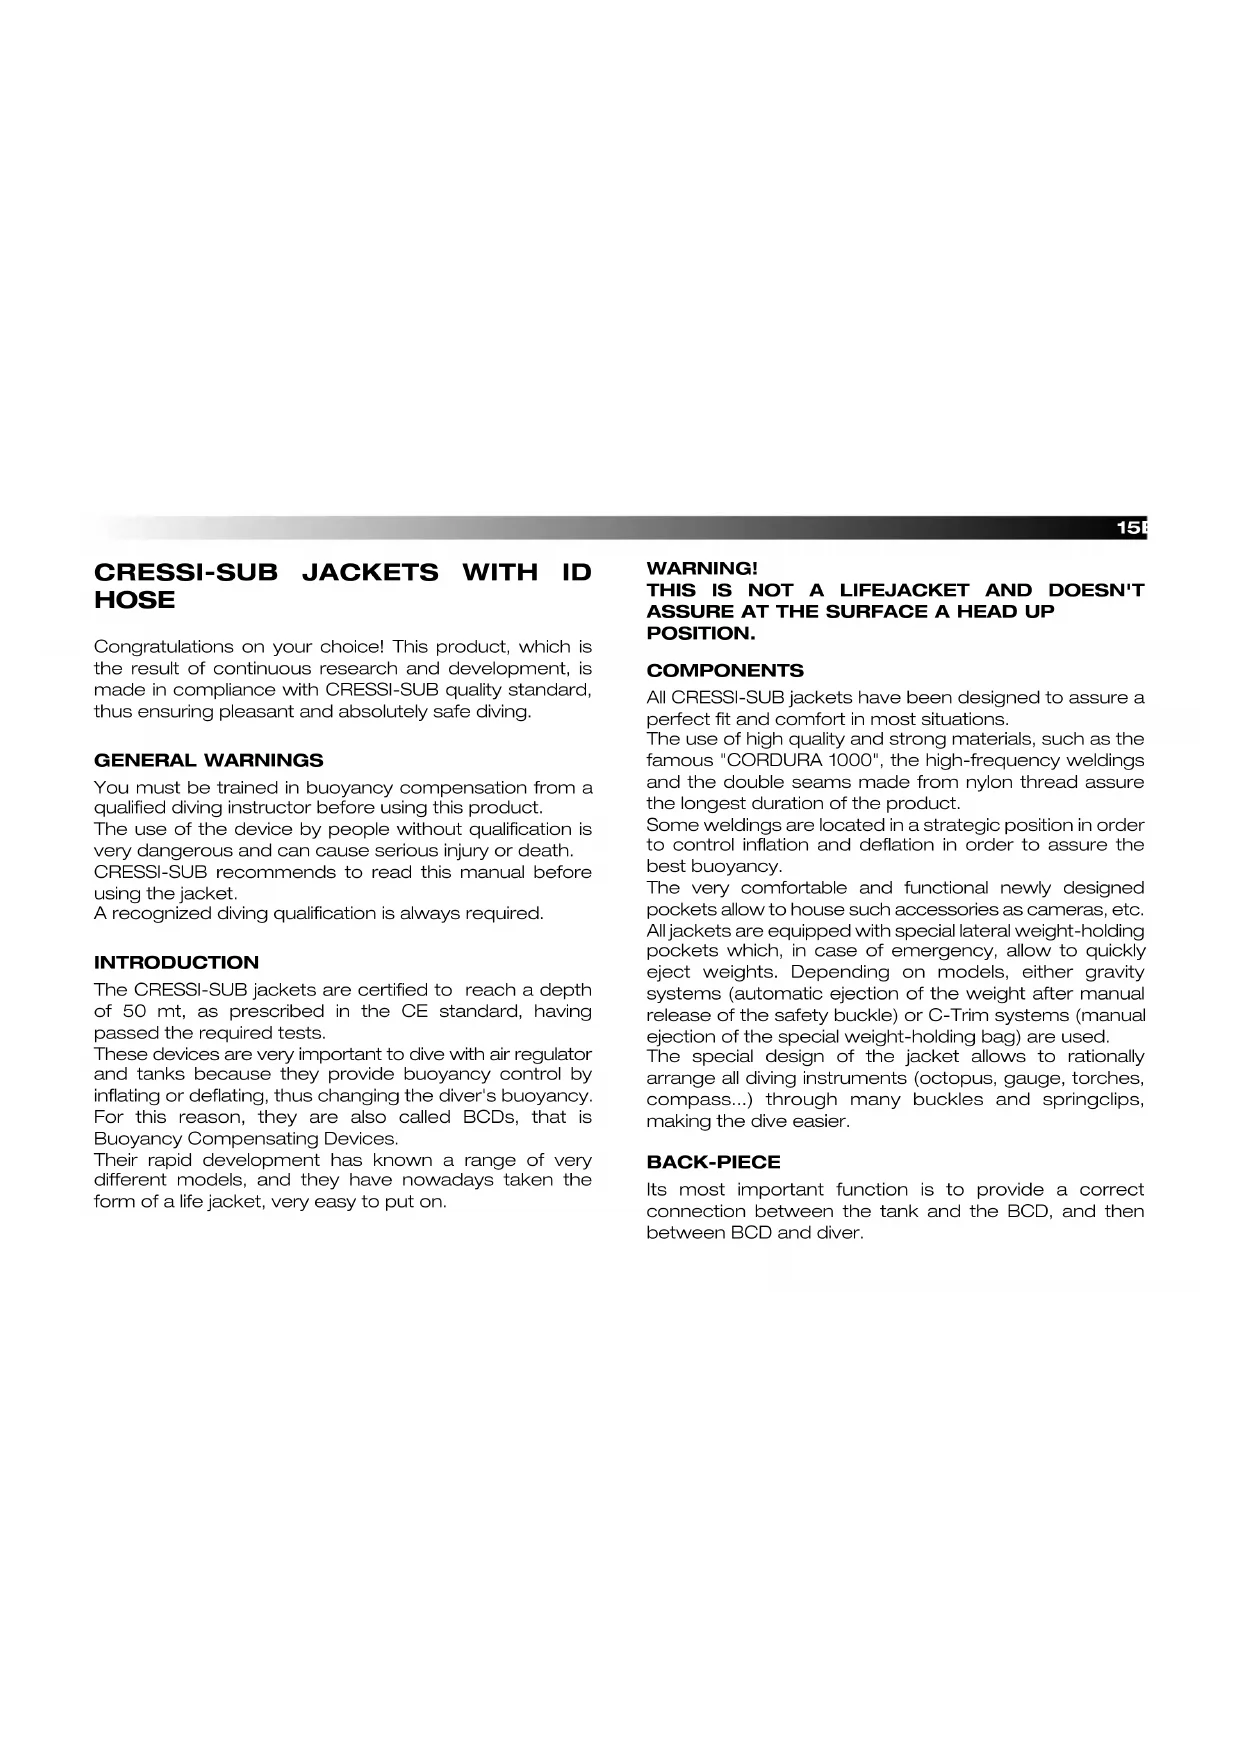
Yellow Cressi-sub handheld device with black handle and gray top (no visible text or symbols)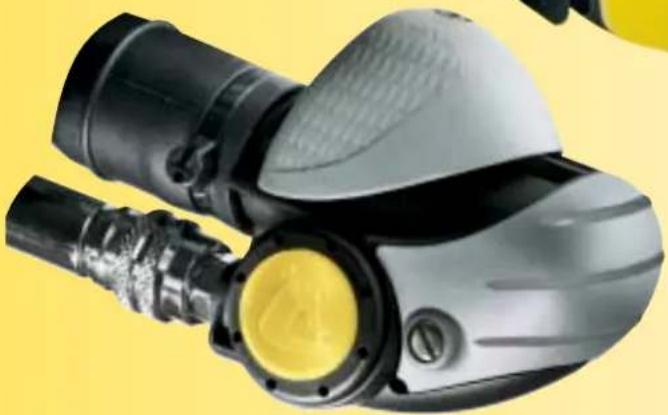
natural_image
Close-up of a black and silver handheld device with yellow circular button, against a yellow background (no text or symbols visible)GILETS STABILISATEURS
TARIERJACKETS
CHALECOS HIDROSTÁTICOS
INDICE GENERALE
MANUALE D'ISTRUZIONI
EQUILIBRATORI CON
TUBO CORRUGATO....pag.6
JACKETS WITH ID HOSE
DIRECTIONS FOR USE....pag.15
MANUEL D'INSTRUCTIONS
GILETS STABILISATEURS
AVEC TUYAU ANNELE....pag. 22
BEDIENUNGSANLEITUNG
TARIERJACKETS....pag.30
natural_image
Close-up of a Cressi-sub mechanical component (no visible text or symbols)MANUALE D'ISTRUZIONI
EQUILIBRATORI
"FLIGHT CONTROL SYSTEM"....pag. 49
"FLIGHT CONTROL SYSTEM"
JACKETS DIRECTIONS FOR USE ..... pag. 63
MANUEL D'INSTRUCTIONS
GILETS STABILISATEURS
"FLIGHT CONTROL SYSTEM"....pag.77
BEDIENUNGSANLEITUNG
TARIERJACKETS MIT
FLIGHT CONTROL SYSTEM....pag. 91
natural_image
Close-up of a mechanical device with metallic components and a handle (no visible text or symbols)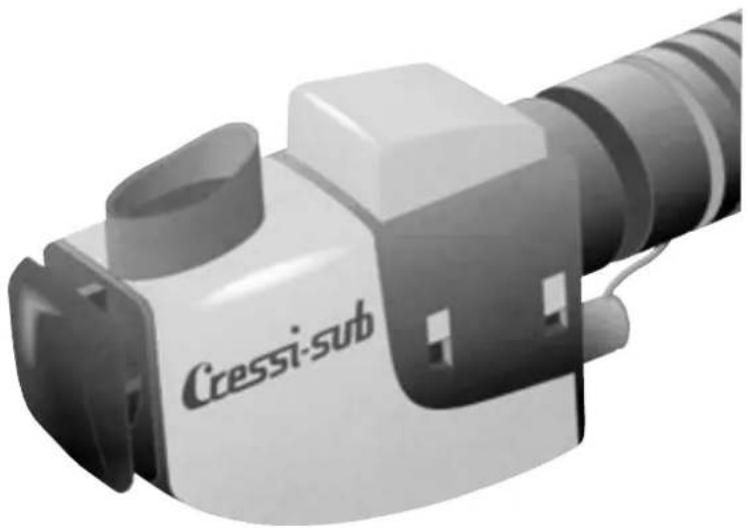
natural_image
Exterior view of a Cressi-sub optical instrument (no text or symbols visible on body)MANUALE D'ISTRUZIONI
EQUILIBRATORI CON
TUBO CORRUGATO....pag. 6
JACKETS WITH ID HOSE
DIRECTIONS FOR USE ..... pag. 15
MANUEL D'INSTRUCTIONS
GILETS STABILISATEURS
AVEC TUYAU ANNELE....pag.22
BEDIENUNGSANLEITUNG
TARIERJACKETS....pag.30
natural_image
Illustration of two types of camera sensors: a fixed lens and a digital camera with a coiled cable (no text or symbols present)6 Italiano
EQUILIBRATORI CRESSI-SUB CON TUBO CORRUGATO
COME INDOSSARE IL JACKET
natural_image
Line drawing of a diver in full gear with bubbles rising (no text or symbols)Fig. A
natural_image
Illustration of two types of camera sensors: a Gasat-subd and a mechanical device (no text or symbols present)CRESSI-SUB JACKETS WITH ID HOSE
Congratulations on your choice! This product, which is the result of continuous research and development, is made in compliance with CRESSI-SUB quality standard, thus ensuring pleasant and absolutely safe diving.
GENERAL WARNINGS
You must be trained in buoyancy compensation from a qualified diving instructor before using this product.
The use of the device by people without qualification is very dangerous and can cause serious injury or death.
CRESSI-SUB recommends to read this manual before using the jacket.
A recognized diving qualification is always required.
INTRODUCTION
The CRESSI-SUB jackets are certified to reach a depth of 50 mt, as prescribed in the CE standard, having passed the required tests.
These devices are very important to dive with air regulator and tanks because they provide buoyancy control by inflating or deflating, thus changing the diver's buoyancy. For this reason, they are also called BCDs, that is Buoyancy Compensating Devices.
Their rapid development has known a range of very different models, and they have nowadays taken the form of a life jacket, very easy to put on.
WARNING!
THIS IS NOT A LIFEJACKET AND DOESN'T ASSURE AT THE SURFACE A HEAD UP POSITION.
COMPONENTS
All CRESSI-SUB jackets have been designed to assure a perfect fit and comfort in most situations.
The use of high quality and strong materials, such as the famous "CORDURA 1000", the high-frequency weldings and the double seams made from nylon thread assure the longest duration of the product.
Some weldings are located in a strategic position in order to control inflation and deflation in order to assure the best buoyancy.
The very comfortable and functional newly designed pockets allow to house such accessories as cameras, etc. All jackets are equipped with special lateral weight-holding pockets which, in case of emergency, allow to quickly eject weights. Depending on models, either gravity systems (automatic ejection of the weight after manual release of the safety buckle) or C-Trim systems (manual ejection of the special weight-holding bag) are used.
The special design of the jacket allows to rationally arrange all diving instruments (octopus, gauge, torches, compass...) through many buckles and springclips, making the dive easier.
BACK-PIECE
Its most important function is to provide a correct connection between the tank and the BCD, and then between BCD and diver.
16 English
A correct design is the starting point to reach the best results.
After many tests and researches, CRESSI-SUB has created a modern back-piece assuring a vertical adjustment of the back support in order to fit each waist.
The newly designed handle makes it easier to carry the jacket everywhere.
You can also buy an additional strap to fasten the tank or it is possible to fasten the tank in two different positions.
INFLATOR
It is the heart of every jacket and assures inflation and deflation.
This important component consists of the by-pass, the ID hose and the deflation valve.
Designed according to the latest technologies, it has a more elegant and discreet look, matching the other BC parts.
A detailed description of the characteristics of each component is given below.
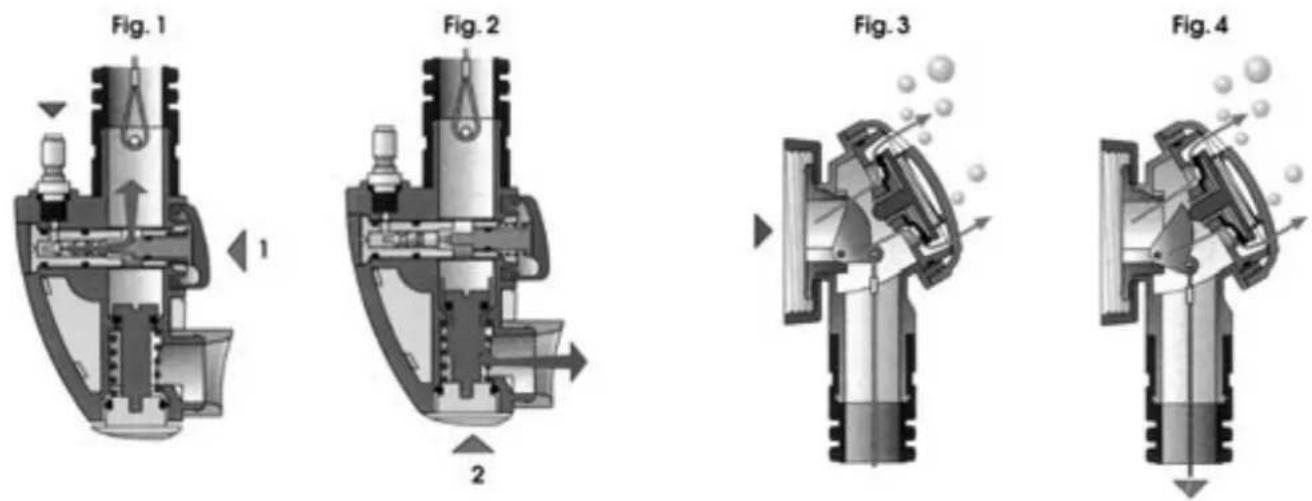
BY-PASS
It controls inflation and deflation.
This very difficult mechanical function has been made easy by CRESSI-SUB technicians through the use of modern materials.
The following figures show the maintenance work which, for safety reasons, must only be carried out by technical personnel authorized by CRESSI-SUB (see figure pag. 16).
CRESSI-SUB ASSUMES NO RESPONSIBILITY FOR ANY MAINTENANCE WORK CARRIED OUT TO THE BY-PASS BODY BY PERSONNEL NOT AUTHORIZED BY CRESSI-SUB.
The low pressure hose of the first stage is connected to the by-pass by means of a quick connector.
Inflation is controlled by push-button 1 (Fig. 1), with air coming from the hose of the first stage, or by blowing in the mouth piece.
Deflation is controlled by push-button 2 (Fig. 2) located in the lower part of the by-pass.
The form of the CRESSI-SUB by-pass has been designed to assure a safe and correct fastening and all comfortable conditions during the dive.
QUICK DEFLATION VALVE
The new deflation valve of the CRESSI-SUB inflators has two main functions:
1) It assures a complete and quick deflation by pulling the internal cord of the ID hose (Fig. 4).
2) It also operates as additional overpressure valve, an exclusive accessory against overinflation, assuring the highest safety during the jacket inflation (Fig. 3).
OVERPRESSURE VALVE
All CRESSI-SUB jackets are equipped with this valve located in both the lower and upper right part of the jacket, on its rear side. Besides controlling inflation by checking that the maximum interstage pressure is not
exceeded, this valve allows the diver to manually deflate when his/her position mainly concentrates air in the lower part of the jacket.
To operate the lower right valve, just pull the cord, by grasping the special knob which, depending on the jacket model, is located on the rear side in the lower right part or on the front side in the lower right part.
To operate the upper right valve, just pull the cord, by grasping the special knob located on the front side on the right shoulder-strap.
18 English
18 English
USE OF THE BCD - JACKET ASSEMBLY WITH STRAPS
First, you must fasten the jacket to the tank, as shown on the figure (steps 1 and 2), correctly putting the buckle in the strap.
WARNING - YOU MUST ALWAYS FASTEN THE STRAP WET!
Otherwise, if the strap is dry, it could stretch, when submersed, and the tank could slip out.
When fastening the jacket to the tank is Important to get the upper side of the back-piece 2-4 cm under the tank deflation valves so that the diver's head doesn't bump against the regulator, hindering his/her swimming.
Secondly, you must connect the LP hose to the by-pass, joining it to the first stage low pressure port because the
BC has been designed to be used with an air pressure ranging from 6 to 12 bars, consequently a higher pressure would be dangerous for the diver.
The other port of the LP hose is provided with a quick connector: make sure that there is not any dirt, sand or other substances before connecting it to the by-pass.
HOW TO WEAR THE JACKET
You can wear the jacket either out of the water or in the water.
It is absolutely necessary to learn how to correctly wear the tanks and the jacket during the diving course.
The jacket is fastened to the diver's body with shoulder straps and a cummerbund.
The main fastening is assured by a cummerbund with abdominal strip and Freematic system that fits every waist and provides the best fastening and a rapid adjustment of the jacket to the body without compression on the chest and the waist.
An additional adjustment is provided by the adjustable shoulder-straps with large front quick-release buckles; the tank is fixed to the back-piece by means of an adjustable band, so that it is possible to adjust tanks of different diameters.
Now, once you have rapidly checked for the correct operation of the inflator, the hoses and the accessories, you are ready to dive.
OPERATION
The jacket operation is controlled by the by-pass, the deflation valve and the overpressure valves.
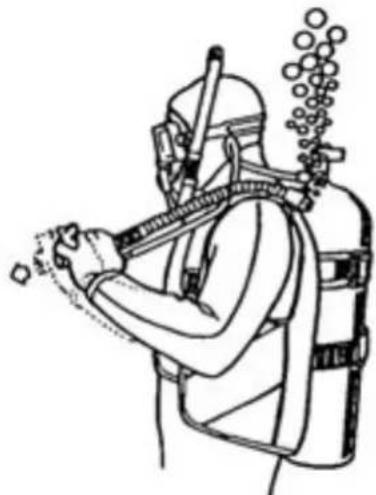
To begin a dive, you must deflate the inflated jacket
20 English
by pulling the ID hose (Fig. A), then using the deflation valve or the lower overpressure valve, if you descend head down.
Now, you can descend at a descending rate that increases in proportion to the water pressure compressing you.
To descend slowly you can inflate. By shortly lightly pressing the inflation button, you can modify the descent rate and then progressively adjust yourself to the increasing depth.
During the dive you can compensate buoyancy in accordance with the depth and tank lightening, due to the air consumption.
natural_image
Line drawing of a diver in full gear with bubbles rising, no text or symbols presentFig. A
To ascend you must inflate, so that a lightly positive buoyancy can be obtained.
In this case, the ascending rate increases in accordance with the pressure and you must operate the deflation systems to compensate and avoid a too rapid ascent.
WARNING: IT IS EXTREMELY DANGEROUS FOR THE DIVER TO ASCEND TOO FAST.
AVOID OVER INFLATING THE JACKET, AND ASCEND WITH A NEUTRAL BUOYANCY, CONTINUOUSLY ADJUSTING BUOYANCY.
USE OF THE EQUIPMENT AND RISK EVALUATIONS
Before using a diving equipment you must follow a recognized diving course and obtain a qualification.
You must be trained and in a good state of health.
Before every dive you must accurately consider the environmental conditions and the psychophysical state of the diver.
It is recommended to avoid the dive, when even only one of the above conditions becomes dangerous.
The environmental dangerous conditions can be the sea situation, the sea currents, the low water temperature, the poor visibility.
The physical dangerous conditions can be a bad state of health, an emotional or physical stress situation, a lacking training, tiredness, digestion.
The materials and the design of CRESSI-SUB equipment assure a totally safe use.
CARE AND MAINTENANCE
After each use, carry out the following operations:
- Remove the tank and rinse the jacket with fresh water, both outside and inside, allowing water to enter the ID hose and the bag through the deflation or the over-pressure valve.
- Drain any water left in the jacket and allow it to dry in the open air with open valves.
- Once it is completely dry, close all valves, lightly inflate it (using the mouth-inflation piece located in the by-pass) and store it in a cool and dry place.
If the device is not used for a long time, lubricate the hose connection and the collar with silicone grease and spread the ID hose with talcum powder.
The CRESSI-SUB jackets are in conformity with the EN 250 - EN 1809 standards and have been given the CE safety certification (CE 0474).
A label bearing the following information is sewn under the lateral or rear pocket:
WARNING!
THIS IS NOT A LIFE JACKET AND DOES NOT ASSURE THE DIVER OF KEEPING HIS/HER HEAD OUT OF THE WATER
- To use this jacket, a specific course held by a certified instructor must be attended.
- In case of emergency, face up buoyancy at the surface may not be provided to all users and in all conditions.
- Before use, check for good condition and proper operation of the jacket and make sure that no holes of damages are present.
- Follow all the instructions in the Owner's Manual.
- Do not inhale gases from inside the bag.
- Do not remove from the jacket.
Model: ____ Manufacturing year: ____
Table showing the buoyancy values (expressed in Newtons) for each jacket size.
Pictogram showing the max. tank capacity in litres.
22 Français
GILETS STABILISATEURS CRESSI-SUB AVEC TUYAU ANNELE
natural_image
Cross-sectional diagram of a mechanical device showing internal components and flow direction (no text or labels)SOUPAPE DE PURGE RAPIDE
natural_image
Cross-sectional diagram of a mechanical device with fluid flow arrows (no text or symbols)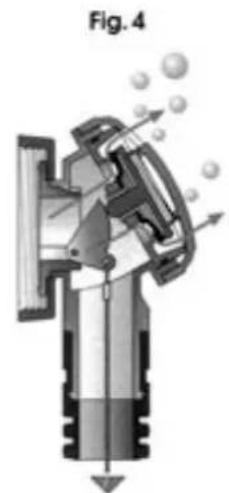
natural_image
Cross-sectional diagram of a mechanical device with internal components and fluid flow arrows (no text or symbols)SOUPAPE DE SURPRESSION
ATTENTION: EFFECTUEZ TOUJOURS LE MON- TAGE AVEC UNE SANGLE HUMIDIFIÉE.
natural_image
Line drawing of a diver in full gear with bubbles rising from the mouth (no text or symbols)Fig. A
WIE TRÄGT MAN DAS TARIERJACKET
natural_image
Line drawing of a diver in full gear holding a device, with bubbles rising from the mouth (no text or symbols)Fig. A
36 Deutsch
natural_image
Cross-sectional diagram of a mechanical device showing internal components and flow direction (no text or labels)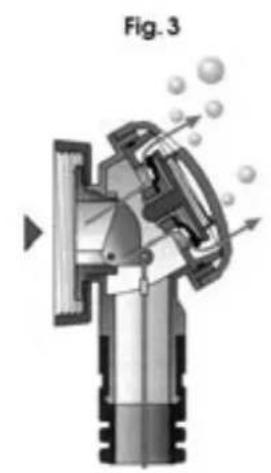
natural_image
Cross-sectional diagram of a mechanical device labeled Fig. 3, showing internal components and fluid flow (no text or symbols)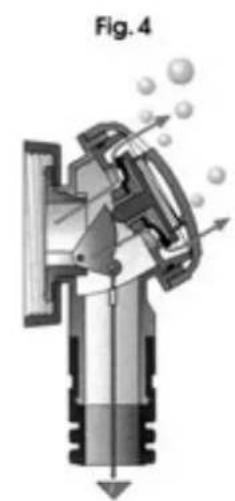
natural_image
Cross-sectional diagram of a mechanical device with internal components and fluid flow arrows (no text or symbols)42 Español
natural_image
Line drawing of a diver in full gear with bubbles rising, no text or symbols presentFig. A
44 Español
natural_image
Close-up of a mechanical device with metallic components and tubing (no visible text or symbols)MANUALE D'ISTRUZIONI
EQUILIBRATORI
"FLIGHT CONTROL SYSTEM" .. pag. 49
"FLIGHT CONTROL SYSTEM"
JACKETS
DIRECTIONS FOR USE ..... pag. 63
MANUEL D'INSTRUCTIONS
GILETS STABILISATEURS
"FLIGHT CONTROL SYSTEM" .. pag. 77
BEDIENUNGSANLEITUNG
TARIERJACKETS MIT
FLIGHT CONTROL SYSTEM . . . . pag. 91
natural_image
Close-up of hands using a screwdriver to adjust or install a small mechanical component (no visible text or symbols)Fig. 3

natural_image
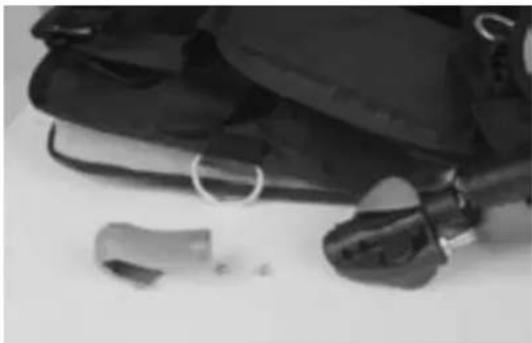
Black-and-white photo of stacked backpacks and a small tool on a plain surface (no text or symbols visible)Fig. 4

natural_image
Close-up of hands adjusting a mechanical component (no visible text or symbols)Fig. 5

natural_image
Close-up of hands assembling a mechanical component (no visible text or symbols)Fig. 6

natural_image
Close-up of a small mechanical component with a circular inset and a small black end, isolated on a plain background (no text or symbols visible)Fig. 8

natural_image
Close-up of hands holding a small object, possibly a device or tool, with no visible text or symbols.Fig. 7
natural_image
Close-up of hands holding a small object, possibly a tool or device, with no visible text or symbols.Fig. 9
54 Italiano
Fig. 10 Fig. 12

natural_image
Two black-and-white photos showing hands using a tool to adjust or install a small mechanical component, with no visible text or symbols.Fig. 11 Fig. 13
56 Italiano
VALVOLA DI SCARICO RAPIDO
natural_image
Close-up of hands adjusting a garment with a button (no visible text or symbols)
natural_image
Close-up of hands adjusting a circular object on a dark fabric garment (no visible text or symbols)
natural_image
Close-up of a person's shirt being adjusted with a tool, showing a button and collar (no text or symbols visible)TUBO PER IL GONFIAGGIO A BOCCA
natural_image
Person wearing a full-body diving suit and harness, handling equipment (no visible text or symbols)Fig. 15
IMPORTANTE:
natural_image
Person in full-body gear holding a baton, no visible text or symbolsFig. 16
60 Italiano
USO DELL'ATTREZZATURA E VALUTAZIONE DEL RISCHIO
natural_image
Close-up of a black and silver robotic device with attached hoses and control buttons (no visible text or symbols)CRESSI-SUB FLIGHT CONTROL SYSTEM JACKETS
Congratulations on your choice! This product, which is the result of continuous research and development, is made in compliance with CRESSI-SUB quality standard, thus ensuring pleasant and absolutely safe diving.
GENERAL WARNINGS
You must be trained in buoyancy compensation from a qualified diving instructor before using this product.
The use of the device by people without qualification is very dangerous and can cause serious injury or death.
CRESSI-SUB recommends to read this manual before using the jacket.
A recognized diving qualification is always required.
INTRODUCTION
The CRESSI-SUB jackets are certified to reach a depth of 50 mt, as prescribed in the CE standard, having passed the required tests.
These devices are very important to dive with air regulator and tanks because they provide buoyancy control by inflating or deflating, thus changing the diver's buoyancy. For this reason, they are also called BCDs, that is Buoyancy Compensating Devices.
Their rapid development has known a range of very different models, and they have nowadays taken the form of a life jacket, very easy to put on.
WARNING!
THIS IS NOT A LIFEJACKET AND DOESN'T ASSURE AT THE SURFACE A HEAD UP POSITION.
COMPONENTS
All CRESSI-SUB jackets have been designed to assure a perfect fit and comfort in most situations.
The use of high quality and strong materials, such as the famous "CORDURA 1000", the high-frequency weldings and the double seams made from nylon thread assure the longest duration of the product.
Some weldings are located in a strategic position in order to control inflation and deflation in order to assure the best buoyancy.
The very comfortable and functional newly designed pockets allow to house such accessories as cameras, etc. All jackets are equipped with special lateral weight-holding pockets which, in case of emergency, allow to quickly eject weights. Depending on models, either gravity systems (automatic ejection of the weight after manual release of the safety buckle) or C-Trim systems (manual ejection of the special weight-holding bag) are used.
The special design of the jacket allows to rationally arrange all diving instruments (octopus, gauge, torches, compass...) through many buckles and springclips, making the dive easier.
BACK-PIECE
Its most important function is to provide a correct connection between the tank and the BCD, and then between BCD and diver.
64 English
A correct design is the starting point to reach the best results.
After many tests and researches, CRESSI-SUB has created a modern back-piece assuring a vertical adjustment of the back support in order to fit each waist.
The newly designed handle makes it easier to carry the jacket everywhere.
You can also buy an additional strap to fasten the tank or it is possible to fasten the tank in two different positions.
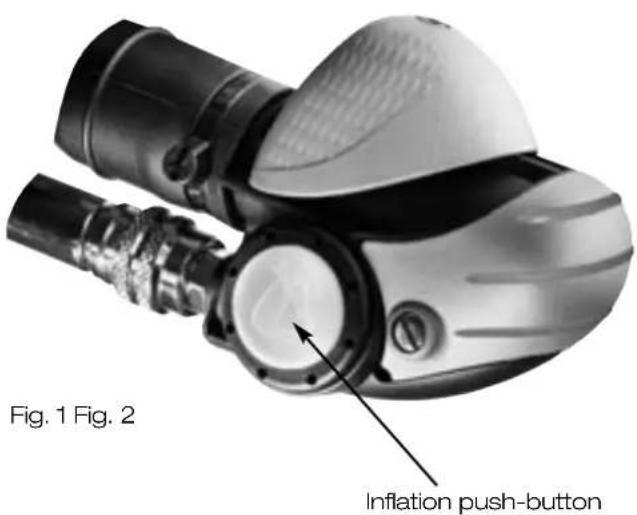
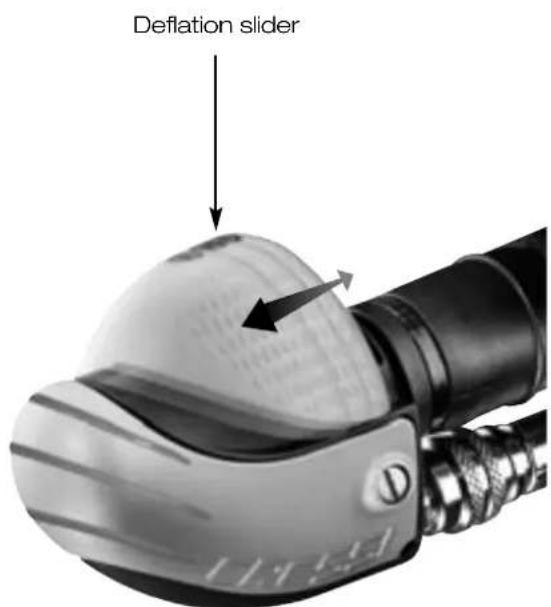
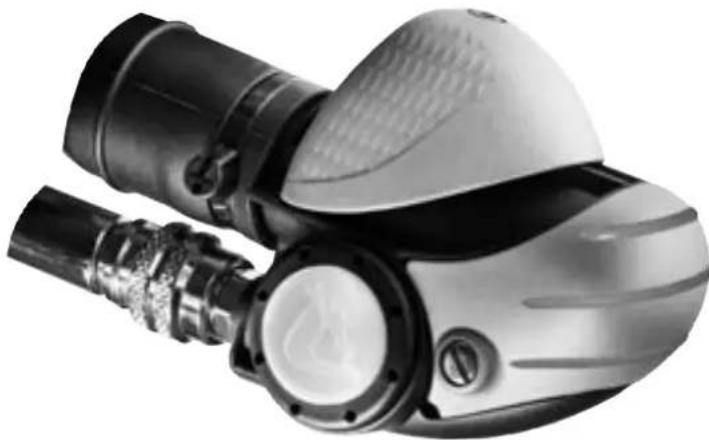
FLIGHT CONTROL SYSTEM INFLATOR
Its largely known functions are to inflate or deflate, but differently from the traditional inflator with ID hose, the new Flight Control System consists of two new elements (by-pass and deflation valve) and provides the following great advantages:
- A fixed by-pass position designed in such a way that controls are always visible and can be easily reached by the hand (even when wearing gloves) thus enabling to control buoyancy in any driver's position.
- The inflation and deflation controls are associated to different mechanical movements for higher safety.
- The by-pass shape provides an ergonomic handgrip and allows to operate controls always with the same hand without moving it (you just have to move only some fingers); moreover, the special soft pipe (connection between bag and by-pass) allows the hand to move more freely.
A detailed description of the characteristics of each component is given below.
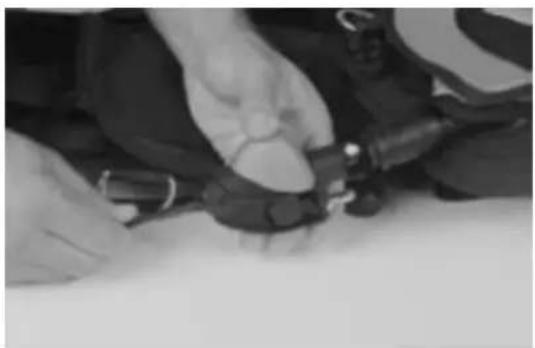
BY-PASS
Its function is to control bag inflation or deflation.
It is located in the lateral left part of the jacket and the pocket is shaped in such a way not to hinder the hand movements during use.
The by-pass quick connection is located in order to facilitate connection/disconnection of the low pressure hose coming from the first stage.
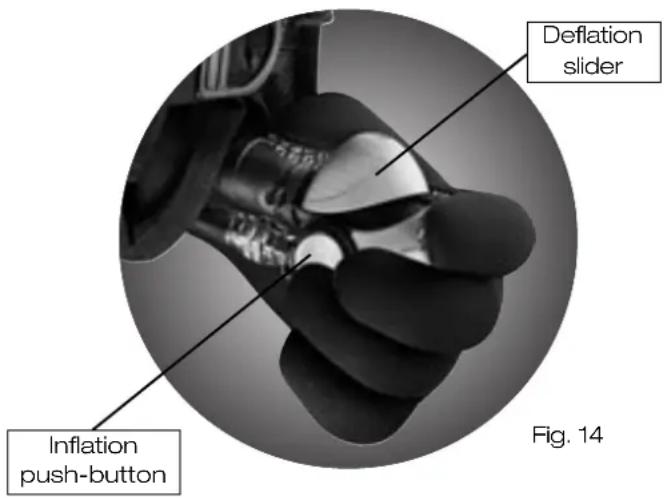
The inflation function is carried out by pressing a push-button (Fig. 1) allowing air to enter the bag.
The deflation function is carried out by moving a slider forward, (Fig. 2) allowing air to escape from the bag, in this way you can have a gradual deflation or a quick deflation by immediately taking the slider to the end of its stroke.
66 English
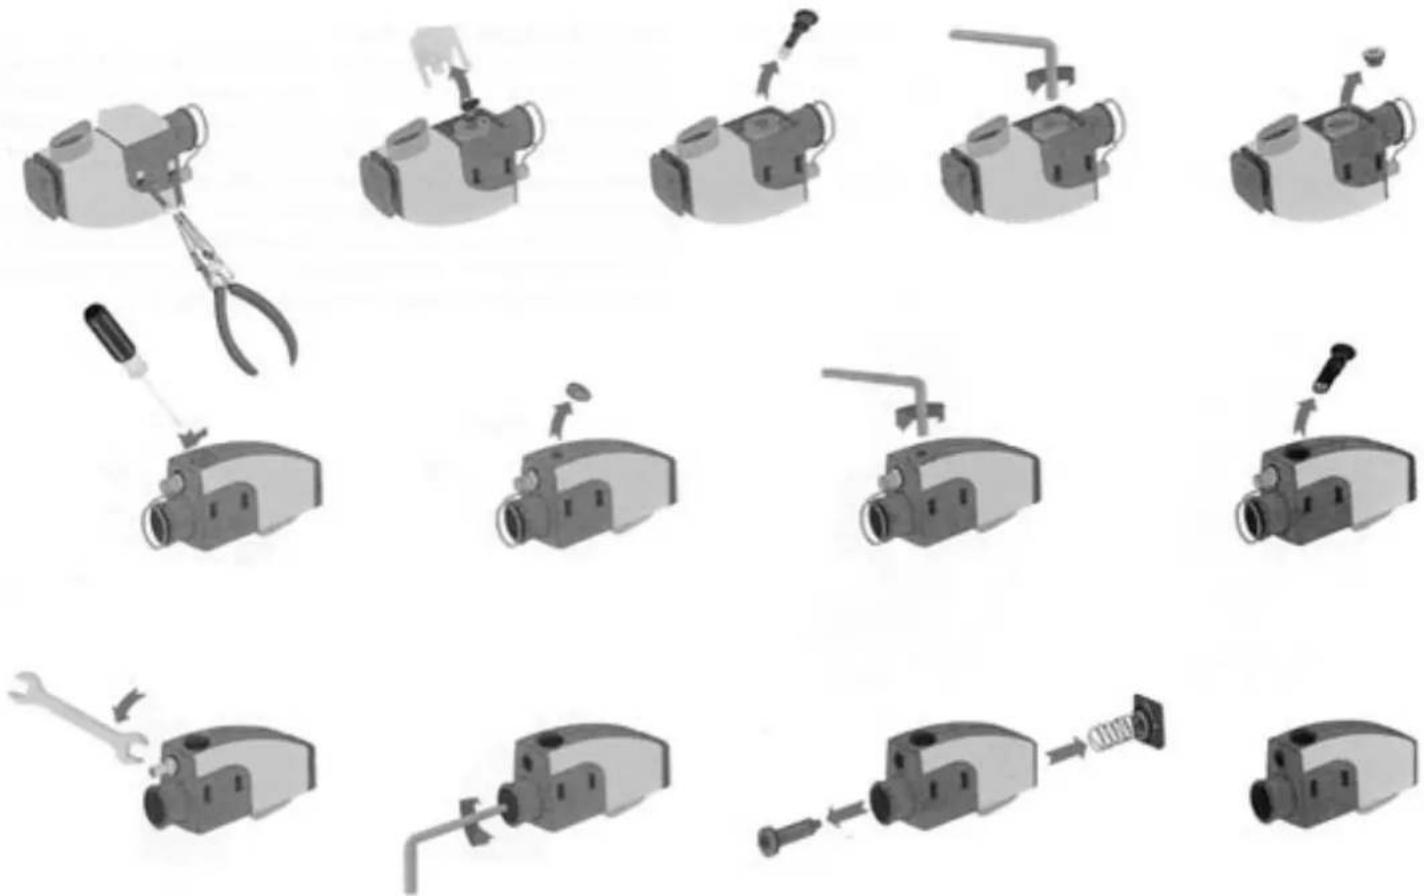
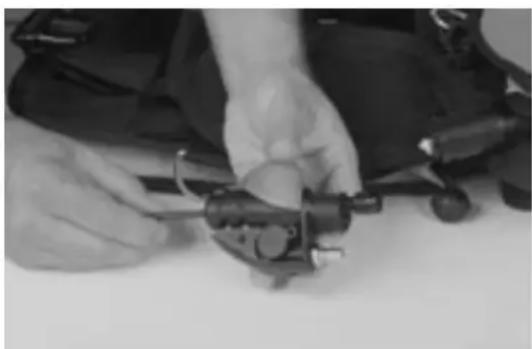
The following figures show the maintenance work which, for safety reasons, must only be carried out by technical personnel authorized by CRESSI-SUB.
CRESSI-SUB ASSUMES NO RESPONSIBILITY FOR ANY MAINTENANCE WORK CARRIED OUT TO THE BY-PASS BODY BY PERSONNEL NOT AUTHORIZED BY CRESSI-SUB.
natural_image
Close-up of hands using a screwdriver to adjust or install a small mechanical component (no visible text or symbols)Fig. 3
natural_image
Black-and-white photo of stacked backpacks and a small tool on a white surface (no text or symbols visible)Fig. 4
natural_image
Close-up of hands adjusting a mechanical component (no visible text or symbols)Fig. 5
natural_image
Close-up of hands assembling a mechanical component (no visible text or symbols)Fig. 6

natural_image
Close-up of a small mechanical component with a circular inset and a small black part, isolated on a plain background (no text or symbols visible)Fig. 8
natural_image
Close-up of hands holding a small object, possibly a device or tool, with no visible text or symbols.Fig. 7

natural_image
Close-up of hands holding a small object, possibly a tool or device, with no visible text or symbols.Fig. 9
68 English
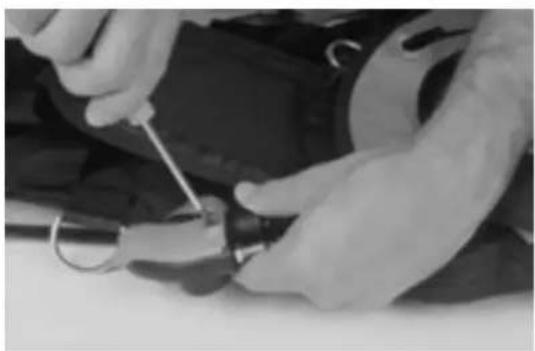
The following figures show how to carry out deflation adjustment which, for safety reasons, must only be carried out by technical personnel authorized by CRESSI-SUB.
CRESSI-SUB ASSUMES NO RESPONSIBILITY FOR ANY DEFLATION ADJUSTMENT CARRIED OUT BY PERSONNEL NOT AUTHORIZED BY CRESSI-SUB.
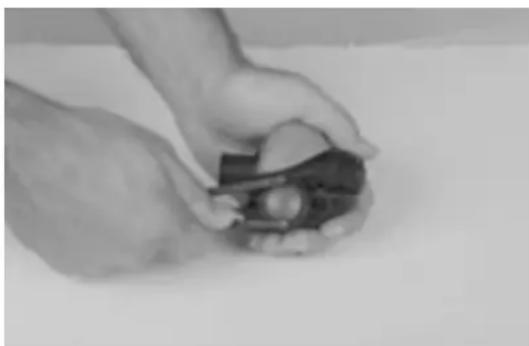
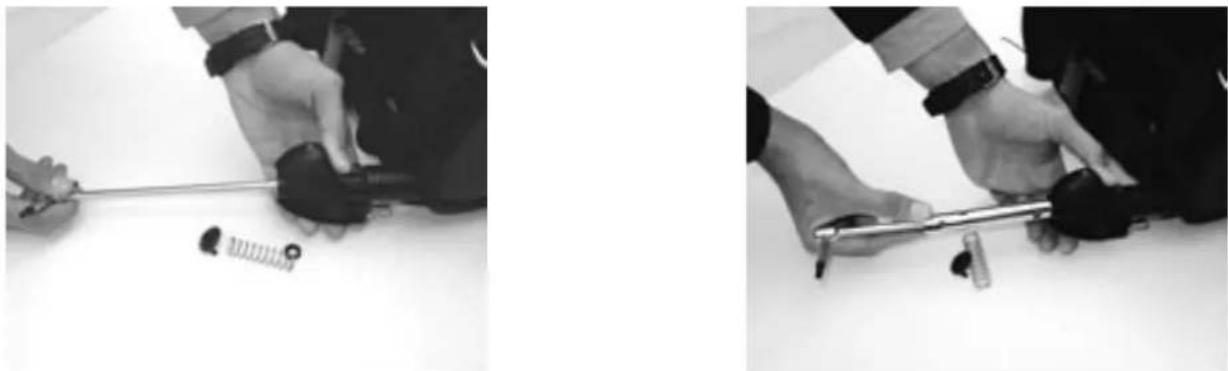
- Place the jacket on a flat surface in its operating position, as shown on Fig. 10 (with the band and all buckles closed).
- Keep the deflation slider at the end of its stroke, while performing adjustment by means of a 5 mm hexagonal wrench, as shown on Fig. 11.
- Adjustment is correct when the cam (see a on Fig. 12) is placed at approximately a distance R which corresponds to 3 mm from the bushing (see b on Fig. 12), keeping the deflation slider at the end of its stroke, as shown on Fig. 11.
- Finally, put the safety lock nut in order to fix adjustment using the 5 mm tee hexagonal wrench to keep the deflation spindle in place (in order not to lose the obtained adjustment), and the modified 13 mm tubular wrench (supplied by CRESSI-SUB) to screw the safety lock nut, as shown on Fig. 13.
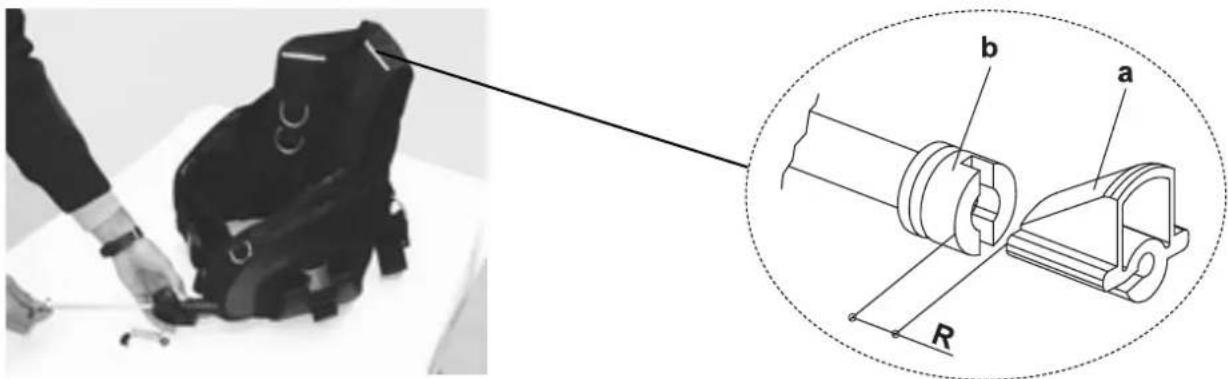
Fig. 10 Fig. 12
natural_image
Two black-and-white photos showing hands using a tool to adjust or install a small mechanical component, with no visible text or symbols.Fig. 11 Fig. 13
70 English
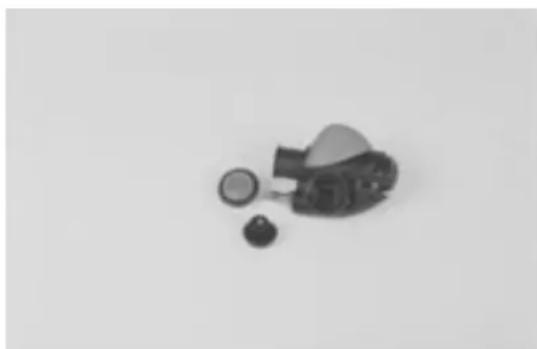
QUICK DEFLATION VALVE
The new valve allows greater deflation than the one traditionally used in the inflator with ID hose. Its primary function is to allow gradual or quick bag deflation: in fact, the valve, equipped with servomechanism, is operated through a cable directly by the by-pass slider.
Its secondary function is to act as an additional overpressure valve, by checking that the bag is not excessively inflated and does not exceed the maximum interstage pressure.
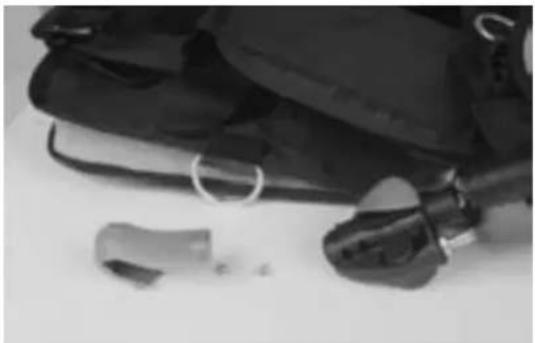
The following figures show the O-ring replacement which, for safety reasons, must only be carried out by technical personnel authorized by CRESSI-SUB.
CRESSI-SUB ASSUMES NO RESPONSIBILITY FOR ANY O-RING REPLACEMENT CARRIED OUT TO THE QUICK DEFLATION VALVE BY PERSONNEL NOT AUTHORIZED BY CRESSI-SUB.

natural_image
Close-up of hands adjusting a garment with a button (no visible text or symbols)
natural_image
Close-up of hands adjusting a garment with a circular button (no visible text or symbols)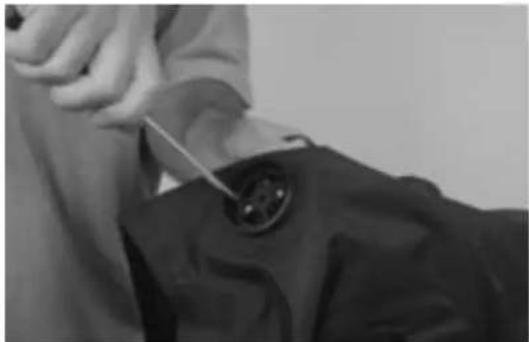
natural_image
Close-up of a hand holding a button on a dark garment, with no visible text or symbolsMOUTH-INFLATION TUBE
This is a silicone tube equipped with a non-return valve and located inside the right pocket of the jacket.
OVERPRESSURE VALVE
All CRESSI-SUB jackets are equipped with this valve located in both the lower and upper right part of the jacket, on its rear side. Besides controlling inflation by checking that the maximum interstage pressure is not exceeded, this valve allows the diver to manually deflate when his/her position mainly concentrates air in the lower part of the jacket.
To operate the lower right valve, just pull the cord, by grasping the special knob which, depending on the jacket model, is located on the rear side in the lower right part or on the front side in the lower right part.
To operate the upper right valve, just pull the cord, by grasping the special knob located on the front side on the right shoulder-strap.
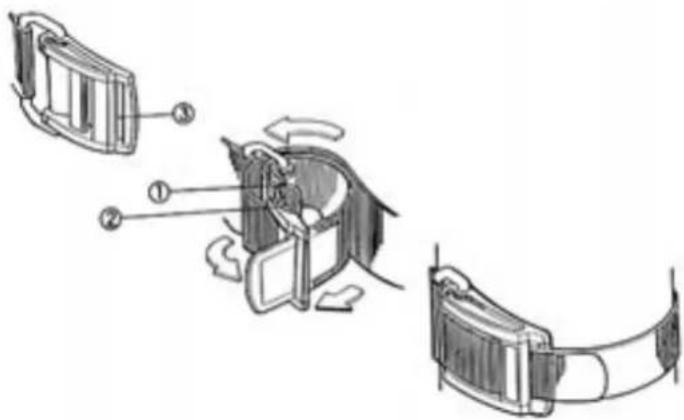
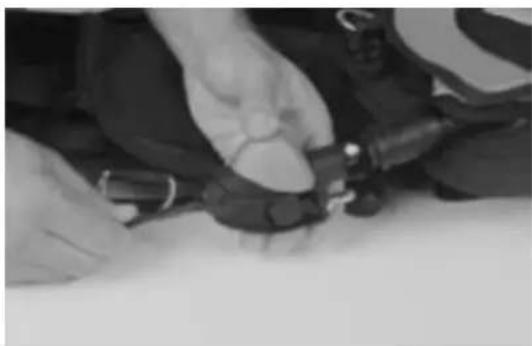
USE OF THE BCD - JACKET ASSEMBLY WITH STRAPS
First, you must fasten the jacket to the tank, as shown on the figure (steps 1 and 2), correctly putting the buckle in the strap.
WARNING - YOU MUST ALWAYS FASTEN THE STRAP WET!
Otherwise, if the strap is dry, it could stretch, when submersed, and the tank could slip out.

When fastening the jacket to the tank is Important to get the upper side of the back-piece 2-4 cm under the tank deflation valves so that the diver's head doesn't bump against the regulator, hindering his/her swimming.
Secondly, you must connect the LP hose to the by-pass, joining it to the first stage low pressure port because the BC has been designed to be used with an air pressure ranging from 6 to 12 bars, consequently a higher pressure would be dangerous for the diver.
The other port of the LP hose is provided with a quick connector: make sure that there is not any dirt, sand or other substances before connecting it to the by-pass.
72 English
HOW TO WEAR THE JACKET
You can wear the jacket either out of the water or in the water.
It is absolutely necessary to learn how to correctly wear the tanks and the jacket during the diving course.
The jacket is fastened to the diver's body with shoulder straps and a cummerbund.
The main fastening is assured by a cummerbund with abdominal strip and Freematic system that fits every waist and provides the best fastening and a rapid adjustment of the jacket to the body without compression on the chest and the waist.
An additional adjustment is provided by the adjustable shoulder-straps with large front quick-release buckles; the tank is fixed to the back-piece by means of an adjustable band, so that it is possible to adjust tanks of different diameters.
Now, once you have rapidly checked for the correct operation of the inflator, the hoses and the accessories, you are ready to dive.
To check for correct inflator operation, before each diving, it is recommended to operate the by-pass controls several times, trying to press the inflation push-button and, in particular, to move the deflation slider.
OPERATION
The jacket operation is controlled by the by-pass, the deflation valve and the overpressure valves.
To begin a dive, you must deflate the inflated jacket by either moving the slider controlling the deflation valve or operating the overpressure valve.
As previously said, you can have a gradual deflation by moving the slider across its stroke or a quick deflation by immediately taking the slider to the end of its stroke (Fig. 14).
Now, you can descend at a descending rate that increases in proportion to the water pressure compressing you.
To descend slowly you can inflate.
By lightly pressing the inflation button, you can modify the descent rate and then progressively adjust yourself to the increasing depth (Fig. 14).
During the dive you can compensate buoyancy in accordance with the depth and tank lightening, due to the air consumption.
To ascend you must inflate, so that a lightly positive buoyancy can be obtained.
In this case, the ascending rate increases in accordance with the pressure and you must operate the deflation systems to compensate and avoid a too rapid ascent.
WARNING: IT IS EXTREMELY DANGEROUS FOR THE DIVER TO ASCEND TOO FAST.
AVOID OVER INFLATING THE JACKET, AND ASCEND WITH A NEUTRAL BUOYANCY, CONTINUOUSLY ADJUSTING BUOYANCY.
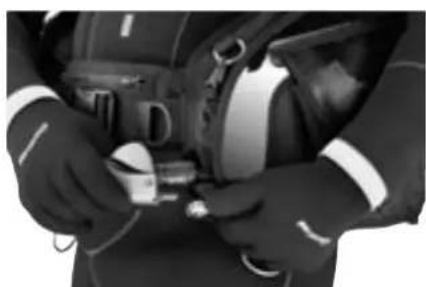
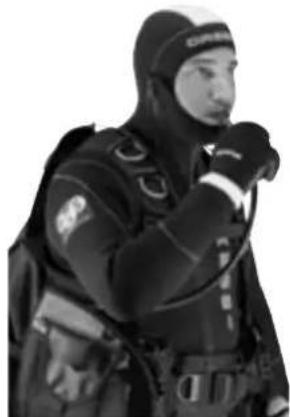
In case of automatic delivery, it is possible to rapidly disconnect the hose by acting on the by-pass quick connector (Fig. 15), thus stopping air from flowing into the bag.
natural_image
Person in full-body gear holding a small object, no visible text or symbolsFig. 15
IMPORTANT:
The deflation rate is always greater than the inflation rate: consequently, in an emergency with a continuous air flow, in order to avoid a sudden bag inflation, you can operate one of the three deflation valves in the jacket, in the event you are not able to readily disconnect the hose.
To let air into the bag, use the appropriate mouth-inflation tube located in the right pocket (Fig. 16).
natural_image
Person in full tactical gear holding a device, no visible text or symbolsFig. 16
74 English
USE OF THE EQUIPMENT AND RISK EVALUATIONS
Before using a diving equipment you must follow a recognized diving course and obtain a qualification.
You must be trained and in a good state of health.
Before every dive you must accurately consider the environmental conditions and the psychophysical state of the diver.
It is recommended to avoid the dive, when even only one of the above conditions becomes dangerous.
The environmental dangerous conditions can be the sea situation, the sea currents, the low water temperature, the poor visibility.
The physical dangerous conditions can be a bad state of health, an emotional or physical stress situation, a lacking training, tiredness, digestion.
The materials and the design of CRESSI-SUB equipment assure a totally safe use.
CARE AND MAINTENANCE
After each use, carry out the following operations:
- Remove the tank and rinse the jacket with fresh water, both outside and inside, allowing water to enter the bag through the deflation or the overpressure valve.
- Drain any water left in the jacket and allow it to dry in the open air with open valves.
- Once it is completely dry, close all valves, lightly inflate it (using the appropriate mouth-inflation tube, if you want) and store it in a cool and dry place.
If the device is not used for a long time, lubricate the hose connection and the collar with silicone grease.
The CRESSI-SUB jackets are in conformity with the EN 250 - EN 1809 standards and have been given the CE safety certification (CE 0474).
A label bearing the following information is sewn under the lateral or rear pocket:
WARNING!
THIS IS NOT A LIFE JACKET AND DOES NOT ASSURE THE DIVER OF KEEPING HIS/HER HEAD OUT OF THE WATER
- To use this jacket, a specific course held by a certified instructor must be attended.
- In case of emergency, face up buoyancy at the surface may not be provided to all users and in all conditions.
- Before use, check for good condition and proper operation of the jacket and make sure that no holes of damages are present.
- Follow all the instructions in the Owner's Manual.
- Do not inhale gases from inside the bag.
- Do not remove from the jacket.
Model: ____ Manufacturing year: ____
Table showing the buoyancy values (expressed in Newtons) for each jacket size.
Pictogram showing the max. tank capacity in litres.
76 Français
natural_image
Close-up of a mechanical device with metallic fittings and a handle (no visible text or symbols)GILETS STABILISATEURS CRESSI-SUB "FLIGHT CONTROL SYSTEM"
natural_image
Close-up of hands using a screwdriver to adjust or install a small component (no visible text or symbols)Fig. 3

natural_image
Close-up of black medical drape and medical clip with a small object on a white surface (no text or symbols visible)Fig. 4
natural_image
Close-up of hands using a tool to adjust or install a mechanical component (no visible text or symbols)Fig. 5

natural_image
Close-up of hands assembling a mechanical component (no visible text or symbols)Fig. 6
natural_image
Close-up of a small mechanical component with a circular head and small protrusions, no visible text or symbols.Fig. 8

natural_image
Close-up of hands holding a small object, possibly a device or tool, with no visible text or symbols.Fig. 7

natural_image
Close-up of hands holding a small object, possibly a tool or device, with no visible text or symbols.Fig. 9
82 Français
Fig. 10 Fig. 12

natural_image
Two black-and-white photos showing hands using a tool to adjust or install a small mechanical component (no text or symbols visible)Fig. 11 Fig. 13
84 Français
SOUPAPE DE PURGE RAPIDE
natural_image
Person adjusting a garment with a button (no visible text or symbols)
natural_image
Close-up of hands performing a massage or massage technique on a dark fabric garment (no visible text or symbols)
natural_image
Close-up of a person's arm holding a small object, possibly a button or tool, in a dark jacket (no visible text or symbols)natural_image
Person wearing a full-body diaphragm and safety harness, handling a small object (no visible text or symbols)Fig. 15
natural_image
Black-and-white photo of a person in full gear and cap, holding an object (no visible text or symbols)Fig. 16
88 Français
UTILISATION DE L'APPAREIL ET EVALUATION DES RISQUES
natural_image
Close-up of a mechanical device with metallic fittings and a handle (no visible text or symbols)GEBRAUCHSANWEISUNG FÜR TARIERJACKETS MIT FLIGHT CONTROL SYSTEM (FCS)
natural_image
Close-up of hands using a tool to adjust or install a mechanical component (no visible text or symbols)Abb. 3
natural_image
Close-up of black medical drape and medical clip with a small object on a white surface (no text or symbols visible)Abb. 4

natural_image
Close-up of hands using a tool to adjust or install a mechanical component (no visible text or symbols)Abb. 5

natural_image
Close-up of hands assembling a mechanical component (no visible text or symbols)Abb. 6

natural_image
Close-up of a small mechanical component with a circular inset and a small black part, isolated on a plain background (no text or symbols visible)Abb. 8

natural_image
Close-up of hands holding a small object, possibly a device or tool, with no visible text or symbols.Abb. 7

natural_image
Close-up of hands holding a small object, possibly a tool or device, with no visible text or symbols.Abb. 9
96 Deutsch
Abb. 10 Abb. 12

natural_image
Two black-and-white photos showing hands using a tool to adjust or install a small mechanical component (no text or symbols visible)Abb. 11 Abb. 13
98 Deutsch
SCHNELLABLASSVENTIL
natural_image
Close-up of hands adjusting a garment with a button (no visible text or symbols)
natural_image
Close-up of hands adjusting a circular object on a dark fabric garment (no visible text or symbols)
natural_image
Close-up of a hand holding a button on a dark garment, with no visible text or symbolsnatural_image
Person wearing a dʒ with blue trim and white lanyard, handling equipment (no visible text or symbols)Abb. 15
WICHTIG:
natural_image
Black-and-white photo of a person in full gear and hooded jacket, holding an object (no visible text or symbols)Abb. 16
102 Deutsch
natural_image
Close-up of a mechanical device with metallic fittings and a handle (no visible text or symbols)CHALECOS HIDROSTÁTICOS CRESSI-SUB CON "FLIGHT CONTROL SYSTEM"
natural_image
Close-up of a mechanical device with labeled parts, showing internal components and a pointer indicating a specific point (no text or symbols on the device itself)Pulsador de carga
natural_image
Close-up of hands using a screwdriver to adjust or install a small mechanical component (no visible text or symbols)Fig. 3

natural_image
Black-and-white photo of stacked backpacks and a small tool on a plain surface (no text or symbols visible)Fig. 4

natural_image
Close-up of hands adjusting a mechanical component (no visible text or symbols)Fig. 5

natural_image
Close-up of hands assembling a mechanical component (no visible text or symbols)Fig. 6

natural_image
Close-up of a small mechanical component with a circular inset and a small black part, isolated on a plain background (no text or symbols visible)Fig. 8

natural_image
Close-up of hands holding a small object, possibly a device or tool, with no visible text or symbols.Fig. 7

natural_image
Close-up of hands holding a small object, possibly a tool or device, with no visible text or symbols.Fig. 9
110 Español
Fig. 10 Fig. 12

natural_image
Two black-and-white photos showing hands using a tool to adjust or install a small mechanical component, with no visible text or symbols.Fig. 11 Fig. 13
112 Español
VÁLVULA DE DESCARGA RÁPIDA
natural_image
Close-up of hands adjusting a garment with a circular button (no visible text or symbols)
natural_image
Close-up of hands adjusting a circular object on a dark fabric garment (no visible text or symbols)
natural_image
Close-up of a person's arm holding a button with a tool, no visible text or symbolsnatural_image
Two black-and-white photos: one of a diver in gear holding a device, the other of a person in full gear adjusting equipment (no visible text or symbols)116 Español
WWW: http://www.cressi-sub.it