
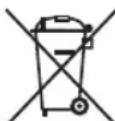
PCFR 1115 H - Deep fryer PROFICOOK - Free user manual and instructions
Find the device manual for free PCFR 1115 H PROFICOOK in PDF.
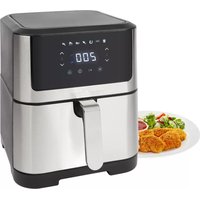
| Product Type | Air Fryer |
| Brand | ProfiCook |
| Model | PCFR 1115 H |
| Power Supply | 220-240 V~, 50/60 Hz |
| Power Consumption | 1700 W |
| Protection Class | I |
| Net Weight | 5.75 kg |
| Temperature Range | 80°C - 200°C |
| Timer | 1 to 60 minutes |
| Automatic Programs | 8 programs (fries, shrimp, meat, poultry, fish, steak, au gratin, bacon) |
| Display | Screen with indicator lights |
| Preheat Function | Yes (program P) |
| Auto Shut-off | Yes |
| Standby Mode | Yes |
| Pause Function | Yes (basket removal) |
| Safety | Safety switch, hot surface (warning) |
| Cleaning | Damp cloth, do not immerse |
| Coating | Non-stick |
| Included Accessories | Grease reservoir, inner basket |
| Warranty | Standard manufacturer (see manual) |
Frequently Asked Questions - PCFR 1115 H PROFICOOK
User questions about PCFR 1115 H PROFICOOK
0 question about this device. Answer the ones you know or ask your own.
Ask a new question about this device
Download the instructions for your Deep fryer in PDF format for free! Find your manual PCFR 1115 H - PROFICOOK and take your electronic device back in hand. On this page are published all the documents necessary for the use of your device. PCFR 1115 H by PROFICOOK.
USER MANUAL PCFR 1115 H PROFICOOK
LET OP: Anti-aanbaklaag
- Estos se consideraran valores guía. El tiempo y la temperaturaSEOSEOSEOSEOSEOSEOSEOSEOSEOSEOSEOSEOSEOSEOSEOSEOSEOSEOSEOSEOSEOSEOSEOSEOSEOSEOSEOSEOSEOSEOSEOSEOSEOSEOSEOSEOSEOSEOSEOSEOSEOSEOSEOSEOSEOSEOSEOSEOSEOSEOSEOSEOSEOSEOSEOSEOSEOSEOSEOSEOSEOSEOSEOSEOSEOSEOSEOSEOSEOSEOSEOSEOSEOSEOSEOSEOSEOSEOSEOSEOSEOSEOSEOSEOSEOSEOSEOSEOSEOSEOSEOSEOSEOSEOSEOSEOSEOSEOSEOSEO SEOEYO OMOOEOO OMOOEOO OMOOEOO OMOOEOO OMOOEOO OMOOEOO OMOOEOO OMOOEOO OMOOEOO OMOOEOO OMOOEOO OMOOEOO OMOOEOO OMOOEOO OMOOEOO OMOOEOO OMOOEOO OMOOEOO OMOOEOO OMOOEOO OMOOEOOO OMOOEOOO OMOOEOOO OMOOEOOO OMOOEOOO OMOOEOOO OMOOEOOO OMOOEOOO OMOOEOOO OMOOEOOO OMOOEOOO OMOOEOOO OMOOEOOO OMOOEOOO OMOOEOOO OMOOEOOO OMOOEOOO OMOOEOOO OMOOEOOO OMOOEOOO OMOOEOoo OMOOEOoo OMOOEOoo OMOOEOoo OMOOEOoo OMOOEOoo OMOOEOoo OMOOEOoo OMOOEOoo OMOOEOoo OMOOEOoo OMOOEOoo OMOOEOoo OMOOEOoo OMOOEOoo OMOOEOoo OMOOEOoo OMOOEOoo OMOOEOoo OMOOEOoo OMOOEOooo OMOOEOoo OMOOEOoo OMOOEOoo OMOOEOoo OMOOEOoo OMOOEOoo OMOOEOoo OMOOEOoo OMOOEOoo OMOOEOoo OMOOEOoo OMOOEOoo OMOOEOoo OMOOEOoo OMOOEOoo OMOOEOoo OMOOEOoo OMOOEOoo OMOOEOoo OMOOEO oo
- Sin embargo, puedeCambiar la temperatura y el tiempo predeterminados de las functions automaticas.
jEsto no es possiblemintras es usa el programa automatico P!
Uso del aparato
Thank you for choosing our product. We hope you will enjoy using the appliance.
Symbols in these Instructions for Use
Important information for your safety is specially marked. It is essential to comply with these instructions in order to avoid accidents and prevent damage to the appliance:

WARNING:
This warns you of dangers to your health and indicates possible injury risks.

CAUTION:
This refers to possible hazards to the appliance or other objects.

NOTE:
This highlights tips and information.
Contents
Overview of the Components. 3
General Notes 40
Special Safety Precautions for this Appliance. 41
Unpacking the Appliance 42
Overview of the Components/ Scope of Delivery. 42
Picture A. 42
Picture B: Symbols on the Control Panel 42
Notes for Use 42
Location 42
Electric Connection 42
Connected Wattage 42
Standby (Standby Mode) 42
Switching the Appliance On/Off 43
Before Initial Use 43
Useful Hints for Use 43
Function Buttons 43
Setting the Temperature and Time 43
Auto Functions 43
Using the Appliance 44
Pause Operation 44
End of Operation 44
Cleaning 44
Storage 45
Troubleshooting 45
Technical Data. 45
Disposal 45
Meaning of the "Dustbin" Symbol 45
General Notes
Read the operating instructions carefully before putting the appliance into operation and keep the instructions including the warranty, the receipt and, if possible, the box with the internal packing. If you give this appliance to other people, please also pass on the operating instructions.
- The appliance is designed exclusively for private use and for the envisaged purpose. This appliance is not fit for commercial use.
- Do not use it outdoors. Keep it away from sources of heat, direct sunlight, humidity (never dip it into any liquid) and sharp edges. Do not use the appliance with wet hands. If the appliance is humid or wet, unplug it immediately.
- When cleaning or putting it away, switch off the appliance and always pull out the plug from the socket (pull the plug itself, not the lead) if the appliance is not being used and remove the attached accessories.
- Do not operate the appliance without supervision. If you leave the room you should always turn the appliance off. Remove the plug from the socket.
- The appliance and the mains lead have to be checked regularly for signs of damage. If damage is found the appliance must not be used.
- Use only original spare parts.
- In order to ensure your children's safety, please keep all packaging (plastic bags, boxes, polystyrene etc.) out of their reach.

WARNING:
Do not allow small children to play with the foil. There is a danger of suffocation!
Special Safety Precautions for this Appliance
You will find the following symbol with warning character on the appliance:
WARNING: Hot surface!
Danger of burns!
During operation and afterwards, the temperature of the accessible surfaces will be very high.
- Grasp the fat tank with inserted basket by the handle. If necessary, use oven gloves.
-
During operation, hot steam may escape from the air outlet opening. Keep a sufficient distance.
-
Do not cover the air inlet opening and air outlet opening, in order to ensure sufficient air circulation.
- Keep sufficient distance (15 cm) to highly flammable objects such as furniture, curtains, etc!.
- Due to rising heat and vapours do not place the appliance under wall cupboards.
- Do not operate the appliance with an external timer or separate remote control system.
- Do not tamper with the safety switch.
- This appliance can be used by children aged from 8 years and above and persons with reduced physical, sensory or mental capabilities or lack of experience and knowledge if they have been given supervision or instruction concerning use of the appliance in a safe way and understand the hazards involved.
Children shall not play with the appliance. - Cleaning and user maintenance shall not be made by children unless they are older 8 years and supervised.
-
Keep the appliance and its cord out of reach of children less than 8 years.
-
Do not repair the appliance by yourself. Always contact an authorized technician. If the supply cord is damaged, it must be replaced by the manufacturer, its service agent or similarly qualified persons in order to avoid a hazard.

CAUTION:
This appliance is not intended to be immersed in water during cleaning. Please observe the instructions that we have included for you in the chapter "Cleaning".
Unpacking the Appliance
- Remove the appliance from its packaging.
- Remove all packaging materials like foils, filling materials, cable holders, and carton packaging.
- Check the scope of deliveries for completeness.
- If there are missing parts or obvious damage, do not use the appliance. Return it to your retailer immediately.
Overview of the Components / Scope of Delivery
Picture A
1 Air inlet opening
2 Air outlet opening
3 Housing
4 Fat tank with internal basket
5 Handle of the basket
6 Cover for the underlying release button
7 Control panel
8 Display
Picture B: Symbols on the Control Panel
9 indicator lamp
10 indicator lamp
11 indicator lamp
12 indicator lamp
13 indicator lamp
14°C button
15 indicator lamp
16 indicator lamp
17 button
18 button
19 button
20 Min button
21 Button
22 Button
23 Indicator lamp
24 P indicator lamp
25 indicator lamp
Notes for Use
Location
- Set the appliance onto a non-slip, level, and heat-resistant surface.
Take care that the appliance and the mains cable never are placed onto hot surfaces or near heat sources (e. g. range, hob).
Electric Connection
Before inserting the power plug into the outlet, check that the mains voltage to be used matches that of the appliance. You can find the required information on the nameplate.
Connected Wattage
The total power consumption of this appliance can be up to 1700 W. With this connected load a separate supply line protected by a 16 A household circuit breaker is recommended.

CAUTION: Overload!
If you use extension leads, these should have a cable cross-section of at least 1.5mm^2
- Do not use any multiple sockets, as this appliance is too powerful.
Standby (Standby Mode)

NOTE:
The appliance is in standby, if the button lights red.
When faced with the following situations, the appliance will switch into standby:
- When the power plug is inserted.
If no button is pressed for approx. 60 seconds. - When the time has elapsed.
- When you press and hold the button for approx. 3 seconds.
Switching the Appliance On/Off
Turn the appliance on and off by using the button.

NOTE:
Operation is only possible if the fat tank is used with the basket in the appliance.
- After the time has elapsed, the appliance will automatically switch into standby mode. The fan keeps running to cool down the appliance. After approx. 20 seconds, you will hear 5 beep sounds and the symbol goes off.
Before Initial Use
- There is a protective layer on the heating element. To remove this, operate the appliance for about 10 minutes without any contents.

NOTE:
Any smoke or smells produced during this procedure are normal. Please ensure sufficient ventilation.

WARNING:
Allow the appliance to cool down before you clean it!
- Disconnect the mains plug from the wall socket.
- Before using the appliance, wipe out the basket, the fat tank and its interior.
Useful Hints for Use
- This appliance is used for the preparation of solid foods. Do not prepare any soups or liquid foodstuffs in it.
- A safety switch prevents the use of the appliance without a basket with the fat tank.
To achieve an optimum result, fill the frying basket maximal up to the MAX marking only. Never overfill the frying basket, so that the food does not touch the heating element. - Never put oil or other liquids in the fat tank. In order to achieve crispy results, you can baste the food with a little oil.
- Do not prepare the appliance for high-fat foods (e.g. sausages).
- All foods can be prepared in the appliance, which are also suitable for the oven.
- Note that the dough expands during baking of cakes, bread or similar. Nothing must come into contact with the heating element.
- Foods that are cooked over one another, must be shaken after half way through the cooking time. Thus the result is optimized and prevents uneven cooking.
Tip: Remove the basket from the fat tank to be able to shake the content in a better way. - Pour water on homemade potato products after cutting at least 30 minutes to reduce the potato starch. Then dry the potato pieces with paper.
-
The cooking time depends on several factors: Size, condition, quantity of food and set temperature. For standard values, see "Function Buttons" "Auto functions".
-
If you do not preheat the hot air fryer, add 3 minutes to the cooking time.
- Fry steaks / larger quantities of meat in a pan previously before leaving to cook in the hot air fryer. Time and temperature are dependent on the desired degree of doneness.
- With the appliance, you can also reheat food. Set the time to 10 minutes and the temperature to 150^ .
Function Buttons

NOTE:
- The buttons on the appliance are touch keys. Gently touch the buttons with a finger to execute the function. Whenever a button is pressed, it will be confirmed by a beep sound.
- By pressing and holding the buttons + or - a fast-forward will start.
Setting the Temperature and Time
Use the and buttons to set the temperature and the time. Press the ^ C or Min button to toggle between the display of the temperature and the time. The display automatically changes after about 5 seconds if no button is pressed.

NOTE:
- The 0^ C button is displayed only when the temperature in the display is lit.
- The Min button is displayed only when the time in the display is lit.
Auto Functions
Press the button to select from the following auto functions:
| Mode | Pre-set temperature in °C | Pre-set time in min. |
| Preheating P 200 3 | ||
| French fries | 200 22 | |
| Prawns | 160 8 | |
| Meat | 200 25 | |
| Poultry | 180 20 | |
| Fish | 200 10 | |
| Steak | 200 12 | |
| Baked with cheese | 170 3 | |
| Bacon | 200 10 |

NOTE:
- These shall be considered as guide values. Depending on the size and weight, the time and temperature may be longer and higher or shorter and lower.
- You may, however, change the pre-set temperature and time of the auto functions. This is not possible while using the automatic program P!
Using the Appliance
- Connect the appliance to a properly installed earthed socket.

NOTE:
You will hear a beep sound and all symbols light up briefly. The button lights red.
- Press the button to switch the appliance on. You will see the pre-adjustment 190^ and 3 minutes.
- Select an auto function by using the button or set the time (1 - 60 minutes) and the temperature (80^ - 200^) individually by using the buttons and

NOTE:
You may use program P for preheating.
- Press the button to start the cooking process.

NOTE:
- Once the pre-set temperature is reached, the symbol will light green.
-
The symbol is switching between the colours red and green. This is normal and it indicates that the temperature is controlled by the thermostat and is being maintained.
-
Using the handle, pull the fat tank with the basket from the appliance.
- Fill the basket with the desired food.
- Slide the fat tank with the basket back into the appliance. It must engage.
- If necessary, shake the food after half the cooking time. Pull it out of the fat tank with the basket on the handle.

WARNING:
Hot steam can escape!
- Never shake the basket when it is in the fat tank, because this may contain hot oil.
-
Place the fat tank with basket on a heat-resistant surface.
-
Slide the cover of the release button towards the basket.
- Press the release button to remove the basket. Shake the contents of the basket.
- Put the basket back in the fat tank. This must engage.
- Slide the fat tank back into the appliance.
Pause Operation
- Press the button to pause the operation. The button is flashing. Press the button again to resume the operation. The button is continuously lit again.
- The operation will also be paused as soon as you remove the basket. In order to turn the appliance back on, insert the basket again.

NOTE:
- The appliance will start from the spot it has been paused.
- If, however, you pull out the power plug, your current settings will be lost. When inserting the power plug and pressing the button the appliance will show the pre-adjustment again.
End of Operation
- After the time has elapsed, the appliance will automatically switch into standby mode. After approx. 20 seconds, you will hear 5 beep sounds and the symbol goes off.
- Pull out the fat tank with the basket by the handle.
- Place the fat tank with basket on a heat-resistant surface.
- Slide the cover of the release button towards the basket.
- Press the release button to remove the basket. Put the food in a heatproof bowl.
- Slide the fat tank back into the appliance.
Cleaning

WARNING:
- Always turn the appliance off before cleaning it and remove the mains plug. Wait until the appliance has cooled down.
- Do not immerse the appliance in water! Doing so may result in an electric shock or fire.

CAUTION: Non-stick coating
- Do not use any wire brush or other abrasive objects.
- Do not use any acidic or abrasive detergents.
- The basket and fat tank can be cleaned in a warm rinse.
- Clean the appliance inside and outside with a slightly moist, not wet cloth.
Storage
- Clean the appliance as described. Let the accessories dry completely.
We recommend that you store the appliance in its original packaging when it is not to be used for a longer period.
Always store the appliance at a well ventilated and dry place outside the reach of children.
Troubleshooting
If a problem occurs, it is often only a small thing. Before you contact our service, please note the following information:
| Problem Possible Cause Remedy | ||
| The appliance is not working. | The appliance has no power supply. Check the sqck with another appliance. | |
| Plug in the mains plug correctly. | ||
| Check the main circuit breaker. | ||
| The grease drainage container and the basket are not properly inserted. | Check the correct position. | |
| The food is not cooked to the end. | The basket is too full. Reduce the amount of food | Smaller quantities are cooked evenly. |
| The temperature is set too low. Set a higher temperaure. | ||
| The cooking time is set too low. Set a longer period of time. | ||
| The food is cooked unevenly. | When foods are placed on top of each other, there is inadequate airflow. | The food must be shaken after half the cooking time. |
| The food is not crisp. | Foods are used, which is only suitable for a conventional fryer. | Use oven-ready food or sprinkle it with a little oil. |
| Smoke comes out of the appliance. | You are preparing very fatty foods. Fat splashes inside the appliance may cause the emission of fumes. Provide adequate ventilation. | |
| In the fat tank there are still fat residues from previous use. | Clean the fat tank after each use as described in the chapter "Cleaning". | |
| The fat tank with internal basket does not snap. | The basket is too full. Reduce the amount of food | |
| The basket in the fat tank is not seated properly. Insert the basket correctly. It must audibly snap. | ||
Technical Data
Model: PC-FR 1177 H
Power supply: 220 - 240 V~, 50 / 60 Hz
Power consumption: 1700 W
Protection class: I
Net weight: approx. 5.75kg
The right to make technical and design modifications in the course of continuous product development remains reserved.
This appliance has been tested according to all relevant current CE guidelines, such as electromagnetic compatibility and low voltage directives, and has been constructed in accordance with the latest regulations.
Disposal
Meaning of the "Dustbin" Symbol
Protect our environment: do not dispose of electrical equipment in the domestic waste.
Please return any electrical equipment that you will no longer use to the collection points provided for their disposal.
This helps avoid the potential effects of incorrect disposal on the environment and human health.
This will contribute to the recycling and other forms of re-utilisation of electrical and electronic equipment.
Information concerning where the equipment can be disposed of can be obtained from your local authority.
Instrukcja obslugi
Jaet COBtI INHOpMaIIO.
Copepkanne
O63op detae np6opa. 3
06ue 3ameuHn
CneuaNbHbIe yka3aHnno 6e3oNaChocTn
Jr 3ToRo np6opa .60
PacnaKobKa yctpoiCTBa. 61
063op detaneepnp6opa/KomnjeKT noctabkn.61
Pucyok A. 61
Pucyok B: CmboJI ha naHEn ynpabneHn..61
PpmeuHnno nncnoB3OBaHnna 61
PacnoonkeHne 61
3Jektpnueckoe noikknoyehne 61
Iotppe6nemam MoHoctb 62
Standby (Dexyphnbpekm) 62
BkIIOUeHHe/BbIKIOUeHHe np6opa. 62
Ipeep nepBbIM NcIOJIb3OBAHHeM 62
Yka3aHnno 3Kcnpyatau.62
I P E D U N P E X K D E H N E:
- Перацстков Всерда Вькючайтпрбор И Вьимаite ceTeBOI StTekeрньй pa3bEМ. ПоождITE, пoka прбор He OCTыИнТ.
He norpykaite np6op B Body! Nocne 3toro Bo3nkaet pck BO3ropania nn yda pa 3neKtpnueckm TOKOM.
BHIMAHHE: AHTnnparaphoe nokpbitne
He npimehaTe npoBOIOUHbIe UeTKeN NIN npedMeTbIC a6pa3nBbIM NOKpbITHeM.
He npimMeHnTe CnIbHbIe nIN a6pa3nBbIe MoIOuIe cpeDCTBA.
Kop3nHy uauy JnJx npa MoXHO OuHuaTb nyTEMnpmbIBKN TENIOBDE.
OuHauTe npBop n3Hytpn n ChapyK n CnerKa yBnaKHeHHo, HO He MOKpO TprnoHQoN.
XpaHeHne
-Почистуе устю В COOTВETCBN C ONICAHNEM. Даite akceccyapam NOHOCTBIO BICOXYHTb.
- PekomeHdyetc xpaHnTb yCTpoiCTBO B erO opmHaBHOH ynaKOBKe, eCNI OHO He 6yDet INCNOJIb3OBAtbcrDINITeJIbHOe Bpem.
Bcerda xpaHnTe yctpoNCTBO B cyXOM, xopoOIO npoBeTpnaeMOM MecTe, HeIOCTyHOM DnIa DeTei.
YcTpaHHe HEnCnpaBHOtei
Bo3NkaHouIe np6IembI qacTo He yBIAHOCTc cepBe3HbIMn. Ipeed o6paueHem B haw cepBncbI ueHTp npocm npouH- TaTb cNeDuOuYIO HOpMaUHO:
Iotpe6JraMaM MaOuHocTb: 1700BaTT
Klacc 3aunTbI: I
Bec HeTTO: npu65.5,75 Kr
CoxpaHeNo npaBo Na TexHnueckne N KOHCTpyKuOnHHbIe N3MeHeHnB pAMkax npoDoJIkaUoSeiCra pa3pa60Kn npOdykTa.
3To n3dJIne npoJNo BCE Heo6xOaMbIe n aKTyaIbHbIe npOBepKn, npEaNcAHHbIe dIpeKTHBOI CE, K npM. Ha 3JIeKTPOMaHTHyIO COBmCTnMOCTb I COOTBeTCTBNE Tpe6oBaHnM K H3KOBoThOH TexHKe, OHO bIo TAKKe COKHcTpUPOBaHO INocTpoEHO C yHeTOM NocJeDHX Tpe6oBaHn IO TexHKe Be3OnaChOCTn.
Yttnn3aun
3haueHne CNMBOJaKop3nHa

3aunTa OKpykaUoien Cpebl: He donyckaetc yTnIn3aun 3JeKTPonpnbopOB BmecTe C bI-TOBbIMN OTXoJamn.
Yttnn3aun yCTapeBwei TexHnKn HncnPpABhIX 3NeKTPponpB6OpOB npOn3BOuNTcB RopOdcknx pNEMhbx NyHKtax.
He donyckaIte He npabnIbHoY tynI3auin OTxOOB.3To HAnocIT Bpe OkpyKaIOSe CpeE N OKa3bBaet HeratNBHOE BO3DeIcTBne Ha 3DopOBBe IIOe.
Oka3bIaBte coaeCTBne nporpamme yTnIIN3aunn n dpyrMM fopmam nepepa60TK n3NeKtpoHHoN n3NeKtpuueckoTeXHKn.
HOpMaIuO NyHKtax yTINN3aun 6bITOBoTExnKMOXHO NOJUHTB B MECTbIX OpraHAX Blactn.
aai
PC-FR 1177 H.
60/50~240-220
1700
1.
5,75
jaiuui jyglil qg 3 aauuaa g aaii 1jaj 1 jaiu b
L
g j 11 CE 1 1 1
"aaal all gdo" jor giso
3 1
A. a1 + a2 + a_3 = 4
JUdo Juaa 1 g a aal aay 10 jao 10 Jauo
auiuuiuuiuuiuui
alaiabll aowllg aolll byl i 0e alnb
a aaa aaaa b b b b b b b b b b b b b b b
joo 1
4ab = 6
Jglio 2u 10 g aagai jI So jajai jao Ie
.1ab
a
. 2.4.5.10.4.5.10.11
.ahwslgaiaaoo
12 ②
·aabjoo
.dua Cua! sJg
Lgolgl
ab = 30
j 1 j0g0 g0g0g0g0g0g0g0g0g0g0g0g0g0g0g0g0g0g0g0g0g0g0g0g0g0g0g0g0g0g0g0g0
190 3 2
1j)GgIbglM yJyIaIeIwI gJyIaIeIb JyIaIeIb 3 (204200J!Jg2080J)80JyJI(d660
+jzjzjzjzjzjzjzj
ab = 120
jssuill P golipduldiS
gall alesu 11 jill de bol A
4ab = 5a
jolgaaa aabgabol jolal jglglae
S_ OBC = 12 · CO · BC = 12 × CD × 5
3 100000000000000000000000000000
gao gao jia jia jia jia jia jia jia jia jia jia jia jia jia jia jia jia jia jia jia jia jia jia jia jia jia jia jia jia jia jia jia jia jia jia jia jia jia jia jia jia jia jia
.
4wolg. gbal 8o 2023 12345678901123456789011234567890
aai jia aaii ge gao gao jia jia
y = x^2 + 1
1jLwJooi jS
i gjg jgi jio loogc alwcljoo
jLwJgSg
.0jolp glaa 1w 1d aI 10 jgul 1jz .9
.10
alwUogoo 10. alwU alljy jzul jdz
gaaaagaaaagaaagaaagaaagaaagaaagaaagaaagaaagaaagaaagaaagaaagaaagaaagaaagaaagaaagaaagaaagaaagaaagaaagaaagaaagaaagaaagaaagaaagaaagaaagaaagaaagaaagaaagaaagaaagaa
joo joo 1000000000000000000000000000000000000
Lgso 1
12
yjgluagg.dwglbclol3jaoa
- S AOB S ADB S_ BDO
gluaaagabglaaiiiaa aieaae gaaalccg aai
cuiuai jn jssu jgwljj aalwjj:
.
0 0du
aalalalalalalalalalalalalalalalalalalalal
a + b = 5
15 k 1g 1j 1 j 10 1 g 1 g 1 g 1 g 1 g
(p0w15)afoLao gJg
1g
. bla
S OBC = S BOC + S_ BOC
.
aJyIgJyIyIyIyIyIyIyIyIyIyIyIyIyIyIyIyIyIyIyIyIyIyIyIyIyIyIyIyIyIyIy
JgJgJgJgJgJgJgJgJgJgJgJgJgJgJgJgJgJgJgJgJgJgJgJgJgJgJgJgJgJgJgJgJgJgJgJgJgJgJgJgJgJgJgJgJg
aai 1 aaii jai jai iai s ie pai ool ool ool ool
.aaabblb
jlll jll lably
Jgglj 151 pduuubl jn no nlaaalll aalb y b
8
8 j 150
J5 J5 1. daxx y jy Lds Jd. dx x y jy Jdy
J 1
j
:
J 1
"
67
67
67.
66
66
66
4olc Udo 30
g Lg jalgl Jgll Jg Jg Jg Jg Jg Jg Jg Jg Jg Jg Jg Jg Jg Jg Jg Jg Jg Jg Jg Jg Jg Jg Jg Jg Jg Jg Jg Jg Jg Jg Jg Jg Jg Jg Jg Jg Jg Jg Jg Jg
sJglil pluaow jglalii
(aIbIoo 51 g (aIbO aoo) y) aIg bIg oIbI I aai I aai I g I b, jIgJIS I. dIy du ng JgJgU puau y. oolal bawilg
jgl jglg jglg jgl
131 (Jusgill Uw Jg dawj wll) 150 yy jll
yuljull jll jn nn jllg jil. djl 0jla uic lsl
jglwl plzwlw jc gll wai lgl alx51 uic.
JgIoo jc Iu (Lxg jjulgl g 2al1
:
y
山
jglpltaeewgws j3 JbLiquoyd
pLuswyyIyloJzgo
Lg 100000000000000000000000000000000000000000000000
jglg
:

jblao 0g jyag ciao de jblae aol yjoa jll iia jao
:

1 1
m : x = 1 或 3x + 4y + 1 = 0

aal jao j 12yabai a jolal jslj g jagll p aai bla . Cloglgl jai all oall jai l
1

- LET OP: Anti-aanbaklaag
- Uso del aparato
- Symbols in these Instructions for Use
- WARNING:
- CAUTION:
- NOTE:
- Contents
- General Notes
- Special Safety Precautions for this Appliance
- WARNING: Hot surface!
- Danger of burns!
- Unpacking the Appliance
- Overview of the Components / Scope of Delivery
- Picture A
- Picture B: Symbols on the Control Panel
- Notes for Use
- Location
- Electric Connection
- Connected Wattage
- CAUTION: Overload!
- Standby (Standby Mode)
- Switching the Appliance On/Off
- Before Initial Use
- Useful Hints for Use
- Function Buttons
- Setting the Temperature and Time
- Auto Functions
- Using the Appliance
- Pause Operation
- End of Operation
- Cleaning
- CAUTION: Non-stick coating
- Storage
- Troubleshooting
- Technical Data
- Disposal
- Meaning of the "Dustbin" Symbol
- Instrukcja obslugi
- Copepkanne
- I P E D U N P E X K D E H N E:
- BHIMAHHE: AHTnnparaphoe nokpbitne
- XpaHeHne
- YcTpaHHe HEnCnpaBHOtei
- Yttnn3aun
- 3haueHne CNMBOJaKop3nHa
- aai
- a
- Lgolgl
- 4olc Udo 30
- 山
- 1
Brand : PROFICOOK
Model : PCFR 1115 H
Category : Deep fryer