LFP519X - Basket ELECTROLUX - Free user manual and instructions
Find the device manual for free LFP519X ELECTROLUX in PDF.
Frequently Asked Questions - LFP519X ELECTROLUX
User questions about LFP519X ELECTROLUX
0 question about this device. Answer the ones you know or ask your own.
Ask a new question about this device
Download the instructions for your Basket in PDF format for free! Find your manual LFP519X - ELECTROLUX and take your electronic device back in hand. On this page are published all the documents necessary for the use of your device. LFP519X by ELECTROLUX.
USER MANUAL LFP519X ELECTROLUX
2.2 EneKtpnuecko CBbp3BaHe

BHIMAHNE!
Pnck OT noxap nIu TOKOB yIap.
- BcunK en. Bp3kn Tpr6Ba da ce HnpaBt OT KBaIuΦnUpaH eJektpotexHnK.
- YBepete ce, ye napameTpnte Ha Ta6eKkata c TexHnueckn DaHHn ca CbBMeCTUMC eJKeKTpNueCKNTe DaHHN Ha 3axpaHbAaata MpeJa.
AkoCmBbT()HnCBa Bbpxy Ta6eNkata C daHHu, yCTpOiCTBOTo Tp6Ba Da ce 3a3EMI.
Bunar n3no3BaIte npaBnHNO MOHTnpaH KOHTaKT CbC 3aUNTa OT TOKOB yIap.
He no3B0nlaBaiTe eJeKtpuuecknte Ka6en Da ce npennntat.
He n3noJI3BaIte pa3KIOHITeIN nn aIaIaTepn C MHORO BXOIOBE.
Ako KOHTaKbTe pa3Xna6eH, He CBbp3BaITe 3axpaHbauu IeNceJ.
He n3dbpnbaiTe 3axpaHbauJia Ka6eJ, 3a da n3knouHTe ypeJa. BnHaHn n3dbpNbaiTe eenceJa Ha 3axpaHbAHeTo.
3aunata OTOKOB ynap Ha ropeuTe n 30InpaHn Yactn Tp6Ba Da 6bde 3aTeHaTn PO TaBb HauHH, Ye da He MoKe Da ce OTcpaHn 6e3 INHCTpyMeHTN. - YBepete ce, ye ypeDbTe e nHcTaInpaH npabuIHo. Xla6ab nn He npabnJeH eJIeKtpueckn Ka6eJ MoKe da DoBeDe do nperepBaHe Ha KJIemTe.
CbpxeTe ypeDa B KpaHa HnHctanaunra.YBepTe ce,Ye nMa DOCTbn Do MpeKaTa Cnei HnHctanaunra.
2.3 V3noJ3BaHe

BHIMAHNE!
Puck OT HapaHyaHe, n3rapaHnI TOKOB yap.
To3n ypeE npedHa3HaueH cMo 3a roTBeHe. He n3noJ3BaIte ypeDa 3a npyru ceJIi.
He npomehnTe npedHa3haueHneTo Haypeda.
He pa6oTeTc ypeDa c MOKpn pbue nJIN KOrato mMa KOHTaKT C BOda.
- I3noJI3BaIte caMo akcecoapnte, OocTaBeHc cypeHa.
- Na3eTe NnAmbK nHn HaropeueHn npedMeTn daJeY OT Ma3HHaTa nHn OINOTO NO Bpeme Ha rotBeHe n PbpxKeHe.
He n3no13BaIte Hnokpnte neKtpueeckpeuETKn.
He n3noJI3BaIte ypeJa KaTo NOBbpxHOCT 3a CbXpaHHeHne.
He n3no3BaTe lynn, 6nHOKn nn npoobn ONTnUHN yCTpoiCTBa 3a DnpeKTHO BRJexJaHe B OCBetIeHneTo Haypeda.
Ako ypeBt pa6OTn C dpyr n yCTpoNCTBa, MaKcImaHTo pa3pa6OteHo HAnraHe He Tp6Ba Da hAdBnUba 4 Pa (4x10⁻⁵ 6ap).
2.4 O6cnyXbaHe
3a nonpaBka Ha ypeDa ce CBbpxeTe c OTOpN3npaH cepBn3eH ueHTbp. 13noJ3BaIte camo opuRHaHn pe3epBHN qactn.
OTHOCHO JAMnata(HTe) BbTpE B TO3n npOdyKT n pe3epBnTe JAMn, npOdaBaHn OTJeHNO: Te3n JAMn ca npedHa3HaueHn Da n3DbpxkAT Ha ekTpeMHn fN3NuYeCKn YcNoBnB DOMaKInHcN ypeN, KaTO Tempepatya, BV6paun, BlaxHoCT nn Ca npedHa3HaueHn Da CNrHaJIN3npaT INΦopMau 3a pa6oTHOTO cbCToHne Ha ypeDa. Te He ca npedHa3HaueHn 3a IN3NoJ3BaHe B dpyrN pRINOxKeHn I He ca NODXODAa 3a OCBETBAHe Ha NOMeUeHn B DOMAKINHCTBOTo.
2.5 IV3xBbpyrJHe

BHIMAHNE!
PnCK OT HapaHbAHe NJI 3aDywaBaHe.
CbpxKeTe ce c 6uHcknte BnaCTn 3a HopMaun Ka Da n3XBpnte ypea.
- N3KJIIOUe Te ypeDa oTeJekTpO3axpaHbaHeTo.
- ɪЗbaɪdTe 3axpaɪnBaɪŋa eɪeɪktpnueckn Kaβeɪn B 6ɪnɪzOCT do ypeə n Iro nɪxBbPJIeTe.
3.ИHCTAJALIЯ

BHIMAHNE!
Bx. rnaBa "Be3onacHocT".
ФиNTbp cakTNBeH BbTneH
BpeMeTo 3a HacnUaHe Ha qntbpa C AKTNBeH Bb- rIeH 3aBnCn OT Tuna roTBeH n peIOBHOcTTa Ha noCTBaHe Ha qntbpa 3a Ma3HHn. BkKTe JnCTOBKaTa, BKIOUeHa B akcecoapa.
6.2Почиствае на Фпгьра 3a Ma3ннн
ФИПТРИТЕ се моHTираTс пOMоцта Ha ckOBи UцфTOBE, pa3пОложен OT obpaTHaTa CTpaHa.
3a da nouchnte foNtbpa:
- HaTnCHeTe npbKkata Ha cko6aTa 3a MoHTax Bbpy NaHeJa Ha qnIbpa nOa6cop6aTopa (1).
2.ЛeкнakIoHete npedHaTa YacT HaФиNTbpa HanoJy (2), cIeД KoetoДрьнHeTe.
IobopeTe IbpBNTe DBe CTbKN 3a BCNUKn fHJTPn.
3. NocTeTe fNITPte 3a Ma3HHn Ha pka, KaTO n3NoI3BaTe r6a c Hea6pa3NBn npenapatn nn rN NOCTeB CbDOMnHa MaUNHa. PpenOpbVame pbHNOuNTBaHe Ha fNITPte 3a Ma3HHn.
i
CbdomnHaTa Tp6Ba Da e HactpoHa Ha HnCKa TemNepaTpa N KpaTbK UKNbl. FNtbpT 3a Ma3HnH MoKe Da 3ary6u CBeta CN, HO TOBA He BnIe Bbpxy pa6oTaTa Ha ypeDa.
- 3a MOHTIpaHe Ha qnITpIte o6paTHO, n3IbJIHTe IbPbIte DBe CTbIKN B o6paTeH peI.
IobopeTe cTbKnTe 3a BCnUKNΦnITpn, aKo e npNJIOXIMO.
6.3 CmHa Ha qnTbpa cakTNBeH BbrHeh - (no n36op)
i
B 3aBnCmOcT OT BnDa, fNtBpT MoKe Da 6bDe nH He MoKe Da 6bDe pereHepnPah. BnKTe JnCTOBkata, npedocTaBeHa c fNtBpa.
3a da cmeHnte fHITbpa:
1.ИЗВаДeTe ΦИЛТРИТe 3a Ma3HиН OТуpeDA.
BnKTe ,NouCTBaHe Ha qnITbpa 3a Ma3HnH" B Ta3N rJaBa.
2.ИЗдьрай Te pa3dйпгя КБМ ДОЛнотаЧаСТ Ha ФиNTьpa.
- JIeKo HAKNoHTe npeHaTa YaCT Ha cnTbpa HaDony, CneKoETo DpbHHeTe.
4.3a MOHTnpaHe Ha cHITbP n3nHHeTe CTbIKnTe B o6paTeH peI.
6.4 CmHa Ha JAmnata
To3n ypeD e cHa6DeH cBc CBeToOnoNHa nAmnUka (LED). Ta3n Yact Tpr6Ba Da ce CMeHN eINHCTBeHO OT TexHk. B cIyau Ha HEn3npaBHOCT BVKTe,ObCnyKBaHe" B rIaBa ,InHCTpyKuIN 3a 6e3ONaCHOCT".
7. OTCTPAHЯBAHE HA HEN3ПРABHOCTN

BHIMAHNE!
Bx. rnaBa "Be3oNaCHocT".
7.1 KaKa Da NocTbNHTe, aKo...
Welcome to Electrolux! Thank you for choosing our appliance.

Get usage advice, brochures, troubleshooting, service and repair information: www.electrolux.com/support
Subject to change without notice.
CONTENTS
1.SAFETY INFORMATION. 54
2.SAFETYINSTRUCTIONS 56
3. INSTALLATION 58
4.PRODUCT DESCRIPTION 58
5.DAILYUSE. 58
6.CARE AND CLEANING 59
7.TROUBLESHOOTING 60
8. ENVIRONMENTAL CONCERNS 61
1. SAFETY INFORMATION
Before the installation and use of the appliance, carefully read the supplied instructions. The manufacturer is not responsible for any injuries or damage that are the result of incorrect installation or usage. Always keep the instructions in a safe and accessible location for future reference.
1.1 Children and vulnerable people safety
- This appliance can be used by children aged from 8 years and above and persons with reduced physical, sensory or mental capabilities or lack of experience and knowledge if they have been given supervision or instruction concerning the use of the appliance in a safe way and understand the hazards involved. Children of less than 8 years of age and persons with very extensive and complex disabilities shall be kept away from the appliance unless continuously supervised.
- Children should be supervised to ensure that they do not play with the appliance.
-
Keep all packaging away from children and dispose of it appropriately.
-
Keep children and pets away from the appliance when it operates.
- Children shall not carry out cleaning and user maintenance of the appliance without supervision.
1.2 General Safety
- This appliance is intended for domestic use above hobs, cookers and similar cooking devices.
- This appliance is designed for single household domestic use in an indoor environment.
- This appliance may be used in offices, hotel guest rooms, bed & breakfast guest rooms, farm guest houses and other similar accommodation where such use does not exceed (average) domestic usage levels.
- Before carrying out any maintenance, disconnect the appliance from the power supply.
- CAUTION: Accessible parts may become hot during use with cooking appliances.
- Use only the fixing screws supplied with the appliance if not supplied, use the screws recommended in the installation instructions. Install the appliance in a safe and suitable place that meets installation requirements.
- WARNING: Failure to install the screws or fixing device in accordance with these instructions may result in electrical hazards.
- Do not use adhesives to fix the appliance.
- The minimum distance between the hob surface on which the pans stand and the lower part of the appliance shall be at least 65~cm , unless otherwise specified in the installation instructions for the appliance or hob.
- The discharge of air must comply with local authorities regulations.
-
Ensure good air ventilation in the room where the appliance is installed to avoid the backflow of gases into the room from appliances burning gas or other fuels, including open fires.
-
Make sure that the ventilation openings are not blocked and the air collected by the appliance is not conveyed into a duct used to exhaust smoke and steam from other appliances (central heating systems, thermosiphons, water-heaters, etc.).
- When the appliance operates with other appliances the maximum vacuum generated in the room should not exceed 0.04 mbar.
- If the supply cord is damaged, it must be replaced by the manufacturer, its Authorised Service Centre or similarly qualified persons to avoid an electrical hazard.
- If the cord set is damaged, it must be replaced by a special cord set available from the manufacturer or its Authorised Service Centre.
- If the appliance is connected directly to the power supply, the electrical installation must be equipped with an isolating device that allows to disconnect the appliance from the mains at all poles. Complete disconnection must comply with conditions specified in the overvoltage category III. The means for disconnection must be incorporated in the fixed wiring in accordance with the wiring rules.
- Do not flambé under the appliance.
- Do not use to exhaust hazardous or explosive materials and vapours.
- Clean the appliance regularly with a soft cloth to prevent the deterioration of the surface material.
- Do not use a steam cleaner, water spray, harsh abrasive cleaners or sharp metal scrapers to clean the surface of the appliance. Use only neutral detergents.
- Clean grease filters regularly (at least every 2 months) and remove grease deposits from the appliance to prevent the risk of fire.
- Use a cloth to clean the interior of the appliance.
2. SAFETY INSTRUCTIONS
2.1 Installation

WARNING!
Risk of injury, electric shock, fire, burns or damage to the appliance.
- Only a qualified person must install this appliance.
- Do not install or use a damaged appliance.
- Follow the installation instructions supplied with the appliance.
- Always take care when moving the appliance as it is heavy. Always use safety gloves and enclosed footwear.
- Before installing the appliance remove all the packaging, the labelling and the protective film.
- Do not install the exhaust air into a wall cavity, unless the cavity is designed for that purpose.
2.2 Electrical connection

WARNING!
Risk of fire and electric shock.
- All electrical connections should be made by a qualified electrician.
- Make sure that the parameters on the rating plate are compatible with the electrical ratings of the mains power supply.
- If the symbol () not printed on the rating plate, the appliance must be earthed.
Always use a correctly installed shockproof socket. - Do not let the electricity mains cable tangle.
- Do not use multi-plug adapters and extension cables.
- If the mains socket is loose, do not connect the mains plug.
- Do not pull the mains cable to disconnect the appliance. Always pull the mains plug.
- The shock protection of live and insulated parts must be fastened in such a way that it cannot be removed without tools.
Make sure the appliance is installed correctly. Loose and incorrect electricity
mains cable can make the terminal become too hot.
- Connect the appliance at the end of the installation. Make sure that there is access to the mains after the installation.
2.3 Use

WARNING!
Risk of injury, burns and electric shock.
- This appliance is for cooking purpose only. Do not use the appliance for other purpose.
- Do not change the specification of this appliance.
- Do not operate the appliance with wet hands or when it has contact with water.
- Use only the accessories supplied with the appliance.
- Keep flames or heated objects away from fats and oils during cooking and frying.
- Do not use uncovered electric grills.
- Do not use the appliance as a storage surface.
- Do not use magnifying glasses, binoculars or similar optical devices to look directly at the lighting of the appliance.
- If the appliance works with other devices, the maximum developed pressure must not exceed 4 Pa (4x10⁻⁵ bar).
2.4 Service
To repair the appliance contact the Authorised Service Centre. Use original spare parts only.
- Concerning the lamp(s) inside this product and spare part lamps sold separately: These lamps are intended to withstand extreme physical conditions in household appliances, such as temperature, vibration, humidity, or are intended to signal information about the operational status of the appliance. They are not intended to be used in other applications and are not suitable for household room illumination.
2.5 Disposal

WARNING!
Risk of injury or suffocation.
-
Contact your municipal authority for information on how to dispose of the appliance.
-
Disconnect the appliance from the mains supply.
-
Cut off the mains electrical cable close to the appliance and dispose of it.
3. INSTALLATION

WARNING!
Refer to Safety chapters.
3.1 Installation instructions

For complete information about the installation of the appliance refer to a separate installation booklet.
4.PRODUCT DESCRIPTION
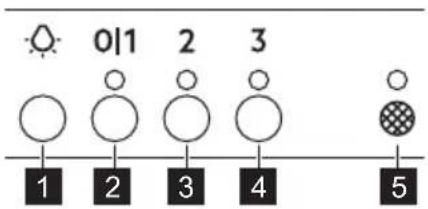
4.1 Control panel overview
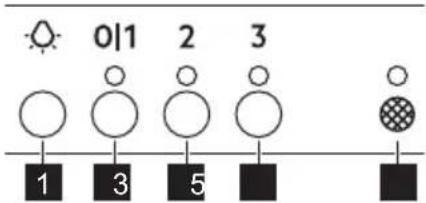
Function Description
1 Lamp Turns the lights on and off.
2 First speed / Off The motor switches to first speed level. Second press turns off the appliance.
3 Second speed The motor switches to second speed level.
4 Third speed The motor switches to third speed level.
Filter notification Reminds to change or clean the charcoal filter and clean the grease filter.
5. DAILY USE
5.1 Using the hood
Check the recommended speed according to the table below.
011 While heating up food, cooking with covered pots.
2 While cooking with covered pots on multiple cooking zones or burners, gentle frying.
3 While boiling and frying big quantities of food without a lid, cooking on multiple cooking zones or burners.

It is recommended to leave the hood operating for approximately 15 minutes before and after cooking.
Activating the appliance
To operate the hood:
- Press the first speed button switch on the appliance.
- If needed, change the speed by pressing the desired button.
Deactivating the appliance
To turn off the appliance press the first speed button again.
Lighting

The hood lighting works independently to other hood functions.
Activating and deactivating the lighting To illuminate the cooking surface press the light button
To switch off the lights, press the light button again.
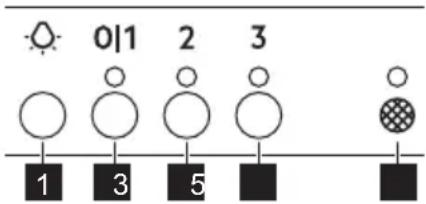
5.2 Filter notification
Filter alarm reminds to change or clean the charcoal filter and clean the grease filter. The filter indicator is turned on for 30 seconds if the grease filter must be cleaned. The filter indicator flashes for 30 seconds if the charcoal filter must be replaced or cleaned.

Refer to cleaning the grease filter in care and cleaning chapter.

Refer to cleaning the charcoal filter or replacing the charcoal filter in care and cleaning chapter.
To reset the function press the button 3 for 3 seconds.
To activate or deactivate function:
- Switch off the appliance.
- To activate function press the button for 3 seconds.
If the function is activated, the indicator flashes two times.
3. To deactivate function press the button for 3 seconds.
If the function is deactivated, the indicator flashes once.
6. CARE AND CLEANING
6.1 Notes on cleaning
Cleaning Agents
Do not use abrasive detergents and brush
Clean the surface of the appliance with a soft cloth with warm water and a mild detergent.
After cooking some parts of appliance can get hot. To avoid stains appliance must be cooled down and dried with clean cloth or paper towels.
Clean stains with a mild detergent.
Keep the hood clean
Clean the appliance each month to prevent the deterioration of the surface material.
Clean the interior and grease filters carefully from fat. Fat accumulation or other residue may cause fire.
Follow the instructions to clean the filters when the filter notification is on. Refer to the Daily Use chapter.
Charcoal filter
The time of saturation of the charcoal filter varies depending on the type of cooking and the regularity of cleaning the grease filter. Refer to leaflet included in the accessory.
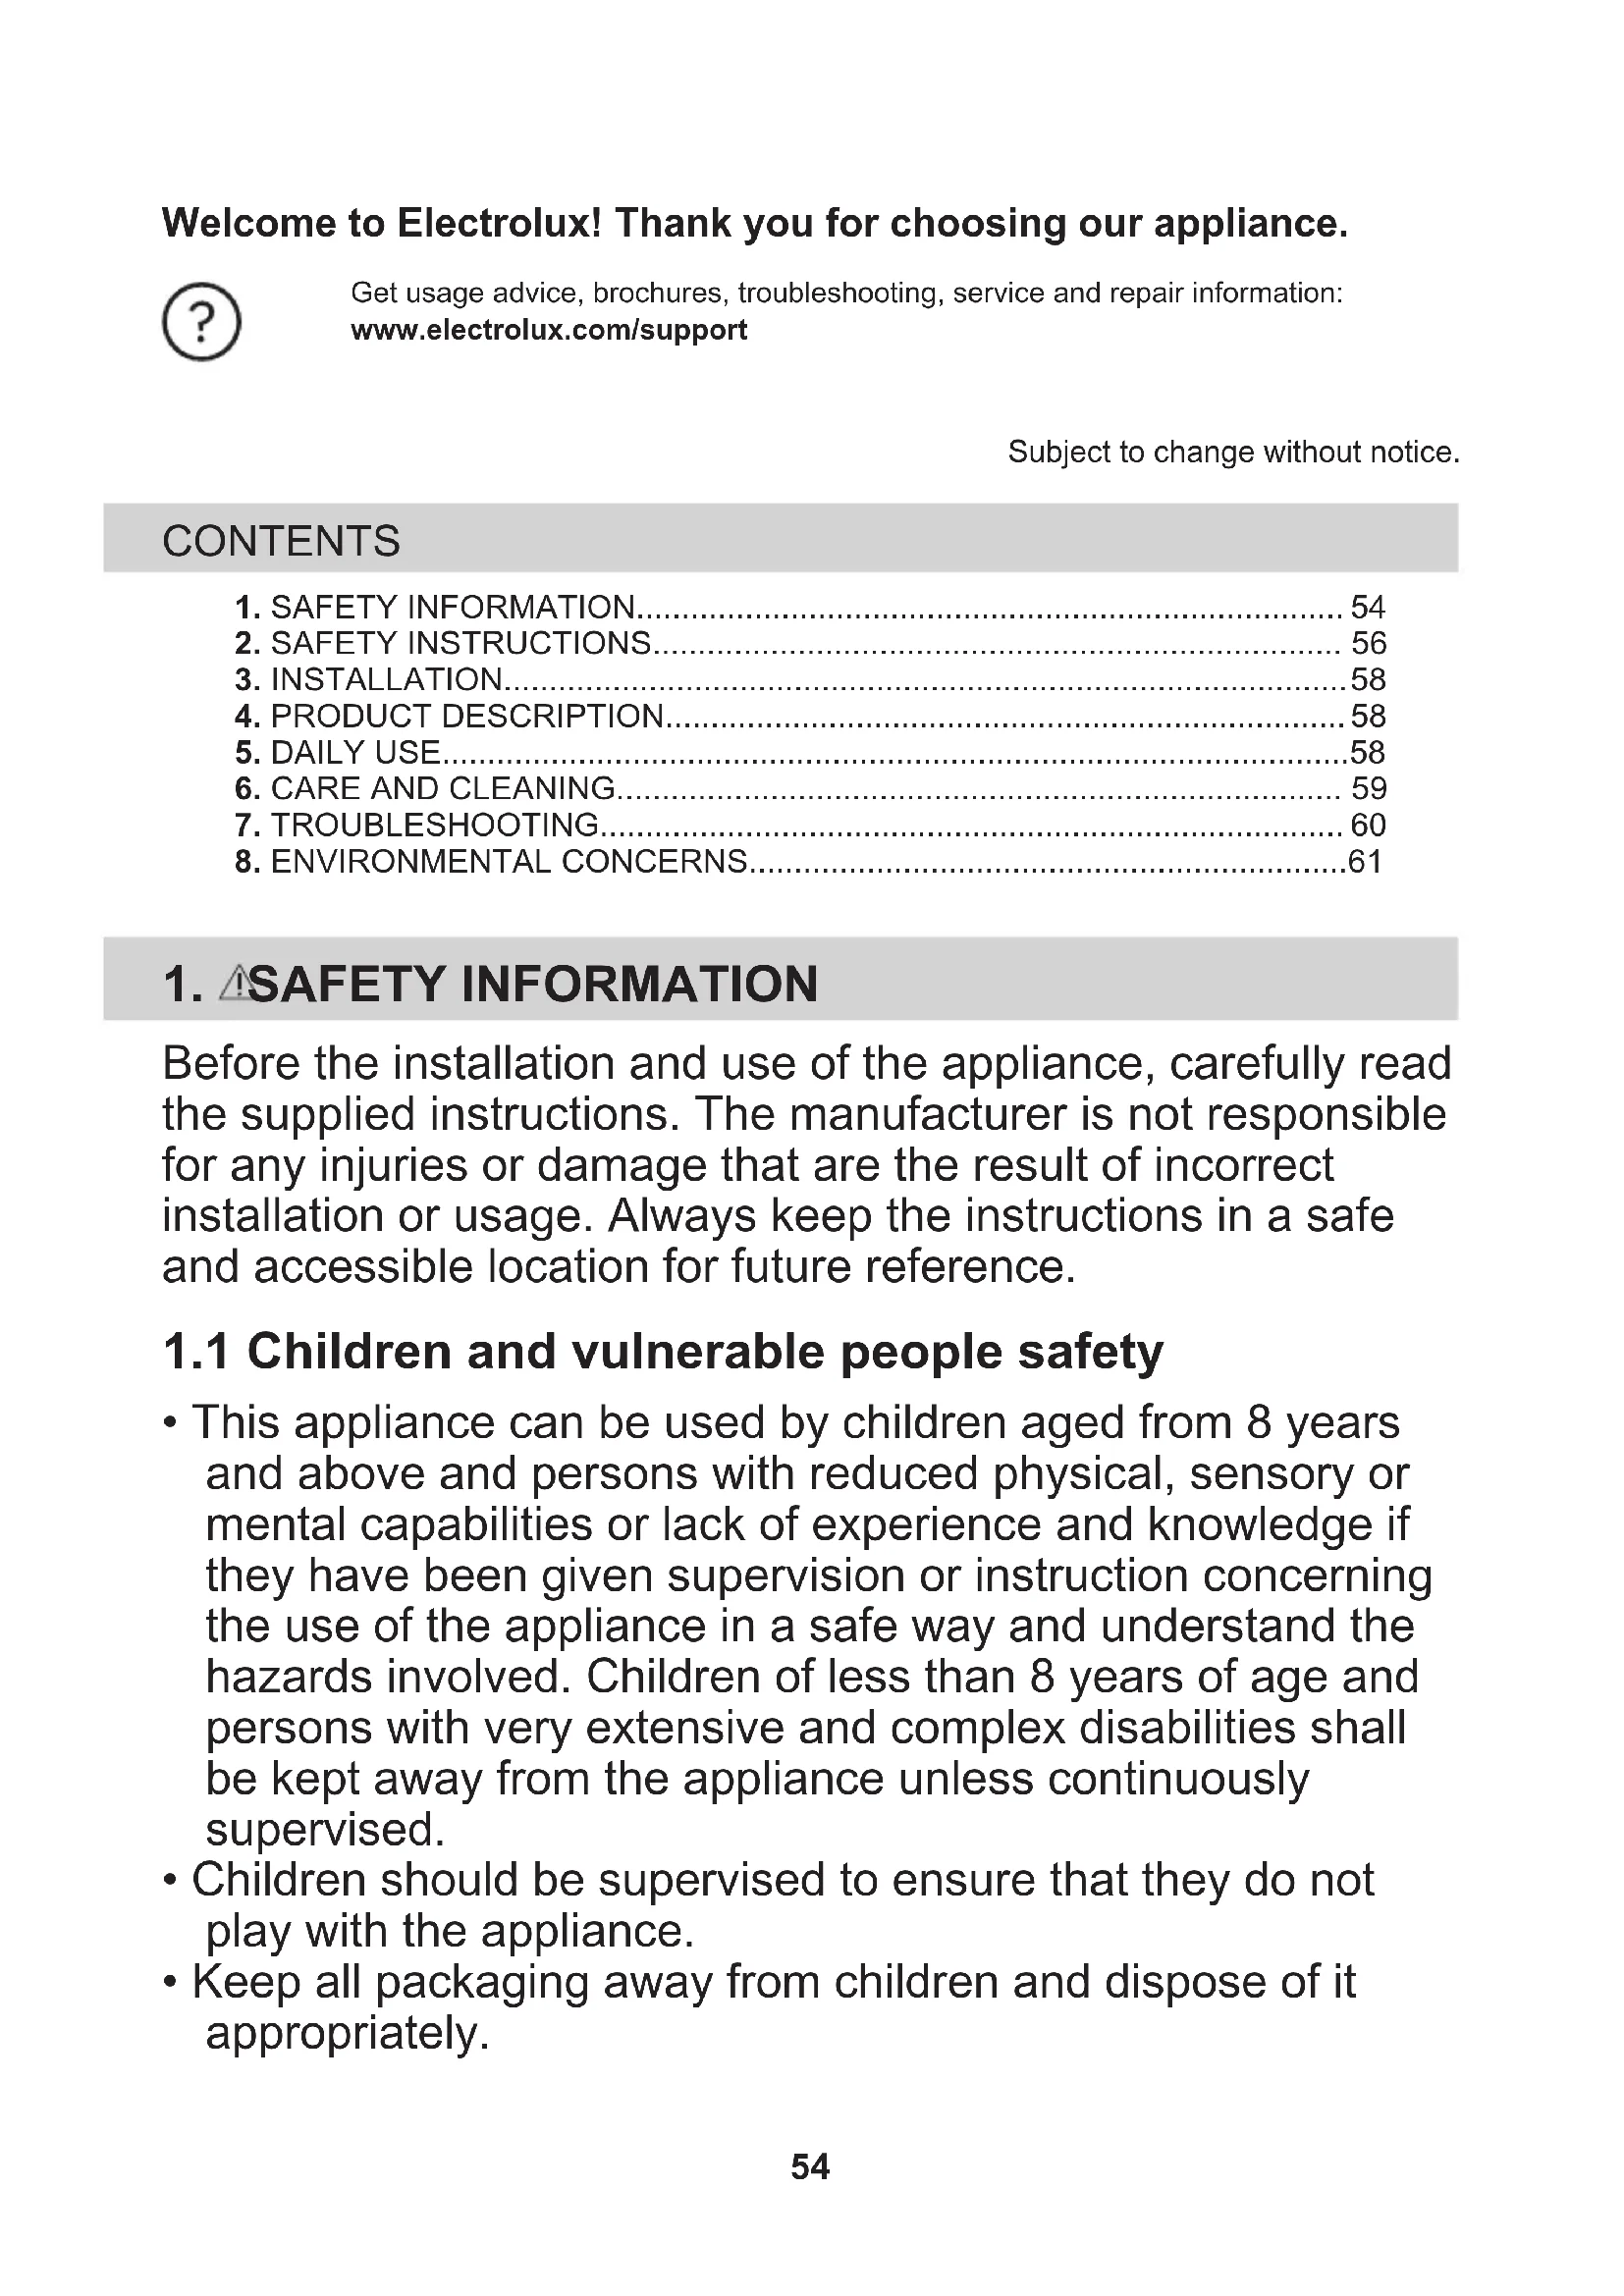
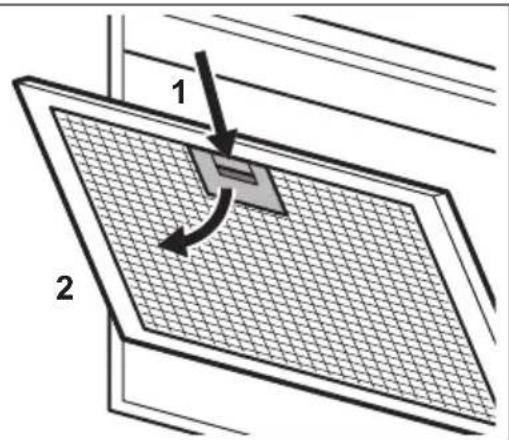
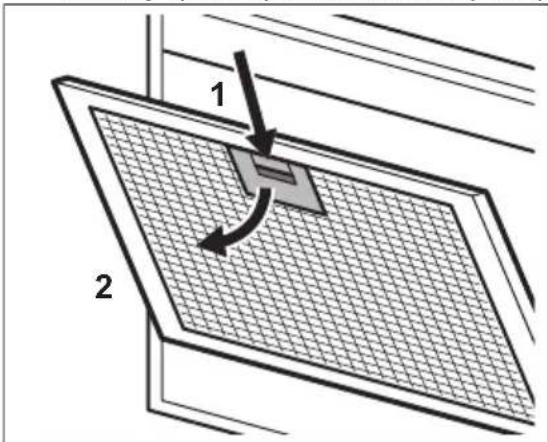
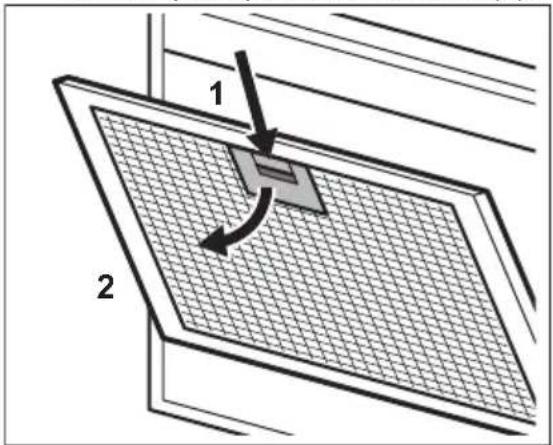
6.2 Cleaning the grease filter
Filters are mounted with the use of clips and pins on the opposite side.
To clean the filter:
- Press the handle of the mounting clip on the filter panel underneath the hood (1).
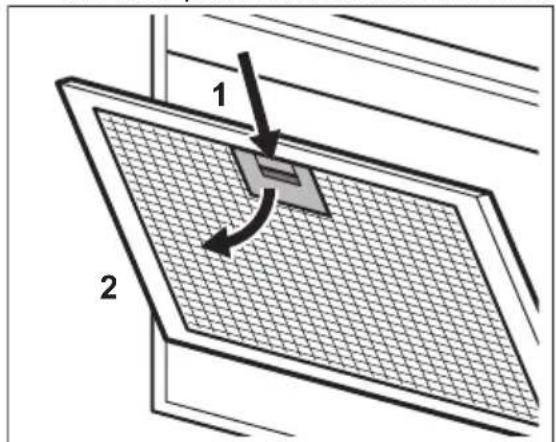
- Slightly tilt the front of the filter downwards (2), then pull.
Repeat the first two steps for all filters. - Clean the grease filters by hand using a sponge with non-abrasive detergents, or clean them in a dishwasher. We recommend cleaning the grease filters by hand.
i
The dishwasher must be set to a low temperature and a short cycle. The grease filter may discolour, it has no influence on the performance of the appliance.
- To mount the filters back follow the first two steps in reverse order.
Repeat the steps for all filters if applicable.
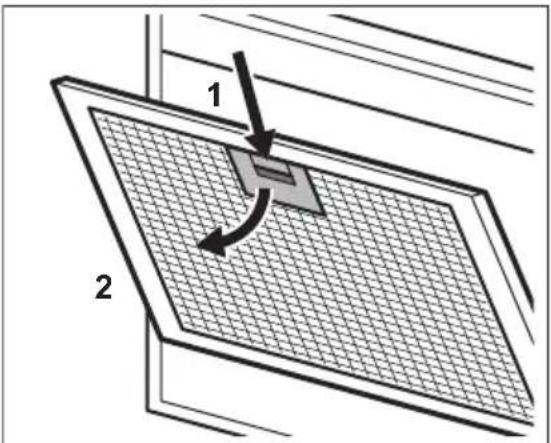
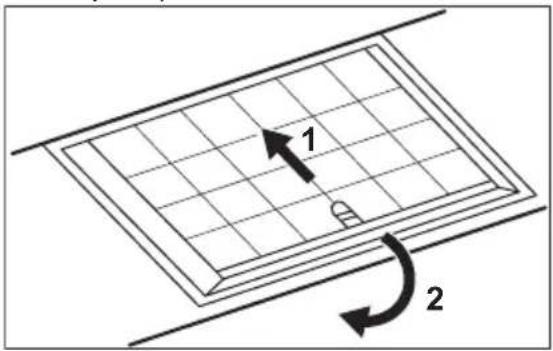
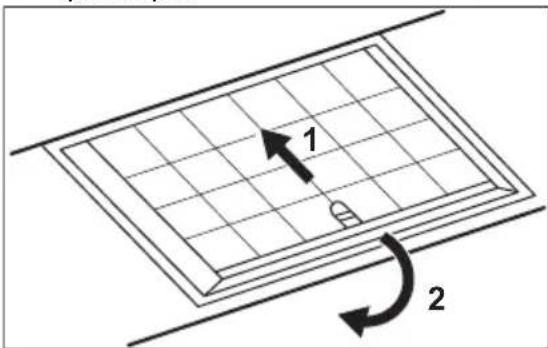
6.3 Replacing the charcoal filter - optional
i
Depending on type, filter can be or cannot be regenerated. Refer to the leaflet provided with the filter.
To replace the filter:
- Remove the grease filters from the appliance.
Refer to "Cleaning the grease filter" in this chapter. - Pull the tab towards the bottom part of the filter.
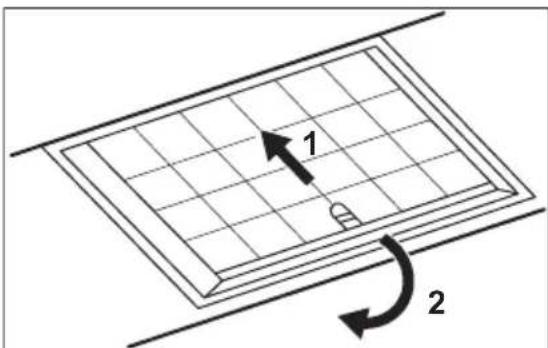
- Slightly tilt the front of the filter downwards, then pull.
- To install a filter, perform the same steps in reverse order.
6.4 Replacing the lamp
This appliance is supplied with a LED lamp. This part can be replaced by a technician only. In case of any malfunction refer to "Service" in the "Safety Instructions" chapter.
7. TROUBLESHOOTING

WARNING!
Refer to Safety chapters.
7.1 What to do if...
| Problem Possible cause Remedy | ||
| You cannot activate the appliance. The appliance is not connec-ted to a power supply or it is connected incorrectly. | Check if the appliance is correctly connec-ted to the electrical supply. | |
| You cannot activate the appliance. Lack of electrical power sup-ply. | Check the fuse or the main switch. If the fuse or the switch continue to break the cir-cuit, contact a qualified electrician. | |
| You cannot activate the appliance. Cabinet doors are not aligned with the cabinet frame. | Align the cabinet doors. | |
| The lamp does not operate. The lamp is defective. Contact an Authorised Service Centre. | ||
| The appliance does not absorb enough vapours. | The motor speed is not ade-quate to the appearing va-pours. | Increase the speed of the motor. |
| The filter alarm indicator on. | The filter alarm is on. The grease filter must be cleaned or the charcoal filter (option-al) must be replaced or cleaned. | Refer to the filter notification in "Daily use" chapter. |
8. ENVIRONMENTAL CONCERNS
Recycle materials with the symbol .Put the packaging in relevant containers to recycle it. Help protect the environment and human health by recycling waste of electrical and electronic appliances. Do not dispose of
appliances marked with the symbol with the household waste. Return the product to your local recycling facility or contact your municipal office.
Sous reserve de modifications.
TABLE DES MATIÈRES
- INFORMATIONS DE SECURITE 87
- INSTRUCTIONS DE SECURITE 90
- INSTALLATION 91
4.DESCRIPTION DU PRODUIT 91 - UTILISATION QUOTIDIENNE 92
- ENTRETIEN ET NETTOYAGE 93
7.DEPANNAGE 94 - EN MATIÈRE DE PROTECTION DE L'ENVIRONNEMENT 95
1. INFORMATIONS DE SECURITE
5. SVAKODNEVNA UPORABA
5.1 Uporaba nape
Provjerite preporucenu brzinu prema tablici u nastavku.
011 Prilikom zagrijavanja hrane, kuhanja sPokri-venim posudama.
Electrolux KOMnHaNcBHa KaW KeIaH3! Kypblfblmb13dbl TaHdaFaHbIHb13fa paKMeT.

PainananyTypaIbIaknapaTbI,KitanwanaapdbI,aKaynbIKtbIJOIOKypaNbI,Kbl3MeT KepcetyXHeXoHdeyTypaIbIaknapaTbMbHaJxepDeH aBHybI3:
www.electrolux.com/support
OHHipuyi eceepTyc3 3repic enriy KyKbIfbHa ne.
MA3M¥Hbl
1.KAYINCI3IK AKNAPATbl. 122
2.KAYINCI3IK TYPALI HYCKAYIAP. 125
3. OPHATY 126
4. ΘHIM CINATTAMACbl 126
5.KYHdJIIKTI PAnDAJAHU 127
6.KYTVKHE T3AJAY. 128
7.AKAYIbIKTAPDbI JKOIO 129
8.KOPUFAH OPTAFA KATbICTbl JAFdAnJAP. 130
1. KAYINCI3IK AKNAPATbl
KypbIfblHbI opHaTbI icKe KoJaHaap aJbIHda 6ipre
Ketki3iIrren HyckaynapdbIMyKnT Okblt bIfbHb3. Dypbc
opHaTnay Hemece naJaIaHbay HTeJxEcInHe opBn aJFaH
kapaKaT HeMece 3aKbIMfa eHdipywi KayaantbI emec.
HyckaylbIKtapdbI KeiH kapan Jypy ywiH oPKaShan Kayinci3
XeHe KOJI XeTImDi Xepe caKTaHbI3.
1.1 BaIIap meH eIci3 aIamdapdbIn kayinci3diRi
-Бул Крьлфынь 8жacтан ackanбалanap men diehe, ce3im He akbl-ои kaibileTTepi wekeyIi He Toxipnbeci a3 adamap e3 kayincizirih kamtamacbI3 etetIH aadamhIn KaandaflaybI He KpyblfblHbI Kayinciz KOndaHy boBihwa 6epren HyckaByHa cyneHIn, dypbic KOndaHbay caIapbIH TycinCe, OHda kondahybHa 6oJaDbI. 8 xacka ToImaFaH 6anaIap MeH MymkiHdkTepi oTe wekeyIi Myredek aadamapdbI backaIap KaandaFamaFah JkaFdaJa KaPbIFbIaH aIbIC yCTay KepeK.
- BaIaIapDbIH KypbIINFbIMeH OiHaMaybIH KaIaFaJAY KepeK.
- Барльк opam mateрnaлдарьн балалардан anbic yctan, kokbicka Tniicti Typde Tactay Kepek.
KypbIfbl Kymbic icTei TpyFaHda, 6aIanap MeH yJ KaHyapnapbIH aIbIC yCTaHbI3.
-Балanap KypblfblHbI XeHney XaHe Ta3aJay XyMbICTapbIH 6akblaycbI3 opblHaMaybl KepeK.
1.2 Kaalnbikayinci3dk
-Булкypынfyиde neштетрдH,tafam nicipriштетрдH xHe coIТэпдiбackaдаNICIPY KypaДapbIHbH yCTiHe opHaJaCTbIPbIN KOДaHyFa apHaJFaH.
- Бул курьлфы iшki optada 6ip OTбасьн TурмьICTbIK naДалануына apHaJFaH.
- ByI KypblfblbI KeHcSeIepde, KOHaKyI 6eJIMeIepiHde, TceK peH TaHfbl ac 6epiTeIH KOHaK 6eJIMeIepiHde, fepMa yIePiHde XHe MynDaI naJaIaIaHy (opTaSha) TyPbICTbIK paJaIaIHy deHreIePiH en acNaIbH bacKa YKcAc TyPbIH JkaIda IpaJaIaIHyFa 6OJaIbI.
- KaHdai da 6ip XeHdey XyMbIcBiH opbIHap aIdbIHda KypblfblHbI KyaT Ke3iHeH axbIpTaBbI3.
- CAKTbIK ECKEPTY: Алмалы 6eIweKTePdi nicipy KypblfblapbImen 6ipre naДaJIaHFaHda bICbIn KeTyi MymkIN.
KypbIbIMeH 6ipre JekTki3iInreH 6eKiTy 6ypaHdaJapbIH FaHa KOJaHbIHbI3, erep JekTki3iImMece, opHaTy HycKayJapbIHDa YcblbIFAH 6ypaHdaJapDbI naJaIaHbIHbI3. KypblfbiHbI opHaTy TaJaIaTpblHa ceykec bIHFaJIbI XeHe Kayinci3 Xepre opHaTbIHbI3.
- ECKEPTY: Бураздалар Немеся беку Крьлбсbl Oсbl
Нчсayларfa сэйкес opнатылмасa, TOK COfy kayintepiHe
эkeлуIMyMKiH.
KypbIfblbI 6eKity ywiH xeImdeepi naJaIaHa6aHbI3.
- Tabanap Koynbifan NeuTih 6eti MeH KypblfbiHbIH TomeHri 6oJIrIHe DeinHri eH a3 KaushbIKTBk, NeWKe Hemece Kypblfifa apHaJFaH OPhATy HcCKaynapbIHda 03ReWe KepCetimMece, Kem DerEHe 65 cm 60nyFa Tnic.
AyaHBI ShbIFapy JepriIKTI HopMaTnBtik aKTInepeH TaJaanTapbHa caikec kenyi kepek.
- Ra3 Hemece 6acka JhaHapMa KOndaHaTbIH KypblfblapdaH, CohBMeH KaTap aMbIK OTTaH 6eJIHeTiH Ra3dap 6emere KaT Ta KIpMec yWih, KypblfblOpHaTbIJaFah 6eJMeHH JkaCbI JeJeTeiInyIn KaMTamacbl3 eTIH3.
KeIeTeY caHbIaynapbIHbIH 6iTeJIIN KaIMaFaHbIH JxHe Kypblfbl XnHaFaH aya 6aCKa KypblfblapdAn KeJeTIH TytIH MeH 6yDbI TapTaTbIH KyIeRe (OpTaIbIKTaH XblbITy KyIeIepi, TepMocnfoHdAp, cy XblbITkbIUtap XHe T.6.) TaCbIMaIdaH6aFaHbIH TekcepH3.
KypbIbIbI baca KypblfblapMeH 6ipre icke KocblfHaDa, 6eImedeeri en yIKeH BaKyum 0,04 m6ap-dan acnay Kepek.
- Erep Kyat cblmbi 3aKbIMdaJcA, TOK COfy KayniH 6oJdbipMay ywiH, OHbl eHdipywi Hemece OHbIH yakiJIeTTi KbI3MeT Kepcety opTaJIbIFbl He coJ CnRAKTbl biIKTi MaMaH aybICTbIPybl Tnic.
- Erep cblm xHaftb 3aKbIMdaJca, OHbl eHdipywiJeH Hemece OHbIH yKeJIeTTi KbI3MeT Kepcety optaIbIFbIHaH aNyFa 6OJaTBH apHaBbI Cblm xHaftbHa aybICTbIPy KepeK.
Kypblfbl Kyat Ke3iHe Tpya Kocblfah 601ca, KypblfblHbI 3neKtp Jeicihin 6apblk nonIOCTepineH axbipatyfa MymkiHdiK 6epeTih TynblkTaftbiW KypblfblMeH Xa6dbkTAJybl KepeK. ToKTan TOnblk aibpy JxmbicTapbH III-wei acbH KepHey caHaTbIHda KepcetilreH JaFdaJnapFa cai icKe acbipy KepeK. Axbipaty KypalbH cbIMdapDbI eTKi3y epexjelepiHe cai 6ekitllren CbIMdapFa bipiktipy KepeK.
KypbIbHbIn actbHa qIaMbe TacinimeH ac nicipyre 6oImaIdbI.
Kayinti Hemece XapbIFbI MATEpnaIapdbI XHe 6ynapdbI naJaIaH6aHbI3.
KypbIbHbIH 6eIHderi MaTePnaIbIH canacbi Tycnec ywiH KymCaK Wy6epeKneH Me3rIn-Me3rIn Ta3aIahbI3.
KypbIbHbIH 6eTih Ta3aIay ywiH 6yMeH Ta3aIay KypaIbIH, cyIbI cnpeiDi, KaTbI Xemiprii 3aTTapDbI Hemece oTKip
Temip KypaIapdbI naIdaIaN6aHbI3. BeiTapan JyfbI3aTTapdbI FaHa KOJIaHbIHbI3.
- Θрт Шьikpac ушin Май кинайтын сугileорд (keMiHde 2 aиda bip pet) кэн Курьлфыfa киналfaH майларды Ta3aJaHbI3.
KypbIINfBInH iWiH wY6epeKeNeh Ta3aJaHaB13.
2. KAYINCI3IK TYPALbI HYCKAYJAP
2.1 Ophaty

AБАЛAHыI3!
KapaKaT any, 3neKtp KaTepi, Kyin Kany, opt Kayni, KypblfBihb6yndipin any Kayni 6ap.
OcbI KypblfblHbI TEK 6iJIkTI MAmaHa FaHa OPhATyFa Tnic.
- ByniHreH KypblfblHbI opHaTnAb3 Hemece icke KocnaHbI3.
KypbInfbImeH6ipreXeTkiinreH opHaTy HcaynapbiH opbiHaB13.
Kypblfbl aybip 6oNfaHdbiKaTH, oPhbHaH XblXbITkAH Ke3De apkaaah a6aB 6OJIbHbI3. Opkawah Kayinci3dk KOnFa6bl MeH 6itey aAK kIM KNHi3.
KypbInfbHbOpHaTnac 6ypbH 6apNbIK opam MaTePnaIaPbIH, XanCbipMaCbIH XHe KOpFaHbI WJdiPi H aJIbHbI3.
Aya TaTkbiw KypblfBiHbI, erep Ka6bipFa opHaTyfa apHaBbl pyKcat bepiimece, OHda opHaTnaHbI3.
2.2 ΘηεκTpTofblHa Kocy

ABAJIAHbI3!
KapaKaT any, Kyni n Kaany XeHe TOK COy Kayni 6ap.
Byn Tek TaFam Nicipyre apHaJFaH Kypblfbl. Kypblfblhbl 6acka MaKcaTTa KOJaHa6aHbI3.
- Byj KypbIJFbIHbIH TexHkAnbIK CnnaTtAmacbIH e3repTneHi3.
KypblfbiHbI DbIMkbIN KOJapMeH Hemece cyFa TnIN TypFaHaDa naJaNaHa6aHbI3.
Tek KypbInfbImeH 6ipre KaMTamacbl3 etinreH akceccyapnapbl faha naaanaHbIbI3.
TamaKtbl TOHmaFHa Hemece MaFanicipin, KybIPFaHda KbI3FaH 3aTTapDbH HeMece OTtbIH KaJIbIHbIH aJIbIC YCTaHbI3.
Ausbik əneKtp rpnIbdeepin naIdaIaHaHbI3.
KypblfblHb caTay opHbI ywiH naDanaH6aHbI3.
KypblfblHbH JapblfbiHa TikeNei Kapay ywiH yIKeTkiu AnHeKTi, Dyp6iHi Hemece backa Da ONTKaJIbIK KypalndapDbI naDanaHbAHy3.
- Erep Kypblfbi 6acka KypblfbnapMeH XyMbic icTece, eH KeT Ty3iJeTIH KbICbIM 4 Pa (4x10⁻⁵ 6ap) wamacbHaH acnaybI Kepek.
2.4 CepBnC
KypblfblHbXeHdey yuH yakiTti Kbl3Met KepeTy opTaIbIbHa xa6apJacblHbI3. Tek fanaΦnpMaJIbIK KocalkbI 6oJIweKTePdi KOJaHaBbIHbI3.
OcbI eHIMHIi iwiHderi waM(ap) MeH waMdaipdbIH KocankbI 6eWekTepi keke
caTbIaIbI: ByJ WAMdap TemnepaTypa,
DipiIN, bINFaIbIbIK CnRAKTBITeTeHWe
fN3NKaJIbIK XaFdaIaNapFa TypMbICTbIK
KypblfBInapDbIH KapcBi TYpybHa HEmce
KypblfBInbIH Kymbc XaFdaIbI TypaJIbI
CnHAn6epyre apHanFaH. Onap 6aca
KoIJaH6anapda naIdaIaNHyfa
apHaImaFah XHe TpyfbH YInepdi
XapbIKTaHdbIpYFa cKeKc KeImeiDi.
2.5 Kokbicka TacTay

ABAAJIAHbI3!
KapaKaT any Hemece THyHbIfy Kayni 6ap.
KypbIbIbIyTnIIaunayKoJIbTypaIbIaknapaanyuHmHnUpaIbOpraHa xa6apnaIbI3.
KypblfblHbI 3JneKtp XeNiciHeaXbIpaTbHbI3.
KypblfbaFaKaBbHOpHaJnacKaH3JIeKtp Ka6enIH Kecin, yTnIn3aunnaHbI3.
3. OPHATY

ABAIJIAHbI3!
Kayinci3diK TapaynapbIH KapaHbI3.
3.1 Ophaty HycKayapby

KypbIbHbI OPhATy TypaNbI TONbIK aKnapat any yWIn XeKe YcBnHbINFaH OPhATy KITanWacbIH KapaHbI3.
4. ΘHIM CYNATTAMACbI
4.1 Baçapy nahanénihe wony
Функця СинаТамасы
1 1
Bipinwi Kblnamdbik/Thetaipyni Motop 6ipinwi Xblnamdbik deHreine abyicaDbI. Ekinwi pet 6ackaH Ke3de KpybIfbEwipipinei.
3 Ekinwi KbldAmdbk Motop ekihi XbldAmdbk DeHreine abyicaabI.
4 Ywihui XbIaamBik Motop ywiHui XbIaamBik DeHreine aybicabl.
Cy3ri TypanbI xa6apnHaDbipy Kemip cy3ricin aybcTbpy He Ta3anay XeHe MaJ cy3ricin Ta3anay KaKeTeEkeHH eCke CanaBl.
5. KYHДЕЛIKTI ПАДАЛAHY
5.1 Aya tapTKbIITbI naJaIaIaHy
TemeHderi keCTere caikec ycbihfahn XbldAmdbkTbI TEKcepH3.
011 TaMaKtbl XbIbITKaHda, KaKnak Ja6blFaH bIdbICTbl KOnDaHbIn NicipreHne.
Biphewe nicipy aMakTapbHna Hemece OTtbIKTapda KaKaNaFbI Xa6bIK bIdbicta TaMaK nicipreHde, 6annen KybipfHaHa.
Ken MeJIWepeDiI TaFamDapBkKaNakCb3 KaHaTkaHda XHe KybipFaHda, 6ipHeWe nicipy aMaFbIHda HeMece OTbIKTapDa nicipreHde.
i
Tafamdbi nicipyre deinH xhe Kein h aya Taptkbltbl waamem 15 MNHyT Kocbin KOI0Fa keHec bepinei.
KypbIFbIHb6eHcHdipy
aya TaPTKbI W KypaIbI naIdaIaNHy ywiH:
- KypbIfblHbI Kocy yuH 6ipihwi XbldAmdbIK TymeciH 016acblb3.
- Kepek 6oJca, kaxeTTi TYmMeWikTi 6acbIn, XblnDaMdbIKTbI e3reptHi3.
KypbInfblHbI cHdipy
KypblfblbI cHdipy ywiH 6ipihwi XbldAmdbIK TYMeWirIH KaTaNacbHb3.
XapbIKTaHdbIpy
i
Aya TaptKbIbTbIH, Wambl baca aya TaaptKbIw fYHKunapbHaH Tayenci3 Kymbc icTeiDi.
XapbiktahdbipydbI 6enceHdipy XaHe oipy
Iicipy6etihkapbIKTaHdbipy ywiH Tymecin TyptiHi3.
Uamapdbieewipy ywiH rYmecin KaI Ta 6acbHb3.
5.2 Cy3ri TypaIbI xa6apHaHdbIpy
Cy3riHic ecepy cnHaIbI KEmip cy3rici H aybictbipy He Ta3anay XeHe MaN cy3rici H Ta3anay kXeTeEkeHH cKe caIaDbI. MaN cy3rici H Ta3anay KepeK 6oIca, cy3riHn HndkaTOpbl TycTePMeH 30 cekyHd 6oIbI XaHaDbI. KEmip cy3rici H aybictbipy He Ta3anay KaXeT 6oIca, cy3riHn HndkaTOpbl TycTePMeH 30 cekyHd 6oIbI XbInbIbIKTaIdbI.
i
«KyTy XeHe Ta3aJay» TapaybIHdaFbl
«MaI cy3ricH Ta3aJay» TapMaFbIH
KapaHbI3.
i
Kytim MeH Ta3anay TapaybIHda KEMip cy3riciH Ta3anay Hemece KEMip cy3riciH aybICTbIPy TypaJIbI KapaHbI3.
Функцянbl kaJIиBaHa KeNTipy ywiH 3 TyImeciH 3ceKHyD 6oBb 6acbHb3.
Функцинblбелсендipy HeMece axkbipaTy yiush:
- KypbIJIbIbIeUpiHiz
2.Функиянblбeнсeндipy yuin 3cekynd boi bacbHb3. ErepФункиябeнсeндipince,ИнdkaTopby TycTe eki pet kblnbikTaIbI.
3.Функиянblахырату yшin 2yIMecih 3 cekyHd 60bl 6acblb13.
Erep yHKun aXbipatbIca, INdkaTopbl TycTe 6ip pet XblblkTaIbl.
6. KTYXΘHE TA3AJAY
6.1 Ta3anay TypaIbI eckepTneIep
Xyfbliu 3aTTap
A6pa3nBti JyfbI 3aTTapDbI XeHe UeTKanapdbI naDanaH6aHbI3.
KypbifbihB H6etH KymcaK Wy6epeKeH, Kblb cyMeH KeHe KymcaK Kyfbl 3aTneH Ta3aHaHbI3.
3ipnydien Kein KypblfbiHbH Ke6ip 6niktepi Kbi3ybi MymkiH. DaTapdbI 6ondbIpMay yuH NpyiFbHbCaJIbHdaTbIn, Ta3a WybepeKneH Hemece KaFa3 cyIJIepMeH KypFaty KepeK.
JaKTapDbj Kymcak Kyfbi3aTneH Ta3aJhaHbI3.
TyTHWBIFAPFbIUtBtTa3aYcTahbl3
KypbIhBHH 6eHneri MaepnAaBn CanacbI TeMeHemeyi yuH KypblBhl a nCaBH Ta3anAn TypbIHbI3.
IwIHderi XHe MaCy3rInepHderi MaNdbMyKnT Ta3aHaBbI. KNaHaJFaH MaHemece 6acka KaNDbIK ePtke Kejnyi MymKiH.
Cy3rIypaIbI xa6apnAnDbIpy KocynI Ke3de cy3rIepdi Ta3anay TypaIbI HycKaynapdbI opbHdaHbI. «KyndienikTi naDanaHy» TapaybIH KaPaHbI3.
Kemip cy3rici
Kemip cy3ricih Tony yaKbITb TaFAM nicipydi Tpyi MeH MaCy3ricih KaHaJbIKTb XnTa3anaHaHbHa 6aNaHbICTb 6oJaB. AkceccyapMeH 6pRe 6epinetIH KITanhaHb KapaHb3.
6.2 Ma' cy3ricin Ta3aJay
Cy3rinepDi opHaTy ywiH Kapama-Kapcbl KaTapbIHda KbICKbiIHTap MeH KaJaaybIHTap NaIaHaHbINFaH.
Cy3riHITa3anay ywiH:
- Aya tapTkblw Kypandbih acTbIHdafbI cy3ri naHeJIHderi 6eKiTy KbickblWBihY cTafblWBih 6acbiHbI3 (1).
- Cy3riH, aIbIHfbl XaFbIH TeMeH Kapaa a3Dan eKeiTih3 (2), codan KeiH TapTbIHbI3.
Bapnbk cy3rinep ywiH anFaWkbI eki Kaamdbi KaTanaHbI.
- Mai cy3rinepiin Xemipriu emec Kyfbu 3aTAPdbI XeHe r6KaHbI KOJaHbIN KOJMeH Ta3aHaB13 HEmece OJapDbI bIDbc XyfbuMaHHaDa Ta3aHaB13. Mai cy3rinepiin KOJMeH Ta3aNaayDbI YCbIHAmbl3.
i
blbc KfbyMmaHnHaTaTeMeH TemepaTypaHbI XHe Kbicka uKnDi opHaty Kepek. Ma cy3ricIH Tyci e3repyi Mymki, 6yN KpybInFbIHbIH XyMbIC ICTeyihe acep etnei.
- Cy3riHi KaIHa opHbHa KOIO yWIn anFaUkbI eKi KaIaMDbI KepiciHwe opbIHdaHbI3.
KaKet 6oJca, 6apNbIK cy3riinep ywiH KaamdapdbI KaTanaHbi3.
6.3 Kəmip cy3ricin aybɪcMbipy -MiHneTTi emec

Typihe 6aHnHbCTbI cy3ri KaNNbHa KeTIPiNyI He KeTIPiIMeyi MymKiH. Cy3rImeH 6ipre 6epinreH npakuaHbI KapaHbl3.
Cy3riHi aybIcTbipy yWiiH:
- Man cy3rinepiH KypbIIFbIaH WbIFapbI aIbIHbI3.
OcbI TapaydaIbI «Man cy3rinepiH Ta3anay»
6eJIIMiH KapaHbI3. - Tiiuhehi cy3riHH ToMeHri 6oJIirHe kapaTapTbIHbI3.
- Cy3riHIn aIbIHfbl XaFbIH TeMeH Kapaia3an eHKeiTHi3, cOdaH KeiH TaPbIHbI3.
4.Cy3riHIOpHaTy ywiH OcbI KaaMdApDbI KepiciHHeOpbIHDaHbI3.
6.4 WamdblyaybICTbipy
Kypblfbl LED wambImeJka6dbkTaIHaH. Byn
6eJIkiTcTexHnK fHa aYbICTbIpaIbI. AkayIbIK
OpbIH anFaH kafdaJa "KayinciDik
Hyckaynapbl" TapaybIHdaFbl "KbI3MeT
KepceTy" 6eJIIMH KapaHbI3.
4. PRODUKTA APRAKSTS
4.PRODUCTBESCHRIJVING
7. PROBLEEMOPLossing

WAARSCHUWING!
1.1 Be3oNaCHocTb DeTei N IInC C OrpaHnueHHbIMN BO3MOxHOCTaMn
- 3TOT npi6op moKET nCNoIb3OBaTbcra DeTbMn cTapWe BOCbMn JET N IINcAmN C OrpaHnueHHbIMN Qn3nueckmN, CEHCOPHbIMN INN yMCTBeHHbIMN CnOCo6HoCTaMn IN C HeIOCTaTOUHbIM ONbITOM INN 3HaHnA M N TOJIbKO pN YCSIOBHN HAXOJDeHnRA NOI PnICMOrPOM INuca, OTBeuaIOSeTo 3a INX 6e3ONaChOCTb, INN IocNe IOnyueHn A COOTBETCTByIOxN INHCTpyKzN, PO3BOJIAIOx INM 6e3OJaCHO 3KcPiYaTnpOBaTb IN3dEJIne IN DaHOx IN M IpeIcTAbHeHne O6 ONaCHOCTn, CBJ3aHHOJ C eRO
He nCnoB3yIe a6pa3nBhIe MOIOuIe cpeCTBa nIeTK.
NoBepxHocTb np60pa npotnpaTe MrgKoTKaHbIO, CMOeHHoB TENIO BOe C MOUcIM CpeCTBOM.
Iocne npirotoBnHn HeKoToPbIe Yactn np60pa cnIbHo harpeBaOTcR.Bo n36exKaHne 6pa3OBaHn IaTeH Heo6xOIMo DaTb np6OpY OCTbITb N BbITEpeTb erO HacyXo YnCTOn TpIIKo NNb6ymaxhbIMN NOToEHzAMn.
OuHaaTe PnTHa MfKIM MOIOUcM CpeiCTBOM.
ДерхиTe BыТяЖу BЧИСТОТe.
Bo n36eKaHne NOBpeKdEHNn NOKpbITn npu6opa pa3 B MeCra npOn3BOaNTe erO OvNCTky.
TtataeIbHO ouHuaTe BHyTppeHHne NOBepxHocTN I KInpoynabNBAIOUne fNbTpbl OT Jnpa. HakonneHne Jnpa nn Dpyrnx OTNOKeHN MoKet npNBecTN BO3ropaHnIO.
PnB BKJIIOUeHm yBeOMnEHN O oJNbTppe cNeaYnte HNCTpyKcIyM NO OCHTE qNJIbTPOB. CM. rnaBy «EKeIDHeBHOe mONb3OBAHne»
YrOJIbHbI ΦmJIbTp
BpemHaCbIeHn yroJIbHOrO pIbtpa BapbnpyETcB 3aBncmocTN OT Bnda npiroTOBJIeHn n peryJIpaHOCTN OCHKTKn XkpoyJaBnBaIOUeO pINbTpa.
Cm. 6pouHOpy, npnIraeMyIO K daHHOMy akceccCyapy.
6.2 OuInCTka KInpoUaBnBaHOoIero cnIbTpTa
KInpoynabIINBaIOUnnnHnIbTp MoKeT n3MeHnTb UBeT; 3TO He NoBnIeT Ha npOn3BOuNTeNbHOCTb np6opa.
4.ДЯ yctaHOBKnФиьТpoB Ha MeCTO BbINOHnTe OINcaHHbIe BblIe IBa Iwara B O6paTHOM NoprKe.
IOBTOPte daHbIe 7aRn CO BCEMN cnBtpamn,ecn3TO npImHeHMO.
6.3 3aMeHa yroIbHoro qnIbTppa —DOnOJIHNTeIbHo

B 3aBnMoCTn OT Tnna NbTp MoKet 6bTb Hn He MoKet 6bITb BOCCTaHOBJIeH. Cm. INcTpyKuH NO pNMeHeHIO, npNlaraemyo K NbTpY.
ДяЗаменифильтра:
1.ИЗВЛЕКИТЕи3прИБОРа
ЖИРОУЛСАЛBAЮUINEФИЛТРБI.
СM.раздел«ЧИСТКАЖИРОУЛСАЛBAЮUISEO
ФИЛТРА»ВЭTOДгАБ.
2. Notaryte 3aueKny no HaprabneHIO K HxKHe yactn cnlbTpA.

- Hemhoro haKIOHnTe nepeHIOU qAcTb cnIbTpba Bn3, a 3aTEM NOTHnTe.
4.ДЯ yctaHOBKnФиьТра BbINOJIHNTe Te Jke WArN B O6paTHOM nopJKe.
6.4 3aMeHa JAmNbl
B KOMNJIeK T NOCTaBn I npIbopa BXoIIT CBETOIOIDHaj lamna. DaHHaJeTeaJIb MOXeT 6bITb 3aMeHeHa TOJbKO TEXHnueCKm CneuHaJIncTOM.B Cnyuae JIO6bIX HEnCnpaBHOCTeM. «CepBnC» I naBbl «Yka3aHnno 6be3OpaCHOCTn»
7. ПОИСК И YYSTPAHEHNE HENCSPABHOCTEIN

BHIMAHHE!
Cm. rnaBbl, coepkaune CbeHnno Texnke 6e3onacHOCTn.
7.1Пonckи устра themselves HeincnpaBocTei
6. HEGA N U N W T H E H E
6.1 Hanomehe y Be3n ca qniuehbeM
CpeiCTBa 3a YnshHeBe
He KopnCTnte abpa3NBHe DeTepeHte uYeTke. NobpunHy ypehaja ouNCTnte MeKOM KPNOM, TOnJOM BOOM N 6NaRIM DeTepeHTOM.
HaKoH KyBaHa, HeKn DeIOBn ypehaja Mory 6ntu Bpe. Na 6ncte cnpeun nojaby fneka, ypehaj mopa da ce oxnnd n ocynn uNCTOM Kpnom nn npnpHm y6pycma.
Φneke ouhcntte 6narn dTepeHTOM.
PeIOBHO YnCTnte acnnpaTOp
CBAKOr Meceua YnCTNe ypehaj da 6nCTe cnpeuHn nponaHaBe NOBpwnHckor MaTepnjana.
Paxbno Oocntne yHyTpaWbOcT n cInTepe 3a mact od machohe.HaromnaHa machoHa nn Dpyrno octaMry npoy3pOKOBaTu NoXap.
PpATne ynyTcTa 3a uHHebe cInTepa KaD ce noJabn obabeWeThe o cInTepy. IorneJaTe oDeBaK CBAKOHeBHa ynotpe6a".
Φιπεp caakTNBHM yrJbEm
Bpeme 3acnheBa yrIbeHOr qntepa Bapupa y 3aBnCHOCtN Ov BpCTe KyBaHa n peoBHOCTu NnHeBa qntepa 3a MacHoHe. IorneJaTe JetaK oJi je YkIbUyeH y3 np6Op.
6.2 Ynshene fo nntepa 3a MaCT
Фиntepn cy moHTnpaHn nomohy cTera n OcngypaHa ha cynpoTHoJ cTpaHn.
Да 6исте очирлн Фиntер:
1.ПиТиСнITEpyKcCTe3aMOHTaKуHa NaHEnyФИntepaIcNoIacnnpaTopa(1).
2.Блaro Hargnte npedbI Deo fntepa HadoJe (2),a 3aTnM NOByuTe. IHOBOHTe npBa Dba KOPaka 3a CBe fNTpe.
3. OuHCTnTe fHnTepe 3a MaHoHy pyuHo, cyHjepom H Hea6pa3nBnHm DeTepueHToM, INN INx ONepTe y MaunHn 3a cyDoBe. IpenOpuyjemo pyuHo nnHebe fHnTepe 3a MaHoHy.

Maunha 3a npahe cydoBa mopa 6ntu noDeWeHa Ha Hncky TemnepaTpy n KpataK uKnIyc. FInIeP 3a MachoHe MoKe Da npomeHn 6oJy, aN To Hema yTucaJa Ha yUnHaK ypehaja.
4.ДабистeВраTNINФИNTepHaMeCTO, cIeIITe npBaДbaKopakaOBpHyTUM peDocneIOM.
IHOBOBnTe KOPaKe 3a CBe FInTepe aKO je To Moryhe.
6.3 3aMeHa qnItepa ca aKTHBHM yIbem -OnuHO

3aBncho OJ BpCTe, fHNTep MOKe nHn He MoKe Da ce pereHepuWe. IorpeJaTe NeTak npINOxeh y3 fHNTep.
Да 6иСte 3aMeHnJIn ΦиТeр:
1.ИЗвадиTe Фнтapestе 3a МаСТ ИЗ урehaja.
Погледajte Oдьak,Чишение Фнтapestа 3a Macht"у OBOM Поглавь.
2. NOByuTe je3nUak npema DOHbEm DeNy cnntepa.
3.БлaroHarHnte npedbN DeoФnTepa HanoJe,a 3aTm NOByuTe.
4.Дабnteнсталралфпгетер, IOHOBHTe nCTe KOPaKe ObPhTm peDocJIeOM.
6.4 3aMeHa JAmPe
Upehaj ce ncnopyyje ca LED lamnucom. Obaj deo moxe da 3aMeHc amo Texnuaq. Y cnuyajy 6nIO kaBor KBapa, norJeJaTe deo "CepBnc" y oJeBky ,NyTCTBa o 6e36eHNOCtN".
7. PEWSABAHBE ППОБЛЕМА

YNO3OPEHBe!
PnnejTe norgabBa o 6e36eHocTn.
ELECTROLUX APPLIANCES AB
BUSINESS SECTOR EMA-EMEA (SEE)
ST GÖRANSGATAN 143
SE-105 45 STOCKHOLM
SWEDEN
TEL: +46 (8) 738 60 00
FAX: +46 (8) 738 63 35
www.electrolux.com
Ithalatci:Electrolux Day.Tuk.Mam.San. Tic.A.S.
Adres: Inci Çikmazı No:3 Inci Ofis Zemin Kat
Daire:6 Altunizade 34662
Uskudar, Istanbul-Turkiye
Müsteri Hizmetleri: 0 850 2503589
musteri_hizmetleri@electrolux.com
WEB: www.electrolux.com.tr
5.1 BnKOpncTaHHBnTAAKKN
IpeBipTe peKoMeHIOBaHy WbNkicTb BiNoBIDHO Do Ta6nCi HxKHe.
011 HarpibaHn iXi, roTyBaHH B HApKPTOMy KpnIuKOIO nocdyi.
2 TpyBaHHB HApriTomy KpiuKoIO NocdyHa KInbKOx 30Hax HarpibaHHa 60 KOHΦopkax, NerKe o6cmaKyBaHH.
BapinHra ta CmaxKeHHBENIKoI KINbKOCTi Xi 6e3KpUuKN, roTyBaHHHa KINbKOx 3OHax Ha-rpiBaHH a6o KOHΦopkax.

PeKOMeHdyE7bc3aIIuHaTu BNTJkKny npauObaTu npotarom npn6n3Ho 15 XBUNH Do Ta nicra roTyBaHHa.
YbIMKHeHH npnnay
ΦiNbTpN BCTaHOBNeHO 3 BnKOpNCtAHHЯ M 3aTnCKaYiB i WNTuΦTiB Ha npOTnJIeXHi CTopoHI.
OoNCTnΦIbTp,BNKOHaTe HabeHeHnxKYe dii.
- HataHcHb pyKy 3aTnckaHa KpInJeHHa Ha naHei pInbTp a NiD BnTgXkoI (1).
- 3nerka haxniltb nepeHIO qactnHy fInbtpa Bn3 (2),notim notarHITb. Nobtopitb nepwi Dba KpOKn dna BCix fInbTpib.
- OuNCTiB JnpoBI fInbTpN BpyHy 3a DOnOMOIOI r6Kn 3 BnKOpNCtAHHm Hea6pa3NBHX MmHnx 3ac06iB a6o BmNte iX y nocydomnHi MaunHi. Mn peKOMeHNyEMO OUnSyBaTu JnpoBI fInbTpN BpyHy.
i
Дя nocydomnHoi MaunHn notpi6HO BCTaHOBHTN H3bky Tempeatpy KopoTKn ZIKN MTTJ. KnpOBn φIbTp MOKe 3He6apBNTncs, 10 He BnNAe Ha eΦeKTNBHicTb po6Ot npnady.
- ьб yctahOBHTn φiNbTpHa Micue, NOBTOPIb Nepsi Dba KpOKn y 3BOPOTHOMy nopAky.
Iobtopitb kpoKn dna BCix pfinbtpiB (aKuo 3actocobHO).
6.3 3aimaHbIbHoro IbTpa (Heoob'ra3koBO)
i
3aJexHo BiD Tnny, fInbTp MoKe iINrAtn NHe NiIgrrAtn BiHOBneHHIO. DnB.6yKlET, 10 NoCTaayEtbc3 fInbTpom.
Iio6 3amHnTn φiNbTp:
1.3HimItbJxipObiΦiNbTpni 3 npnnaDy.
INB.NyHKT «OuHcEHnJxipOBOroΦiNbTppa»
B CbOMy po3diNi.
2. NotarytB y3nOK y HanpMky HxHbOi YactuHnΦinbtpy.

- 3nerka Haxnilitb nepeHIO qactHy fInbTpa Bn3,NOTIM NOTARHITb.
- Σιοδ BCTaHOBuTn φιNbTp, NOBTOpiTi Cami KpOKN B 3BOpOTHomY NOPaDky.
6.4 3aɪha Jæmnn
PpunaD noctaAcBcI3 CbitIOioHOI npnno. LTO Detanb MoKe 3amHOBaTn nIwe KbaIipikOBaHn cneiaJIcT. Y BUnaKy 6yNb-IAKOHeCnpabHocTi 3BepHiBcRdo pO3diny «Cepbic» rnaBn «IHCTpyKciI IoDo 6e3neKn).
7. YCYHEHЯ HECPABHOCTEY

NONEPEDKEHHI
IINB. po3diN 3 iHΦopMaciEIO zuoToTexhikn 6e3neKn.
7.1 II B pa3i BHHKHeHn npo6Jem
Jr Jr Jr Jr Jr Jr Jr Jr Jr Jr Jr Jr Jr Jr Jr Jr Jr Jr Jr Jr Jr Jr Jr Jr Jr Jr Jr Jr Jr Jr Jr Jr Jr Jr Jr Jr Jr Jr Jr Jr Jr Jr Jr Jr Jr Jr Jr Jr Jr Jr Jr
1 4
. 1
.
6.3
i
Sg jilal yj Sg gll w. jilal go aq rall oaiill g>0d
jaiJlWy
m = 311
1 + u8 = 8
一
0
1
2
3
一
2.3 p1x
.1 1 1 1 1 1 1 1 1 1 1 1 1 1 1 1 1 1 1 1 1 1 1 1 1 1 1 1 1 1 1
jge gao aegal laxlAL y | pssuW y 120, aiaaI plw>yl gll aiwl jlc bol > Iaillgblll xic ojjggsy C .olbaallcayilkssllpssuW y
jgs jgjjy 100000000000000000000000000000000000000000000000000000000000000000000
)4×1.075
2.4 aooJI
o>1.aaieaojS Jai jgJgJy . aaiy
J.3
J3.1
| x - 1| = | x - 2| = 1
aal .4
4.1

a_b = 1.
oo o 15g jge g oo oogoll y l
J. J. J. J. J. J. J. J. J. J. J. J. J. J. J. J. J. J. J. J. J. J. J. J. J. J. J. J. J. J. J. J. J. J. J. J. J. J. J. J. J. J. J. J. J. J. J. J. J. J. J.
Jl
0jI gJg> 1 Jlalal
auiuiee
JgJl JwAeV slgo pdsuW
jlll lalllgcl gdd jlll gallbaw jn bai
J 65 J
.
.
j j j j j j j j j j j j j j j j j j j j j j j j j j j j j j j j j j j j j j j j
g 1 g
y jgll gagall gell lal ggllll
J 1
aallll g, a, a, a, a, a, a, a, a, a, a, a, a, a, a, a, a, a, a, a, a, a, a, a, a, a, a, a, a, a, a, a, a, a, a, a, a, a, a, a, a, a
(1)
EJgJgJgJgJgJgJgJgJgJg
0.04 000
aJl JdIy jy
J 1
a
JLwAagaa Jllw! jy
LgI I I I I I I I I I I I I I I I I I I
Ug201
- 1
271 2.2
270 3
270 4
269 5
268 1.6
267
267 8
JALI Jlogle 1
. 1 J 1 1 1 1 1 1 1 1 1 1 1 1 1 1 1 1 1 1 1 1 1 1 1 1 1 1 1 1 1 1 1 1 1 1 1 1 1 1
scll lI g Jb1 1.1
8 12 y JbJy jgJgJgJgJgJg
gJgJgJgJgJgJgJgJgJgJgJgJgJgJgJgJgJgJgJgJgJgJgJgJgJgJgJgJgJgJgJgJgJgJgJgJgJgJgJgJgJgJgJgJgJgJgJgJgJgJg
a gglg l ylll g 1 1 1 1 1 1 1 1 1
aallll lall aegg aaaiyaae yjgljll piaeaaslae
y 8 JJ JI JIJI
.
JgJypeucpcnlaJlably JcJrWy
Jg 120
.
.
.
electrolux.com