USER MANUAL S9001 Caffitaly
English Instruction book
A: "Espresso" button, left group;
B: "Long coffee" button, left group;
C: "Filter coffee" button, left group;
D: "Cleaning cycle" button, left group;
E: "Hot water" dispensing button;
F: "Espresso" button, right group;
G: "Long coffee" button, right group;
H: "Filter coffee" button, right group;
I: "Cleaning cycle" button, right group;
L: "Steam" dispensing button;
M: Lid and Water Tank;
N: Capsule compartment opening / closing lever, left group;
0: Information display:
01 - Decrease value button (Down);
02-Increase value button (Up);
03 - Confirm button (OK);
P: Capsule compartment opening / closing lever, right group;
Q: Coffe dispenser, left group;
R: Hot water dispenser;
S: Used capsule drawer;
T: Coff eedispenser, right group;
U: Steam dispenser;
X: Drip-tray with grille;
W: Main switch;
Y: Power cord;
Z: "Cleaning"(dummy) capsule kit.
Deutsch
Follow the instructions (Symbols) 25
Your Caffitaly System contact 25
Safety instructions 26
- Instructions for use and disposal 28
INSTALLATION 28
First use or after a long period of disuse 28
- Turning the appliance on 29
General operating indications 29
Cup / espressocup height adjustment 32
DISPENSING THE PRODUCT 33
- Correct use of the buttons 33
Dispensing coffee 33
- Programming the amount of coffee in a cup 33
Dispensing hot water 34
Preparing cappuccino / Dispensing steam 34
Automatic cleaning cycle 34
Energy saving 35
Daily cleaning 35
- Setting the language 35
- Descaling 36
MISCELLANEOUS 37
Technical data 37
Troubleshooting 37
INTRODUCTION
Thank you for having chosen our product and for the trust in our company.
You can savour your favourite hot beverages at any time of the day with our appliance by choosing one of the various capsules that Caffity offers. For example: an espresso, or a hot beverage, will be ready in just a few seconds.
Follow the instructions (Symbols)

Attention.
This is the safety warning symbol.
It is used to call attention to possible risks of personal injury.
Comply with the safety messages provided in order to avoid possible injury or death.
NB.
This symbol is used to highlight some actions that will optimise machine use.
Not dishwasher safe Cleaning advice
Your Caffi taly System contact
info@caffitaly.com
Safety instructions
Read the following instructions CAREFULL! In this way you will prevent the risk of accidents and damage to the appliance.
- Do not allow the appliance to be used by children (even over 8 years old), or people with impaired mental, physical or sensory faculties or insufficient experience and expertise, unless they are carefully supervised and instructed by a person responsible for their safety. Children must be kept under supervision to prevent them from playing with the appliance!
- Only use the special Caffi taly System capsules.
- Any use of the appliance not according to these instructions may cause harm to persons and voids the warranty. The manufacturer declines any liability for injury or damage resulting from improper use of the appliance.
- The surface on which the machine is installed must be level, solid, firm and heat resistant. The cup warmer must be located more than 150 ~cm from the floor. The support surface must not slope more than 2^ .
- After removing the packaging, check that the appliance is not damaged. In case of damage, or at the first sign of faultiness (unusual noise or odours), or if any problem occurs inside the appliance, do not use it. Contact an Authorised Service Centre.
- Only connect the appliance to approved power sockets. Make sure the mains voltage matches that shown on the data plate located on the bottom of the appliance.
- Installation must be carried out by the operator in accordance with the applicable safety regulations.
- The appliance must be installed in a place where it can be checked by qualifi ed personnel.
- The packaging elements (plastic bags, etc.) are potential hazards and must not be left within the reach of children.
- Only use the appliance if the power cord is intact. To replace a damaged cord, contact an Authorised Service Centre. Danger of death caused by electric shocks.
- Grip the plug without pulling on the cord to disconnect it. Do not leave the power cord near hot surfaces and sharp edges or objects.
-
Use and store the appliance only indoors. Make sure the electrical elements, plugs and cords are dry. Never immerse the appliance in water or any other liquid. Do not install the machine in areas where a jet of water can be used. Protect the appliance from sprays and drips. Water and electricity together create a risk of electrocution.
-
Never place hands inside the capsule compartment. Danger of injury.
- Always close the lever. Never open the lever while a beverage is being dispensed.
- Do not aim the jet of hot water and/or steam against anyone. Do not touch the hot water wand with hands; danger of scalding!
- Never remove parts of the machine, except those indicated for daily cleaning.
- Do not insert anything in the openings. This could cause electric shocks! Any operation not described in this instruction manual must only be carried out by an Authorised Service Centre!
- Clean the appliance carefully and regularly. If it is not cleaned, the build-up that forms could be hazardous to the health. Unplug the appliance and allow it to cool before cleaning.
- Unplug the appliance if it is not going to be used for a long period of time (holidays, etc.). Protect it from dust and dirt.
Instructions for use and disposal

The appliance is made with high quality materials that can be reused or recycled. Dispose of the appliance in a suitable waste collection centre.
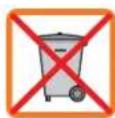
Instructions for correct disposal of the product according to European Directive 2002/96/EC and Italian Leg. Decree no. 151 of 25 July 2005. At the end of its useful life, the product must not be disposed of with household waste. It can be taken to a suitable recycling centre set up by the local authorities or returned to a dealer who provides this service. Disposing of an electrical appliance separately avoids possible negative consequences for the environment and human health due to its inadequate disposal and enables the materials it is made of to be recovered in order to obtain an important saving of energy and resources. The crossed-out bin symbol applied on the product highlights the obligation to dispose of electrical appliances separately. Improper disposal of the product by the user involves the application of administrative penalties as provided for under the current regulations. The packaging is made from recyclable materials. Contact the competent authorities for information regarding local regulations.
INSTALLATION
First use or after a long period of disuse
NB: If the machine has a connection to the water supply, open the tap located upstream before starting the machine; this will automatically fill the tank when it is started.
- Remove the tank lid (Fig.1).
- Lift the handle and remove the tank (Fig.2).
- Fill the tank with fresh, still water (Fig.3).
- Put the tank back, making sure it is inserted up to the stop and refit the lid.
- Make sure the plug is properly inserted in the socket.
- Turn on the machine by setting the main switch to "l".
- Wait for the machine to finish the water circuit fi lling cycle and warming up.
- Raise the lever (N) to open the capsule compartment of the left group (Fig.4).
Insert a "cleaning" capsule supplied (Fig.5).
- Completely close the lever (N) (Fig.6).
- Place a large container (at least 250ml ) under the left coffe dispenser (Fig.12).
Press the button D. Wait for the machine to finish dispensing. Empty the container.
- Raise the lever (N) to eject the capsule (Fig.4).
- Close the lever (N) (Fig.6).
Pull out the used capsule drawer and recover the "cleaning" capsule (Fig.18). Re-insert the used capsule drawer.
- Insert the "cleaning" capsule in the right group (Fig.7 - 8 - 9)
- Place a large container (at least 250ml ) under the right coffe dispenser (Fig.15).
Press the button I. Wait for the machine to finish dispensing. Empty the container.
- Raise the lever (P) to eject the capsule (Fig.7).
- Close the lever (P) (Fig. 9).
Pull out the used capsule drawer and recover the "cleaning" capsule (Fig.18). Re-insert the used capsule drawer.
NB: The "cleaning" capsule can be used several times while it is still intact. In case of loss or depletion of the "cleaning" capsule supplied, a old capsule can be used after emptying it.
Turning the appliance on
- Remove and fi II the tank with fresh, still water (Fig.3).
- Turn the machine on by setting the main switch to "l".
- The display shows the various machine phases. Wait until it is ready to use.
NB: If the machine has a connection to the water supply, open the tap located upstream before starting the machine; this will automatically fill the tank when it is started.
General operating indications
The machine has a display which provides the user with all the information necessary for its operation.
The display is divided into sections in order to better communicate with the user. Messages are shown by categories to facilitate their understanding. Messages can be combined and different for each group, because the machine allows all functions to be managed in an independent way.
HEATING UP
Left group in heating up phase.
Hot water dispensing in heating up phase.
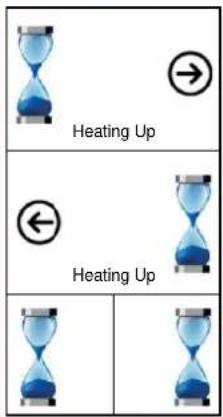
Right group in heating up phase.
Steam dispensing in heating up phase.
THE MACHINE IS READY TO USE
Left group ready.
Hot water dispensing ready.
Right group ready.
WHEN DISPENSING AN ESPRESSO
| Dispensing an espresso in the left
group. | Dispensing an espresso in the right
group. |
| Dispensing |
|
NB: The icon that appears during dispensing is that of the button pressed for each group. With this machine each group can dispense a different type of coffe at the same time, separately and autonomously.
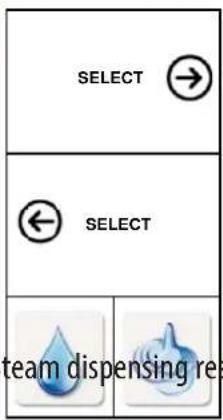
WHEN DISPENSING HOT WATER
| Left group ready. Dispensing hot water (animated icon). | SELECT | Right group ready. |
| ← SELECT |
| |
WHEN DISPENSING STEAM
| Left group ready. | SELECT | Right group ready. Dispensing steam (animated icon). |
| ← SELECT |
| |
DURING THE AUTOMATIC CLEANING CYCLE OF THE 2 GROUPS
Execution of left group automatic cleaning cycle (animated icon).
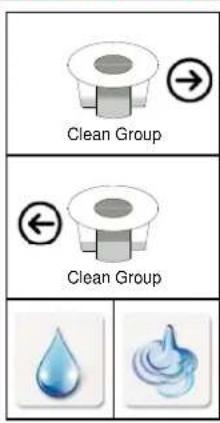
Execution of right group automatic cleaning cycle (animated icon).
AT THE END OF THE AUTOMATIC CLEANING CYCLE OF THE 2 GROUPS
Raise the lever (N) of the left group to eject the "cleaning" (dummy) capsule into the special drawer.
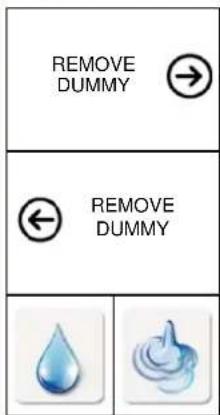
Raise the lever (P) of the right group to eject the "cleaning" (dummy) capsule into the special drawer.
DESCALING SIGNAL
Descale as soon as possible.
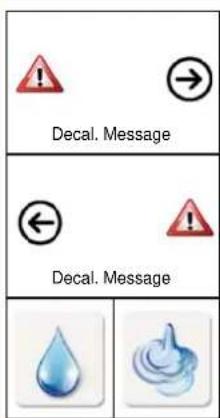
Descale as soon as possible.
NB: Signalling of the need to carry out descending is displayed when the function is ACTIVE.
ALARM SIGNALLING FOR THE USER
IF THE LEVER IS RAISED DURING DISPENSING
Close the lever of the left group.
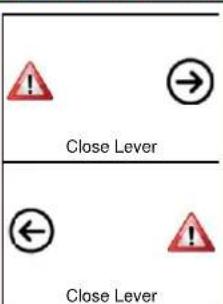
Close the lever (P) of the right group.


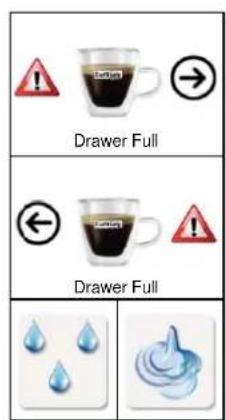
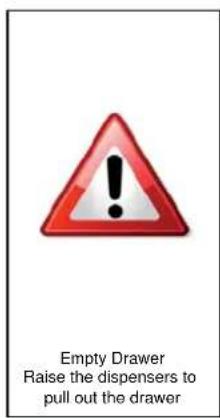
The machine signals the need to empty the used capsule drawer. Raise both dispensers and pull out the drip-tray and the used capsule drawer (Fig.19). Coffee can still be dispensed.
The used capsule
builder must be
emptied. Raise both dispensers and pull out the drip-tray and the used capsule
builder (Fig.19).
The appliance is blocked.
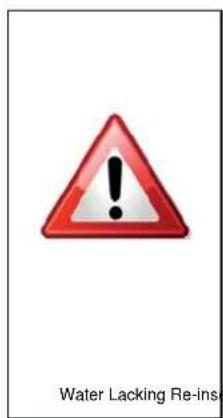
The water tank must be filled. The appliance is blocked.
The used capsule
drawer must be
reinserted.
The appliance is blocked.
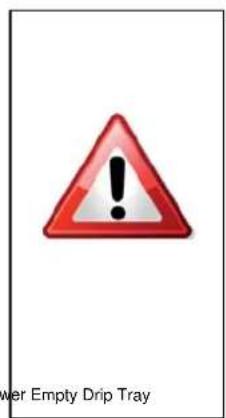
The drip-tray must be emptied.
The appliance is blocked.
NOTE: If the function is active.
Cup / espresso cup height adjustment.
The coffe dispensers can be adjusted in height to allow the use of the desired cups/espresso cups. To adjust the coffe dispenser, it must be moved vertically to the desired height.
To adjust:
- the dispenser of the left group, adjust the dispenser (Fig.10);
- the dispenser of the right group, adjust the dispenser (Fig.13).
dispensing the product
To dispense "Espresso" or "Long coffee", only use the buttons A or B for the left group, F or G for the right group. Depending on the amount, the same buttons are to be used for dispensing barley or ginseng capsules.
The button C for the left group and H for the right group (3rd from the top, lit up BLUE) must only be used for "Filter coff ee" or "American" coff ee. The same button can be used for tea, chamomile or herbal tea capsules.
Do not use the buttons C and H for espresso or in any case coffee with a strong flavour. In fact, in this function the machine is set for low pressure and this reduces the "cream", the flavour of the coffee, and could cause dispensing to stop.

NB: Traces of the product just dispensed may remain in the circuit of the machine. To retain the full flavour when dispensing instant drinks, it is advisable to do a short rinse. To rinse, see the section "Cleaning cycle". In any case, it is advisable to carry out this procedure at least once a day.
Dispensing coff ee
NB: Coffee dispensing is managed in an equivalent way in both groups installed on the machine. Each coffee group is managed independently, using the side button panel.
- Raise the lever (N) or (P) to open the capsule compartment (Fig.4 or Fig.7).
- Insert the capsule, pressing it gently inside (Fig.5 or Fig.8).
- Completely close the lever (N) or (P) (Fig.6 or Fig.9).
- Place a cup or espresso cup under the coffe dispenser (Fig.11/12 or 14/15).
Press (briefly) button (A or B) or (F or G), depending on the desired coffee.
- Dispensing stops when the programmed amount is reached.
- Raise the lever (N) or (P) to eject the used capsule into the special drawer (Fig.4 or Fig.7).
- Close the lever (N) or (P) (Fig.6 or Fig.9).

NB: The amounts of coffee dispensed can be programmed according to personal taste and the size of the cups or espresso cups used.
To program the amounts, refer to the section "Programming the amount of coffee in a cup".
Programming the amount of coffee in a cup
- Raise the lever (N) or (P) to open the capsule compartment (Fig.4 or Fig.7).
- Insert the capsule, pressing it gently inside (Fig.5 or Fig.8).
- Completely close the lever (N) or (P) (Fig.6 or Fig.9).
- Place a cup or espresso cup under the dispenser (Fig.11/12 or 14/15).
- Press and hold the desired coffe button.
- On reaching the desired amount of coffee, release the button. The button is now programmed. The amount of coffe dispensed can be programmed from a minimum of 20 to a maximum of 250ml .
- Raise the lever (N) or (P) to eject the used capsule into the special drawer (Fig.4 or Fig.7).
- Close the lever (N) or (P) (Fig.6 or Fig.9).
Dispensing hot water

ATTENTION! The hot water wand get very hot: Danger of scalding! Clean the wand with a damp cloth after each use.
- Place a metal container under the hot water wand (Fig.16).
- Press the button E. Dispensing of hot water starts.
- Dispensing stops when the programmed amount is reached.
- Remove the container of hot water.
NB: After dispensing hot water, the system requires a pause time of 15 seconds before being able to dispense again. If hot water is dispensed 2 times in succession, it is advisable to wait 1 minute before dispensing hot water or steam again
Preparing cappuccino / Dispensing steam

ATTENTION! During preparation there may be some brief sprays of hot water and the steam wand becomes very hot: Danger of scalding! Clean the wand with a damp cloth after each use.
- Place a metal container under the steam wand (Fig.17).
Press the button L; this will discharge any water remaining in the circuit.
After a few seconds, only steam will start to come out; press the button L again and empty the container.
- Half-fi II a cup with milk, then immerse the steam wand in it (Fig.17).
- Press the button L to start dispensing steam.
- Move the cup in a slight circular motion so that the milk is more evenly heated.
- When the preparation is completed, press the button L again.
- Place the cup under the desired dispenser to dispense the coffe in the freshly frothed milk (Fig.12 or Fig.15).
NB: Whenever heating milk, to ensure correct cleaning it is advisable to dispense steam for a few seconds, directing the steam wand inside the grille.
Automatic cleaning cycle
It is advisable to run the automatic cleaning cycle of the two groups every day. To do this, proceed as follows:
- Place a large container (at least 250ml ) under the two dispensers (Fig.12 and Fig.15).
- Raise the levers (N) and (P) to open the capsule compartment (Fig.4 and Fig.7).
Insert the "cleaning" capsule in the two groups, pressing it gently inside (Fig.5 and Fig.8).
- Completely close the levers (N) and (P) (Fig.6 and Fig.9).
Press the buttons D and I. The machine dispenses water. Repeat the operation if the dispensed water is not clean.
- Raise the levers (N) and (P) to eject the "cleaning" capsule into the special drawer (Fig.4 and Fig.7).
- Close the levers (N) and (P) (Fig.6 and Fig.9).
Pull out the used capsule drawer and recover the two "cleaning" capsules (Fig.18).
Energy saving
If this function is active, the machine automatically reduces consumption after a certain time of non-use (from 15 minutes to 12 hours). The buttons blink slowly and sequentially. Press any button to restore normal operating conditions. The appliance will start warming up.
Daily cleaning
- Raise both dispensers and pull out the drip-tray and the used capsule drawer (Fig.19).
- Raise the used capsule drawer (Fig.20); empty and rinse it.
- Empty and wash the drip-tray.
- Remove the water tank (Fig.2); empty and rinse it.

NB: Traces of the product just dispensed may remain in the circuit of the machine. To retain the full flavour when dispensing instant drinks, it is advisable to do a short rinse. To rinse, see the section "Cleaning cycle". In any case, it is advisable to carry out this procedure at least once a day.

Use a soft cloth and a mild detergent to clean the surfaces of the appliance. Do not use jets of water to clean the appliance.
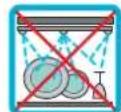
The plastic parts of the machine, including the tank, are NOT dishwasher safe.
Setting the language
The machine allows quick selection of the language in which messages are shown on the display. To carry out the selection, proceed as follows.
- Turn the machine off.
- Press the buttons A-B and at the same time turn the machine on by pressing the main switch.
- The language menu appears on the display.
- Press the button 01 or 02 to select the desired language.
- Press the button 03 to confirm. The machine returns to the main menu.
Dscaling
Descending signal: when the message "Descending" appears on the display, it is advisable to run the descending cycle, as illustrated below.
The machine features an advanced programme that monitors how much water is used to dispense products. This measurement lets the user know when the machine needs to be descaled.
Make sure to use Caffitaly System descaler, which is designed to respect the machine's technical characteristics, in full compliance with consumer safety. The descending solution must be disposed of according to the manufacturer's directions and/or the regulations in force in the country of use.

Read the precautions given on the descaler package CAREFULLY. Avoid contact with eyes, skin and the surfaces of the machine. Do not turn the machine off or raise the lever during descending. A person must be present during the operation.
Do not use vinegar: it could damage your machine!
- Empty and rinse out the used capsule drawer and drip-tray then refit them (Fig.19 - 20 - 21).
- Place a container (at least 500ml ) under the dispensers (Fig.12 and Fig.15).
- Keep the buttons 01 and 02 pressed at the same time for 5 seconds. The message "Descending" appears on the display. Press the button 03 "OK" to start the descending cycle.
The message "Fill tank" appears on the display.
- Remove and empty the water tank (Fig.2).
- Mix the contents of a bottle of Caffitaly System descaler with approximately 2 litres of water and pour into the tank.
Press the button 03 "OK". The message "Close levers" appears on the display.
- Raise the levers (N) and (P) to open the capsule compartment (Fig.4 and Fig.7).
- Insert the "cleaning" capsule, pressing it gently inside (Fig.5 and Fig.8).
- Completely close the levers (N) and (P) (Fig.6 and Fig.9).
Press the button 03 "OK". The message "Confirm start procedure" appears on the display.
Press the button 03 "OK" again to start the cycle. The message "Running" appears on the display.
- The machine dispenses approximately 75 cc of descending solution fi rst from the left dispenser and then from the right dispenser.
If the containers fill up, empty them out.
After a 1 minute pause the dispensing is repeated. This is repeated 6 times.
- At the end of the last repetition, the machine dispenses the remaining solution from both groups at the same time, until the tank is empty. The message "Emptying system" appears on the display.
- When the first phase has been completed, the message "Fill tank" appears on the display.
- Carefully rinse out the water tank and refill it with fresh water (Fig.3).
- Empty and rinse out the used capsule drawer and the containers used, and put them back in place.
Press the button 03 "OK". The message "Rinsing systems" appears on the display.
- The machine dispenses the rinsing water (until the water tank is empty).
- When the rinsing cycle has been completed, the message "Fill tank" appears on the display.
- Carefully rinse out the water tank and refill it with fresh water (Fig.3).
- Press the button 03 "OK" to exit the cycle.
- The machine is in the heating phase
- Raise the levers (N) and (P) to eject the "cleaning" capsules into the special drawer.
- Completely close the levers (N) and (P) (Fig.6 and Fig.9)
- Empty and rinse out the used capsule drawer, recovering the "cleaning" capsules, and refit it together with the drip-tray (Fig.19 - 20 - 21).
MISCELLANEOUS
Technical data
| kg | Approx. 24 kg | ~ See the data plate on the base of the machine. |
| 4 litres Max. 15 bar | P |
| Ambient temperature:
10°C - 40°C | <70dB A |
| 540 mm | 60 capsules |
| 545 mm 395 mm 435 mm | |
The materials and objects in contact with food products comply with the requirements of European Regulation 1935/2004.
Troubleshooting
PROBLEM POSSIBLE CAUSE CURE
The coff ee is not hot enough. Cold cups / Espresso cups.
Scale build-up in machine.
The lever cannot be lowered. Capsule stuck inside the machine.
When a button is pressed to dispense coffe, the machine seems to start but then stops without dispensing coffe, or only dispenses a small amount.
Coff ee is dispensed very slowly, and is of poor quality.
Incorrect programming of amounts.
The button C or H was used with an espresso capsule.
- Preheat the cup.
- Descale.
- Remove the stuck capsule.
Reprogram the amount for the button. See the section "Programming the amount of coff ee in a cup".
Use the appropriate buttons for espresso coff ee.
INDEX
EINLEITUNG 39
AUSGAB DES PRODUKTES 47
AUSGAB DES PRODUKTES
PROBLEMA CAUSA POSIBLE SOLUCION
PROBLEMA POSSIVEL CAUSA SOLUÇAO
Caffitaly System S.p.A.
via Panigali 38
40041 Gaggio Montano (BO)- Italy
Phone: +39 0534 38911
Fax: +39 0534 38962
Web: www.caffi taly.com
Caffitaly
system