
SDM976A - Monitor SONY - Free user manual and instructions
Find the device manual for free SDM976A SONY in PDF.



| Product type | LCD Monitor |
| Brand | Sony |
| Model | SDM976A (SDM-E76A/E96A/E76D/E96D series) |
| Screen size | 17 inches or 19 inches depending on sub-model |
| Maximum resolution | 1280 x 1024 pixels |
| Panel technology | a-Si active matrix TFT |
| Horizontal frequency | 28-80 kHz (analog), 28-64 kHz (digital) |
| Vertical frequency | 56-75 Hz (analog), 60 Hz (digital) |
| Input connectors | HD15 (VGA) and DVI-D on D models |
| Power supply | 100-240 V AC, 50/60 Hz |
| Power consumption | Max 38 W (17") / 44 W (19") during operation |
| Dimensions (width x height x depth) | 17": 382 x 403.2 x 193.2 mm; 19": 420 x 433.1 x 193.2 mm |
| Weight | Approx. 4.5 kg (17") / 5.5 kg (19") |
| Image functions | Adjustments: backlight, contrast, brightness, gamma, sharpness, color temperature, menu position |
| Power saving | VESA DPMS, ENERGY STAR, NUTEK compliant; standby power < 1 W |
| Auto adjustment | Yes, for analog signals (phase, clock, position) |
| Tilt | Manually adjustable |
| Wall mount | VESA compliant (screws not supplied) |
| Maintenance | Clean with a soft cloth and mild detergent; do not use solvents |
| Safety | Avoid extreme temperatures, shocks, and strong magnetic fields |
| Recycling | Contains mercury; dispose of in accordance with local regulations |
| Operating temperature | 5°C to 35°C |
Frequently Asked Questions - SDM976A SONY
User questions about SDM976A SONY
0 question about this device. Answer the ones you know or ask your own.
Ask a new question about this device
Download the instructions for your Monitor in PDF format for free! Find your manual SDM976A - SONY and take your electronic device back in hand. On this page are published all the documents necessary for the use of your device. SDM976A by SONY.
USER MANUAL SDM976A SONY
www.tcodevelopment.com
This monitor complies with the TCO'03 guidelines.
Table of Contents
Precautions for Use 4
Names of Parts 5
Connection and Setup 6
Step 1: Attach the Stand 6
Step 2: Connect the Cables
Step 3: Connect the Power Cord 7
Step 4: Organize the Cables 7
Step 5: Turn on the Power 8
To Switch the Input (INPUT Button)
This display is designed for use in Japan only and cannot be used in any other country.
Main Specifications
SDM-E76A
The display you have just purchased carries the TCO'03 Displays label. This means that your display is designed, manufactured and tested according to some of the strictest quality and environmental requirements in the world. This makes for a high performance product, designed with the user in focus that also minimizes the impact on our natural environment.
■ Ergonomics
- Good visual ergonomics and image quality in order to improve the working environment for the user and to reduce sight and strain problems. Important parameters are luminance, contrast, resolution, reflectance, colour rendition and image stability.
Energy
- Energy-saving mode after a certain time - beneficial both for the user and the environment
- Electrical safety
Emissions
- Electromagnetic fields
- Noise emissions
Ecology
- The product must be prepared for recycling and the manufacturer must have a certified environmental management system such as EMAS or ISO 14 001
- Restrictions on
- chlorinated and brominated flame retardants and polymers
- heavy metals such as cadmium, mercury and lead.
The requirements included in this label have been developed by TCO Development in co-operation with scientists, experts, users as well as manufacturers all over the world. Since the end of the 1980s TCO has been involved in influencing the development of IT equipment in a more user-friendly direction. Our labelling system
started with displays in 1992 and is now requested by users and IT-manufacturers all over the world.
For more information, please visit
www.tcodevelopment.com
Recycling Information
Customer in Europe
The collection and recycling of this product has been planned according to your country's relevant legislation. To ensure that this product will be collected and recycled in a way that minimizes the impact on the environment, please do the following:
- If you purchased this product for private use, contact your municipality or the waste collection system and bring the product to this collection point / have the product be picked up by the waste collection system. Alternatively, your retailer might take back this if you purchase new equivalent equipment; please check with your retailer whether he will take back this product before bringing it. For information on your country's recycling arrangements, please contact the Sony representation in your country (contact details at: www.sony-europe.com).
Further details on specific recycling systems can be found at the following addresses:
- Belgium: www-recupel.be
- Netherlands: www.nvmp.nl (consumer electronics) www.ictmilieu.nl (IT equipment)
- Norway: www.elretur.no
- Sweden: www.el-kretsen.se
- Switzerland: www.swico.ch
- If you use this product professionally, check the product's delivery contract for take back / recycling arrangements and follow the procedures described therein. Alternatively, follow the procedures described under point 1.
Customer in USA
We Sony as a member of EIA recommends to visit URL below http://www.eiae.org/
Customer in Asia
http://www.sony.co.jp/SonyInfo/Environment/recycle/3R.html
TFTLCDColor ComputerDisplay
Operating Instructions (GB)
SDM-E76A/SDM-E96A
SDM-E76D/SDM-E96D
Owner's Record
The model and serial numbers are located at the rear of the unit. Record these numbers in the spaces provided below. Refer to them whenever you call upon your dealer regarding this product. Model No. _ _ Serial No. ____
WARNING
To reduce the risk of fire or electric shock, do not expose this apparatus to rain or moisture.
Dangerously high voltages are present inside the unit. Do not open the cabinet. Refer servicing to qualified personnel only.
FCC Notice
This equipment has been tested and found to comply with the limits for a Class B digital device, pursuant to Part 15 of the FCC Rules. These limits are designed to provide reasonable protection against harmful interference in a residential installation. This equipment generates, uses, and can radiate radio frequency energy and, if not installed and used in accordance with the instructions, may cause harmful interference to radio communications. However, there is no guarantee that interference will not occur in a particular installation. If this equipment does cause harmful interference to radio or television reception, which can be determined by turning the equipment off and on, the user is encouraged to try to correct the interference by one or more of the following measures: - Reorient or relocate the receiving antenna. - Increase the separation between the equipment and receiver. - Connect the equipment into an outlet on a circuit different from that to which the receiver is connected. - Consult the dealer or an experienced radio/TV technician for help. You are cautioned that any changes or modifications not expressly approved in this manual could void your authority to operate this equipment.
IMPORTANT
If you have any questions about this product, you may call; Sony Customer Information Services Center 1-800-222-7669 or http://www.roy.com/
Declaration of Conformity
Trade Name: SONY
Model: SDM-E76A/SDM-E96A
SDM-E76D/SDM-E96D
Responsible Party: Sony Electronics Inc.
Address: 16530 Via Esprillo,
San Diego, CA 92127 U.S.A.
Telephone Number: 858-942-2230
This device complies with part 15 of the FCC rules. Operation is subject to the following two conditions: (1) This device may not cause harmful interference, and (2) this device must accept any interference received, including interference that may cause undesired operation.
NOTICE
This notice is applicable for USA/Canada only.
If shipped to USA/Canada, install only a UL LISTED/CSA
LABELLED power supply cord meeting the following
specifications:
SPECIFICATIONS
Plug Type Nema-Plug 5-15p
Cord Type SVT or SJT, minimum 3 x 18 AWG
Length Maximum 15 feet
Rating Minimum 7 A, 125 V
NOTICE
As an ENERGY STAR Partner, Sony Corporation has determined that this product meets the ENERGY STAR guidelines for energy efficiency.
This monitor complies with the TCO'03 guidelines.
Table of Contents
Precautions. 4
Identifying parts and controls 5
Setup 6
Step 1: Use the stand. 6
Step 2: Connect the display to your computer 6
Step 3: Connect the power cord. 7
Step 4: Secure the cords. 7
Step 5: Turn on the monitor and computer 7
Adjusting the tilt 8
Selecting the input signal (INPUT button) (SDM-E76D/SDM-E96D only) 8
Customizing Your Monitor 9
Navigating the menu. 9
Adjusting the backlight (BACKLIGHT) 10
Adjusting the contrast (CONTRAST) 10
Adjusting the black level of an image (BRIGHTNESS) 11
Adjusting the picture's sharpness and centering (SCREEN) (analog RGB signal only). 11
Adjusting the color temperature (COLOR) 13
Changing the gamma setting (GAMMA). 13
Adjusting the sharpness (SHARPNESS) 13
Changing the menu's position (MENU POSITION) 13
Changing the input automatically (INPUT SENSING) (SDM-E76D/SDM-E96D only) 14
Selecting the on-screen menu language (LANGUAGE). 14
Additional settings. 14
Technical Features 16
Power saving function. 16
Automatic picture quality adjustment function (analog RGB signal only) 16
Troubleshooting. 17
On-screen messages 17
Trouble symptoms and remedies 18
Specifications. 20
TCO'03 Eco-document
Macintosh is a trademark licensed to Apple Computer, Inc., registered in the U.S.A. and other countries.
- Windows is a registered trademark of Microsoft Corporation in the United States and other countries. VESA and DDC are trademarks of the Video Electronics Standards Association.
- ENERGY STAR is a U.S. registered mark.
- Adobe and Acrobat are trademarks of Adobe Systems Incorporated.
- All other product names mentioned herein may be the trademarks or registered trademarks of their respective companies.
- Furthermore, "TM" and "®" are not mentioned in each case in this manual.
Precautions
Warning on power connections
- Use the supplied power cord. If you use a different power cord, be sure that it is compatible with your local power supply.
For the customers in the U.S.A.
If you do not use the appropriate cord, this monitor will not conform to mandatory FCC standards.
For the customers in the UK
If you use the monitor in the UK, be sure to use the appropriate UK power cord.
Example of plug types
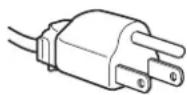
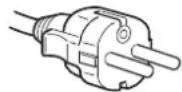
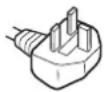
for 100 to 120V AC for 200 to 240V AC for 240V AC only
The equipment should be installed near an easily accessible outlet.
Installation
Do not install or leave the monitor:
- In places subject to extreme temperatures, for example near a radiator, heating vent, or in direct sunlight. Subjecting the monitor to extreme temperatures, such as in an automobile parked in direct sunlight or near a heating vent, could cause deformations of the casing or malfunctions.
- In places subject to mechanical vibration or shock.
- Near any equipment that generates a strong magnetic field, such as a TV or various other household appliances.
- In places subject to inordinate amounts of dust, dirt, or sand, for example near an open window or an outdoor exit. If setting up temporarily in an outdoor environment, be sure to take adequate precautions against airborne dust and dirt. Otherwise irreparable malfunctions could occur.
Place this unit on a flat surface. Do not place it on an uneven surface like the edge of a desk. If a part of this unit sticks out from such surface, it may fall or cause damaged and injury.
Handling the LCD screen
- Do not leave the LCD screen facing the sun as it can damage the LCD screen. Take care when you place the monitor by a window.
- Do not push on or scratch the LCD screen. Do not place a heavy object on the LCD screen. This may cause the screen to lose uniformity or cause LCD panel malfunctions.
- If the monitor is used in a cold place, a residual image may appear on the screen. This is not a malfunction. The screen returns to normal as the temperature rises to a normal operating level.
- If a still picture is displayed for a long time, a residual image may appear for a while. The residual image will eventually disappear.
- The LCD panel becomes warm during operation. This is not a malfunction.
Note on the LCD (Liquid Crystal Display)
Please note that the LCD screen is made with high-precision technology. However, black points or bright points of light (red, blue, or green) may appear constantly on the LCD screen, and irregular colored stripes or brightness may appear on the LCD screen. This is not a malfunction.
(Effective dots: more than 99.99%)
Maintenance
- Be sure to unplug the power cord from the power outlet before cleaning your monitor.
- Clean the LCD screen with a soft cloth. If you use a glass cleaning liquid, do not use any type of cleaner containing an anti-static solution or similar additive as this may scratch the LCD screen's coating.
- Clean the cabinet, panel, and controls with a soft cloth lightly moistened with a mild detergent solution. Do not use any type of abrasive pad, scouring powder, or solvent, such as alcohol or benzine.
- Do not rub, touch, or tap the surface of the screen with sharp or abrasive items such as a ballpoint pen or screwdriver. This type of contact may result in a scratched picture tube.
- Note that material deterioration or LCD screen coating degradation may occur if the monitor is exposed to volatile solvents such as insecticide, or if prolonged contact is maintained with rubber or vinyl materials.
Transportation
- Disconnect all cables from the monitor and grasp the monitor firmly with both hands when transporting. If you drop the monitor, you may be injured or the monitor may be damaged.
- When you transport this monitor for repair or shipment, use the original carton and packing materials.
Installation on a wall or a mounting arm
If you intend to install the display on a wall or a mounting arm, be sure to consult qualified personnel.
Disposal of the monitor
- Do not dispose of this monitor with general household waste.
- The fluorescent tube used in this monitor contains mercury. Disposal of this monitor must be carried out in accordance with the regulations of your local sanitation authority.
Identifying parts and controls
See the pages in parentheses for further details.
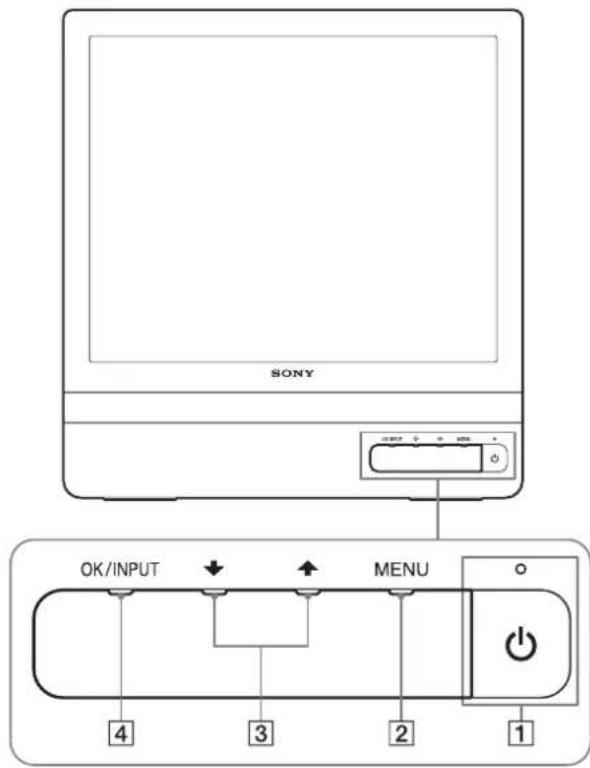
The power switch and the control buttons are on the lower right part of the front of the monitor.
Front of the display
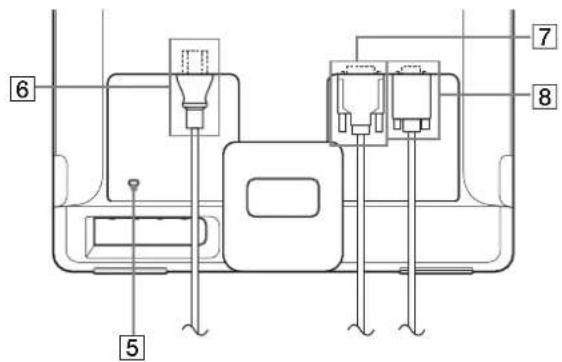
Rear of the display
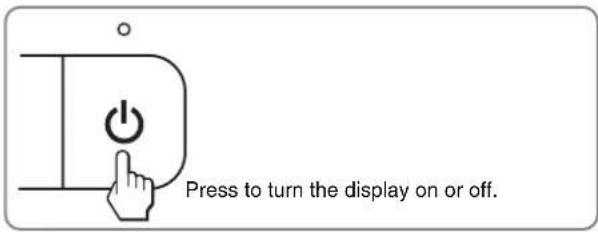
1 (Power) switch and indicator (pages 7, 16)
To turn the display on or off, press the power switch. The power indicator lights up in green when the display is turned on, and lights up in orange when the monitor is in power saving mode.
2 MENU button (pages 9, 10)
This button displays or closes the main menu.
You can also switch on the DDC/CI function by keeping this button pressed for more than 8 seconds.
3 Down/Up buttons (page 10)
These buttons function as the down/up buttons when selecting the menu items and making adjustments.
OK button (page 10)
This button selects the item or executes the settings in the menu.
INPUT button (page 8) (SDM-E76D/SDM-E96D only)
This button switches the video input signal between INPUT1 and INPUT2 when two computers are connected to the monitor.
5 Security Lock Hole
The security lock hole should be applied with the Kensington Micro Saver Security System.
Micro Saver Security System is a trademark of Kensington.
6 AC IN connector (page 7)
Connect the power cord (supplied).
7 DVI-D input connector (digital RGB) for INPUT1 (page 6) (SDM-E76D/SDM-E96D only)
This connector inputs digital RGB video signals that comply with DVI Rev.1.0.
8 HD15 input connector (analog RGB) (page 6)
This connector inputs analog RGB video signals (0.7 Vp-p, positive) and SYNC signals.
Setup
Before using your monitor, check that the following items are included in your carton:
- LCD display
- Power cord HD15-HD15 video signal cable (analog RGB)
- DVI-D video signal cable (digital RGB) (SDM-E76D/SDM-E96D only)
- Cord strap
- CD-ROM (utility software for Windows/Macintosh, Operating Instructions, etc.) Warranty card
- Quick Setup Guide
Step 1: Use the stand
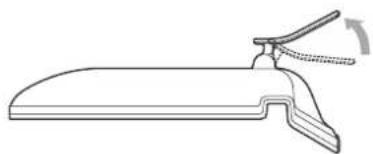
Use the supplied stand
Open the stand.
Note
The stand is folded at the factory. Be sure not to place the display vertically with the stand as it is. Otherwise, the display may topple over.
Use the VESA compatible stand
When using a non-supplied VESA compatible mounting arm or stand, use the VESA compatible screws to attach.
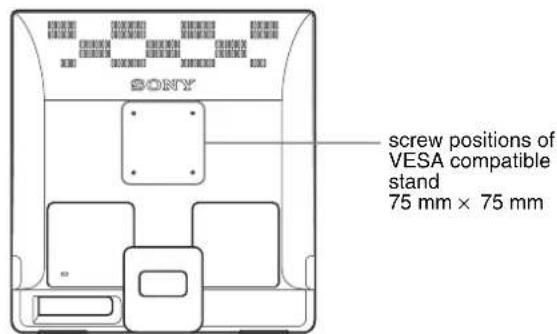
You can use the display with or without the supplied stand.
Step 2: Connect the display to your computer
Turn off the monitor and computer before connecting.
Notes
- Do not touch the pins of the video signal cable connector as this might bend the pins.
- Check the alignment of the HD15 connector to prevent bending the pins of the video signal cable connector.
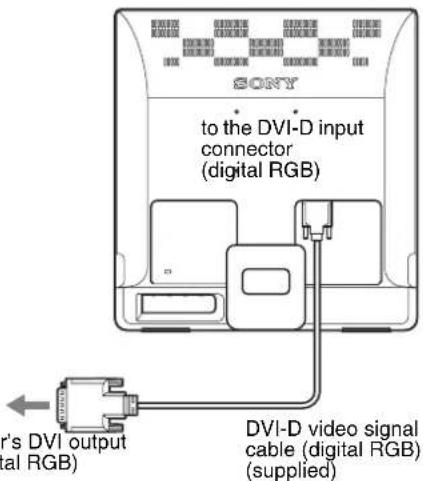
Connect a computer equipped with a DVI output connector (digital RGB) (SDM-E76D/SDM-E96D only)
Using the supplied DVI-D video signal cable (digital RGB), connect the computer to the monitor's DVI-D input connector (digital RGB)
Connect a computer equipped with an HD15 output connector (analog RGB)
Using the supplied HD15-HD15 video signal cable (analog RGB), connect the computer to the monitor's HD15 input connector (analog RGB).
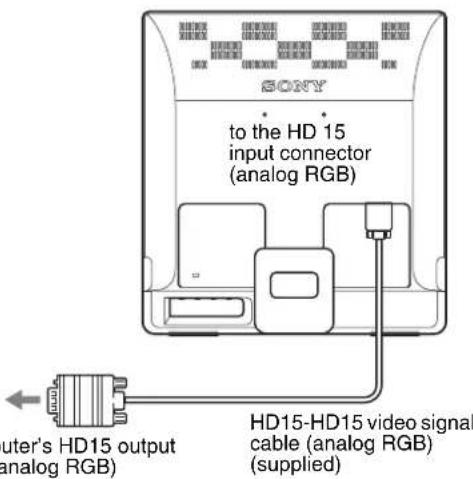
Step 3: Connect the power cord
With the monitor and computer switched off, first connect the power cord to the monitor, then connect it to a power outlet.
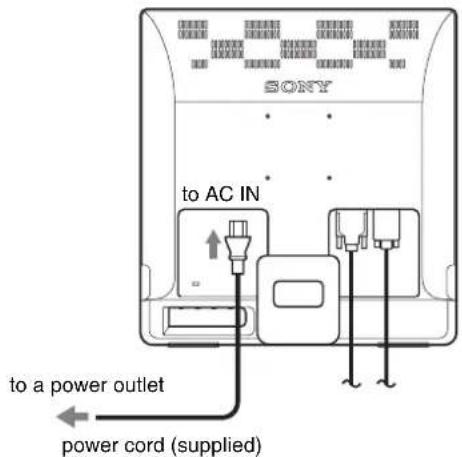
Step 4: Secure the cords
Bundle the cables and cords.
Using the supplied cord strap, bundle the cables and cords.
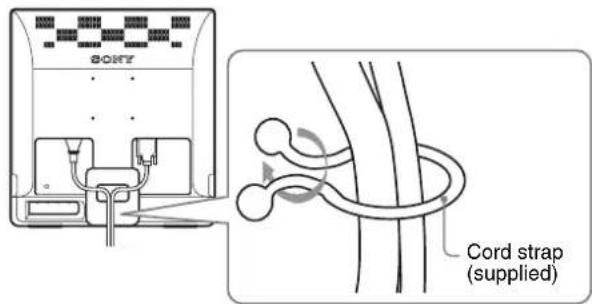
The illustration of the back of the monitor shown here is that of the SDM-E76D.
The same applies for the other models.
Step 5: Turn on the monitor and computer
Press the power switch.
The power indicator of the monitor lights up in green.
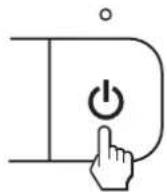
Turn on the computer.
The installation of your monitor is complete. If necessary, use the monitor's controls to adjust the picture.
If no picture appears on your screen
- Check that the power cord and the video signal cable are properly connected.
- If NO INPUT SIGNAL appears on the screen:
The computer is in the power saving mode. Try pressing any key on the keyboard or moving the mouse.
- If CABLE DISCONNECTED appears on the screen:
Check that the video signal cable is properly connected.
- If OUT OF RANGE appears on the screen:
Reconnect the old monitor. Then adjust the computer's graphics board within the following ranges.
| Analog RGB Digital RGB(SDM-E76D/SDM-E96D only) | |
| Horizontal frequency | 28-80 kHz 28-64 kHz |
| Vertical frequency | 56-75 Hz 60 Hz |
| Resolution | 1280×1024 or less 1280×1024 or less |
For more information about the on-screen messages, see "Trouble symptoms and remedies" on page 18.
No need for specific drivers
The monitor complies with the "DDC" Plug & Play standard and automatically detects all the monitor's information. No specific driver needs to be installed to the computer.
The first time you turn on your computer after connecting the monitor, the setup Wizard may appear on the screen. In this case, follow the on-screen instructions. The Plug & Play monitor is automatically selected so that you can use this monitor.
The vertical frequency turns to 60Hz
Since flickers are unobtrusive on the monitor, you can use it as it is. You do not need to set the vertical frequency to any particular high value.
Adjusting the tilt
This display can be adjusted within the angles shown below.
Approx. 5° - 25°
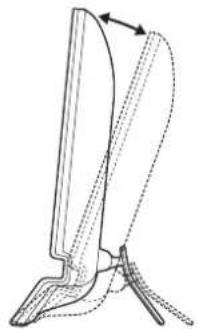
Grasp the lower sides of the LCD panel, then adjust screen tilt.
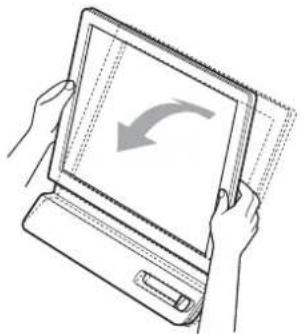
To use the display comfortably
This display is designed so that you can set it up at a comfortable viewing angle. Adjust the viewing angle of your display according to the height of the desk and chair, and so that light is not reflected from the screen to your eyes.
Note
When adjusting the screen tilt, make sure not to knock or drop the display off the desk.
Selecting the input signal (INPUT button) (SDM-E76D/SDM-E96D only)
Press the INPUT button.
The input signal change each time you press this button.


On-screen message
Input signal configuration
(Appears about 5 seconds on
the upper left corner.)
INPUT1: DVI-D input connector (digital RGB) for INPUT1
INPUT2: HD15 input connector (analog RGB) for INPUT2
Customizing Your Monitor
Before making adjustments
Connect the monitor and the computer, and turn them on. Wait for at least 30 minutes before making adjustments for the best result.
You can make numerous adjustments to your monitor using the on-screen menu.
Connect the monitor and the computer, and turn them on. Wait for at least 30 minutes before making adjustments for the best result.
You can make numerous adjustments to your monitor using the on-screen menu.
Use the down/up and OK buttons to select the icons in the above main menu illustration. The following 1 to 10 menu appears. Keep pressing down to scroll down until the icons in menu 9 and 10 appear. See page 10 for more information on using the down/up and OK buttons.
Press the MENU button to display the main menu on your screen. See page 10 for more information on using the MENU button.
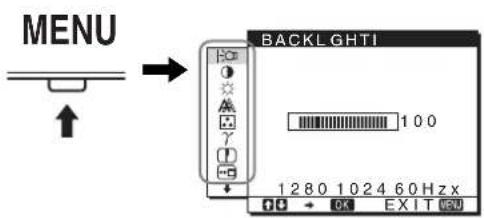
Use the down/up arrow and OK buttons to select the icons in the main menu illustration above. The following menu items 1 to 10 appear. Keep pressing the down arrow to scroll down until the icons for items 9 and 10 appear. See page 10 for more information on using the down/up arrow and OK buttons.
1BACKLIGHT (page 10)
Select the BACKLIGHT menu to adjust the brightness of the backlight.
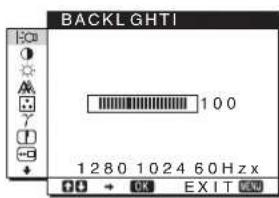
2 CONTRAST (page 10)
Select the CONTRAST menu to adjust the picture contrast.
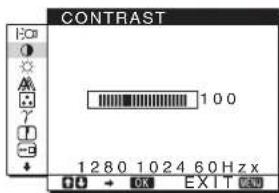
3 BRIGHTNESS (page 11)
Select the BRIGHTNESS menu to adjust the picture brightness (black level).
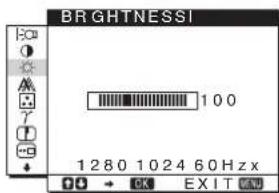
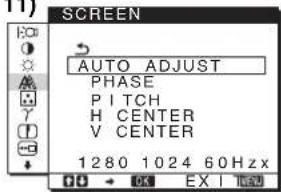
4 SCREEN A (page
Select the SCREEN menu to adjust the picture's sharpness (phase/pitch) or its centering (horizontal/vertical position).
11)
5 COLOR (page 13)
Select the COLOR menu to adjust the color temperature of the picture. This adjusts the tone of the screen. While COLOR is set to sRGB, you cannot adjust CONTRAST, BRIGHTNESS or GAMMA.
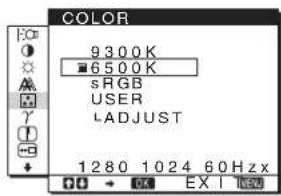
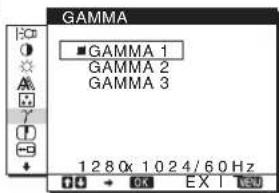
6 GAMMA (page 13)
Select the GAMMA menu to change the picture's color shade setting.
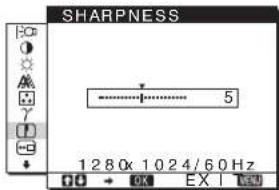
7 SHARPNESS (page 13)
Select the SHARPNESS menu to adjust to sharpen the edge of images.
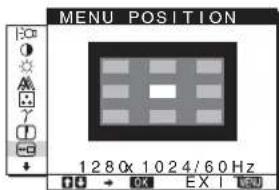
8 MENU POSITION (page 13)
Select the MENU POSITION to change the onscreen menu position.
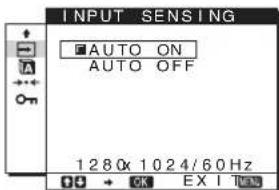
9 INPUT SENSING
page 14 (SDM-E76D/ SDM-E96D only)
The monitor automatically detects an input signal to an input terminal, and changes the input automatically before the monitor goes into the power saving mode.
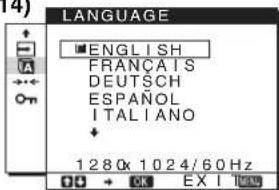
10 LANGUAGE (page
Select LANGUAGE to change the language used on menus or messages.
14)
11 Other menus (page 14)
Set the following menu items: - RESET - MENU LOCK
Using the MENU, down/up, and OK buttons
1 Display the main menu.
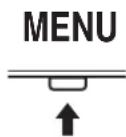
Press the MENU button to display the main menu on your screen.
2 Select the menu you want to adjust.
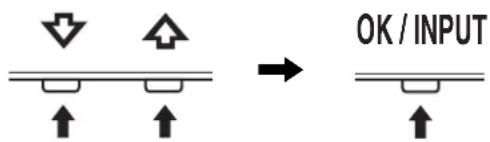
Press the down/up buttons to display the desired menu. Press the OK button to select the menu item.
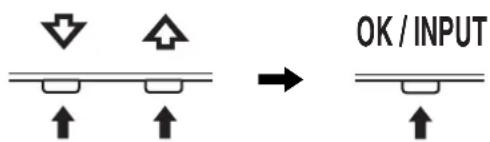
3 Adjust the menu.
Press the down/up buttons to make the adjustment, then press the OK button.
When you press the OK button, the setting is stored, then the display returns to the previous menu.
4 Close the menu.
Press the MENU button once to return to normal viewing. If no buttons are pressed, the menu closes automatically after about 45 seconds.
Resetting the adjustments
You can reset the adjustments using the RESET menu. See page 14 for more information on resetting the adjustments.
Controlling the monitor by computer
Press the MENU button down for at least 5 seconds. You will see an on-screen message indicating the current setting. After 3 seconds the DDC/CI setting is switched on or off, as shown below.
On-screen messages (Appear for a while)
DDC-CI:ON (default setting)
Allows the computer to control menu settings.
DDC-CI: OFF Does not allow the computer to control menu settings.
Note
This function applies only to computers that support the DDC/CI (Display Data Channel Command Interface) function.
Adjusting the backlight (BACKLIGHT)
If the screen is too bright, adjust the backlight and make the screen easier to see.
1 Press the MENU button.
The main menu appears on the screen.
2 Press the down/up buttons to select BACKLIGHT and press the OK button.
The BACKLIGHT menu appears on the screen.
3 Press the down/up buttons to adjust the light level and press the OK button.
Adjusting the contrast (CONTRAST)
Adjust the picture contrast.
Note
While COLOR is set to sRGB, you cannot adjust CONTRAST, BRIGHTNESS or GAMMA.
1 Press the MENU button.
The main menu appears on the screen.
2 Press the down/up buttons to select (CONTRAST) and press the OK button.
The CONTRAST menu appears on the screen.
3 Press the down/up buttons to adjust the contrast and press the OK button.
Adjusting the black level of an image (BRIGHTNESS)
Adjust the picture brightness (black level).
Note
While COLOR is set to sRGB, you cannot adjust CONTRAST, BRIGHTNESS or GAMMA.
1 Press the MENU button.
The main menu appears on the screen.
2 Press the down/up buttons to select (BRIGHTNESS) and press the OK button.
The BRIGHTNESS menu appears on the screen.
3 Press the down/up buttons to adjust the brightness and press the OK button.
Adjusting the picture's sharpness and centering (SCREEN) (analog RGB signal only)
Automatic picture quality adjustment function
When the monitor receives an input signal, it automatically adjusts the picture's position and sharpness (phase/pitch), and ensures that a clear picture appears on the screen (page 16).
Notes
- While the automatic picture quality adjustment function is activated, only the power switch will operate.
- The picture may flicker during this time, but this is not a malfunction. Simply wait a few moments until the adjustment completes.
If the automatic picture quality adjustment function of this monitor seems to not completely adjust the picture
You can make further automatic adjustment of the picture quality for the current input signal. (See AUTO ADJUST below.)
If you still need to make further adjustments to the picture quality
You can manually adjust the picture's sharpness (phase/pitch) and position (horizontal/vertical position).
These adjustments are stored in memory and automatically recalled when the display receives the same input signal. These settings may have to be repeated if you change the input signal after reconnecting your computer.
Make further automatic adjustments to the picture quality for the current input signal (AUTO ADJUST)
Set the optimum phase, pitch and horizontal/vertical position for the current input signal.
1 Press the MENU button.
The main menu appears on the screen.
2 Press the down/up buttons to select (SCREEN) and press the OK button.
The SCREEN menu appears on the screen.
3 Press the down/up buttons to select AUTO ADJUST and press the OK button.
The AUTO ADJUST menu appears on the screen.
4 Press the down/up buttons to select ON or OFF and press the OK button.
- ON: Make the appropriate adjustments of the screen's phase, pitch and horizontal/vertical position for the current input signal and store them.
Note
When the monitor is turned on or the input signal is changed, AUTO ADJUST makes the automatic adjustments.
- OFF: AUTO ADJUST is not available.
Note
AUTO ADJUST works automatically when the input signal is changed.
5 Press the down/up buttons to select and press the OK button.
Return to the menu screen.
Adjust the picture's sharpness and position manually (PITCH/PHASE/H CENTER/VCENTER)
You can adjust the picture's sharpness as follows. This adjustment is effective when the computer is connected to the monitor's HD15 input connector (analog RGB).
1 Set the resolution to 1280 x 1024 on the computer.
2 Load the CD-ROM.
3 Start the CD-ROM
For Windows User
When Auto run operates:
Select the area, language and model, and click DISPLAY ADJUSTMENT TOOL (UTILITY).
4 Click "Adjust" and confirm the current resolution (top value) and recommended resolution (bottom value), and then click "Next".
Test pattern for PITCH appears.
5 Press the MENU button.
The main menu appears on the screen.
6 Press the down/up buttons to select (SCREEN) and press the OK button.
The SCREEN menu appears on the screen.
7 Press the down/up buttons to select PITCH and press the OK button.
The PITCH adjustment menu appears on the screen.
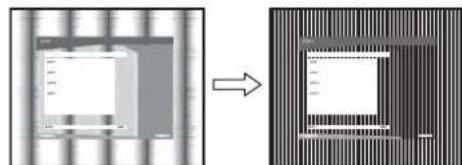
8 Press the down/up buttons until the vertical stripes disappear.
Adjust so that the vertical stripes disappear.
9 Press the OK button.
The main menu appears on the screen.
If horizontal stripes are observed over the entire screen, adjust the PHASE using the following procedures.
10 Click "Next".
Test pattern for PHASE appears.
11 Press the down/up buttons to select PHASE and press the OK button.
The PHASE adjustment menu appears on the screen.
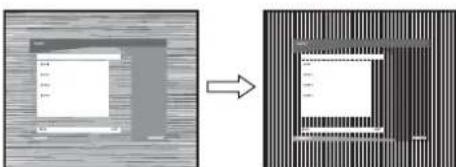
12 Press the down/up buttons until the horizontal stripes are at a minimum.
Adjust so that the horizontal stripes are at a minimum.
13 Press the OK button.
The main menu appears on the screen.
14 Click "Next".
Test pattern for CENTER appears.
15 Press the down/up buttons to select H CENTER or V CENTER and press the OK button.
The H CENTER adjustment menu or V CENTER adjustment menu appears on the screen.
16 Press the down/up buttons to center the test pattern on the screen.
17 Click "Next".
Click "End" or "EXIT" to turn off the test pattern.
When Auto run fails to operate:
1 Open "My Computer" and right click the CD-ROM icon.
Go to "Explorer" and open the CD-ROM icon.
2 Open [Utility] and then select [WINDOWS].
3 Start [WIN Utility.EXE].
Test pattern appears. Go to step 4.
For Macintosh User
1 Open the CD-ROM.
2 Open [Utility] and then select [MAC].
3 Open [MAC UTILITY] and then start [MAC_CLASSICUTILITY] or [MAC OSXUTILITY].
Test pattern appears. Go to step 4.
4 Press the MENU button.
The main menu appears on the screen.
5 Press the down/up buttons to select A (SCREEN) and press the OK button.
The SCREEN menu appears on the screen.
6 Press the down/up buttons to select PHASE and press the OK button.
The PHASE adjustment menu appears on the screen.
7 Press the down/up buttons until the horizontal stripes are at a minimum.
Adjust so that the horizontal stripes are at a minimum.
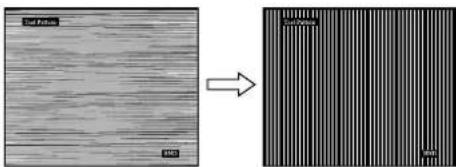
8 Press the OK button.
The main menu appears on the screen.
If vertical stripes are observed over the entire screen, adjust the PITCH using the following procedures.
9 Press the down/up buttons to select PITCH and press the OK button.
The PITCH adjustment menu appears on the screen.
10 Press the down/up buttons until the vertical stripes disappear.
Adjust so that the vertical stripes disappear.
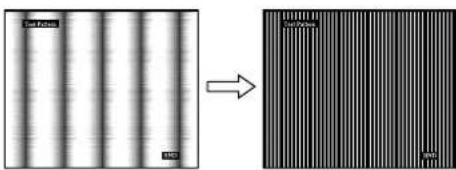
11 Press the OK button.
The main menu appears on the screen.
12 Press the down/up buttons to select H CENTER or V CENTER and press the OK button.
The H CENTER adjustment menu or V CENTER adjustment menu appears on the screen.
13 Press the down/up buttons to center the test pattern on the screen.
14 Click "END" on the screen to turn off the test pattern.
Adjusting the color temperature (COLOR)
You can select the color level of the picture's white color field from the default color temperature settings.
Also, if necessary, you can fine tune the color temperature.
You can set the desired color temperature for each mode of the brightness of screen.
1 Press the MENU button.
The main menu appears on the screen.
2 Press the / buttons to select (COLOR) and press the OK button.
The COLOR menu appears on the screen.
3 Press the / buttons to select the desired color temperature and press the OK button.
Whites will change from a bluish hue to reddish hue as the temperature is lowered from 9300K to 6500K (default setting).
When you select "sRGB," the colors adjust to the sRGB profile. (The sRGB color setting is an industry-standard color space protocol designed for computer products.) If you select "sRGB," the color settings of your computer must be set to the sRGB profile.
Notes
- If a connected computer or other equipment is not sRGB-compliant, color cannot be adjusted to the sRGB profile.
- While COLOR is set to sRGB, you cannot adjust CONTRAST, BRIGHTNESS or GAMMA.
Fine tuning the color temperature (USER ADJUSTMENT)
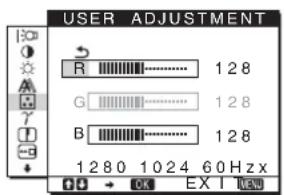
1 Press the / buttons to select ADJUST and press the OK button.
The USER ADJUSTMENT menu appears on the screen.
2 Press the down/up buttons to select R (Red) or B (Blue) and press the OK button. Then press the down/up buttons to adjust the color temperature and press the OK button.
Since this adjustment changes the color temperature by increasing or decreasing the R and B components with respect to G (green), the G component is fixed.
3 Press the down/up buttons to select the check mark, then press the OK button.
The new color setting is stored in memory for USER and automatically recalled whenever USER is selected.
The main menu appears on the screen.
Changing the gamma setting (GAMMA)
You can associate the picture's color shade on the screen with the picture's original color shade.
Note
While COLOR is set to sRGB, you cannot adjust CONTRAST, BRIGHTNESS or GAMMA.
1 Press the MENU button.
The main menu appears on the screen.
2 Press the down/up buttons to select GAMMA and press the OK button.
The GAMMA menu appears on the screen.
3 Press the down/up buttons to select the desired mode and press the OK button.
Adjusting the sharpness (SHARPNESS)
Adjust to sharpen the edge of images, etc.
1 Press the MENU button.
The main menu appears on the screen.
2 Press the down/up buttons to select (SHARPNESS) and press the OK button.
The SHARPNESS menu appears on the screen.
3 Press the down/up buttons to adjust the sharpness and press the OK button.
Changing the menu's position (MENU POSITION)
You can change the menu position if it is blocking an image on the screen.
1 Press the MENU button.
The main menu appears on the screen.
2 Press the down/up buttons to select (MENU POSITION) and press the OK button.
The MENU POSITION menu appears on the screen.
3 Press the down/up buttons to select the desired position and press the OK button.
There are three positions each for the top, center and bottom of the screen.
Changing the input automatically (INPUT SENSING)
(SDM-E76D/SDM-E96D only)
When you select AUTO ON in the INPUT SENSING menu, the monitor automatically detects an input signal to an input terminal, and changes the input automatically before the monitor goes into the power saving mode.
1 Press the MENU button.
The main menu appears on the screen.
2 Press the down/up buttons to select (INPUT SENSING) and press the OK button.
The INPUT SENSING menu appears on the screen.
3 Press the down/up buttons to select the desired mode and press the OK button.
- AUTO ON: When the selected input terminal has no input signal, or when you select an input terminal by the INPUT button on the monitor and the terminal has no input signal, the on-screen message appears (page 17) and the monitor checks the input signal to another input terminal automatically to change the input. When the input is changed, the selected input terminal is displayed on the left upper of the screen. When there is no input signal, the monitor goes into the power saving mode automatically.
- AUTO OFF: The input is not changed automatically. Press the INPUT button to change the input.
Selecting the on-screen menu language (LANGUAGE)
You can change the language used on menus or messages displayed on this monitor.
1 Press the MENU button.
The main menu appears on the screen.
2 Keep pressing the down button until the icon of the desired option item appears.
3 Press the down/up buttons to select (LANGUAGE) and press the OK button.
The LANGUAGE menu appears on the screen.
4 Press the down/up buttons to select a language and press the OK button.
- ENGLISH FRANCAIS: French
- DEUTSCH: German
- ESPANOL: Spanish ITALIANO: Italian
- NEDERLANDS: Dutch SVENSKA: Swedish
- PYZCKN: :曲本 ·中文: Chinese
Additional settings
You can adjust the following options:
- RESET - MENU LOCK
1 Press the MENU button.
The main menu appears on the screen.
2 Keep pressing the down button until the icon of the desired option item appears. 3 Press the down/up buttons to select the desired option item and press the OK button.
Adjust the selected option item according to the following instructions.
Resetting the adjustment data to the defaults
You can reset the adjustments to the default settings.
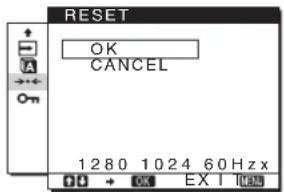
1 Press the down/up buttons to select RESET and press the OK button.
The RESET menu appears on the screen.
2 Press the down/up buttons to select the desired mode and press the OK button.
- OK: To reset all of the adjustment data to the default settings. Note that the LANGUAGE setting is not reset by this method.
- CANCEL: To cancel resetting and return to the menu screen.
Locking the menus and controls
You can lock the control of buttons to prevent accidental adjustments or resetting.
1 Press the down/up buttons to select ON (MENU LOCK) and press the OK button.
The MENU LOCK menu appears on the screen.
2 Press the down/up buttons to select ON or OFF and press the OK button.
- ON: Only the power switch will operate. If you attempt any other operation, the MENU LOCK icon appears on the screen.
- OFF: Set (MENU LOCK) to OFF. If you set the ON (MENU LOCK) item to ON, only this menu item can be selected.
Technical Features
Power saving function
This monitor meets the power-saving guidelines set by VESA, ENERGY STAR, and NUTEK. If the monitor is connected to a computer or video graphics board that is DPMS (Display Power Management Standard) for Analog input/DMPM (DVI Digital Monitor Power Management) for Digital input compliant, the monitor will automatically reduce power consumption as shown below.
| Power mode Power consumption (power) indicator | ||
| normal operation | 38W(max.) | green |
| (SDM-E76A/SDM-E76D) | ||
| 44W(max.) | ||
| (SDM-E96A/SDM-E96D) | ||
| active off* (deep sleep)** | 1.0W(max.) orange | |
| power off 1.0W(max.) off | ||
- When your computer enters the "active off" mode, the input signal is cut and NO INPUT SIGNAL appears on the screen. After 5 seconds, the monitor enters the power saving mode. ** "deep sleep" is the power saving mode defined by the Environmental Protection Agency.
Automatic picture quality adjustment function (analog RGB signal only)
When the monitor receives an input signal, it automatically adjusts the picture's position and sharpness (phase/pitch), and ensures that a clear picture appears on the screen.
The factory preset mode
When the monitor receives an input signal, it automatically matches the signal to one of the factory preset modes stored in the monitor's memory to provide a high quality picture at the center of the screen. If the input signal matches the factory preset mode, the picture appears on the screen automatically with the appropriate default adjustments.
If input signals do not match one of the factory preset modes
When the monitor receives an input signal that does not match one of the factory preset modes, the automatic picture quality adjustment function of this monitor is activated to ensure that a clear picture always appears on the screen (within the following monitor frequency ranges):
Horizontal frequency: 28 - 80 kHz
Vertical frequency: 56 - 75 Hz
Consequently, the first time the monitor receives input signals that do not match one of the factory preset modes, the monitor
may take a longer time than normal to display the picture on the screen. This adjustment data is automatically stored in memory so that next time, the monitor will function in the same way as when the monitor receives the signals that match one of the factory preset modes.
Note (SDM-E76D/SDM-E96D only)
There is no need to adjust the digital RGB signals of the DVI-D input connector for INPUT1.
If you adjust the phase, pitch and picture position manually while OFF of AUTO ADJUST is selected
For some input signals, the automatic picture quality adjustment function of this monitor may not completely adjust the picture position, phase, and pitch. In this case, you can set these adjustments manually (page 11). If you set these adjustments manually, they are stored in memory as user modes and automatically recalled whenever the monitor receives the same input signals.
Notes
- While the automatic picture quality adjustment function is activated, only the power switch will operate.
- The picture may flicker during this time, but this is not a malfunction. Simply wait a few moments until the adjustment completes.
Troubleshooting
Before contacting technical support, refer to this section.
On-screen messages
If there is something wrong with the input signal, one of the following messages appears on the screen. To solve the problem, see "Trouble symptoms and remedies" on page 18.
If OUT OF RANGE appears on the screen
This indicates that the input signal is not supported by the monitor's specifications. Check the following items.
Example
INFORMATION
OUT OF RANGE INPUT1: DVI-D xxx.xkHz/xxxxHz
If "xxx.x kHz/xxx Hz" is displayed
This indicates that either the horizontal or vertical frequency is not supported by the monitor's specifications.
The figures indicate the horizontal and vertical frequencies of the current input signal.
If "RESOLUTION > 1280 x 1024" is displayed
This indicates that the resolution is not supported by the monitor's specifications (1280 x 1024 or less).
If NO INPUT SIGNAL appears on the screen
This indicates that no signal is being input.
Example
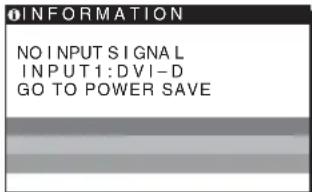
GO TO POWER SAVE
The monitor will enter the power saving mode after about 5 seconds from the time the message is displayed.
If CABLE DISCONNECTED appears on the screen
This indicates that the video signal cable has been disconnected.
Example
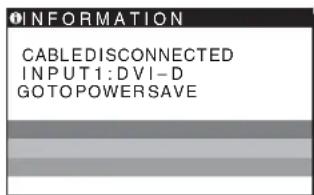
GO TO POWER SAVE
The monitor will enter the power saving mode after about 45 seconds from the time the message is displayed.
Trouble symptoms and remedies
If a problem is caused by the connected computer or other equipment, please refer to the connected equipment's instruction manual.
| Symptom Check these items | |
| No picture | |
| If the (1) (power) indicator is not lit, or if the (1) (power) indicator will not light up when the (1) (power) switch is pressed, | ·Check that the power cord is properly connected. |
| If CABLE DISCONNECTED appears on the screen, | ·Check that the video signal cable is properly connected and all plugs are firmly seated in their sockets (page 6).·Check that the video input connector's pins are not bent or pushed in.·Check that the input select setting is correct (page 8).·A non-supplied video signal cable is connected. If you connect a non-supplied video signal cable, CABLE DISCONNECTED may appear on the screen before entering the power saving mode. This is not a malfunction. |
| If NO INPUT SIGNAL appears on the screen, or the (1) (power) indicator is orange, | ·Check that the video signal cable is properly connected and all plugs are firmly seated in their sockets (page 6).·Check that the video input connector's pins are not bent or pushed in.·Check that the input select setting is correct (page 8).■ Problems caused by a computer or other equipment connected, and not caused by the monitor·The computer is in the power saving mode. Try pressing any key on the keyboard or moving the mouse.·Check that your graphics board is installed properly.·Change your graphic board to the latest driver. Or match the version of your graphic board to the current OS.·When using a laptop computer, set the output of your computer to video out (for details on video out setting, contact your computer manufacturer).·Check that the computer's power is on.·Restart the computer. |
| If OUT OF RANGE appears on the screen, | ■ Problems caused by a computer or other equipment connected, and not caused by the monitor·Check that the video frequency range is within that specified for the monitor. If you replaced an old monitor with this monitor, reconnect the old monitor and adjust the computer's graphics board within the following ranges:Horizontal: 28-80 kHz (analog RGB), 28-64 kHz (digital RGB for SDM-E76D/SDME96D only)Vertical: 56-75 Hz (analog RGB), 60 Hz (digital RGB for SDM-E76D/SDM-E96D only)Resolution: 1280×1024 or less·Start your OS in Safe mode and restart the computer after setting the resolution. The setting of safe mode varies depending on your OS. For more details, contact your computer manufacturer. |
| If you are using Windows and replaced an old monitor with this monitor, | ·If you replaced an old monitor with this monitor, reconnect the old monitor and do the following. Select "SONY" from the "Manufacturers" list and select the desired model name from the "Models" list in the Windows device selection screen. If the model name of this monitor does not appear in the "Models" list, try "Plug & Play." |
| If using a Macintosh system, | ·If you use the Macintosh adapter (not supplied), check that the Macintosh adapter and the video signal cable are properly connected. |
| Picture flickers, bounces, oscillates, or is scrambled | Adjust the pitch and phase (page 11).Try plugging the monitor into a different AC outlet, preferably on a different circuit.Problems caused by a computer or other equipment connected, and not caused by the monitorCheck your graphics board manual for the proper monitor setting.Confirm that the graphics mode (VESA, Macintosh 19" Color, etc.) and the frequency of the input signal are supported by this monitor. Even if the frequency is within the proper range, some graphics boards may have a sync pulse that is too narrow for the monitor to sync correctly.Adjust the computer's refresh rate (vertical frequency) to obtain the best possible picture. |
| Picture is fuzzy | Adjust the brightness and contrast (page 10, 11).Adjust the pitch and phase (page 11).Problems caused by a computer or other equipment connected, and not caused by the monitorSet the resolution to 1280 × 1024 on your computer. |
| Picture is ghosting | Eliminate the use of video cable extensions and/or video switch boxes. Check that all plugs are firmly seated in their sockets. |
| Picture is not centered or sized properly | Adjust the pitch and phase (page 11).Adjust the picture position (page 11). Note that some video modes do not fill the screen to the edges. |
| Picture is too small | Problems caused by a computer or other equipment connected, and not caused by the monitorSet the resolution to 1280 × 1024 on your computer. |
| Picture is dark | Adjust the brightness using the BRIGHTNESS menu (page 11).Adjust the backlight (page 10).It takes a few minutes for the display to become bright after turning on the monitor. |
| Wavy or elliptical pattern (moire) is visible | Adjust the pitch and phase (page 11). |
| Color is not uniform · Adjust the pitch and phase (page 11). | |
| White does not look white · Adjust the color temperature (page 13). | |
| Monitor buttons do not operate (Appears on the screen) | If the menu lock is set to ON, set it to OFF (page 15). |
| The monitor turns off after a while | Problems caused by a computer or other equipment connected, and not caused by the monitorSet the computer's power saving setting to off. |
| Resolution displayed on the menu screen is incorrect | Depending on the graphics board setting, the resolution displayed on the menu screen may not coincide with the one set on the computer. |
If any problem persists, call your authorized Sony dealer and give the following information:
- Model name: SDM-E76A, SDM-E96A, SDM-E76D or SDME96D
- Serial number
- Detailed description of the problem
- Date of purchase
- Name and specifications of your computer and graphics board
Specifications
SDM-E76A
LCD panel Panel type: a-Si TFT Active Matrix
Picture size: 17.0 inch
Input signal format RGB operating frequency*
Horizontal: 28 - 80kHz (analog RGB)
Vertical: 56 - 75Hz (analog RGB)
Resolution Horizontal: Max.1280 dots
Vertical: Max.1024 lines
Input signal levels Analog RGB video signal
0.7 Vp-p, 75 Ω, positive
SYNC signal
TTL level, 2.2kΩ
positive or negative
(Separate horizontal and vertical)
Power requirements 100-240 V, 50-60 Hz
Max. 1.0 A
Operating temperature 5-35 ° C
Dimensions (width/height/depth)
Display (5°)
Approx. 382× 403.2× 193.2mm
(151 / 8× 157 / 8× 75 / 8 inches)
3/4 oz)
Mass Approx. 4.5kg (9 lb 14
Plug & Play DDC2B
Accessories See page 6.
SDM-E96A
LCD panel Panel type: a-Si TFT Active Matrix
Picture size: 19.0 inch
Input signal format RGB operating frequency*
Horizontal: 28 - 80kHz (analog RGB)
Vertical: 56 - 75Hz (analog RGB)
Resolution Horizontal: Max.1280 dots
Vertical: Max.1024 lines
Input signal levels Analog RGB video signal
0.7 Vp-p, 75 Ω, positive
SYNC signal
TTL level, 2.2 kΩ
positive or negative
(Separate horizontal and vertical)
Power requirements 100-240 V, 50-60 Hz
Max. 1.0 A
Operating temperature 5-35 °C
Dimensions (width/height/depth)
Display (5°)
Approx. 420 × 433.1 × 193.2 mm
(16 5/8 × 17 1/8 × 7 5/8 inches)
Mass Approx. 5.5 kg (12 lb 2 oz)
Plug & Play DDC2B
Accessories See page 6.
- Recommended horizontal and vertical timing condition
Horizontal sync width duty should be more than 4.8% of total horizontal time or 0.8 μs, whichever is larger. Horizontal blanking width should be more than 2.5 μs. Vertical blanking width should be more than 450 μs.
Design and specifications are subject to change without notice.
SDM-E76D
LCD panel Panel type: a-Si TFT Active Matrix
Picture size: 17.0 inch
Input signal format RGB operating frequency*
Horizontal: 28 - 80 kHz (analog RGB)
28-64 kHz (digital RGB)
Vertical: 56 - 75 Hz (analog RGB)
60 Hz (digital RGB)
Resolution Horizontal: Max. 1280 dots
Vertical: Max. 1024 lines
Input signal levels Analog RGB video signal
0.7 Vp-p, 75 Ω, positive
SYNC signal
TTL level, 2.2 kΩ
positive or negative
(Separate horizontal and vertical)
Digital RGB (DVI) signal: TMDS
(Single link)
Power requirements 100-240 V, 50-60 Hz
Max. 1.0 A
Operating temperature 5-35 °C
Dimensions (width/height/depth)
Display (5°)
Approx. 382 × 403.2 × 193.2 mm
(15 1/8 × 15 7/8 × 7 5/8 inches)
3/4 oz)
Mass Approx. 4.5 kg (9 lb 14 oz)
Plug & Play DDC2B
Accessories See page 6.
SDM-E96D
LCD panel Panel type: a-Si TFT Active Matrix
Picture size: 19.0 inch
Input signal format RGB operating frequency*
Horizontal: 28 - 80 kHz (analog RGB)
28-64 kHz (digital RGB)
Vertical: 56 - 75 Hz (analog RGB)
60 Hz (digital RGB)
Resolution Horizontal: Max.1280 dots
Vertical: Max.1024 lines
Input signal levels Analog RGB video signal
0.7 Vp-p, 75 Ω, positive
SYNC signal
TTL level, 2.2 kΩ
positive or negative
(Separate horizontal and vertical)
Digital RGB (DVI) signal: TMDS
(Single link)
Power requirements 100 - 240 V, 50 - 60 Hz
Max. 1.0 A
Operating temperature 5-35 °C
Dimensions (width/height/depth)
Display (5°)
Approx. 420 × 433.1 × 193.2 mm
(16 5/8 × 17 1/8 × 7 5/8 inches)
Mass
Approx. 5.5 kg (12 lb 2 oz)
Plug & Play
DDC2B
Accessories See page 6.
- Recommended horizontal and vertical timing condition
Horizontal sync width duty should be more than 4.8% of total horizontal time or 0.8 μs, whichever is larger. Horizontal blanking width should be more than 2.5 μs. Vertical blanking width should be more than 450 μs.
Design and specifications are subject to change without notice.
TCO'03 Eco-document
■ Congratulations!
The display you have just purchased carries the TCO'03 Displays label. This means that your display is designed, manufactured and tested according to some of the strictest quality and environmental requirements in the world. This makes for a high performance product, designed with the user in focus that also minimizes the impact on our natural environment.
■ Ergonomics
- Good visual ergonomics and image quality in order to improve the working environment for the user and to reduce sight and strain problems. Important parameters are luminance, contrast, resolution, reflectance, colour rendition and image stability.
Energy
- Energy-saving mode after a certain time - beneficial both for the user and the environment
- Electrical safety
Emissions
- Electromagnetic fields
- Noise emissions
Ecology
- The product must be prepared for recycling and the manufacturer must have a certified environmental management system such as EMAS or ISO 14001.
- Restrictions on
- chlorinated and brominated flame retardants and polymers
- heavy metals such as cadmium, mercury and lead.
The requirements included in this label have been developed by TCO Development in co-operation with scientists, experts, users as well as manufacturers all over the world. Since the end of the 1980s TCO has been involved in influencing the development of IT equipment in a more user-friendly direction. Our labelling system
started with displays in 1992 and is now requested by users and IT-manufacturers all over the world.
For more information, please visit
www.tcodevelopment.com
Recycling Information
Customer in Europe
The collection and recycling of this product has been planned according to your country's relevant legislation. To ensure that this product will be collected and recycled in a way that minimizes the impact on the environment, please do the following:
- If you purchased this product for private use, contact your municipality or the waste collection system and bring the product to this collection point / have the product be picked up by the waste collection system. Alternatively, your retailer might take back this if you purchase new equivalent equipment; please check with your retailer whether he will take back this product before bringing it. For information on your country's recycling arrangements, please contact the Sony representation in your country (contact details at: www.sony-europe.com).
Further details on specific recycling systems can be found at the following addresses:
- Belgium: www-recupel.be
- Netherlands: www.nvmp.nl (consumer electronics) www.ictmilieu.nl (IT equipment)
- Norway: www.elretur.no
- Sweden: www.el-kretsen.se
- Switzerland: www.swico.ch
- If you use this product professionally, check the product's delivery contract for take back / recycling arrangements and follow the procedures described therein. Alternatively, follow the procedures described under point 1.
Customer in USA
We Sony as a member of EIA recommends to visit URL below http://www.eiae.org/
Customer in Asia
http://www.sony.co.jp/SonyInfo/Environment/recycle/3R.html
TFT LCD Color Computer Display
Mode d'emploi
(FR)
SDM-E76A/SDM-E96A
SDM-E76D/SDM-E96D
Owner's Record
The model and serial numbers are located at the rear of the unit. Record these numbers in the spaces provided below. Refer to them whenever you call upon your dealer regarding this product. Model No. ______ Serial No. ______
WARNING
To reduce the risk of fire or electric shock, do not expose this apparatus to rain or moisture.
Dangerously high voltages are present inside the unit. Do not open the cabinet. Refer servicing to qualified personnel only.
FCC Notice
This equipment has been tested and found to comply with the limits for a Class B digital device, pursuant to Part 15 of the FCC Rules. These limits are designed to provide reasonable protection against harmful interference in a residential installation. This equipment generates, uses, and can radiate radio frequency energy and, if not installed and used in accordance with the instructions, may cause harmful interference to radio communications. However, there is no guarantee that interference will not occur in a particular installation. If this equipment does cause harmful interference to radio or television reception, which can be determined by turning the equipment off and on, the user is encouraged to try to correct the interference by one or more of the following measures: - Reorient or relocate the receiving antenna. - Increase the separation between the equipment and receiver. - Connect the equipment into an outlet on a circuit different from that to which the receiver is connected. - Consult the dealer or an experienced radio/TV technician for help. You are cautioned that any changes or modifications not expressly approved in this manual could void your authority to operate this equipment.
IMPORTANT
If you have any questions about this product, you may call; Sony Customer Information Services Center 1-800-222-7669 or http://www.roy.com/
Declaration of Conformity
Trade Name: SONY
Model: SDM-E76A/SDM-E96A
SDM-E76D/SDM-E96D
Responsible Party: Sony Electronics Inc.
Address: 16530 Via Esprillo,
San Diego, CA 92127 U.S.A.
Telephone Number: 858-942-2230
This device complies with part 15 of the FCC rules. Operation is subject to the following two conditions: (1) This device may not cause harmful interference, and (2) this device must accept any interference received, including interference that may cause undesired operation.
NOTICE
This notice is applicable for USA/Canada only.
If shipped to USA/Canada, install only a UL LISTED/CSA
LABELLED power supply cord meeting the following
specifications:
SPECIFICATIONS
Plug Type Nema-Plug 5-15p
Cord Type SVT or SJT, minimum 3 x 18 AWG
Length Maximum 15 feet
Rating Minimum 7 A, 125 V
NOTICE
As an ENERGY STAR Partner, Sony Corporation has determined that this product meets the ENERGY STAR guidelines for energy efficiency.
This monitor complies with the TCO'03 guidelines.
Table of Contents
Precautions. 4
Technical Specifications. 16
Technical Specifications
Vertical frequency: 56-75 Hz
The display you have just purchased carries the TCO'03 Displays label. This means that your display is designed, manufactured and tested according to some of the strictest quality and environmental requirements in the world. This makes for a high performance product, designed with the user in focus that also minimizes the impact on our natural environment.
■ Ergonomics
- Good visual ergonomics and image quality in order to improve the working environment for the user and to reduce sight and strain problems. Important parameters are luminance, contrast, resolution, reflectance, colour rendition and image stability.
Energy
- Energy-saving mode after a certain time - beneficial both for the user and the environment
- Electrical safety
Emissions
- Electromagnetic fields
- Noise emissions
Ecology
- The product must be prepared for recycling and the manufacturer must have a certified environmental management system such as EMAS or ISO 14001.
- Restrictions on chlorinated and brominated flame retardants and polymers.
- Heavy metals such as cadmium, mercury and lead.
The requirements included in this label have been developed by TCO Development in co-operation with scientists, experts, users as well as manufacturers all over the world. Since the end of the 1980s TCO has been involved in influencing the development of IT equipment in a more user-friendly direction. Our labelling system
started with displays in 1992 and is now requested by users and IT-manufacturers all over the world.
For more information, please visit
www.tcodevelopment.com
Recycling Information
Customer in Europe
The collection and recycling of this product has been planned according to your country's relevant legislation. To ensure that this product will be collected and recycled in a way that minimizes the impact on the environment, please do the following:
- If you purchased this product for private use, contact your municipality or the waste collection system and bring the product to this collection point / have the product be picked up by the waste collection system. Alternatively, your retailer might take back this if you purchase new equivalent equipment; please check with your retailer whether he will take back this product before bringing it. For information on your country's recycling arrangements, please contact the Sony representation in your country (contact details at: www.sony-europe.com). Further details on specific recycling systems can be found at the following addresses:
- Belgium: www.recupel.be
- Netherlands: www.nvmp.nl (consumer electronics) www.ictmilieu.nl (IT equipment)
- Norway: www.elretur.no
- Sweden: www.el-kretsen.se
- Switzerland: www.swico.ch
- If you use this product professionally, check the product's delivery contract for take back / recycling arrangements and follow the procedures described therein. Alternatively, follow the procedures described under point 1.
Customer in USA
We, Sony, as a member of EIA, recommend visiting the URL below: http://www.ciac.org/
Customer in Asia
http://www.sony.co.jp/SonyInfo/Environment/recycle/3R.html
TFT LCD Color Computer Display
Bedienungsanleitung
(DE)
SDM-E76A/SDM-E96A
SDM-E76D/SDM-E96D
Owner's Record
The model and serial numbers are located at the rear of the unit. Record these numbers in the spaces provided below. Refer to them whenever you call upon your dealer regarding this product. Model No. ____ Serial No. ____
WARNING
To reduce the risk of fire or electric shock, do not expose this apparatus to rain or moisture.
Dangerously high voltages are present inside the unit. Do not open the cabinet. Refer servicing to qualified personnel only.
FCC Notice
This equipment has been tested and found to comply with the limits for a Class B digital device, pursuant to Part 15 of the FCC Rules. These limits are designed to provide reasonable protection against harmful interference in a residential installation. This equipment generates, uses, and can radiate radio frequency energy and, if not installed and used in accordance with the instructions, may cause harmful interference to radio communications. However, there is no guarantee that interference will not occur in a particular installation. If this equipment does cause harmful interference to radio or television reception, which can be determined by turning the equipment off and on, the user is encouraged to try to correct the interference by one or more of the following measures: - Reorient or relocate the receiving antenna. - Increase the separation between the equipment and receiver. - Connect the equipment into an outlet on a circuit different from that to which the receiver is connected. - Consult the dealer or an experienced radio/TV technician for help. You are cautioned that any changes or modifications not expressly approved in this manual could void your authority to operate this equipment.
IMPORTANT
If you have any questions about this product, you may call; Sony Customer Information Services Center 1-800-222-7669 or http://www.sony.com/
Declaration of Conformity
Trade Name: SONY
Model: SDM-E76A/SDM-E96A
SDM-E76D/SDM-E96D
Responsible Party: Sony Electronics Inc.
Address: 16530 Via Esprillo,
San Diego, CA 92127 U.S.A.
Telephone Number: 858-942-2230
This device complies with part 15 of the FCC rules. Operation is subject to the following two conditions: (1) This device may not cause harmful interference, and (2) this device must accept any interference received, including interference that may cause undesired operation.
NOTICE
This notice is applicable for USA/Canada only.
If shipped to USA/Canada, install only a UL LISTED/CSA
LABELLED power supply cord meeting the following
Specifications:
SPECIFICATIONS
Plug Type: NEMA 5-15P
Cord Type: SVT or SJT, minimum 3 x 18 AWG
Length: Maximum 15 feet
Rating: Minimum 7 A, 125 V
NOTICE
As an ENERGY STAR Partner, Sony Corporation has determined that this product meets the ENERGY STAR guidelines for energy efficiency.
This monitor complies with the TCO'03 guidelines.
Contents
Horizontal frequency: 28-80 kHz
Vertical frequency: 56-75 Hz
■ Congratulations!
The display you have just purchased carries the TCO'03 Displays label. This means that your display is designed, manufactured and tested according to some of the strictest quality and environmental requirements in the world. This makes for a high performance product, designed with the user in focus that also minimizes the impact on our natural environment.
■ Ergonomics
- Good visual ergonomics and image quality in order to improve the working environment for the user and to reduce sight and strain problems. Important parameters are luminance, contrast, resolution, reflectance, colour rendition and image stability.
Energy
- Energy-saving mode after a certain time - beneficial both for the user and the environment
- Electrical safety
Emissions
- Electromagnetic fields
- Noise emissions
Ecology
- The product must be prepared for recycling and the manufacturer must have a certified environmental management system such as EMAS or ISO 14001
- Restrictions on
- chlorinated and brominated flame retardants and polymers
- heavy metals such as cadmium, mercury and lead.
The requirements included in this label have been developed by TCO Development in cooperation with scientists, experts, users as well as manufacturers all over the world. Since the end of the 1980s, TCO has been involved in influencing the development of IT equipment in a more user-friendly direction. Our labelling system
started with displays in 1992 and is now requested by users and IT-manufacturers all over the world.
For more information, please visit
www.tcodevelopment.com
Recycling Information
Customer in Europe
The collection and recycling of this product has been planned according to your country's relevant legislation. To ensure that this product will be collected and recycled in a way that minimizes the impact on the environment, please do the following:
- If you purchased this product for private use, contact your municipality or the waste collection system and bring the product to this collection point / have the product be picked up by the waste collection system. Alternatively, your retailer might take back this if you purchase new equivalent equipment; please check with your retailer whether he will take back this product before bringing it. For information on your country's recycling arrangements, please contact the Sony representation in your country (contact details at: www.sony-europe.com). Further details on specific recycling systems can be found at the following addresses:
Belgium: www.RECupel.be - Netherlands: www.nvmp.nl (consumer electronics) www.ictmilieu.nl (IT equipment) - Norway: www.elretur.no - Sweden: www.el-kretsen.se - Switzerland: www.swico.ch
- If you use this product professionally, check the product's delivery contract for take back / recycling arrangements and follow the procedures described therein. Alternatively, follow the procedures described under point 1.
Customer in USA
We Sony as a member of EIA recommends to visit URL below http://www.ciac.org/
Customer in Asia
http://www.sony.co.jp/SonyInfo/Environment/recycle/3R.html
The model and serial numbers are located at the rear of the unit. Record these numbers in the spaces provided below. Refer to them whenever you call upon your dealer regarding this product. Model No. ____ Serial No. ____
WARNING
To reduce the risk of fire or electric shock, do not expose this apparatus to rain or moisture.
Dangerously high voltages are present inside the unit. Do not open the cabinet. Refer servicing to qualified personnel only.
FCC Notice
This equipment has been tested and found to comply with the limits for a Class B digital device, pursuant to Part 15 of the FCC Rules. These limits are designed to provide reasonable protection against harmful interference in a residential installation. This equipment generates, uses, and can radiate radio frequency energy and, if not installed and used in accordance with the instructions, may cause harmful interference to radio communications. However, there is no guarantee that interference will not occur in a particular installation. If this equipment does cause harmful interference to radio or television reception, which can be determined by turning the equipment off and on, the user is encouraged to try to correct the interference by one or more of the following measures: - Reorient or relocate the receiving antenna. - Increase the separation between the equipment and receiver. - Connect the equipment into an outlet on a circuit different from that to which the receiver is connected. - Consult the dealer or an experienced radio/TV technician for help. You are cautioned that any changes or modifications not expressly approved in this manual could void your authority to operate this equipment.
IMPORTANT
If you have any questions about this product, you may call; Sony Customer Information Services Center 1-800-222-7669 or http://www.sony.com/
Declaration of Conformity
Trade Name: SONY
Model: SDM-E76A/SDM-E96A
SDM-E76D/SDM-E96D
Responsible Party: Sony Electronics Inc.
Address: 16530 Via Esprillo,
San Diego, CA 92127 U.S.A.
Telephone Number: 858-942-2230
This device complies with part 15 of the FCC rules. Operation is subject to the following two conditions: (1) This device may not cause harmful interference, and (2) this device must accept any interference received, including interference that may cause undesired operation.
NOTICE
This notice is applicable for USA/Canada only.
If shipped to USA/Canada, install only a UL LISTED/CSA
LABELLED power supply cord meeting the following
specifications:
SPECIFICATIONS
Plug Type Nema-Plug 5-15p
Cord Type SVT or SJT, minimum 3 x 18 AWG
Length Maximum 15 feet
Rating Minimum 7 A, 125 V
NOTICE
As an ENERGY STAR Partner, Sony Corporation has determined that this product meets the ENERGY STAR guidelines for energy efficiency.
This monitor complies with the TCO'03 guidelines.
Indices
Precautions 4
INPUT1: DVI-D connector DC input DVI-D
The display you have just purchased carries the TCO'03 Displays label. This means that your display is designed, manufactured and tested according to some of the strictest quality and environmental requirements in the world. This makes for a high performance product, designed with the user in focus that also minimizes the impact on our natural environment.
■ Ergonomics
- Good visual ergonomics and image quality in order to improve the working environment for the user and to reduce sight and strain problems. Important parameters are luminance, contrast, resolution, reflectance, colour rendition and image stability.
Energy
- Energy-saving mode after a certain time - beneficial both for the user and the environment
- Electrical safety
Emissions
- Electromagnetic fields
- Noise emissions
Ecology
- The product must be prepared for recycling and the manufacturer must have a certified environmental management system such as EMAS or ISO 14001
- Restrictions on chlorinated and brominated flame retardants and polymers
- heavy metals such as cadmium, mercury and lead.
The requirements included in this label have been developed by TCO Development in co-operation with scientists, experts, users as well as manufacturers all over the world. Since the end of the 1980s TCO has been involved in influencing the development of IT equipment in a more user-friendly direction. Our labelling system
started with displays in 1992 and is now requested by users and IT-manufacturers all over the world.
For more information, please visit
www.tcodevelopment.com
Recycling Information
Customer in Europe
The collection and recycling of this product has been planned according to your country's relevant legislation. To ensure that this product will be collected and recycled in a way that minimizes the impact on the environment, please do the following:
- If you purchased this product for private use, contact your municipality or the waste collection system and bring the product to this collection point / have the product be picked up by the waste collection system. Alternatively, your retailer might take back this if you purchase new equivalent equipment; please check with your retailer whether he will take back this product before bringing it. For information on your country's recycling arrangements, please contact the Sony representation in your country (contact details at: www.sony-europe.com). Further details on specific recycling systems can be found at the following addresses:
- Belgium: www.RECupel.be
- Netherlands: www.nvmp.nl (consumer electronics) www.ictmilieu.nl (IT equipment)
- Norway: www.elretur.no
- Sweden: www.el-kretsen.se
- Switzerland: www.swico.ch
- If you use this product professionally, check the product's delivery contract for take back / recycling arrangements and follow the procedures described therein. Alternatively, follow the procedures described under point 1.
Customer in USA
We Sony as a member of EIA recommends to visit URL below http://www.ciac.org/
Customer in Asia
http://www.sony.co.jp/SonyInfo/Environment/recycle/3R.html
TFT LCD Color Computer Display
The model and serial numbers are located at the rear of the unit. Record these numbers in the spaces provided below. Refer to them whenever you call upon your dealer regarding this product. Model No. _ _ Serial No. ____
WARNING
To reduce the risk of fire or electric shock, do not expose this apparatus to rain or moisture.
Dangerously high voltages are present inside the unit. Do not open the cabinet. Refer servicing to qualified personnel only.
FCC Notice
This equipment has been tested and found to comply with the limits for a Class B digital device, pursuant to Part 15 of the FCC Rules. These limits are designed to provide reasonable protection against harmful interference in a residential installation. This equipment generates, uses, and can radiate radio frequency energy and, if not installed and used in accordance with the instructions, may cause harmful interference to radio communications. However, there is no guarantee that interference will not occur in a particular installation. If this equipment does cause harmful interference to radio or television reception, which can be determined by turning the equipment off and on, the user is encouraged to try to correct the interference by one or more of the following measures: - Reorient or relocate the receiving antenna. - Increase the separation between the equipment and receiver. - Connect the equipment into an outlet on a circuit different from that to which the receiver is connected. - Consult the dealer or an experienced radio/TV technician for help. You are cautioned that any changes or modifications not expressly approved in this manual could void your authority to operate this equipment.
IMPORTANT
If you have any questions about this product, you may call; Sony Customer Information Services Center 1-800-222-7669 or http://www.roy.com/
Declaration of Conformity
Trade Name: SONY
Model: SDM-E76A/SDM-E96A
SDM-E76D/SDM-E96D
Responsible Party: Sony Electronics Inc.
Address: 16530 Via Esprillo,
San Diego, CA 92127 U.S.A.
Telephone Number: 858-942-2230
This device complies with part 15 of the FCC rules. Operation is subject to the following two conditions: (1) This device may not cause harmful interference, and (2) this device must accept any interference received, including interference that may cause undesired operation.
NOTICE
This notice is applicable for USA/Canada only.
If shipped to USA/Canada, install only a UL LISTED/CSA
LABELLED power supply cord meeting the following
specifications:
SPECIFICATIONS
Plug Type Nema-Plug 5-15p
Cord Type SVT or SJT, minimum 3 x 18 AWG
Length Maximum 15 feet
Rating Minimum 7 A, 125 V
NOTICE
As an ENERGY STAR Partner, Sony Corporation has determined that this product meets the ENERGY STAR guidelines for energy efficiency.
This monitor complies with the TCO'03 guidelines.
[MAC_CLASSIC Utility] or [MAC OSX Utility].
The display you have just purchased carries the TCO'03 Displays label. This means that your display is designed, manufactured and tested according to some of the strictest quality and environmental requirements in the world. This makes for a high performance product, designed with the user in focus that also minimizes the impact on our natural environment.
■ Ergonomics
- Good visual ergonomics and image quality in order to improve the working environment for the user and to reduce sight and strain problems. Important parameters are luminance, contrast, resolution, reflectance, colour rendition and image stability.
Energy
- Energy-saving mode after a certain time - beneficial both for the user and the environment
- Electrical safety
Emissions
- Electromagnetic fields
- Noise emissions
Ecology
- The product must be prepared for recycling and the manufacturer must have a certified environmental management system such as EMAS or ISO 14 001
- Restrictions on - chlorinated and brominated flame retardants and polymers
- heavy metals such as cadmium, mercury and lead.
The requirements included in this label have been developed by TCO Development in co-operation with scientists, experts, users as well as manufacturers all over the world. Since the end of the 1980s TCO has been involved in influencing the development of IT equipment in a more user-friendly direction. Our labelling system
started with displays in 1992 and is now requested by users and IT-manufacturers all over the world.
For more information, please visit
www.tcodevelopment.com
Recycling Information
Customer in Europe
The collection and recycling of this product has been planned according to your country's relevant legislation. To ensure that this product will be collected and recycled in a way that minimizes the impact on the environment, please do the following:
- If you purchased this product for private use, contact your municipality or the waste collection system and bring the product to this collection point / have the product be picked up by the waste collection system. Alternatively, your retailer might take back this if you purchase new equivalent equipment; please check with your retailer whether he will take back this product before bringing it. For information on your country's recycling arrangements, please contact the Sony representation in your country (contact details at: www.sony-europe.com). Further details on specific recycling systems can be found at the following addresses:
- Belgium: www.recupel.be
- Netherlands: www.nvmp.nl (consumer electronics) www.ictmilieu.nl (IT equipment)
- Norway: www.elretur.no
- Sweden: www.el-kretsen.se
- Switzerland: www.swico.ch
- If you use this product professionally, check the product's delivery contract for take back / recycling arrangements and follow the procedures described therein. Alternatively, follow the procedures described under point 1.
Customer in USA
We Sony as a member of EIA recommends to visit URL below http://www.ciac.org/
Customer in Asia
http://www.sony.co.jp/SonyInfo/Environment/recycle/3R.html
TFT LCD Color Computer Display
The model and serial numbers are located at the rear of the unit. Record these numbers in the spaces provided below. Refer to them whenever you call upon your dealer regarding this product. Model No. _ _ Serial No. ____
WARNING
To reduce the risk of fire or electric shock, do not expose this apparatus to rain or moisture.
Dangerously high voltages are present inside the unit. Do not open the cabinet. Refer servicing to qualified personnel only.
FCC Notice
This equipment has been tested and found to comply with the limits for a Class B digital device, pursuant to Part 15 of the FCC Rules. These limits are designed to provide reasonable protection against harmful interference in a residential installation. This equipment generates, uses, and can radiate radio frequency energy and, if not installed and used in accordance with the instructions, may cause harmful interference to radio communications. However, there is no guarantee that interference will not occur in a particular installation. If this equipment does cause harmful interference to radio or television reception, which can be determined by turning the equipment off and on, the user is encouraged to try to correct the interference by one or more of the following measures: - Reorient or relocate the receiving antenna. - Increase the separation between the equipment and receiver. - Connect the equipment into an outlet on a circuit different from that to which the receiver is connected. - Consult the dealer or an experienced radio/TV technician for help. You are cautioned that any changes or modifications not expressly approved in this manual could void your authority to operate this equipment.
IMPORTANT
If you have any questions about this product, you may call; Sony Customer Information Services Center 1-800-222-7669 or http://www.sony.com/
Declaration of Conformity
Trade Name: SONY
Model: SDM-E76A/SDM-E96A
SDM-E76D/SDM-E96D
Responsible Party: Sony Electronics Inc.
Address: 16530 Via Esprillo,
San Diego, CA 92127 U.S.A.
Telephone Number: 858-942-2230
This device complies with part 15 of the FCC rules. Operation is subject to the following two conditions: (1) This device may not cause harmful interference, and (2) this device must accept any interference received, including interference that may cause undesired operation.
NOTICE
This notice is applicable for USA/Canada only.
If shipped to USA/Canada, install only a UL LISTED/CSA
LABELLED power supply cord meeting the following
specifications:
SPECIFICATIONS
Plug Type Nema-Plug 5-15p
Cord Type SVT or SJT, minimum 3 x 18 AWG
Length Maximum 15 feet
Rating Minimum 7 A, 125 V
NOTICE
As an ENERGY STAR Partner, Sony Corporation has determined that this product meets the ENERGY STAR guidelines for energy efficiency.
This monitor complies with the TCO'03 guidelines.
Contents
Precautions 4
Adjust the sharpness (SHARPNESS) 13
Change the menu position (MENU Position) 13
Change the input signal automatically (INPUT SENSING) (only SDM-E76D/SDM-E96D). 14
Select the on-screen menu language (LANGUAGE) 14
INPUT1: DVI-D connector for DVI-D input
■ Adjusting the regulations
Adjusting the sharpness (SHARPNESS)
Adjust to sharpen the outline of images, etc.
Horizontal Resolution: Max. 1280 points, Vertical: Max. 1024 lines
Input signal levels: Analog RGB video signal 0.7 Vp-p, 75 Ω, positive
SYNC signal: TTL level, 2.2 kΩ, positive or negative (Separate horizontal and vertical sync)
Power requirements: 100-240 V, 50-60 Hz, Max. 1.0 A
Horizontal Resolution: Max. 1280 points
Horizontal Resolution: Max. 1280 points
Congratulations!
The display you have just purchased carries the TCO'03 Displays label. This means that your display is designed, manufactured and tested according to some of the strictest quality and environmental requirements in the world. This makes for a high performance product, designed with the user in focus that also minimizes the impact on our natural environment.
■ Ergonomics
- Good visual ergonomics and image quality in order to improve the working environment for the user and to reduce sight and strain problems. Important parameters are luminance, contrast, resolution, reflectance, colour rendition and image stability.
Energy
- Energy-saving mode after a certain time - beneficial both for the user and the environment
- Electrical safety
Emissions
- Electromagnetic fields
- Noise emissions
Ecology
- The product must be prepared for recycling and the manufacturer must have a certified environmental management system such as EMAS or ISO 14001
- Restrictions on
- chlorinated and brominated flame retardants and polymers
- heavy metals such as cadmium, mercury and lead.
The requirements included in this label have been developed by TCO Development in co-operation with scientists, experts, users as well as manufacturers all over the world. Since the end of the 1980s TCO has been involved in influencing the development of IT equipment in a more user-friendly direction. Our labelling system
started with displays in 1992 and is now requested by users and IT-manufacturers all over the world.
For more information, please visit
Recycling Information
Customer in Europe
The collection and recycling of this product has been planned according to your country's relevant legislation. To ensure that this product will be collected and recycled in a way that minimizes the impact on the environment, please do the following:
- If you purchased this product for private use, contact your municipality or the waste collection system and bring the product to this collection point / have the product be picked up by the waste collection system. Alternatively, your retailer might take back this if you purchase new equivalent equipment; please check with your retailer whether he will take back this product before bringing it. For information on your country's recycling arrangements, please contact the Sony representation in your country (contact details at: www.sony-europe.com). Further details on specific recycling systems can be found at the following addresses:
Belgium: www.recupel.be - Netherlands: www.nvmp.nl (consumer electronics) www.ictmilieu.nl (IT equipment) - Norway: www.elretur.no - Sweden: www.el-kretsen.se - Switzerland: www.swico.ch
- If you use this product professionally, check the product's delivery contract for take back / recycling arrangements and follow the procedures described therein. Alternatively, follow the procedures described under point 1.
Customer in USA
We Sony as a member of EIA recommends to visit URL below http://www.ciac.org/
Customer in Asia
http://www.sony.co.jp/SonyInfo/Environment/recycle/3R.html
TFTLCD Color Computer Display
Hnctpykua no 3Kcnnyataaun
(RU)
SDM-E76A/SDM-E96A
SDM-E76D/SDM-E96D
Owner's Record
The model and serial numbers are located at the rear of the unit. Record these numbers in the spaces provided below. Refer to them whenever you call upon your dealer regarding this product. Model No. ______ Serial No. ______
WARNING
To reduce the risk of fire or electric shock, do not expose this apparatus to rain or moisture.
Dangerously high voltages are present inside the unit. Do not open the cabinet. Refer servicing to qualified personnel only.
FCC Notice
This equipment has been tested and found to comply with the limits for a Class B digital device, pursuant to Part 15 of the FCC Rules. These limits are designed to provide reasonable protection against harmful interference in a residential installation. This equipment generates, uses, and can radiate radio frequency energy and, if not installed and used in accordance with the instructions, may cause harmful interference to radio communications. However, there is no guarantee that interference will not occur in a particular installation. If this equipment does cause harmful interference to radio or television reception, which can be determined by turning the equipment off and on, the user is encouraged to try to correct the interference by one or more of the following measures: - Reorient or relocate the receiving antenna. - Increase the separation between the equipment and receiver. - Connect the equipment into an outlet on a circuit different from that to which the receiver is connected. - Consult the dealer or an experienced radio/TV technician for help. You are cautioned that any changes or modifications not expressly approved in this manual could void your authority to operate this equipment.
IMPORTANT
If you have any questions about this product, you may call; Sony Customer Information Services Center 1-800-222-7669 or http://www.sony.com/
Declaration of Conformity
Trade Name: SONY
Model: SDM-E76A/SDM-E96A
SDM-E76D/SDM-E96D
Responsible Party: Sony Electronics Inc.
Address: 16530 Via Esprillo,
San Diego, CA 92127 U.S.A.
Telephone Number: 858-942-2230
This device complies with part 15 of the FCC rules. Operation is subject to the following two conditions: (1) This device may not cause harmful interference, and (2) this device must accept any interference received, including interference that may cause undesired operation.
BZ02
Manufacturer: Sony Corporation Address: 6-7-35 Kitashinagawa,
Shinagawa-ku, Tokyo 141-0001, Japan
Country of Origin: China
NOTICE
This notice is applicable for USA/Canada only.
If shipped to USA/Canada, install only a UL LISTED/CSA
LABELLED power supply cord meeting the following specifications:
SPECIFICATIONS
Plug Type Nema-Plug 5-15p
Cord Type SVT or SJT, minimum 3 x 18 AWG
Length Maximum 15 feet
Rating Minimum 7 A, 125 V
NOTICE
As an ENERGY STAR Partner, Sony Corporation has determined that this product meets the ENERGY STAR guidelines for energy efficiency.
This monitor complies with the TCO'03 guidelines.
Table of Contents 4
Identification of Controls 5
Preparation for Use 6
Step 1: Checking the Contents of the Package 6
Step 2: Connecting the Monitor to Your Computer 6
Step 3: Connecting the Power Cord 7
Step 4: Securing the Cables 7
Step 5: Turning On the Monitor and Computer 7
Tilt Adjustment 8
Selecting the input signal (INPUT button) (SDM-E76D/SDM-E96D only) 8
Setting the user configuration of the monitor 9
Navigating the on-screen menu 9
Adjusting the backlight (BACKLIGHT) 10
Adjusting the contrast (CONTRAST) 11
Adjusting the black level of the image (BRIGHTNESS) 11
Adjusting the sharpness and phase of the image (PHASE) (RGB analog signal only) 11
Adjusting the color temperature (COLOR) 13
Changing the gamma parameters (GAMMA) 14
Adjusting the sharpness (SHARPNESS) 14
Selecting the menu position (POSITION) 14
Automatic input switching (INPUT DETECT) (SDM-E76D/SDM-E96D only) 14
Selecting the on-screen menu language (LANGUAGE) 14
Additional settings 15
Technical specifications 15
Function menu: Energy saving 15
Function: Automatic image quality adjustment (only for analog RGB signal) 15
Troubleshooting 16
On-screen messages 16
Symptoms and corrective actions 17
Technical specifications 20
TCO'03 Eco-document
Precautions
Precautions when connecting to the power supply
- Use the power cord supplied with the monitor. If using another power cord, make sure it is suitable for use in the local power supply.
For customers in the USA
Using a power cord that does not meet the requirements may cause the monitor to not comply with the mandatory FCC standards.
For customers in the United Kingdom
When using the monitor in the UK, use the appropriate power cord for the UK.
Examples of plug types
100-120V alternating current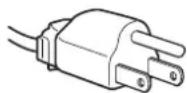
200-240V alternating current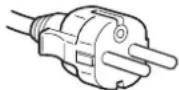
Only for 240V alternating current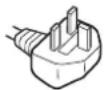
The socket must be located in an easily accessible place near the device.
Installation
Do not install or leave the monitor:
In places exposed to high temperatures, for example, near batteries, heaters, or in places where direct sunlight may shine. Placing the monitor in places exposed to high temperatures, for example, in cars, parked in sunny places, or near heaters, may lead to deformation of the case or malfunction. In places where vibration or sharp mechanical impacts are possible. Near equipment that generates a strong magnetic field, for example, televisions or other household appliances. In places where dust, dirt, or sand may accumulate, for example, near an open window or exit from a room. If the device is moved outdoors, be sure to take appropriate precautions against dust and dirt in the air. Otherwise, the device may be irreparably damaged.
Install the system on a flat surface. Do not install it on uneven surfaces: for example, on the edge of a table. If parts of the system protrude beyond the edge of the surface on which it is installed, this may cause a fall, injury, or damage to the device.
Cleaning the LCD screen
Do not leave the LCD screen in places where sunlight falls on it, as this may damage it. Be careful when placing the monitor near a window. Do not touch or scratch the LCD screen. Do not place heavy objects on the LCD screen. This may cause screen distortion or malfunction of the LCD panel.
If the monitor is used in a cold place, a residual image may appear on the screen. This is not a sign of malfunction. The screen returns to normal display as soon as the temperature becomes normal. If a still image is displayed for a long time, a residual image may appear on the screen for a while. The residual image disappears over time. The LCD panel may warm up during operation. This is not a sign of malfunction.
Note on LCD (Liquid Crystal Display)
Please note that the LCD is manufactured using high-precision technology. However, on the LCD screen, permanent black or bright dots (red, blue, or green) may appear, as well as bright stripes or irregularly shaped spots. This is not a sign of malfunction. (Effective number of dots: more than 99.99%)
Care
- Before cleaning the monitor, be sure to unplug the power cable from the outlet. - Wipe the LCD screen with a soft cloth. If you need to use a liquid cleaner, do not use products containing antistatic solutions or harsh additives, as you may damage the LCD screen coating. - Wipe the housing, stand, and control buttons with a soft cloth slightly dampened in a mild detergent solution. Do not use rough cloths, abrasive pastes, or solvents such as alcohol or gasoline. Do not touch the screen, scratch it, or hit it with sharp or hard objects (ballpoint pens, screwdrivers). This may cause scratches on the screen surface. - Note that treating the monitor with solvents such as acetone, thinners, or alcohol may cause damage to materials or peeling of the screen coating.
Transportation
- When transporting, disconnect all cables from the monitor and hold the monitor firmly. Dropping the monitor may cause injury or damage. - When moving the monitor or sending it for repair, use the original cardboard box and packing materials.
WALL MOUNTING ON A LOAD-BEARING BRACKET
If you plan to mount the monitor on a wall, you must install it on a load-bearing bracket, after consulting with qualified specialists.
Disposal of the monitor
Do not throw this monitor away with other household waste. - The fluorescent lamp installed in this monitor contains mercury. Disposal of this monitor must be carried out in accordance with the instructions of local sanitary authorities.
Identification of control parts
See pages in parentheses for detailed information.
The power switch is located in the lower right part of the front panel of the monitor.
Front panel of the monitor
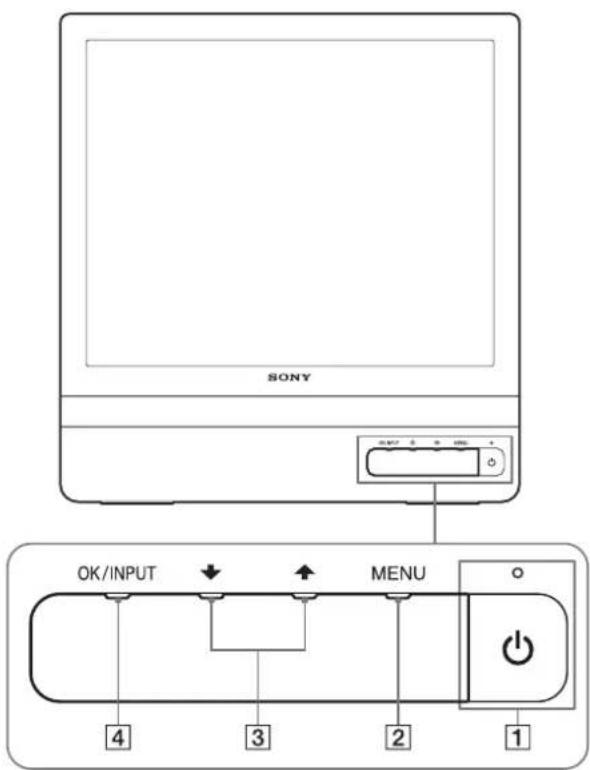
Rear panel of the monitor
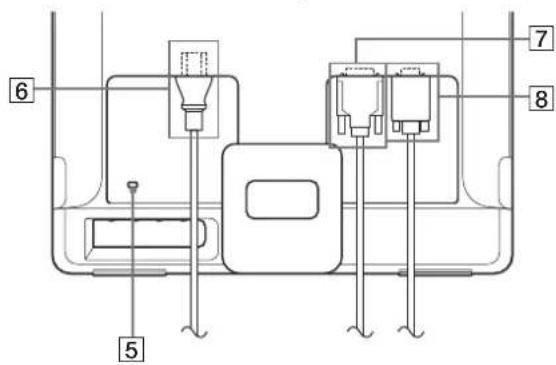
1 Power switch / indicator (p.7,15)
To turn the monitor on or off, press the power switch.
When the monitor is on, the power indicator lights green, and when the monitor is in power saving mode, it lights orange.
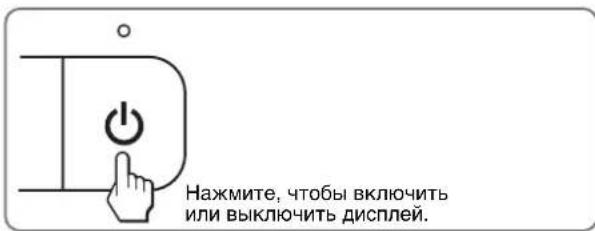
2 MENU button (p. 9, 10)
Press this button to open/close the main menu. In the menu, you can enable the DDC/CI function by holding this button down for more than 8 seconds.
3 Buttons ↓/↑ (p. 10)
These buttons perform the functions of buttons 1/1 when selecting menu items and making settings.
4 OK button (p. 10)
This button is used to select items and apply settings in the menu. INPUT button (p. 8) (only for SDM-E76D/SDM-E96D)
Using this button, you can switch the input video signal between INPUT1 and INPUT2 when two computers are connected to the monitor.
5 Security lock hole
The security lock hole must be used for the Kensington Micro Saver Security System.
Micro Saver Security System is a trademark of Kensington.
6 AC IN connector (p. 7)
Connect the power cable (included).
7 DVI-D input connector (digital RGB) for INPUT1 (p. 6) (only for SDM-E76D/SDM-E96D)
Digital RGB video signals conforming to DVI Rev.1.0 are input through this connector.
8 HD15 input connector (analog RGB) (p. 6)
Depending on the connector type, analog RGB (0.7 Vp-p, positive) and synchronization signals are supplied.
Getting started
Before using the monitor, check that the following items are included in the box:
Power cord, signal cable HD15-HD15 (analog RGB), DVI-D signal cable (digital RGB) (only for SDM-E76D/SDM-E96D models), cable holder, CD-ROM (utilities for Windows and Macintosh, operating instructions, etc.), warranty card, quick setup guide.
If there is no picture on the screen
- If the message CABLE NOT CONNECTED appears on the screen:
Make sure the power cord and signal cable are connected correctly. If the message NO SIGNAL appears on the screen: The computer is in power saving mode. Try pressing any key on the keyboard or moving the mouse.
Make sure the signal cable is connected correctly.
- If the message OUT OF RANGE appears on the screen:
Turn off the monitor. Then adjust the computer's graphics adapter within the following ranges.
Each time you press the button, the input signal changes.
Screen messages (appear for about 5 seconds on the input signal in the upper left corner.)
INPUT1: DVI-D connector (digital RGB) INPUT1
INPUT2: HD15 input connector (analog RGB) INPUT2
Setting up the monitor's user adjustments
Performing settings
Connect the monitor to the computer, and then turn them on.
For the best result, the settings should be performed within 30 minutes.
Most monitor settings are performed using the on-screen menu.
Select the menu for adjusting the brightness and contrast of the image.
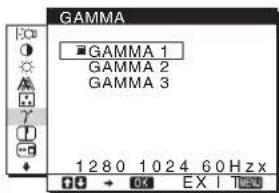
Sharpness (p. Select the Sharpness menu to adjust the sharpness of the image contours.
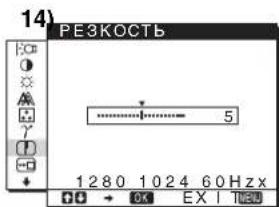
8 POSITION menu (p.14)
Select the POSITION menu to choose the position of the on-screen menu.
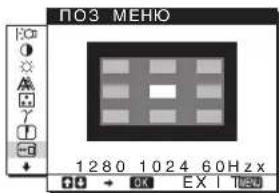
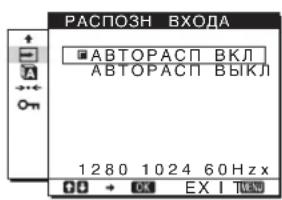
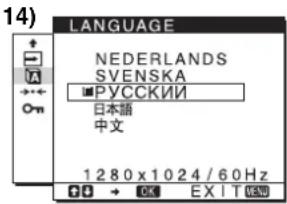
- RESET LOCK MENU
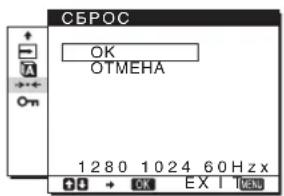
Using the MENU, / and OK
1 Display the main menu.
Press the MENU button to display the main menu on the screen.
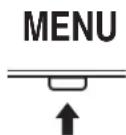
2 Select the menu to be adjusted.
Press the / buttons to select the desired menu. Press the OK button to select the menu item.
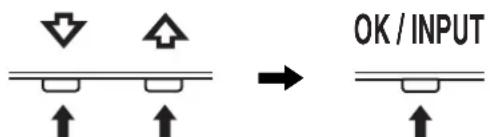
3 Perform the menu settings.
Press the / buttons to select the setting, then press the OK button. When the OK button is pressed, the setting is saved, and the display returns to the previous menu.
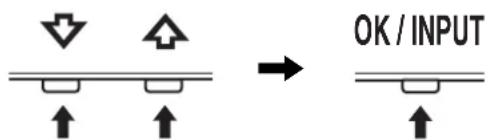
4 Close the menu.
Press the MENU button once to return to normal viewing mode. If no buttons are pressed, the on-screen menu automatically disappears after approximately 45 seconds.
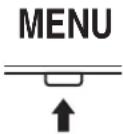
Restoring default settings
You can return to the default settings via the RESET menu. See page 15 for more detailed information about returning to default settings.
Controlling the monitor from a computer
Press and hold the MENU button for at least 5 seconds. You will see an on-screen message showing the current settings. After 3 seconds, the DDC/CI setting will be enabled or disabled, as shown below.
Adjust the image contrast.
Application
If the COLOR parameter is set to sRGB, you can adjust the CONTRAST, BRIGHTNESS, or GAMMA settings.
1 Press the MENU button.
The main menu appears on the screen.
2 Press the / buttons to select
(CONTRAST), then press the OK button.
The CONTRAST menu appears on the screen.
Press the / keys to adjust.
Then press the OK button.
Adjusting the black level of the image (brightness)
Adjust the brightness of the image (black level).
Note
If the color parameter is set to sRGB, you will not be able to adjust contrast, brightness, or gamma.
1 Press the MENU button. The main menu appears on the screen. 2 Press the key to select (brightness), then press the OK button. The brightness menu appears on the screen. 3 Press the / keys to adjust brightness, then press the OK button.
Adjusting image sharpness and centering
When auto adjustment does not work:
1 Open "My Computer" and right-click the CD-ROM icon. Select "Open" and open the CD-ROM icon.
2 Open [Utility] and select [WINDOWS].
Macintosh users
1 Open the CD-ROM drive icon.
2 Open [Utility] and select [MAC].
3 Open [MAC UTILITY] and run [MAC_CLASSICUTILITY] or [MAC OSXUTILITY].
Press the MENU button. Go to point 4.
4 Press the MENU button.
The main menu appears on the screen.
5 Press the / buttons to select SCREEN, then press the OK button.
The SCREEN menu appears on the screen.
6 Press the / buttons to select PHASE, then press the OK button. The PHASE setting menu will be shown on the screen. 7 Press the / buttons until the horizontal bars become minimal. Adjust them so that the horizontal bars are minimal.
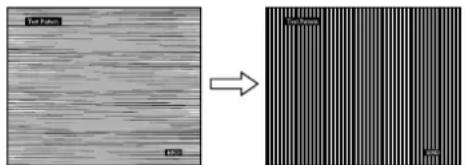
8 Press the OK button.
The main menu appears on the screen. If vertical bars are visible on the screen, adjust the PITCH parameter by performing the following steps.
9 Press the / buttons to select PITCH, then press the OK button. The PITCH setting menu will be shown on the screen. 10 Press the / buttons until the vertical bars disappear. Adjust them so that the vertical bars disappear.
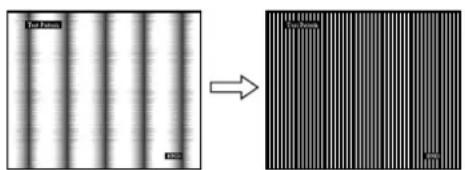
11 Press the OK button.
The main menu appears on the screen.
12 Press the button to select HORIZ CENTER or VERT CENTER, then press the OK button. The HORIZ CENTER or VERT CENTER setting menu will be shown on the screen. 13 Press the / buttons to move the test pattern to the center of the screen. 14 Press the "END" button on the screen to turn off the test pattern.
Color temperature setting (LBT)
You can select the white balance level of the image from the following color temperature settings by default. If necessary, you can also perform fine adjustment of the color temperature. You can set the required color temperature for any screen brightness mode.
1 Press the MENU button. The main menu appears on the screen. 2 Press the / buttons to select (LBT), then press the OK button. The LBT menu appears on the screen. 3 Press the / buttons to select the required color temperature, then press the OK button.
The color temperature can be changed to a reddish or bluish tint. The temperature ranges from 9300K to 6500K (default value). If you select "sRGB", the color profile of the display space is set to sRGB. (The sRGB color parameter is considered the standard for the color space protocol for computer technology.) If you select "sRGB", the color setting of your computer should be set to the sRGB profile.
Note
If the connected computer or other equipment is not sRGB-compatible, colors may not be displayed correctly for the sRGB profile. - If you select the sRGB value for the color parameter, you will not be able to adjust contrast, brightness, or gamma.
Color Temperature Fine Adjustment (Manual Adjustment)
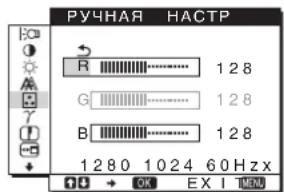
1 Press the / button to select the adjustment, then press OK. The manual adjustment screen appears. 2 Press the / button to select R (Red) or B (Blue), then press OK. Then press the / button to adjust the color temperature, and then press OK.
Since this color temperature adjustment is made by increasing or decreasing the R component relative to G (Green), the G component remains unchanged.
3 Press the button to select the element → , then press OK.
The new adjustment will be saved in memory as Manual and will be called up as Manual whenever Manual is selected. The main menu appears on the screen.
Changing Gamma Parameters (GAMMA)
You can match the color tone of the image on the screen with the original color tone of the image.
Note
If you select the sRGB value for the color parameter, you will not be able to adjust contrast, brightness, or gamma.
1 Press the MENU button. The main menu appears on the screen. 2 Press the / button to select γ (GAMMA), then press OK. The GAMMA screen appears. 3 Press the /↑ button to select the desired mode, then press OK.
Sharpness Adjustment (SHARPNESS)
Adjusts the sharpness of the image, etc.
1 Press the MENU button.
The main menu appears on the screen.
2 Press the / buttons to select SHARPNESS, then press the OK button. The SHARPNESS menu appears on the screen. 3 Press the / buttons to adjust the sharpness, and press the OK button.
Selecting the menu position (POSITION MENU)
You can change the position of the menu if it obstructs the image on the screen.
1 Press the MENU button.
The main menu appears on the screen.
2 Press the / buttons to select (POSITION MENU), then press the OK button.
The POSITION MENU appears on the screen.
3 Press the / buttons to select the desired position, then press the OK button.
There are three menu position options: at the top, center, or bottom of the screen.
AUTOMATIC INPUT SWITCHING (INPUT DETECTION)
(Only for models SDM-E76D/SDM-E96D)
If you select the value AUTO INPUT in the INPUT DETECTION menu, the monitor will automatically detect the input signal from the input terminal and switch to it, before the monitor enters the power saving mode.
1 Press the MENU button.
The main menu appears on the screen.
2 Press the / buttons to select
(INPUT SELECT), then press the OK button.
The input selection menu appears on the screen.
3 Press the button to select the desired input, then press the OK button.
- AUTO INPUT: If there is no input signal on the selected input terminal, or if the input terminal is selected using the INPUT button on the monitor and then there is no input signal on that terminal, a message appears on the screen (p.16) and the monitor automatically checks for the presence of an input signal on other input terminals and changes the input. When the input is changed, the selected input terminal is displayed in the upper left corner of the screen. If there is no input signal, the monitor automatically switches to power saving mode.
- AUTO INPUT OFF: Automatic input change is not performed. Press the INPUT button to change the input terminal.
Selecting the on-screen menu language (LANGUAGE)
You can change the language used in the menus and messages displayed on the monitor screen.
1 Press the MENU button.
The main menu appears on the screen.
2 Press the button to scroll to the desired setting.
3 Press the / button to select
(LANGUAGE), then press the OK button.
The LANGUAGE will appear on the screen.
4 Press the / buttons to select the language, and press the OK button.
- ENGLISH: English
- FRANÇAIS: French
- DEUTSCH: German
- ESPAÑOL: Spanish ITALIANO: Italian
- NEDERLANDS: Dutch SVENSKA: Swedish
- РУССКИЙ: Russian
Additional settings
You can configure additional parameters:
C PROS - BLOCKING
1 Press the MENU button.
The main menu will appear on the screen.
2 Press the button repeatedly until the desired setting is reached. 3 Press the button to select the desired parameter, then press the OK button.
Select the desired parameter according to the instructions given below.
Returning these settings to default values
You can reset the settings to default values.
1 Press the ↓/↑ button to select → ↔ (RESET), then press the OK button.
The RESET screen appears.
2 Press the ↓/↑ button to select the desired mode, then press the OK button.
OK: Reset all settings to default values. Note that this method cannot reset the LANGUAGE setting. CANCEL: Cancel the reset and return to the menu screen.
MENU LOCK
You can lock the control buttons to prevent accidental changes to settings or reset.
1 Press the ↓/↑ button to select MENU LOCK, then press the OK button.
The MENU LOCK screen appears.
2 Press the ↓/↑ button to select ON or OFF, then press the OK button.
ON: Only the power switch works. When other operations are performed, the lock icon will be displayed on the screen. OFF: Set the lock to OFF. If you set the lock to ON, only this menu item can be selected.
Technical specifications
Energy saving function
The monitor complies with the standards for energy consumption established by VESA, ENERGY STAR, and NUTEK. If the monitor is connected to a computer or video adapter that supports DPMS (the monitor power management standard) for analog input signals, or the DMPN standard (power management for digital monitor DVI) for digital input signals, the monitor will automatically reduce power consumption according to the table below.
Image size: 19.0
inches
Input signal format
Pixel clock frequency RGB*
Horizontal scan:
Image size:
17.0 inches
Input signal format
Pixel clock frequency RGB*
Horizontal scan
28-80 kHz (analog RGB)
28-64 kHz (digital RGB)
Vertical scan:
56-75 Hz (analog RGB)
60T (HpOBnRGB)
Resolution horizontal:
Max. 1280 dots
Vertical:
Max. 1024 lines
Input signal levels
Analog RGB
0.7 Vp-p, 75 Ω,
positive
Sync signal
TTL level, 2.2 kΩ
positive or
negative
(separate horizontal
and vertical)
Input connector RGB (DVI) (one)
connection TMDS)
Power supply 100-240V, 50-60Hz,
max. 1.0A
Operating temperature 5-35°C
Dimensions (W x H x D)
Display (5°):
Resolution horizontal:
Max. 1280 dots
Vertical:
Max. 1024 lines
Input signal levels
Analog video signal
0.7 Vp-p, 75 Ω,
Positive
Level TTL, 2.2 KΩ,
Positive
Negative
(Separate horizontal
Vertical)
Digital RGB (DVI) (Digital
connection TMDS)
Input 100-240 V, 50-60 Hz
Max. 1.0 A
Operating temperature 5-35 °C
The display you have just purchased carries the TCO'03 Displays label. This means that your display is designed, manufactured and tested according to some of the strictest quality and environmental requirements in the world. This makes for a high performance product, designed with the user in focus that also minimizes the impact on our natural environment.
■ Ergonomics
- Good visual ergonomics and image quality in order to improve the working environment for the user and to reduce sight and strain problems. Important parameters are luminance, contrast, resolution, reflectance, colour rendition and image stability.
Energy
- Energy-saving mode after a certain time - beneficial both for the user and the environment
- Electrical safety
Emissions
- Electromagnetic fields
- Noise emissions
Ecology
- The product must be prepared for recycling and the manufacturer must have a certified environmental management system such as EMAS or ISO 14 001
- Restrictions on chlorinated and brominated flame retardants and polymers
- Heavy metals such as cadmium, mercury and lead.
The requirements included in this label have been developed by TCO Development in co-operation with scientists, experts, users as well as manufacturers all over the world. Since the end of the 1980s TCO has been involved in influencing the development of IT equipment in a more user-friendly direction. Our labelling system
started with displays in 1992 and is now requested by users and IT-manufacturers all over the world.
For more information, please visit
www.tcodevelopment.com
Recycling Information
Customer in Europe
The collection and recycling of this product has been planned according to your country's relevant legislation. To ensure that this product will be collected and recycled in a way that minimizes the impact on the environment, please do the following:
- If you purchased this product for private use, contact your municipality or the waste collection system and bring the product to this collection point / have the product be picked up by the waste collection system. Alternatively, your retailer might take back this if you purchase new equivalent equipment; please check with your retailer whether he will take back this product before bringing it. For information on your country's recycling arrangements, please contact the Sony representation in your country (contact details at: www.sony-europe.com). Further details on specific recycling systems can be found at the following addresses:
- Belgium: www.RECupel.be
- Netherlands: www.nvmp.nl (consumer electronics) www.ictmilieu.nl (IT equipment)
- Norway: www.elretur.no
- Sweden: www.el-kretsen.se
- Switzerland: www.swico.ch
- If you use this product professionally, check the product's delivery contract for take back / recycling arrangements and follow the procedures described therein. Alternatively, follow the procedures described under point 1.
Customer in USA
As a member of EIA, Sony recommends visiting the URL below: http://www.ciac.org/
Customer in Asia
http://www.sony.co.jp/SonyInfo/Environment/recycle/3R.html
TFT LCD Color Computer Display
Bruksanvisning
(SE)
SDM-E76A/SDM-E96A
SDM-E76D/SDM-E96D
Owner's Record
The model and serial numbers are located at the rear of the unit. Record these numbers in the spaces provided below. Refer to them whenever you call upon your dealer regarding this product. Model No. _ _ Serial No. ____
WARNING
To reduce the risk of fire or electric shock, do not expose this apparatus to rain or moisture.
Dangerously high voltages are present inside the unit. Do not open the cabinet. Refer servicing to qualified personnel only.
FCC Notice
This equipment has been tested and found to comply with the limits for a Class B digital device, pursuant to Part 15 of the FCC Rules. These limits are designed to provide reasonable protection against harmful interference in a residential installation. This equipment generates, uses, and can radiate radio frequency energy and, if not installed and used in accordance with the instructions, may cause harmful interference to radio communications. However, there is no guarantee that interference will not occur in a particular installation. If this equipment does cause harmful interference to radio or television reception, which can be determined by turning the equipment off and on, the user is encouraged to try to correct the interference by one or more of the following measures: - Reorient or relocate the receiving antenna. - Increase the separation between the equipment and receiver. - Connect the equipment into an outlet on a circuit different from that to which the receiver is connected. - Consult the dealer or an experienced radio/TV technician for help. You are cautioned that any changes or modifications not expressly approved in this manual could void your authority to operate this equipment.
IMPORTANT
If you have any questions about this product, you may call; Sony Customer Information Services Center 1-800-222-7669 or http://www.sony.com/
Declaration of Conformity
Trade Name: SONY
Model: SDM-E76A/SDM-E96A
SDM-E76D/SDM-E96D
Responsible Party: Sony Electronics Inc.
Address: 16530 Via Esprillo,
San Diego, CA 92127 U.S.A.
Telephone Number: 858-942-2230
This device complies with part 15 of the FCC rules. Operation is subject to the following two conditions: (1) This device may not cause harmful interference, and (2) this device must accept any interference received, including interference that may cause undesired operation.
NOTICE
This notice is applicable for USA/Canada only.
If shipped to USA/Canada, install only a UL LISTED/CSA
LABELLED power supply cord meeting the following
Specifications:
SPECIFICATIONS
Plug Type: NEMA Plug 5-15P
Cord Type: SVT or SJT, minimum 3 x 18 AWG
Length: Maximum 15 feet
Rating: Minimum 7 A, 125 V
NOTICE
As an ENERGY STAR Partner, Sony Corporation has determined that this product meets the ENERGY STAR guidelines for energy efficiency.
This monitor complies with the TCO'03 guidelines.
(only for analog RGB signal) 15
Troubleshooting 16
On-screen messages 16
3 Start [WIN_UTILITIES.EXE].
Test pattern appears. Continue to step 4.
For Macintosh users:
Digital RGB-signal (DVI): TMDS
(single link)
Digital RGB-signal (DVI): TMDS
(single link)
Power supply 100-240 V, 50-60 Hz
Max. 1.0 A
°C
Operating temperature 5-35
Size (width/height/depth)
Screen image (5°)
Approximately 420× 433.1× 193.2mm
Weight Approximately 5.5 kg
Plug & Play DDC2B
■ Congratulations!
The display you have just purchased carries the TCO'03 Displays label. This means that your display is designed, manufactured and tested according to some of the strictest quality and environmental requirements in the world. This makes for a high performance product, designed with the user in focus that also minimizes the impact on our natural environment.
Ergonomics
- Good visual ergonomics and image quality in order to improve the working environment for the user and to reduce sight and strain problems. Important parameters are luminance, contrast, resolution, reflectance, colour rendition and image stability.
Energy
- Energy-saving mode after a certain time - beneficial both for the user and the environment
- Electrical safety
Emissions
- Electromagnetic fields
- Noise emissions
Ecology
- The product must be prepared for recycling and the manufacturer must have a certified environmental management system such as EMAS or ISO 14001
- Restrictions on
- chlorinated and brominated flame retardants and polymers
- heavy metals such as cadmium, mercury and lead.
The requirements included in this label have been developed by TCO Development in co-operation with scientists, experts, users as well as manufacturers all over the world. Since the end of the 1980s TCO has been involved in influencing the development of IT equipment in a more user-friendly direction. Our labelling system
started with displays in 1992 and is now requested by users and IT-manufacturers all over the world.
For more information, please visit
www.tcodevelopment.com
Recycling Information
Customer in Europe
The collection and recycling of this product has been planned according to your country's relevant legislation. To ensure that this product will be collected and recycled in a way that minimizes the impact on the environment, please do the following:
- If you purchased this product for private use, contact your municipality or the waste collection system and bring the product to this collection point / have the product be picked up by the waste collection system. Alternatively, your retailer might take back this if you purchase new equivalent equipment; please check with your retailer whether he will take back this product before bringing it. For information on your country's recycling arrangements, please contact the Sony representation in your country (contact details at: www.sony-europe.com). Further details on specific recycling systems can be found at the following addresses:
Belgium: www.RECupel.be - Netherlands: www.nvmp.nl (consumer electronics) www.ictmilieu.nl (IT equipment) - Norway: www.elretur.no - Sweden: www.el-kretsen.se - Switzerland: www.swico.ch
- If you use this product professionally, check the product's delivery contract for take back / recycling arrangements and follow the procedures described therein. Alternatively, follow the procedures described under point 1.
Customer in USA
We Sony as a member of EIA recommends to visit URL below http://www.ciac.org/
Customer in Asia
http://www.sony.co.jp/SonyInfo/Environment/recycle/3R.html
TFT LCD Color Computer Display
User's Manual.
(NL)
SDM-E76A/SDM-E96A
SDM-E76D/SDM-E96D
Owner's Record
The model and serial numbers are located at the rear of the unit. Record these numbers in the spaces provided below. Refer to them whenever you call upon your dealer regarding this product. Model No. ____ Serial No. ____
WARNING
To reduce the risk of fire or electric shock, do not expose this apparatus to rain or moisture.
Dangerously high voltages are present inside the unit. Do not open the cabinet. Refer servicing to qualified personnel only.
FCC Notice
This equipment has been tested and found to comply with the limits for a Class B digital device, pursuant to Part 15 of the FCC Rules. These limits are designed to provide reasonable protection against harmful interference in a residential installation. This equipment generates, uses, and can radiate radio frequency energy and, if not installed and used in accordance with the instructions, may cause harmful interference to radio communications. However, there is no guarantee that interference will not occur in a particular installation. If this equipment does cause harmful interference to radio or television reception, which can be determined by turning the equipment off and on, the user is encouraged to try to correct the interference by one or more of the following measures: - Reorient or relocate the receiving antenna. - Increase the separation between the equipment and receiver. - Connect the equipment into an outlet on a circuit different from that to which the receiver is connected. - Consult the dealer or an experienced radio/TV technician for help. You are cautioned that any changes or modifications not expressly approved in this manual could void your authority to operate this equipment.
IMPORTANT
If you have any questions about this product, you may call; Sony Customer Information Services Center 1-800-222-7669 or http://www.sony.com/
Declaration of Conformity
Trade Name: SONY
Model: SDM-E76A/SDM-E96A
SDM-E76D/SDM-E96D
Responsible Party: Sony Electronics Inc.
Address: 16530 Via Esprillo,
San Diego, CA 92127 U.S.A.
Telephone Number: 858-942-2230
This device complies with part 15 of the FCC rules. Operation is subject to the following two conditions: (1) This device may not cause harmful interference, and (2) this device must accept any interference received, including interference that may cause undesired operation.
NOTICE
This notice is applicable for USA/Canada only.
If shipped to USA/Canada, install only a UL LISTED/CSA
LABELLED power supply cord meeting the following
specifications:
SPECIFICATIONS
Plug Type Nema-Plug 5-15p
Cord Type SVT or SJT, minimum 3 x 18 AWG
Length Maximum 15 feet
Rating Minimum 7 A, 125 V
NOTICE
As an ENERGY STAR Partner, Sony Corporation has determined that this product meets the ENERGY STAR guidelines for energy efficiency.
This monitor complies with the TCO'03 guidelines.
Contents
Picture format: 19.0 inch
Input signal format RGB operating frequency*
Horizontal: 28-80 kHz
(analog RGB)
28-64 kHz
(digital RGB)
Vertical: 56-75 Hz (analog RGB)
60 Hz (digital RGB)
The display you have just purchased carries the TCO'03 Displays label. This means that your display is designed, manufactured and tested according to some of the strictest quality and environmental requirements in the world. This makes for a high performance product, designed with the user in focus that also minimizes the impact on our natural environment.
■ Ergonomics
- Good visual ergonomics and image quality in order to improve the working environment for the user and to reduce sight and strain problems. Important parameters are luminance, contrast, resolution, reflectance, colour rendition and image stability.
Energy
- Energy-saving mode after a certain time - beneficial both for the user and the environment
- Electrical safety
Emissions
- Electromagnetic fields
- Noise emissions
Ecology
- The product must be prepared for recycling and the manufacturer must have a certified environmental management system such as EMAS or ISO 14 001
- Restrictions on - chlorinated and brominated flame retardants and polymers
- heavy metals such as cadmium, mercury and lead.
The requirements included in this label have been developed by TCO Development in cooperation with scientists, experts, users, and manufacturers all over the world. Since the end of the 1980s, TCO has been involved in influencing the development of IT equipment in a more user-friendly direction. Our labeling system
started with displays in 1992 and is now requested by users and IT manufacturers all over the world.
For more information, please visit
www.tcodevelopment.com
Recycling Information
Customer in Europe
The collection and recycling of this product has been planned according to your country's relevant legislation. To ensure that this product will be collected and recycled in a way that minimizes the impact on the environment, please do the following:
- If you purchased this product for private use, contact your municipality or the waste collection system and bring the product to this collection point / have the product be picked up by the waste collection system. Alternatively, your retailer might take back this if you purchase new equivalent equipment; please check with your retailer whether he will take back this product before bringing it. For information on your country's recycling arrangements, please contact the Sony representation in your country (contact details at: www.sony-europe.com). Further details on specific recycling systems can be found at the following addresses:
- Belgium: www.recupel.be
- Netherlands: www.nvmp.nl (consumer electronics) www.ictmilieu.nl (IT equipment)
- Norway: www.elretur.no
- Sweden: www.el-kretsen.se
- Switzerland: www.swico.ch
- If you use this product professionally, check the product's delivery contract for take back / recycling arrangements and follow the procedures described therein. Alternatively, follow the procedures described under point 1.
Customer in USA
We Sony as a member of EIA recommends to visit URL below http://www.ciac.org/
Customer in Asia
http://www.sony.co.jp/SonyInfo/Environment/recycle/3R.html
Color LCD Monitor
Operating Instructions (CS)
SDM-E76A/SDM-E96A
SDM-E76D/SDM-E96D
Owner's Record
The model and serial numbers are located at the rear of the unit. Record these numbers in the spaces provided below. Refer to them whenever you call upon your dealer regarding this product. Model No. _ _ Serial No. ____
WARNING
To reduce the risk of fire or electric shock, do not expose this apparatus to rain or moisture.
Dangerously high voltages are present inside the unit. Do not open the cabinet. Refer servicing to qualified personnel only.
FCC Notice
This equipment has been tested and found to comply with the limits for a Class B digital device, pursuant to Part 15 of the FCC Rules. These limits are designed to provide reasonable protection against harmful interference in a residential installation. This equipment generates, uses, and can radiate radio frequency energy and, if not installed and used in accordance with the instructions, may cause harmful interference to radio communications. However, there is no guarantee that interference will not occur in a particular installation. If this equipment does cause harmful interference to radio or television reception, which can be determined by turning the equipment off and on, the user is encouraged to try to correct the interference by one or more of the following measures: - Reorient or relocate the receiving antenna. - Increase the separation between the equipment and receiver. - Connect the equipment into an outlet on a circuit different from that to which the receiver is connected. - Consult the dealer or an experienced radio/TV technician for help. You are cautioned that any changes or modifications not expressly approved in this manual could void your authority to operate this equipment.
IMPORTANT
If you have any questions about this product, you may call; Sony Customer Information Services Center 1-800-222-7669 or http://www.roy.com/
Declaration of Conformity
Trade Name: SONY
Model: SDM-E76A/SDM-E96A
SDM-E76D/SDM-E96D
Responsible Party: Sony Electronics Inc.
Address: 16530 Via Esprillo,
San Diego, CA 92127 U.S.A.
Telephone Number: 858-942-2230
This device complies with part 15 of the FCC rules. Operation is subject to the following two conditions: (1) This device may not cause harmful interference, and (2) this device must accept any interference received, including interference that may cause undesired operation.
NOTICE
This notice is applicable for USA/Canada only.
If shipped to USA/Canada, install only a UL LISTED/CSA
LABELLED power supply cord meeting the following
specifications:
SPECIFICATIONS
Plug Type Nema-Plug 5-15p
Cord Type SVT or SJT, minimum 3 × 18 AWG
Length Maximum 15 feet
Rating Minimum 7 A, 125 V
NOTICE
As an ENERGY STAR Partner, Sony Corporation has determined that this product meets the ENERGY STAR guidelines for energy efficiency.
This monitor complies with the TCO'03 guidelines.
Installation 6
Step 1: Use the stand 6
Step 2: Connect the monitor to your computer 6
Step 3: Connect the power cord 7
Step 4: Secure the cables 7
Step 5: Turn on the monitor and computer 7
Adjusting the tilt 8
Selecting the input signal (INPUT button) (SDM-E76D/SDM-E96D only) 8
Setting the monitor 8
Navigating the menu 8
Adjusting the backlight (Backlight) 10
Adjusting the contrast (Contrast) 10
Adjusting the black level of the image (Brightness) 10
3 Open [MAC_UTILITY], then start [MAC_CLASSIC_UTILITY]
The display you have just purchased carries the TCO'03 Displays label. This means that your display is designed, manufactured and tested according to some of the strictest quality and environmental requirements in the world. This makes for a high performance product, designed with the user in focus that also minimizes the impact on our natural environment.
Ergonomics
- Good visual ergonomics and image quality in order to improve the working environment for the user and to reduce sight and strain problems. Important parameters are luminance, contrast, resolution, reflectance, colour rendition and image stability.
Energy
- Energy-saving mode after a certain time - beneficial both for the user and the environment
- Electrical safety
Emissions
- Electromagnetic fields
- Noise emissions
Ecology
- The product must be prepared for recycling and the manufacturer must have a certified environmental management system such as EMAS or ISO 14 001
- Restrictions on - chlorinated and brominated flame retardants and polymers
- heavy metals such as cadmium, mercury and lead.
The requirements included in this label have been developed by TCO Development in co-operation with scientists, experts, users as well as manufacturers all over the world. Since the end of the 1980s TCO has been involved in influencing the development of IT equipment in a more user-friendly direction. Our labelling system
Started with displays in 1992 and is now requested by users and IT manufacturers all over the world.
For more information, please visit
www.tcodevelopment.com
Recycling Information
Customer in Europe
The collection and recycling of this product has been planned according to your country's relevant legislation. To ensure that this product will be collected and recycled in a way that minimizes the impact on the environment, please do the following:
- If you purchased this product for private use, contact your municipality or the waste collection system and bring the product to this collection point / have the product be picked up by the waste collection system. Alternatively, your retailer might take back this if you purchase new equivalent equipment; please check with your retailer whether he will take back this product before bringing it. For information on your country's recycling arrangements, please contact the Sony representation in your country (contact details at: www.sony-europe.com). Further details on specific recycling systems can be found at the following addresses:
- Belgium: www.recupel.be
- Netherlands: www.nvmp.nl (consumer electronics) www.ictmilieu.nl (IT equipment)
- Norway: www.elretur.no
- Sweden: www.el-kretsen.se
- Switzerland: www.swico.ch
- If you use this product professionally, check the product's delivery contract for take back / recycling arrangements and follow the procedures described therein. Alternatively, follow the procedures described under point 1.
Customer in USA
We Sony as a member of EIA recommends to visit URL below http://www.ciac.org/
Customer in Asia
http://www.sony.co.jp/SonyInfo/Environment/recycle/3R.html
TFT LCD Color Computer Display
Návod k obsluze
(CZ)
SDM-E76A/SDM-E96A
SDM-E76D/SDM-E96D
Owner's Record
The model and serial numbers are located at the rear of the unit. Record these numbers in the spaces provided below. Refer to them whenever you call upon your dealer regarding this product. Model No. _ _ Serial No. ____
WARNING
To reduce the risk of fire or electric shock, do not expose this apparatus to rain or moisture.
Dangerously high voltages are present inside the unit. Do not open the cabinet. Refer servicing to qualified personnel only.
FCC Notice
This equipment has been tested and found to comply with the limits for a Class B digital device, pursuant to Part 15 of the FCC Rules. These limits are designed to provide reasonable protection against harmful interference in a residential installation. This equipment generates, uses, and can radiate radio frequency energy and, if not installed and used in accordance with the instructions, may cause harmful interference to radio communications. However, there is no guarantee that interference will not occur in a particular installation. If this equipment does cause harmful interference to radio or television reception, which can be determined by turning the equipment off and on, the user is encouraged to try to correct the interference by one or more of the following measures: - Reorient or relocate the receiving antenna. - Increase the separation between the equipment and receiver. - Connect the equipment into an outlet on a circuit different from that to which the receiver is connected. - Consult the dealer or an experienced radio/TV technician for help. You are cautioned that any changes or modifications not expressly approved in this manual could void your authority to operate this equipment.
IMPORTANT
If you have any questions about this product, you may call; Sony Customer Information Services Center 1-800-222-7669 or http://www.sony.com/
Declaration of Conformity
Trade Name: SONY
Model: SDM-E76A/SDM-E96A
SDM-E76D/SDM-E96D
Responsible Party: Sony Electronics Inc.
Address: 16530 Via Esprillo,
San Diego, CA 92127 U.S.A.
Telephone Number: 858-942-2230
This device complies with part 15 of the FCC rules. Operation is subject to the following two conditions: (1) This device may not cause harmful interference, and (2) this device must accept any interference received, including interference that may cause undesired operation.
NOTICE
This notice is applicable for USA/Canada only.
If shipped to USA/Canada, install only a UL LISTED/CSA
LABELLED power supply cord meeting the following
specifications:
SPECIFICATIONS
Plug Type Nema-Plug 5-15p
Cord Type SVT or SJT, minimum 3 × 18 AWG
Length Maximum 15 feet
Rating Minimum 7 A, 125 V
NOTICE
As an ENERGY STAR Partner, Sony Corporation has determined that this product meets the ENERGY STAR guidelines for energy efficiency.
This monitor complies with the TCO'03 guidelines.
Contents
Parts and Controls 5
Installation 6
Installation 1: Use the stand. 6
Installation 2: Connect the display to the computer. 6
Installation 3: Connect the power cable. 7
Installation 4: Secure the cables. 7
Installation 5: Turn on the monitor and the computer. 7
Tilt adjustment 8
■ Congratulations!
The display you have just purchased carries the TCO'03 Displays label. This means that your display is designed, manufactured and tested according to some of the strictest quality and environmental requirements in the world. This makes for a high performance product, designed with the user in focus that also minimizes the impact on our natural environment.
■ Ergonomics
- Good visual ergonomics and image quality in order to improve the working environment for the user and to reduce sight and strain problems. Important parameters are luminance, contrast, resolution, reflectance, colour rendition and image stability.
Energy
- Energy-saving mode after a certain time - beneficial both for the user and the environment
- Electrical safety
Emissions
- Electromagnetic fields
- Noise emissions
Ecology
- The product must be prepared for recycling and the manufacturer must have a certified environmental management system such as EMAS or ISO 14001
- Restrictions on
- chlorinated and brominated flame retardants and polymers
- heavy metals such as cadmium, mercury and lead.
The requirements included in this label have been developed by TCO Development in co-operation with scientists, experts, users as well as manufacturers all over the world. Since the end of the 1980s TCO has been involved in influencing the development of IT equipment in a more user-friendly direction. Our labelling system
started with displays in 1992 and is now requested by users and IT-manufacturers all over the world.
For more information, please visit
www.tcodevelopment.com
Recycling Information
Customer in Europe
The collection and recycling of this product has been planned according to your country's relevant legislation. To ensure that this product will be collected and recycled in a way that minimizes the impact on the environment, please do the following:
- If you purchased this product for private use, contact your municipality or the waste collection system and bring the product to this collection point / have the product be picked up by the waste collection system. Alternatively, your retailer might take back this if you purchase new equivalent equipment; please check with your retailer whether he will take back this product before bringing it. For information on your country's recycling arrangements, please contact the Sony representation in your country (contact details at: www.sony-europe.com). Further details on specific recycling systems can be found at the following addresses:
Belgium: www.RECupel.be - Netherlands: www.nvmp.nl (consumer electronics) www.ictmilieu.nl (IT equipment) - Norway: www.elretur.no - Sweden: www.el-kretsen.se - Switzerland: www.swico.ch
- If you use this product professionally, check the product's delivery contract for take back / recycling arrangements and follow the procedures described therein. Alternatively, follow the procedures described under point 1.
Customer in USA
We Sony as a member of EIA recommends to visit URL below http://www.ciac.org/
Customer in Asia
http://www.sony.co.jp/SonyInfo/Environment/recycle/3R.html
TFT LCD Color Computer Display
The model and serial numbers are located at the rear of the unit. Record these numbers in the spaces provided below. Refer to them whenever you call upon your dealer regarding this product. Model No. _ _ Serial No. ____
WARNING
To reduce the risk of fire or electric shock, do not expose this apparatus to rain or moisture.
Dangerously high voltages are present inside the unit. Do not open the cabinet. Refer servicing to qualified personnel only.
FCC Notice
This equipment has been tested and found to comply with the limits for a Class B digital device, pursuant to Part 15 of the FCC Rules. These limits are designed to provide reasonable protection against harmful interference in a residential installation. This equipment generates, uses, and can radiate radio frequency energy and, if not installed and used in accordance with the instructions, may cause harmful interference to radio communications. However, there is no guarantee that interference will not occur in a particular installation. If this equipment does cause harmful interference to radio or television reception, which can be determined by turning the equipment off and on, the user is encouraged to try to correct the interference by one or more of the following measures: - Reorient or relocate the receiving antenna. - Increase the separation between the equipment and receiver. - Connect the equipment into an outlet on a circuit different from that to which the receiver is connected. - Consult the dealer or an experienced radio/TV technician for help. You are cautioned that any changes or modifications not expressly approved in this manual could void your authority to operate this equipment.
IMPORTANT
If you have any questions about this product, you may call; Sony Customer Information Services Center 1-800-222-7669 or http://www.roy.com/
Declaration of Conformity
Trade Name: SONY
Model: SDM-E76A/SDM-E96A
SDM-E76D/SDM-E96D
Responsible Party: Sony Electronics Inc.
Address: 16530 Via Esprillo,
San Diego, CA 92127 U.S.A.
Telephone Number: 858-942-2230
This device complies with part 15 of the FCC rules. Operation is subject to the following two conditions: (1) This device may not cause harmful interference, and (2) this device must accept any interference received, including interference that may cause undesired operation.
NOTICE
This notice is applicable for USA/Canada only.
If shipped to USA/Canada, install only a UL LISTED/CSA
LABELLED power supply cord meeting the following
specifications:
SPECIFICATIONS
Plug Type Nema-Plug 5-15p
Cord Type SVT or SJT, minimum 3 x 18 AWG
Length Maximum 15 feet
Rating Minimum 7 A, 125 V
NOTICE
As an ENERGY STAR Partner, Sony Corporation has determined that this product meets the ENERGY STAR guidelines for energy efficiency.
This monitor complies with the TCO'03 guidelines.
The display you have just purchased carries the TCO'03 Displays label. This means that your display is designed, manufactured and tested according to some of the strictest quality and environmental requirements in the world. This makes for a high performance product, designed with the user in focus that also minimizes the impact on our natural environment.
■ Ergonomics
- Good visual ergonomics and image quality in order to improve the working environment for the user and to reduce sight and strain problems. Important parameters are luminance, contrast, resolution, reflectance, colour rendition and image stability.
Energy
- Energy-saving mode after a certain time - beneficial both for the user and the environment
- Electrical safety
Emissions
- Electromagnetic fields
- Noise emissions
Ecology
- The product must be prepared for recycling and the manufacturer must have a certified environmental management system such as EMAS or ISO 14 001
- Restrictions on - chlorinated and brominated flame retardants and polymers
- heavy metals such as cadmium, mercury and lead.
The requirements included in this label have been developed by TCO Development in co-operation with scientists, experts, users as well as manufacturers all over the world. Since the end of the 1980s TCO has been involved in influencing the development of IT equipment in a more user-friendly direction. Our labelling system
started with displays in 1992 and is now requested by users and IT-manufacturers all over the world.
For more information, please visit
www.tcodevelopment.com
Recycling Information
Customer in Europe
The collection and recycling of this product has been planned according to your country's relevant legislation. To ensure that this product will be collected and recycled in a way that minimizes the impact on the environment, please do the following:
- If you purchased this product for private use, contact your municipality or the waste collection system and bring the product to this collection point / have the product be picked up by the waste collection system. Alternatively, your retailer might take back this if you purchase new equivalent equipment; please check with your retailer whether he will take back this product before bringing it. For information on your country's recycling arrangements, please contact the Sony representation in your country (contact details at: www.sony-europe.com). Further details on specific recycling systems can be found at the following addresses:
- Belgium: www.RECupel.be
- Netherlands: www.nvmp.nl (consumer electronics) www.ictmilieu.nl (IT equipment)
- Norway: www.elretur.no
- Sweden: www.el-kretsen.se
- Switzerland: www.swico.ch
- If you use this product professionally, check the product's delivery contract for take back / recycling arrangements and follow the procedures described therein. Alternatively, follow the procedures described under point 1.
Customer in USA
We Sony as a member of EIA recommends to visit URL below http://www.ciac.org/
Customer in Asia
http://www.sony.co.jp/SonyInfo/Environment/recycle/3R.html
TFT LCD Color Computer Display
Instruction Manual
(PL)
SDM-E76A/SDM-E96A
SDM-E76D/SDM-E96D
Owner's Record
The model and serial numbers are located at the rear of the unit. Record these numbers in the spaces provided below. Refer to them whenever you call upon your dealer regarding this product. Model No. _ _ Serial No. ____
WARNING
To reduce the risk of fire or electric shock, do not expose this apparatus to rain or moisture.
Dangerously high voltages are present inside the unit. Do not open the cabinet. Refer servicing to qualified personnel only.
FCC Notice
This equipment has been tested and found to comply with the limits for a Class B digital device, pursuant to Part 15 of the FCC Rules. These limits are designed to provide reasonable protection against harmful interference in a residential installation. This equipment generates, uses, and can radiate radio frequency energy and, if not installed and used in accordance with the instructions, may cause harmful interference to radio communications. However, there is no guarantee that interference will not occur in a particular installation. If this equipment does cause harmful interference to radio or television reception, which can be determined by turning the equipment off and on, the user is encouraged to try to correct the interference by one or more of the following measures: - Reorient or relocate the receiving antenna. - Increase the separation between the equipment and receiver. - Connect the equipment into an outlet on a circuit different from that to which the receiver is connected. - Consult the dealer or an experienced radio/TV technician for help. You are cautioned that any changes or modifications not expressly approved in this manual could void your authority to operate this equipment.
IMPORTANT
If you have any questions about this product, you may call; Sony Customer Information Services Center 1-800-222-7669 or http://www.roy.com/
Declaration of Conformity
Trade Name: SONY
Model: SDM-E76A/SDM-E96A
SDM-E76D/SDM-E96D
Responsible Party: Sony Electronics Inc.
Address: 16530 Via Esprillo,
San Diego, CA 92127 U.S.A.
Telephone Number: 858-942-2230
This device complies with part 15 of the FCC rules. Operation is subject to the following two conditions: (1) This device may not cause harmful interference, and (2) this device must accept any interference received, including interference that may cause undesired operation.
NOTICE
This notice is applicable for USA/Canada only.
If shipped to USA/Canada, install only a UL LISTED/CSA
LABELLED power supply cord meeting the following
specifications:
SPECIFICATIONS
Plug Type Nema-Plug 5-15p
Cord Type SVT or SJT, minimum 3 x 18 AWG
Length Maximum 15 feet
Rating Minimum 7 A, 125 V
NOTICE
As an ENERGY STAR Partner, Sony Corporation has determined that this product meets the ENERGY STAR guidelines for energy efficiency.
This monitor complies with the TCO'03 guidelines.
Table of contents
3 Run [WIN_UTILITY.EXE].
[MAC_CLASSIC Utility] or [MAC OSX Utility].
■ Congratulations!
The display you have just purchased carries the TCO'03 Displays label. This means that your display is designed, manufactured and tested according to some of the strictest quality and environmental requirements in the world. This makes for a high performance product, designed with the user in focus that also minimizes the impact on our natural environment.
■ Ergonomics
- Good visual ergonomics and image quality in order to improve the working environment for the user and to reduce sight and strain problems. Important parameters are luminance, contrast, resolution, reflectance, colour rendition and image stability.
Energy
- Energy-saving mode after a certain time - beneficial both for the user and the environment
- Electrical safety
Emissions
- Electromagnetic fields
- Noise emissions
Ecology
- The product must be prepared for recycling and the manufacturer must have a certified environmental management system such as EMAS or ISO 14001
- Restrictions on
- chlorinated and brominated flame retardants and polymers
- heavy metals such as cadmium, mercury and lead.
The requirements included in this label have been developed by TCO Development in co-operation with scientists, experts, users as well as manufacturers all over the world. Since the end of the 1980s TCO has been involved in influencing the development of IT equipment in a more user-friendly direction. Our labelling system
started with displays in 1992 and is now requested by users and IT-manufacturers all over the world.
For more information, please visit
www.tcodevelopment.com
Recycling Information
Customer in Europe
The collection and recycling of this product has been planned according to your country's relevant legislation. To ensure that this product will be collected and recycled in a way that minimizes the impact on the environment, please do the following:
- If you purchased this product for private use, contact your municipality or the waste collection system and bring the product to this collection point / have the product be picked up by the waste collection system. Alternatively, your retailer might take back this if you purchase new equivalent equipment; please check with your retailer whether he will take back this product before bringing it. For information on your country's recycling arrangements, please contact the Sony representation in your country (contact details at: www.sony-europe.com). Further details on specific recycling systems can be found at the following addresses:
Belgium: www.RECupel.be - Netherlands: www.nvmp.nl (consumer electronics) www.ictmilieu.nl (IT equipment) - Norway: www.elretur.no - Sweden: www.el-kretsen.se - Switzerland: www.swico.ch
- If you use this product professionally, check the product's delivery contract for take back / recycling arrangements and follow the procedures described therein. Alternatively, follow the procedures described under point 1.
Customer in USA
As a member of EIA, Sony recommends visiting the URL below: http://www.ciac.org/
Customer in Asia
http://www.sony.co.jp/SonyInfo/Environment/recycle/3R.html
TFT LCD Color Computer Display
The model and serial numbers are located at the rear of the unit. Record these numbers in the spaces provided below. Refer to them whenever you call upon your dealer regarding this product. Model No. ______ Serial No. ______
WARNING
To reduce the risk of fire or electric shock, do not expose this apparatus to rain or moisture.
Dangerously high voltages are present inside the unit. Do not open the cabinet. Refer servicing to qualified personnel only.
FCC Notice
This equipment has been tested and found to comply with the limits for a Class B digital device, pursuant to Part 15 of the FCC Rules. These limits are designed to provide reasonable protection against harmful interference in a residential installation. This equipment generates, uses, and can radiate radio frequency energy and, if not installed and used in accordance with the instructions, may cause harmful interference to radio communications. However, there is no guarantee that interference will not occur in a particular installation. If this equipment does cause harmful interference to radio or television reception, which can be determined by turning the equipment off and on, the user is encouraged to try to correct the interference by one or more of the following measures: - Reorient or relocate the receiving antenna. - Increase the separation between the equipment and receiver. - Connect the equipment into an outlet on a circuit different from that to which the receiver is connected. - Consult the dealer or an experienced radio/TV technician for help. You are cautioned that any changes or modifications not expressly approved in this manual could void your authority to operate this equipment.
IMPORTANT
If you have any questions about this product, you may call Sony Customer Information Services Center at 1-800-222-7669 or visit http://www.sony.com/
Declaration of Conformity
Trade Name: SONY
Model: SDM-E76A/SDM-E96A
SDM-E76D/SDM-E96D
Responsible Party: Sony Electronics Inc.
Address: 16530 Via Esprillo,
San Diego, CA 92127 U.S.A.
Telephone Number: 858-942-2230
This device complies with part 15 of the FCC rules. Operation is subject to the following two conditions: (1) This device may not cause harmful interference, and (2) this device must accept any interference received, including interference that may cause undesired operation.
NOTICE
This notice is applicable for USA/Canada only.
If shipped to USA/Canada, install only a UL LISTED/CSA
LABELLED power supply cord meeting the following
specifications:
SPECIFICATIONS
Plug Type Nema-Plug 5-15p
Cord Type SVT or SJT, minimum 3 x 18 AWG
Length Maximum 15 feet
Rating Minimum 7 A, 125 V
NOTICE
As an ENERGY STAR Partner, Sony Corporation has determined that this product meets the ENERGY STAR guidelines for energy efficiency.
This monitor complies with the TCO'03 guidelines.
Table of Contents
Caution 4
Monitor parts and adjustment elements. 5
Setup. 6
Setup 1: Use the supplied stand. 6
Setup 2: Connect the monitor to your computer. 6
Image size: 17.0
Signal input format Working frequency RGB*
signal
Horizontal: 28 - 80 kHz (analog RGB)
Vertical: 56 - 75 Hz (analog RGB)
LCD panel Panel type:
a-Si TFT with active matrix
Image size: 19.0
LCD panel Panel type:
a-Si TFT with active matrix
Image size: 17.0
LCD panel Panel type:
a-Si TFT with active matrix
Image size: 19.0
■ Congratulations!
The display you have just purchased carries the TCO'03 Displays label. This means that your display is designed, manufactured and tested according to some of the strictest quality and environmental requirements in the world. This makes for a high performance product, designed with the user in focus that also minimizes the impact on our natural environment.
■ Ergonomics
- Good visual ergonomics and image quality in order to improve the working environment for the user and to reduce sight and strain problems. Important parameters are luminance, contrast, resolution, reflectance, colour rendition and image stability.
Energy
- Energy-saving mode after a certain time - beneficial both for the user and the environment
- Electrical safety
Emissions
- Electromagnetic fields
- Noise emissions
Ecology
- The product must be prepared for recycling and the manufacturer must have a certified environmental management system such as EMAS or ISO 14001.
- Restrictions on
- chlorinated and brominated flame retardants and polymers
- heavy metals such as cadmium, mercury and lead.
The requirements included in this label have been developed by TCO Development in co-operation with scientists, experts, users as well as manufacturers all over the world. Since the end of the 1980s TCO has been involved in influencing the development of IT equipment in a more user-friendly direction. Our labelling system
started with displays in 1992 and is now requested by users and IT-manufacturers all over the world.
For more information, please visit
www.tcodevelopment.com
Recycling Information
Customer in Europe
The collection and recycling of this product has been planned according to your country's relevant legislation. To ensure that this product will be collected and recycled in a way that minimizes the impact on the environment, please do the following:
- If you purchased this product for private use, contact your municipality or the waste collection system and bring the product to this collection point / have the product be picked up by the waste collection system. Alternatively, your retailer might take back this if you purchase new equivalent equipment; please check with your retailer whether he will take back this product before bringing it. For information on your country's recycling arrangements, please contact the Sony representation in your country (contact details at: www.sony-europe.com). Further details on specific recycling systems can be found at the following addresses:
Belgium: www.recupel.be - Netherlands: www.nvmp.nl (consumer electronics) www.ictmilieu.nl (IT equipment) - Norway: www.elretur.no - Sweden: www.el-kretsen.se - Switzerland: www.swico.ch
- If you use this product professionally, check the product's delivery contract for take back / recycling arrangements and follow the procedures described therein. Alternatively, follow the procedures described under point 1.
Customer in USA
We Sony as a member of EIA recommends to visit URL below http://www.ciac.org/
Customer in Asia
http://www.sony.co.jp/SonyInfo/Environment/recycle/3R.html
TFTLCDColor ComputerDisplay
Kullanim Bilgileri
(TR)
SDM-E76A/SDM-E96A
SDM-E76D/SDM-E96D
Owner's Record
The model and serial numbers are located at the rear of the unit. Record these numbers in the spaces provided below. Refer to them whenever you call upon your dealer regarding this product. Model No. ____ Serial No. ____
WARNING
To reduce the risk of fire or electric shock, do not expose this apparatus to rain or moisture.
Dangerously high voltages are present inside the unit. Do not open the cabinet. Refer servicing to qualified personnel only.
FCC Notice
This equipment has been tested and found to comply with the limits for a Class B digital device, pursuant to Part 15 of the FCC Rules. These limits are designed to provide reasonable protection against harmful interference in a residential installation. This equipment generates, uses, and can radiate radio frequency energy and, if not installed and used in accordance with the instructions, may cause harmful interference to radio communications. However, there is no guarantee that interference will not occur in a particular installation. If this equipment does cause harmful interference to radio or television reception, which can be determined by turning the equipment off and on, the user is encouraged to try to correct the interference by one or more of the following measures: - Reorient or relocate the receiving antenna. - Increase the separation between the equipment and receiver. - Connect the equipment into an outlet on a circuit different from that to which the receiver is connected. - Consult the dealer or an experienced radio/TV technician for help. You are cautioned that any changes or modifications not expressly approved in this manual could void your authority to operate this equipment.
IMPORTANT
If you have any questions about this product, you may call; Sony Customer Information Services Center 1-800-222-7669 or http://www.roy.com/
Declaration of Conformity
Trade Name: SONY
Model: SDM-E76A/SDM-E96A
SDM-E76D/SDM-E96D
Responsible Party: Sony Electronics Inc.
Address: 16530 Via Esprillo,
San Diego, CA 92127 U.S.A.
Telephone Number: 858-942-2230
This device complies with part 15 of the FCC rules. Operation is subject to the following two conditions: (1) This device may not cause harmful interference, and (2) this device must accept any interference received, including interference that may cause undesired operation.
NOTICE
This notice is applicable for USA/Canada only.
If shipped to USA/Canada, install only a UL LISTED/CSA
LABELLED power supply cord meeting the following
specifications:
SPECIFICATIONS
Plug Type Nema-Plug 5-15p
Cord Type SVT or SJT, minimum 3 x 18 AWG
Length Maximum 15 feet
Rating Minimum 7 A, 125 V
NOTICE
As an ENERGY STAR Partner, Sony Corporation has determined that this product meets the ENERGY STAR guidelines for energy efficiency.
This monitor complies with the TCO'03 guidelines.
Contents
Warnings 4
Screen size: 19.0 inches
Input signal format RGB operating frequency*
Horizontal: 28-80 kHz (analog RGB)
28-64 kHz (digital RGB)
Vertical: 56-75 Hz (analog RGB)
60 Hz (digital RGB)
Resolution Horizontal: Max. 1280 dots
Vertical: Max. 1024 lines
Input signal level RGB video signal
Operating temperature 5-35
Congratulations!
The display you have just purchased carries the TCO'03 Displays label. This means that your display is designed, manufactured and tested according to some of the strictest quality and environmental requirements in the world. This makes for a high performance product, designed with the user in focus that also minimizes the impact on our natural environment.
■ Ergonomics
- Good visual ergonomics and image quality in order to improve the working environment for the user and to reduce sight and strain problems. Important parameters are luminance, contrast, resolution, reflectance, colour rendition and image stability.
Energy
- Energy-saving mode after a certain time - beneficial both for the user and the environment
- Electrical safety
Emissions
- Electromagnetic fields
- Noise emissions
Ecology
- The product must be prepared for recycling and the manufacturer must have a certified environmental management system such as EMAS or ISO 14001
- Restrictions on
- chlorinated and brominated flame retardants and polymers
- heavy metals such as cadmium, mercury and lead.
The requirements included in this label have been developed by TCO Development in co-operation with scientists, experts, users as well as manufacturers all over the world. Since the end of the 1980s TCO has been involved in influencing the development of IT equipment in a more user-friendly direction. Our labelling system
started with displays in 1992 and is now requested by users and IT-manufacturers all over the world.
For more information, please visit
www.tcodevelopment.com
Recycling Information
Customer in Europe
The collection and recycling of this product has been planned according to your country's relevant legislation. To ensure that this product will be collected and recycled in a way that minimizes the impact on the environment, please do the following:
- If you purchased this product for private use, contact your municipality or the waste collection system and bring the product to this collection point / have the product be picked up by the waste collection system. Alternatively, your retailer might take back this if you purchase new equivalent equipment; please check with your retailer whether he will take back this product before bringing it. For information on your country's recycling arrangements, please contact the Sony representation in your country (contact details at: www.sony-europe.com). Further details on specific recycling systems can be found at the following addresses:
- Belgium: www.recupel.be
- Netherlands: www.nvmp.nl (consumer electronics) www.ictmilieu.nl (IT equipment)
- Norway: www.elretur.no
- Sweden: www.el-kretsen.se
- Switzerland: www.swico.ch
- If you use this product professionally, check the product's delivery contract for take back / recycling arrangements and follow the procedures described therein. Alternatively, follow the procedures described under point 1.
Customer in USA
We Sony as a member of EIA recommends to visit URL below http://www.eiae.org/
Customer in Asia
http://www.sony.co.jp/SonyInfo/Environment/recycle/3R.html

- TABLE OF CONTENTS
- CONNECTION AND SETUP
- MAIN SPECIFICATIONS
- SDM-E76A
- ERGONOMICS
- ENERGY
- EMISSIONS
- ECOLOGY
- RECYCLING INFORMATION
- CUSTOMER IN EUROPE
- CUSTOMER IN USA
- CUSTOMER IN ASIA
- TFTLCDCOLOR COMPUTERDISPLAY
- OWNER'S RECORD
- WARNING
- FCC NOTICE
- IMPORTANT
- DECLARATION OF CONFORMITY
- NOTICE
- SETUP
- CUSTOMIZING YOUR MONITOR
- TECHNICAL FEATURES
- TROUBLESHOOTING
- SPECIFICATIONS
- PRECAUTIONS
- WARNING ON POWER CONNECTIONS
- INSTALLATION
- HANDLING THE LCD SCREEN
- NOTE ON THE LCD (LIQUID CRYSTAL DISPLAY)
- MAINTENANCE
- TRANSPORTATION
- INSTALLATION ON A WALL OR A MOUNTING ARM
- DISPOSAL OF THE MONITOR
- IDENTIFYING PARTS AND CONTROLS
- FRONT OF THE DISPLAY
- REAR OF THE DISPLAY
- STEP 1: USE THE STAND
- USE THE SUPPLIED STAND
- NOTE
- USE THE VESA COMPATIBLE STAND
- STEP 2: CONNECT THE DISPLAY TO YOUR COMPUTER
- NOTES
- CONNECT A COMPUTER EQUIPPED WITH A DVI OUTPUT CONNECTOR (DIGITAL RGB) (SDM-E76D/SDM-E96D ONLY)
- CONNECT A COMPUTER EQUIPPED WITH AN HD15 OUTPUT CONNECTOR (ANALOG RGB)
- STEP 3: CONNECT THE POWER CORD
- STEP 4: SECURE THE CORDS
- STEP 5: TURN ON THE MONITOR AND COMPUTER
- IF NO PICTURE APPEARS ON YOUR SCREEN
- NO NEED FOR SPECIFIC DRIVERS
- ADJUSTING THE TILT
- TO USE THE DISPLAY COMFORTABLY
- SELECTING THE INPUT SIGNAL (INPUT BUTTON) (SDM-E76D/SDM-E96D ONLY)
- CONNECT THE MONITOR AND THE COMPUTER, AND TURN THEM ON. WAIT FOR AT LEAST 30 MINUTES BEFORE MAKING ADJUSTMENTS FOR THE BEST RESULT
- YOU CAN MAKE NUMEROUS ADJUSTMENTS TO YOUR MONITOR USING THE ON-SCREEN MENU
- USE THE DOWN/UP AND OK BUTTONS TO SELECT THE ICONS IN THE ABOVE MAIN MENU ILLUSTRATION. THE FOLLOWING 1 TO 10 MENU APPEARS. KEEP PRESSING DOWN TO SCROLL DOWN UNTIL THE ICONS IN MENU 9 AND 10 APPEAR. SEE PAGE 10 FOR MORE INFORMATION ON USING THE DOWN/UP AND OK BUTTONS
- BACKLIGHT (PAGE 10)
- CONTRAST (PAGE 10)
- BRIGHTNESS (PAGE 11)
- SCREEN A (PAGE
- COLOR (PAGE 13)
- GAMMA (PAGE 13)
- SHARPNESS (PAGE 13)
- MENU POSITION (PAGE 13)
- INPUT SENSING
- PAGE 14 (SDM-E76D/ SDM-E96D ONLY)
- LANGUAGE (PAGE
- OTHER MENUS (PAGE 14)
- USING THE MENU, DOWN/UP, AND OK BUTTONS
- DISPLAY THE MAIN MENU
- SELECT THE MENU YOU WANT TO ADJUST
- ADJUST THE MENU
- CLOSE THE MENU
- RESETTING THE ADJUSTMENTS
- CONTROLLING THE MONITOR BY COMPUTER
- ON-SCREEN MESSAGES (APPEAR FOR A WHILE)
- ADJUSTING THE BACKLIGHT (BACKLIGHT)
- PRESS THE MENU BUTTON
- PRESS THE DOWN/UP BUTTONS TO SELECT BACKLIGHT AND PRESS THE OK BUTTON
- PRESS THE DOWN/UP BUTTONS TO ADJUST THE LIGHT LEVEL AND PRESS THE OK BUTTON
- ADJUSTING THE CONTRAST (CONTRAST)
- PRESS THE DOWN/UP BUTTONS TO SELECT (CONTRAST) AND PRESS THE OK BUTTON
- PRESS THE DOWN/UP BUTTONS TO ADJUST THE CONTRAST AND PRESS THE OK BUTTON
- ADJUSTING THE BLACK LEVEL OF AN IMAGE (BRIGHTNESS)
- PRESS THE DOWN/UP BUTTONS TO SELECT (BRIGHTNESS) AND PRESS THE OK BUTTON
- PRESS THE DOWN/UP BUTTONS TO ADJUST THE BRIGHTNESS AND PRESS THE OK BUTTON
- ADJUSTING THE PICTURE'S SHARPNESS AND CENTERING (SCREEN) (ANALOG RGB SIGNAL ONLY)
- AUTOMATIC PICTURE QUALITY ADJUSTMENT FUNCTION
- IF THE AUTOMATIC PICTURE QUALITY ADJUSTMENT FUNCTION OF THIS MONITOR SEEMS TO NOT COMPLETELY ADJUST THE PICTURE
- IF YOU STILL NEED TO MAKE FURTHER ADJUSTMENTS TO THE PICTURE QUALITY
- MAKE FURTHER AUTOMATIC ADJUSTMENTS TO THE PICTURE QUALITY FOR THE CURRENT INPUT SIGNAL (AUTO ADJUST)
- PRESS THE DOWN/UP BUTTONS TO SELECT (SCREEN) AND PRESS THE OK BUTTON
- PRESS THE DOWN/UP BUTTONS TO SELECT AUTO ADJUST AND PRESS THE OK BUTTON
- PRESS THE DOWN/UP BUTTONS TO SELECT ON OR OFF AND PRESS THE OK BUTTON
- PRESS THE DOWN/UP BUTTONS TO SELECT AND PRESS THE OK BUTTON
- ADJUST THE PICTURE'S SHARPNESS AND POSITION MANUALLY (PITCH/PHASE/H CENTER/VCENTER)
- START THE CD-ROM
- CLICK "ADJUST" AND CONFIRM THE CURRENT RESOLUTION (TOP VALUE) AND RECOMMENDED RESOLUTION (BOTTOM VALUE), AND THEN CLICK "NEXT
- PRESS THE DOWN/UP BUTTONS TO SELECT PITCH AND PRESS THE OK BUTTON
- ADJUSTING THE COLOR TEMPERATURE (COLOR)
- PRESS THE / BUTTONS TO SELECT (COLOR) AND PRESS THE OK BUTTON
- PRESS THE / BUTTONS TO SELECT THE DESIRED COLOR TEMPERATURE AND PRESS THE OK BUTTON
- FINE TUNING THE COLOR TEMPERATURE (USER ADJUSTMENT)
- PRESS THE / BUTTONS TO SELECT ADJUST AND PRESS THE OK BUTTON
- PRESS THE DOWN/UP BUTTONS TO SELECT R (RED) OR B (BLUE) AND PRESS THE OK BUTTON. THEN PRESS THE DOWN/UP BUTTONS TO ADJUST THE COLOR TEMPERATURE AND PRESS THE OK BUTTON
- PRESS THE DOWN/UP BUTTONS TO SELECT THE CHECK MARK, THEN PRESS THE OK BUTTON
- CHANGING THE GAMMA SETTING (GAMMA)
- PRESS THE DOWN/UP BUTTONS TO SELECT GAMMA AND PRESS THE OK BUTTON
- PRESS THE DOWN/UP BUTTONS TO SELECT THE DESIRED MODE AND PRESS THE OK BUTTON
- ADJUSTING THE SHARPNESS (SHARPNESS)
- PRESS THE DOWN/UP BUTTONS TO SELECT (SHARPNESS) AND PRESS THE OK BUTTON
- PRESS THE DOWN/UP BUTTONS TO ADJUST THE SHARPNESS AND PRESS THE OK BUTTON
- CHANGING THE MENU'S POSITION (MENU POSITION)
- PRESS THE DOWN/UP BUTTONS TO SELECT (MENU POSITION) AND PRESS THE OK BUTTON
- PRESS THE DOWN/UP BUTTONS TO SELECT THE DESIRED POSITION AND PRESS THE OK BUTTON
- CHANGING THE INPUT AUTOMATICALLY (INPUT SENSING)
- (SDM-E76D/SDM-E96D ONLY)
- SELECTING THE ON-SCREEN MENU LANGUAGE (LANGUAGE)
- ADDITIONAL SETTINGS
- LOCKING THE MENUS AND CONTROLS
- PRESS THE DOWN/UP BUTTONS TO SELECT ON (MENU LOCK) AND PRESS THE OK BUTTON
- POWER SAVING FUNCTION
- AUTOMATIC PICTURE QUALITY ADJUSTMENT FUNCTION (ANALOG RGB SIGNAL ONLY)
- THE FACTORY PRESET MODE
- IF INPUT SIGNALS DO NOT MATCH ONE OF THE FACTORY PRESET MODES
- NOTE (SDM-E76D/SDM-E96D ONLY)
- IF YOU ADJUST THE PHASE, PITCH AND PICTURE POSITION MANUALLY WHILE OFF OF AUTO ADJUST IS SELECTED
- ON-SCREEN MESSAGES
- IF OUT OF RANGE APPEARS ON THE SCREEN
- INFORMATION
- IF "XXX.X KHZ/XXX HZ" IS DISPLAYED
- IF "RESOLUTION > 1280 X 1024" IS DISPLAYED
- IF NO INPUT SIGNAL APPEARS ON THE SCREEN
- GO TO POWER SAVE
- IF CABLE DISCONNECTED APPEARS ON THE SCREEN
- TROUBLE SYMPTOMS AND REMEDIES
- SDM-E96A
- SDM-E76D
- SDM-E96D
- TCO'03 ECO-DOCUMENT
- CONGRATULATIONS
- TFT LCD COLOR COMPUTER DISPLAY
- TECHNICAL SPECIFICATIONS
- CONTENTS
- INDICES
- ADJUSTING THE REGULATIONS
- TFTLCD COLOR COMPUTER DISPLAY
- PREPARATION FOR USE
- SETTING THE USER CONFIGURATION OF THE MONITOR
- PRECAUTIONS WHEN CONNECTING TO THE POWER SUPPLY
- FOR CUSTOMERS IN THE USA
- FOR CUSTOMERS IN THE UNITED KINGDOM
- CLEANING THE LCD SCREEN
- NOTE ON LCD (LIQUID CRYSTAL DISPLAY)
- CARE
- WALL MOUNTING ON A LOAD-BEARING BRACKET
- IDENTIFICATION OF CONTROL PARTS
- FRONT PANEL OF THE MONITOR
- REAR PANEL OF THE MONITOR
- GETTING STARTED
- IF THERE IS NO PICTURE ON THE SCREEN
- IF THE MESSAGE CABLE NOT CONNECTED APPEARS ON THE SCREEN
- IF THE MESSAGE OUT OF RANGE APPEARS ON THE SCREEN
- SETTING UP THE MONITOR'S USER ADJUSTMENTS
- PERFORMING SETTINGS
- POSITION MENU (P.14)
- USING THE MENU, / AND OK
- SELECT THE MENU TO BE ADJUSTED
- PERFORM THE MENU SETTINGS
- RESTORING DEFAULT SETTINGS
- CONTROLLING THE MONITOR FROM A COMPUTER
- APPLICATION
- ADJUSTING THE BLACK LEVEL OF THE IMAGE (BRIGHTNESS)
- ADJUSTING IMAGE SHARPNESS AND CENTERING
- PRESS THE OK BUTTON
- COLOR TEMPERATURE SETTING (LBT)
- COLOR TEMPERATURE FINE ADJUSTMENT (MANUAL ADJUSTMENT)
- CHANGING GAMMA PARAMETERS (GAMMA)
- SHARPNESS ADJUSTMENT (SHARPNESS)
- SELECTING THE MENU POSITION (POSITION MENU)
- AUTOMATIC INPUT SWITCHING (INPUT DETECTION)
- (ONLY FOR MODELS SDM-E76D/SDM-E96D)
- RETURNING THESE SETTINGS TO DEFAULT VALUES
- MENU LOCK
- ENERGY SAVING FUNCTION
- COLOR LCD MONITOR
- SETTING THE MONITOR
Brand : SONY
Model : SDM976A
Category : Monitor