Comet - Lawn mower Klippo - Free user manual and instructions
Find the device manual for free Comet Klippo in PDF.
Frequently Asked Questions - Comet Klippo
User questions about Comet Klippo
0 question about this device. Answer the ones you know or ask your own.
Ask a new question about this device
Download the instructions for your Lawn mower in PDF format for free! Find your manual Comet - Klippo and take your electronic device back in hand. On this page are published all the documents necessary for the use of your device. Comet by Klippo.
USER MANUAL Comet Klippo
INNKJØRING, FØRSTE OLJESKIFT
Motoren er etterjustert og behoover ingen direkte innkjording, men kjoer med moderat belastning de forste timene.
VEDLIKEHOLDSFORSKRIFTER
Excellent, Comet, Pro 19, Pro 21
MATERIALAALPISPESIFIFAATIO
Runko SS 4261; 5,3 kg
TEKNISET TIEDOT KLIPPO Pro 21 S
Instruction manual for KLIPO LAWNMOWERS
Models: Excellent S, Excellent S Selfstart, Excellent S SD, Comet, Pro 19 S and Pro 21 S. Engines: Briggs & Stratton; Quantum XLS 50, Intek Edge 60.
Congratulations on purchasing a Klippo Lawnmower!
Before starting, we recommend that you carefully read instruction manual in order to obtain the best from your mower.
Safety instructions for power lawnmower with horizontally rotating blades
These instructions are to be carfully studied before the lawnmower is used.
- Keep hand and feet clear of the rotating blades and never put your hand or foot into any ejector opening without first making sure that the blade is not moving and the ignition cable is disconnected from the spark plug.
- Do not touch the blade until the ignition cable has been disconnected from the spark plug. Rotating the blades may cause the engine to start.
3.Do not leave the machine unattended without stopping the engine. - The engine speed regulator must not be disabled. The pre-adjusted number of revolutions may not be changed. Protections and safety devices may not be taken away or be set out of function.
- Do not top up with fuel when the engine is warm. Don't smoke while filling up with fuel or in the near of the tank. WARNING! Petrol is very flammable! Store the fuel in containers intended for petrol. Don't remove the fuel filler or fill up with fuel while the engine is running.
- Never allow children or other persons whom are not familiar with the machine to operate the lawnmower.
Even if the machine has very effective protections it could throw out solid objects that can cause injuries.
- Keep the lawn as clear as possible of stones or other objects that the lawnmower can strike. Avoid driving over gravel paths etc.
8.Familiarize lawnmower operators with the risks and explain how accident are to be avoided.
9.The machine may not be used for any other purpose than cutting grass.
10.Wear pants and suitable shoes while cutting grass. Beware that a lawn could be slippery! - Comet SE: Don' leave the machine with the ignition key!
12.Never touch anything under the cutting deck, as for instance dismount or mount the mulching insert, without disconnecting the spark plug cable first.
13.Do not use the lawnmower if any protection or safety device is damaged. Inspect the machine before every use. Control regularly that all screws and nuts are fastened, especially blade and engine.
Fitting and adjustment
UPPER HANDLE
Fitted without tools, with a strong nut on the articulated plate.
HANDLE POSITION
When required, the handle can be rotated laterally to some extent by means of the handle joint, e.g., when mowing close to hedges or house walls. The handle can be set to different positions for the best operating position. The handle can be altered in height at the chassis mount by turning the nylon knobs (fig. 1).
SETTING THE CUTTING HEIGHT(fig. 2)
Move the lever forwards for taller grass. The lever positions correspond to 3-6 mm grass height. All the weels are set
simultaneously in one operation. Make use of the efficient height setting of the KLIPO lawn-mowers when mowing edges or trimming.
Never cut grass unnecessarily short. This makes spreading/ collection more difficult and increases the risk of "scalping".
Mulching insert Excellent- and Pro 19-models
This insert is mounted on the Excellent-models and is dismounted on the Pro 19-models by delivery. This is mounted/ dismounted by the two screws on the rear/upper part of the cutting deck (fig. 15). Beware that the spark plug cable is disconnected before dismounting/mounting!
Discharge protection Klippo Excellent S SD, please look at the enclosed assembly instruction!
Before starting the engine
Before starting engines for the first time: fill with oil (fig 8.) and READ THE ENCLOSED INSTRUCTION MANUAL FOR THE ENGINE!
Unscrew the dipstick and fill up with approx 0,6 lit. of engine oil, viscosity SAE 30, Klippo oil no. 7201 or according to the engine manual. Fill up to the full graduation mark on the dipstick (do not fill above it).
NB. THE OIL IS DRAINED PRIOR TO DELIVERY!
When operated for the first time, the silencer will change colour and may smoke briefly.
OIL CHECK
Check the oil level before starting and every five hours. Take off the dipstick and dry it up. Screw the dipstick into the tube completely and make sure that the oil reaches the FULL mark (fig. 3).
RUNNING-IN and FIRST OIL CHANGE
The engine has already been adjusted and required no running-in as such, although you should run it at no more than moderate load for the first few hours. Remember to change the oil the first time after five hours of operation (fig. 9), and then every twenty-five hours.
PETROL
Use leadfree 95 octane petrol. Stop the engine before filling. Do not overfill the tank so much that it overflows.
Leave around 6mm for the fuel to expand.
Don't let the machine stay over the winter with petrol in the tank. This could cause starting problems in spring.
Starting the engine
MODELS WITHOUT ELECTRIC START
- Starting a cold engine: Set the trottle control to full speed position (hare). Push the Prime-starter (fig. 4) throughly three times. It is placed in the front of the engine. When starting a warm engine, normally pushing the prime-starter is unnecessary.
- The security bail (fig. 5b) must be in operating position, by starting and operating.
- Give the staring string a powerful lug. By cold weather it could be necessary to repeat the procedure. If the engine has got too much petrol, try to start with the throttle control in idle position (turtle). If the engine still doesn't start, take off the spark plug and clean it and try again.
Excellent Selfstart: Please follow the special starting instruction!
COMET SE
When starting for the first time, the battery may not be sufficiently charged. In that case start the engine with the starting string and then charge the battery with the charger supplied. Refer to "Maintenance", "Battery charging".
ELECTRIC STARTER (fig. 12) (before starting for the first time, connect the battery cable, fig. 13)
Follow the starting instructions above according to point 1 and 2 then turn the ignition key on the handle clockwise. Hold the key in this position until the engine starts, release it when it has done so and move the controls to the operating position.
STOP
COMET is stopped by dropping the security bail (fig. 5b), the engine stops and the drive will be disengaged, or through moving the drive-control (fig. 5c) to stop (backwards-upwards). The engine will then be running but the drive is disengaged. To engage the drive again - move the drive-control forwards-down-wards.
Excellent S, Pro 19 S and Pro 21 S is stopped by dropping the safety bail (fig. 5b). If you just want to stop the transmission while the engine is running, drop the safety bail just a little bit until the transmission control is dropping. To engage the transmission again, push the transmission control forwards (fig. 5c).
General remarks
Tidy up the lawn before mowing. Solid objects laying in the grass are dangerous to hit with blade and are worning out the blades unnecessarily.
A lawnmower must not be driven into solid objects, check the lawn for any concealed pipes and mark their position. Drive the lawnmower calmly and methodically, e.g., in continuous circles and always in such a way that you even out any stripes. Mow in different directions every time.
TIPS ON MOWING
Experts agree that it is the best to trim only one third of the length of the grass at one time, as this stimulates its growth and gives a tougher and greener lawn.
See to that the blades are in good condition. If they are worn the cut will be uneven and the grass will be yellow in the section surface. Mow often. An ornamental lawn should be mown twice a week but never do so when the grass is wet with rain or dew, as it makes spreading more difficult.
ADVANTAGES OF FRONT-WHEEL DRIVE
The entire lawnmower is more manoeuvrable and can turn, reverse and mow close to trees etc. Just depress the handle and allow the front wheels to spin in the air. Mowing can also be done with front-wheel drive disengaged.
Maintenance
NB. To prevent accidental engine starting, always disconnect the ignition cable when the engine or lawnmower is being serviced!
The machine should be left to an authorized KLIPO-workshop after every season. Machines with catalytic converter should be left to an authorized KLIPO-workshop at least every third year or every 100 operating hours, whichever occurs first.
MAINTENANCE INSTRUCTIONS
Keep the top underneath of the lawnmower clean and wipe off any grass before it dries. When working underneath the machine place the machine with the spark plug upwards and disconnect the ignition cable. Tighten all mounting bolts from time to time and lubricate catches and axles after every season. Bare-metal parts should be rubbed down with a rag dipped in anti-corrosion oil. Routine servicing every fifty hours is recommended in cases of professional use. Use only KLIPO original spare parts and accessories. (It's a condition for the CE-marking).
CUTTER BLADE SYSTEM
Fig. 6: Blade plate with 4 pcs replaceable lower cutter tongues and two replaceable upper blades, standard at the Comet. Mulcherblade, standard at Excellent, Pro 19 and Pro 21. Compact-blade, standard at Excellent S SD.
Blade replacement: Firm blade/Blade plate
A robust cup spring presses the blade plate/blade against a friction washer. A 14mm ring spanner or sockel is recommended for removal of the blade bolt, which has a conventional right-hand thread. To assemble, tighten the bolt firmly and carefully knock the sockel onto it with a hammer. The blade also functions as a flywheel. If it slips the engine may run unevenly or be difficult to start, e.g., may backfire. N.B. To avoid vibration, fit the blade with the markings on the blade mount facing the side of the blade. See fig. 7.
Blade replacement: Cutter tongues/upper blades (fig. 6)
First run the lawnmower until it is out of fuel, remove the cable from the spark plug and lift the lawnmower with the sparkplug upwards. Clean out the "keyhole" in the plate and scrape off any grass remains. A retaining spring can now be seen through the keyhole. Press the spring upwards slightly and at the same knock or press on the blade so that it loosens. Check that the mounting roller for the new blade slides into the keyhole and is retained by the spring. Tap it where required. Centrifugal force will retain the blade in the correct position when the engine is running.
Replacement of upper blade of the blade plate
Unscrew the blade plate from the shaft, loosen the nut and remove the blade and spacer washer. NB. These are located below and above the blade. Tighten the nut when fitting the new blade. Refit the blade plate.
VIBRATIONS
Never run a lawnmower if it vibrates abnormally. If a blade on the plate is damaged, also replace the opposite blade. NB. If a blade is damaged and a spare is missing, also remove the opposite blade. Combiblade: if a blade is damaged, replace it.
AIR CLEANER SERVICE
(fig. 8 and 9) Quantum- and Intek-engines
Clean the element every three months or every twenty-five hours, whichever comes first. NB. Clean the element more frequently when operating under dusty conditions.
- Loosen the screw and lower the cover as shown in the figure.
- Carefully remove the element.
- Clean the element by carefully knocking it against a flat surface. If it is heavily soiled, it must be replaced.
- Replace the element, close the cover and tighten firmly.
NORMAL OIL CHANGE
Unscrew the dipstick and place the lawn-mower in such a position as to allow the oil to run out. This can be done most easily when the engine is warm and the fuel tank is empty.
REPLACEMENT AND ADJUSTMENT OF V-BELTS (fig. 14)
- Remove the cover from the gearbox (4 pcs screws). Clean out any dirt in the gear housing.
- Remove the hub from the front wheel by the transmission, prising it out carefully with a screwdriver. Unscrew the locking screw and remove the wheel.
- Lift off the belt from the pulley 1936. Before installing the new belt, check that the inner pulley runs easily on the shaft. If not, spray a little rustdissolving oil between and behind the pulleys and put a little grease on the shaft. Mount the new belt and make sure that is is correctly located by the belt adjustment ball bearing. 1471.
- Adjustment: The belt can be adjusted by moving the ball bearing 1471 upwards or downwards. When the lawnmower has been in use for some hours the belt will have been stretched and it should be readjusted.
- Screw the cover in position on the gearbox and test-drive the lawnmower.
THE BATTERY (Comet SE) is a 12-volt lead-acid battery that does not normally require maintenance and is charged during operation.
If repeated starting attempts are made without the engine starting, the battery may have been discharged and starting will have to be done manually with the starting string. A completely discharged battery can be recharged by means of the charger supplied with the lawnmower. NB. The battery may require charging at some point during the mowing season and absolutely prior to winter storage.
CHARGING THE BATTERY (Comet SE)
- Disassemble the connector on to the cable by the battery (fig. 13).
- Connect the battery cable to the charger and connect the latter to a 220 v 50 Hz wall socket.
- After charging, which may take up to 24 hours in the case of a completely flat battery, disconnect the charger and reconnect the battery to the engine cable.
NB. Do not charge at temperatures below +5^ .
NB! A used lead-acid battery must not be disposed of in household refuse and should be handed in at you nearest service workshop.
TROUBLESHOOTING
If the engine does not start, check the following:
1. That there is fresh petrol in the tank.
2. Control that the brake cable is correctly adjusted.
3. That the spark plug is not fouled with soot and the gap is correct (it should be 0,7-0,8 mm).
4. Is the blade properly fastened?
5. Is the air filter blocked with dirt? Clean or change it! If the engine fails to start after these measures, contact your nearest service workshop.
6. Does the cutting result being bad and the blades of the grass being uneven in cut area? Change the blade of the lawnmower! Also the collecting is influenced by a worn blade.
CLEANING
Place the lawnmower with the spark plug upwards. First run until the tank is half empty, otherwise petrol will leak out through the venting hole in the tank cap. Beware of the environment and the fire danger! NB. Never flush the lawnmower with a high-pressure cleaner.
WINTER STORAGE
Run until no more petrol is left and change the oil. Then pour one spoonful of oil into the spark-plug hole and turn over the engine so that the oil is distributed. Clean the air filter and gear housing. Store the lawnmower indoors in a dry spot. Charge the battery with the charger.
Assurance of conformity
Klippo original spare parts have to be used if the CE-marking should be valid.
The undersigned, Roger Klotz, c/o Klippo AB, Knivgatan 3 - 7, SE-212 28 Malmö, Sweden, do hereby certify that the following lawnmowers conform to the essential health and safety requirements in the Directive 98/37/EEC and EN836 and conform to the demands of the Directive 2000/14/EG regarding noise and Directive 89/336 concerning electromagnetic compatibility.
Tested accordingly to EN836 and ISO11094.
The judgement of the conformity of the Directive 2000/14/EG has been done according to Annex VI in the mentioned Directive.
Type: Rotary lawnmower with combustion engine
Manufactured by: Klippo AB
Brand: Klippo
Technical responsible:Anders Björkqvist
Tested at: Svensk Maskinprovning AB, Fyrisborgsgatan 3, SE-754 50 Uppsala, Sweden Notified body no: 0404
| Model Serial Engine Engine- Measured Guaranteed Operators- Blade Cutting type number -volume noise level noise level level -power dB(A) dB(A) type dB(A) cm cc/hp | ||||||||
| Excellent S | K05630 | B&S Quantum 50 | 190/5,0 | 92 | 96 | 81 | Mulcherblade | 48 |
| Exc S Selfstart | K05640 | B&S Quantum 50TM | 190/5,0 | 92 | 96 | 81 | Mulcherblade | 48 |
| Exc S SD | K05660 | B&S Quantum 50 | 190/5,0 | 95 | 96 | 85 | Mulcherblade | 48 |
| Pro 19 S | K06720 | B&S Intek Edge 60 | 190/6,0 | 91 | 96 | 79 | Mulcherblade | 48 |
| Pro 19 S | K06750 | B&S Intek 55 | 170/5,5 | 92 | 96 | 79 | Mulcherblade | 48 |
| Comet S | K03000 | B&S Quantum 50 | 190/5,0 | 92 | 100 | 82 | Blade plate | 53 |
| Comet SE | K03100 | B&S Quantum 50ES | 190/5,0 | 93 | 100 | 82 | Blade plate | 53 |
| Pro 21 S | K08110 | B&S Intek 60 | 190/6,0 | 92 | 100 | 82 | Mulcherblade | 53 |
| Pro 21 S | K08120 | B&S Intek 55 | 170/5,5 | 92 | 100 | 82 | Mulcherblade | 53 |
Vibration level: See Technical specifications, page 44!
Issued in Malmö, Sweden 22th of september 2005

Roger Klotz, Managing Director, Klippo AB
*According to SS-EN ISO 5349/2
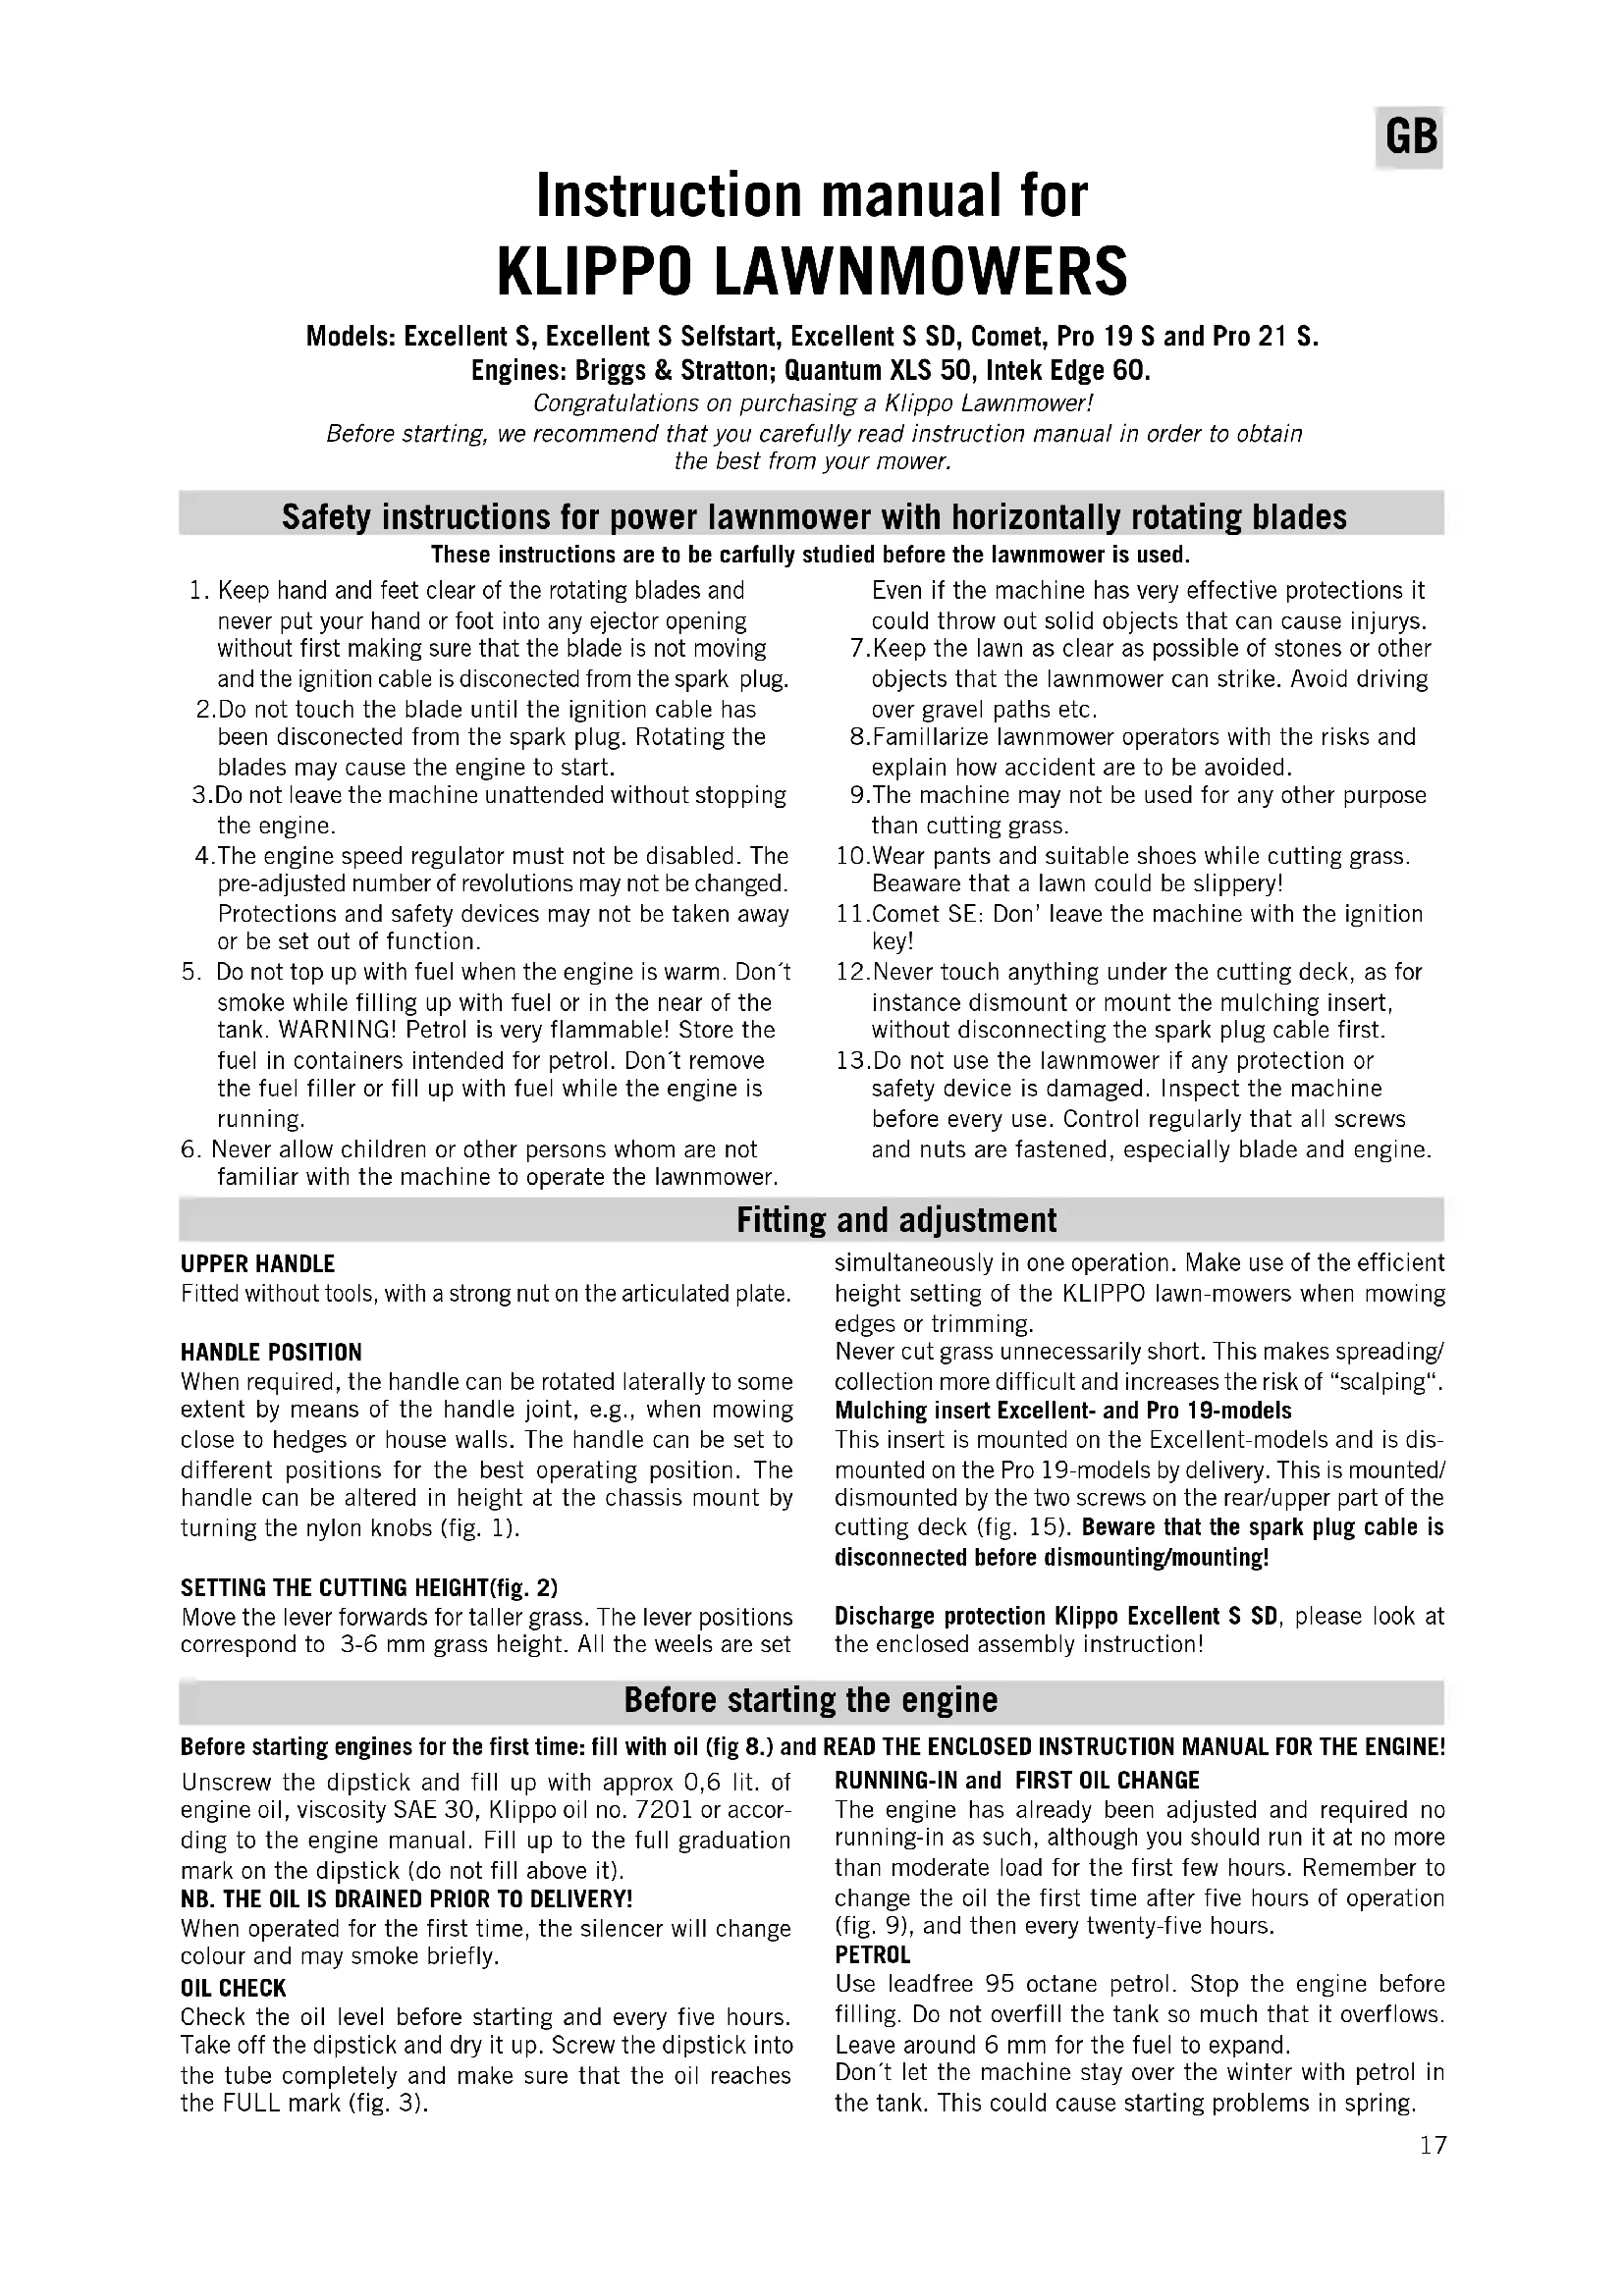
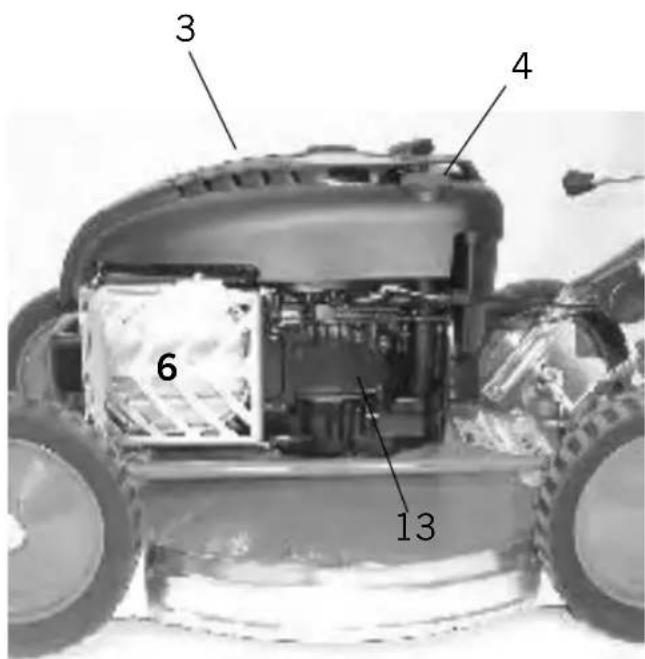
| S 1. Model, typumnem 7. Tändstift 13. Vevhus 3. Skyddsgaller 9. Förgasare 14. Oljesump 4. Oljesticka 11. Starthandtag 15. Lufffilter 6. Ljuddampare 12. Bensintank 16. Bensinpäfyllning |
| DK 1. Model, typumnem 7. Taandrær 13. Krumtaphus 3. Beskylttelsegitter 9. Karburator 14. Oliesump 4. Oljepind 11. Starthandtag 15. Lufffilter 6. Lyddæmpfer 12. Benzintank 16. Bensinpäfyllning |
| N 1. Model, typumnem 7. Tennplugg 12. Benzintank 3. Beskylttelse gitter 8. Sylindertopp 13. Vevhus 4. Oljepinne 9. Förgasser 14. Oljesump 6. Lyddemper 10. Veivakselet 15. Lufffilter 11. Starthandtag 16. Bensinpäfyllning |
| SF 1. Mallin typpinumero 7. Sytytystulppa 12. Poittoaimetankki 3. Turvallisuusohjet 8. Sylinterinkansl 13. Valhteisto 4. Öjytikkko 9. Kaasutin 14. Oljykammio 6. Äanvalmennin 10. Vetoakselli 15. Ilmansuodatlin 11. Kännistyskahva 16. Poltoaineen lisdys |
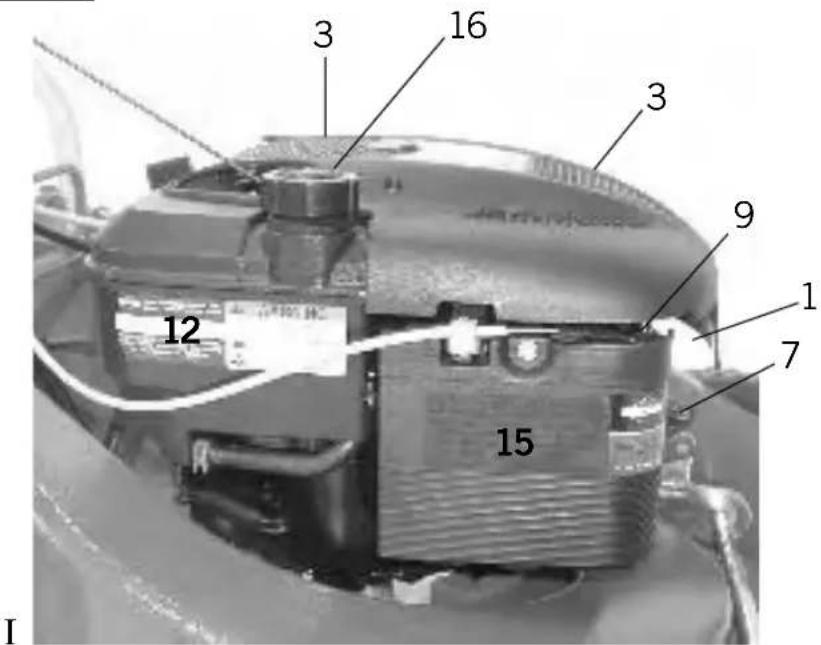
Briggs & Stratton Quantum 50 (Comet, Comet SE, Excellent S, Excellent S Selfstart, Excellent S SD)
VII

Modell, typnummer 7, Tändstift 13, Veyhus
3. Skyddsgaller 9. Forgasare 14. Oljesump
4.Oljecticka 11. Starhandtag 15. Luftfilter
6. Ljuddampare 12. Bensintank 16. Bensinpafyllning
DK
- Model, typenummer 7. Taendrør 13. Krumtaphus
- Beskyttelegitter 9. Karburator 14. Oliesump
- Oliepind 11. Starthandtag 15. Luftfilter
- Lyddaemper 12. Benzintank 16. Benzinpafyldning
N
- Model, typedefer 7. Tennplugg 12. Benzintank
-
Beskytelse gitter 8. Sylindertopp 13. Vevhus
-
Forgasser
14.Oljesump
- Velivaksel
15.Luftfilter
- Starthang
g 16. Bensinpafylling