Classic 2in1 - Baby walker Baninni - Free user manual and instructions
Find the device manual for free Classic 2in1 Baninni in PDF.
| Product Type | 2-in-1 Baby Walker (Rider and Swing) |
| Brand | Baninni |
| Model | Classic 2in1 |
| Recommended Age | 7 to 15 months |
| Maximum Child Height | 81 cm (32 inches) |
| Maximum Child Weight | 15 kg (30 lbs) |
| Approx. Dimensions (L x W x H) | 60 x 50 x 45 cm (estimated) |
| Walker Weight | Approximately 3.5 kg (estimated) |
| Materials | Plastic, metal, textile (seat) |
| Play Tray Power | 2 AA batteries (not included) |
| Number of Height Positions | 3 adjustable positions |
| Main Functions | Rider with multidirectional wheels, swing, play tray with musical activities |
| Safety | Anti-tip safety stops, wide base, wheel brakes, height lock |
| Care and Cleaning | Clean the frame with a damp cloth and mild detergent. Do not use abrasives. The seat can be removed for cleaning. |
| Spare Parts and Repairability | Contact the local supplier. Parts such as wheels, stoppers, and tray are replaceable. |
| General Information | Assembly by an adult. Use only on flat surfaces. Do not leave the child unattended. Recommended usage time: max 30 minutes per session. |
Frequently Asked Questions - Classic 2in1 Baninni
User questions about Classic 2in1 Baninni
0 question about this device. Answer the ones you know or ask your own.
Ask a new question about this device
Download the instructions for your Baby walker in PDF format for free! Find your manual Classic 2in1 - Baninni and take your electronic device back in hand. On this page are published all the documents necessary for the use of your device. Classic 2in1 by Baninni.
USER MANUAL Classic 2in1 Baninni
natural_image
Black and white photo of a baby dog walker device with patterned back cover and control panel (no text or symbols visible)"THE FIRST STEPS TO KNOWLEDGE"
BABY WALKER CLASSIC MONTAGE RICHTLIJNEN
NL
"THE FIRST STEPS TO KNOWLEDGE"
MONTAGE-INSTRUCTIES
MONTAGE VAN DE VEILIGHEIDSRUBBERTJES EN DE WIELEN (fig. 1):
natural_image
Diagram of a car interior with structural components and sensor placements (no text or labels)fig. 1
natural_image
3D rendered object resembling a car seat or housing with three protruding wires (no text or symbols visible)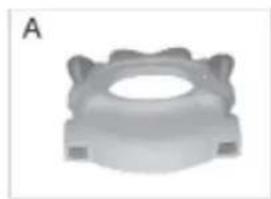
natural_image
3D rendered mechanical component with a central hole and flanged ends (no text or symbols)
natural_image
Top-down view of a car hood with two side-mounted sensors (no text or symbols visible)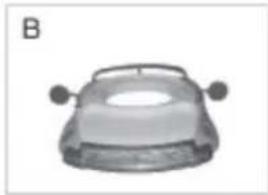
natural_image
Top-down view of a car head with two side handles (no text or symbols visible)fig. 2
natural_image
White hot air balloon with patterned spherical top and circular base, suspended by strings (no text or symbols visible)B
natural_image
3D rendered mechanical component with a magnified inset showing a hand holding a small object (no text or symbols visible)fig. 3
natural_image
Close-up of a mechanical component with a dome-shaped top and arched base (no visible text or symbols)natural_image
Close-up of a hand inserting a small component into a device (no visible text or symbols)natural_image
Close-up of a hand using a power tool on a device, with arrows indicating motion direction (no text or symbols visible)natural_image
Medical or laboratory equipment image showing a device with a black arrow pointing to a component (no visible text or symbols)natural_image
Close-up of a white plastic container with two arrows pointing to a small component (no text or symbols visible)natural_image
Close-up of a hand inserting a cable into a white plastic enclosure (no text or symbols visible)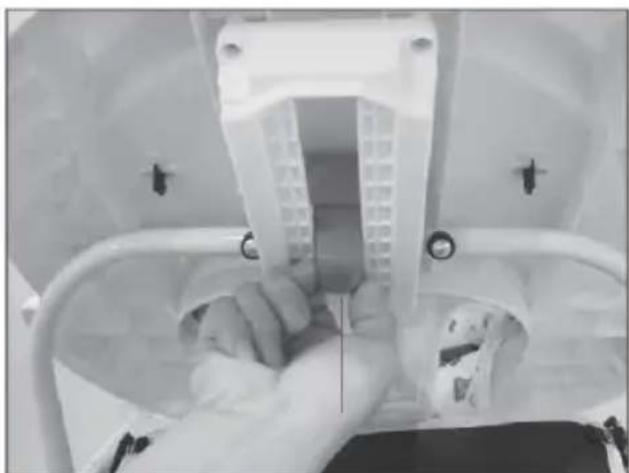
natural_image
Close-up of a hand inserting a plastic component into a medical device (no visible text or symbols)fig. 5
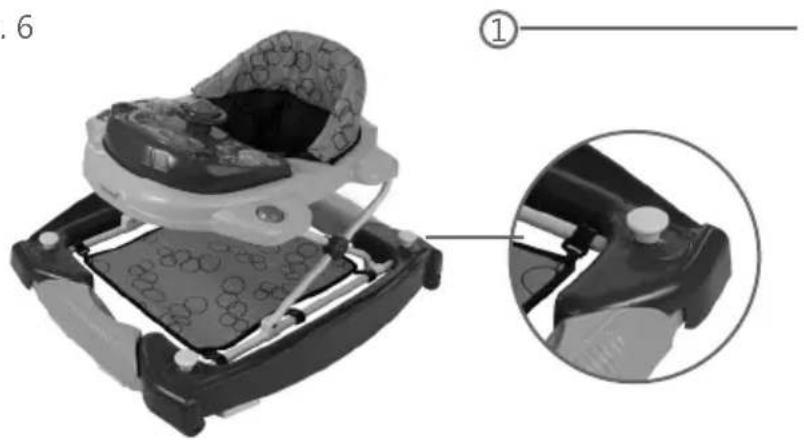
SCHOMMELFUNCTIE (fig. 6):
natural_image
Top-down view of a mechanical component with four rectangular parts and internal ribs (no text or symbols visible)natural_image
Mechanical device with a circular component and magnified inset showing internal components (no text or symbols visible)natural_image
Mechanical device with a patterned head and internal components, shown in two views (no text or symbols visible)- Non-rechargeable batteries are not to be charged.
- Different types of batteries or new and used batteries can not be mixed.
- Only batteries of the same or equivalent type as recommended are to be used.
-
Batteries are to be inserted with the correct polarity.
-
Exhausted batteries are to be removed from the toy.
6.The supply terminals are not to be short-circuited. - Rechargeable batteries are to be removed from the toy before being charged (if removable).
- Rechargeable batteries are only to be charged under adult supervision(if removable).
BABY WALKER CLASSIC ASSEMBLY GUIDELINES
GB
For safety reasons please follow the instructions below
Should you have any questions about your baby walker, or experience any difficulties, please contact the retailer from which you purchased the product. Your local retailer is in the best position to address any requirements.
DRAWINGS IN THIS MANUAL ARE FOR ILLUSTRATION PURPOSES ONLY - ACTUAL PRODUCT MAY VARY MANUFACTURER RESERVES THE RIGHT TO CHANGE ANY SPECIFICATION OR FEATURES WITHOUT PRIOR NOTICE.
"THE FIRST STEPS TO KNOWLEDGE"
ASSEMBLY INSTRUCTIONS
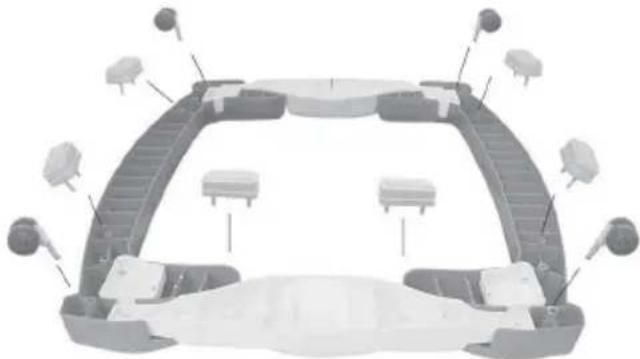
ASSEMBLY OF SAFETY RUBBER AND WHEELS (pic. 1):
Insert all the safety rubbers and wheels into the correct holes on the bottom.
natural_image
Diagram of a car's interior structure with multiple sensors and seating areas (no text or labels)pic. 1
ASSEMBLY OF THE DECORATIVE PARTS (pic. 2).
(Please choose method A or B according to different product structure)
natural_image
3D rendered object resembling a mechanical component with three protruding pins (no text or symbols visible)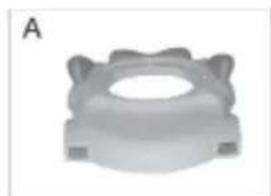
natural_image
Close-up of a mechanical component with a central hole and flanged ends (no visible text or symbols)
natural_image
Top-down view of a car with two side-mounted sensors and a central dome (no text or symbols visible)
natural_image
Top-down view of a car head with two side handles (no text or symbols visible)pic. 2
A) Insert the decorative parts into the holes of the upper tray. B) Insert the decorative parts into the holes on the upper tray like the pic. 2
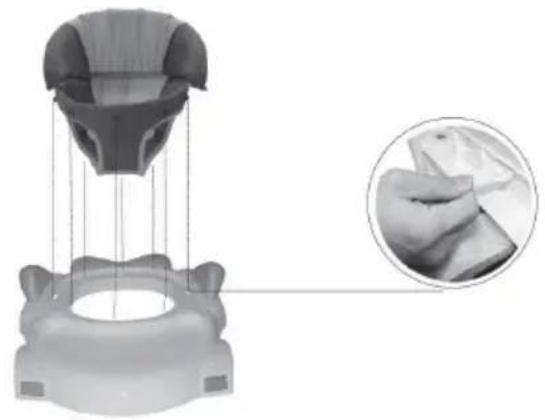
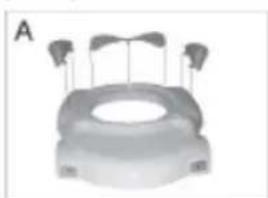
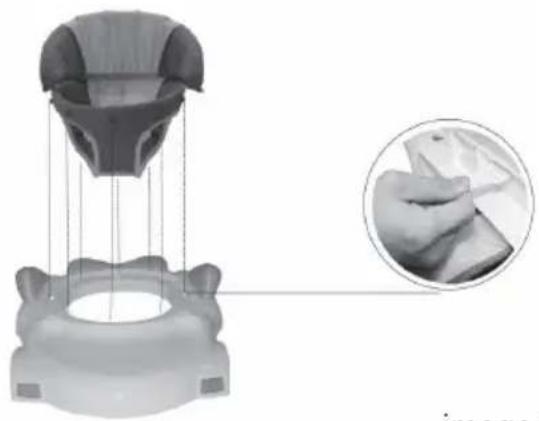
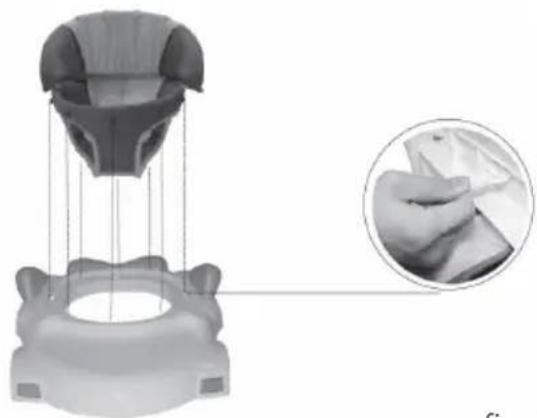
ASSEMBLY OF SEAT (pic. 3)
(Please choose method A or B according to different product structure)
A
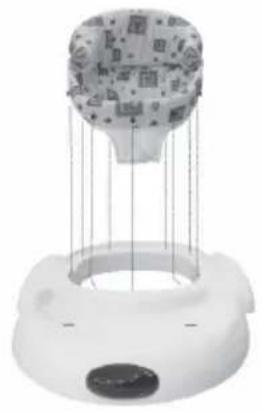
natural_image
White hot air balloon device with hanging wires and a circular base (no text or symbols visible)B
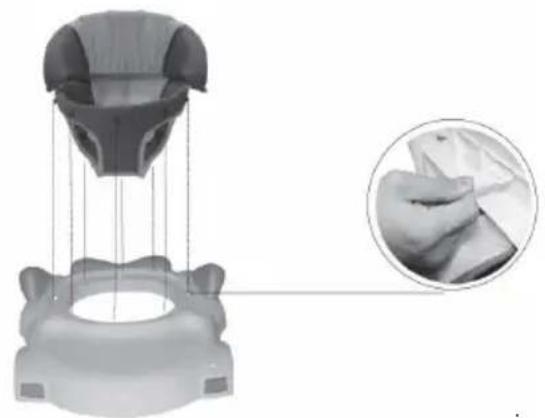
natural_image
3D rendered mechanical component with a magnified inset showing hand holding a piece of paper (no text or symbols visible)pic. 3
A) Insert the pins on the seat into the holes of the tray completely.
B) Insert the pins on the seat into the holes of the tray completely. And turn the white plastic claspers by 90 degree to ensure it was fixed tightly on the tray.
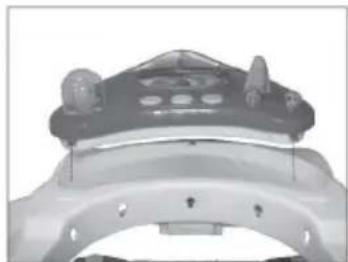
ASSEMBLY OF TOY TRAY (pic. 4):
(Please choose method A or B or C according to different product structure)
- Use a screwdriver to unscrew the battery cover.
- insert batteries ensure correct polarity.
- Screw battery cover back on.
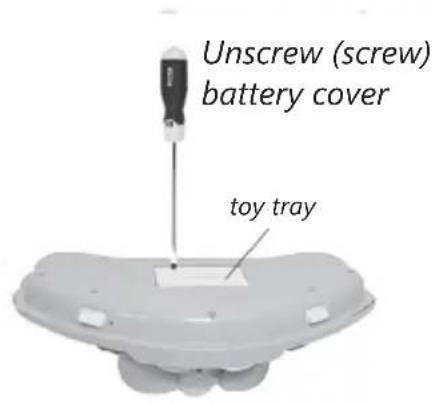
text_image
Unscrew (screw) battery cover toy tray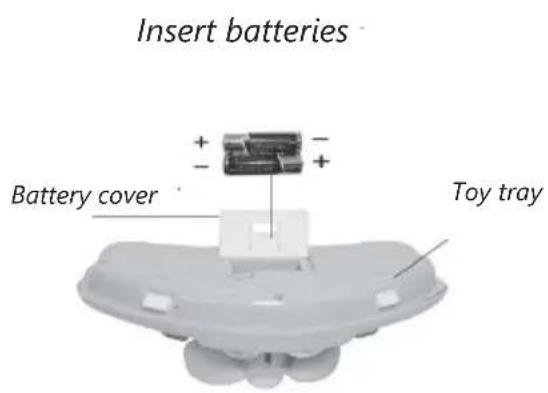
text_image
Insert batteries Battery cover Toy trayA
natural_image
Close-up of a mechanical component with a dome-shaped top and mounting holes (no visible text or symbols)B
natural_image
Close-up of a hand adjusting a mechanical component with a tool (no visible text or symbols)C
text_image
1 a b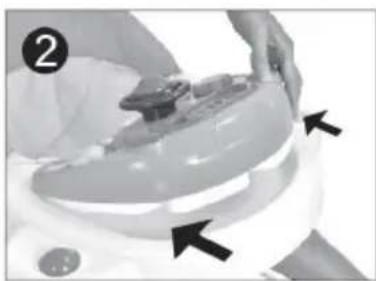
natural_image
Close-up of a hand pressing down on a small electronic device (no visible text or symbols)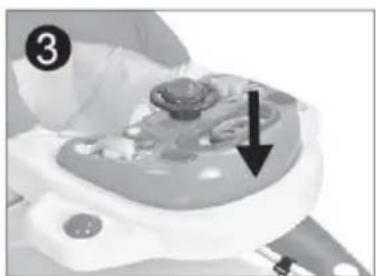
natural_image
Medical device component with arrow pointing to a central area (no visible text or symbols)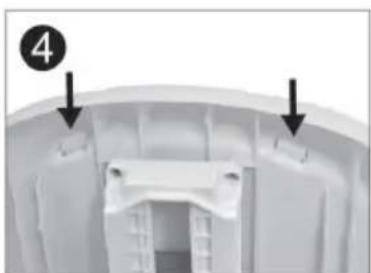
natural_image
Interior view of a white plastic enclosure with two arrows pointing to specific components (no text or symbols visible)fig. 4
Kindly remind: there are different kinds of toy trays are optional, follow the methods A,B,C to assemble them respectively
A. Insert the multifunctional playboard into the tray and fix with bolts.
B. Press the bolts up and turn the them 90 degrees.
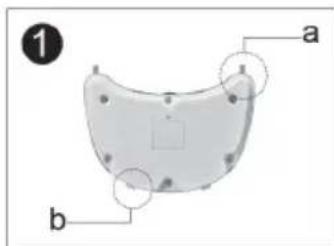
C. 1. As the picture shown on Fig. 1, there are 4 snap-fit components (a, b) on both front and rear toy tray.
- As the arrow shown on fig 2 fix the rear toy tray onto the upper tray, and then press down the front toy tray to fix the toy tray, make sure the snap-fit components are fixed firmly on their position (see fig. 3).
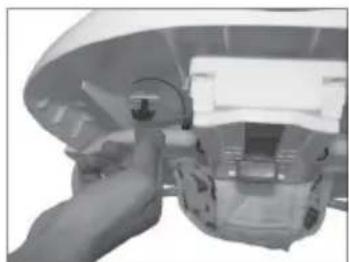
Press down simultaneously on the snap-fit components on the base of the toy section to release the toy tray (see fig. 4)
HEIGHT ADJUSTMENT (pic. 5):
to adjust the walker to desired position (3 positions available) place one hand on the top of the walker, and turn the red button on the height adjustment mechanism beneath the top tray by 90 degrees with the other hand, then push the button up, it will return to original position, the mechanism is locked automatically.

natural_image
Close-up of a white plastic electrical outlet with wires and a hand inserting a cable (no visible text or symbols)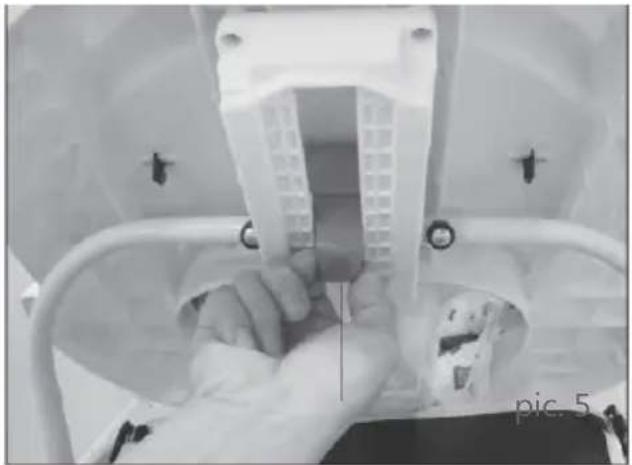
natural_image
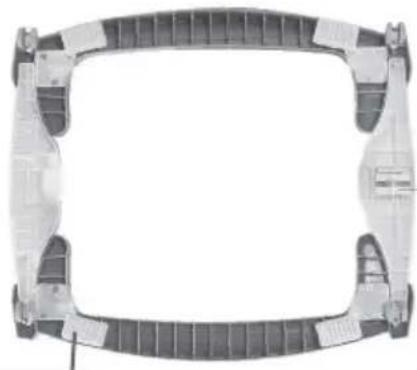
Close-up of a person holding a white plastic component, viewed through a transparent container (no visible text or symbols)ROCKING FUNCTION (pic. 6):
With safety rubber under the base and 4 pcs global wheels for avoiding kids falling down the stairs or tipping over.
Forward device only keeps walker go forward and stopper wheel device slowdown walking speed.
natural_image
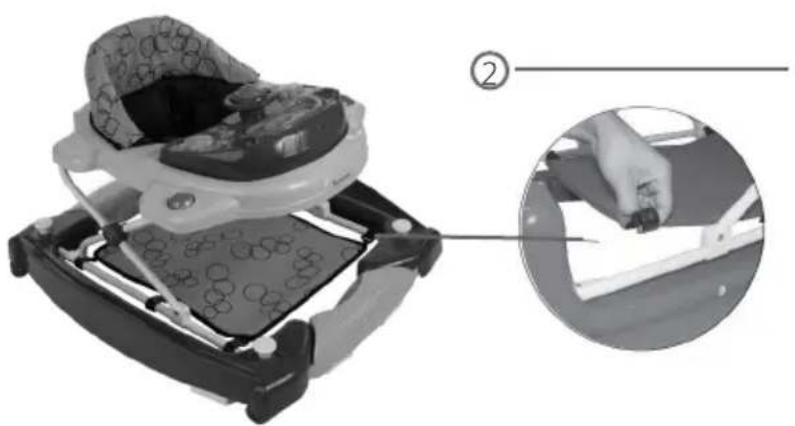
Top-down view of a mechanical component with symmetrical structural elements (no text or symbols visible)- Pull up the bottun maximumly and turn it clockwise or counterclockwise a little to fix it at the highest point. Then turn both bottoms by 90 degrees, put the button back to the original position
- When use it as a rocker, fix the foot stepping cloth on the tube as shown in the picture (2)
- When you use it as a walker, take out the foot stepping cloth.
pic. 6
natural_image
Mechanical component diagram showing a clamping mechanism with magnified inset view (no text or symbols)Pull the button up and turn it a little to fix it to the highest position.
natural_image
Close-up of a car seatbelt device with a hand inserting a tool, shown in two views (no text or symbols visible)Change the walker into a rocker
WARNING
- For the baby up 7 months and under 15 months.
- Do not use until baby can sit unassisted.
- Never leave child unattended. Always keep child in view while in walker.
- When use it as a rocker, do not turn it upside down or shake it acutely.
- Never use near stair, steps or thresholds. Check that surfaces are flat and free of objects that may cause tipping over either indoors or outdoors. To reduce chance of the child slipping out of the seat, check that both feet of child touch the floor and never carry the walker with the child in it.
- To avoid burn injuries, keep the child away from ranges, radiators, space heaters, fireplaces, etc.
- Do not use walker near driveways, streets, swimming pools, or any other areas that are not safe.
- Discontinue using the walker when it is damaged or broken.
- This walker is recommended for a child capable of sitting upright unassisted, 32 inches (81cm) tall or less, and weighing 30 pounds (15KGS) or less.
- Use only for limited period of say 30 minutes at a time, this walker is not a training aid and excessive use may impair the babys natural walking development.
- Your baby walker frame may be cleaned using a damp cloth and normal domestic detergent. Do not use abrasives or bleach, if you should remove the seat from the walker for any reason, ensure that it is properly refitted and that all hooks and studs are properly engaged.
- Your walker needs regular checking for safety and
performance. Ensure there is no damage, that the height adjustment is properly locked and the castors operate smoothly.
- Adult assembly is necessary.
- keep away from fire.
- Non-rechargeable batteries are not to be charged.
- Different types of batteries are not to be mixed.
- Only batteries of the same or equivalent type as recommended are to be used
- rechargeable batteries are to be removed from the toy before being charged (if removable)
- rechargeable batteries are only to be charged under adult supervision.
- batteries are to be inserted with the correct polarity.
- Empty batteries are to be removed from the toy. The supply terminals are not to be short-circuited.

WARNING
-
Non-rechargeable batteries are not to be charged.
-
Different types of batteries or new and used batteries can not be mixed.
-
Only batteries of the same or equivalent type as recommended are to be used.
-
Batteries are to be inserted with the correct polarity.
-
Exhausted batteries are to be removed from the toy.
-
The supply terminals are not to be short-circuited.
-
Rechargeable batteries are to be removed from the toy before being charged (if removable).
-
Rechargeable batteries are only to be charged under adult supervision (if removable).
BABY WALKER CLASSIC
INSTRUCTIONS DE MONTAGE
FR
"THE FIRST STEPS TO KNOWLEDGE"
INSTRUCTIONS DE MONTAGE
MONTAGE DES STOPPEURS DE SECURITE ET DES ROUES (image 1):
natural_image
Diagram of a vehicle chassis frame with sensors and structural components (no text or labels)Image 1
MONTAGE DES PIECES DECORATIVES (image 2).
natural_image
3D rendered object resembling a mechanical component with three protruding pins (no text or symbols visible)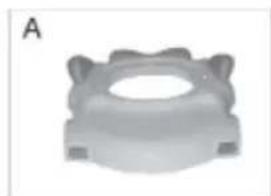
natural_image
3D rendered mechanical component with a central hole and flanges (no text or symbols)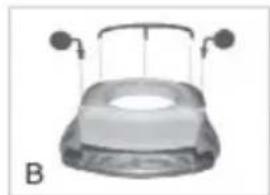
natural_image
Top-down view of a car with two side-mounted sensors and a dome-shaped opening (no text or symbols visible)
natural_image
Top-down view of a car head with two side handles (no text or symbols visible)Image 2
natural_image
White hot air balloon with patterned spherical body suspended by strings, mounted on a circular base (no text or symbols visible)B
natural_image
3D rendered mechanical component with a magnified inset showing a hand holding a piece of paper (no text or symbols visible)image 3
natural_image
Close-up of a mechanical component with a dome-shaped top and mounting holes (no visible text or symbols)natural_image
Close-up of a hand operating a mechanical device with a handle (no visible text or symbols)natural_image
Close-up of a hand pressing down on a white surface with black arrows pointing to the area (no text or symbols visible)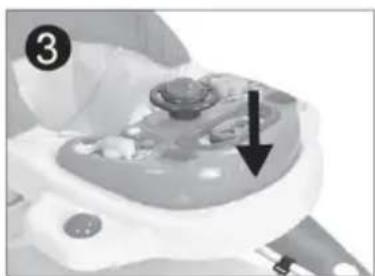
natural_image
Medical device component with a black arrow pointing to a specific area (no visible text or symbols)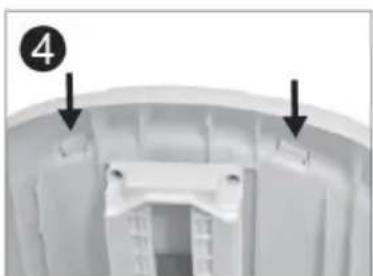
natural_image
Close-up of a white plastic container with two arrows pointing to internal components (no text or symbols visible)image 4
AJUSTEMENT DE LA HAUTEUR (image 5):
natural_image
Close-up of a hand inserting a plastic component into a white electrical socket (no text or symbols visible)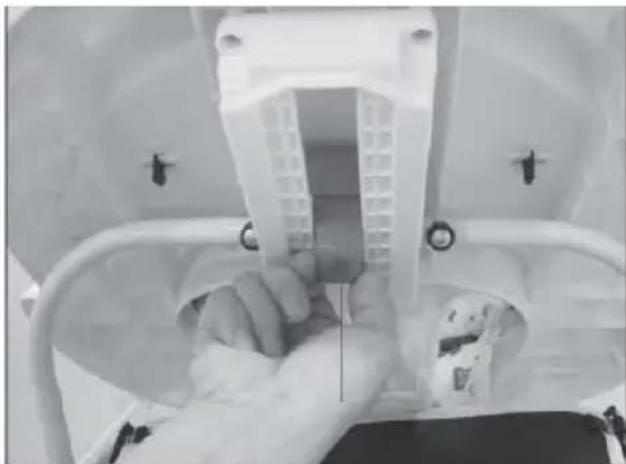
natural_image
Close-up of a hand holding a medical device inside a transparent medical scanner (no visible text or symbols)image 5
FONCTION BALANCOIRE (image 6):
natural_image
Top-down view of a mechanical component with symmetrical supports and central frame (no text or symbols)- Non-rechargeable batteries are not to be charged.
- Different types of batteries or new and used batteries can not be mixed.
- Only batteries of the same or equivalent type as recommended are to be used.
-
Batteries are to be inserted with the correct polarity.
-
Exhausted batteries are to be removed from the toy.
- The supply terminals are not to be short-circuited.
- Rechargeable batteries are to be removed from the toy before being charged (if removable).
- Rechargeable batteries are only to be charged under adult supervision (if removable).
BABY WALKER CLASSIC MONTAGEANLEITUNG
DE
"THE FIRST STEPS TO KNOWLEDGE"
MONTAGEHINWEISE
MONTAGE DER GUMMITEILE UND RÄDER (ABB. 1):
natural_image
Diagram of a car's internal structure with multiple sensors and components (no text or labels)fig. 1
MONTAGE DER DEKORATIVEN TEILE (ABB. 2).
natural_image
3D rendered object resembling a mechanical component with three protruding wires (no text or symbols visible)
natural_image
3D rendered mechanical component with a central hole and flanged ends (no text or symbols)
natural_image
Top-down view of a car hood with two side-mounted sensors (no text or symbols visible)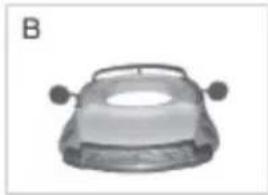
natural_image
3D rendered image of a car's front wheel and side arm (no text or symbols)fig. 2
natural_image
White cylindrical object with patterned spherical top suspended by strings, mounted on a circular base (no text or symbols visible)B
natural_image
3D rendered mechanical component with a magnified inset showing hand positioning (no text or symbols)fig. 3
natural_image
Close-up of a mechanical component with a dome-shaped top and mounting holes (no visible text or symbols)natural_image
Close-up of a robotic arm joint with visible mechanical components (no text or symbols)natural_image
Close-up of hands using a power shaver to press or install a device, with arrows indicating motion (no text or symbols visible)natural_image
Close-up of a medical or laboratory device with a black arrow pointing to a component (no visible text or symbols)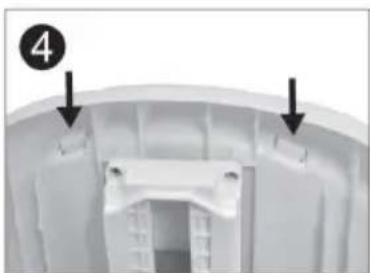
natural_image
Close-up of a white plastic component with two black arrows pointing to features, no visible text or symbols.fig. 4
natural_image
Close-up of a hand inserting a plastic component into a white electrical socket (no text or symbols visible)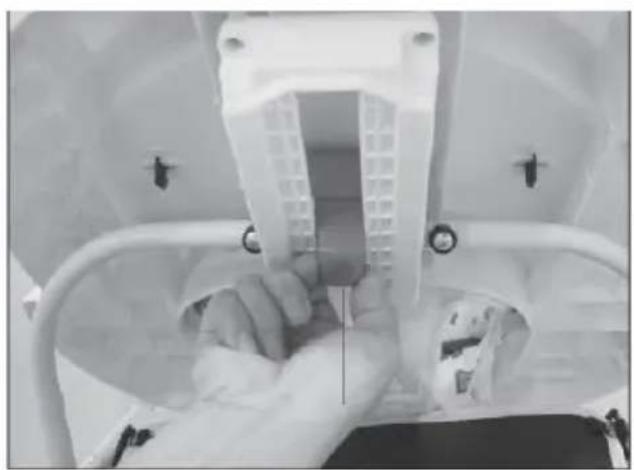
natural_image
Close-up of a person holding a medical device inside a medical scanner (no visible text or symbols)fig. 5
SCHAUKELFUNKTION (ABB. 6):
natural_image
Top-down view of a mechanical component with four rectangular arms and internal ribs (no text or symbols visible)"THE FIRST STEPS TO KNOWLEDGE"
Voortstraat 12
2490 Balen - Belgium
www.baninni.com
Find us on Facebook & Instagram.am