
TKP100A - Receiver HAGER - Free user manual and instructions
Find the device manual for free TKP100A HAGER in PDF.
| Product Type | Receiver (home automation controller) |
| Brand | Hager |
| Model | TKP100A |
| Dimensions (without rear cover) | 178.5 × 156 × 48.4 mm |
| Power supply | Power supply unit TKC110 (input 230 V AC, output 5 V DC, 3 A) |
| Power consumption | < 3 W (standby) |
| Connectivity | Ethernet LAN RJ45, optional WiFi (TKH180) |
| USB ports | 2 USB ports 5 V DC, max 250 mA per port |
| Radio frequency | 868-870 MHz / 433-434 MHz |
| Outdoor range | 300 m |
| Protection rating | IP30 / IK04 |
| Operating temperature | 0°C to +40°C |
| Storage temperature | -25°C to +70°C |
| Relative humidity | 93% RH at 40°C |
| Housing material | PC/ASA-PC-Elastomer |
| Signaling | RGB lighting (status indicators) |
| Buttons | OK (acknowledgment), Reset (factory reset) |
| Compatibility | Quicklink products, Hager septio alarms |
| Mobile app | coviva (iOS 7.1+, Android 4.1+) |
| Installation | Flat surface, wall or VDI enclosure (min depth 50 mm) |
| Removable rear cover | Yes (for rear USB access and QR code) |
| Warranty | 2 years |
Frequently Asked Questions - TKP100A HAGER
User questions about TKP100A HAGER
0 question about this device. Answer the ones you know or ask your own.
Ask a new question about this device
Download the instructions for your Receiver in PDF format for free! Find your manual TKP100A - HAGER and take your electronic device back in hand. On this page are published all the documents necessary for the use of your device. TKP100A by HAGER.
USER MANUAL TKP100A HAGER
A convenient way to be informed of the status of your home !
| Flashing Fixed Flashing Fixed* Flashing | ||||
| Critical Alert such as Intrusion or Fire | Error Hardware or Software Error | Technical alert or installation warning such as low battery on an installed product | Energy saving mode active for your installation | Updating Software update in progress |
*Note : Available in future releases
Instructions
Pages 01-32
Welcome to the universe of coviva!
1x Wall-mounting plate
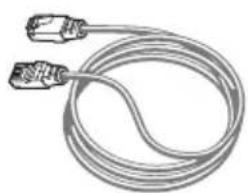
1x LAN Ethernet cable
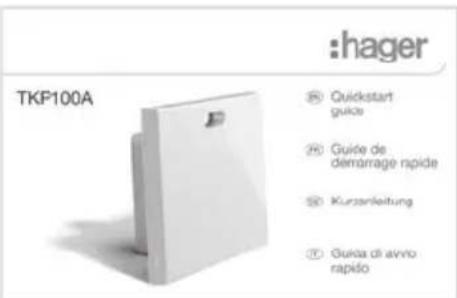
1x Quickstart guide
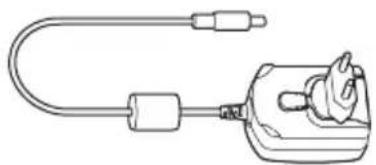
1xTKC110:230VAC/5VDCPower supply

Warning :
Only use the provided TKC110 Power Supply to power the Controller. Use of other or inappropriate power supply may damage the Controller
Thank you !
and Welcome to the universe of coviva!
We thank you for choosing this high-performance home controller, that is designed to provide an easy, secured, and seamless experience for your Smart Home. The TKP100 coviva controller can be used in conjunctions with many peripherals from Hager range and more, to operate and interconnect your Smart Home applications such as:

Security
In link with sepio alarm range, the TKP100 coviva controller becomes a powerful IP transmitter, a flexible remote control, and a friendly real-time notification engine.


Comfort
The TKP100 coviva controller is the perfect interface to provide control, visualisation, and logic capabilities to your quicklink installation, ideal in retrofit and renovation applications.
Energy Efficiency
Associated with electrical heating outputs or hot-water thermostatic valves, the TKP100 coviva controller becomes an intelligent energy management unit, capable of handling multiple zones through an easy interface.

Connected Objects The TKP100 coviva
controller enables you to link to a number of state-of-the-art connected objects for more creative and innovative applications!
User rights, roles & privileges
The TKP100 and its coviva App understand that you are different
By managing complementary installer and user access rights for proper secure operation and administration of your system.

Installer
Role: Installs and maintains the system.
All rights at time of installation (before Handover)
- Remote access on request, with Referent user approval after Handover

Referent User
Role: Owner of the system, has highest user privilege and extended rights.
- Define other users
- Has a Hager portal account
- One per installation (only)

Classic User
Role: User of the system with normal rights
- Can customize the system
- NB: no Hager portal account needed

Restricted User*
Role: User of the system with limited rights
- Limited customization
- NB: no Hager portal account needed
(*) Available in a future release
Note : Detailed description of which actions are allowed or not for each User profile is available in the online documentation at: www.hager.com/coviva/users
Quickstart Installer Guide


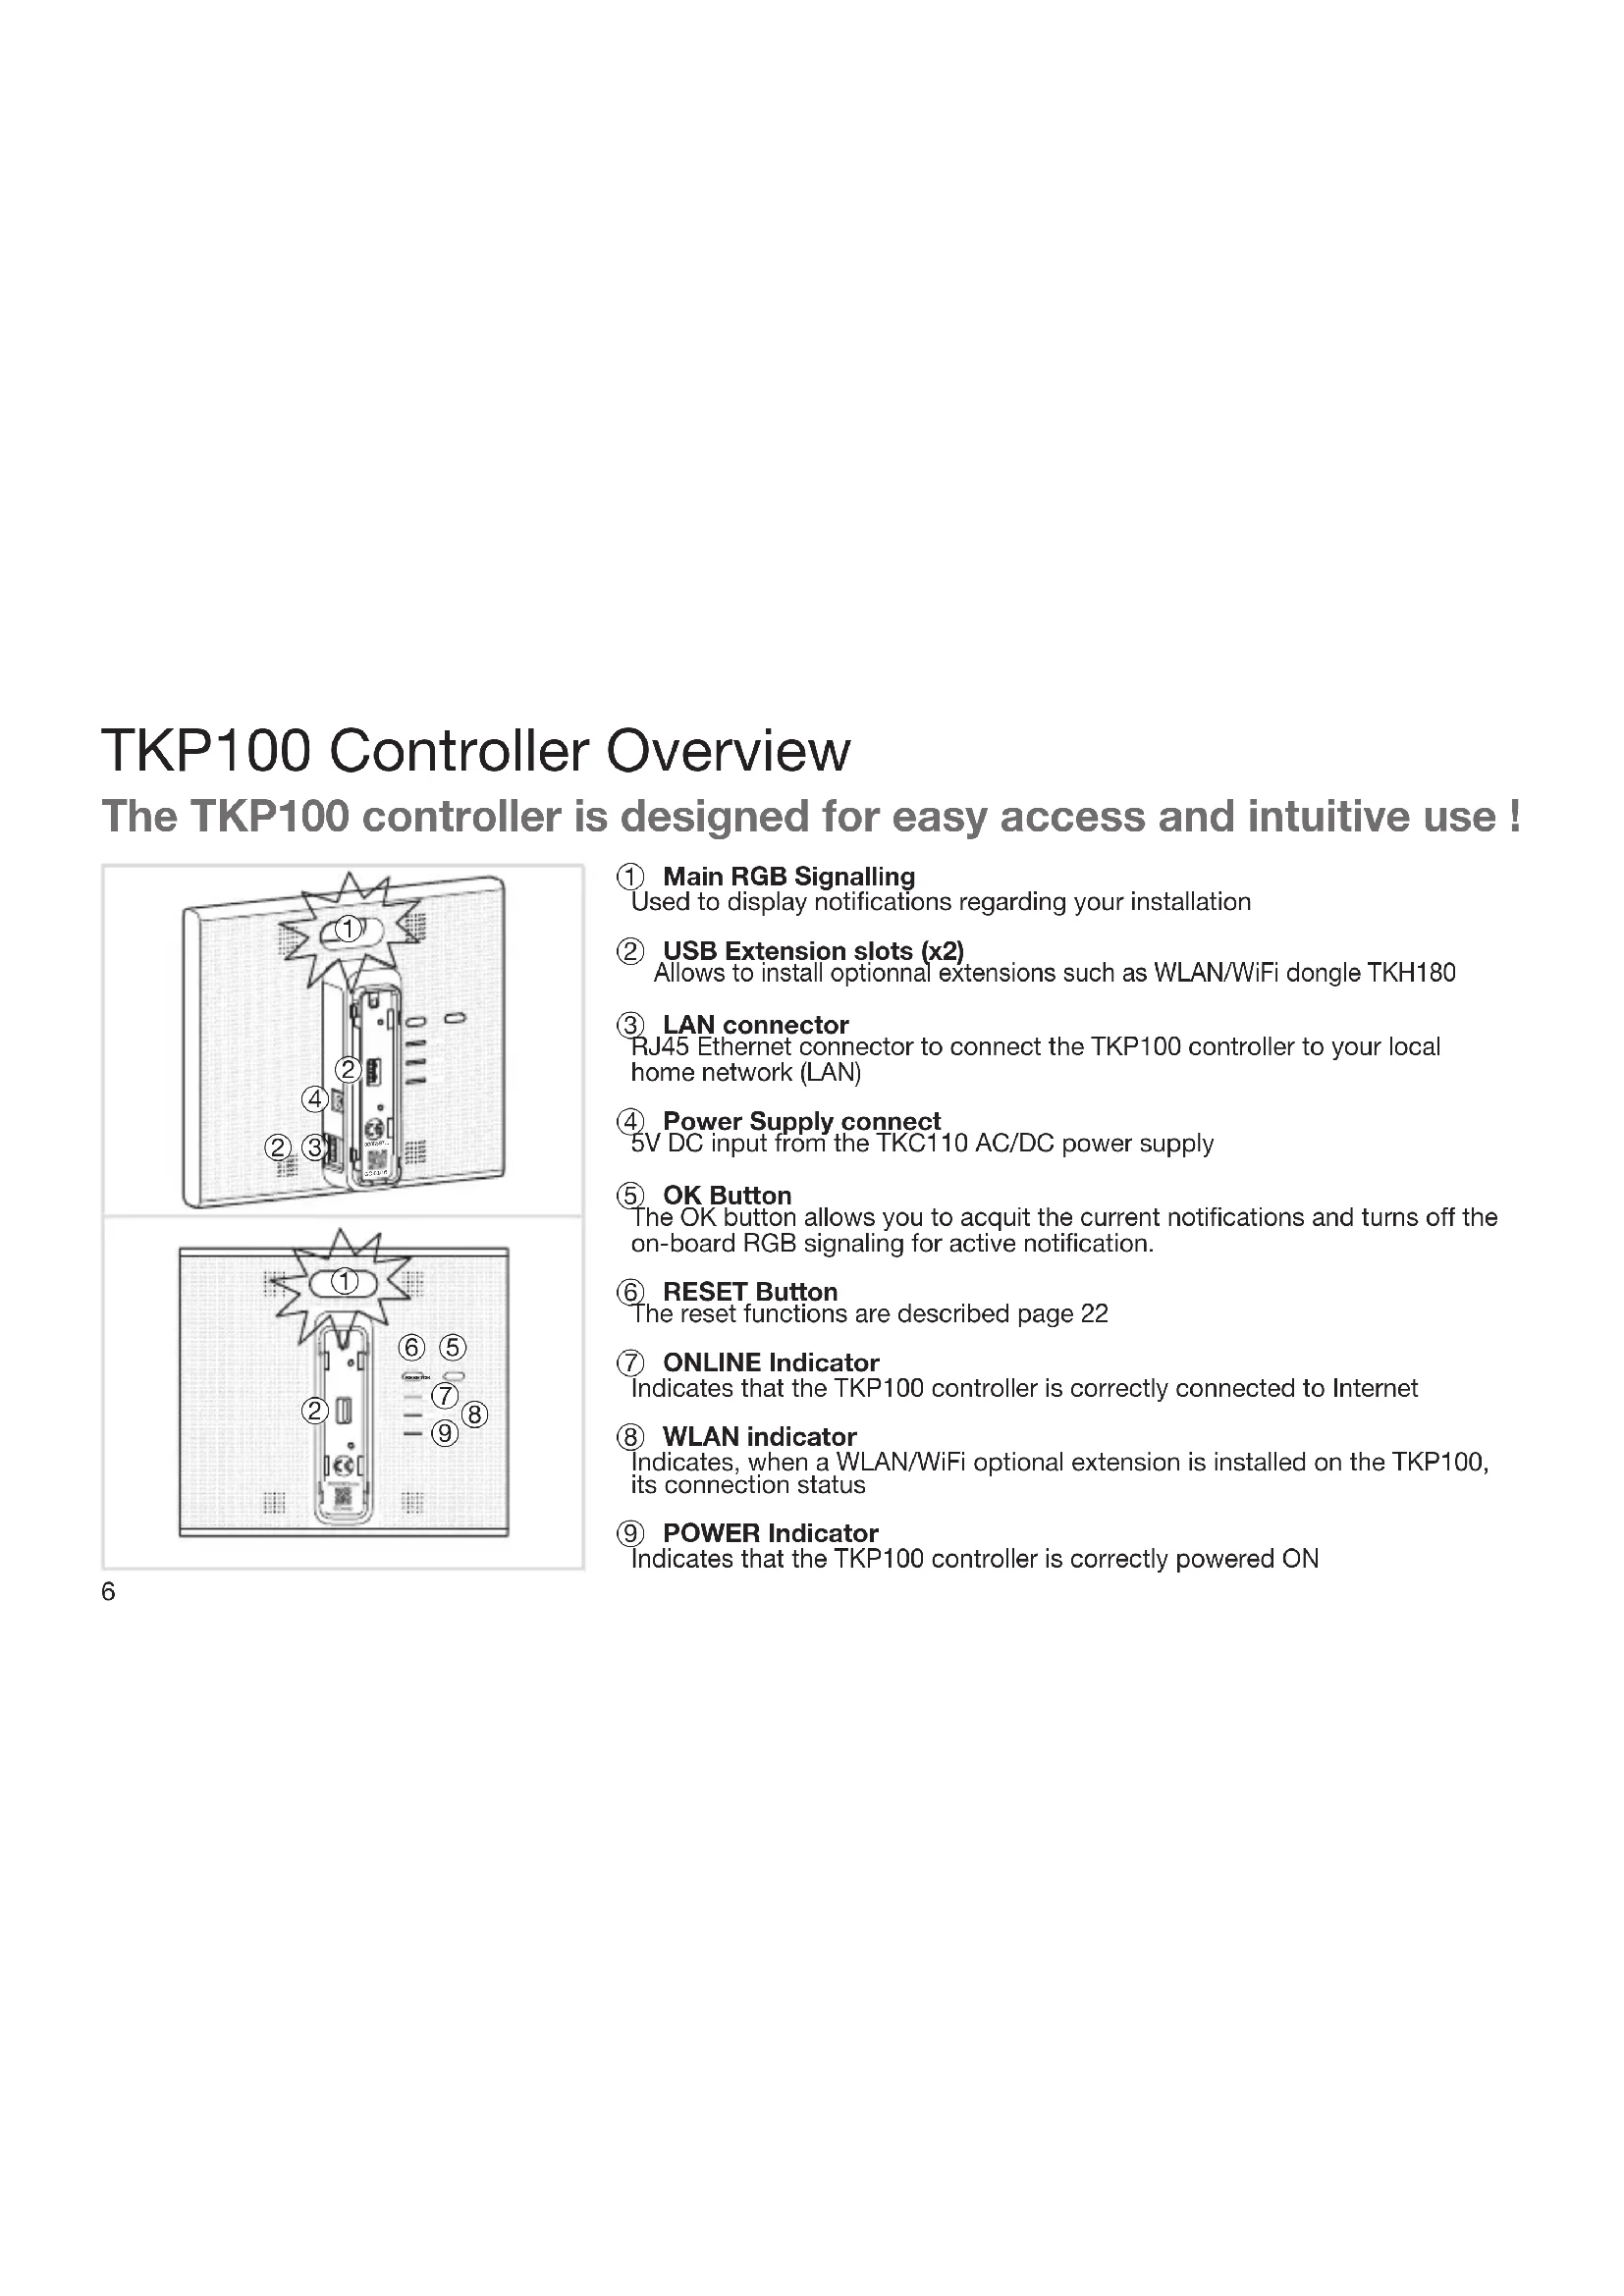
TKP100 Controller Overview
The TKP100 controller is designed for easy access and intuitive use !
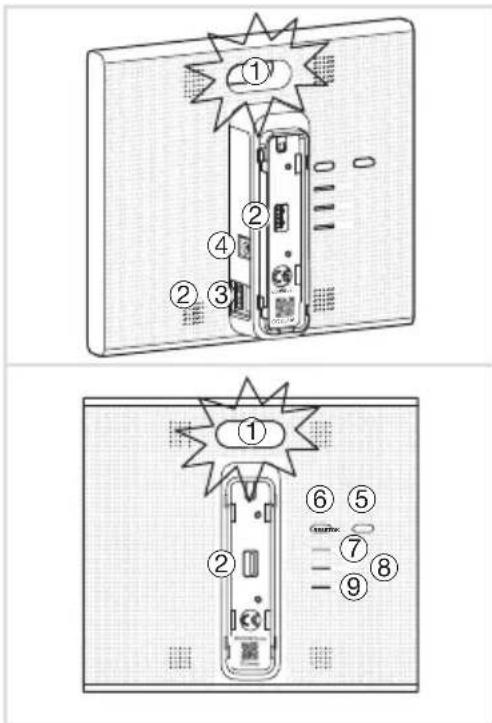
① Main RGB Signalling Used to display notifications regarding your installation
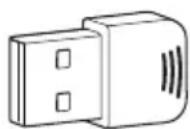
② USB Extension slots (x2) Allows to install optional extensions such as WLAN/WiFi dongle TKH180
③ LAN connector RJ45 Ethernet connector to connect the TKP100 controller to your local home network (LAN)
④ Power Supply connect 5V DC input from the TKC110 AC/DC power supply
⑤ OK Button The OK button allows you to acquire the current notifications and turns off the on-board RGB signaling for active notification.
⑥ RESET Button The reset functions are described page 22
⑦ ONLINE Indicator Indicates that the TKP100 controller is correctly connected to Internet
⑧ WLAN indicator Indicates, when a WLAN/WiFi optional extension is installed on the TKP100, its connection status
9 POWER Indicator Indicates that the TKP100 controller is correctly powered ON
TKP100 Controller Overview Back-cover disassembly / reassembly
① Slide the back-cover downwards from the main part of the TKP100 controller.
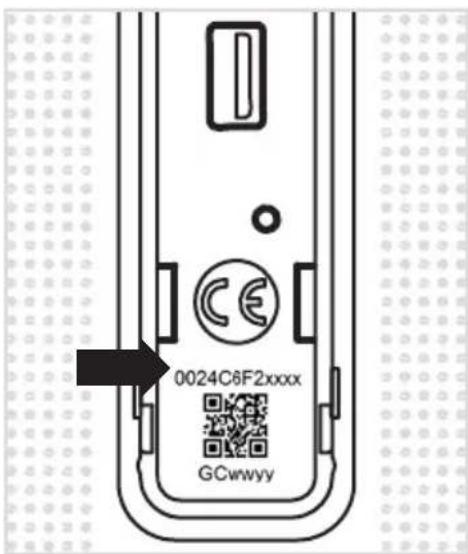
② Remove it by pulling away from the main part of the controller, letting the rear USB extension slot appear as well as the controller's fl ashcode and coviva ID.
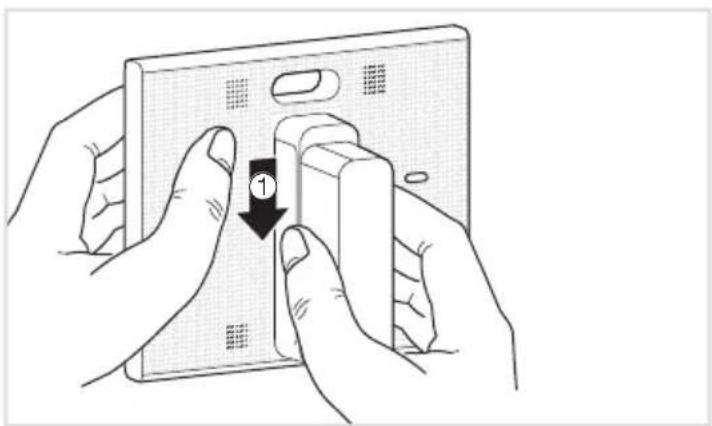
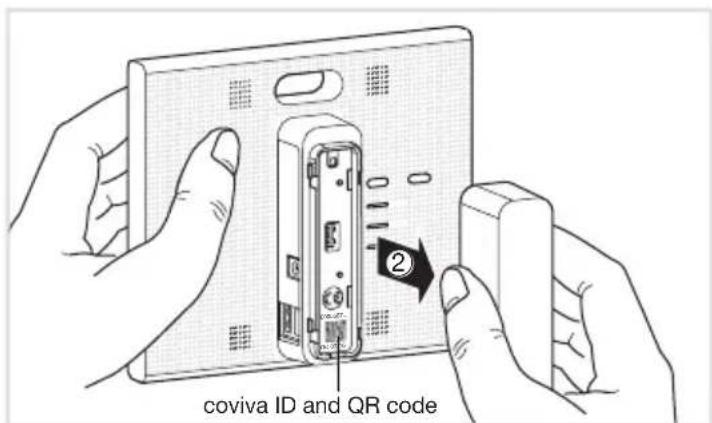
The back-cover may be re-assembled by executing the reverse procedure from the one described above.
Note : When installed lying on a flat surface, it is strongly recommended to leave the back-cover mounted, for best stability and protection.
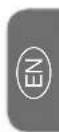
Preliminar Registration Steps
Become a coviva installer in 3 easy steps!
This page describes how to register as a coviva installer. It is a mandatory step to be able to perform the installation. This sequence must be done only once for all, (before your first installation), and doesn't need to be repeated for each new installation.
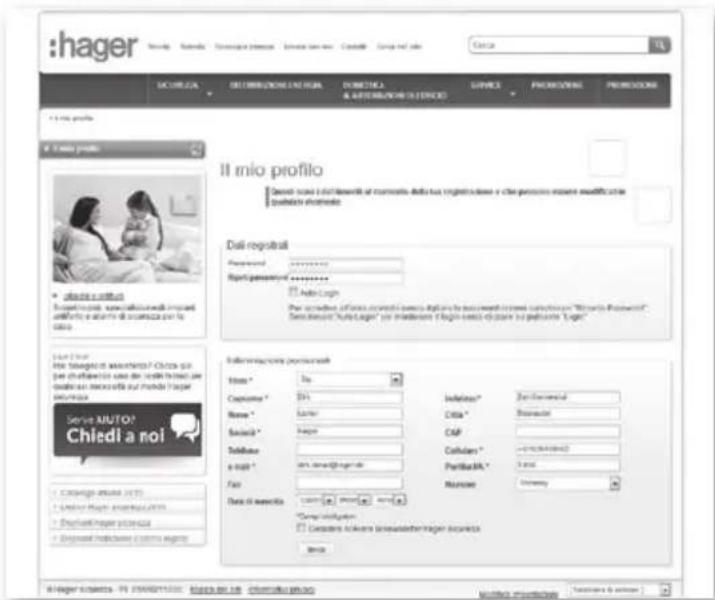
Create your Installer account on Hager portal
-
Go to the following web page: www.hager.com/coviva/registration or scan the following QR code :
-
To finalize your Hager portal account activation, you shall click on the link sent in the confirmation email.
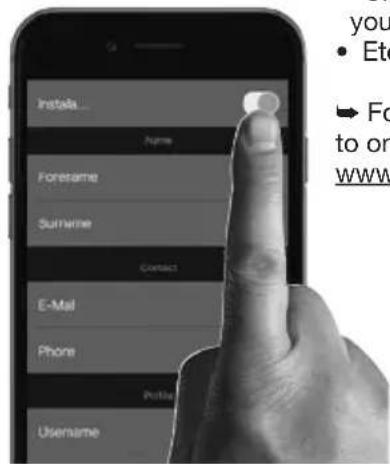
② install the coviva mobile application
- Log in to your App store and download the free coviva App.

Available on the App Store
Minimal requirements :iOS version 7.1 or higher

ANDROID APP ON Google play
Minimal requirements : Android version 4.1 or higher
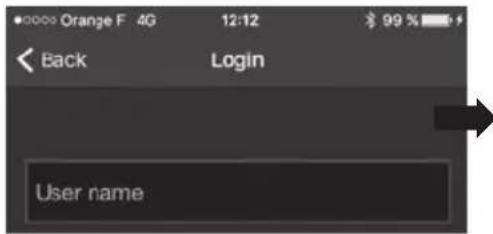
Login to the coviva App as Installer
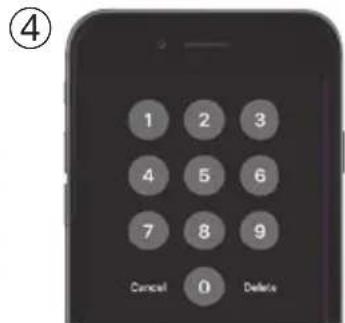
- Click on the "Installer" icon and login using your Hager portal registration (N.B : you must be connected to internet).
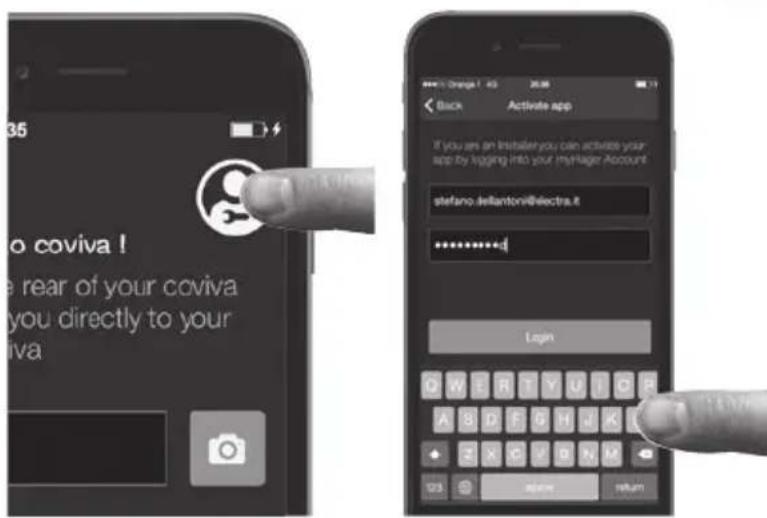
- You are now logged to the App as an authorized coviva installer!
Note : If you use a new mobile device, or after de-installing the coviva App, you should only repeat steps 2 and 3 as described on this page
Installation of the TKP100 controller
The controller may be freely installed in your customer's home
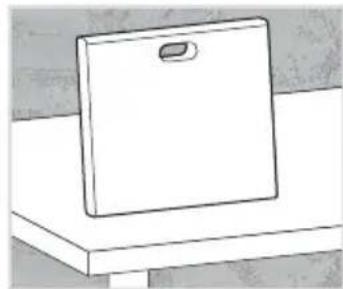
Installation on a fl at surface
- Simply place the controller free standing on a fl at surface.
General Installation tips
The TKP100 is a radio controller and shall be as such placed :
- as centrally as possible from its associated peripherals
away from metal planes, armed concrete and other radiofrequency perturbation sources.
Always avoid proximity of heat sources and humidity.
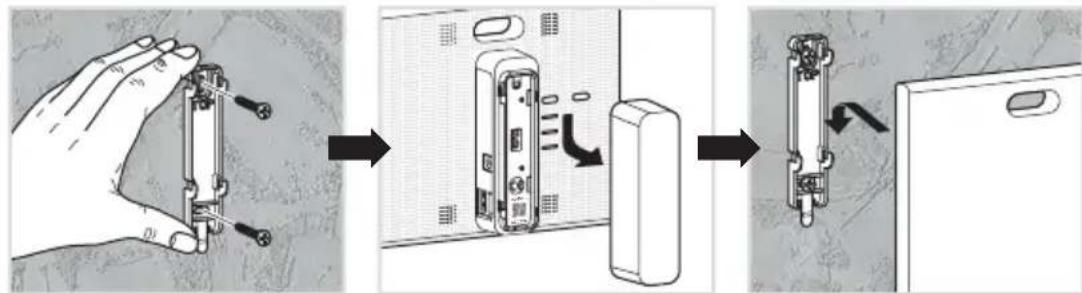
Installation on a wall
- Use the included wall adapter to fix the TKP100 controller on a wall (screws not included).
Installation in a home networking or multimedia enclosure
Home networking or multimedia enclosures allowing a minimum of 50mm host product depth can generally be equipped with the TKP100 controller.
Installation Procedure Overview
To install and config gure the TKP100A, simply register and follow four easy steps
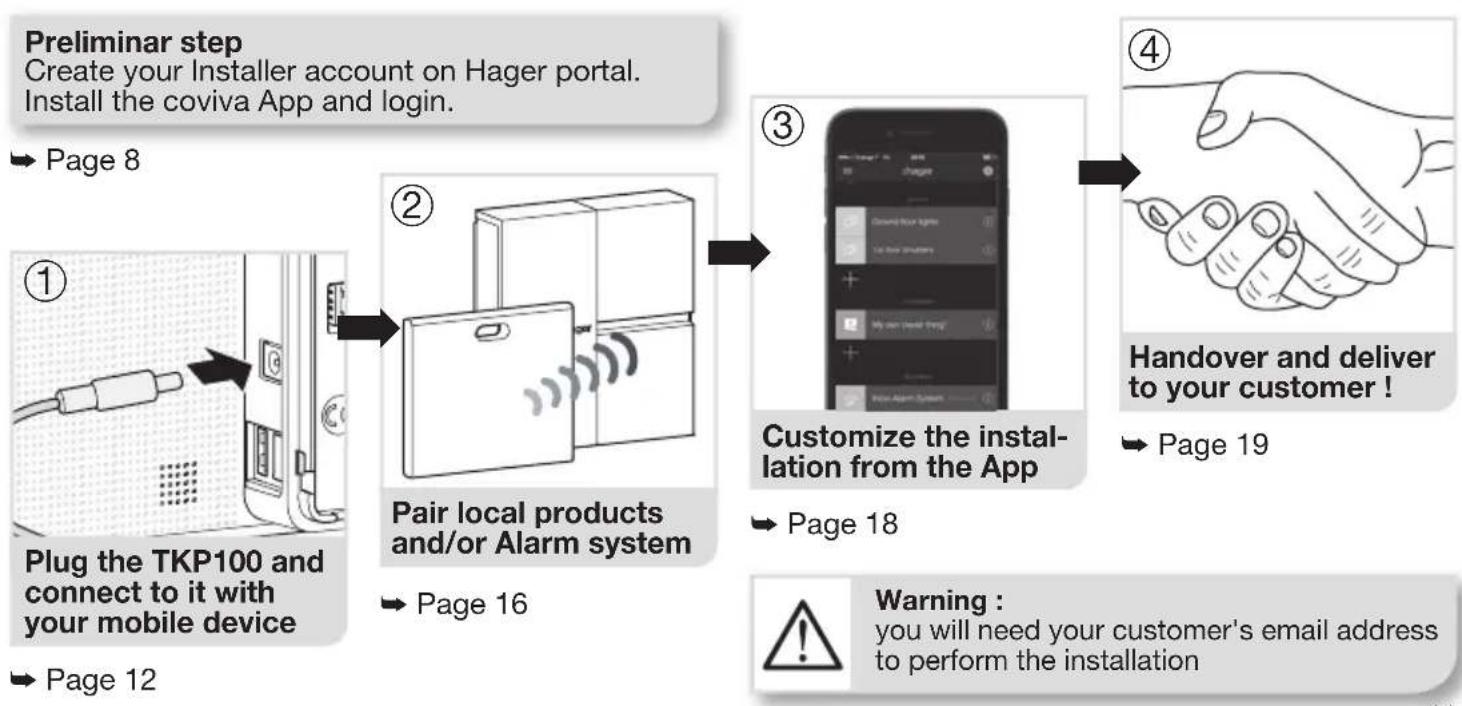
Installation Step 1.A
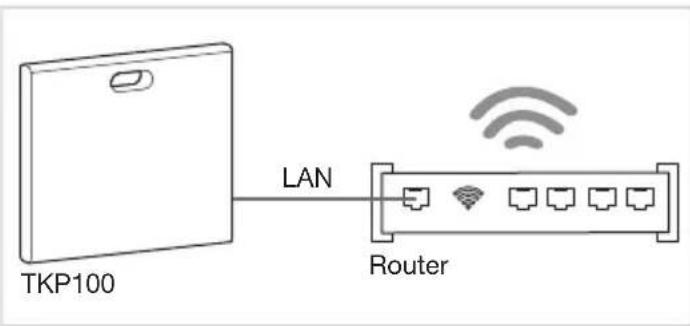
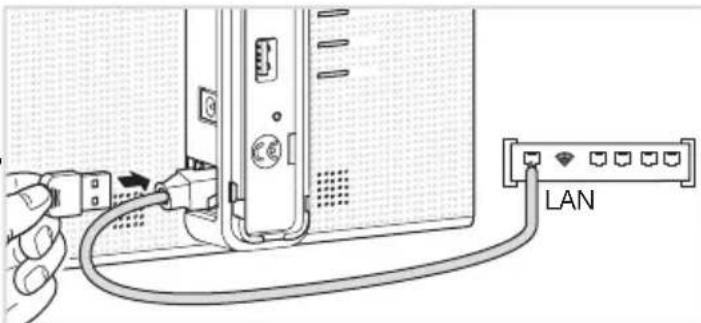
Plug the TKP100 and connect locally to it with WiFi (WLAN) network :
Connect to the TKP100 using the local router
Connect to the TKP100 using the optional TKH180 WiFi/WLAN extension
- Connect the controller to the customer's WiFi router with the provided LAN cable.
- Activate the WiFi of your mobile device and register it to the local WiFi network of your customer.
Note: To ensure the highest level of security, this initial connection to the TKP100 has to be performed locally (on installation site) and cannot be performed from a remote location.
or
- Alternatively, the optional TKH180 can conveniently create a private "confi guration hotspot" for you, useful to easily install the entire system without the need to access your customer's WiFi router. Network name: coviva -XXXXXXXXXX (XXXXXXXXXX being the coviva ID). No password is needed).
- Nevertheless, to enable proper activation after installation and correct remote control and functionality in runtime, the controller must be permanently connected to internet using the LAN connection.
Installation Step 1.B
Create a new installation
Click on the "installer login" icon
Then, restart the installation and when reaching Step 1.B, select "New installation"
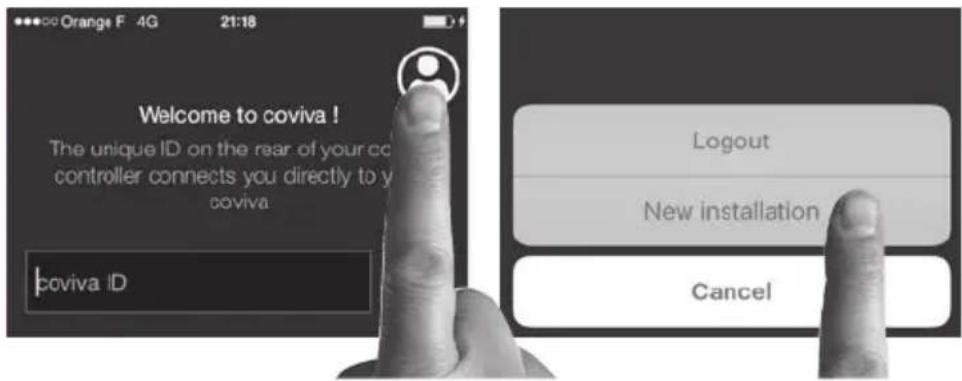
Connect to your TKP100 controller
(detailed procedure on next page)
In case you need to continue an already started installation...
- Click on "Current Installations" instead of "New installation",
- Continue working normally and finalize the installation!
Note : The appearance on Android app may be slightly different, but the function is identical.
Installation Step 1.C
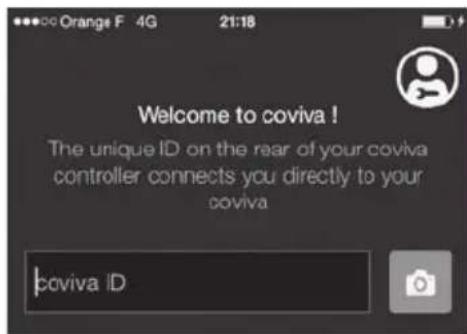
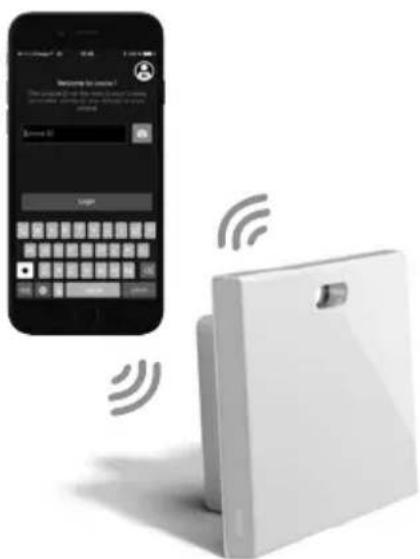
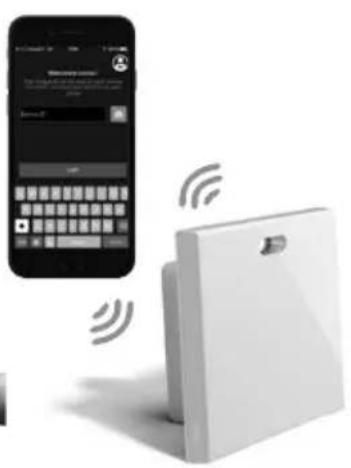
How to connect your coviva App to the TKP100 controller :
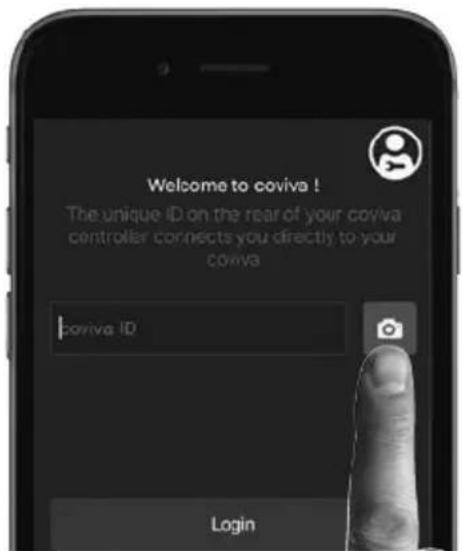
Remove the back cover and scan your TKP100 unique QR code
- This QR code is located at the rear side of the product (behind the back cover).
Alternatively, you may also link your App to the controller by typing the unique identification code, called the "coviva ID", that is located just next to the QR code.
A great story begins
Your coviva app and TKP100 are now communicating sweetly.
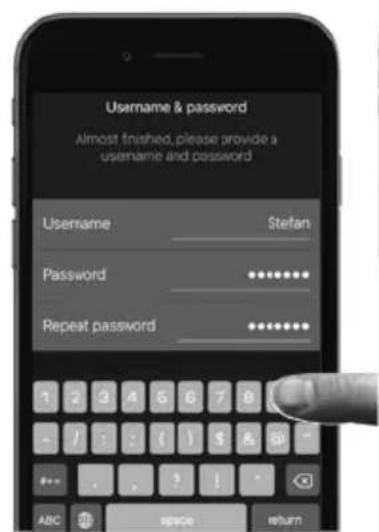
Installation Step 1.D Declare the Referent User..
You will be asked, before pairing any device, to enter you customer's email. The declared email will receive the role of "Referent User" (cf page 4).
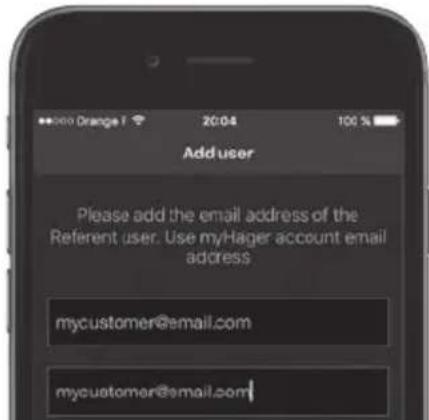
Tip: In case you mistyped or entered a wrong (or invalid) email, it is possible to step back to this declaration by performing a "User's reset", as described on page 22. Then, restart the installation and when reaching Step 1.B, select "New installation".
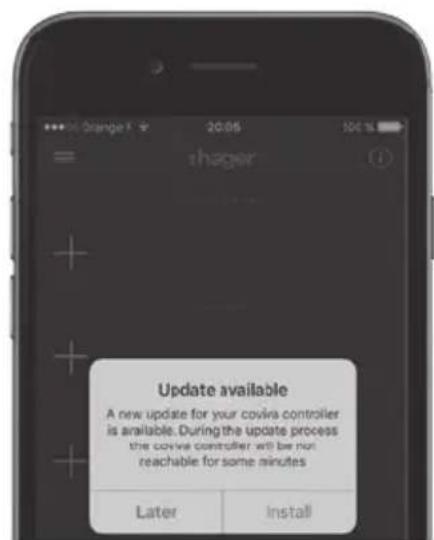
..and install the latest updates !
If an update of the TKP100's software is available, it is highly recommended that you accept it and let it complete fully before continuing the installation. The update is complete when the controller completely stops blinking.

Installation Step 2.A : Associating products
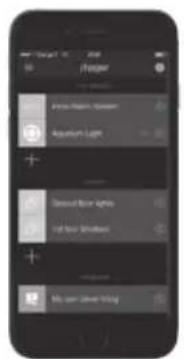
You can easily associate a number of quicklink products to your TKP100 as follows :
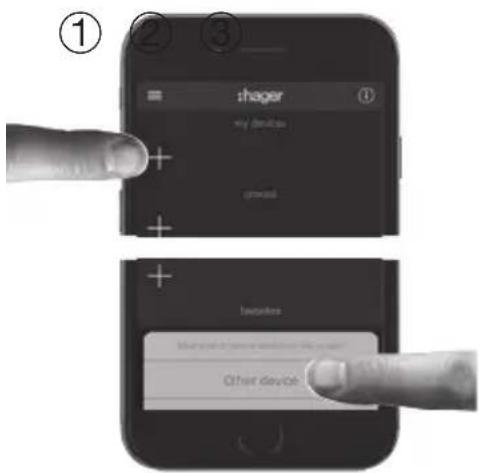
Press the blue "+" Button in the coviva App main page to add a new Device to your installation and select "Other device".
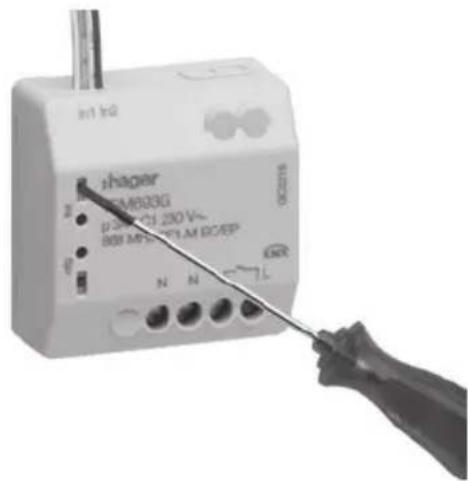
When asked by the coviva App, identify the device to add by pressing shortly the FCT button.
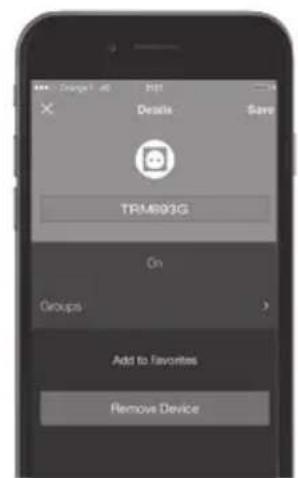
Your Product is now paired and can be used in your installation!
Note : List of compatible quicklink devices can be found on www.hager.com/coviva/compatibility
Installation Step 2.B : Associating an Alarm System You can easily associate a sepio Hager Alarm System to the TKP100 as follows :
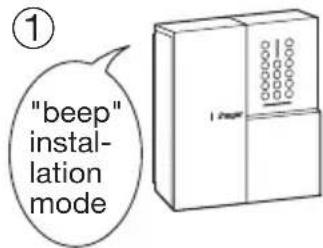
The control panel must be in installation mode. If it is not, enter :
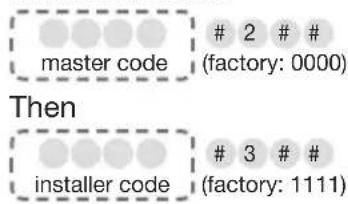
Press the blue "+" Button in the coviva App main page to add a new Device, and select "Alarm System".
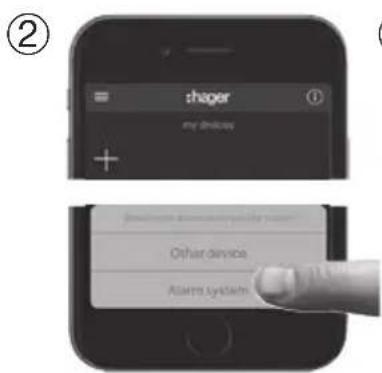
After a few seconds, your Alarm Control Panel serial number (last 6 digits) shall appear in the list. Confirm the right Control Panel serial by clicking "OK".
Your Alarm System is now paired and ready for use with coviva! You will always be asked to type the Alarm installer code to access the Alarm System visualisation and functions from the App.
Note: Only one control panel can be paired to the TKP100.
You will find more detailed information on alarm installation and settings on: www.hager.com/coviva/alarm

Installation Step 3 : Customization
It is now time to make the system yours !
- The coviva App provides numerous possibilities to easily adapt the system to your customer's need. Here is a quick overview of what you can achieve with it :
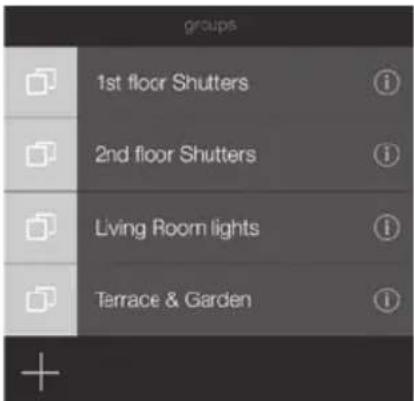
Friendly Groups
The TKP100 paired devices appearing in the coviva App can be freely grouped together for easy navigation.
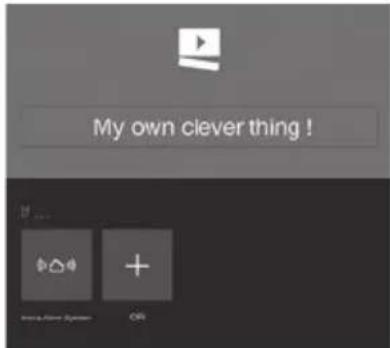
Let covigrams work for you!
This fl exible and friendly logic engine manage repetitive or conditional actions such as scenes and scenarios, create custom actions, notifi cations, easily :
Note : There is much more to discover from the coviva App! To get an overview of what's in for you, connect to www.hager.com/coviva/app
Installation Step 4 : Handover
Time to deliver your work to your lucky customer !
The Handover procedure allows you to perform an optimal transfer of control of the system from you (as installer) to your customer, without having to duplicate, share or disclose logins or access codes, to maintain a maximum level of security and confidentiality of the installation. N.B. This step is mandatory!
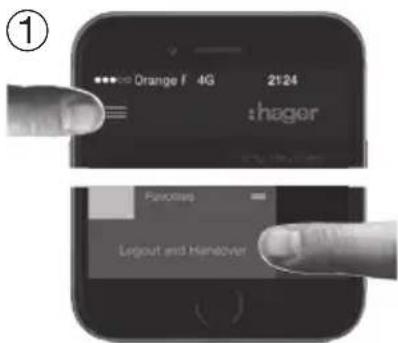
When the installation is completed, at time of disconnecting, the App will ask you to validate the Handover, which will launch the Handover process!
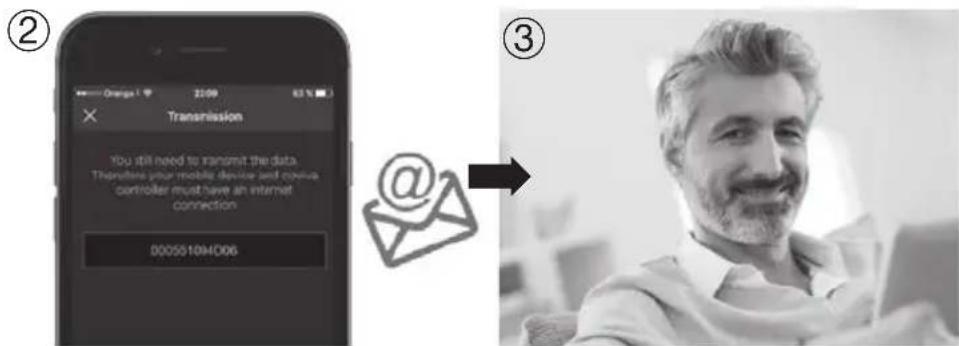
An email is sent to your customer defined as Referent User to activate his access to the system and transfer the rights to control it.
The Referent User activates his account. System is ready to be used by him!
Note : To perform the Handover, both the TKP100 and the mobile device running the App must be connected to internet.
Setting up the TKP100 permanent connection
Select the connection mode of the TKP100 to the local network in normal use
Once your installation is finished, it is time to assign the permanent connectivity to your customer's local network, that will provide the internet (IP) access.
LAN Connection

WiFi Connection
(available in a future release)
This is the recommended connection mode for the TKP100 due to its speed, security and reliability.
- Connect the controller to the customer's router with the provided LAN cable
- Only use the provided LAN cable, or cable of equivalent grade if you need a different length : Cat. 5E F/UTP
You may connect permanently the TKP100 to customer's internet access using the optional Hager TKH180 WLAN/Wifi End-User extension.
This is a fl exible connection mode because it increases the TKP100 controller's freedom of placement in your customer's home !
Note : The TKP100 can work in standalone (without Internet access) but with limited functionality (no remote control, no notifications, etc..). Nevertheless purely local automatisms (such as covigrams) not requiring internet access will generally continue working normally.
Remote Maintenance & Diagnostics
Get remote access to the system for easy maintenance !
The TKP100 can be remotely accessed by the Installer to perform verifications, modify installation profile and settings, inspect event logs, etc ... without the need to come on customer's site.
Authorization & Access
The remote access to the TKP100 is only possible :
- after Handover
- when the TKP100 is properly connected to internet
- under specific authorization granted by the Referent User as follows:
What can I do in remote access?
- Verify the state of the installations
- Add or remove a product remotely
Add or remove users - Modify coviva App settings
- Create or modify a covigram for your customer
Etc...
For more information please refer to online documentation www.hager.com/coviva/documentation
TKP100 Reset Modes
Each of those 3 reset modes is triggered from the TKP100 controller itself and use a different reset sequence, described in detail on page 23.

Network reset
Useful to ...
in case of WiFi access code loss in use with TKH180 Wifi extension
What it does :
Re-initialize the network settings. it will re-open a local access to the controller
What it does NOT :
This reset mode does not modify any other setting, installation profi le, links, or user profi le.

Users reset
Useful to ...
- To defi ne a different Referent User, or correct a wrong (or mistyped) email address
- For an installer-level user to take system control.
What it does :
Returns the controller to preHandover state
What it does NOT :
This reset doesn't modify installation profi le, links, and other settings.

Factory reset
Useful to ...
Restart an installation from scratch.
What it does :
Return the controller to its original factory state. Be particulary cautious when using it, since this Reset procedure will delete all installation profi le, links, and local user profi les defi ned previously, and rollback all installed TKP100 controller software updates.

Warning: When doing a Factory Reset, it is mandatory to connect the controller to Internet for proper system reactivation to its original state.
TKP100 Controller reset modes
For detailed description of use & effect of each reset modes please refer to "TKP100 Reset Modes" page 22.
| Network reset 1. Press the RESET button for more than 5 seconds | 2. When the unit flashes in blue, release RESET button shortly, then press it again to confirm. | Flashing | 3. When successful, a short series of fast blue flashes of the signalling RGB confirm the reset. | (BLUE) |
| Users reset 1. Press the RESET button for more than 20 seconds | 2. The units flashes in blue, then when it starts flashing in yellow, release RESET button shortly, then press it again to confirm. | Flashing | 3. When successful, a short series of fast yellow flashes of the signalling RGB confirm the reset. | (YELLOW) |
| Factory reset 1. Simultaneously press RESET and power on the TKP100 | 2. Maintaining the RESET button pressed while the unit starts flashing slowly (approximately 5 seconds). | Flashing | 3. When the unit flashes faster in red, release the RESET button. Wait for a few minutes until the unit completely stops flashing in blue, which indicates the end of the sequence. | (RED) |
RGB Light Signaling
A convenient way to be informed of the status of your home !
| Red - Flashing Fixed Yellow - Flashing | Green - Fixed* Blue | - Flashing | ||
| Critical Alert such as Intrusion or Fire | Error Hardware or Software Error | Technical alert or installation warning such as low battery on an installed product | Energy saving mode active for your installation | Updating Software update in progress |
*Note : Available in future releases
Quickstart End-User Guide

Referent User First-Time Connection

Referent User receives email with link to activate his system.
Referent User is asked to finalize and validate his Hager portal account.
After step 2, direct access to the WebApp control from Hager portal following the coviva controller section is possible! (details on page 28)
Referent User installs the coviva App, available from the main AppStore on his mobile device (cf p.9).
Referent User should log in at least once using his Hager portal login, and while being connected to Internet.
Control of the installation from the native coviva App is now possible !
Note : Steps from 1 to 4 on this page are normally done only once, except the case where the Referent User changes of device, or de-install/re-install the coviva App. In this case, step 3 and 4 shall be performed again.
Classic and Restricted* User first connection
This is how the Classic Users and Restricted Users may connect to their installation
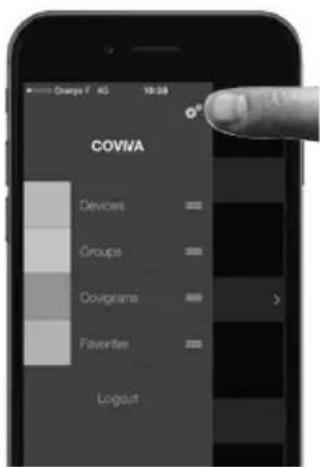
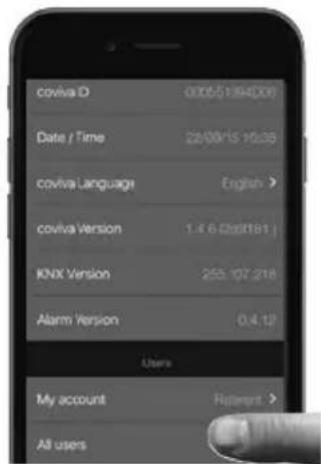
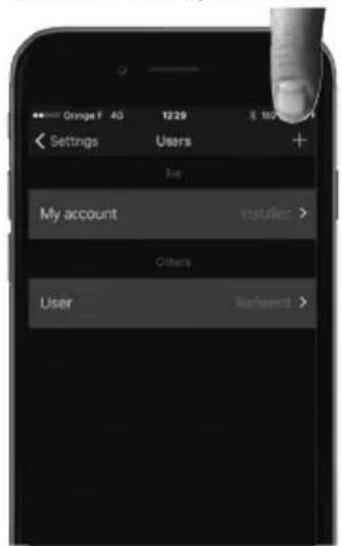
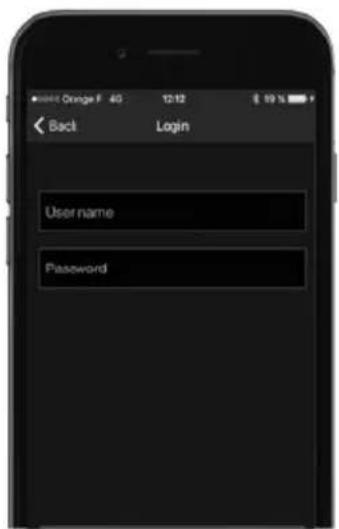
① Be defined by the Referent User! This is done directly from the coviva App in the Settings/Users/All users section. Download and open the coviva App.
② Discover locally the TKP100 controller (as described Installation Step 1.B, p.13)
③ Log in using username & password provided by the Referent User
(*) Available in a future release

Controlling your Home with the WebApp In those occasions where you mobile will go on strike..
A Web access, what for?
The TKP100 can be controlled in normal use using the web portal access, from a browser HTML5-compliant such as © Chrome, Safari, Internet Explorer or Firefox. The control interface is very similar to the coviva Mobile App, and provides the same level functional access with exception of installation functions, with a layout compliant to larger displays.
Accessing the WebApp directly (All users)
The coviva controller can be remotely accessed with a most browsers by entering the following URL :
http://XXXXXX.koalabox.net/webapp
...where XXXXX is the coviva ID of your controller. Please refer to page 14 to fi nd it.
Accessing the WebApp through your Hager portal
- login to Hager portal account
- browsing to "coviva controller" section (left navigation panel)
- click the rightmost icon on your controller's registration line.

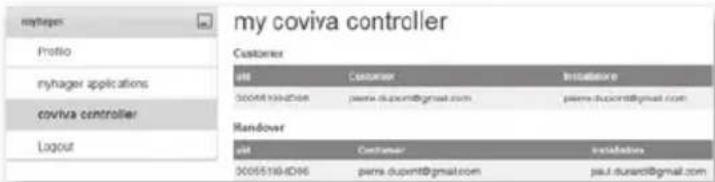
Note : This mode of access is only available to the system's Referent User. Many other useful services can be accessed from Hager portal !
Security Information – Conformity – Warranty
Important Security Information
- The product shall be installed in compliance with country of installation's applicable standards, regulations, and electrical installation norms.
- Installation altitude shall not exceed ≤ 2000m .
Important recommendation regarding the use of covigramsto control the Alarm System :
- Switching off the alarm central unit from any device must be performed in a secure manner with an access code, password, or key.
- Products are installed and used under the sole responsibility of the installer and end customer.
- The manufacturer may in no way be held responsible in the event of damage linked to fraudulent or malicious use of the product.
Regulatory compliance :
- EN 60950-1
EN55032
EN 55024
EN 300220-1
EN 300220-2
EN 301489-3
Conformity

This product can be used in all the E.U countries and Switzerland
Terms of warranty
2 years standard

Support & Maintenance
Support contact
- Please refer to www.hager.com/coviva/help for more information.
FAQ
- Please refer to www.hager.com/coviva/help for more information.
Technical Specifications
Power Supply
Power consumption
Isolation Class
Radio emission
Radio range
Protection
Operating Temp.
Storage temperature
Relative humidity
Network connectivity
Extensions
Dimensions
Material
Sector / AC Input Voltage Range 230V 50Hz DC Output 5V - 3A
Normal: <3W
2
868-870 MHz / 433-434 MHz 0,1-10% transmitter duty cycle Receiver category 2
300 meters outdoor
IP30 / IK04
0^ + 40^
-25°C +70°C
93% HR 40°C
Ethernet LAN
WiFi 802,11 b/g/n (using optional TKH180)*
2x USB ports 5V DC
250 mA max/port
178,5 x 156 x 48,4 mm Dimension without the removable
PC/ASA-PC-Elastomer
Notes
Only use the TKC110 provided Power Supply
Make sure to use the right shielded Ethernet cable, class : 5E F/UTP for proper system performance
Warning: TKP100 Extensions are designed to receive Hager qualified extensions exclusively. Don't use them to connect or charge other type of equipment.
back-cover
Note : All specifications are subject to change without prior notice. *Available in future releases
Instructions
Welcome to the universe of coviva !

DISPONIBLE SUR Google play
Alternatively, you could use the associative language to identify the code of the function. Alternatively, you could use the associative language to identify the function. Alternatively, you could use the associative language to identify the function. Alternatively, you could use the associative language to identify the function. Alternatively, you could use the associative language to identify the function. Alternatively, you could use the associative language to identify the function. Alternatively, you could use the associative language to identify the function. Alternatively, you could use the associative language to identify the function. Alternatively, you could use the associative language to identify the function. Alternatively, you could use
Specifications techniques
Alimentation
Consummation electrique
Classe d'iso1ation
Émission radio
Portee radio
Protection
Welcome to the universe of coviva !

Pages 33-64

Seiten 65-96

Welcome to the universe of coviva !

Bienvenue dansl’univers coviva !
For detailed description of use & effect of each reset modes please refer to "TKP100 Reset Modes" page 22.
| Network reset 1. Press the RESET button for more than 5 seconds | 2. When the unit flashes in blue, release RESET button shortly, then press it again to confirm. | Flashing | 3. When successful, a short series of fast blue flashes of the signalling RGB confirm the reset. | |
| Users reset 1. Press the RESET button for more than 20 seconds | 2. The units flashes in blue, then when it starts flashing in yellow, release RESET button shortly, then press it again to confirm. | Flashing | 3. When successful, a short series of fast yellow flashes of the signalling RGB confirm the reset. | |
| Factory reset 1. Simultaneously press RESET and power on the TKP100 | 2. Maintaining the RESET button pressed while the unit starts flashing slowly (approximately 5 seconds). | Flashing | 3. When the unit flashes faster in red, release the RESET button. Wait for a few minutes until the unit completely stops flashing, which indicates the end of the sequence. |
hager
Hager SAS
F-67212 OBERNAI CEDEX
6LE001568A
- A convenient way to be informed of the status of your home !
- Instructions
- Warning :
- Thank you !
- and Welcome to the universe of coviva!
- Security
- Comfort
- Energy Efficiency
- Connected Objects The TKP100 coviva
- User rights, roles & privileges
- The TKP100 and its coviva App understand that you are different
- Quickstart Installer Guide
- TKP100 Controller Overview
- The TKP100 controller is designed for easy access and intuitive use !
- TKP100 Controller Overview Back-cover disassembly / reassembly
- Preliminar Registration Steps
- Become a coviva installer in 3 easy steps!
- Create your Installer account on Hager portal
- ② install the coviva mobile application
- Available on the App Store
- ANDROID APP ON Google play
- Login to the coviva App as Installer
- Installation of the TKP100 controller
- The controller may be freely installed in your customer's home
- Installation on a fl at surface
- General Installation tips
- Installation on a wall
- Installation in a home networking or multimedia enclosure
- Installation Procedure Overview
- To install and config gure the TKP100A, simply register and follow four easy steps
- Installation Step 1.A
- Plug the TKP100 and connect locally to it with WiFi (WLAN) network :
- or
- Installation Step 1.B
- Create a new installation
- Click on the "installer login" icon
- In case you need to continue an already started installation...
- Installation Step 1.C
- How to connect your coviva App to the TKP100 controller :
- Remove the back cover and scan your TKP100 unique QR code
- A great story begins
- Installation Step 1.D Declare the Referent User..
- ..and install the latest updates !
- Installation Step 2.A : Associating products
- Installation Step 2.B : Associating an Alarm System You can easily associate a sepio Hager Alarm System to the TKP100 as follows :
- Installation Step 3 : Customization
- It is now time to make the system yours !
- Friendly Groups
- Let covigrams work for you!
- Installation Step 4 : Handover
- Time to deliver your work to your lucky customer !
- Setting up the TKP100 permanent connection
- Select the connection mode of the TKP100 to the local network in normal use
- LAN Connection
- WiFi Connection
- Remote Maintenance & Diagnostics
- Get remote access to the system for easy maintenance !
- Authorization & Access
- TKP100 Reset Modes
- Network reset
- Useful to ...
- What it does :
- What it does NOT :
- Users reset
- Factory reset
- TKP100 Controller reset modes
- RGB Light Signaling
- Quickstart End-User Guide
- Referent User First-Time Connection
- Classic and Restricted* User first connection
- This is how the Classic Users and Restricted Users may connect to their installation
- Controlling your Home with the WebApp In those occasions where you mobile will go on strike..
- A Web access, what for?
- Accessing the WebApp directly (All users)
- http://XXXXXX.koalabox.net/webapp
- Accessing the WebApp through your Hager portal
- Security Information – Conformity – Warranty
- Important Security Information
- Important recommendation regarding the use of covigramsto control the Alarm System :
- Regulatory compliance :
- Conformity
- Terms of warranty
- Support & Maintenance
- Support contact
- FAQ
- Technical Specifications
- Notes
- DISPONIBLE SUR Google play
- Specifications techniques
- hager
Brand : HAGER
Model : TKP100A
Category : Receiver