
Elements Smoke Pack - Detector GIGASET - Free user manual and instructions
Find the device manual for free Elements Smoke Pack GIGASET in PDF.
| Product type | Connected smoke detector |
| Brand | Gigaset |
| Model | Elements Smoke Pack |
| Power supply | Primary lithium battery 3.0 V (type CR2) – fixed and replaceable |
| Battery life | Up to 10 years (replacement recommended according to DIN 14676 standard) |
| DECT radio range | Indoors: max. 50 m |
| Operating temperature | -10 °C to +60 °C |
| Mounting | On ceiling, min. distance 50 cm from walls and lamps, away from air currents and steam sources |
| Alarm signal | Loud intermittent beep (every 0.5 s) + flashing red LED |
| Function test | Press the detector head for at least 1 second – beep sounds if OK |
| Mute | Press the head during an alarm – reduces sensitivity for about 10 min |
| Low battery indicator | Short beep every 40 s |
| Fault/dirt indicator | 3 short beeps every 40 s – replace the detector |
| Standard | Compliant with DIN 14676 – mandatory replacement after 10 years |
| Maintenance | Wipe with a damp or antistatic cloth – do not use solvents or dry microfiber cloth |
| Package contents | Detector, base, instruction manual, fixed battery installed, replaceable battery, 2 screws, 2 wall plugs, 1 adhesive pad |
| Optional accessories | Plastic security seals, locking screws (ordered separately) |
| Use | Indoors only – not in humid or explosion-risk rooms |
| Dimensions (estimated) | Diameter approx. 10 cm, height approx. 5 cm |
| Weight (estimated) | Approx. 150 g |
Frequently Asked Questions - Elements Smoke Pack GIGASET
User questions about Elements Smoke Pack GIGASET
0 question about this device. Answer the ones you know or ask your own.
Ask a new question about this device
Download the instructions for your Detector in PDF format for free! Find your manual Elements Smoke Pack - GIGASET and take your electronic device back in hand. On this page are published all the documents necessary for the use of your device. Elements Smoke Pack by GIGASET.
USER MANUAL Elements Smoke Pack GIGASET
Operating and Installation Guide
- For users of Smart Home
smart care users, please follow the instructions in the smart care app
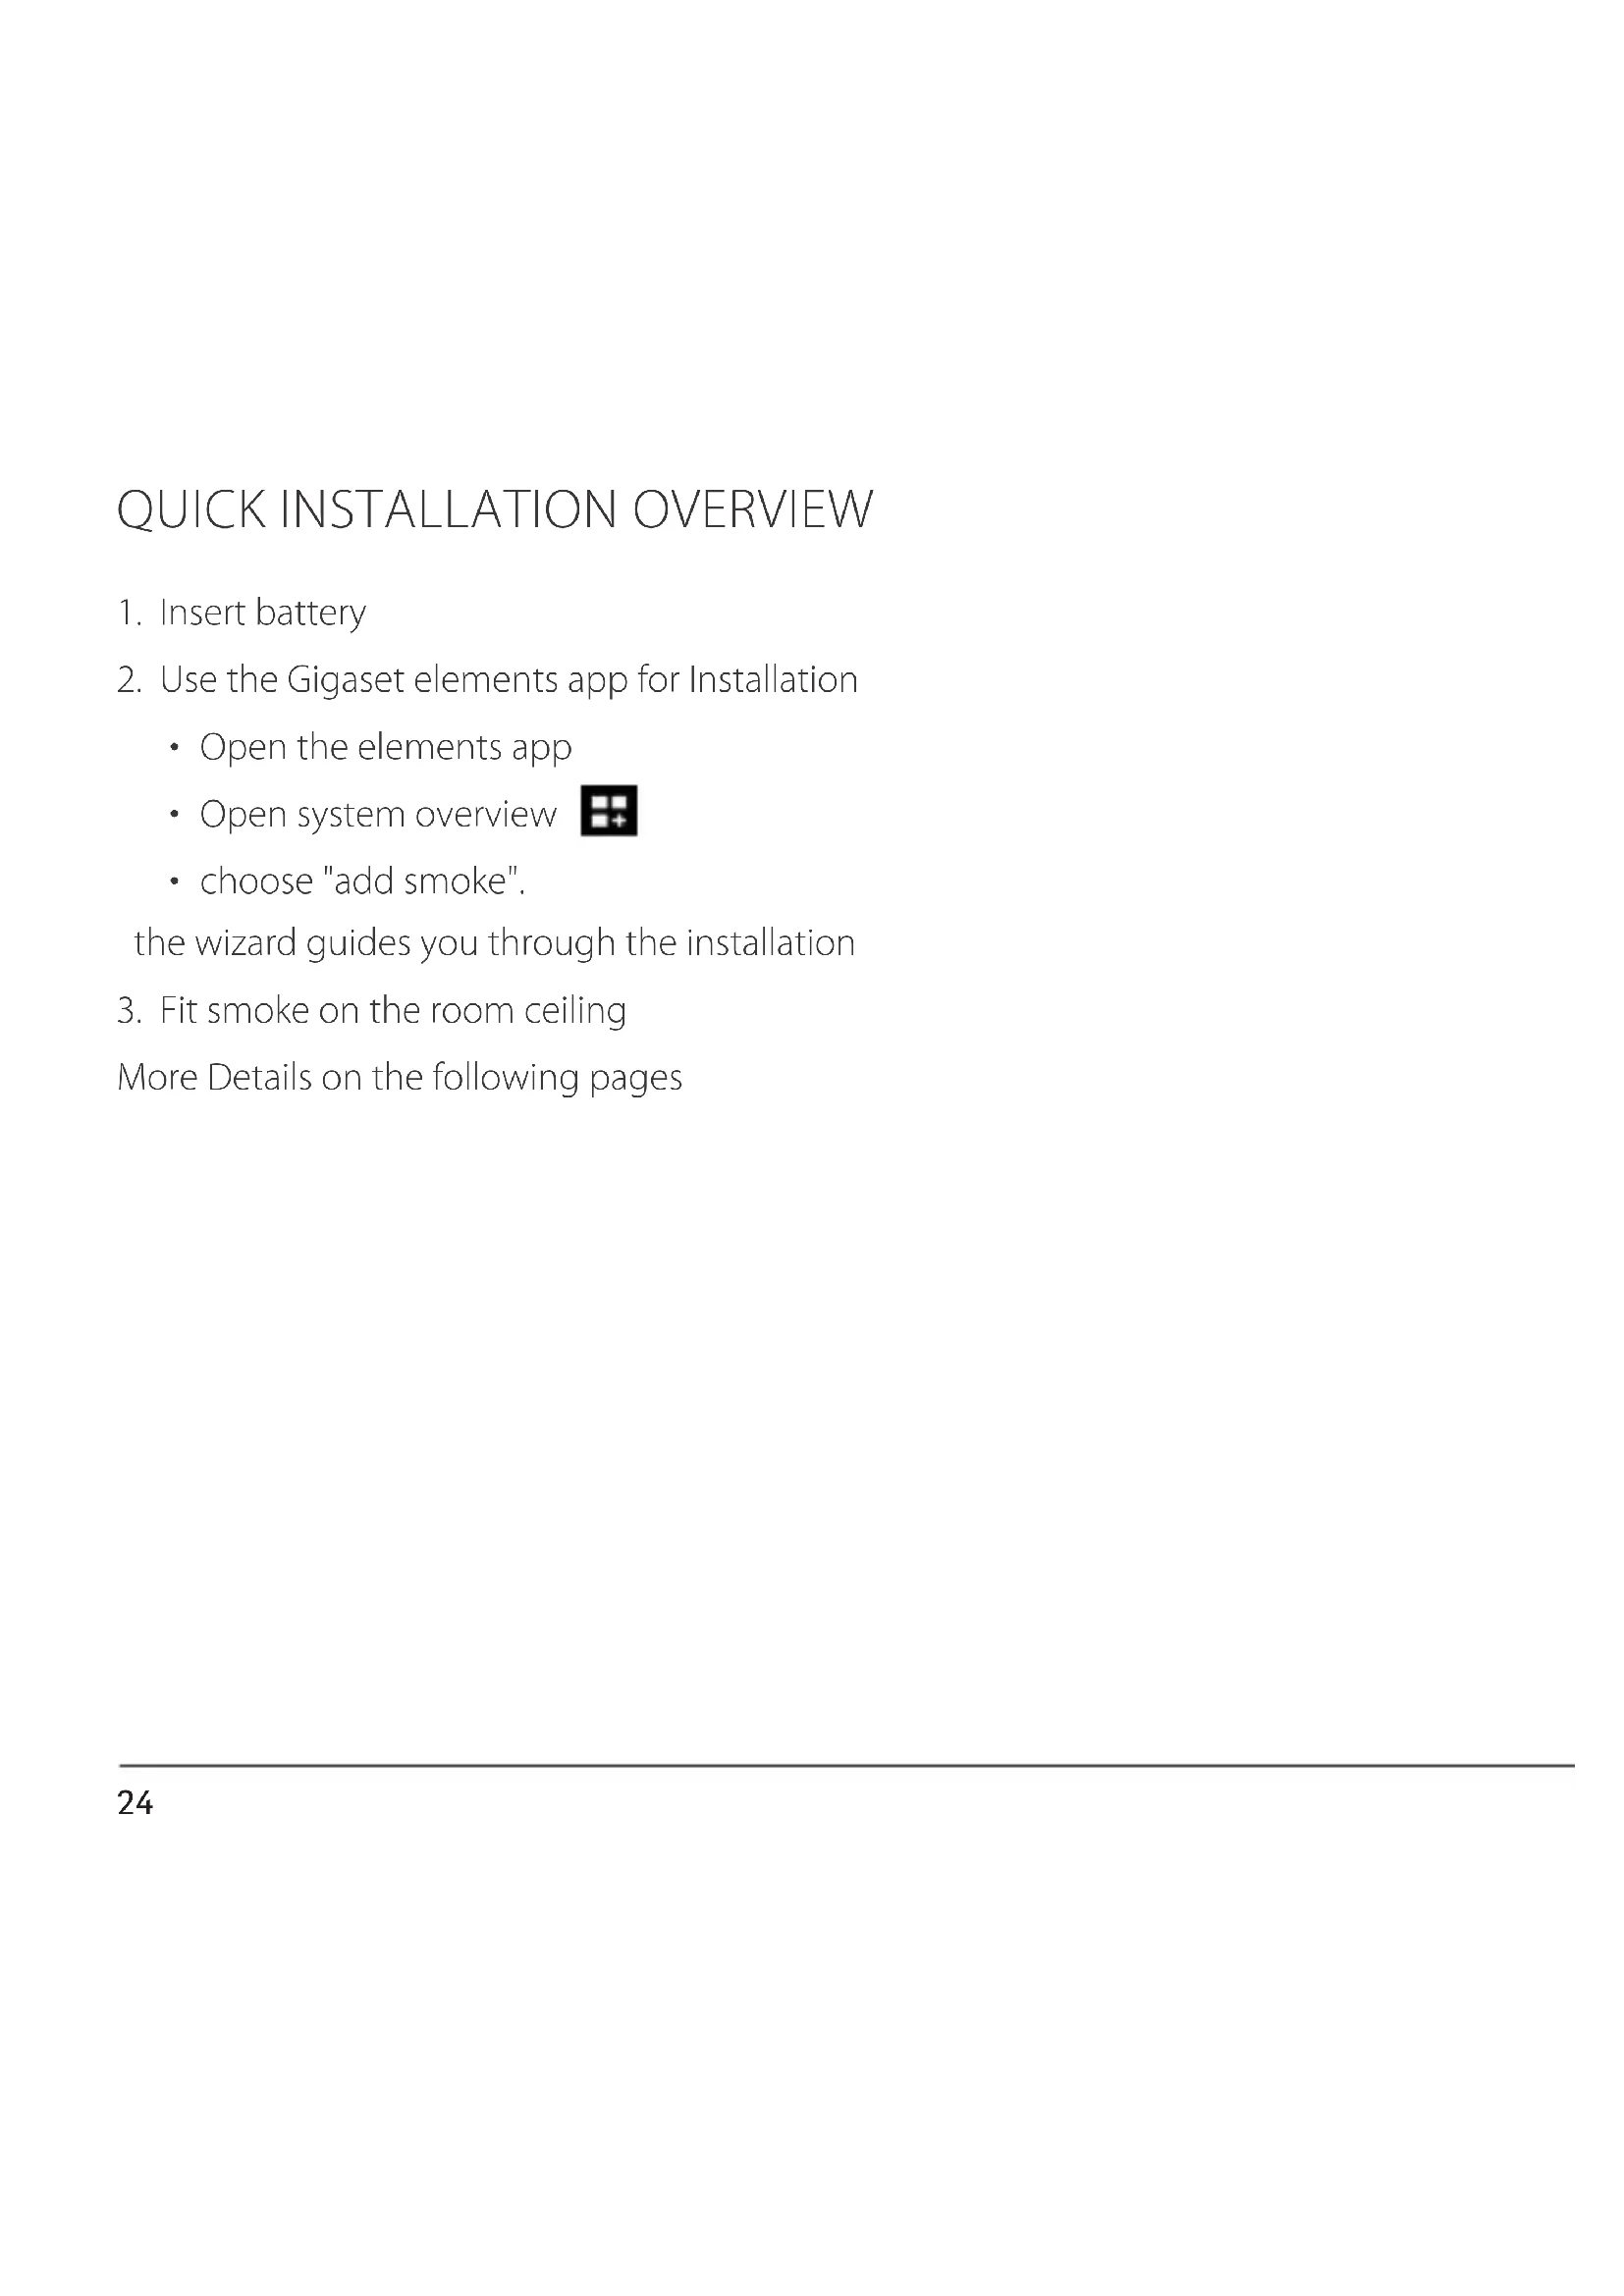
QUICK INSTALLATION OVERVIEW
- Insert battery
-
Use the Gigaset elements app for Installation
-
Open the elements app
- Open system overview
- choose "add smoke".
the wizard guides you through the installation
- Fit smoke on the room ceiling
More Details on the following pages
- Insert battery
-
Use the Gigaset elements app for Installation
-
Open the elements app
- Open system overview
- choose "add smoke".
the wizard guides you through the installation
- Fit smoke on the room ceiling
More Details on the following pages
OPERATING AND INSTALLATION GUIDE
CONTENTS
General information 26
Installation location 27
Safety information 29
Installation and use 35
System and alarm signals 39
Function and alarm test 40
Maintenance and care 41
Alarm / battery fault muting 42
Optional accessory 43
Information on the adhesive strips 44
SMOKE ALARM smoke
GENERAL INFORMATION:
The smoke alarm alerts you early and reliably to an accumulation of fire smoke, and gives you and your family plenty of time to escape to safety.
This is of particular importance at night because when asleep we are not able to smell fire smoke, and so are exposed to the toxic gases generated by fires.
During this phase, the smoke alarm gives you a head start to escape the room safely.
Experience has shown that smoke alarms save lives.
In this respect, please also follow our instructions on using our product properly.
Delivered with the smoke alarm (including base) are this operating guide, the leaflet with important information, a permanently installed battery, a replaceable battery, 2 screws and dowels for attaching the alarm, and an adhesive pad.
OPERATING AND INSTALLATION GUIDE
INSTALLATION LOCATION
The smoke alarm is fitted to the ceiling of the room. Fitting it in the centre of the room gives the smoke alarm its optimum detection characteristics.
To provide minimum protection, smoke alarms must be installed in bedrooms, children's rooms and landings/hallways so you are woken up when an alarm is raised.
In multi-storey buildings, at least one additional smoke alarm should be positioned in the hallway on every floor.
If a smoke alarm is connected to a Gigaset base, the maximum range for DECT wireless transmission is 50 metres (indoor).
NOTE!
The smoke alarm only works when securely seated into the base.
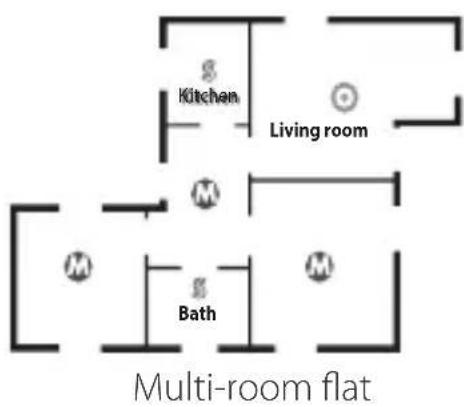
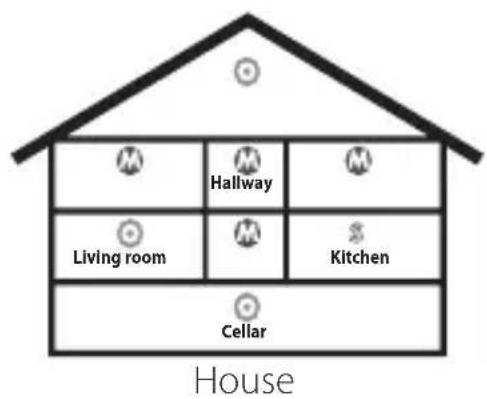
M = MINIMUM PROTECTION
= OPTIMAL PROTECTION
S = SPECIAL PROTECTION
SMOKE ALARM smoke
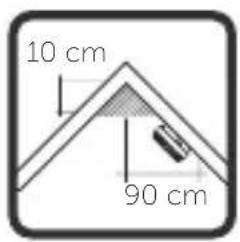
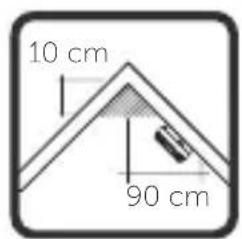
INSTALLATION POSITION FOR INCLINED ROOFS
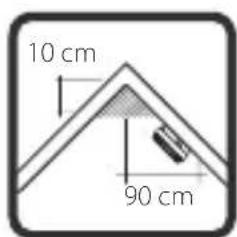
FOR INCLINED OR POINTED ROOFS
For installation to inclined or pointed ceilings, and rooms with an inclined ceiling, smoke alarms should be installed at least 10 cm vertically underneath the highest point, and no more than 90 cm horizontally from the highest point.
These distances also apply when multiple alarms are installed in one room. Install individual smoke alarms at appropriate distances from each other.
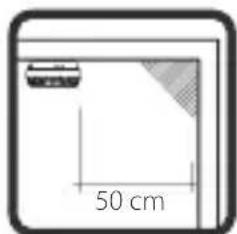
CEILING INSTALLATION
When fitting smoke alarms to the ceiling, keep a distance of at least 50~cm from a wall.
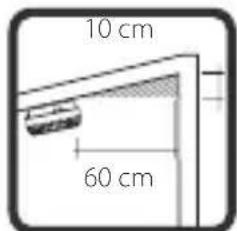
ANGLED CEILING
In rooms having a ceiling at an angle greater than 7 degrees (corresponds to a height difference of about 50~cm over 4m ), smoke alarms should be positioned on the ceiling in the higher part of the room.
OPERATING AND INSTALLATION GUIDE
SAFETY INFORMATION - PLEASE NOTE:

NOTE
Read the safety instructions and user guide prior to use.
The smoke alarm is delivered with a permanently installed battery and a replaceable battery. No rechargeable batteries or mains adapters are required to provide power.

Only insert the following batteries: Lithium Primary 3.0 Volt (CR2). Batteries with visible damage must be replaced.
MEDICAL DEVICES
The functioning of medical devices can be affected.
Bear in mind the technical conditions of the environment in question (such as a doctor's surgery).
If you use medical devices (such as pacemakers), please find out from the device manufacturer the extent to which the devices in question are immune to external, high-frequency energy.
SMOKE ALARM smoke
SAFETY INFORMATION - PLEASE NOTE:
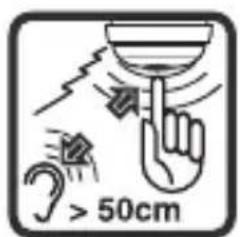
CAUTION - ACOUSTIC WARNING SIGNAL
A loud, high-pitched alarm sounds when the function tests are performed (the face of the alarm is pressed).
Keep your ears at least 50 cm away from the smoke alarm.
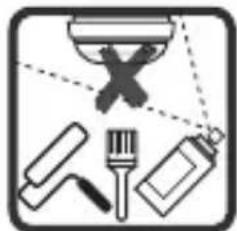
DO NOT SPRAY OR PAINT OVER AN ALARM
Smoke alarms may not be coated with paint.
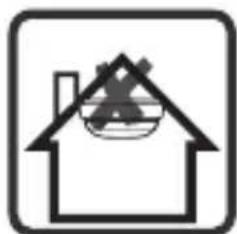
INSTALLATION IN ROOF GABLES
Installation in roof gables is only permitted when they are fitted in line with "Installation position for inclined roofs".
OPERATING AND INSTALLATION GUIDE
SAFETY INFORMATION - PLEASE NOTE:
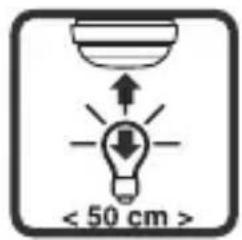
DISTANCE FROM LIGHTS
Keep a distance of at least 50~cm between lights and smoke alarm installation position.
FORINDOORUSEONLY
Smoke alarms are only permitted for indoor use.

People have a reduced perception of fire and fire smoke especially when asleep. Smoke alarms provide an early warning so that speedy reactions are possible. Smoke alarms do not provide protection from material damage.
SMOKE ALARM smoke
SAFETY INFORMATION - PLEASE NOTE:
BEAR IN MIND THE ENVIRONMENT
Do not use the devices in potentially explosive environments, such as paint shops.
DISPOSAL
Do not throw (rechargeable) batteries out with household waste. For this, observe local waste disposal regulations (available from your local authority).
In Germany: Dispose of these in the green "Gemeinsame Rücknahmesystem Batterien" (Collective return system for batteries) boxes provided at specialist retailers.
OPERATING AND INSTALLATION GUIDE
SAFETY INFORMATION - PLEASE NOTE:
All electrical and electronic devices must be disposed of at local authority sites (separate from general household waste).
If a product displays the symbol of a crossed-out rubbish bin, the product is subject to European Directive 2012/19/EU.
Proper disposal and separate collection of used equipment help to prevent potential harm to human health and the environment. They are prerequisites for the reuse and recycling of used electrical and electronic equipment.
Consult your local authority or waste disposal firm for more comprehensive information on disposal of your old devices.
SMOKE ALARM smoke
SMOKE ALARMS MAY NOT BE AFFIXED AT THE FOLLOWING PLACES:
DISTANCE FROM WATER VAPOUR
Rooms in which high levels of water vapour are generated under normal conditions (e.g. kitchen, bathroom/toilet)
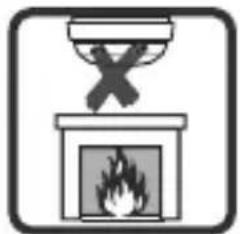
DISTANCE FROM FIREPLACES
Near fireplaces and open flues
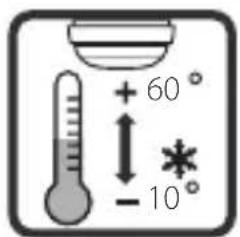
TEMPERATURE RANGE
Rooms having temperatures lower than -10^ or higher than +60^
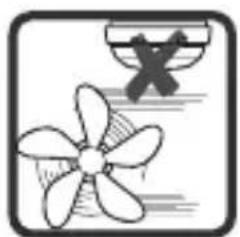
DO NOT POSITION IN DRAUGHTS
Near ventilation shafts (e.g. of air-conditioning or recirculation air system)
OPERATING AND INSTALLATION GUIDE
INSTALLATION AND USE
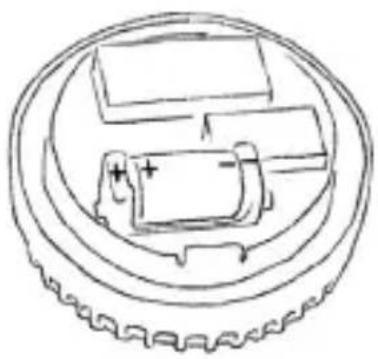
- Insert the battery. Note the correct polarity.
-
Register smoke to your base station.
-
Look for the small red registration button.
- Bring smoke into the immediate vicinity of your base.
- Start the Gigaset elements app.
- In the app, open the system overview and select "Add + smoke", then follow the instructions on the screen.
- Smoke is then connected to Gigaset elements and is shown in the system overview of the app.

SMOKE ALARM smoke
-
Decide on the right location for smoke:
-
Within reach of base (max. 50 m).
- If possible, in the middle of the room, with a minimum distance of 50 cm away from live wires.
-
Check that no live wires run across the installation location and keep a minimum distance of 50~cm from walls and lights.
-
Ensure that the dust created from drilling cannot dirty the smoke alarm.
-
Use adhesive pads for installation if you do not want to drill. For information on installing with adhesive pads see: "Optional accessory"
OPERATING AND INSTALLATION GUIDE
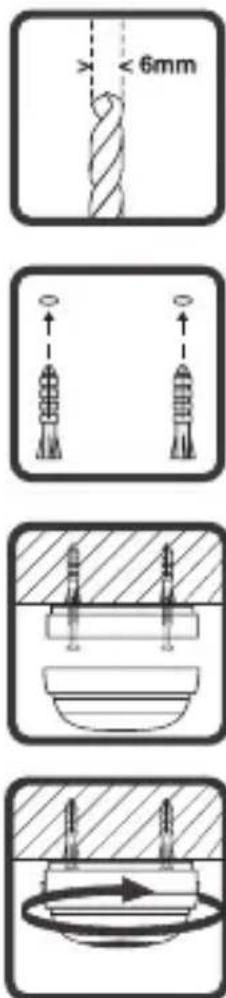
-
Use a 6 mm bit to drill two holes in the ceiling.
-
You can use the lower part / base of the smoke alarm as a template.
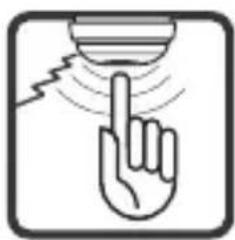
-
Insert the dowels provided into the drill holes.
-
Use the screws supplied to attach the base of the alarm to the ceiling.
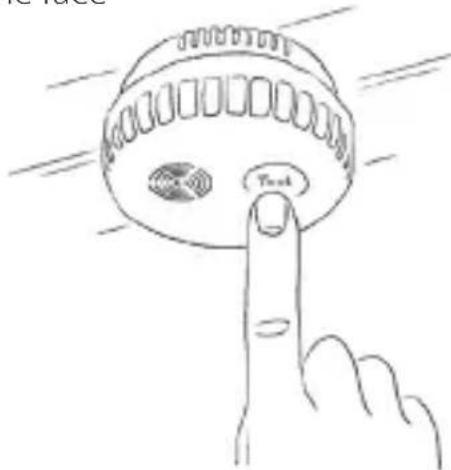
-
Place the face of the alarm onto the lower part and lock it into place by turning it clockwise.
-
The smoke alarm is activated automatically by locking it into the base.
SMOKE ALARM smoke
- Perform a function test. To do this, press the face of the alarm for at least 1 second.
- When the signal sounds, the function test is successful and the smoke alarm is working correctly.

OPERATING AND INSTALLATION GUIDE
SYSTEM AND ALARM SIGNALS
| Acoustic signal Red LED Function / Meaning | ||
| No sound | Flashes every 344 seconds | Normal state, automatic self-test |
| Loud intermittent sound every 0.5 seconds | Flashes every 0.5 seconds | Alarm state |
| Short signal sound every 40 seconds | OFF | Battery change display, please renew the alarm |
| 3 short signal sounds every 40 seconds | OFF | Fault/dirt, please renew the alarm |
| No sound | Flashes every 10 seconds | Alarm muting |
| Loud intermittent sound | Flashes every 0.5 seconds whilst the face of the alarm is pressed | Function test |
SMOKE ALARM smoke
FUNCTION AND ALARM TEST
- Perform a visual inspection of the smoke alarm.
In so doing, check:
- The smoke alarm is in place
- The smoke inlet openings for coarse dirt (dust, paint)
- The smoke alarm for mechanical damage
A damaged smoke alarm must be replaced immediately.
- Perform a function test. To do this, press the face of the alarm for at least 1 second. The signal sounds if the function test is successful.
The smoke alarm is working correctly.
- DIN 14676 stipulates that smoke alarms must be replaced with new ones after 10 years at the latest.
After every function test, alarm muting is enabled automatically for approx. 10 minutes.
NOTE!
Alarm muting has no function when the smoke alarm is tested with test aerosol.
OPERATING AND INSTALLATION GUIDE
MAINTENANCE
The state building codes in some federal states stipulate that owners of houses and flats are responsible for ensuring that smoke alarms are installed and function correctly. Maintenance must be performed at least once a year and comprises (according to DIN 14676) a visual inspection and function/alarm test. A function test must be performed following a longer period of absence, but no later than after a year.
REplacement DATE ON THE LABEL
Replace all smoke alarms after 10 years at the latest.
The recommended date for replacement is on the label in format month/year.
Smoke alarms can be stored for a maximum period of 2 years before being used.
CARE
Wipe the device with a damp or antistatic cloth.
Do not use solvents or microfibre cloths.
Never use a dry cloth as this can cause static charging.
SMOKE ALARM smoke
ALARM MUTING
When an alarm is raised, alarm muting can be activated by pressing the face of the alarm. This reduces the response sensitivity of the alarm / increases its activation threshold. The alarm is muted if the smoke concentration in the smoke chamber is below the increased activation threshold after the face
of the alarm is pressed.
If the smoke concentration is still above the increased activation threshold, muting is not activated until the smoke concentration drops below the increased activation threshold.
The smoke alarm is muted.
The smoke alarm returns to normal mode after about 10 minutes.
BATTERY FAULT MUTING
This function is especially useful at night. Press the test button on the face of the alarm to suppress the fault signal for about 8 hours when a battery fault occurs. After this time, the battery fault signal is sounded again and you are reminded to replace the smoke alarm.
OPERATING AND INSTALLATION GUIDE
OPTIONAL ACCESSORY
CNBOP-PIB APPROVED ADHESIVE PAD
The smoke alarm base can be attached to the ceiling using the screws and dowels supplied or with the dual-sided adhesive pad. For order request, please contact the Gigaset customer service www.gigaset.com/service.
When using the adhesive pad to fit the alarm, note the condition of the surface in question to guarantee secure adhesion of the smoke alarm. Best possible adhesive force is only attained with clean surfaces. Before using the adhesive pad, carefully check that the condition of the surface used is suitable for permanent bearing and bonding of the weight (carry out test adhesion as required).
For installation, pull the protective film from one side of the adhesive pad and stick it onto the middle of the base of the smoke alarm. Next, remove the protective film on the other side and press the base firmly to attach it to the ceiling. Then continue with the installation as described in section "Installation and use".
SMOKE ALARM smoke
INFORMATION ON THE ADHESIVE STRIPS
- Only stick the sensors onto clean, dry, grease-free surfaces which are as smooth and sturdy as possible.
- The optimal adhesive strength is attained after about 48 hours.
- The adhesive strips are intended for one-time use only.
- Only use the adhesive strips provided.
Gigaset Communications GmbH assumes no liability for potential damage to surfaces caused by sticking on, setting up, installing and removing Gigaset sensors and actuators.
ANTI-TAMPER SEAL OR SAFETY SCREW
A plastic anti-tamper seal can be affixed to the smoke alarm to prevent unauthorised removal.
Instead of this seal, a safety screw can be fitted to prevent unauthorised removal of the smoke alarm.
The seal and screw are not included in the delivery and can be ordered separately. Please contact the Gigaset customer service www.gigaset.com/service.
APERCU INSTALLATION RAPIDE
M = PROTECTION MINIMALE
PROTECTION OPTIMALE
= PROTECTION SPECIALE
DETECTEUR AVERTISSEUR DE FUMEE smoke
EMPLACEMENT DE MONTAGE POUR TOITS INCLINÉS
PLAFONDS INCLINES OU POINTUS
ACCESSORIES OPTIONNELS
PATINS ADHÉSIFS RECONNUS CNBOP-PIB
M MINIMALE BESCHERMING
= OPTIMALE BESCHERMING
S = SPECIALE BESCHERMING
ROOKMELDER smoke
MONTAGE BIJ SCHUINE DAKEN
SCHUINE PLAFONDS OF NOKKEN VAN DAKEN
WAARSCHUWINGSSIGNAAL
ALMOHADILLAS ADHESIVAS
www.gigaset.com/service.
Manufacturer: Gigaset Communications GmbH

Issued by
Gigaset Communications GmbH
Frankenstr. 2a, D-46395 Bocholt
© Gigaset Communications GmbH 2019
Subject to availability.
All rights reserved. Rights of modification reserved.
www.gigaset.com

A31008-N2517-R101-2-4X19
- QUICK INSTALLATION OVERVIEW
- OPERATING AND INSTALLATION GUIDE
- CONTENTS
- Installation and use 35
- SMOKE ALARM smoke
- GENERAL INFORMATION:
- INSTALLATION LOCATION
- NOTE!
- INSTALLATION POSITION FOR INCLINED ROOFS
- FOR INCLINED OR POINTED ROOFS
- CEILING INSTALLATION
- ANGLED CEILING
- NOTE
- MEDICAL DEVICES
- INSTALLATION AND USE
- FUNCTION AND ALARM TEST
- MAINTENANCE
- REplacement DATE ON THE LABEL
- CARE
- ALARM MUTING
- BATTERY FAULT MUTING
- OPTIONAL ACCESSORY
- CNBOP-PIB APPROVED ADHESIVE PAD
- INFORMATION ON THE ADHESIVE STRIPS
- ANTI-TAMPER SEAL OR SAFETY SCREW
- APERCU INSTALLATION RAPIDE
- DETECTEUR AVERTISSEUR DE FUMEE smoke
- EMPLACEMENT DE MONTAGE POUR TOITS INCLINÉS
- PLAFONDS INCLINES OU POINTUS
- ACCESSORIES OPTIONNELS
- ROOKMELDER smoke
- MONTAGE BIJ SCHUINE DAKEN
- SCHUINE PLAFONDS OF NOKKEN VAN DAKEN
- ALMOHADILLAS ADHESIVAS
Brand : GIGASET
Model : Elements Smoke Pack
Category : Detector