
BakeMaster Mini - Barbecue Hendi - Free user manual and instructions
Find the device manual for free BakeMaster Mini Hendi in PDF.

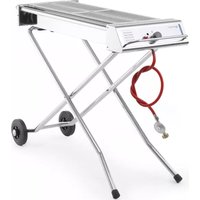
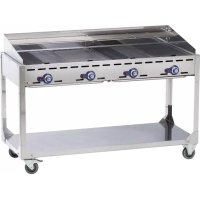
| Product type | Gas barbecue |
| Brand | Hendi |
| Model | BakeMaster Mini |
| Usage | Outdoor only |
| Fuel | Propane gas (bottle >10 kg recommended) |
| Ignition type | Piezo electric (ignition button) |
| Burner material | Stainless steel |
| Injector diameter | 1.10 mm |
| Gas hose length | Maximum 1.5 m |
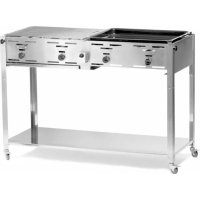
| Main accessories | Top grill, optional cooking plate, grease container, legs, wheel (Quattro) |
| Available spare parts | Cooking plate, grills, container, legs, wheel, ignition button, gas valve, burner |
| Maintenance | Clean exterior with damp cloth and mild detergent; soak and brush the grill; do not immerse |
| Safety | Do not move while lit, do not modify, keep out of reach of children, annual check of hose and installations |
| Warranty | 1 year (free repair or replacement in case of defect) |
Frequently Asked Questions - BakeMaster Mini Hendi
User questions about BakeMaster Mini Hendi
0 question about this device. Answer the ones you know or ask your own.
Ask a new question about this device
Download the instructions for your Barbecue in PDF format for free! Find your manual BakeMaster Mini - Hendi and take your electronic device back in hand. On this page are published all the documents necessary for the use of your device. BakeMaster Mini by Hendi.
USER MANUAL BakeMaster Mini Hendi
You should read this user manual carefully before using the appliance.
Thank you for purchasing this Hendi appliance. Please read these user instructions carefully before connecting the appliance in order to prevent damage due to incorrect use. Read the safety instructions in particular very carefully.
Safety Regulations
- Only use this appliance outdoors.
- Incorrect operation and improper use of the appliance can seriously damage the appliance and injure users.
- The appliance may only be used for the purpose it was intended and designed for. The manufacturer is not liable for any damage caused by incorrect operation and improper use.
- Never try to open the casing of the appliance yourself.
- Do not insert any objects in the casing of the appliance.
- Do not use the appliance after it has fallen or is damaged in any other way. Have it checked and repaired, if necessary, by a certified repair company.
- Do not try to repair the appliance yourself. This could give rise to life-threatening situations.
- Always keep an eye on the appliance when in use.
- Children do not understand that incorrect use of appliances can be dangerous. Therefore, never let children use appliances without supervision.
- Do not use any extra devices that are not supplied along with the appliance.
- The use of the installation must comply with the applicable national and local regulations.
- This appliance is not intended for use by persons (including children) with reduced physical, sensory or mental capabilities, or lack of experience and knowledge, unless they have been given supervision or instruction concerning use of the appliance by a person responsible for their safety.
- This appliance is intended solely for preparing food.
- Gas and electrical installations should be checked at least once a year.
- Note: the griddle is hot. Let it cool down before touching or removing it.
- We recommend to use only gas cylinders with a capacity of more than 10 kilo's.
General instructions
- Necessary changes may only be done by a qualified technician
- Use only the supplied pressure regulator.
- This appliance is only suited for propane gas.
- Check that there are no kinks in the gas hose.
- The length of the gas hose may not exceed 1,5 meters.
- Keep the appliance away from (easily) flammable material.
- Do not move the gas appliance during use.
Always close the tap on the gas cylinder if the appliance is no longer being used. -
The user must not change parts of the appliance that are sealed by the manufacturer.
Install the appliance as level as possible. -
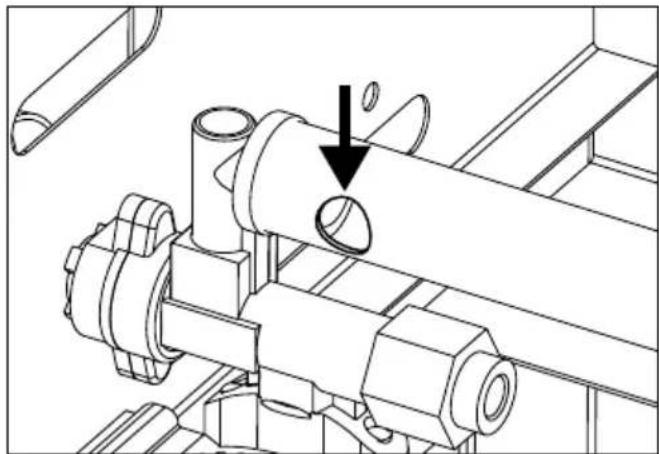
Before each use, the user must always check whether the holes [pictured below] of the burner are clear of obstructions and not blocked.
- Replacement of the gas bottle must be performed outside the range of any sources of ignition.
WARNING: Some parts of the appliance can become hot. Keep children away from the gas griddle.
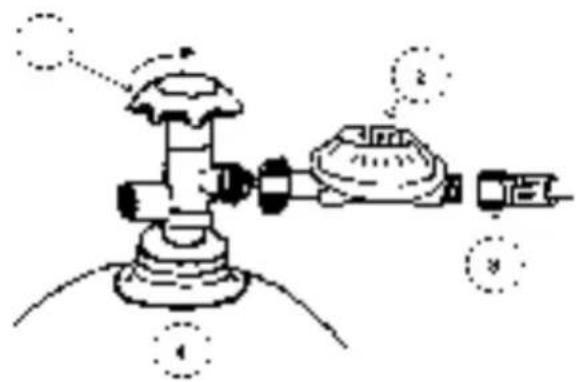
Connecting the gas bottle
1 = main tap
2 = pressure regulator
3 = gas hose
4 = gas bottle
Attach the pressure regulator to the gas bottle using the large brass nut. Always ensure that the rubber-sealing washer is present in the nut. [NB. This rubber washer is not required for UK-type pressure regulators]. Tighten the nut well. Note that the nut has a left-hand thread.
Check the connections for leaks using a soap and water solution.
Igniting the gas griddle
- Place the grill grid.
- Turn the knob to the "big flame" position. Keep the knob pressed and press the ignition button a few times until the burner is burning complete
ly. Keep the knob pressed in for approximately a further 10 seconds. The burner will continue to burn.
Turning off the gas griddle
- Turn the knob completely to the right. The burner will go off.
Note! After turning off the burners, wait approximately 10 minutes before reigning the burners. After turning off the burners, always turn off the main tap on the gas cylinder and the tap on the appliance!
Cleaning and maintenance
- Let the appliance cool down before cleaning
- Beware: Never immerse the appliance in water or any other liquid!
- Clean the outside of the appliance with a damp cloth (water with mild detergent).
- The grid and/or baking tray of the grill should be cleaned regularly. Let it soak in cleaning agent first, then use an abrasive material like a scourer or wire brush. If you use special barbecue cleaner, follow the instructions on the packaging.
-
Clean the ventilation slots (if applicable) with a vacuum cleaner.
-
Keep inside after use.
- Let specialised personnel clean at least once a year the burner.
- Never use a high pressure cleaner.
- Maintenance after every use: Clean the griddle. Clean the grease holder.
- If the injector must be replaced, replace it only with an original spare part acquired from the manufacturer. The diameter of the injector is noted on the injector: 1.10 ~mm .
Fault
| Fault Possible cause Fault | lt Possible cause | ||
| Burner will not ignite: Defective igniter Burner does not burn fully: Gas cylinder is (almost) empty | |||
| Defective thermocouple | |||
| Dirty sparking plug Kink in gas hose | |||
| Defective pressure regulator | |||
| Empty gas cylinder | |||
| Kink in gas hose Defective gas tap | |||
| Clogged jet Main jet clogged | |||
Note
-
It is to be recommended to replace the gas hose after 3 or 4 years (see date shown on hose). The gas hose becomes porous after a time. Also check the hose for leaks on a yearly basis at least. Even if the expiration date has not been expired yet, you must check the condition of the hose always. In case of damage/cracks you have to replace the hose immediately. Please make sure that you comply with all local health and safety regulations (e.g. fire code).
-
Pressure regulators have a default maximum life span as indicated by the date printed on the regulator, but please note that local health and safety regulations may overrule this.
- Only replace the pressure regulator with one provided by the manufacturer.
- Consult the local regulations, these may differ.
- Always store gas bottles upright, in use as well as when empty.
Accessories
| Description Article no. | |
| Baking tray Grill/Bake master Mini 154687 | |
| Baking tray Grill/Bake master Maxi/ Quattro 154656 | |
| Upper grid Grill master Mini 154663 | |
| Upper grid Grill master Maxi/ Quattro 154632 | |
| Lower grid Grill master Mini 154670 | |
| Lower grid Grill master Maxi/Quattro 154649 | |
| Grease holder Grill master Mini 154748 | |
| Grease holder Grill master Maxi/ Quattro 154755 | |
| Leg Grill master Mini 154823 | |
| Leg Grill master Maxi 154694 | |
| Leg Grill master Quattro 928226 | |
| Wheel Quattro 928233 | |
| Ignition button Grill/Bake master Mini/Maxi/Quattro | |
| button Quattro 928240 | |
| Gas tap Grill/Bake master Mini / Maxi/Quattro | 154724 |
| Burner Grill/Bake master Mini / Maxi / Quattro | 154731 |
EN
Important!
When you are using the baking tray for the Grillmaster Mini / Maxi / Quattro, you must remove the upper & lower griddle and the grease holder. When you don't do this, there will be such an amount of heat inside the appliance that this heat will cause damage.
Warranty
Any defect affecting the functionality of the appliance that becomes apparent within one year after purchase will be corrected by free repair or replacement provided the appliance has been used and maintained in accordance with the instructions and has not been abused or misused in any way. Your statutory rights are not affected. If the appliance is claimed under warranty, state where and
when it was bought and include proof of purchase (f.e. receipt).
In line with our policy of continuous product development we reserve the right to change the product, packaging and documentation specifications without notice.
Discarding & Environment
At the end of the life of the appliance, please dispose of the appliance according to the regulations and guidelines applicable at the time.
Throw packing materials like plastic and boxes in the appropriate containers.
1=IraBbIiBeHTnIb
2 = peDyKTop
3 = rα3OBbI WJIaHr
4=6aJIIOH Cra3OM
IodKIOHTe peyKTOp K ra3OBMy 6aHNoHy c nomOu60JIbWoJ NaTyHHoRraIKn. Bcerda cJeDInTe 3a TEM, yTO6bl raiKa ImeJa pe3INHOoe yNIOTHHeHne. (PpIMeAHHe: Pe3INHOoe yNIOTHHeHne He Tpe6byETcA dJa peyKTopa TaKOro Tnna, KOtOpBn NcNoB3yeemCBA BeNIko6pTuTahnn). 3aTaNITE KpeNko raKy. PpIMeAHHe: raKa IMeet neByIO pe3b6y.

PpOBepbTe coeHHeHn Ha repMeTnHocThMbIbHbIM pactBOpOM.
BkIoueHne ra3oBOrorpna
Hendi Food Service Equipment GmbH
Central Barn, Hornby Road
Lancaster, LA2 9JX, United Kingdom
Tel: +44 (0)333 0143200
Email: sales@hendi.co.uk
Hendi Food Service Equipment Romania Srl
PKS Hendi South East Europe SA
5 Metsovou Str.
18346 Moschato, Athens, Greece
Tel: +30 210 4839700
Email: office.greece@hendi.eu
Hendi HK Ltd.
1208, 12/F Exchange Tower
33 Wang Chiu Road, Kowloon Bay, Hong Kong
Tel: +852 2154 2618
Email: info-hk@hendi.eu
FindHendi on internet:
www.hendi.eu
www.facebook.com/HendiFoodServiceEquipment
www.linkedin.com/company/hendi-food-service-equipment-b.v.
www.youtube.com/HendiEquipment
- Changes, printing and typesetting errors reserved.
- Änderungen und Druckfehler vorbehalten.
Wijzigingen en drukfouten voorbehonden. - Producent zastrzega sobie prawo do zmian oraz będów drukarskich w instrukczy.
-
Variations et fautes d'impression réservés.
-
Errori di cambiamenti, di stampa e di impaginazione riservati.
- Drepturi rezervate cu privire la modificari si greseli de imprimare.
-ImMeHeHn,neaTnBepCTKnOuN6Kn3auiuHbI.
-Me enupaen aaiayaw,aaewkrtunwoc koiotouxeioepia
- Safety Regulations
- General instructions
- Connecting the gas bottle
- Igniting the gas griddle
- Turning off the gas griddle
- Cleaning and maintenance
- Note
- Important!
- Warranty
- Discarding & Environment
- BkIoueHne ra3oBOrorpna
- Hendi Food Service Equipment GmbH
- Hendi Food Service Equipment Romania Srl
- PKS Hendi South East Europe SA
- Hendi HK Ltd.
- FindHendi on internet:
Brand : Hendi
Model : BakeMaster Mini
Category : Barbecue