
DVP911 - Portable DVD Player LENCO - Free user manual and instructions
Find the device manual for free DVP911 LENCO in PDF.

| Product Type | Portable DVD Player |
| Brand | Lenco |
| Model | DVP911 |
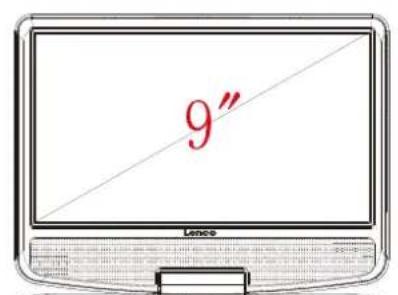
| Screen | 9-inch TFT screen (approx.), configurable 16:9 or 4:3 aspect ratio |
| Power Supply | AC adapter 100-240 V AC, 50/60 Hz; rechargeable battery 7.4 V |
| Power Consumption | < 10 W |
| Battery Charging Time | Approximately 3 to 4 hours |
| Supported Disc Formats | DVD, VCD, CD, MP3, JPEG |
| Main Functions | DVD/VCD/CD/MP3/JPEG playback, zoom, slow motion, programming, repeat, multiple angles, subtitles, audio languages, OSD menu |
| Connections | AV output (video + audio), headphone jack, USB port, DC 9-12 V input |
| Remote Control | Yes, included |
| Built-in Speakers | 2 × 1 W |
| Car Installation | Headrest mounting kit included |
| Video Settings | NTSC/PAL, picture format 4:3 or 16:9, brightness/contrast/saturation settings |
| Audio Settings | Stereo mix, Dolby Digital (dual mono, dynamic), language selection |
| Maintenance and Cleaning | Soft dry cloth; do not use solvents. Unplug before cleaning. |
| Safety Instructions | Do not expose to moisture, do not block openings, avoid magnetic fields, unplug during storms, do not open the casing |
| Operating Temperature | 0 °C to 45 °C (battery charging); -20 °C to 65 °C (discharging) |
| Spare Parts and Repairability | Contact an authorized repair center; unauthorized opening voids warranty. AC adapter (model PEA-090100VE/PEA-090100VG) available. |
| General Information | Warranty according to European legislation. Non-professional use only. CE marking. |
Frequently Asked Questions - DVP911 LENCO
User questions about DVP911 LENCO
0 question about this device. Answer the ones you know or ask your own.
Ask a new question about this device
Download the instructions for your Portable DVD Player in PDF format for free! Find your manual DVP911 - LENCO and take your electronic device back in hand. On this page are published all the documents necessary for the use of your device. DVP911 by LENCO.
USER MANUAL DVP911 LENCO
Usage of controls or adjustments or performance of procedures other than those specified herein may result in hazardous radiant exposure.
Thisunitshouldnotbeadjustedorpairedbyanyoneexceptqualifiedservicepersonnel.
PRECAUTIONSBEFOREUSE
KEEPTHESEINSTRUCTIONSINMIND:
1.Donotusethisdevicenearwater.
2.Cleanonlywithaslightlydampcloth.
-
- Don't step on or pinch the power adaptor. Be very careful, particularly near the plugs and the cable's exit point. Do not place heavy items on the power adaptor, which may damage it. Keep the entire device out of children's reach! When playing with the power cable, they can seriously injure themselves.
-
- Unplug this device during lightning storms or when unused for a long period.
- Keep the device away from heat sources such as radiators, heaters, stoves, candles and other heat-generating productsornakedflame.
3.Donotcoverorblockanyven tilation openings. When placing the device on a shelf, leave 5 cm (2") free space aroundthewholedevice.
4.Installinaccordancewiththesuppliedusermanual.
8.Avoidusingthedevicenearstrongmagne ticfields.
9. Electrostatic discharge can disturb normal usage of this device. If so, simply reset and restart the device following the instrucitmanual.During file transmission, please handle with care and operate in a safe environment.
10. Warning! Never insert an object into the product through the vents or openings. High voltage flows through the product and iner ting an object can cause electric shock and/or short circuitinternal parts. For the same reason, donotspillwaterorliquidontheproduct.
11. Do not use in wet or moist areas such as bathrooms, steamy kitchens or near swimming pools.
12.Donotusethisdevicewhencondensanmayocur.
13. Although this device is manufactured with the utmost care and checked several times before leaving the factory, it is still possible that problems may occur, as with all electrical appliances. If you notice smoke, an excessive build-up or theateranyotherexpectedphenomena, you should disconnechefrom themainpower socketimmediately.
14. This device must operate on a power source as specified on the specificationlabel.Ifyouarenotsurehe ft typeofpowersupplyusedinyourhome,consultyourdealerorlocalpowercomp any.
15. Thesocketoutletmustbeinstallednearthequipmentandmustbeeasilyaccessible.
16. * Do not overload ac outlets or extension cords. Overloading can cause fire or electric shock.
17.*Deviceswithclass1construc tionshouldbeconnectedtoamainsocketoutletwithaproteceveartied connection.
18.*Deviceswithclass2construc tiondonotrequireaearthedconnecn.ti
19.Keepawayfromrodents.Rodentsenjoybi tingonpowercords.
20. Alwaysholdtheplugwhenpullingitouto fthemainsupplysocket.Dono tpullthepowercord.Thiscause ashortcircuit.
21. Avoid placing the device on any surfaces that may be subject to vibrations or shocks.
22. Tocleanthe device, use as ft drycloth. Donotusesolventsorpetrolbasedfluids. Toremoveseverestains, you mayuseadampclothwithdilutedetergent.
23. The supplier is not responsible for damage or lost data caused by malfunction, misuse, modification of the deviceor battery replacement.
24.Dono tinterruptteconnecntwhenthedeviceisformangortransferrin gfiles.Otherwise,datamayber corruptedorlost.
25.1 fthe unit has USB playback function, the usb memory stick should be plugged into the unit directly. Don't use an usb extension cable because it can cause interference resulting infailingofdata.
26. The apparatus shall not be exposed to dripping or splashing and make sure that no objects filled with liquids, such as vases, are placed on near the apparatus.
27.*Tocpletelydisconnec tthe power input, the mains plug ofthe apparatus shall be disconnected from the mains,asthedisconnectdeviceisthemainsplugofapparatus.
28.1 fthe unit works with battery, Battery shall not be exposed to excessive heat such as sunshine, fire or the like.
- Attention should be drawn to the environmental aspects of battery disposal.
- The apparatus can only be used in moderate extremely cold or climates warm environments should be avoided.
- The rating label has been marked on the bottom or back panel ofthe apparatus.
- This device is not intended for use by people (including children) with physical, sensory or mental disabilities, or a lack of experience and knowledge, unless they're under supervision or have received instructions about the correctuseofthedevc ebytheperson who isresponsiblefortheirsafety.
- This productis intended for non professional use only and notfor commercial or industrial use.
- Make sure the unitis adjusted to a stable position. Damage caused by using this productin an unstable position or by failure to follow any other warning or precaution contained within this user manual will not be covered by warranty.
- Never remove the casing of this apparatus.
- Never place this apparatus on other electrical equipment.
- Do not use or store this productinaplacewhereitissub jectto direct sunlight, heat, excessive dust or vibration.
- Do not allow children access to plastic bags.
- Only use attachments/accessories specified by the manufacturer.
- Refer all servicing to qualified service personnel. Servicing is required when the apparatus has been damaged in any way, such as the power supply cord or the plug, when liquid has been spilled or objects have fallen into the apparatus, when the apparatus has been exposed to rain or moisture, does not operate normally, or has been dropped.
- *Do not use a damaged power cord or plug or a loose outlet. Doing so may result in fire or electric shock.
- Prolonged exposure to loud sounds from personal music players may lead to temporary or permanent hearing loss.
INSTALLATION
- Unpack all parts and remove protective material.
*Do not connectthe unitto the mains before checking the mains voltage and before all other connections have beenmade.
*Those instruction are related only to products using power cable or AC power adaptor.
Power supply adaptor
Manufacturer: Shenzhen Mass Power Electronics Limited
Model number: PEA-090100VE/PEA-090100VG
Only use the power supply listed in the user instructions

WARNING: Prolonged exposure to loud sounds from personal music players may lead to temporary or permanent hearing loss.
To prevent possible hearing damage, do not listen at high volume levels for long periods.
2. Identification of Controls
Main Unit
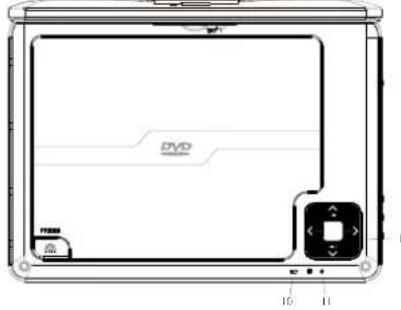
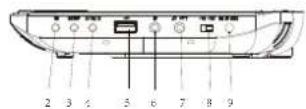
- / Up/Prev
Down/Next
VOL-Left/VOL
VOL+Right/VOL+ - PLAY/PAUSE
- SETUP
- SOURCE
- USB
- Earphone Socket
- AV OUT
- ON/OFF
- DC IN 9-12V
- Battery Charging Indicator Illuminates green flashing when the battery is charging. Illuminates green when the battery is fully charged.
- Power Indicator Illuminates red when the unit is switched on.
2. Identification of Controls
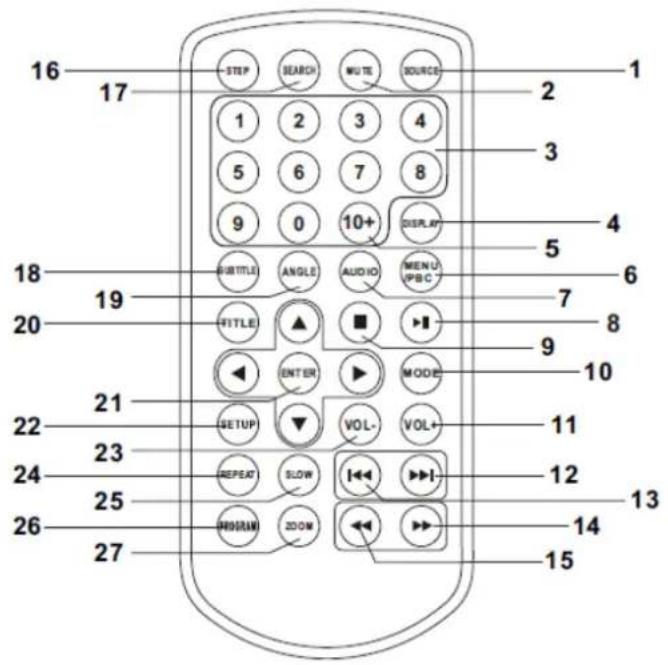
Remote control unit
1. SOURCE
DVD/USB.
2. MUTE
Disable Audio output.
3.0-9 NUMBER BUTTON
Selects numbered items in a menu.
4. DISPLAY
To display the playtime and status information.
5. 10+ BUTTON
In order to select a track 10, for CD, press 10+ button first, then press 0 button; for DVD, press 10+ button, for DVD, select track greater than 10. For example, track 12, first press 10+ , highlight bar appear and further press 10+ and press number 2 button; select track 23, press 10+ button 3 times and press number 3 button.
6. MENU/PBC
Return to DVD root menu (DVD).
PBC on/off switch (VCD).
7.AUDIO
DVD: Press AUDIO repeatedly during playback to hear a different audio language or audio track, if
available.
CD/VCD: Press AUDIO repeatedly during playback to hear a different audio channel (Left, Right, Mix, Stereo).
8. PLAY/PAUSE
Press PLAY/PAUSE once to pause playback, pressing PLAY/PAUSE second time will resume the playback.
9. STOP
When this button is pressed once, the unit records the stopped point, from where playback will resume if PLAY (▶II) is pressed after wards. But if STOP button is pressed again instead of PLAY (▶II) button, there will be no resume function.
10.MODE
Set LCD parameter (adjust brightness, contrast, and saturation).
-
VOL+
-
VOL-
Adjust volume.
12. Forward Skip
Go to next chapter/track.
For MP3, if want to go to desire track, need to press number button on R/C or / button to highlight the track and then press "ENTER" button to play the desire track.
13. Reverse Skip
Go to previous chapter/track to the beginning.
For MP3, if want to go to desire track, need to press number button on R/C or / button to highlight the track and then press "ENTER" button to play the desire track.
14.▶ BUTTON
Press BUTTON allow skipping ahead at 5-level speed (X2 -> X4 -> X8 -> X16 -> X32 -> PLAY); press PLAY button return to normal playback.
2. Identification of Controls
Remote control unit
15. BUTTON
Press BUTTON allow skipping back at 5-level speed (X2 -> X4 -> X8 -> X16 -> X32 -> PLAY), press PLAY button return to normal playback.
16. STEP
Step the motion in DVD mode.
17.SEARCH
Go to time point, title or chapter you want in DVD Mode.
18. SUBTITLE
Press SUBTITLE repeatedly during playback to hear a different subtitle languages.
19. ANGLE
DVD: Press ANGLE will change the view angle, on DVDs that support this feature.
20. TITLE
Return to DVD title menu
21. ENTER
Confirms menu selection.
22. SETUP
Accesses or removes setup menu.
24. REPEAT
Press REPEAT during playback to select a desired repeat mode.
DVD: you can play select repeat chapter/title/off.
CD/VCD: you can select repeat single/all/off.
MP3: you can select repeat single/folder/off and random.
25.SLOW
Press SLOW button repeatedly to enter slow playback, and cycle between different speeds. The speeds are 1/2, 1/4, 1/8, 1/16, and normal.
26.PROGRAM
DVD/VCD: The program function enables you to store your favorite tracks from the disc. Press PROGRAM button; then PROGRAM MENU will appear on screen, now you can use the number key to direct input the titles, chapters or tracks number and select PLAY option. To resume normal playback, press PROGRAM and select clear program option on the program menu, press PROGRAM again to exit program menu.
MP3: Press PROGRAM button, it will go back to the file list. Press PROGRAM button again, it will go back to the MP3 folder
27.ZOOM
DVD/VCD: Use ZOOM to enlarge or shrink the video image.
- Press ZOOM during playback or still playback to activate the Zoom function. The square frame appears briefly in the right bottom of the picture.
- Each press of the ZOOM button changes the TV screen in the following sequence:
2X size 3X size 4X size 1 / 2 size 1 / 3 size 1 / 4 size normal size
JPEG: Use ZOOM to enlarge or shrink the picture.
- Press 'ZOOM'.
- Used "▶" to enlarge, or "▲" to shorten the picture.
Use the button to move through the zoomed picture.
3. SETUP Menu Setting
General Setup Page
Press SETUP button to get to the setup menu. Use direction buttons to select the preferred item. After finishing settings, press SETUP again to normal display.
The following menu items can be changed:
GENERAL: selects the GENERAL PAGE menu.
AUDIO: selects the AUDIO PAGE menu.
VIDEO: selects the VIDEO PAGE menu.
PREFERENCE: selects the PREFERENCE PAGE menu.
General Setup Page
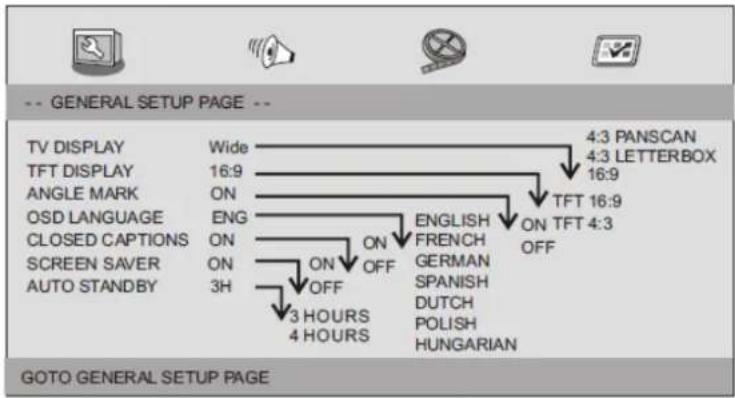
TV DISPLAY: selects the aspect ratio of the playback picture.
4:3 PANSCAN: if you have a normal TV and want both sides of the picture to be trimmed or formatted to fit your TV screen.
4:3 LETTERBOX: if you have a normal TV. In this case, a wide picture with black bands on the upper and lower portions of the TV screen will be displayed.
16:9: wide screen display.
TFT DISPLAY: Select the TFT display to 16:9 or 4:3.
Angle Mark
Displays current angle setting information on the right hand corner of the TFT screen if available on the disc.
OSD Language
You can select your own preferred language settings.
Closed Captions
Closed captions are data that are hidden in the video signal of some discs. Before you select this function, please ensure that the disc contains closed captions information and your TV set also has this function.
Screen Saver
This function is used to turn the screen saver on or off
Auto Standby
This function is used to select auto standby settings after 3 or 4 hours.
3 HOURS: the unit will turn to standby mode after 3 hours if there is no interaction from user within this period of time.
4 HOURS: the unit will turn to standby mode after 4 hours if there is no interaction from user within this period of time.
OFF: the auto standby function is disabled, and the unit will stay in the "on" mode even if there's no interaction from user.
Audio Setup Page
Audio Setup Page
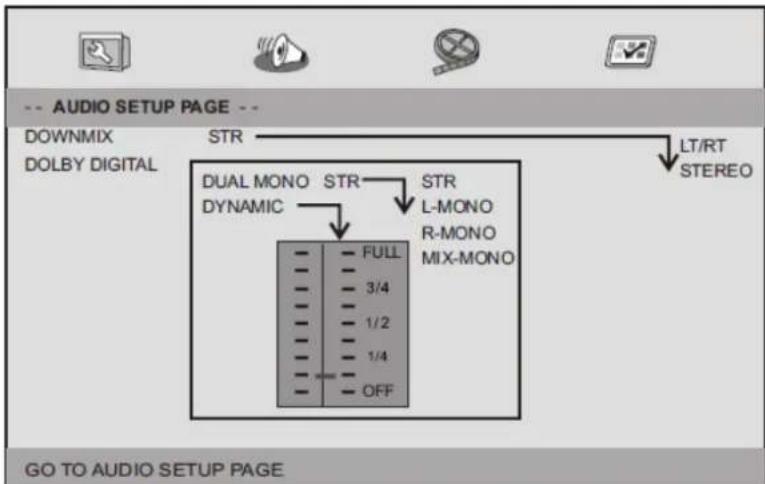
3. SETUP Menu Setting
Audio Setup Page
Downmix
This option allows you to set the stereo analog output of your DVD Player.
LT/RT: Select this option if your DVD Player is connected to a Dolby Pro Logic decoder.
Stereo: Select this option when the output delivers sound from only the two front speakers.
Dolby digital
The options included in Dolby Digital Setup are: 'Dual Mono' and 'Dynamic'.
Dual Mono
Stereo: Left mono sound will send output signals to Left speaker and Right mono sound will send output signals to Right speaker.
L-Mono: Left mono sound will send output signals to Left speaker and Right speaker.
R-Mono: Right mono sound will send output signals to Left speaker and Right speaker.
Mix-Mono: Left and Right mixed mono sound will send output signals to Left and Right speakers.
Dynamic
Dynamic range compression.
Video Setup Page
Video Setup Page
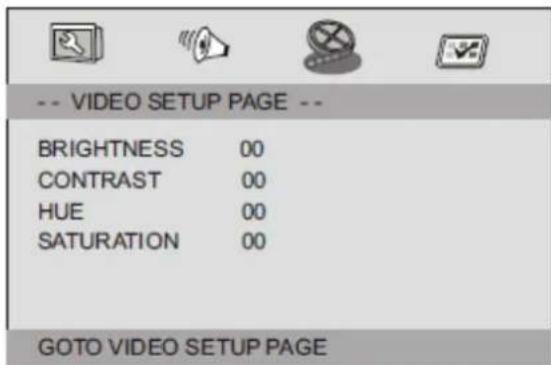
Brightness, Contrast, Hue, Saturation: setting the video quality.
Preference Page
Preference Page
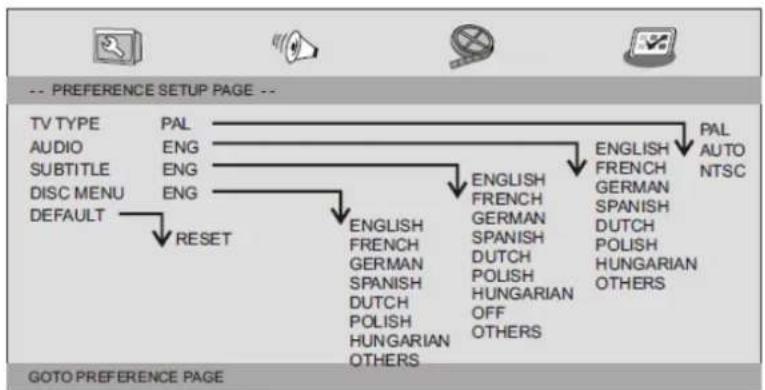
TV Type
Selecting the color system that corresponds to your TV when AV outputs. This DVD Player is compatible with both NTSC and PAL.
3. SETUP Menu Setting
Preference Page
PAL - Select this if the connected TV is PAL system. It will change the video signal of a NTSC disc and output in PAL format.
NTSC - Select this if the connected TV is NTSC system. It will change the video signal of a PAL disc and output in NTSC format.
Auto: Chang the video signal output automatic according to the playing disk format.
Audio: Selects a language for audio (if available).
Subtitle: Selects a language for subtitle (if available).
Disc Menu: Selects a language for disc menu (if available).
Default: Back to the factory setting.
4. Parameters and specifications
Technical parameters
| Item | Standard requirement | |
| Power requirements | : AC 100-240 V, 50/60 Hz | |
| Power consumption | : <10W | |
| Operating humidity | : 5% to 90% | |
| Output | VIDEO OUT | : 1 Vp-p (75Ω) |
| AUDIO OUT | : 1.2 Vrms (1 KHz, 0dB) | |
| Audio | : Speaker: 1Wx2, Headphones output | |
System
| Laser | : Semiconductor laser, wavelength 650 nm |
| Signal system | : NTSC/PAL |
| Frequency response | : 20 Hz to 20 kHz (1 dB) |
| Signal-to-noise ratio | : More than 80 dB (ANALOG OUT connectors only) |
| Dynamic range | : More than 85 dB (DVD/CD) |
Note: Design and specifications are subject to change prior notice.
5. Battery Parameters
Battery Specifications:
Output: 7.4V
Charge/Discharge Time:
Standard charge time: 3h 4h
Storage and work circumstances:
- Storage circumstances
Temperature
Humidity
6 months
-20^ +45^
65 ± 20%
1 week
-20^ +65^
65 ± 20%
2.Work circumstances
Temperature
Humidity
Standard charge
0^ +45^
65 ± 20%
Standard discharge
-20^ +65^
65 ± 20%
Battery Charging
Connect the DVD player to the supplied power adaptor, the LED indicator will be Green Flashing when the battery is charging and will turn into green when the battery is fully charged.
6. Mounting the DVD in a Car
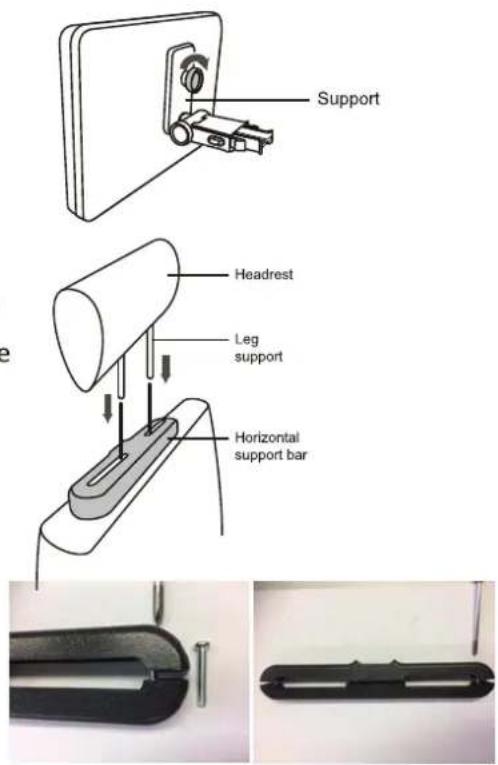
Use the supplied mounting kit to install the DVD players on the back of the vehicle's headrests.
- Align the angled support's bolt to the screw hole on the back of the DVD unit. Turn the bolt clockwise and secure the support.
- Lift the headrest off its leg supports. Align the horizontal support with the headrest leg slots and ensure the horizontal support rests securely on the top of the car seat. Reattach the headrest.
Remark: If the legs of the headrest are too thick for the opening of the horizontal support bar of the bracket, please unscrew the 4 screws of the support bar of the bracket to adjust the opening. In case the screws are too short, use the longer screws (provided in the giftbox).
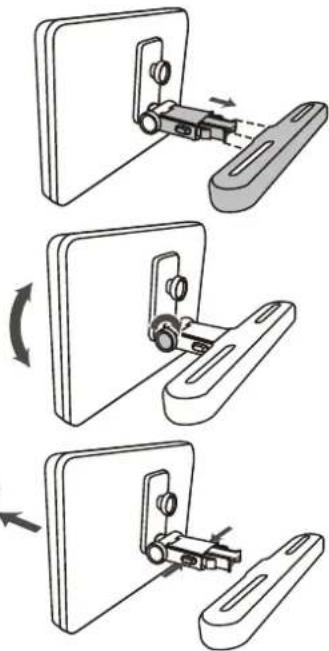
- Grip the DVD firmly with both hands and slot the angled support firmly into the support bar. It will click. Ensure the entire unit is secure.
- Adjust the angle of the DVD unit, then secure by tightening the bolt on the right.
- To remove the DVD from the horizontal support bar, support the DVD unit with one hand. With the other hand, firmly squeeze the release buttons either side of the angled support and pull.
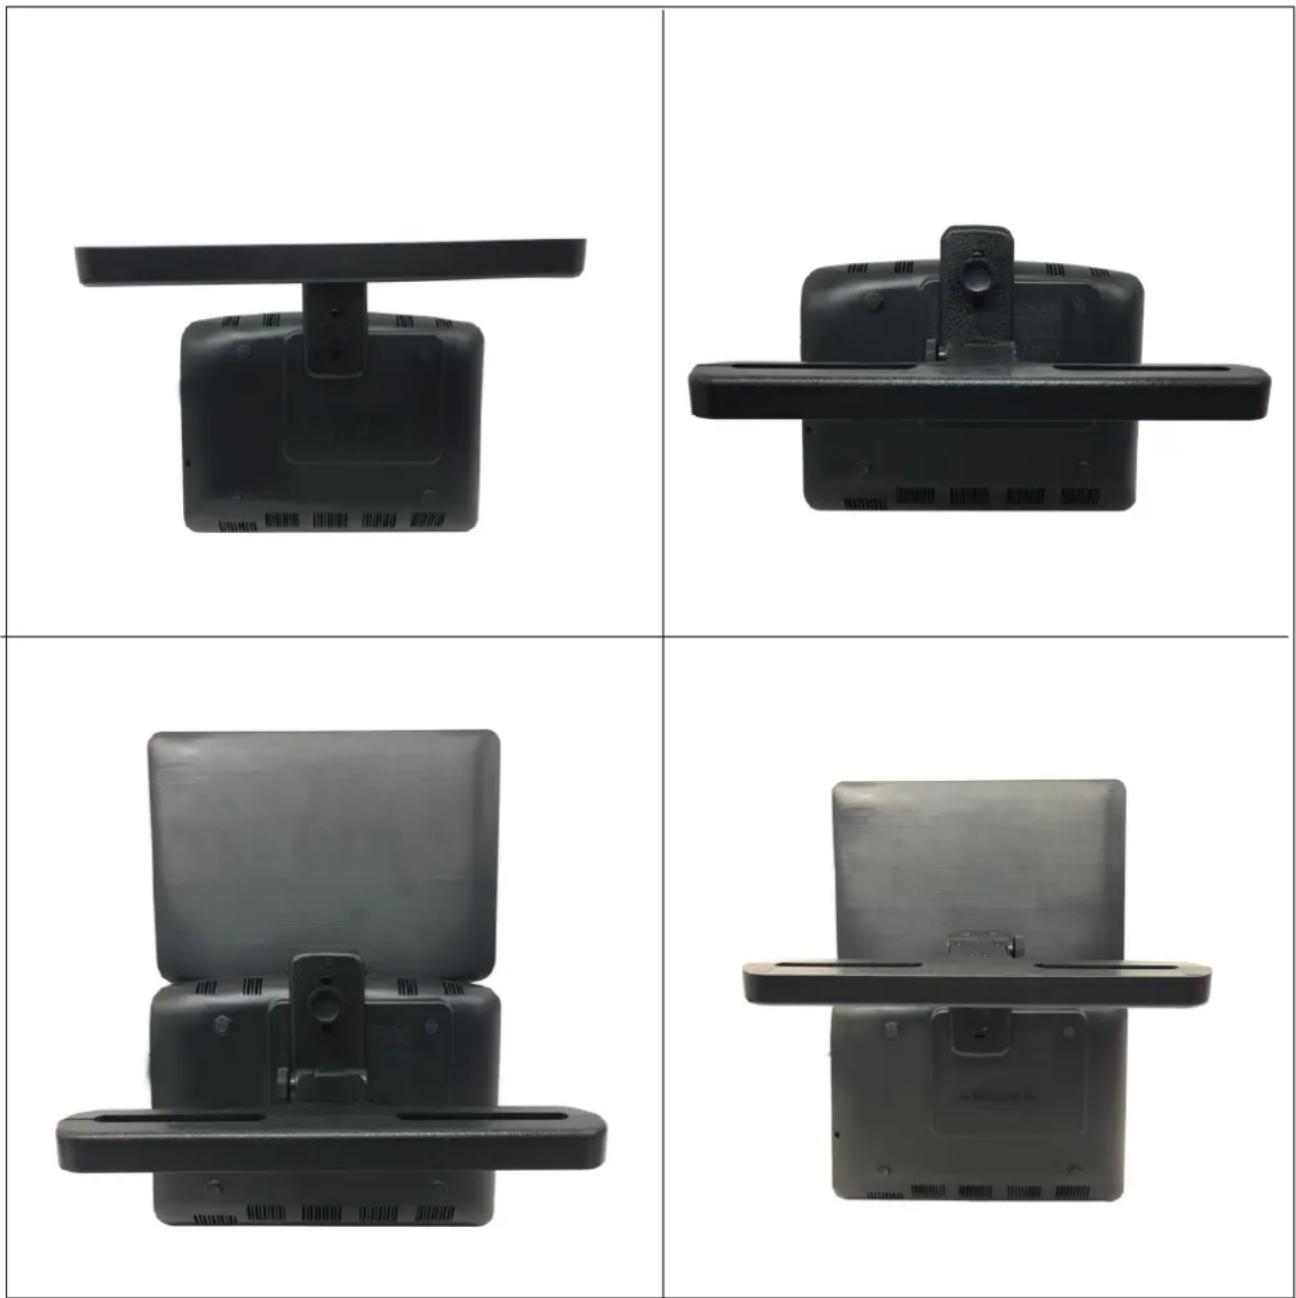
There are several ways of fixing the portable DVD to the bracket and to install it in the car. Please check the most stable way in your own car and the best viewing angle for the user.

This unit should never be used by the vehicle's driver or left unsecured in the vehicle while driving.
- If this unit is being used in your vehicle, be sure that it is secured or held safely, and does not obstruct any safety device, including air bags or seat belts.
- All passengers should wear seat belts when using this unit in a moving vehicle.
If in doubt, please contact your vehicle manufacturer for further advice.
7. Guarantee
Lenco offers service and warranty in accordance with the European law, which means that in case of repairs (both during and after the warranty period) you should contact your local dealer.
Important note: It is not possible to send products that need repairs to Lenco directly.
Important note: If this unit is opened or accessed by a non-official service center in any way, the warranty expires.
This device is not suitable for professional use. In case of professional use, all warranty obligations of the manufacturer will be voided.
8. Disclaimer
Updates to Firmware and/or hardware components are made regularly. Therefore some of the instruction, specifications and pictures in this documentation may differ slightly from your particular situation. All items described in this guide for illustration purposes only and may not apply to particular situation. No legal right or entitlements may be obtained from the description made in this manual.
9. Disposal of the Old Device

This symbol indicates that the relevant electrical product or battery should not be disposed of as general household waste in Europe. To ensure the correct waste treatment of the product and battery, please dispose them in accordance to any applicable local laws of requirement for disposal of electrical equipment or batteries. In so doing, you will help to conserve natural resources and improve standards of environmental protection in treatment and disposal of electrical waste (Waste Electrical and Electronic Equipment Directive).
10. CE Marking

Products with the CE marking comply with the EMC Directive (2014/30/EU) and the Low Voltage Directive (2014/35/EU) issued by the Commission of the European Community.
Hereby, Lenco Benelux BV; Thermiekstraat la, 6361 HB Nuth, The Netherlands, declares that this product is in compliance with the essential requirements.
The declaration of conformity may be consulted via techdoc@lenco.com
11. Service
For more information and helpdesk support, please visit www.lenco.com
Lenco Benelux BV; Thermiekstraat Ia, 6361 HB, The Netherlands.
Nederlandss
LETOP:
OSD Language (OSD Taal)
U kunt uw eigene gewenste taalinstellingen selecteren.
Closed Captions (Ondertitels)
Page Configuration video
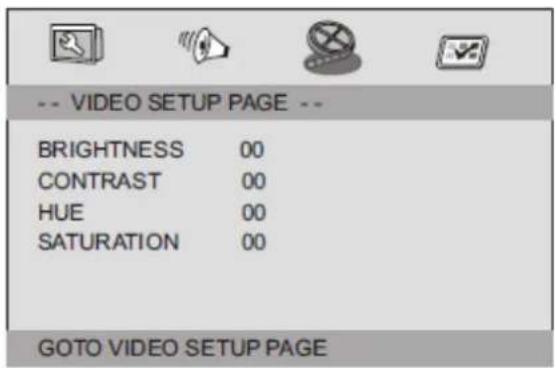
Brightness, Contrast, Hue, Saturation (Luminosite, contraste, nuance, saturation): réglage de la qualité video.
Page Preférences
Page Preférences

TV Type (Type TV)
Dual Mono (Mono dual)

- PRECAUTIONSBEFOREUSE
- KEEPTHESEINSTRUCTIONSINMIND:
- INSTALLATION
- Identification of Controls
- Main Unit
- SOURCE
- MUTE
- 3.0-9 NUMBER BUTTON
- DISPLAY
- 10+ BUTTON
- MENU/PBC
- 7.AUDIO
- PLAY/PAUSE
- STOP
- 10.MODE
- Forward Skip
- Reverse Skip
- 14.▶ BUTTON
- Remote control unit
- BUTTON
- STEP
- 17.SEARCH
- SUBTITLE
- ANGLE
- TITLE
- ENTER
- SETUP
- REPEAT
- 25.SLOW
- 26.PROGRAM
- 27.ZOOM
- SETUP Menu Setting
- General Setup Page
- Angle Mark
- OSD Language
- Closed Captions
- Screen Saver
- Auto Standby
- Audio Setup Page
- Downmix
- Dolby digital
- Dual Mono
- Dynamic
- Video Setup Page
- Preference Page
- TV Type
- Parameters and specifications
- Technical parameters
- Battery Parameters
- Mounting the DVD in a Car
- Guarantee
- Disclaimer
- Disposal of the Old Device
- CE Marking
- Service
- Nederlandss
- LETOP:
- OSD Language (OSD Taal)
- Closed Captions (Ondertitels)
- Page Configuration video
- Page Preférences
- TV Type (Type TV)
- Dual Mono (Mono dual)
Brand : LENCO
Model : DVP911
Category : Portable DVD Player